Versions Compared

Key

  • This line was added.
  • This line was removed.
  • Formatting was changed.

...

Configure Test Run Columns

...

Xray provides the ability to configure columns for the Test Runs table. This configuration is specific to each user and can be restored to the default configuration defined in the Default columns layout page in Xray app administration.

The last column (i.e., Test Run Status) is fixed and cannot be removed from the table.

To configure columns for the Test Runs table,

Step 1: Open the Test issue.

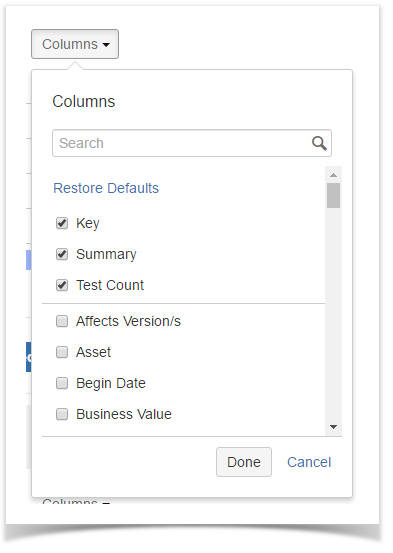
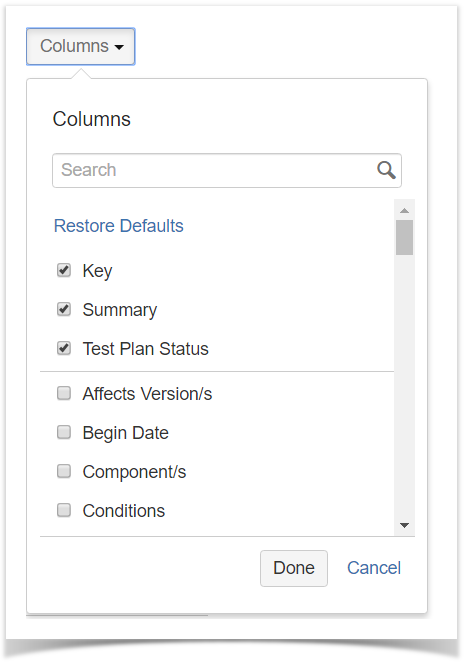
Step 2: Click on the Columns select dropdown that appears in the Test Runs section, above the table in the top right corner. A list of the current configure columns and all available columns appears.

Step 3: Add or remove columns by clicking the checkboxes next to each field.

Step 4: Click the Done button when finished or Cancel to abort this operation. The table refreshes with the configured columns.

Test Run Specific Columns

The following columns are not Jira fields, but they represent information stored internally by Xray for Test Runs. You can also choose these columns for your layout.

...

Restoring Columns to Default Configuration

To restore columns in the Test Runs table to the default configuration,

Step 1: Open the Test issue.

Step 2: Click on Columns, select the dropdown that appears in the Test Runs section, above the table in the top right corner. A list of the current configure columns and all available columns appear.

Step 3: Click the Restore Columns link above the columns list. The table refreshes with the default configured columns.

Change the Order of Columns

To reorder columns in the Test Runs table,

Step 1: Open the Test issue.

Step 2: Hover over the desired column header.

Step 3: Click in the column header and drag it to the desired position.

...

More info in Test Runs.

Configure Test Set Columns

Section
Column

Xray provides the ability to configure columns for the Test Sets table. This configuration is specific to each user and can be restored to the default configuration defined in the Default columns layout page in Xray app administration.

To configure columns for the Test Sets table,

Step 1: Open the Test issue.

Step 2: Click on Columns, select the dropdown that appears in the Test Sets section, above the table in the top right corner. A list of the current configure columns and all available columns appears.

Step 3: Add or remove columns by clicking the checkboxes next to each field.

Step 4: Click the Done button when finished or Cancel to abort this operation. The table refreshes with the configured columns.

Restoring Columns to Default Configuration

To restore columns in the Test Sets table to the default configuration,

Step 1: Open the Test issue.

Step 2: Click on the Columns select dropdown that appears in the Test Sets section, above the table in the top right corner. A list of the current configure columns and all available columns appears.

Step 3: Click the Restore Columns link above the columns list. The table refreshes with the default configured columns.

Change Columns Order

To reorder columns in the Test Sets table,

Step 1: Open the Test issue.

Step 2: Hover over the desired column header.

Step 3: Click on the column header and drag it to the desired position.

Column

...

Section
Column

Xray provides the ability to configure columns for the Test Plans table. This configuration is specific to each user and can be restored to the default configuration defined in the Default columns layout page in Xray app administration.

To configure columns for the Test Plans table,

Step 1: Open the Test issue.

Step 2: Click on Columns, select the dropdown that appears in the Test Plans section, above the table in the top right corner. A list of the current configure columns and all available columns appears.

Step 3: Add or remove columns by clicking the checkboxes next to each field.

Step 4: Click the Done button when finished or Cancel to abort this operation. The table refreshes with the configured columns.

Restoring Columns to Default Configuration

To restore columns in the Test Plans table to the default configuration,

Step 1: Open the Test issue.

Step 2: Click on Columns, select the dropdown that appears in the Test Plans section, above the table in the top right corner. A list of the current configure columns and all available columns appears.

Step 3: Click the Restore Columns link above the columns list. The table refreshes with the default configured columns.

Change the Order of Columns

To reorder columns in the Test Plans table,

Step 1: Open the Test issue.

Step 2: Hover over the desired column header.

Step 3: Click on the column header and drag it to the desired position.

Column

...