Page History
| Status | ||||
|---|---|---|---|---|
|
| Status | ||||
|---|---|---|---|---|
|
| Info |
|---|
Maecenas eget tellus eget felis semper sollicitudin tempus non enim. Fusce sollicitudin porta felis, vitae consectetur elit consequat a. Vestibulum erat quam, dignissim |
Edit
Editing an existing Test can be done in one of two ways:
Using the Edit Issue dialog box
The Edit Issue dialog box is similar to the Create Issue dialog box, and can be accessed through the following steps:
Step 1: Click the Edit button (at the top-left of the 'view issue' page) to open the Edit Issue dialog box.

Step 2: Modify your Test's details in the appropriate fields of the Edit Issue dialog box General tab.

Step 3: Click on the Test Details tab to edit the Test Type and any complementary fields.
Step 3a: If you are editing a Manual Test:
- To input a new Manual Steps field, use the empty areas at the bottom and click the Add button.
- Use the Pencil button to edit a previously entered Manual Step, and click the Update button when done.
- Use the Bin button to delete a previously entered Manual Step.
- To change a Manual Step position in the Test, drag the left area on the that row and drop it to the desired place.

Step 3b: If you are editing a Cucumber Test:
- To change test type on Cucumber Type, select either Scenario or Scenario Outline.
- In the Steps field, you can edit a previously entered or create a new Cucumber Scenario clauses in Gherkin.

Step 3c: If you are editing a Generic Test:
-In the Steps field, you can edit a previously entered or create a new Definition for the automated generic Test.

Optional:
- Click on the Test Sets tab to edit Test Set associations.
- Click on the Pre-Conditions tab to edit Pre-Condition associations.
- Click on the Link Issues tab to edit Links with other issues.
Step 4: Click the Update button to save your changes.
| Tip | ||
|---|---|---|
| ||
Lorem ipsum dolor sit amet, consectetur adipiscing elit. Vivamus imperdiet, nisl tristique consequat euismod, tortor lectus gravida mauris, quis efficitur enim nisi at ex. Proin sem nulla, commodo sed iaculis nec, eleifend id ante. Fusce finibus accumsan iaculis. Nunc auctor luctus erat, at interdum dui ultricies sit amet. Vestibulum dapibus, mauris nec lobortis interdum, urna tortor volutpat metus, vitae efficitur nunc lectus sed metus. Morbi non sapien ac dolor rhoncus luctus eu et nibh. Ut nisl risus, facilisis id velit et, pharetra suscipit purus. Curabitur vitae t |
Inline Editing Xray Tests
Xray Test issue sections support inline editing similar to Jira native and custom fields inline edit. This prevents full page reloads when modifying fields.
Inline Edit Fields
To inline edit a field, just hover over the field view area and click it.
The following Test fields support inline edit:
- Type: The Test issue type
- Definition: The automated generic test definition (only visible for Generic tests)
- Cucumber Type: The Cucumber Scenario type (only visible for Cucumber tests)
To inline edit automated Test issues:
Step 1b: If you are inline editing a Cucumber Test:
- You can hover over the actual Test Type, click it, and change it to another type that is available on the select box.
- You can hover over the actual Cucumber Type, click it, and change it to another type that is available on the select box.
- You can hover over the Steps field, click it, and edit its contents.

Step 1c: If you are inline editing a Generic Test:
- You can hover over the actual Test Type, click it, and change it to another type available on the select box.
- You can hover over the Definition field, click it, and edit its contents.

Notes: On Jira versions greater or equal to 7.3.0, the Definition field supports Jira's Rich Text Editor. To enable the Rich Text Editor, you have to set the renderer of the definition custom field to Wiki Style Renderer. It is also possible to use Rich Text Editor on Jira versions greater than 7.2.0 by enabling the experimental Rich Text Editor in Jira configurations, but this feature is not totally supported by Xray.
Manual Test Steps Table
In addition to inline editable fields, Xray provides a Restful table for inline editing manual Test steps direcly from the Test view issue screen.
From this table you can:
Add Steps: After entering the Test step details (Step, Data and Expected Result fields) using the bottom table row text boxes, click on the Plus icon for creating a new step. The new step will be added in the last position in the steps table.
Remove Steps: The last column for each step contains a Bin button for removing steps. After clicking the button, you will be prompted with a confirmation message to delete the step. This operation cannot be undone.
Edit Steps: When hovering over Step, Data and Expected Result fields, they get highlighted and if you click them, the step row visualization will change to edit mode. From here, you can edit the fields and click on the Update button that appears in the last column to save changes or you can cancel the changes by clicking on the Cancel button. Either way, the row will be back in View mode.
Move Steps: You can move a Test step Up or Down in the Test steps table in one of two ways:
- Click on the drag area in the first column of each step and drag the step to the desired position.
- Click on the actions menu and choosing the "Move To.." option. This method allows you to directly move a step to a specific position.
Add Attachments: While in View or Edit modes, you can add attachments to a step using the Plus sign appearing in the Attachments column. After clicking the button, you will be prompted with a dialog to choose the attachments to add.
Remove Attachments: While in View or Edit modes, you can remove attachments of Test steps using the Bin button that appears when hovering over existing attachments. After clicking the button, you will be prompted with a confirmation message to remove the attachment or not.
Copy Step Fields: You can copy the Step, Data and Expected Result fields to the clipboard by hovering over these fields and choosing the Copy icon next to each highlighted field. If the copy is successful, a green border will appear momentarily around the Copy icon.
Expand Fields: If the text boxes are too small to show all the information, you can expand the Step, Data and Expected Result fields by clicking the Expand icon next to each highlighted field. An inline dialog, with a bigger area, will be opened with the contents of the field and a wiki notation toolbar to assist you in writing your information. This operation is available in both View and Edit modes for manual Test steps.
Clone Steps: To clone an existing Test step, click on the actions menu and choose the "Clone" option. A confirmation message will appear. Once you confirm, a new step will be created in the last position, containing all information of the cloned step (Step, Data, Expected Result and Attachments).


| Info | ||
|---|---|---|
| ||
You can only inline edit Xray fields if you have permission to edit the Test issue. |
Changing the Type of a Test
In the Global Preferences, Xray allows you to configure if a test definition is deleted or not.
If enabled, the previous Info details will be deleted.

Otherwise, the Info details will not be deleted, and it'll be possible to undo the Test Type change operation and keep the previous information.
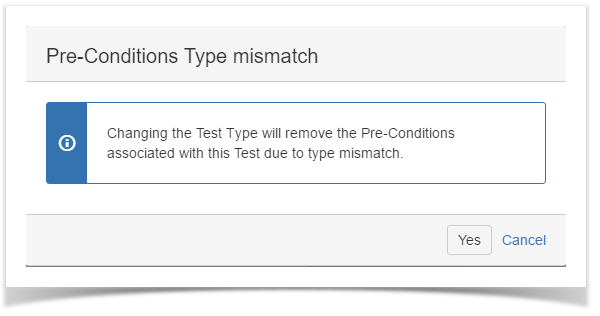
Additionally, in both cases, because each pre-condition must be of the same Type of the Test, any associated Pre-Conditions will be lost.
| Tip | ||
|---|---|---|
| ||
Lorem ipsum dolor sit amet, consectetur adipiscing elit. Vivamus imperdiet, nisl tristique consequat euismod, tortor lectus gravida mauris, quis efficitur enim nisi at ex. Proin sem nulla, commodo sed iaculis nec, eleifend id ante. Fusce finibus accumsan iaculis. Nunc auctor luctus erat, at interdum dui ultricies sit amet. Vestibulum dapibus, mauris nec lobortis interdum, urna tortor volutpat metus, vitae efficitur nunc lectus sed metus. Morbi non sapien ac dolor rhoncus luctus eu et nibh. Ut nisl risus, facilisis id velit et, pharetra suscipit purus. Curabitur vitae t |