Page History
...
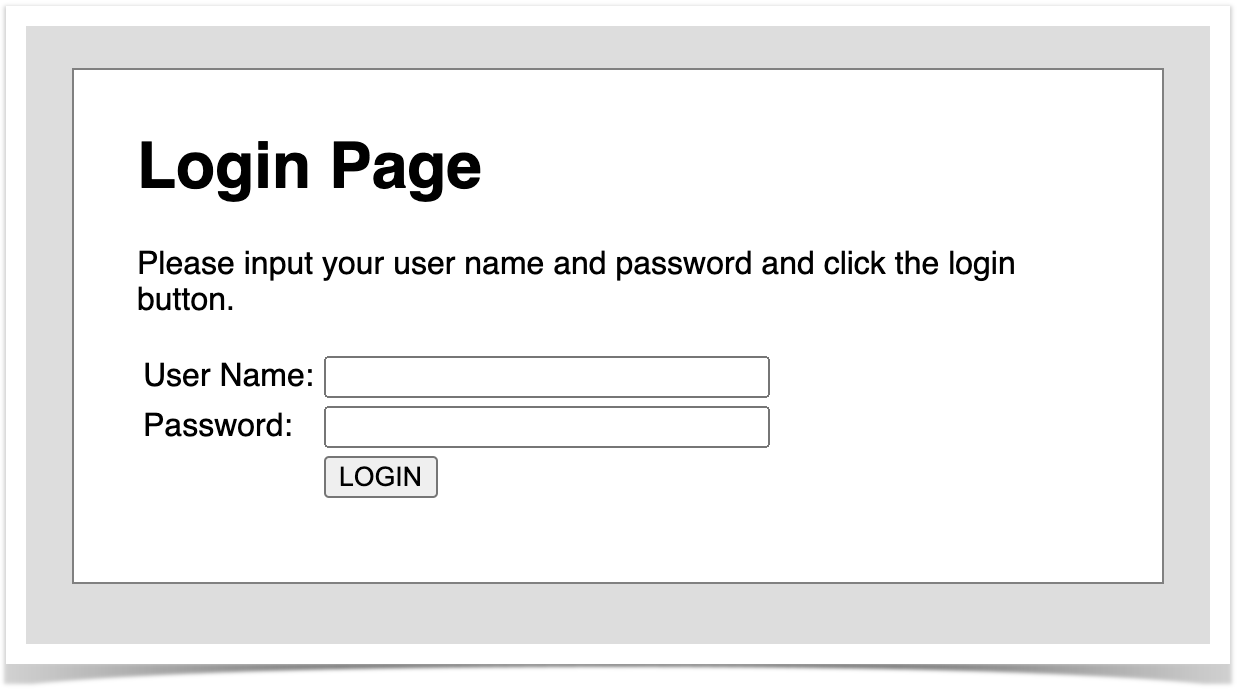
For the purpose of this tutorial, we'll use a dummy website (source-code here) containing just a few pages to support login/logout kind of features; we aim to test precisely those features.
Before moving into the actual implementation, we need to decide is which workflow we'll use: do we want to use Xray/Jira as the master for writing the declarative specification (i.e. the Gherkin based Scenarios), or do we want to manage those outside using some editor and store them in Git, for example?
| Info | ||
|---|---|---|
| ||
Please see Testing in BDD with Gherkin based frameworks (e.g. Cucumber) for an overview of the possible workflows. The place that you'll use to edit the Cucumber Scenarios will affect your workflow. There are teams that prefer to edit Cucumber Scenarios in Jira using Xray, while there others that prefer to edit them by writing the .feature files by hand using some IDE. |
Using Jira and Xray as master
This section assumes using Xray as master, i.e. the place that you'll be using to edit the specifications (e.g. the scenarios that are part of .feature files).
The overall flow would be something like this:
- create Scenario/Scenario Outline as a Test in Jira; usually, it would be linked to an existing "requirement"/Story (i.e. created from the respective issue screen)
- implement the code related to Gherkin statements/steps and store it in Git, for example
- generate .feature files based on the specification made in Jira
- checkout the code from Git
- run the tests in the CI
- import the results back to Jira
Usually, you would start by having a Story, or similar (e.g. "requirement"), to describe the behavior of a certain feature and use that to drive your testing.
If you have it, then you can just use the "Create Test" on that issue to create the Scenario/Scenario Outline and have it automatically linked back to the Story/"requirement".
Otherwise, you can create the Test using the standard (issue) Create action from Jira's top menu.
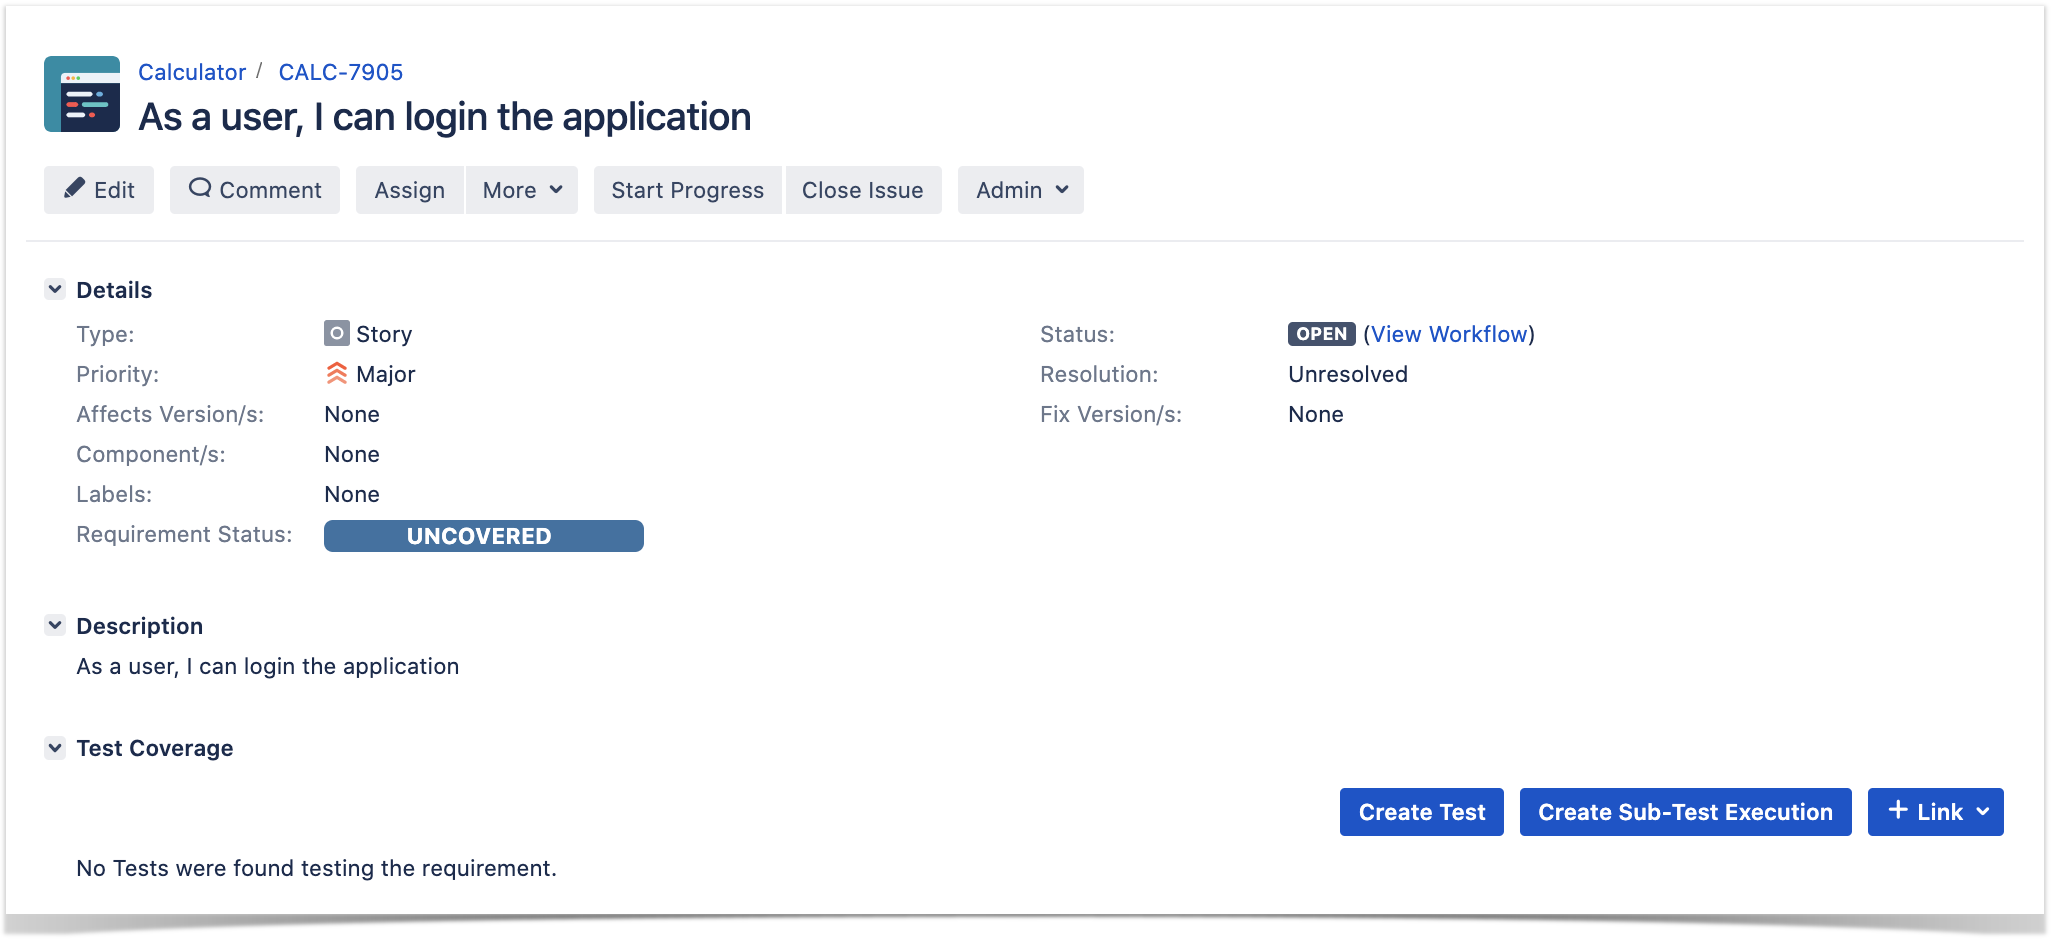
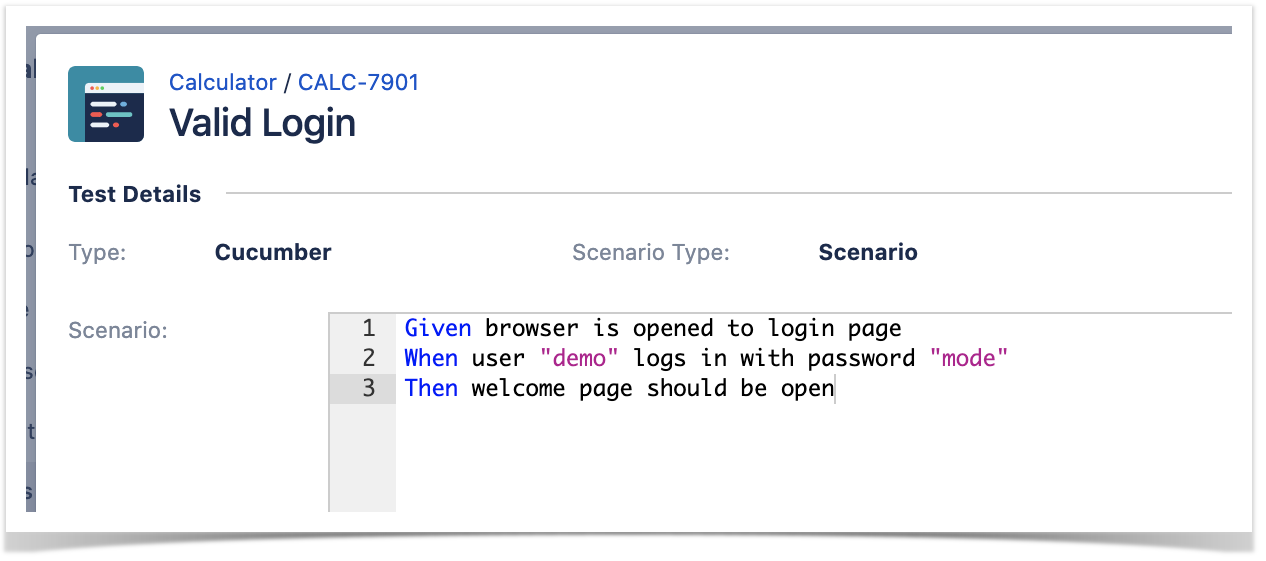
In this case, we'll create a Cucumber Test, of Cucumber Type "Scenario".
We can fill out the Gherkin statements immediately on the Jira issue create dialog or we can create the Test issue first and fill out the details on the next screen, from within the Test issue. In the latter case, we can take advantage of the built-in Gherkin editor which provides auto-complete of Gherkin steps.
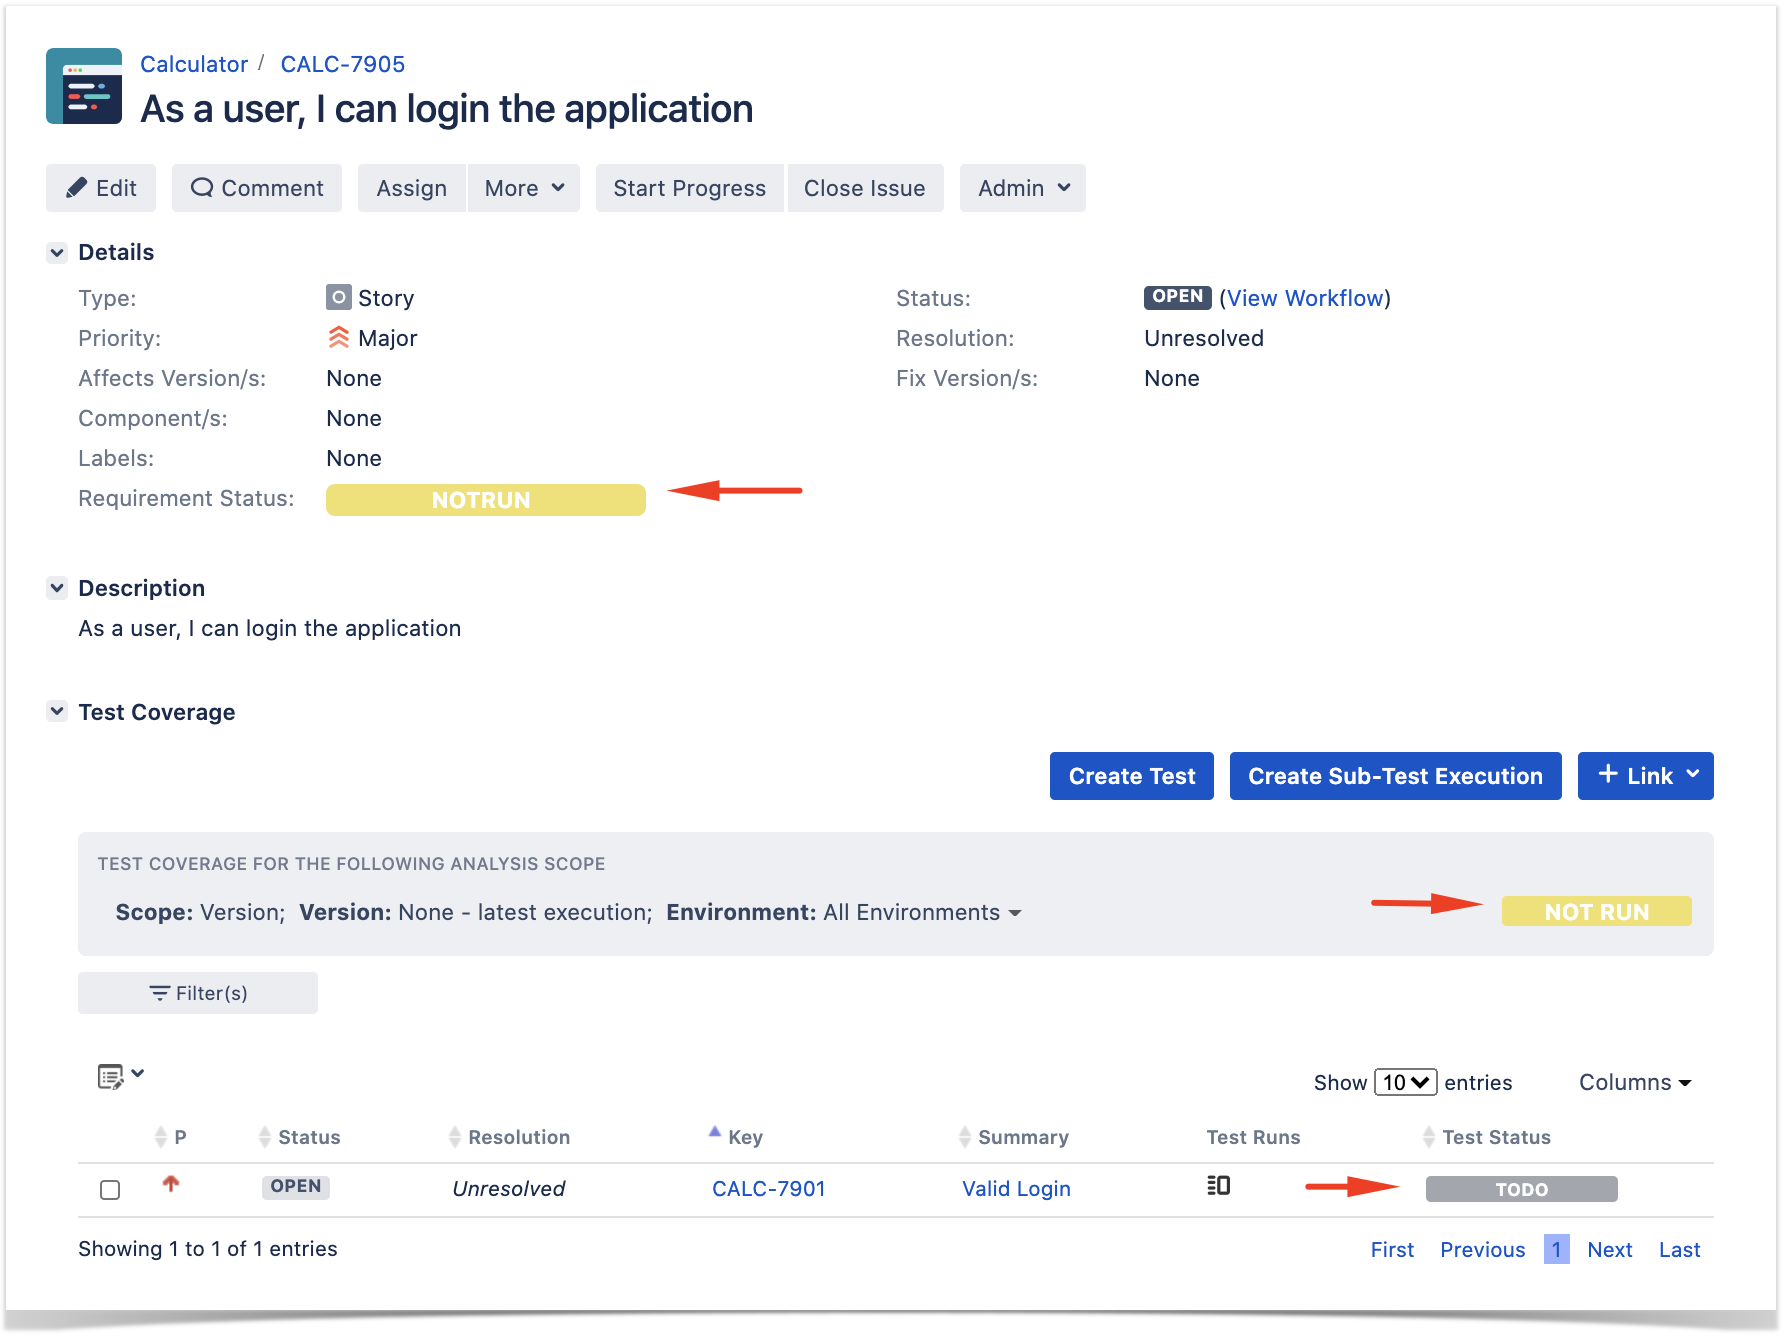
After the Test is created it will impact the coverage of related "requirement", if any.
The coverage and the test results can be tracked in the "requirement" side (e.g. user story). In this case, you may see that coverage changed from being UNCOVERED to NOTRUN (i.e. covered and with at least one test not run).
The related statement's code is managed outside of Jira and stored in Git, for example.
In Cypress, tests related code is stored under cypress/integration directory, which itself contains several other directories. In this case, we've organized them as follows:
We need to configure Cypress to use the cypress-cucumber-preprocessor, which provides the ability of understanding .feature files and also of producing Cucumber JSON reports.
| Code Block | ||||||
|---|---|---|---|---|---|---|
| ||||||
const cucumber = require('cypress-cucumber-preprocessor').default

/**
 * @type {Cypress.PluginConfig}
 */
module.exports = (on, config) => {
  // `on` is used to hook into various events Cypress emits
  // `config` is the resolved Cypress config
  on('file:preprocessor', cucumber())
}
|
In Cypress' main configuration file, we define the base URL of the website under test, the regex of the files that contain the test scenarios (i.e. <...>.feature files). Other options may be defined (e.g for bypassing chromeWebSecurity, additional reporters, the ability to upload results to Cypress infrastructure in the cloud, etc).
| Code Block | ||||||
|---|---|---|---|---|---|---|
| ||||||
{
  "baseUrl": "https://robotwebdemo.herokuapp.com/",
  "testFiles": "**/*.feature",
  "ignoreTestFiles": [
    "*.js",
    "*.md"
  ],
  "reporter": "junit",
  "reporterOptions": {
    "mochaFile": "test-results/test-output-[hash].xml"
  },
  "chromeWebSecurity": false,
  "projectId": "bfi83g"
} |
Before moving into the actual implementation, we need to decide is which workflow we'll use: do we want to use Xray/Jira as the master for writing the declarative specification (i.e. the Gherkin based Scenarios), or do we want to manage those outside using some editor and store them in Git, for example?
| Info | ||
|---|---|---|
| ||
Please see Testing in BDD with Gherkin based frameworks (e.g. Cucumber) for an overview of the possible workflows. The place that you'll use to edit the Cucumber Scenarios will affect your workflow. There are teams that prefer to edit Cucumber Scenarios in Jira using Xray, while there others that prefer to edit them by writing the .feature files by hand using some IDE. |
Using Jira and Xray as master
This section assumes using Xray as master, i.e. the place that you'll be using to edit the specifications (e.g. the scenarios that are part of .feature files).
The overall flow would be something like this:
- create Scenario/Scenario Outline as a Test in Jira; usually, it would be linked to an existing "requirement"/Story (i.e. created from the respective issue screen)
- implement the code related to Gherkin statements/steps and store it in Git, for example
- generate .feature files based on the specification made in Jira
- checkout the code from Git
- run the tests in the CI
- import the results back to Jira
Usually, you would start by having a Story, or similar (e.g. "requirement"), to describe the behavior of a certain feature and use that to drive your testing.
If you have it, then you can just use the "Create Test" on that issue to create the Scenario/Scenario Outline and have it automatically linked back to the Story/"requirement".
Otherwise, you can create the Test using the standard (issue) Create action from Jira's top menu.
In this case, we'll create a Cucumber Test, of Cucumber Type "Scenario".
We can fill out the Gherkin statements immediately on the Jira issue create dialog or we can create the Test issue first and fill out the details on the next screen, from within the Test issue. In the latter case, we can take advantage of the built-in Gherkin editor which provides auto-complete of Gherkin steps.
After the Test is created it will impact the coverage of related "requirement", if any.
The coverage and the test results can be tracked in the "requirement" side (e.g. user story). In this case, you may see that coverage changed from being UNCOVERED to NOTRUN (i.e. covered and with at least one test not run).
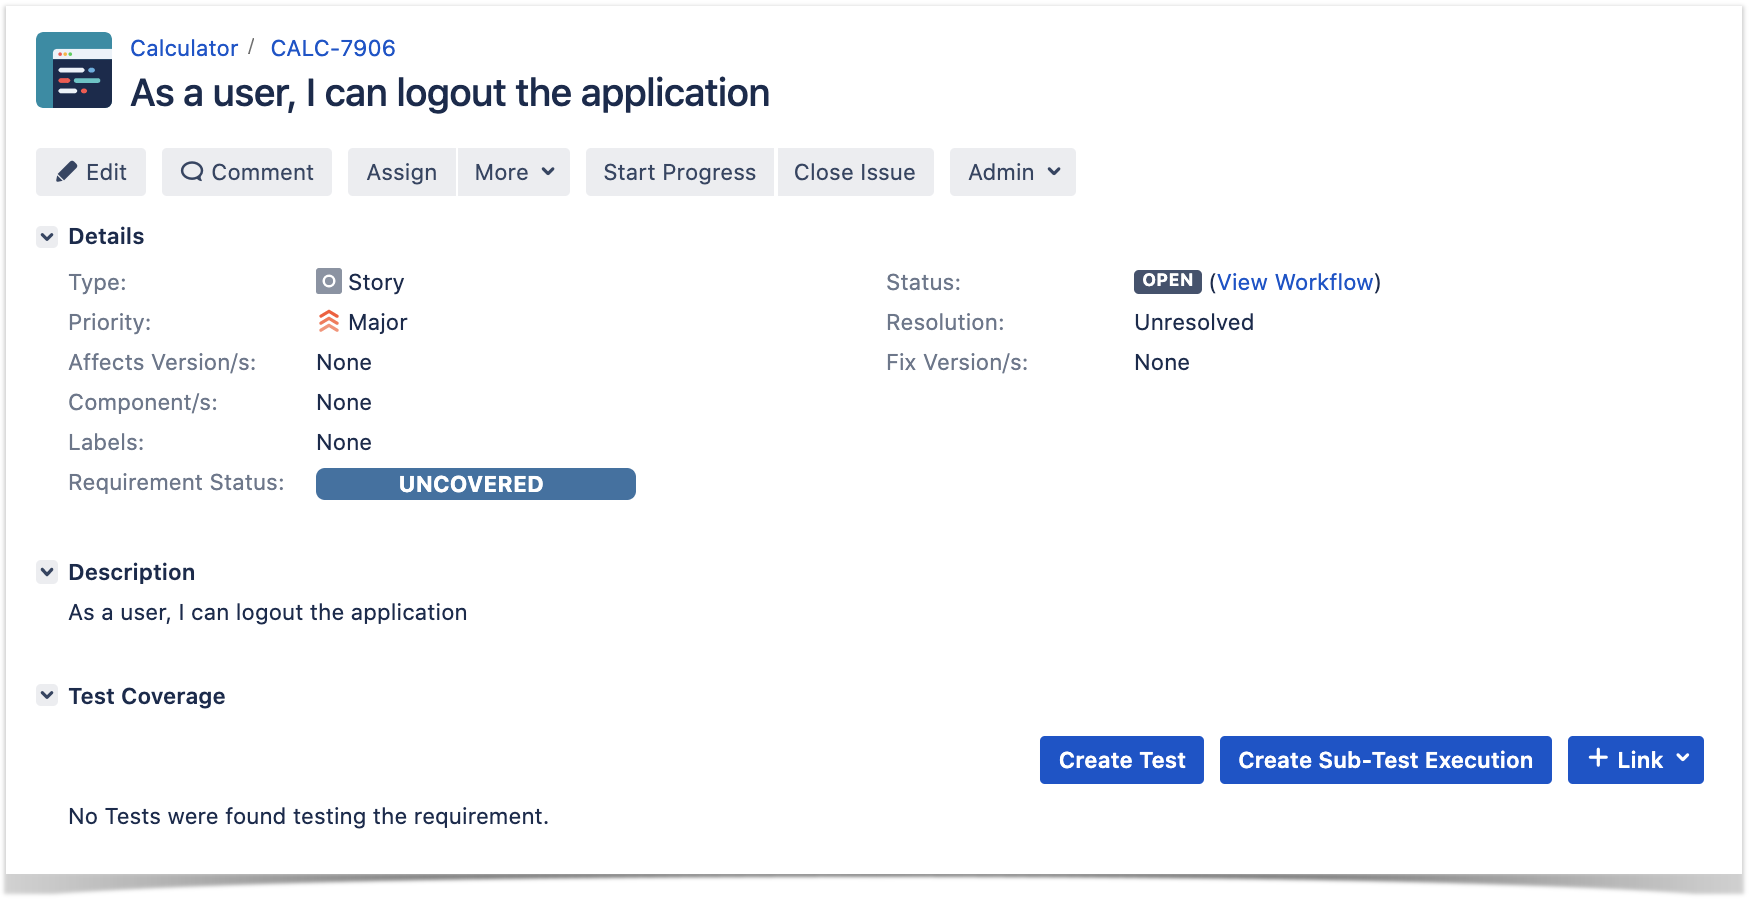
Additional tests could be created, eventually linked to the same Story or linked to another one (e.g. logout).
The related statement's code is managed outside of Jira and stored in Git, for example.
In Cypress, tests related code is stored under cypress/integration directory, which itself contains several other directories. In this case, we've organized them as follows:
cypress/integration/common: step implementation files, in JavaScript.Code Block language js title cypress/integration/common/login.js collapse true import
cypress/integration/common: step implementation files, in JavaScript.Code Block language js title cypress/integration/common/login.js collapse true import { Given, When } from 'cypress-cucumber-preprocessor/steps'; import LoginPage from '../../pages/login-page'; import LoginResultsPage from '../../pages/login-results-page'; Given(/^browser is opened to login page$/, () => { LoginPage.visit(); }); When('user {string} logs in with password {string}', (username, password) => { LoginPage.enter_username(username); LoginPage.enter_password(password); LoginPage.pressLogin(); }); Then(/^welcome page should be open$/, () => { LoginResultsPage.expect().toBeSuccessful(); }); Then(/^error page should be open$/, () => { LoginResultsPage.expect().toBeUnsuccessful(); });Code Block language js title cypress/integration/common/logout.js collapse true import { Given, When } from 'cypress-cucumber-preprocessor/steps'; import LoginPage from '../../pages/login-page'; import LoginResultsPage from '../../pages/login-results-page'; Given(/^browser is opened to login page$/, () => { LoginPage.visit(); }); When('user {string} logs in with password {string}', (username, password) => { LoginPage.enter_username(username); LoginPage.enter_password(password); LoginPage.pressLogin(); }); Then(/^welcome page should be open$/, () => { LoginResultsPage.expect().toBeSuccessful(); }); Then(/^error page should be open$/, () => { LoginResultsPage.expect().toBeUnsuccessful(); });
cypress/integration/pages: abstraction of different pages, somehow based on the page-objects modelCode Block language js title cypress/integration/pagescommon/loginlogout.js collapse true import LoginResultsPage{ Given, When } from './logincypress-resultscucumber-pagepreprocessor/steps'; const USERNAME_FIELD = 'input[id=username_field]'; const PASSWORD_FIELD = 'input[id=password_field]'; const LOGIN_BUTTON = 'input[type=submit]'; const LOGIN_TEXT = 'LOGIN'; class LoginPage { static visit() { cy.visit('/'); } static enter_username(username) { cy.get(USERNAME_FIELD) .typeimport LoginPage from '../../pages/login-page'; import LoginResultsPage from '../../pages/login-results-page'; Given(/^browser is opened to login page$/, () => { LoginPage.visit(); }); When('user {string} logs in with password {string}', (username, password) => { LoginPage.enter_username(username); } static LoginPage.enter_password(password) {; cyLoginPage.getpressLogin(PASSWORD_FIELD) .type(password); } static pressLogin(); }); Then(/^welcome page should be open$/, () => { cyLoginResultsPage.getexpect(LOGIN_BUTTON).containstoBeSuccessful(LOGIN_TEXT); }); Then(/^error page should be open$/, .click(); => { return new LoginResultsPage.expect();.toBeUnsuccessful(); } } export default LoginPage;);
cypress/integration/pages: abstraction of different pages, somehow based on the page-objects modelCode Block language js title cypress/integration/pages/login-results-page.js collapse true constimport RESULT_HEADERLoginResultsPage =from 'h1./login-results-page'; classconst LoginResultsPage { static expect() { return { toBeSuccessful: () => USERNAME_FIELD = 'input[id=username_field]'; const PASSWORD_FIELD = 'input[id=password_field]'; const LOGIN_BUTTON = 'input[type=submit]'; const LOGIN_TEXT = 'LOGIN'; class LoginPage { static visit() { cy.visit('/'); } static enter_username(username) { cy.get(RESULT_HEADER).should('have.text', 'Welcome Page'USERNAME_FIELD) .type(username); }, toBeUnsuccessful: () => static enter_password(password) { cy.get(PASSWORD_FIELD) cy.gettype(RESULT_HEADER).should('have.text', 'Error Page')password); } static pressLogin() { },cy.get(LOGIN_BUTTON).contains(LOGIN_TEXT) }.click(); return new }LoginResultsPage(); } } export default LoginResultsPageLoginPage;
Code Block language js title cypress/integration/pages/logoutlogin-results-page.js collapse true const RESULT_HEADER = 'h1'; class LogoutResultsPageLoginResultsPage { static expect() { return { toBeSuccessful: () => { cy.get(RESULT_HEADER).should('have.text', 'LoginWelcome Page') }, }; toBeUnsuccessful: () => }{ } export default LogoutResultsPage;
Code Block language js title cypress/integration/pages/welcome-page.js collapse true import LoginPage from './login-page'; const LOGOUT_LINK = 'a'; const LOGOUT_TEXT = 'logout'; class WelcomePage { static visit() { cy.visit('/welcome.html'); } static pressLogout() { cy.get(LOGOUT_LINK).contains(LOGOUT_TEXT) .click(); return new LoginPage(); } } export default WelcomePage;
cypress/integration/login: Cucumber .feature files, containing the tests as Gherkin Scenario(s)/Scenario Outline(s)Code Block title cypress/integration/login/login.feature collapse true @REQ_CALC-7905 Feature: As a user, I can login the applicaiton Scenario: Valid Login Given browser is opened to login page When user "demo" logs in with password "mode" Then welcome page should be open Scenario: Invalid Login Given browser is opened to login page When user "dummy" logs in with password "password" Then error page should be open Scenario Outline: Login With Invalid Credentials Should Fail Given browser is opened to login page When user "<username>" logs in with password "<password>" Then error page should be open Examples: | username | password | | invalid | mode | | demo | invalid | | invalid | invalid |Code Block title cypress/integration/login/logout.feature collapse true @REQ_CALC-7906 Feature: As a user, I can logout the application Scenario: Valid Logout Given user is on the welcome page When user chooses to logout Then login page should be open
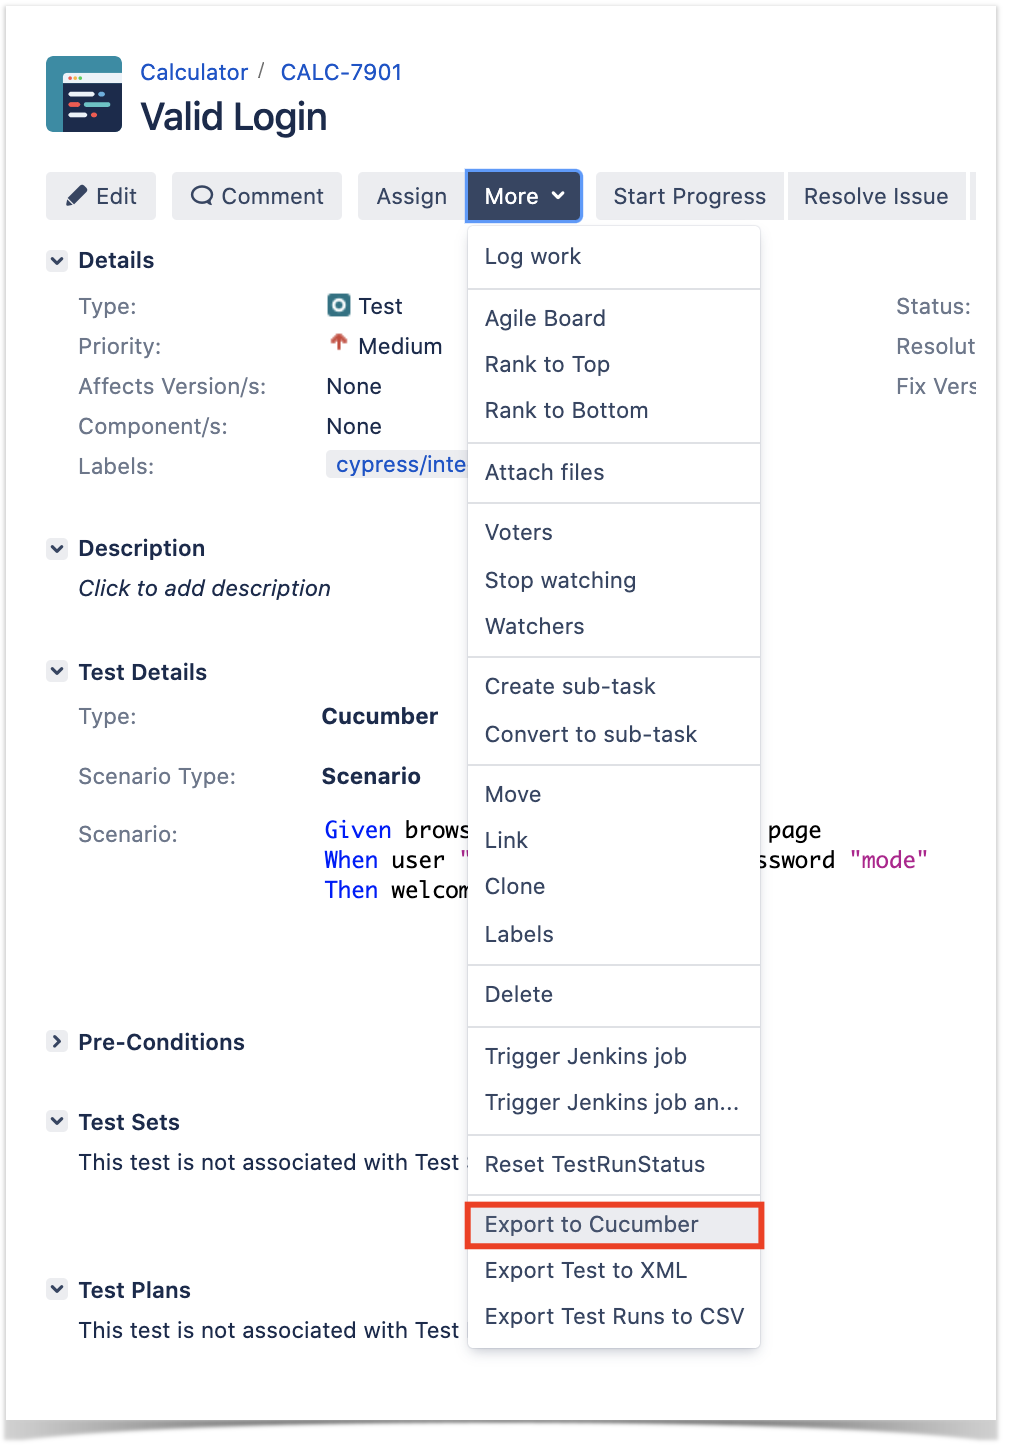
You can then export the specification of the test to a Cucumber .feature file via the REST API, or the Export to Cucumber UI action from within the Test/Test Execution issue or even based on an existing saved filter. A plugin for your CI tool of choice can be used to ease this task.
So, you can either:
- use the UI
- use the REST API (more info here)
Code Block language bash #!/bin/bash curl -u admin:admin "http://192.168.56.102/rest/raven/1.0/export/test?keys=CALC-4763&fz=true" -o features.zip rm -f features/*.feature unzip -o features.zip -d features
- use one of the available CI/CD plugins (e.g. see an example of Integration with Jenkins)

After being exported, the created .feature(s) will contain references to the Test issue key and the covered "requirement" issue key, if that's the case. The naming of these files is detailed in Export Cucumber Features.
cy.get(RESULT_HEADER).should('have.text', 'Error Page') }, }; } } export default LoginResultsPage;Code Block language js title cypress/integration/pages/logout-results-page.js collapse true const RESULT_HEADER = 'h1'; class LogoutResultsPage { static expect() { return { toBeSuccessful: () => { cy.get(RESULT_HEADER).should('have.text', 'Login Page') }, }; } } export default LogoutResultsPage;Code Block language js title cypress/integration/pages/welcome-page.js collapse true import LoginPage from './login-page'; const LOGOUT_LINK = 'a'; const LOGOUT_TEXT = 'logout'; class WelcomePage { static visit() { cy.visit('/welcome.html'); } static pressLogout() { cy.get(LOGOUT_LINK).contains(LOGOUT_TEXT) .click(); return new LoginPage(); } } export default WelcomePage;
cypress/integration/login: Cucumber .feature files, containing the tests as Gherkin Scenario(s)/Scenario Outline(s)Code Block title cypress/integration/login/login.feature collapse true @REQ_CALC-7905 Feature: As a user, I can login the applicaiton Scenario: Valid Login Given browser is opened to login page When user "demo" logs in with password "mode" Then welcome page should be open Scenario: Invalid Login Given browser is opened to login page When user "dummy" logs in with password "password" Then error page should be open Scenario Outline: Login With Invalid Credentials Should Fail Given browser is opened to login page When user "<username>" logs in with password "<password>" Then error page should be open Examples: | username | password | | invalid | mode | | demo | invalid | | invalid | invalid |Code Block title cypress/integration/login/logout.feature collapse true @REQ_CALC-7906 Feature: As a user, I can logout the application Scenario: Valid Logout Given user is on the welcome page When user chooses to logout Then login page should be open
You can then export the specification of the test to a Cucumber .feature file via the REST API, or the Export to Cucumber UI action from within the Test/Test Execution issue or even based on an existing saved filter. A plugin for your CI tool of choice can be used to ease this task.
So, you can either:
- use the UI
- use the REST API (more info here)
Code Block language bash #!/bin/bash rm -f features/*.feature curl -u admin:admin "http://jiraserver.example.com/rest/raven/1.0/export/test?keys=CALC-7905;CALC-7906&fz=true" -o features.zip unzip -o features.zip -d features
- use one of the available CI/CD plugins (e.g. see an example of Integration with Jenkins)
We will export the features to a new directory named features/ on the root folder of your Cypress project (we'll need to tell Cypress to use this folder).
After being exported, the created .feature(s) will contain references to the Test issue key and the covered "requirement" issue key, if that's the case. The naming of these files is detailed in Export Cucumber Features.
| Code Block | ||||
|---|---|---|---|---|
| ||||
@REQ_CALC-7905
Feature: As a user, I can login the applicaiton

Scenario: Valid Login
    Given browser is opened to login page
    When user "demo" logs in with password "mode"
    Then welcome page should be open

Scenario: Invalid Login
    Given browser is opened to login page
    When user "dummy" logs in with password "password"
    Then error page should be open

Scenario Outline: Login With Invalid Credentials Should Fail
    Given browser is opened to login page
    When user "<username>" logs in with password "<password>"
    Then error page should be open

    Examples:
        | username  | password |
        | invalid   |   mode   |
        | demo      | invalid  |
| invalid | invalid | |
| Code Block | ||||
|---|---|---|---|---|
| ||||
@REQ_CALC-7906
Feature: As a user, I can logout the application

Scenario: Valid Logout
    Given user is on the welcome page
    When user chooses to logout
Then login page should be open |
To run the tests and produce Cucumber JSON reports(s), we can either use npm or cypress command directly.
| No Format |
|---|
npm run test

# or instead...

node_modules/cypress/bin/cypress run --spec 'features/**/*.feature' --config integrationFolder=. |
This will produce one Cucumber JSON report in cypress/cucumber-json directory per each .feature file.
The cypress-cucumber-preprocessor package, as of v4.0.0, does not produce reports containing the screenshots embedded.
However, the following script (credits to the user that provided it on GitHub) can be used to update the previous JSON reports so that they contain the screenshots of the failed tests.
| Code Block | ||||||
|---|---|---|---|---|---|---|
| ||||||
const fs = require('fs-extra')
const path = require('path')
const chalk = require('chalk')

const cucumberJsonDir = './cypress/cucumber-json'
const cucumberReportFileMap = {}
const cucumberReportMap = {}
const jsonIndentLevel = 2
const ReportDir = './cypress/reports/cucumber-report'
const screenshotsDir = './cypress/screenshots'

getCucumberReportMaps()
addScreenshots()

//Mapping cucumber json files from the cucumber-json directory to the features
function getCucumberReportMaps() {
    const files = fs.readdirSync(cucumberJsonDir).filter(file => {
        return file.indexOf('.json') > -1
    })
    files.forEach(file => {
        const json = JSON.parse(
            fs.readFileSync(path.join(cucumberJsonDir, file))
        )
        if (!json[0]) { return }
        const [feature] = json[0].uri.split('/').reverse()
        cucumberReportFileMap[feature] = file
        cucumberReportMap[feature] = json
    })
}

//Adding screenshots to the respective failed test steps in the feature files
function addScreenshots() {

    const prependPathSegment = pathSegment => location => path.join(pathSegment, location)

    const readdirPreserveRelativePath = location => fs.readdirSync(location).map(prependPathSegment(location))

    const readdirRecursive = location => readdirPreserveRelativePath(location)
        .reduce((result, currentValue) => fs.statSync(currentValue).isDirectory()
            ? result.concat(readdirRecursive(currentValue))
            : result.concat(currentValue), [])
    const screenshots = readdirRecursive(path.resolve(screenshotsDir)).filter(file => {
        return file.indexOf('.png') > -1
    })

    const featuresList = Array.from(new Set(screenshots.map(x => x.match(/[\w-_.]+\.feature/g)[0])))
    featuresList.forEach(feature => {
        screenshots.forEach(screenshot => {

            const regex = /(?<=\ --\ ).*?((?=\ \(example\ \#\d+\))|(?=\ \(failed\)))/g
            const [scenarioName] = screenshot.match(regex)
            console.info(chalk.blue('\n Adding screenshot to cucumber-json report for'))
            console.info(chalk.blue(scenarioName))

            console.log(featuresList)
            console.log(feature)
            console.log(cucumberReportMap)
            const myScenarios = cucumberReportMap[feature][0].elements.filter(
                e => scenarioName.includes(e.name)
            )
            if (!myScenarios) { return }
            let foundFailedStep = false
            myScenarios.forEach(myScenario => {
                if (foundFailedStep) {
                    return
                }
                let myStep
                if (screenshot.includes('(failed)')) {
                    myStep = myScenario.steps.find(
                        step => step.result.status === 'failed'
                    )
                } else {
                    myStep = myScenario.steps.find(
                        step => step.name.includes('screenshot')
                    )
                }
                if (!myStep) {
                    return
                }
                const data = fs.readFileSync(
                    path.resolve(screenshot)
                )
                if (data) {
                    const base64Image = Buffer.from(data, 'binary').toString('base64')
                    if (!myStep.embeddings) {
                        myStep.embeddings = []
                        myStep.embeddings.push({ data: base64Image, mime_type: 'image/png' })
                        foundFailedStep = true
                    }
                }
            })
            //Write JSON with screenshot back to report file.
fs.writeFileSync( | ||||||
| Code Block | ||||||
| ||||||
@REQ_CALC-7895 Feature: As a user, I can calculate the sum of 2 numbers # Addition is great as a verification exercise to get the Cucumber-js infrastructure up and running @TEST_CALC-4763 @features/addition.feature Scenario: Add two number Given the numbers 2 and 3 path.join(cucumberJsonDir, cucumberReportFileMap[feature]), JSON.stringify(cucumberReportMap[feature], null, jsonIndentLevel) When they are added together ) Then}) should the result be 5 |
...
 })
} |
The cucumber-json-merge utility may be handy to merge the results of each feature, so they can be then submitted to Xray as one single file.
Next, is an example of a shell script with all these steps.
| Code Block | ||||
|---|---|---|---|---|
|
...
| |||
#!/bin/bash

rm -f cypress/cucumber-json/*
npm run test
npm run attach_screenshots
cucumber-json-merge -d cypress/cucumber-json/ | |||
| No Format | |||
|---|---|---|---|
./node_modules/cucumber/bin/cucumber-js -f json:report.json |
After running the tests, results can be imported to Xray via the REST API, or the Import Execution Results action within the Test Execution, or by using one of the available CI/CD plugins (e.g. see an example of Integration with Jenkins).
...
| Info | ||
|---|---|---|
| ||
To import results, you can use two different endpoints/"formats" (endpoints described in Import Execution Results - REST):
The standard cucumber endpoint (i.e. /import/execution/cucumber) is simpler but more restrictive: you cannot specify values for custom fields on the Test Execution that will be created. This endpoint creates new Test Execution issues unless the Feature contains a tag having an issue key of an existing Test Execution. The multipart cucumber endpoint will allow you to customize fields (e.g. Fix Version, Test Plan), if you wish to do so, on the Test Execution that will be created. Note that this endpoint always creates new Test Executions (as of Xray v4.2). In sum, if you want to customize the Fix Version, Test Plan and/or Test Environment of the Test Execution issue that will be created, you'll have to use the "multipart cucumber" endpoint. |
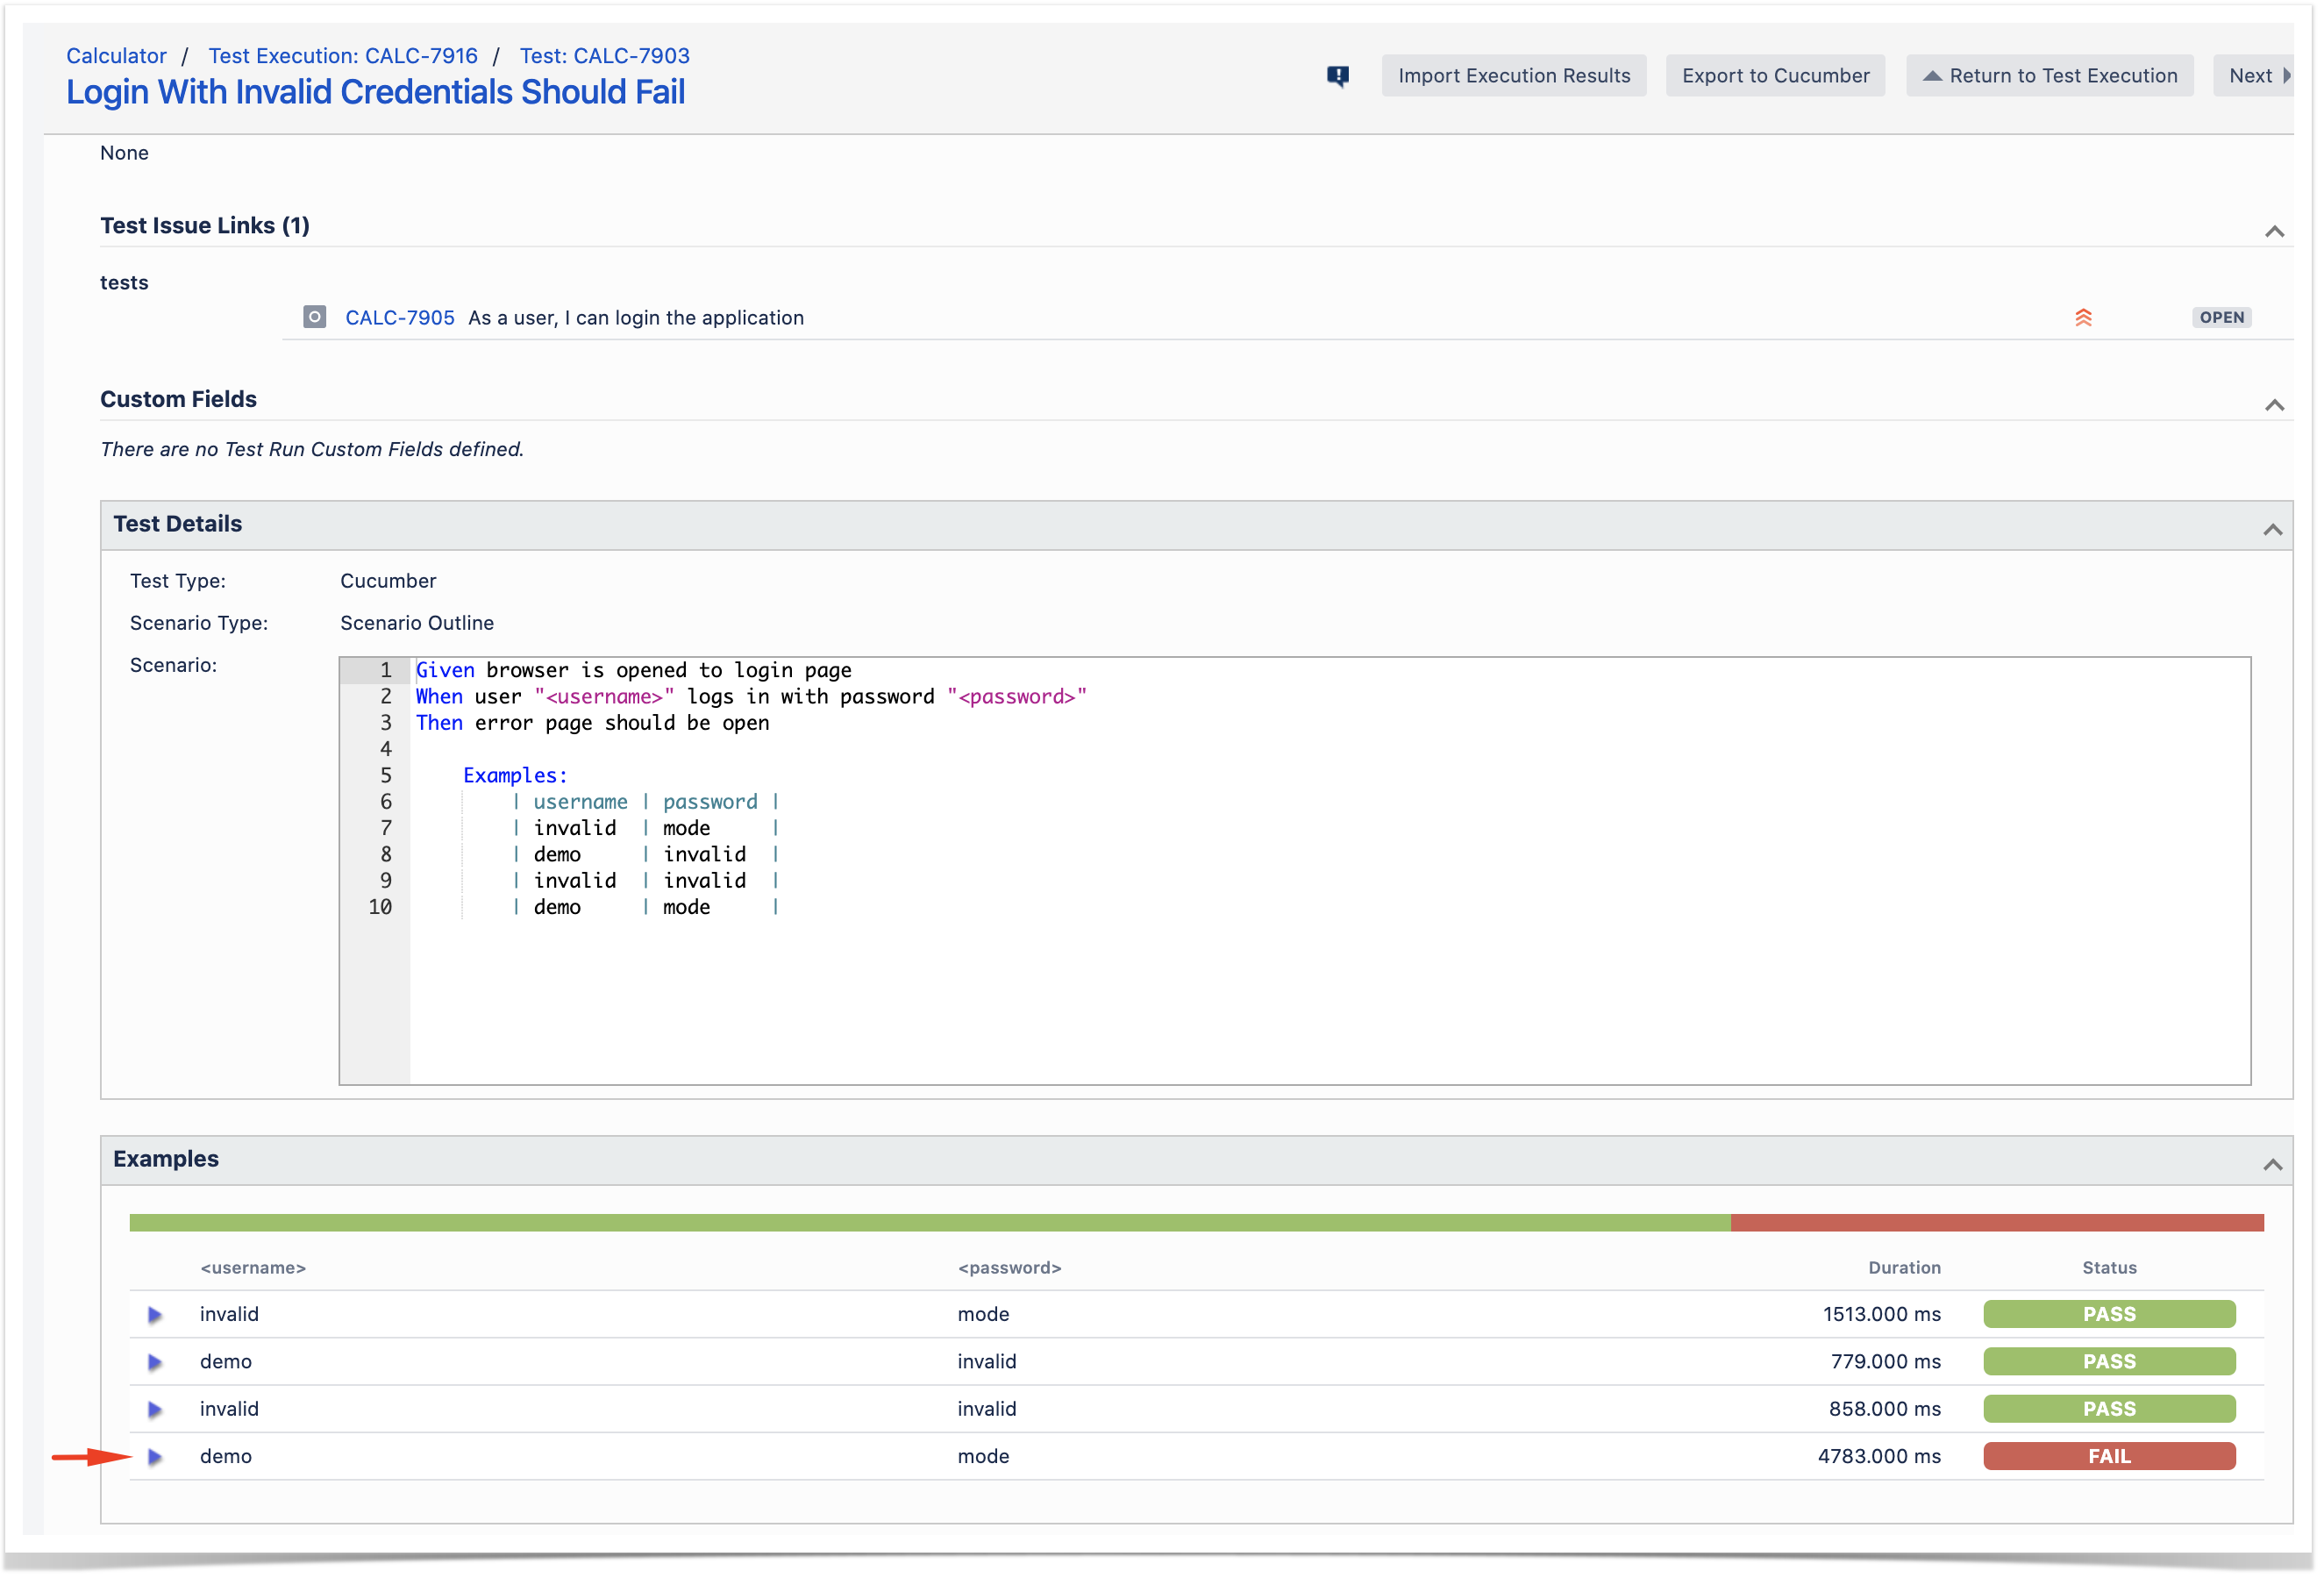
A new Test Execution will be created (unless you originally exported the Scenarios/Scenario Outlines from a Test Execution).

The execution screen details of the Test Run will provide overall status information and Gherkin statement-level results.


, Test Plan and/or Test Environment of the Test Execution issue that will be created, you'll have to use the "multipart cucumber" endpoint. |
A new Test Execution will be created (unless you originally exported the Scenarios/Scenario Outlines from a Test Execution).
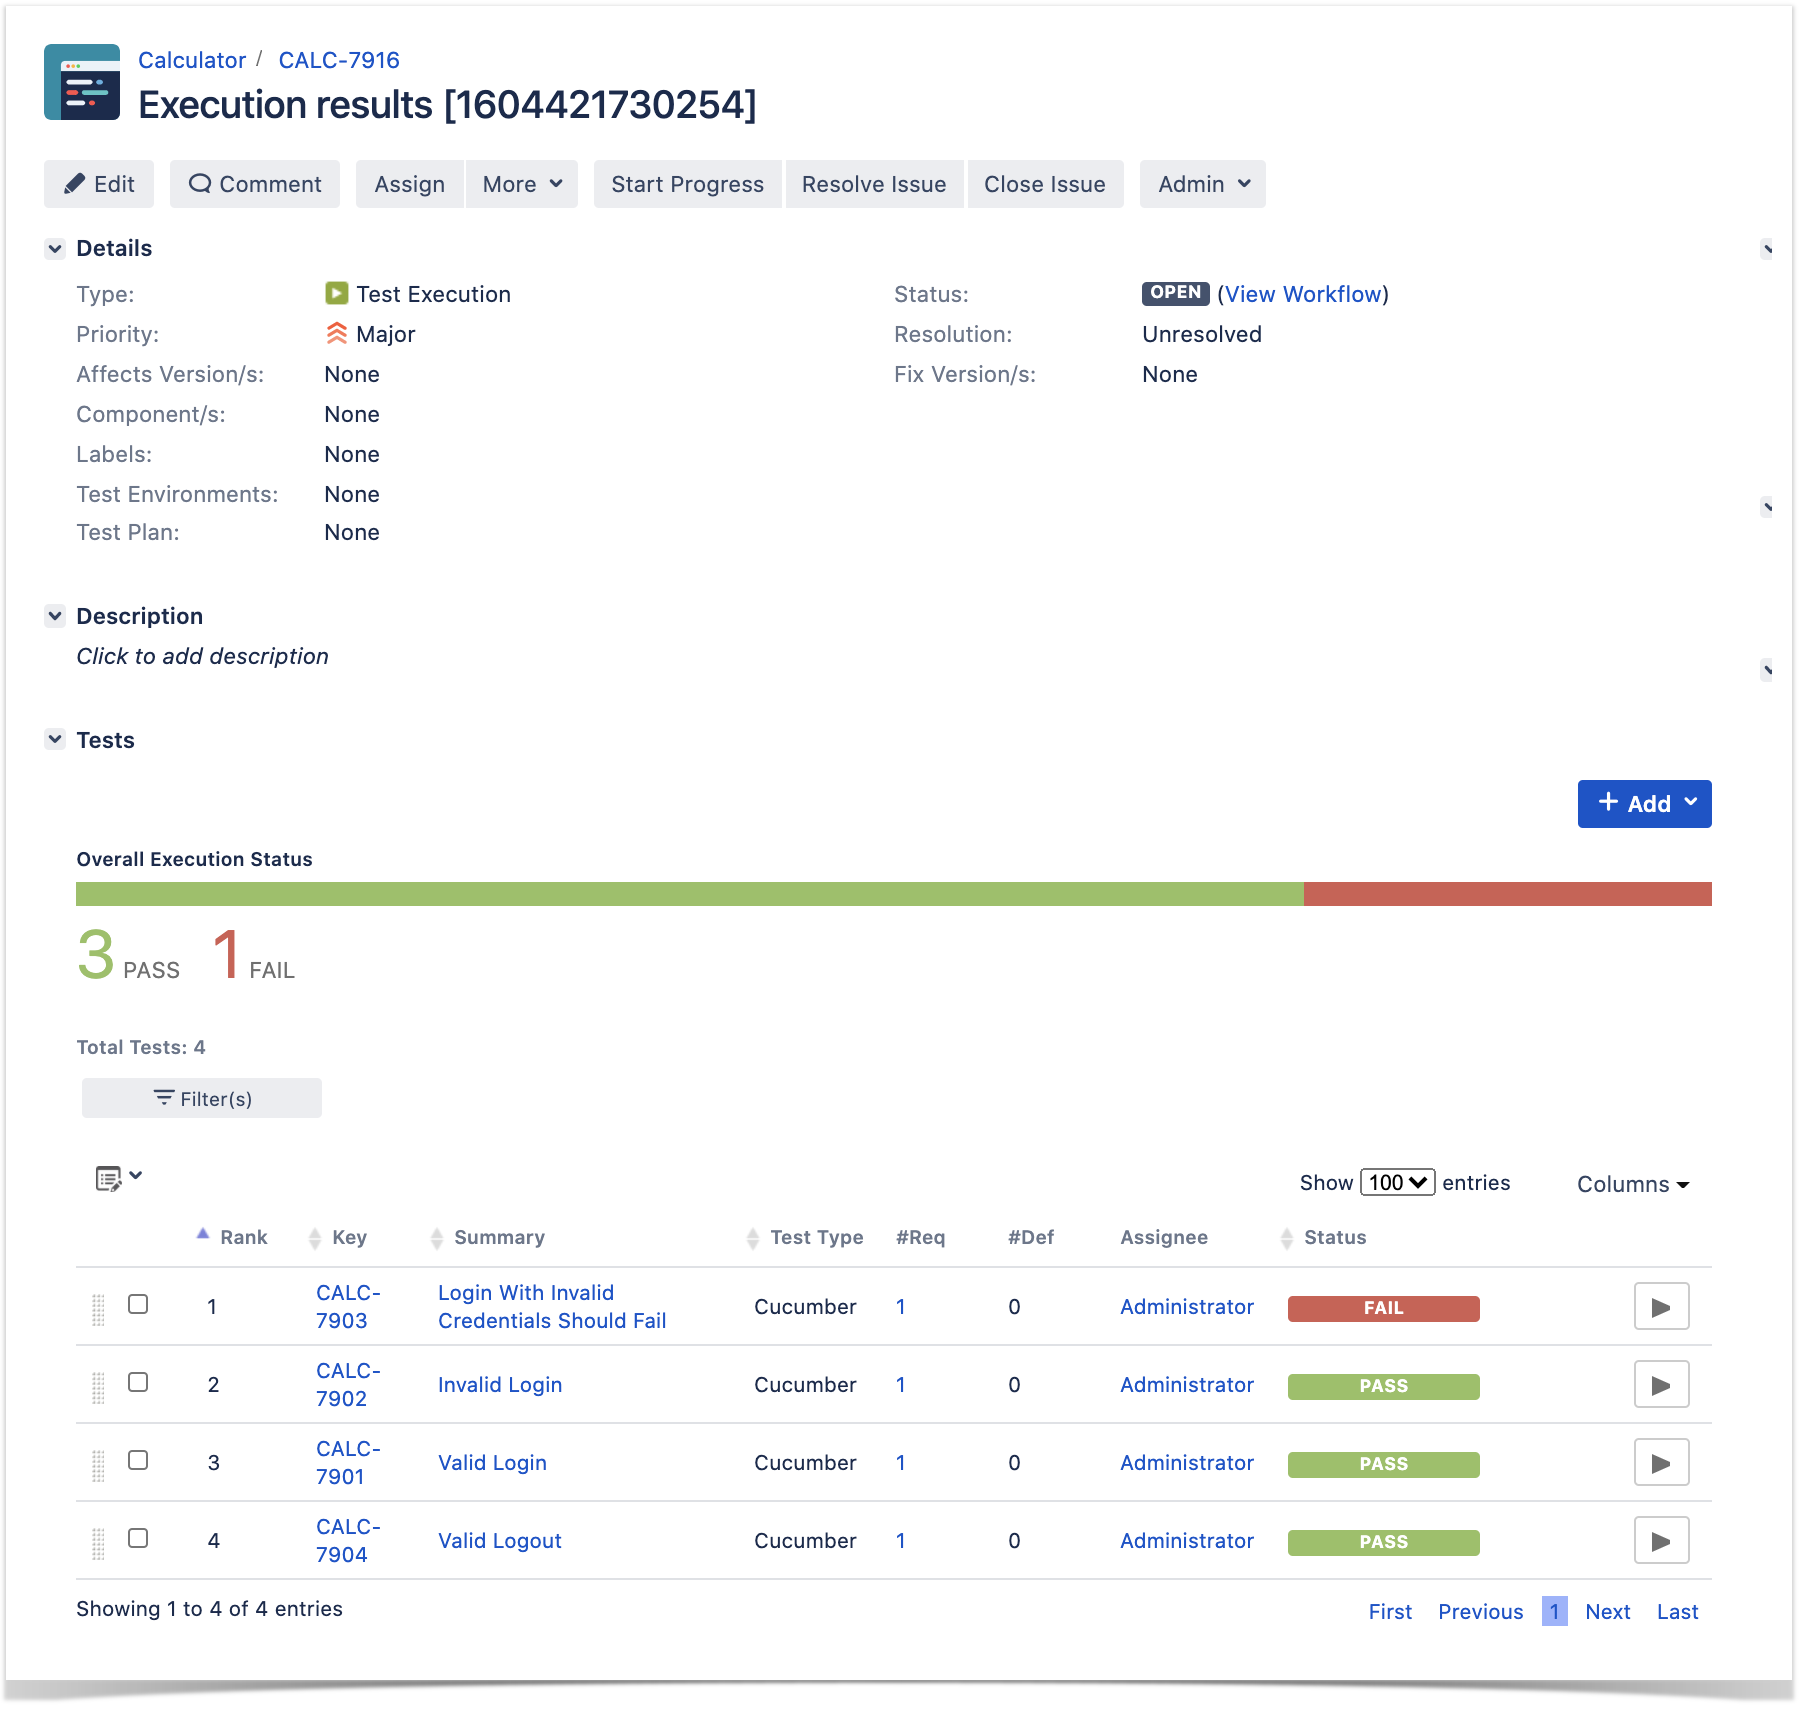
One of the tests fails (on purpose).
The execution screen details of the Test Run will provide overall status information and Gherkin statement-level results, therefore we can use it to analyze the failing test.
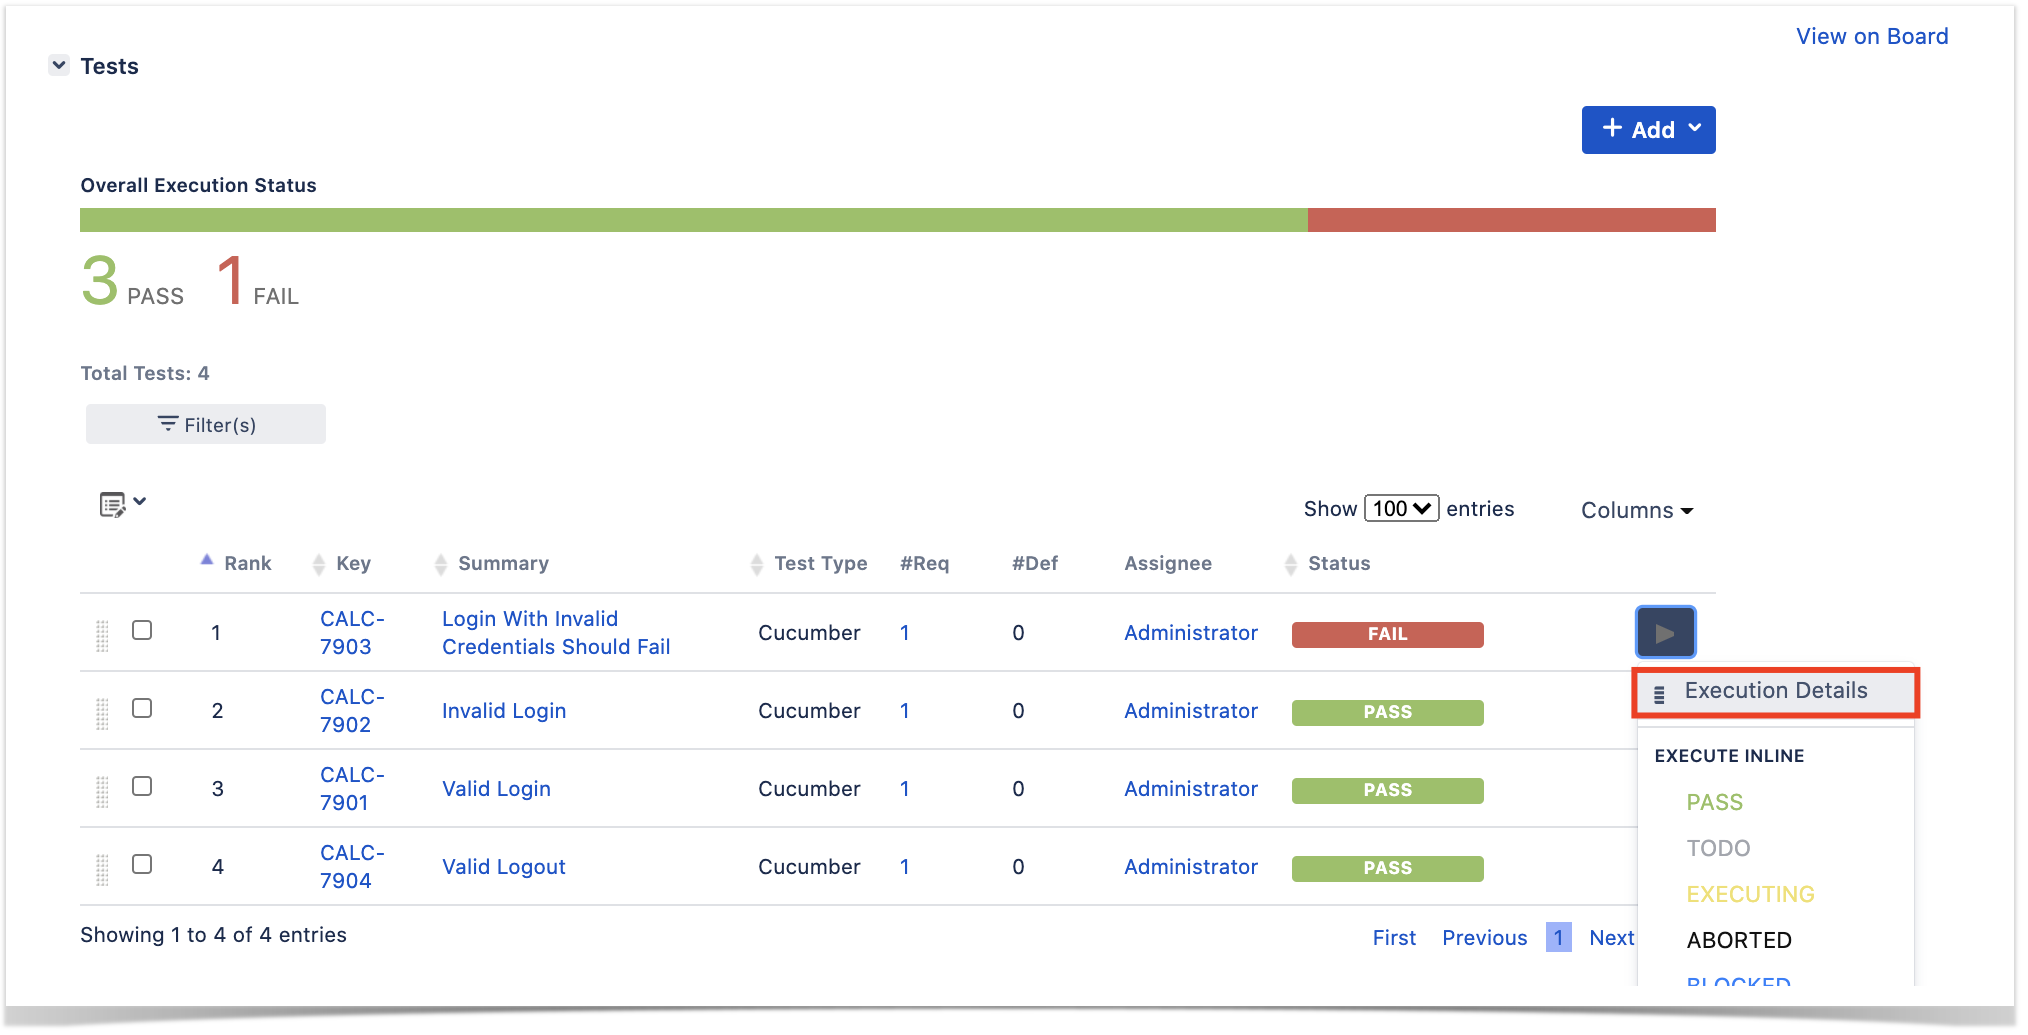
A given example can be expanded to see all Gherkin statements and, if available, it is possible to see also the attached screenshot(s).
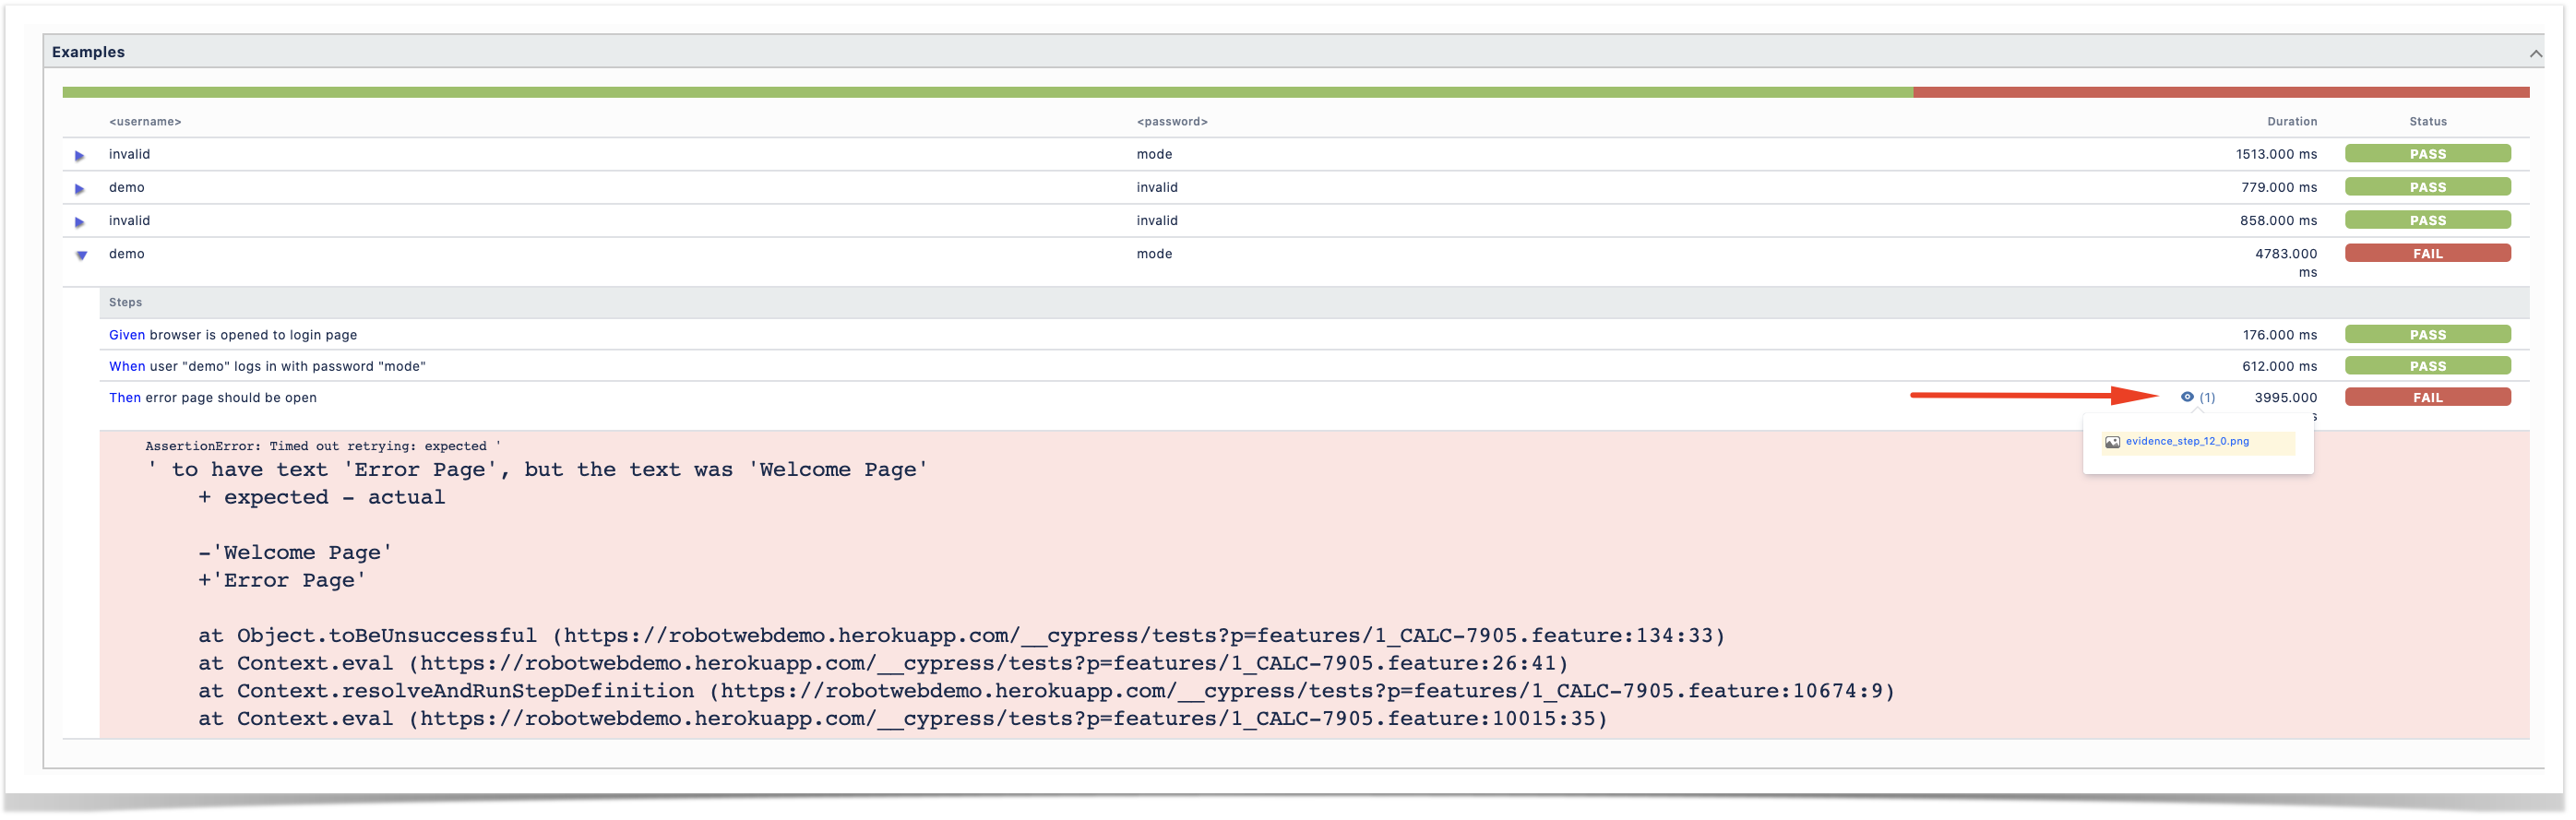
Note: in this case, the bug was on the Scenario Outline example which was using a valid username/password combination.
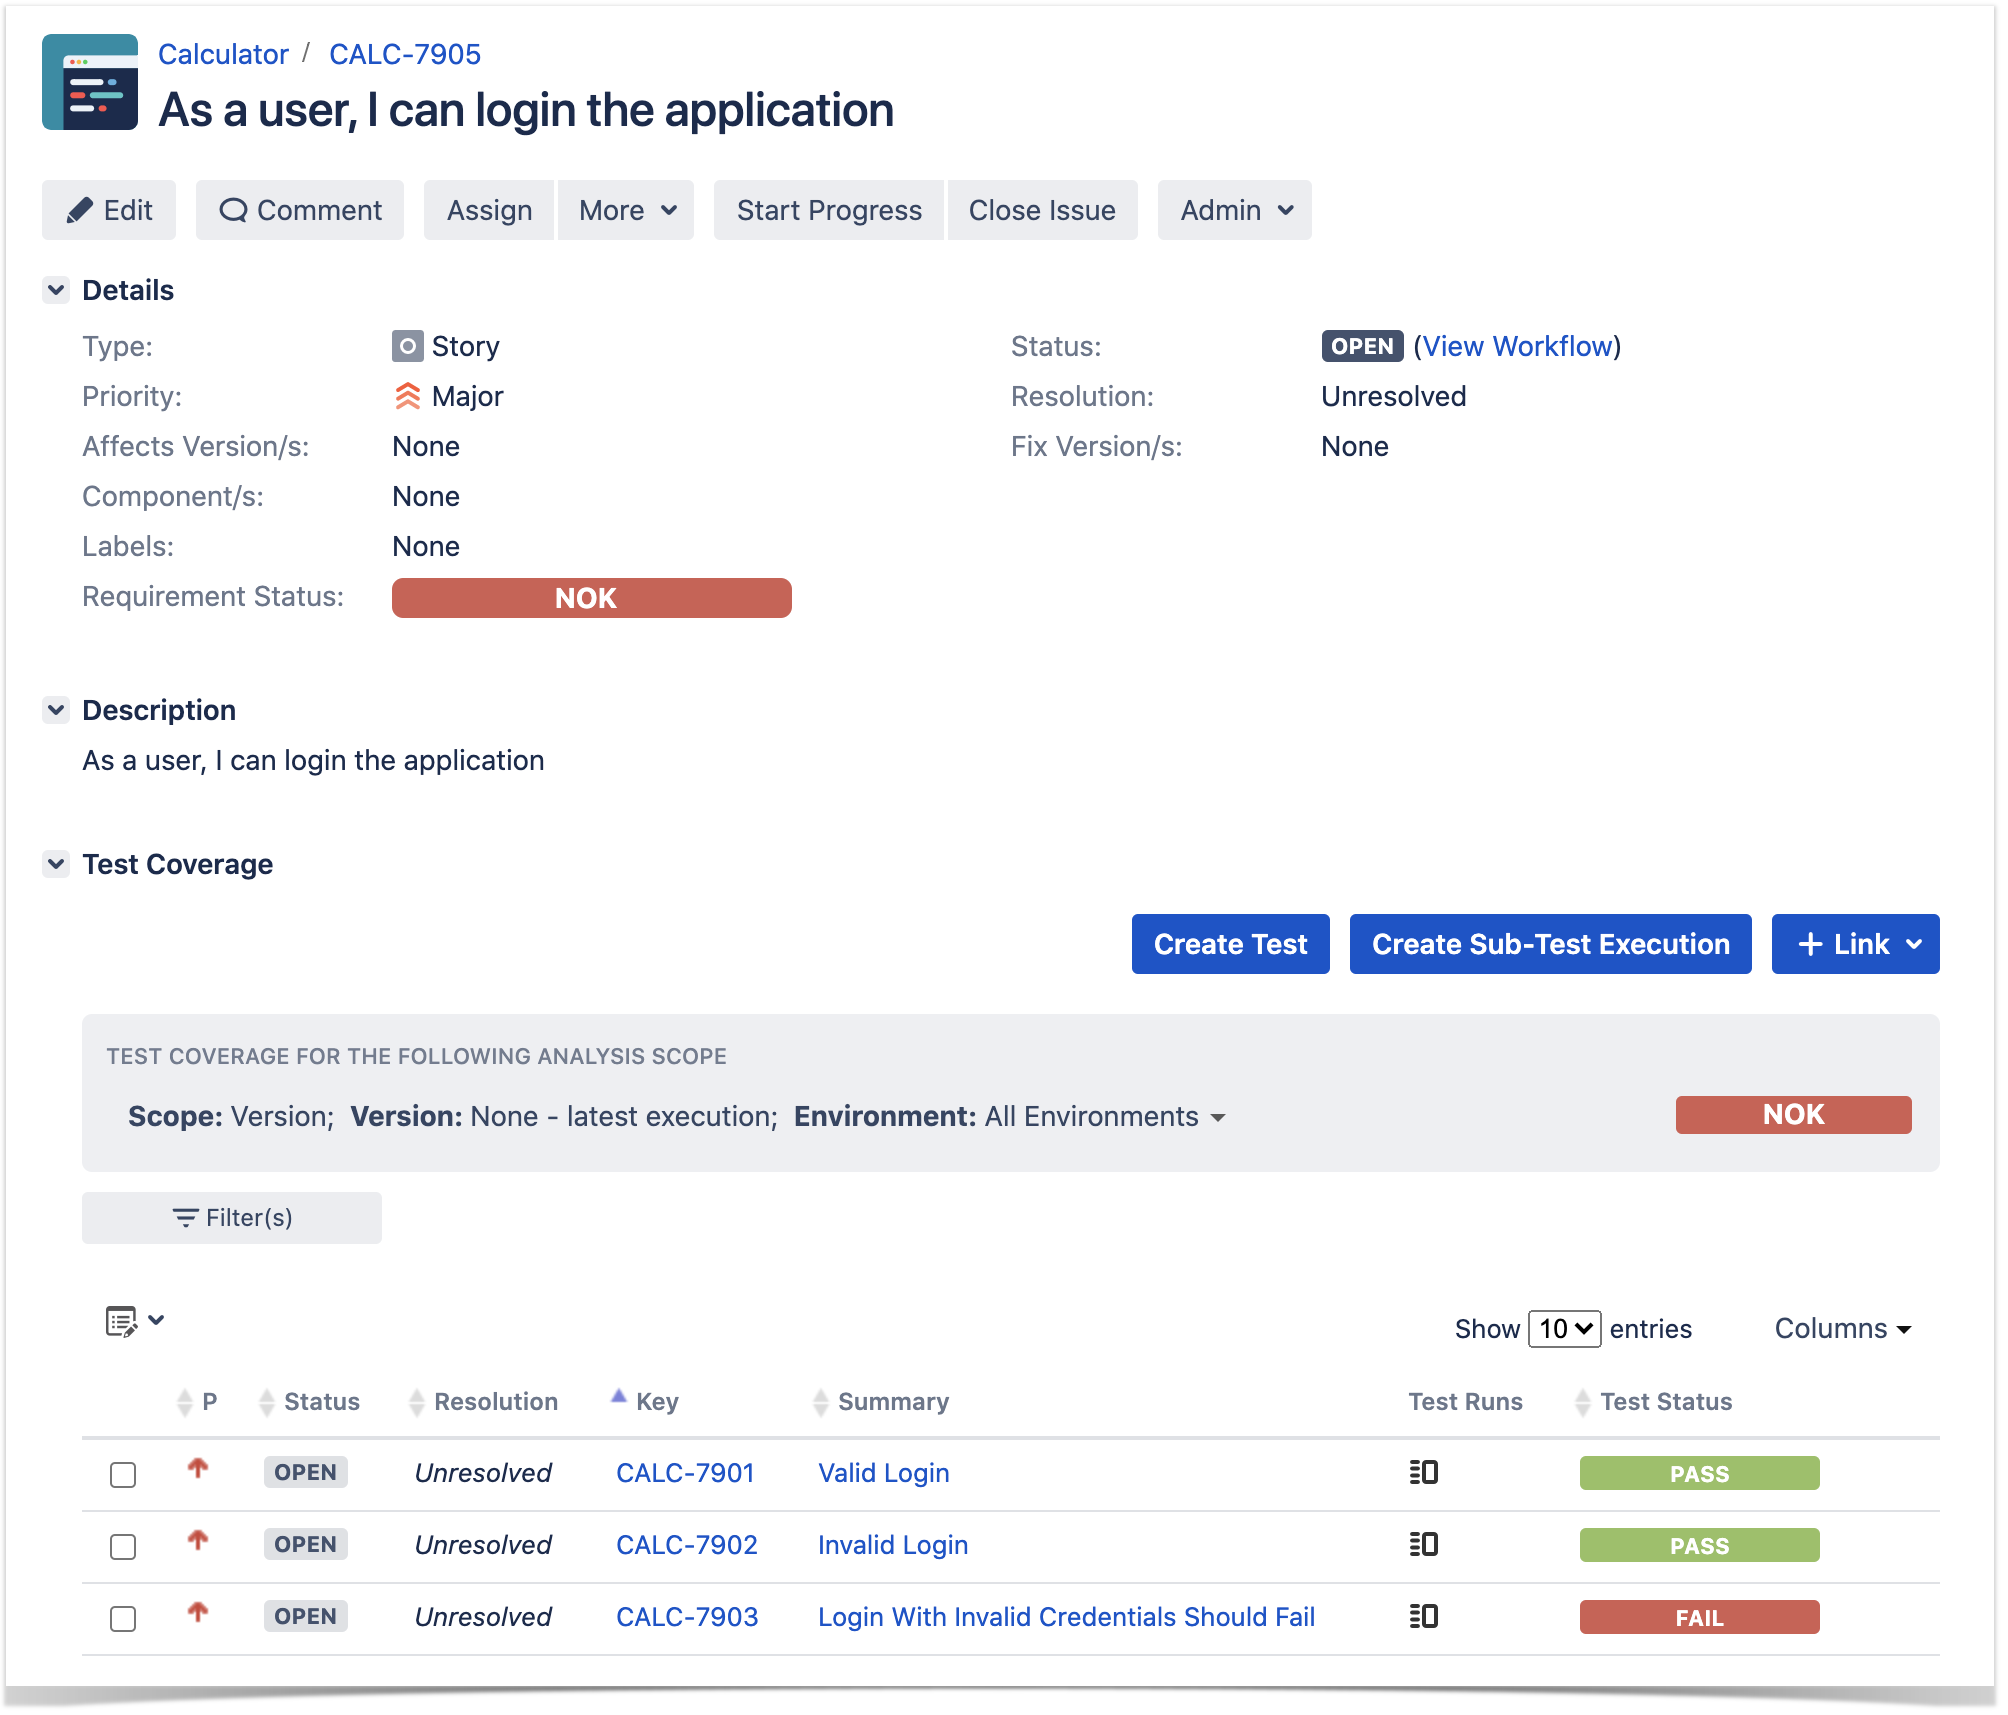
Results are reflected on the covered item (e.g. Story). On its issue screen, coverage now shows that the item is OK based on the latest testing results, that can also be tracked within the Test Coverage panel bellow. 
References
- Cypress
- Cypress documentation
- cypress-cucumber-example
- issue related to adding screenshots to the cucumber JSON report(s)
...