Page History
...
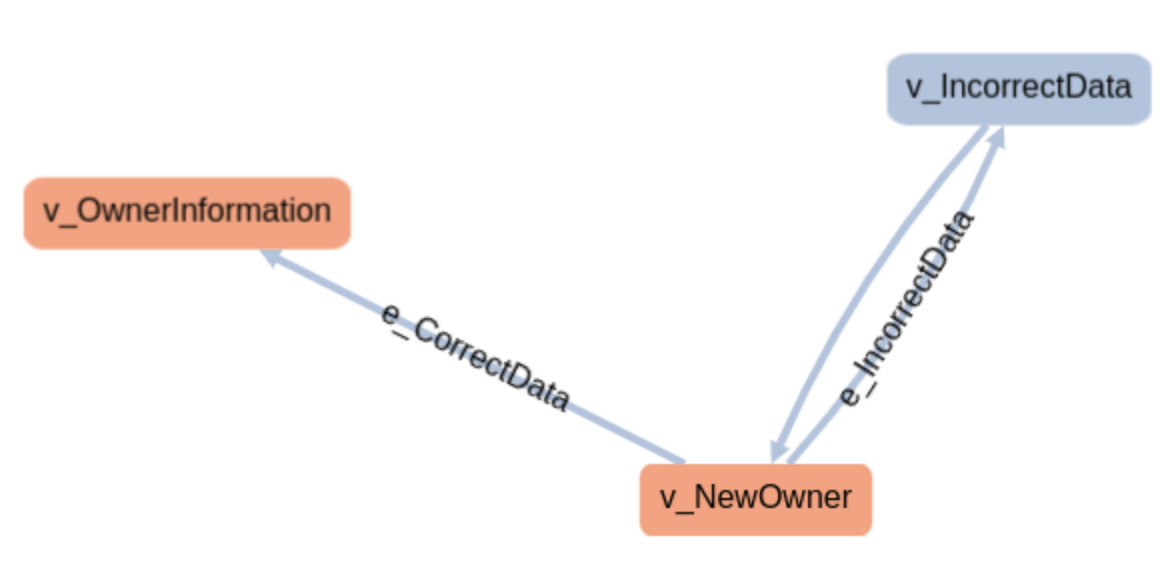
Let's pick the NewOwner model as an example, which is quite simple.
"v_NewOwner" represents, accordingly to what we've defined for our model, being on the "New Owner" page.
...
Otherwise, if we fill incorrect data (i.e. using the edge "e_IncorrectData") an error will be shown and the user keeps on the "New Owner" page.
| Info | ||
|---|---|---|
| ||
Usually, to implement the automation code we would create a Maven project from scratch, copy the model file(s), and generate a skeleton of the sources for our model. To do so, we would perform something such as: # generate a Maven project prepared for GraphWalker archetype:generate -B -DarchetypeGroupId=org.graphwalker -DarchetypeArtifactId=graphwalker-maven-archetype -DgroupId=com.company -DartifactId=myProject store the JSON of the model(s) in src/main/resources/
generate a skeleton of an implementable interface graphwalker:generate-sources |
The Java class that implements the edges and vertices of this model is defined in the class NewOwnerTest. Actions performed in the edges are quite simple. Assertions are also simple as they're only focused on the state/vertex they are at.
| Code Block | ||||||
|---|---|---|---|---|---|---|
| ||||||
package com.company.modelimplementations;


import com.company.NewOwner;
import com.github.javafaker.Faker;
import org.graphwalker.core.machine.ExecutionContext;
import org.graphwalker.java.annotation.GraphWalker;
import org.openqa.selenium.By;

import static com.codeborne.selenide.Condition.text;
import static com.codeborne.selenide.Condition.visible;
import static com.codeborne.selenide.Selenide.$;
import static com.codeborne.selenide.Selenide.$x;

/**
 * Implements the model (and interface) NewOwnerSharedState
 * The default path generator is Random Path.
 * Stop condition is 100% coverage of all edges.
 */
@GraphWalker(value = "random(edge_coverage(100))")
public class NewOwnerTest extends ExecutionContext implements NewOwner {

    @Override
    public void v_OwnerInformation() {
        $(By.tagName("h2")).shouldHave(text("Owner Information"));
        $x("/html/body/div/table[last()]/tbody/tr/td[2]/img").shouldBe(visible);
    }

    @Override
    public void e_CorrectData() {
        fillOwnerData();
        $(By.id("telephone")).sendKeys(String.valueOf(new Faker().number().digits(10)));
        $("button[type=\"submit\"]").click();
    }

    @Override
    public void e_IncorrectData() {
        fillOwnerData();
        $(By.id("telephone")).sendKeys(String.valueOf(new Faker().number().digits(20)));
        $("button[type=\"submit\"]").click();
    }

    @Override
    public void v_IncorrectData() {
        $(By.cssSelector("div.control-group.error > div.controls > span.help-inline"))
                .shouldHave(text("numeric value out of bounds (<10 digits>.<0 digits> expected)"));
    }

    @Override
    public void v_NewOwner() {
        $(By.tagName("h2")).shouldHave(text("New Owner"));
        $x("/html/body/table/tbody/tr/td[2]/img").shouldBe(visible);
    }

    private void fillOwnerData() {
        $(By.id("firstName")).clear();
        $(By.id("firstName")).sendKeys(new Faker().name().firstName());

        $(By.id("lastName")).clear();
        $(By.id("lastName")).sendKeys(new Faker().name().lastName());

        $(By.id("address")).clear();
        $(By.id("address")).sendKeys(new Faker().address().fullAddress());

        $(By.id("city")).clear();
        $(By.id("city")).sendKeys(new Faker().address().city());

        $(By.id("telephone")).clear();
    }
} |
To run the tests we can use Maven, since there is a specific plugin for assisting on this. This will produce a single JUnit XML report stored in the target/graphwalker-reports/ directory.
| Code Block | ||||
|---|---|---|---|---|
| ||||
rm -f target/graphwalker-reports/*.xml
mvn graphwalker:test |
After successfully running the tests and generating the JUnit XML report, it can be imported to Xray (either by the REST API or through the Import Execution Results action within the Test Execution, or even by using a CI tool of your choice).
| Code Block | ||||
|---|---|---|---|---|
| ||||
REPORT_FILE=$(ls target/graphwalker-reports/TEST-GraphWalker-*.xml | sort | tail -n 1)
curl -H "Content-Type: multipart/form-data" -u admin:admin -F "file=@$REPORT_FILE" http://jiraserver.example/rest/raven/1.0/import/execution/junit?projectKey=CALC |
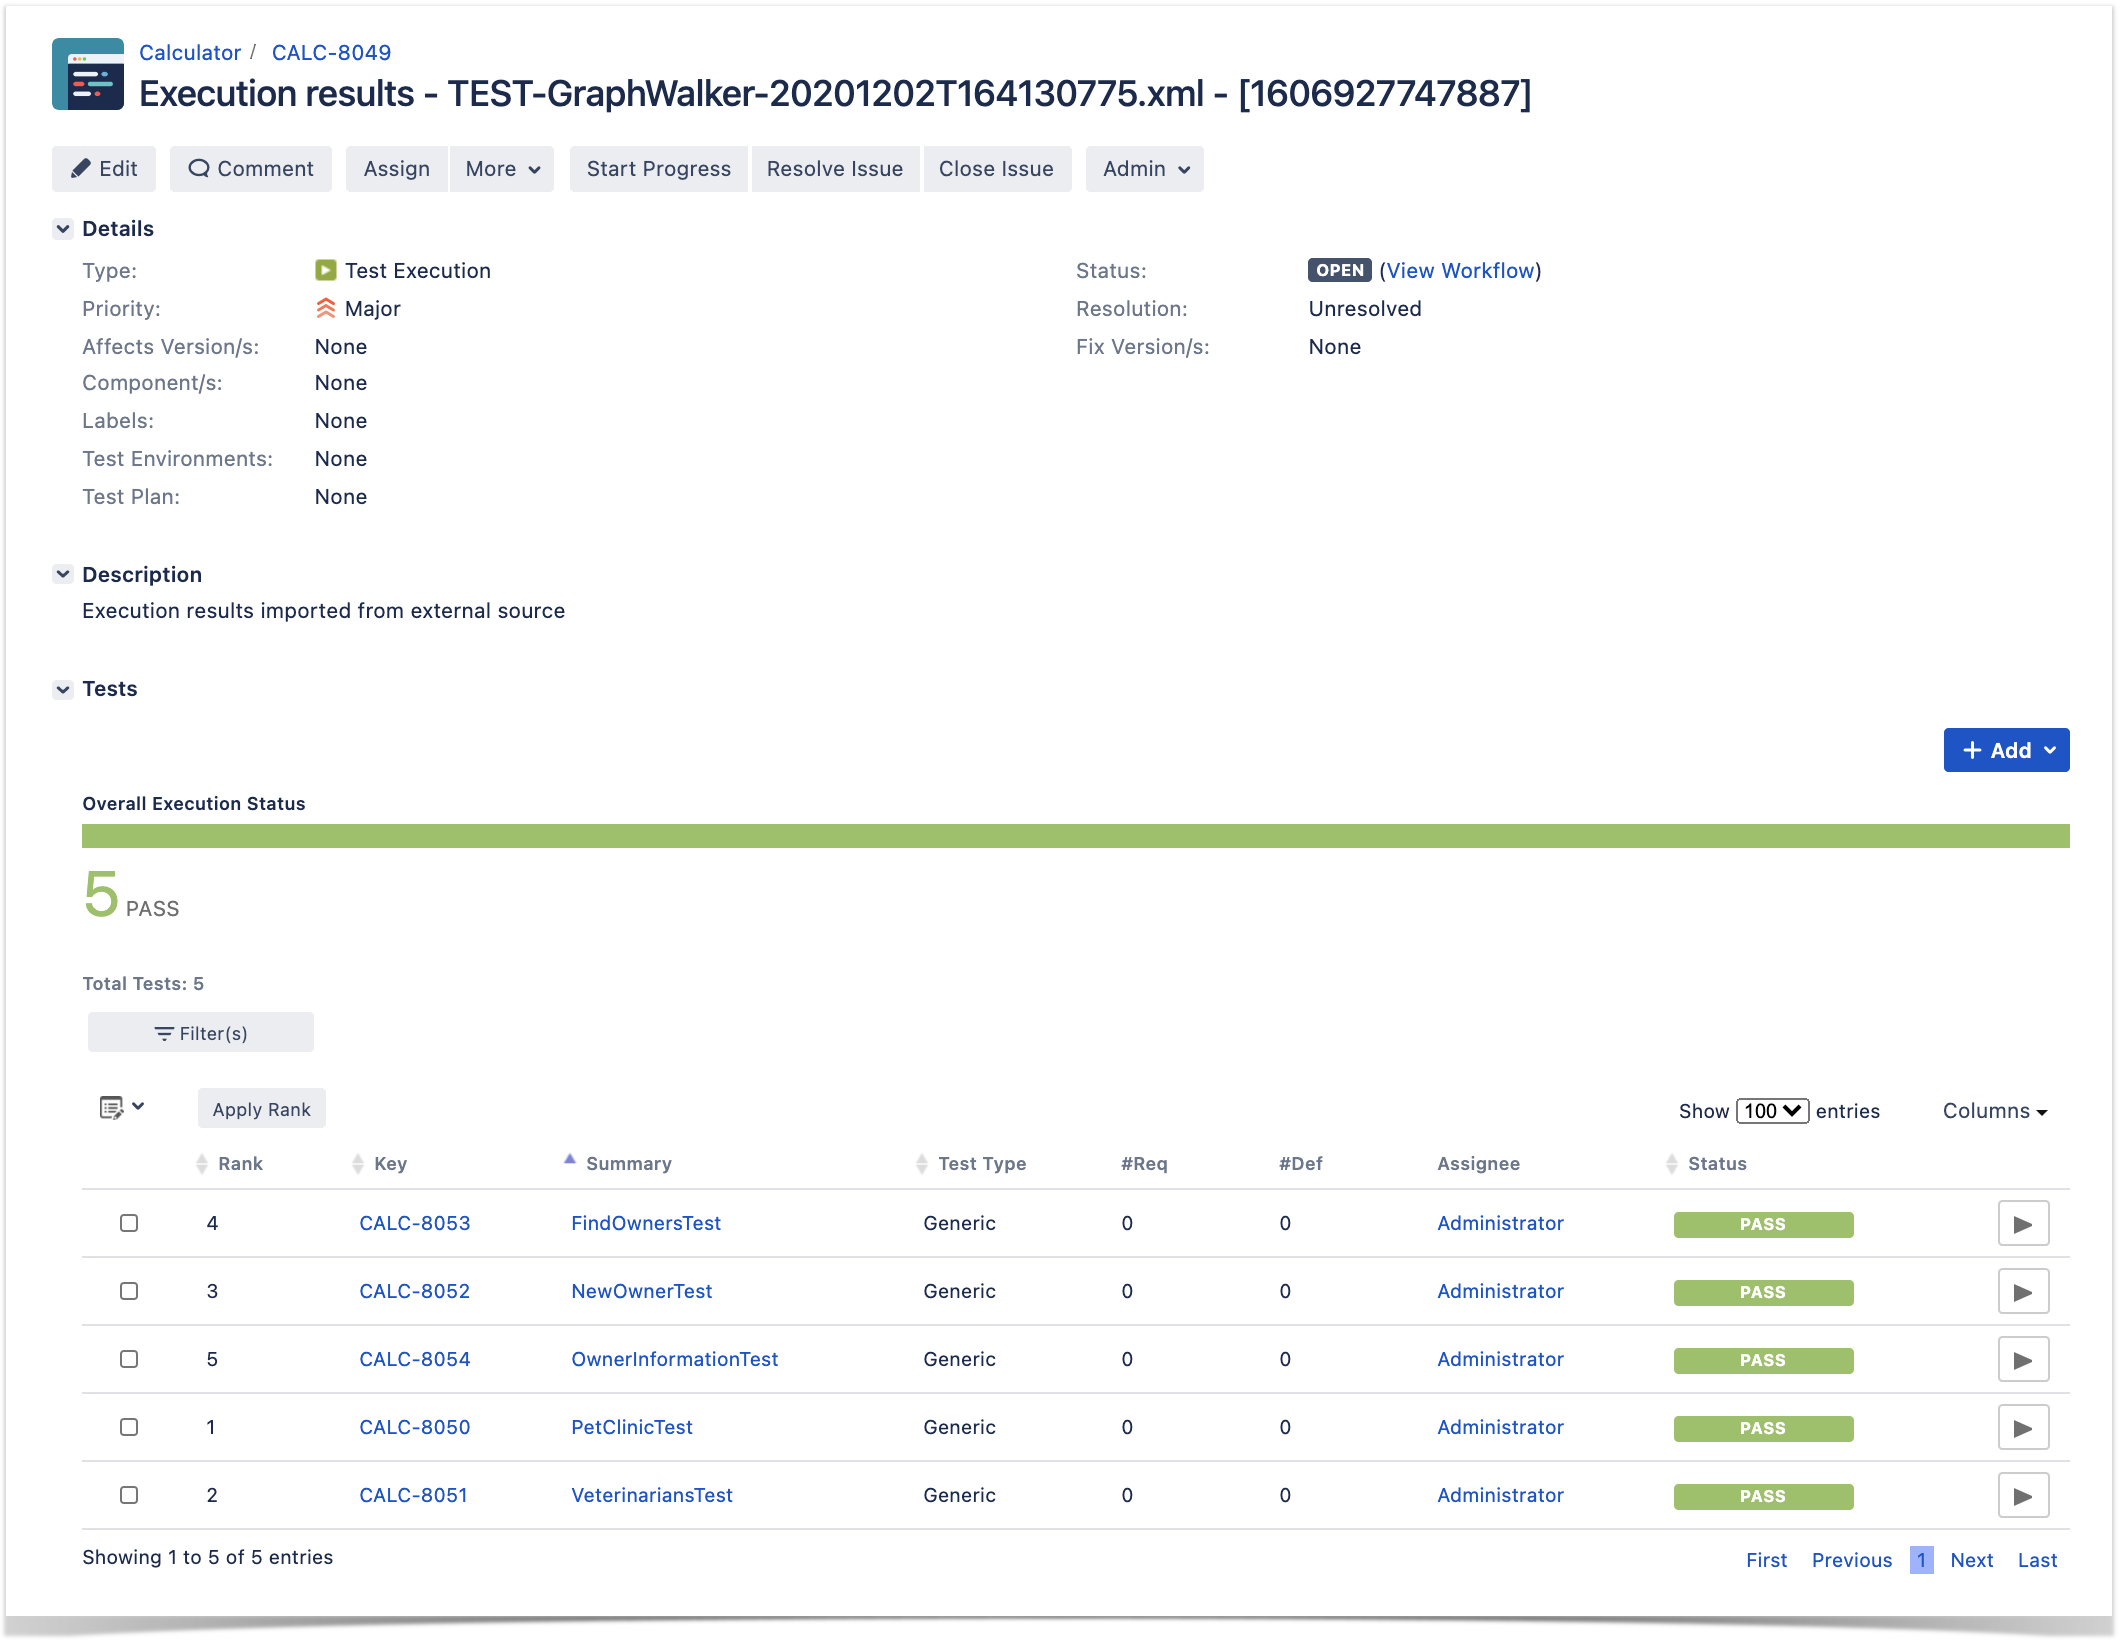
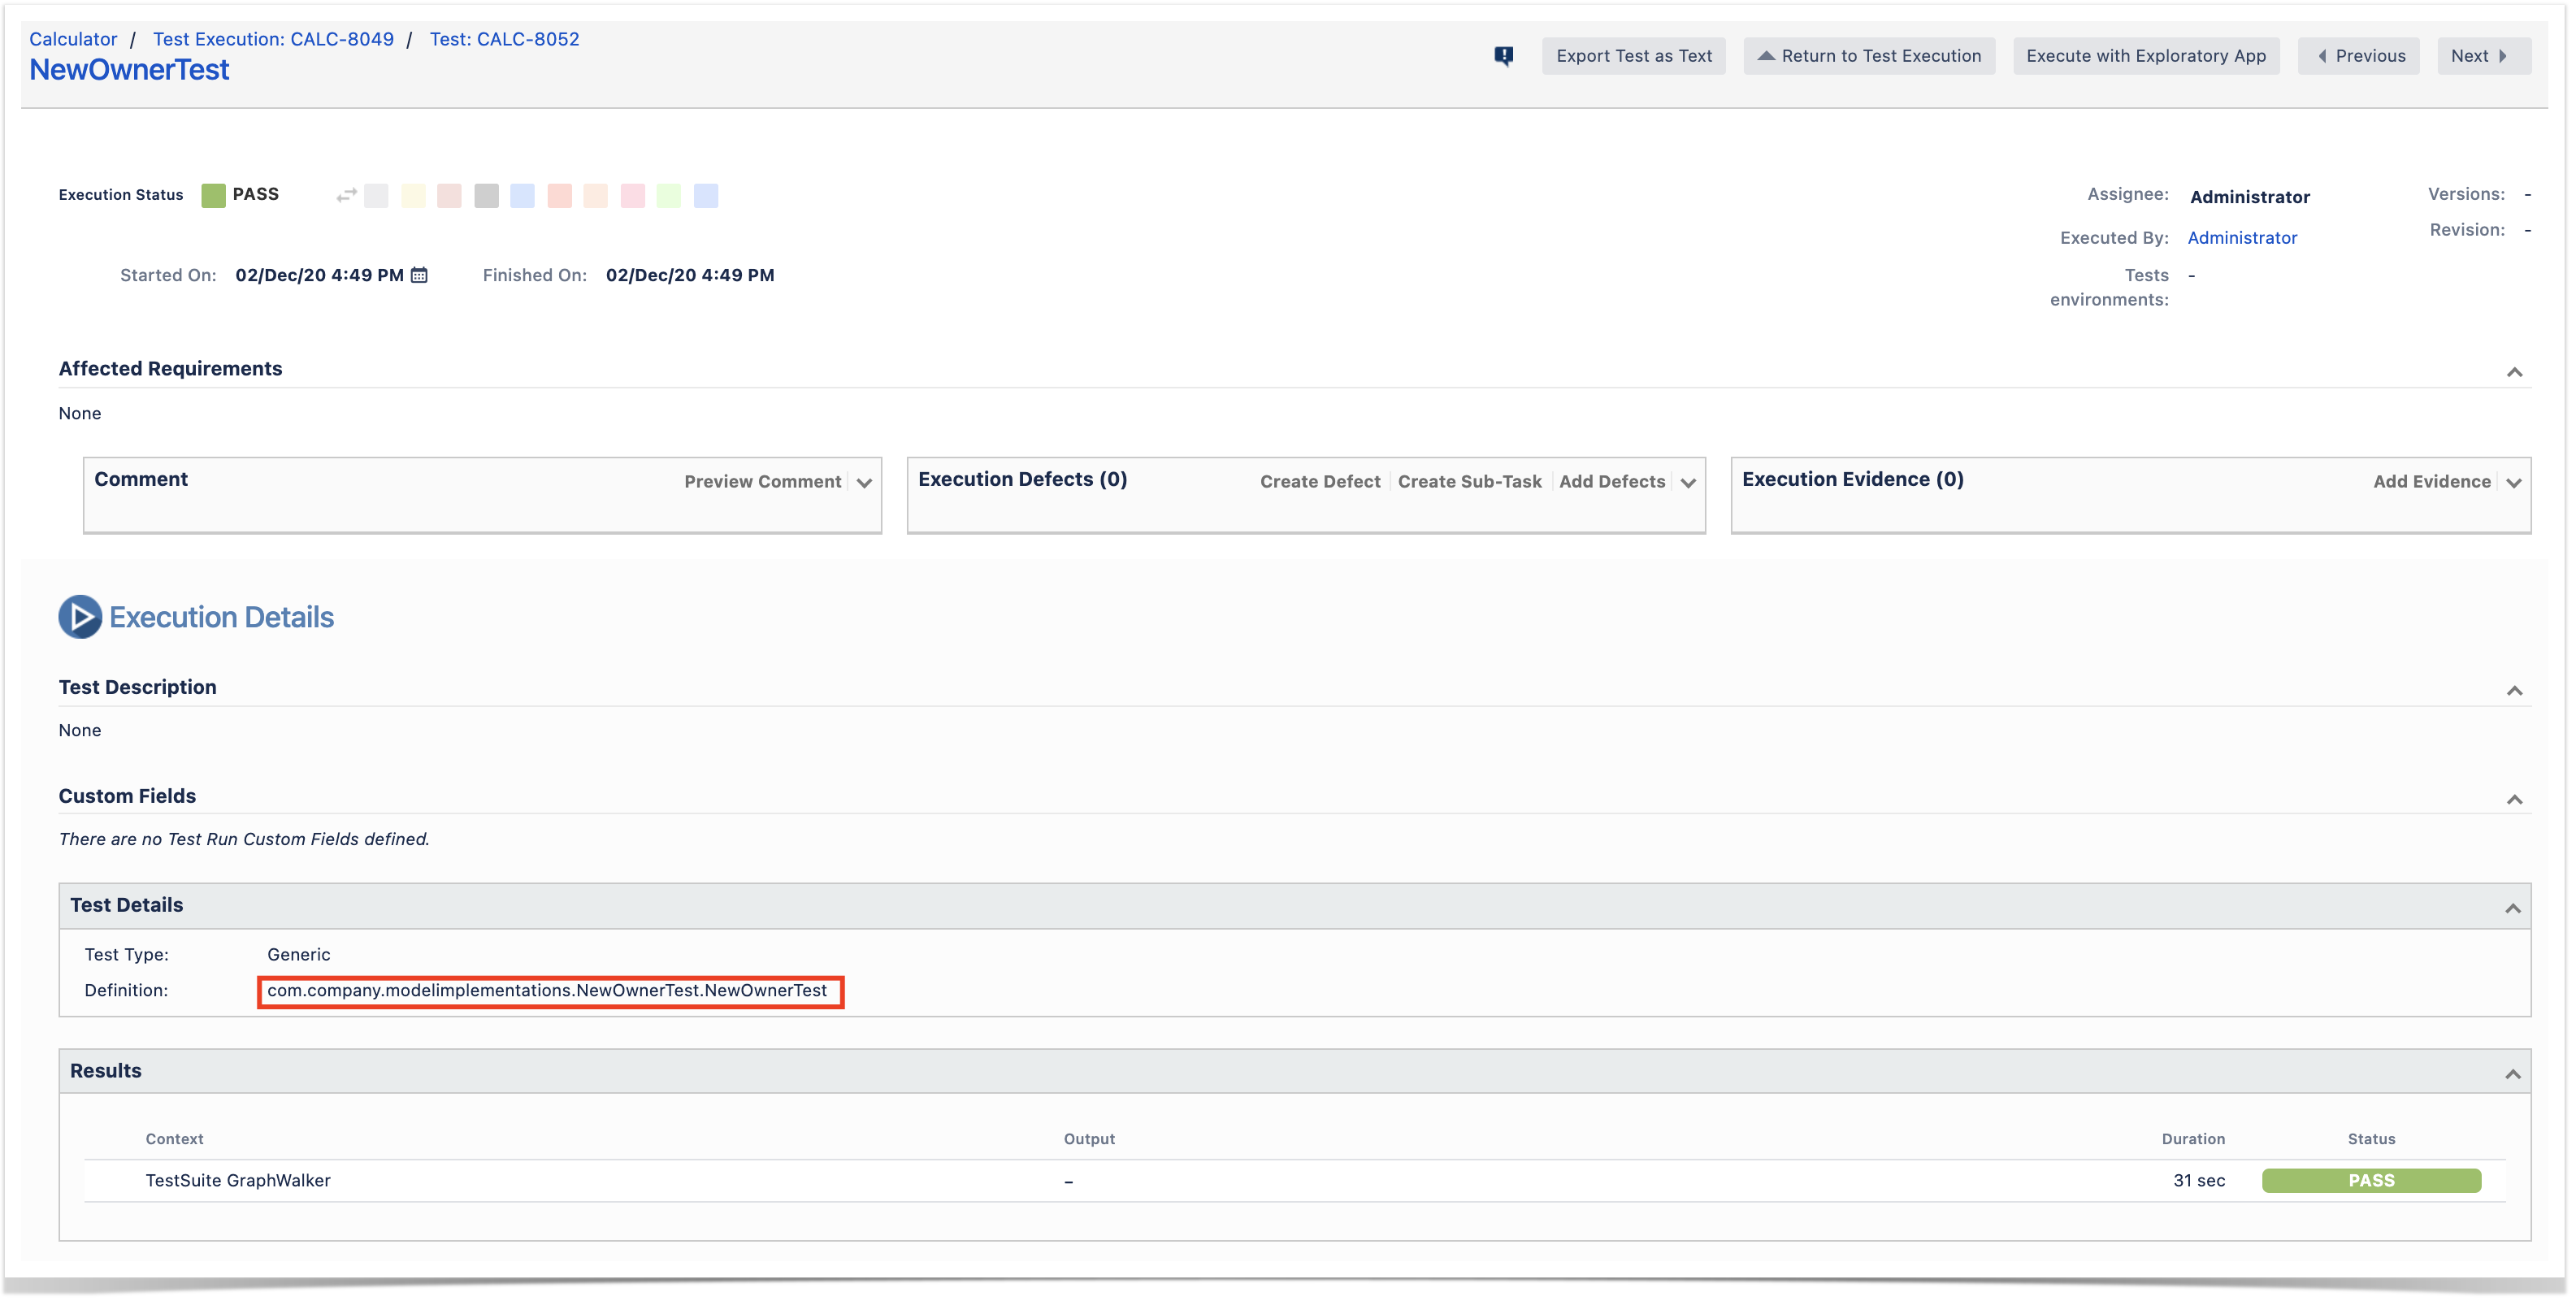
Each model is mapped to JUnit's testcase element which in turn is mapped to a Generic Test in Jira, and the Generic Test Definition field contains the name of the package and the class that implements the model related methods for edges and vertices. The summary of each Test issue is filled out with the name of the class.
The Execution Details page also shows information about the Test Suite, which will be just GraphWalker.
Tips
In the previous example, we can see that the class NewOwnerTest extends ExecutionContext; this ties the model with the path generator and provides a context for tracking the internal state and history of the model while it is transversed.
The @GraphWalker annotation is used to specify the path generator and stop conditions. This is used for online path generation during test execution.
If follows this syntax:
@GraphWalker(value="generator(stop_conditions)", start = "start_element", groups = { "group" } )
such as:
@GraphWalker(value="random(reached_vertex(v_ShoppingCart))", start="e_StartBrowser", groups= { "default" } )
| Info | |||||||||
|---|---|---|---|---|---|---|---|---|---|
| |||||||||
Tests using the model can be created and executed programatically similar to other tests, using JUnit or other testing framework. More info here and here. The flow is something like:
In this case, we could execute the tests using Maven. We would then use the JUnit XML report produced by JUnit itself.
|
To run the tests we can use Maven, since there is a specific plugin for assisting on this. This will produce a single JUnit XML report stored in the target/graphwalker-reports/ directory.
| Code Block | ||||
|---|---|---|---|---|
| ||||
rm -f target/graphwalker-reports/*.xml
mvn graphwalker:test |
After successfully running the tests and generating the JUnit XML report, it can be imported to Xray (either by the REST API or through the Import Execution Results action within the Test Execution, or even by using a CI tool of your choice).
| Code Block | ||||
|---|---|---|---|---|
| ||||
REPORT_FILE=$(ls target/graphwalker-reports/TEST-GraphWalker-*.xml | sort | tail -n 1)
curl -H "Content-Type: multipart/form-data" -u admin:admin -F "file=@$REPORT_FILE" http://jiraserver.example/rest/raven/1.0/import/execution/junit?projectKey=CALC |
Each model is mapped to JUnit's testcase element which in turn is mapped to a Generic Test in Jira, and the Generic Test Definition field contains the name of the package and the class that implements the model related methods for edges and vertices. The summary of each Test issue is filled out with the name of the class.
The Execution Details page also shows information about the Test Suite, which will be just GraphWalker.
Tips
- Use MBT not to replace existing test scripts but in cases where yoou need to provide greater coverage
- Discuss the model(s) with the team and the ones that can be most useful for your use case
- You can control the seed of the random generator used by GraphWalker, so you can easily reproduce bugs (i.e. by reproducing the generated path)
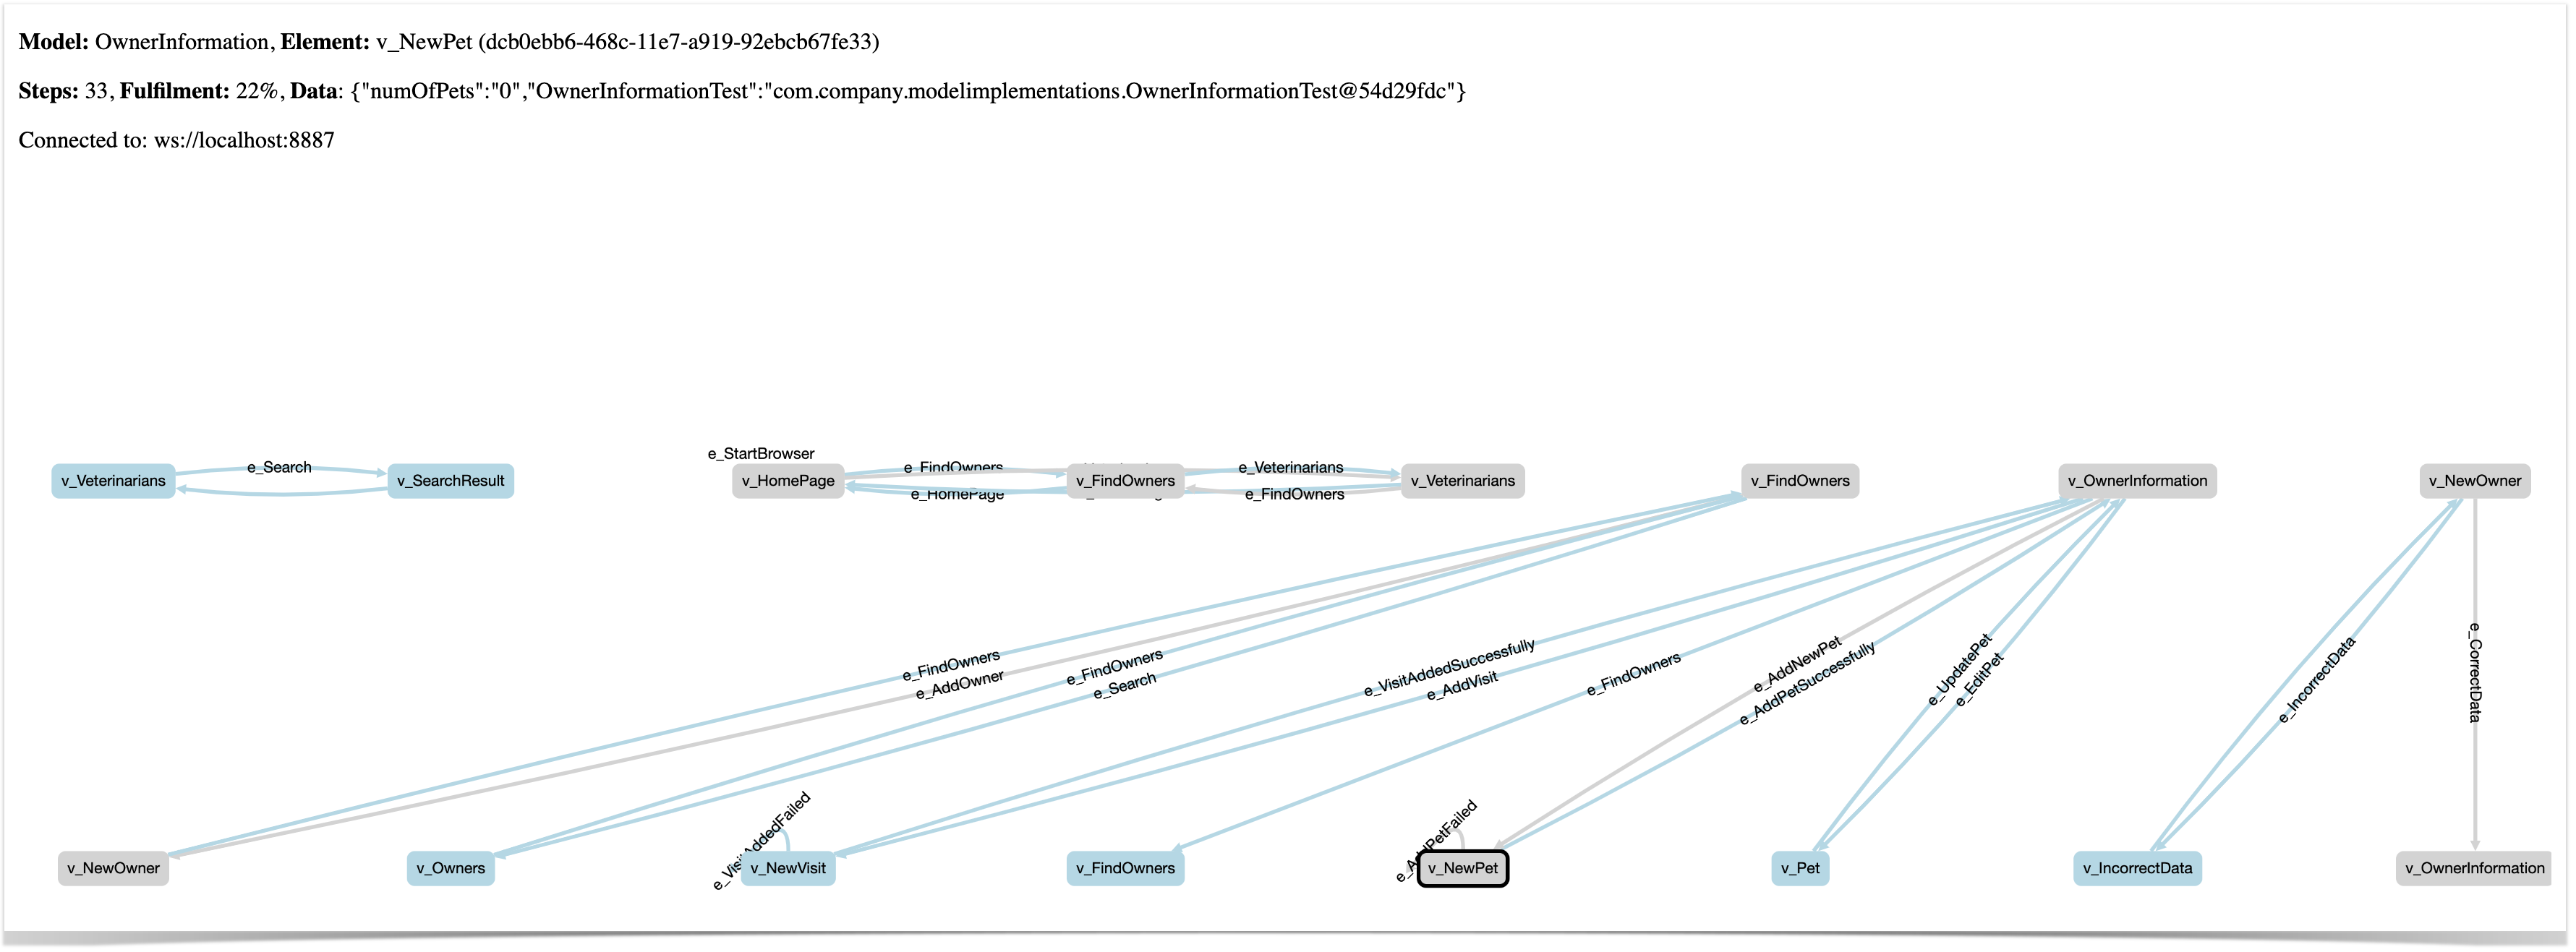
- You can use GraphWalker Player to see the graph being transversed in real-time. You can use a sample HTML file that contains the code to connect to a WebSocket server that you need to instantiate in the runner side (example) .
- Example:
- open the file index.html in your browser, using an URL such as "file:///Users/you/index.html?wsURI=localhost:8887?wsURI=localhost:8887"
- execute GraphWalker, using the custom runner
mvn exec:java -Dexec.mainClass="com.company.runners.WebSocketApplication"
- Example:
- Use MBT not to replace existing test scripts but in cases where yoou need to provide greater coverage
- Discuss the model(s) with the team and the ones that can be most useful for your use case
- You can control the seed of the random generator used by GraphWalker, so you can easily reproduce bugs (i.e. by reproducing the generated path)
- Multiple runs of your tests can be grouped and consolidate in a Test Plan, so you can have an updated overview of their current state
- After importing the results, you can link the corresponding Test issues with an existing requirement or user story and thus truck coverage directly on the respective issue, or even on a Agile board


...