Page History
...
The Automation for Jira app/feature enables users to easily extend and implement automation in Jira without having to code.
...
Rules can also be triggered manually or may be scheduled.
| Info | ||
|---|---|---|
| ||
Automation for Jira has become part of Jira Datacenter offering, enabling automation of flows for all Jira users. Please check Atlassian's Jira Automation documentation for more info. |
Since Xray uses issue types for most of its entities and since Xray provides many JQL functions that allow you to obtain testing-related information, Automation for Jira can be used with Xray in a very straightforward way.
...
| Info | ||
|---|---|---|
| ||
The following examples are provided as-is, no warranties attached; use them carefully. Please feel free to adapt them to your needs. Note: We don't provide support for Automaton for Jira; if you have doubts concerning its usage, please contact Automation for Jira's support. |
Usage Examples
Jenkins
Trigger a Jenkins project build from an issue
In this very simple scenario, we'll implement a rule, triggered manually, that will trigger a Jenkins project/job. The action will be available from within the "More" menu, in all issues of the selected project.
We're assuming that:
- you just want to trigger a CI job, period; this job may be totally unrelated to the issue from where you triggered it
- what the CI job will do, including if it will report the results back to Xray or not, is not relevant
Jenkins configuration
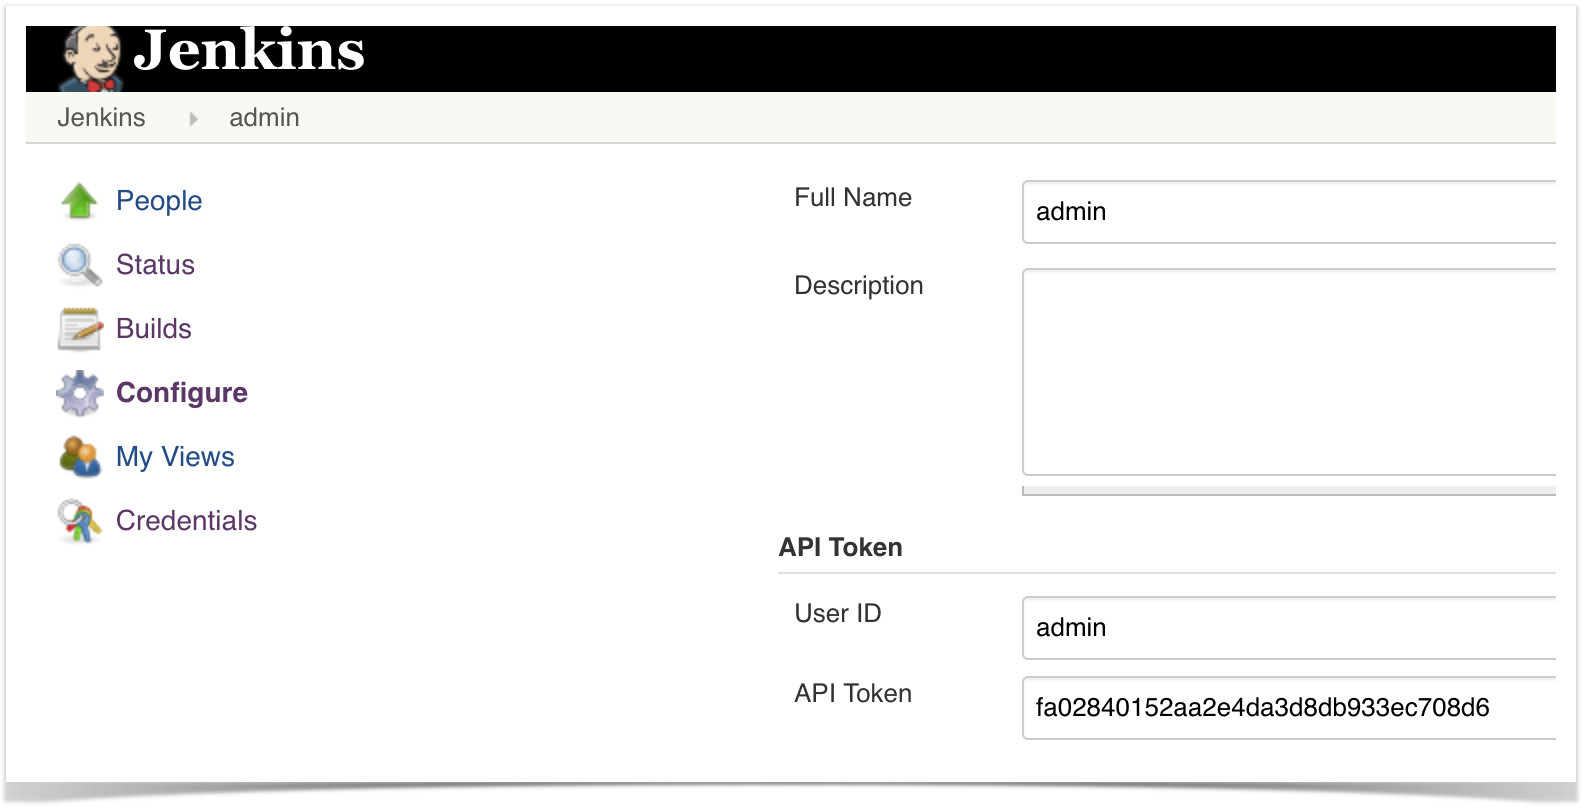
In Jenkins, we need to generate an API token for some user, which can be done from the profile settings page.
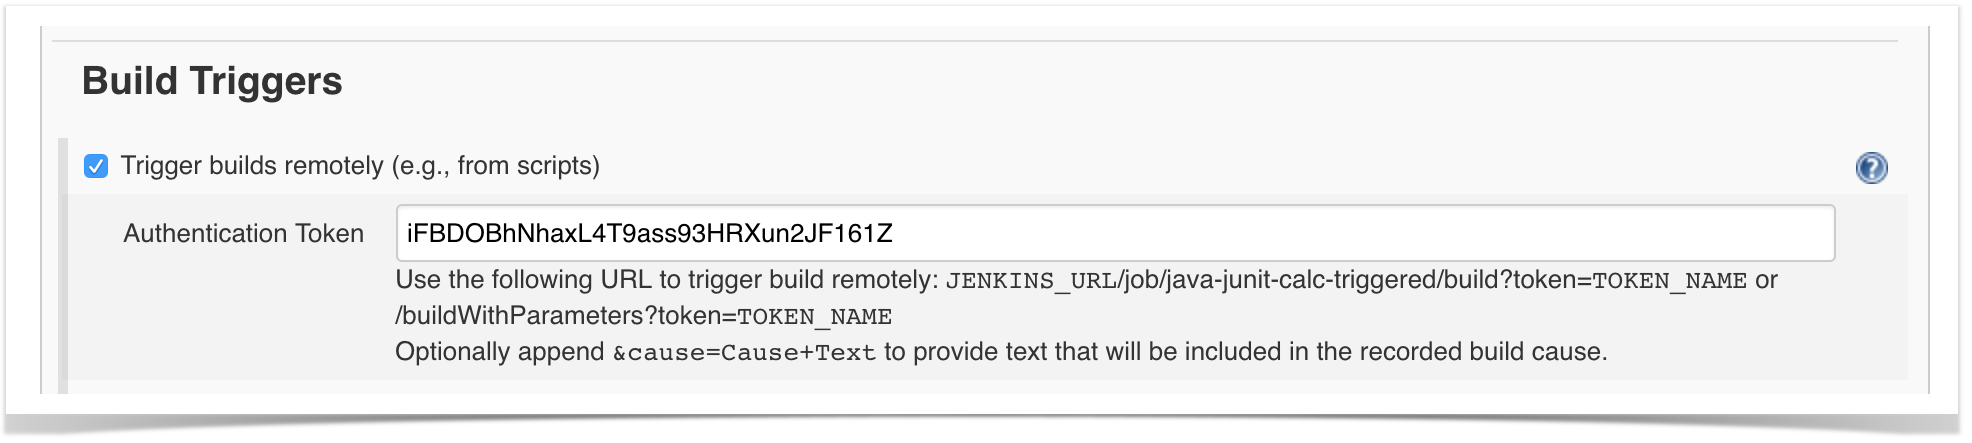
At the project level, we need to enable remote build triggers, so we can obtain an "authentication token" to be used in the HTTP request afterwards.
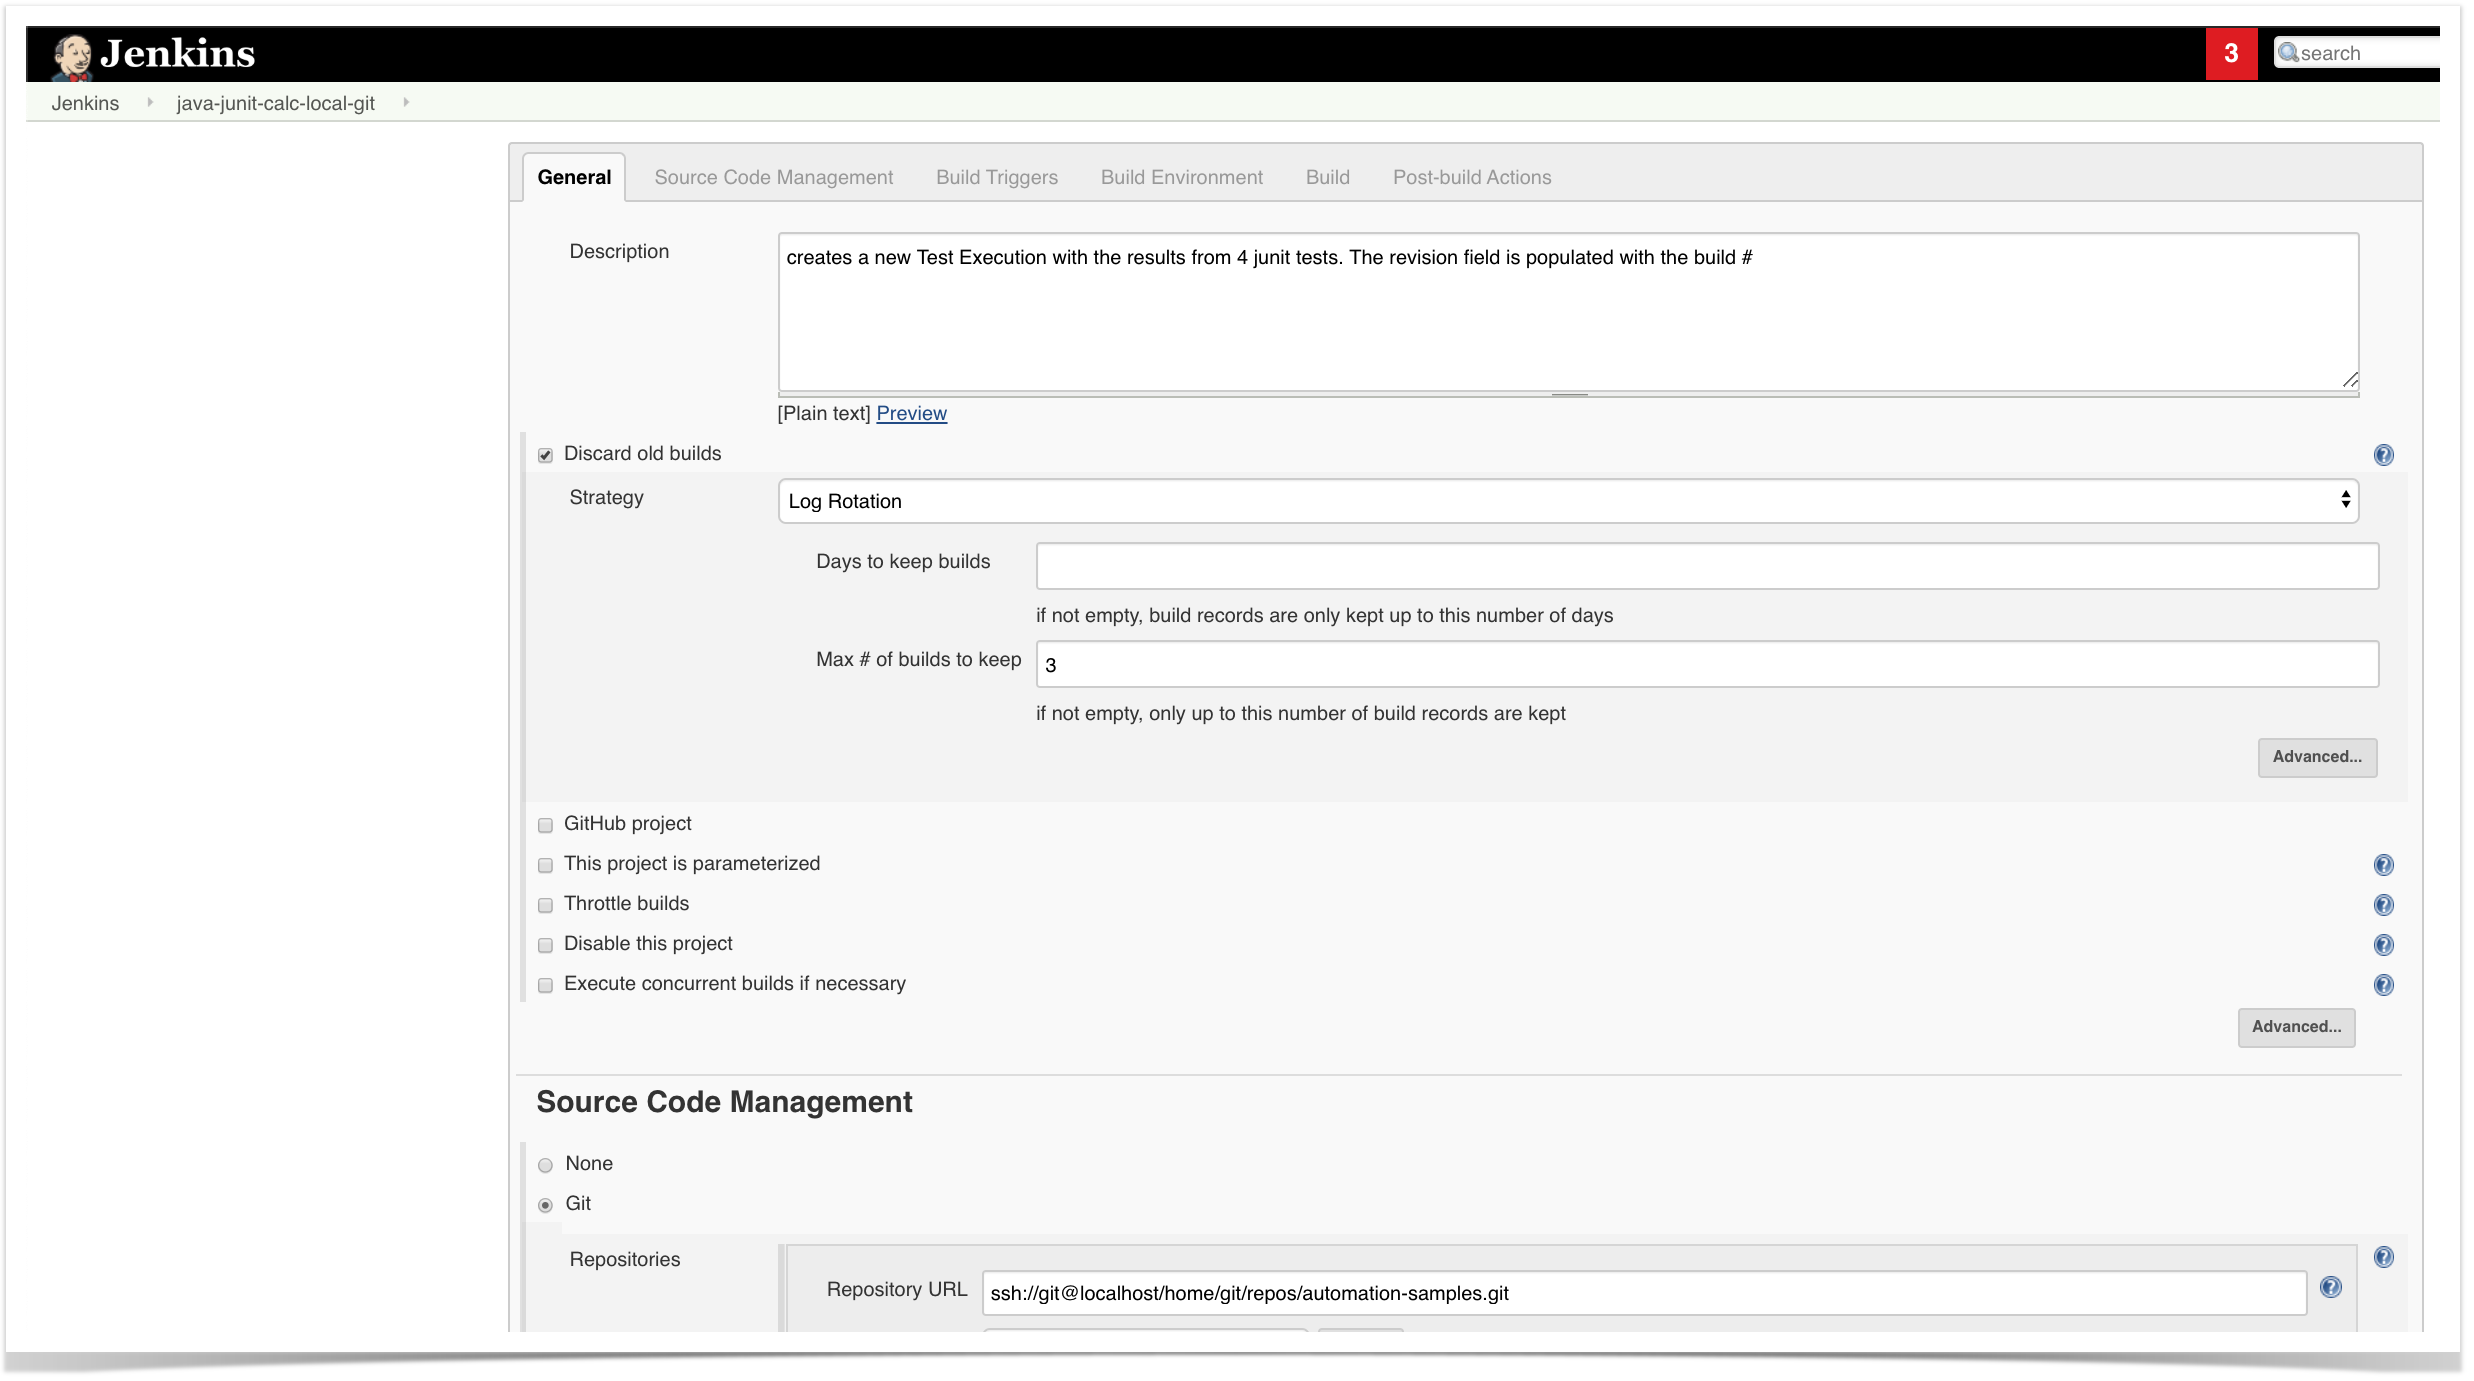
The project itself is a normal one, without parameters.
Automation for Jira configuration
- create a new rule and define the "When" (i.e. when it to should be triggered ), to be "Manually triggered"

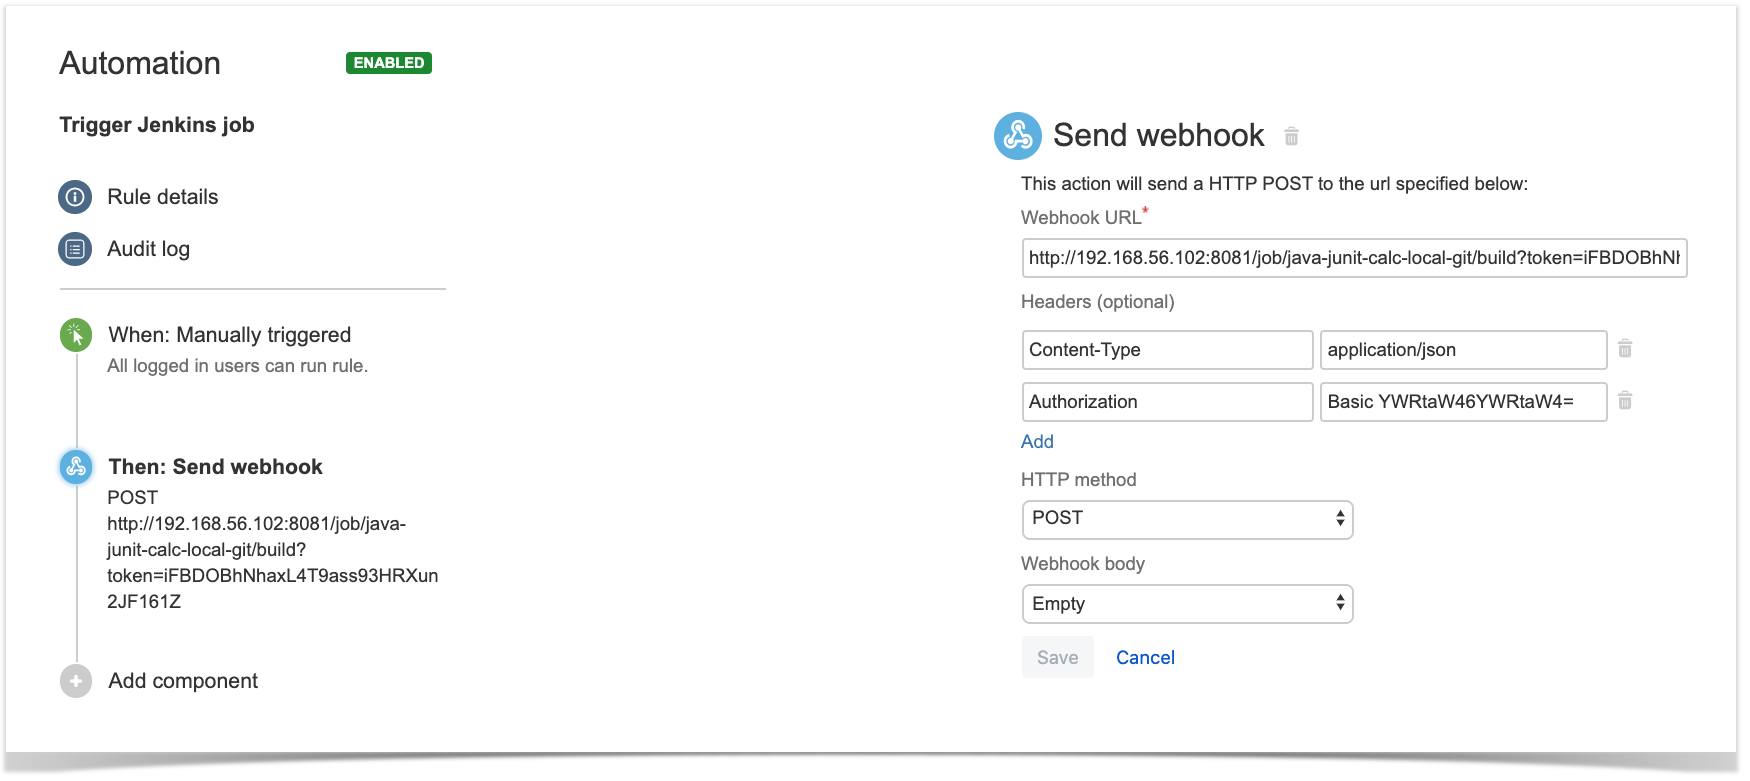
2. define an action (i.e. the "Then") as "Send webhook" and configure it as follows
- the Webhook URL provided above follows this syntax:
- <jenkins_base_url>/job/<name_of_jenkins_project_job>/build?token=<token>
- besides the "Content-Type" header that should be "application/json", define also an "Authorization" header having the value "Basic <auth>", where the base64 encoded <auth> can be generated using your Jenkins API credentials
After publishing the rule, you can go to the screen of an issue and trigger the Jenkins project/job.
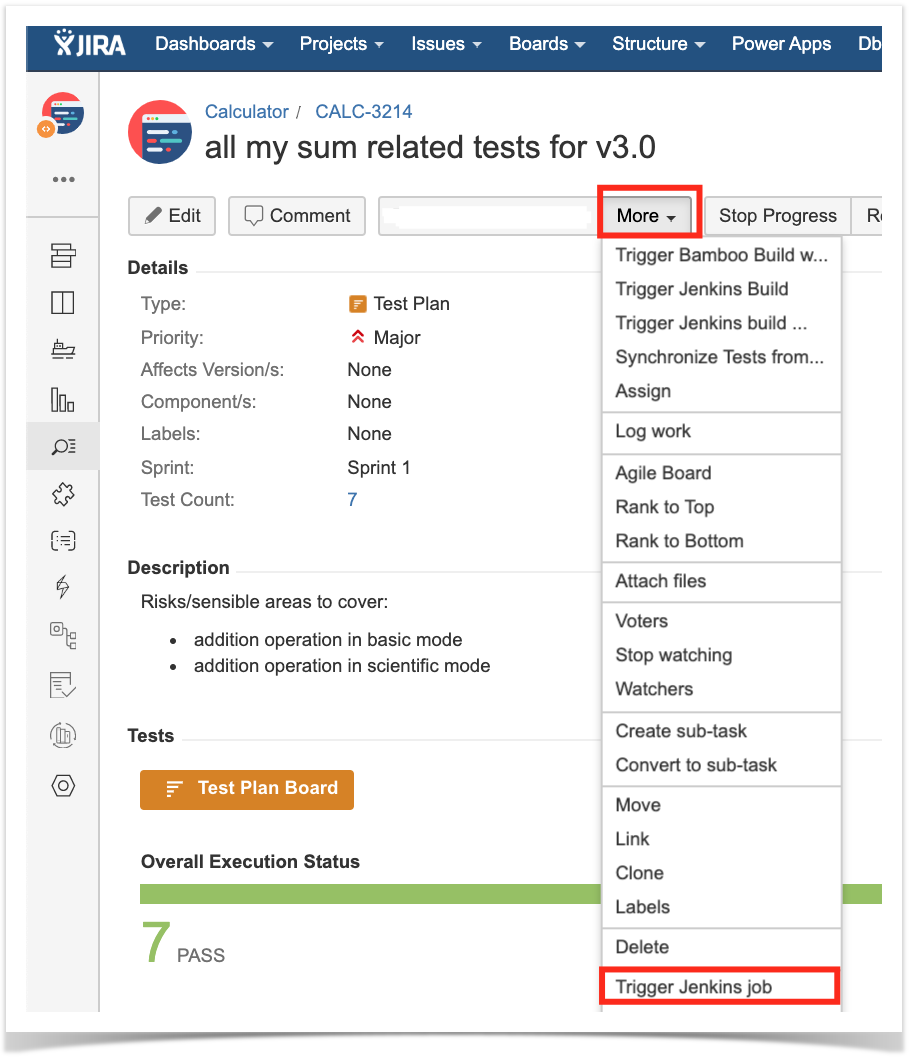
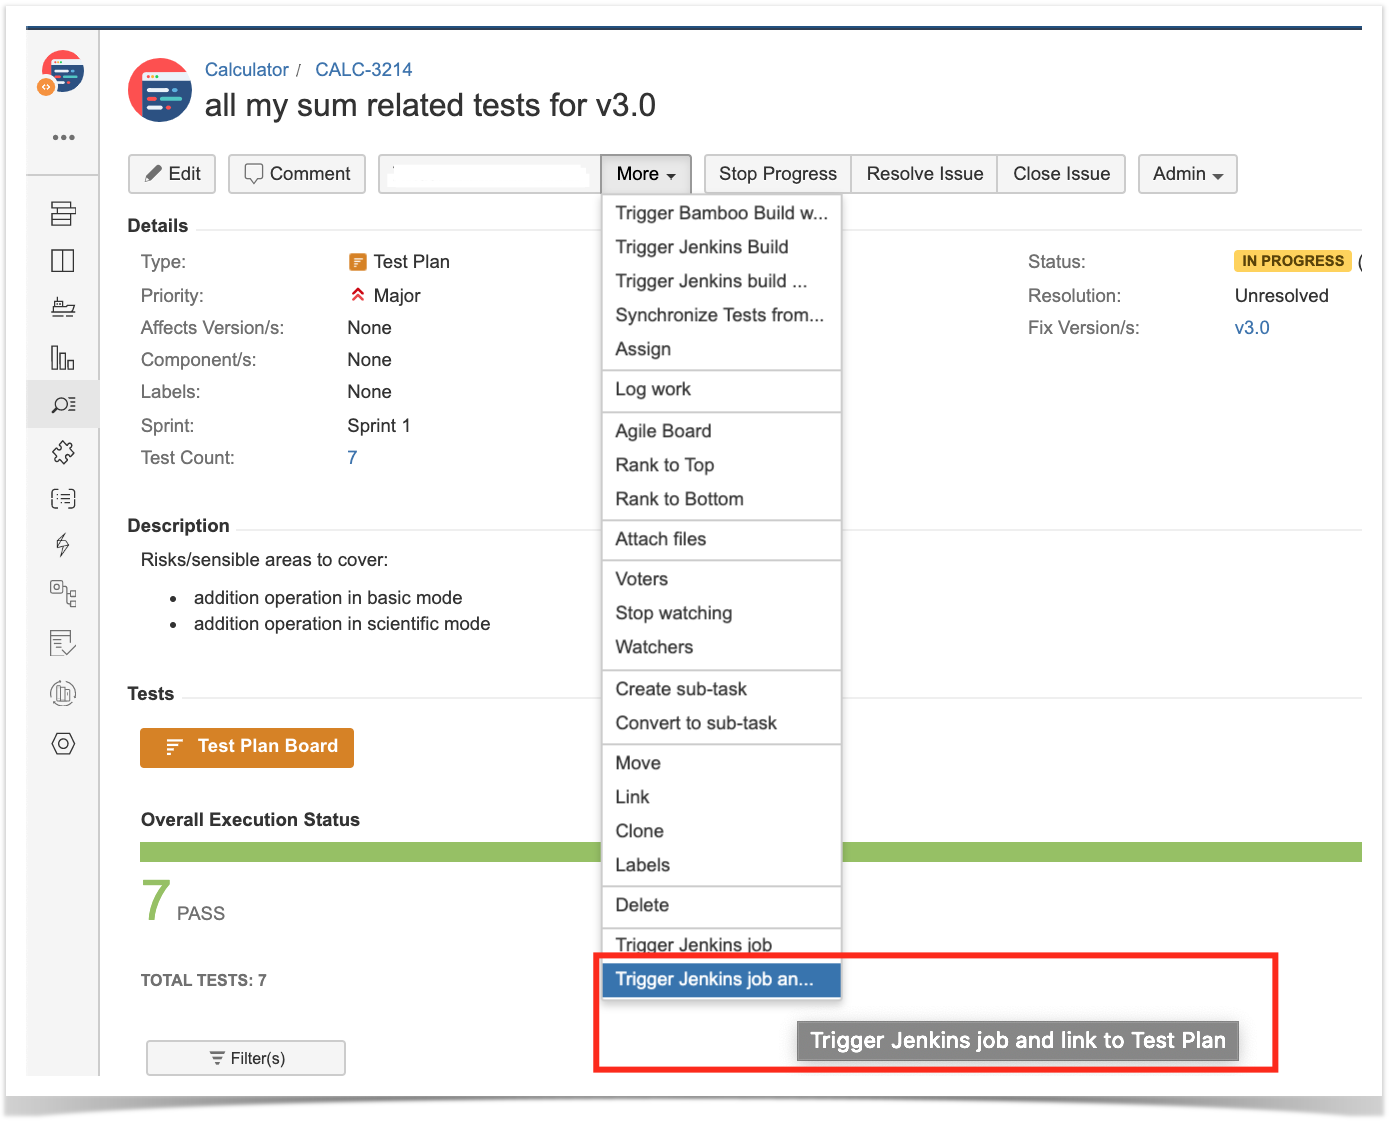
Trigger a Jenkins project build from a Test Plan and report the results back to it
In this simple scenario, we'll implement a rule, triggered manually, that will trigger a Jenkins project/job. The action will be available from within the "More" menu, for all Test Plan issues of the selected project.
We're assuming that:
- you just want to trigger a CI job, period; this job may be totally unrelated to the issue from where you triggered it
- the results will be submitted back to Xray, if the project is configured to do so in Jenkins
Jenkins configuration
In Jenkins, we need to generate an API token for some user, which can be done from the profile settings page.
At the project level, we need to enable remote build triggers, so we can obtain an "authentication token" to be used in the HTTP request afterwards.
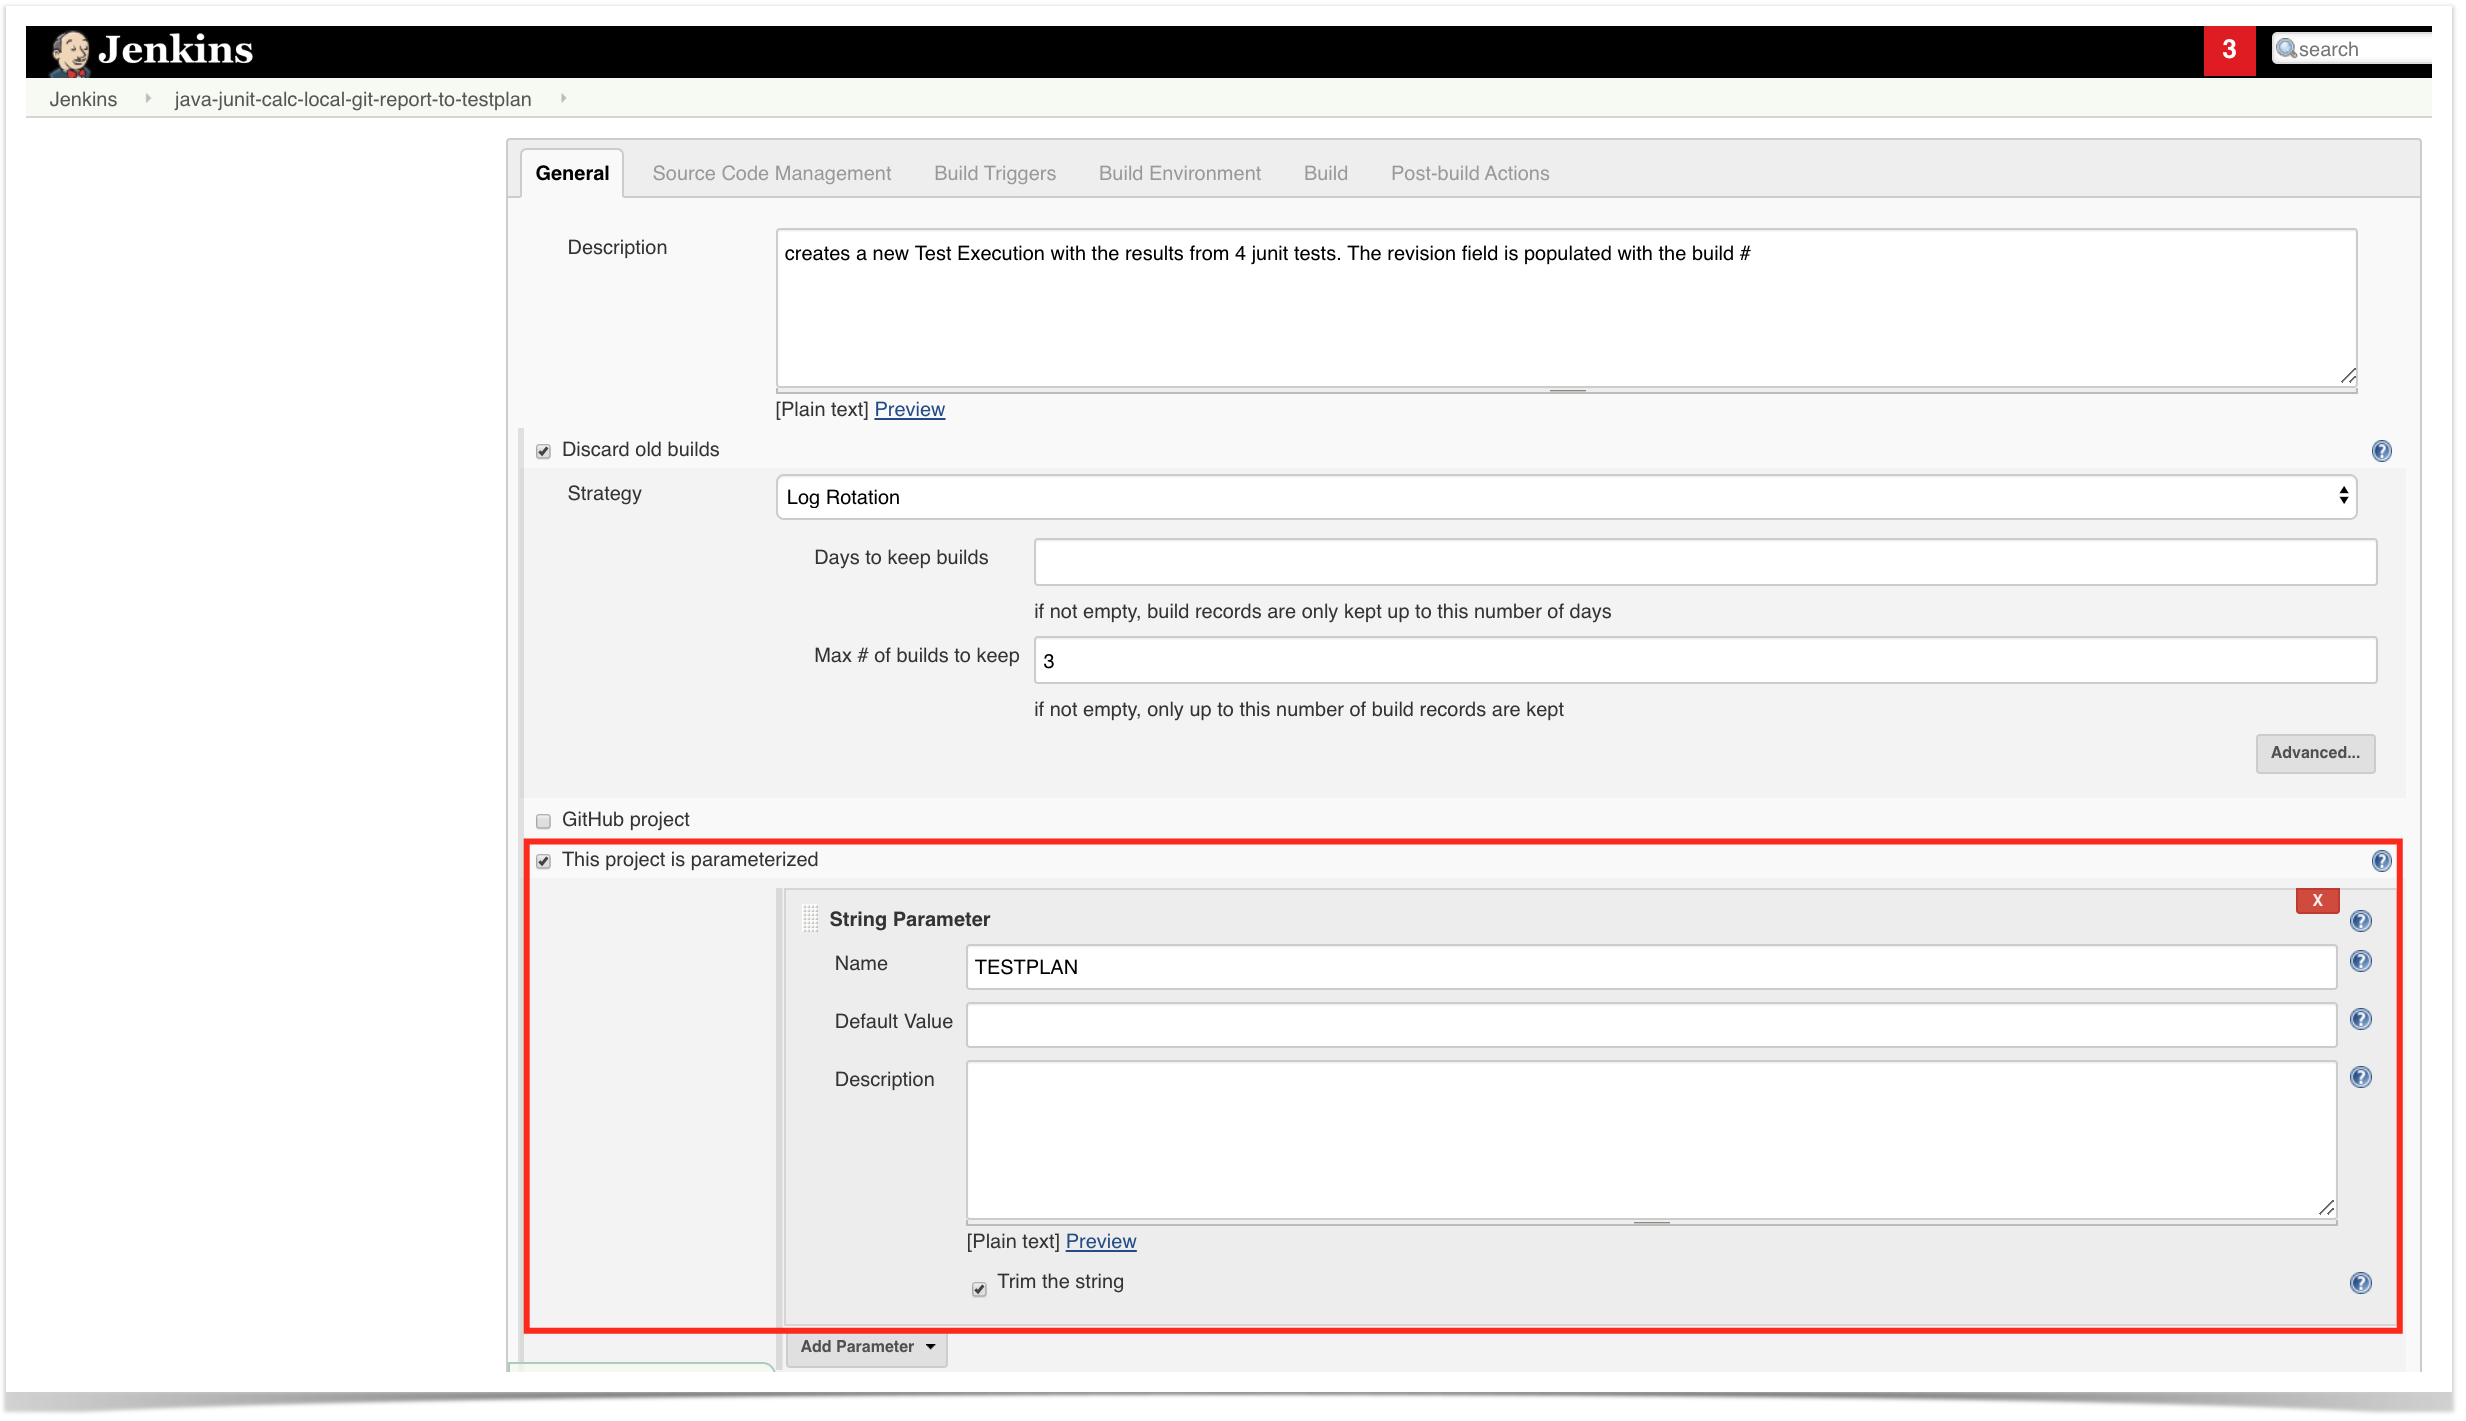
The project itself is a normal one; the only thing relevant to mention is that this project is a parameterized one, so it receives TESTPLAN, that in our case will be coming from Jira.
Automation for Jira configuration
- create a new rule and define the "When" (i.e. when it to should be triggered ), to be "Manually triggered"
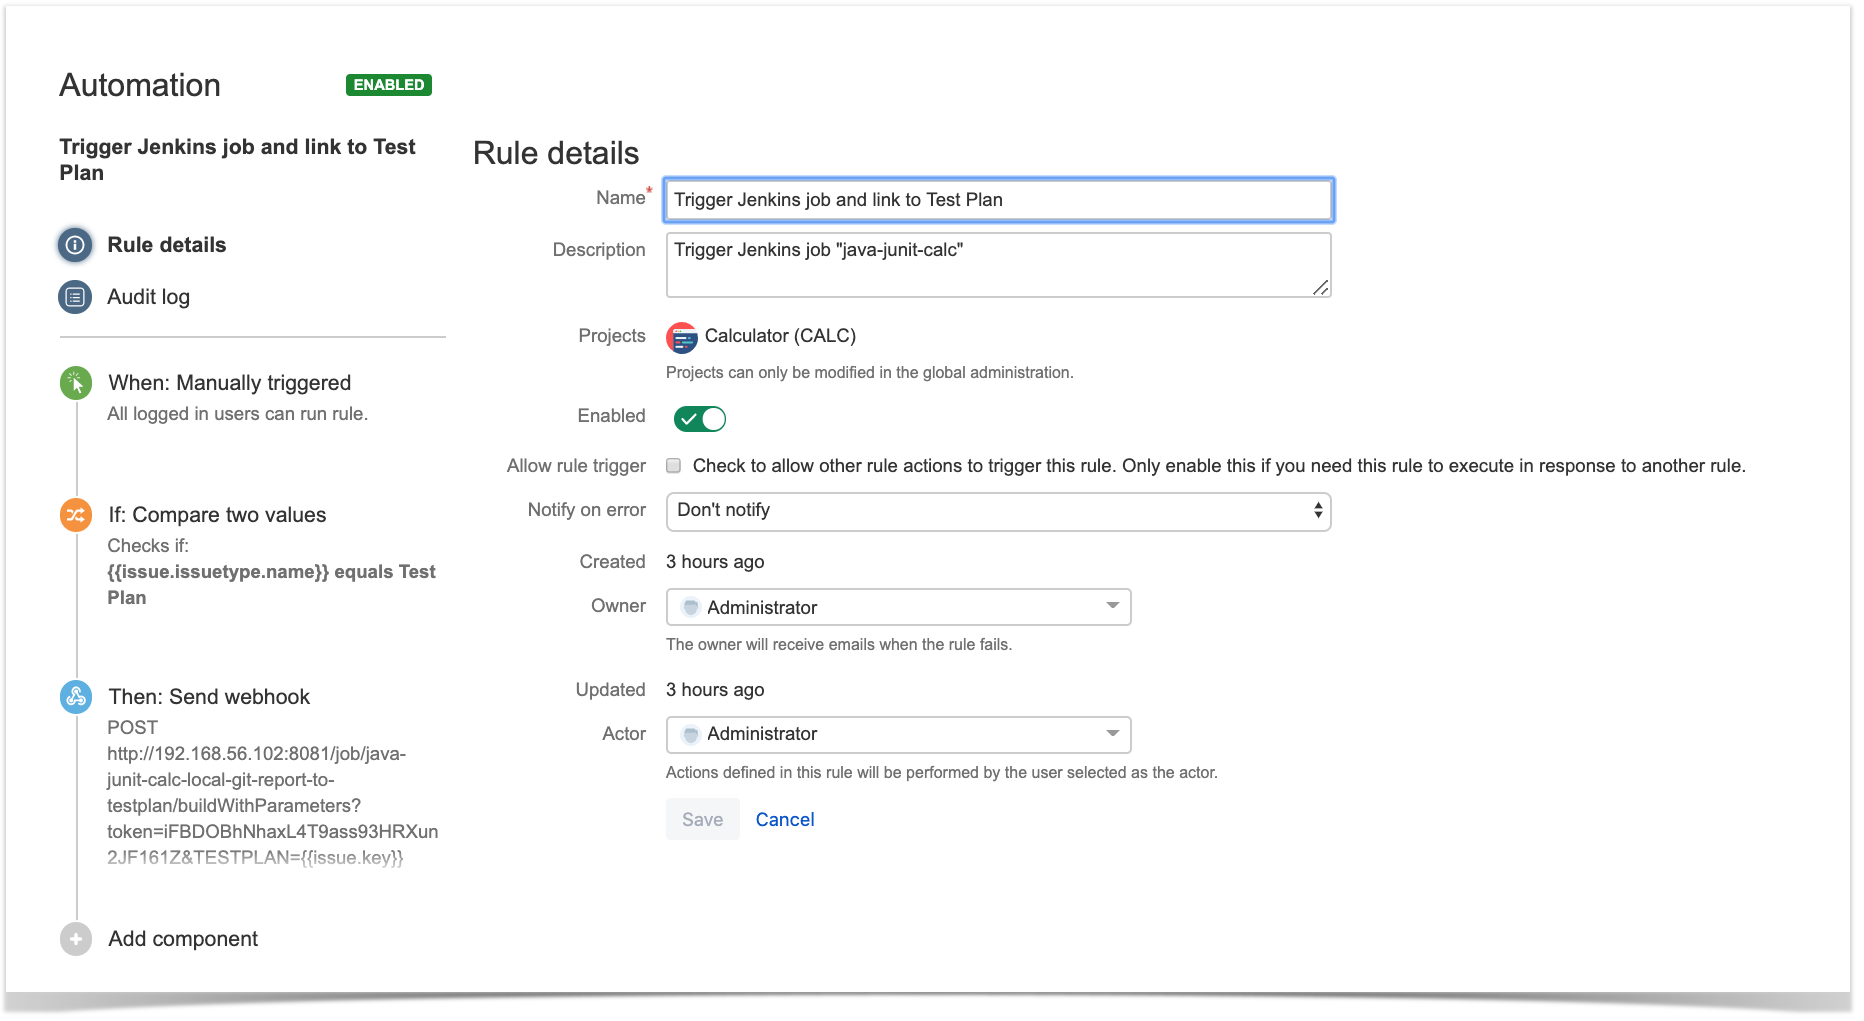
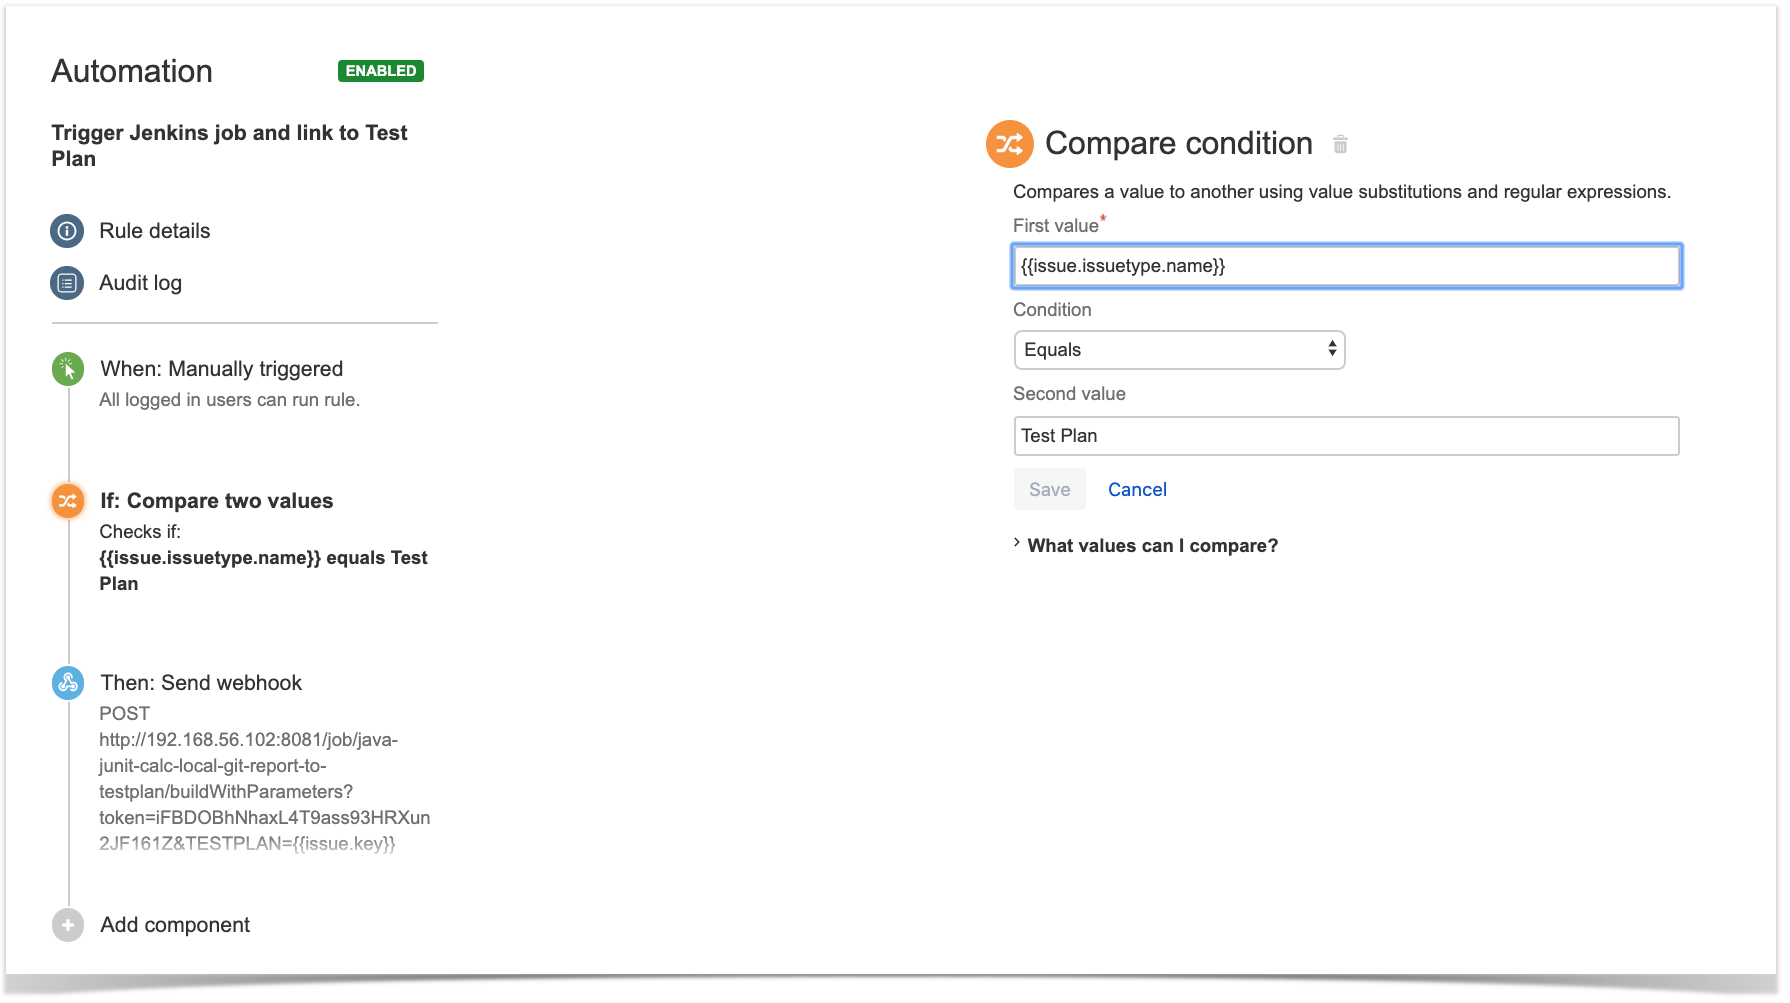
2. define the condition so that this rule can only be executed from Test Plan issue
3. define an action (i.e. the "Then") as "Send webhook" and configure it as follows

- the Webhook URL provided above follows this syntax:
- <jenkins_base_url>/job/<name_of_jenkins_project_job>/buildWithParameters?token=<token>&TESTPLAN={{issue.key}}
- besides the "Content-Type" header that should be "application/json", define also an "Authorization" header having the value "Basic <auth>", where the base64 encoded <auth> can be generated using your Jenkins API credentials
After publishing the rule, you can go to the screen of an issue and trigger the Jenkins project/job.
Azure DevOps
Trigger a Azure DevOps pipeline from a Test Plan and report the results back to it
Azure DevOps configuration
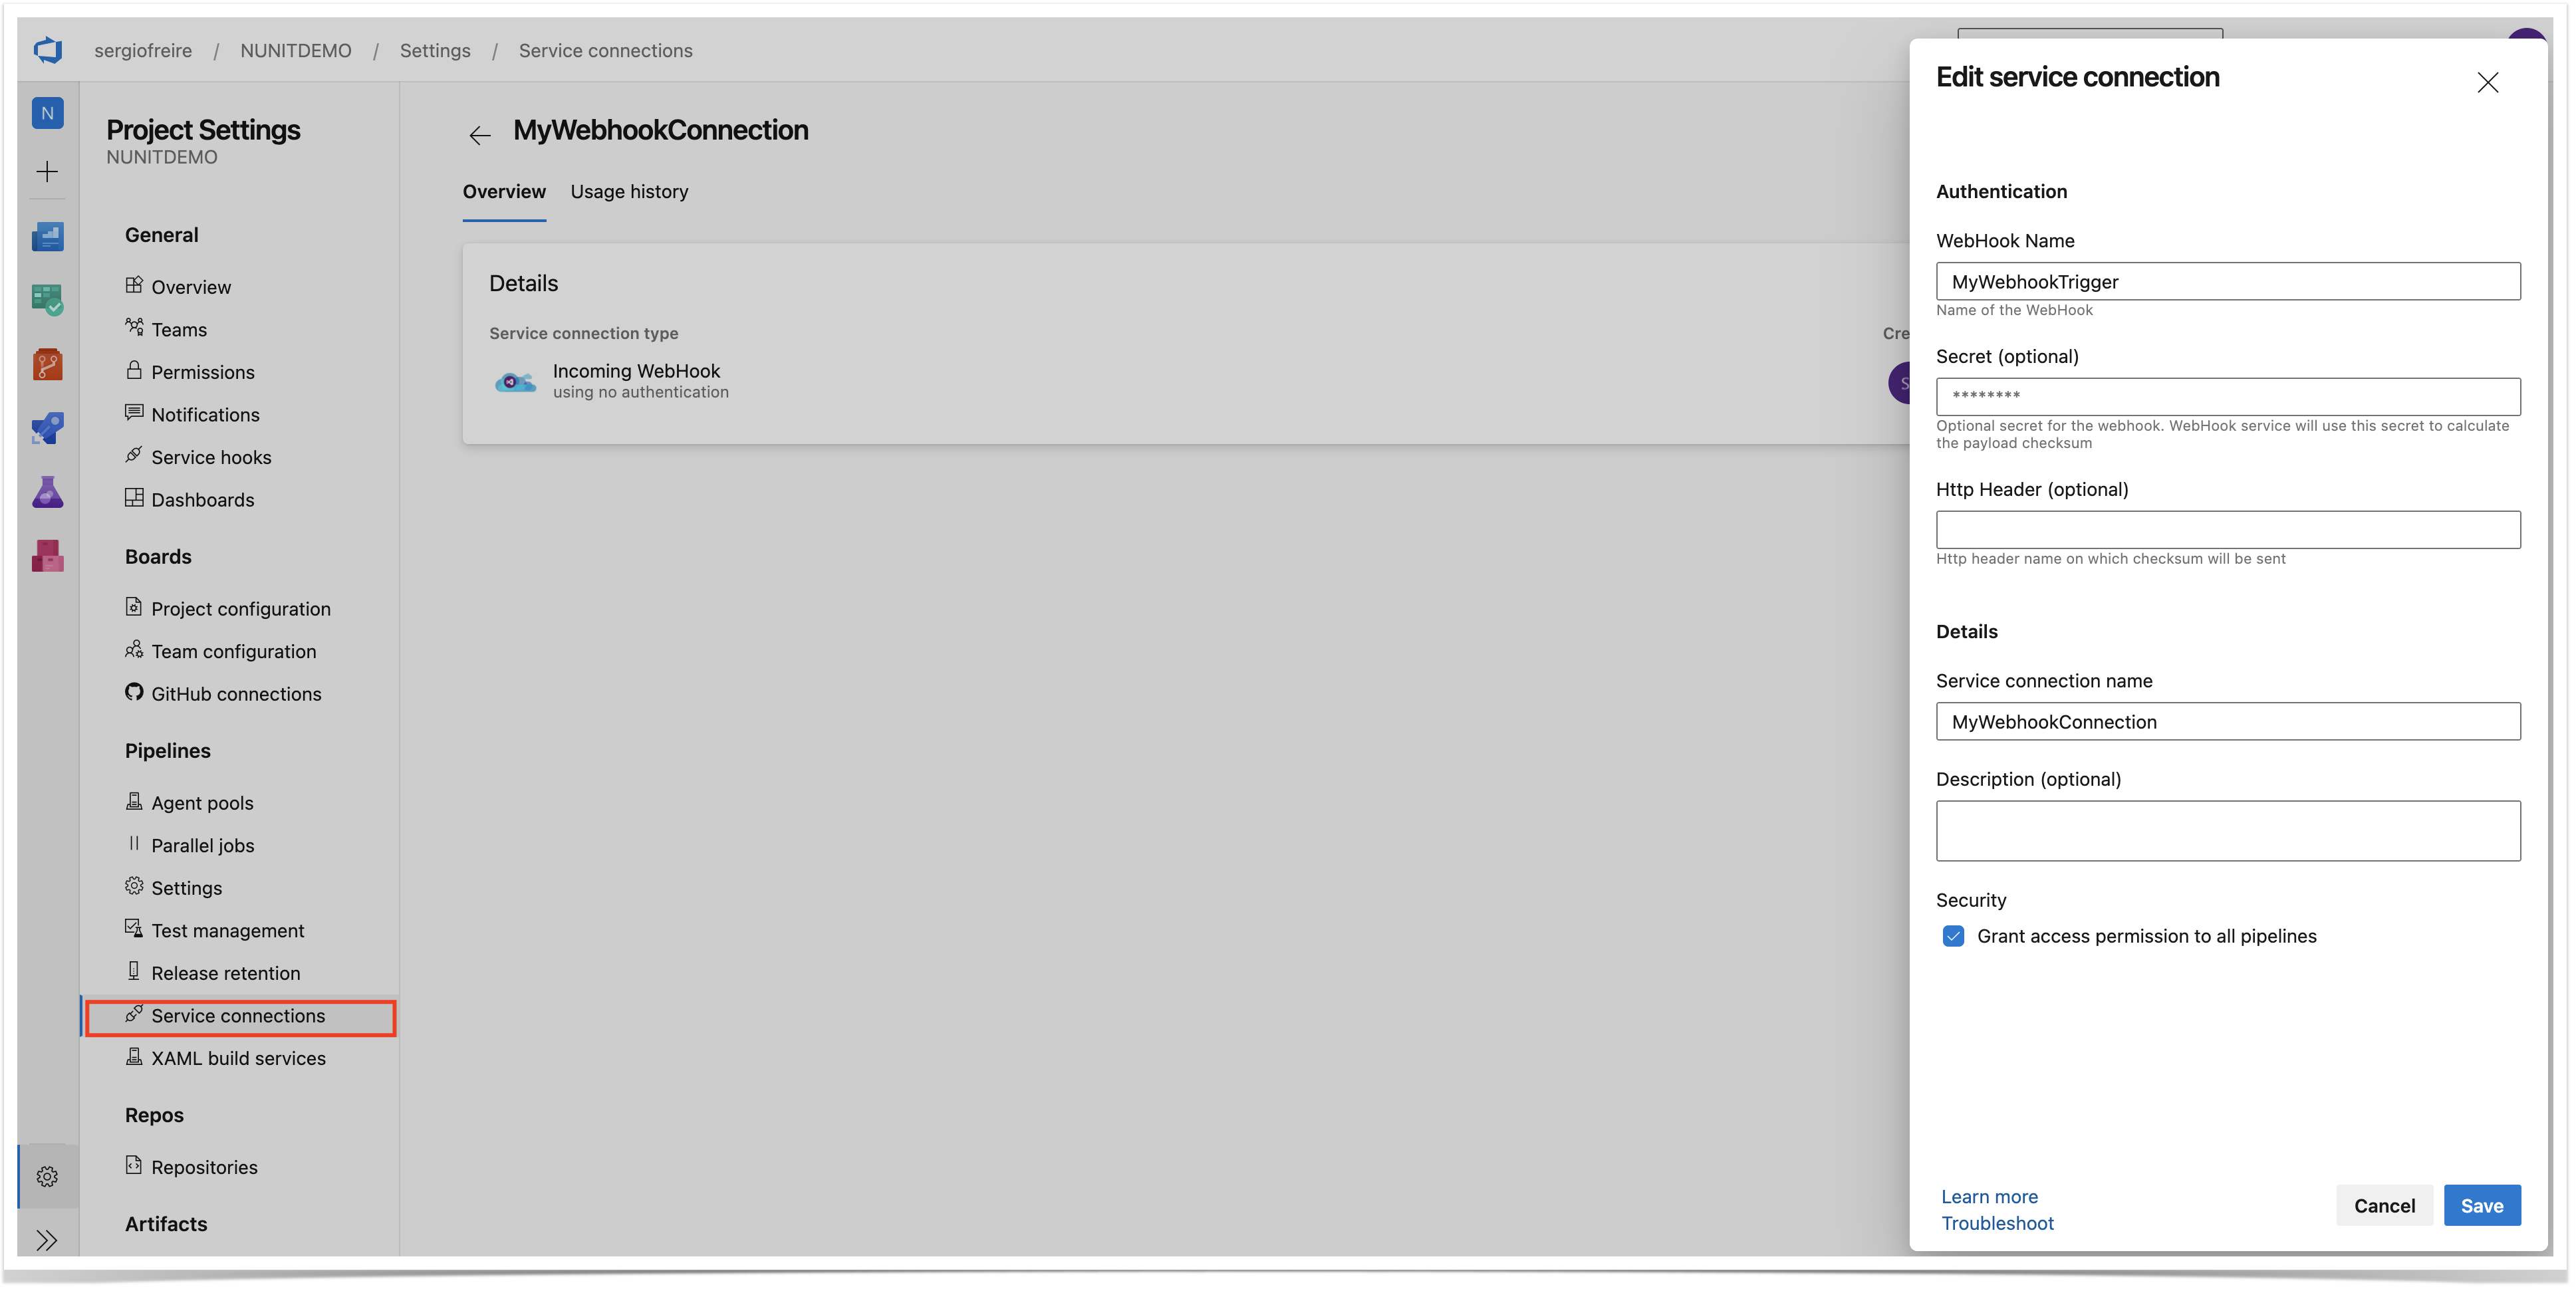
We need to create a service connection, using the "incoming webhook" template, so that we can use Azure DevOps API later on.
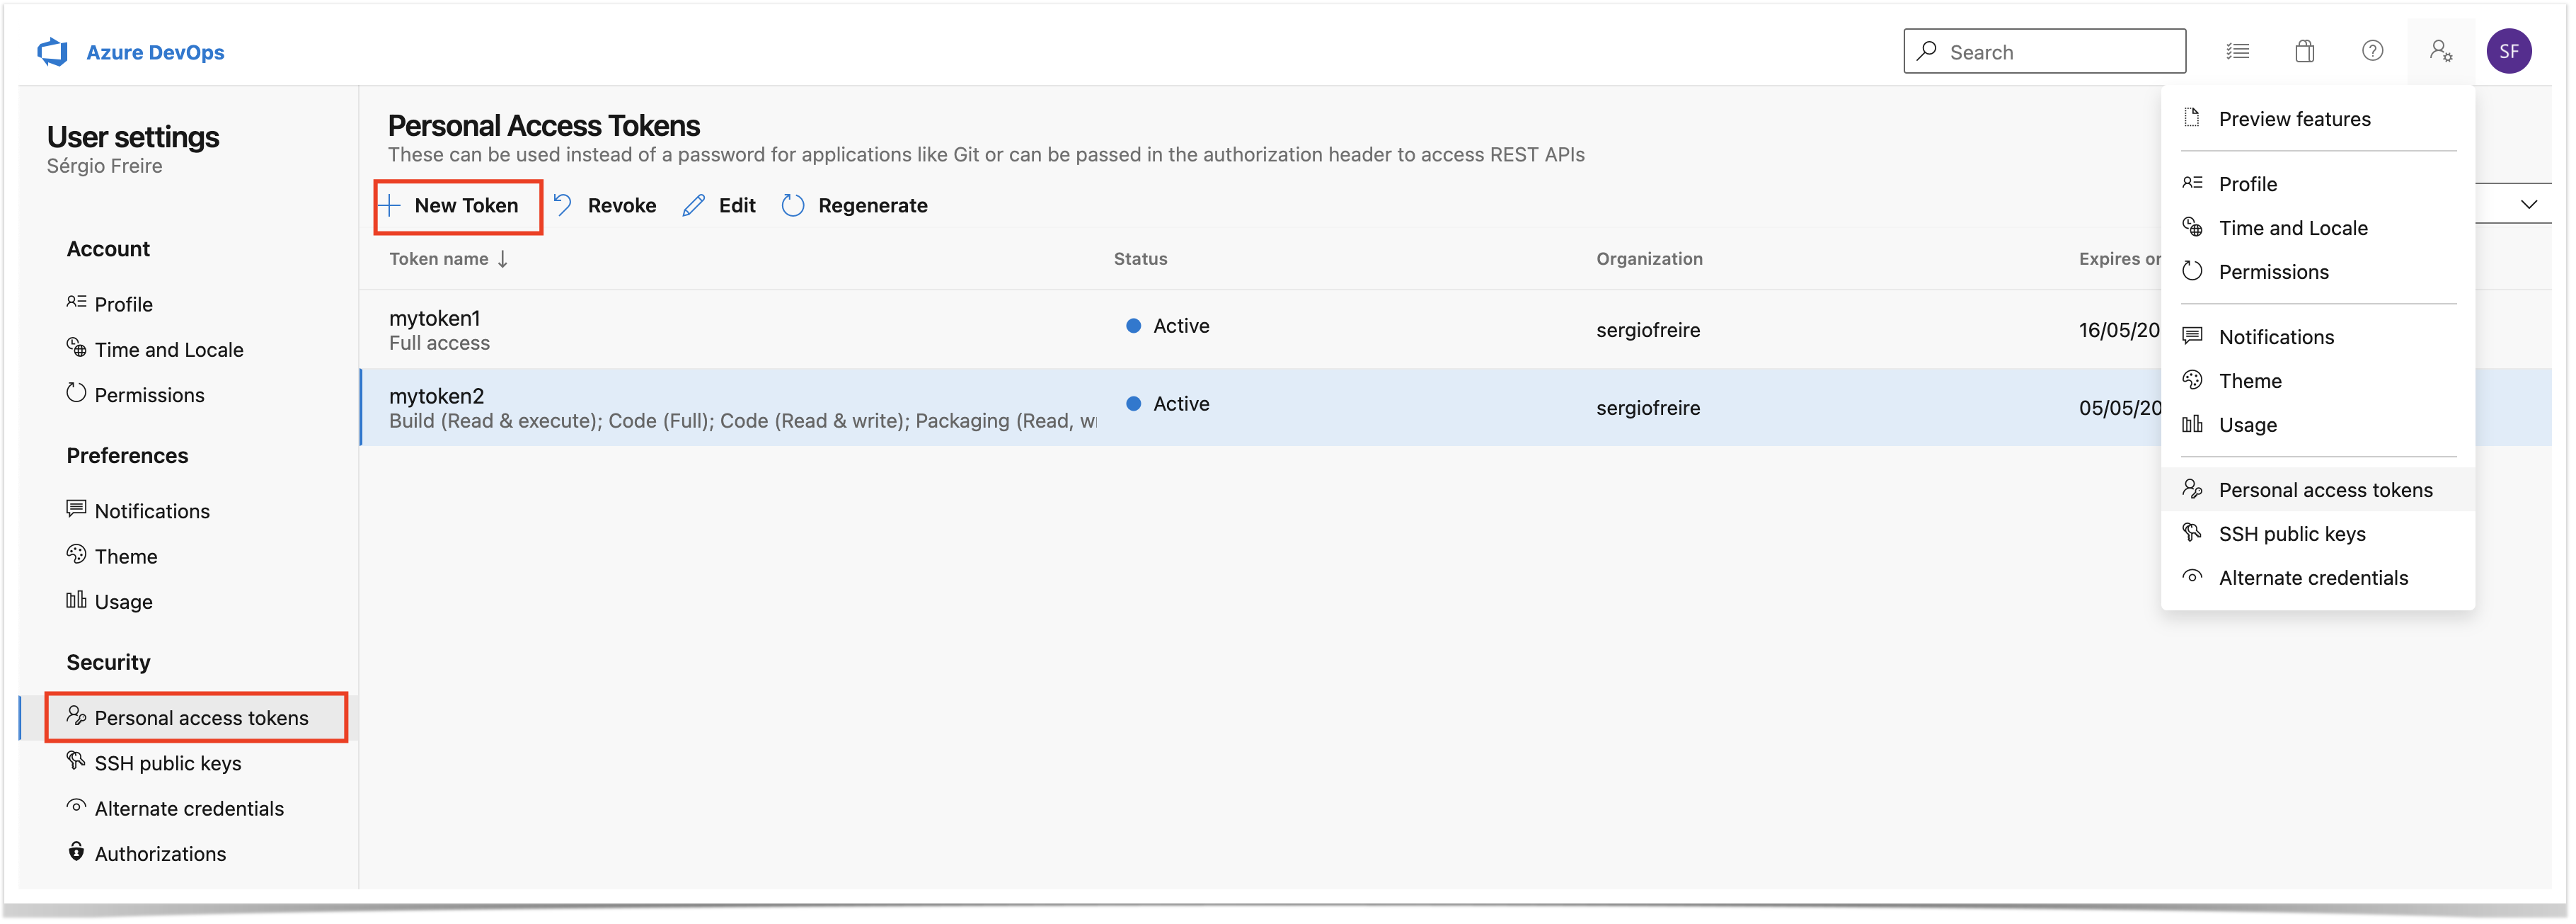
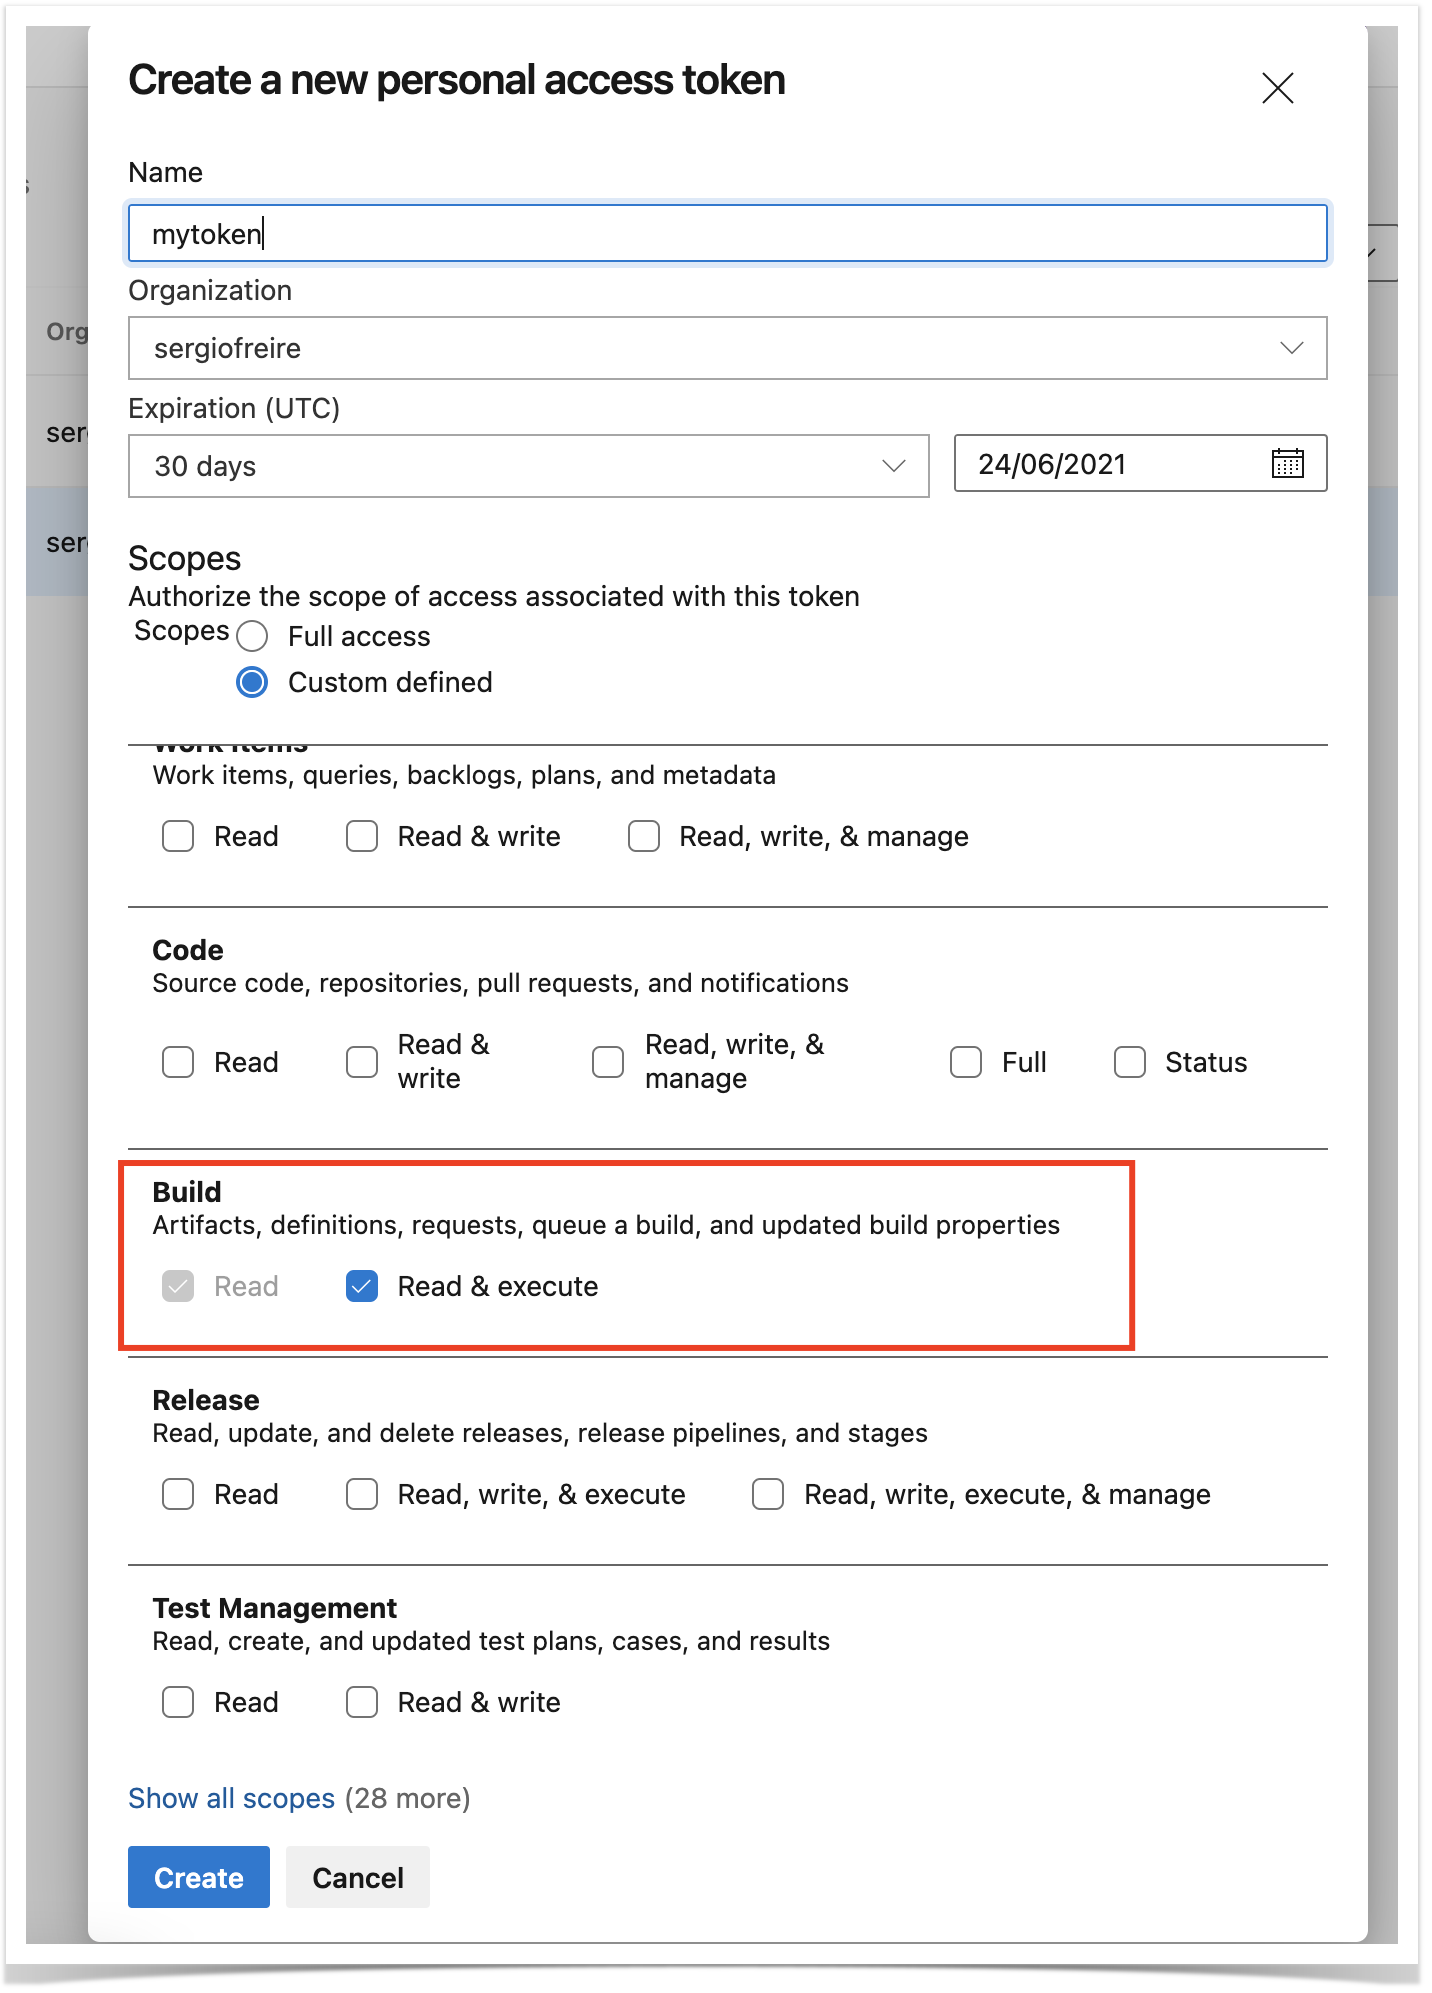
Create a Personal Access Token (PAT), so you can use it as the password in API requests, along with the "organization name" as username.
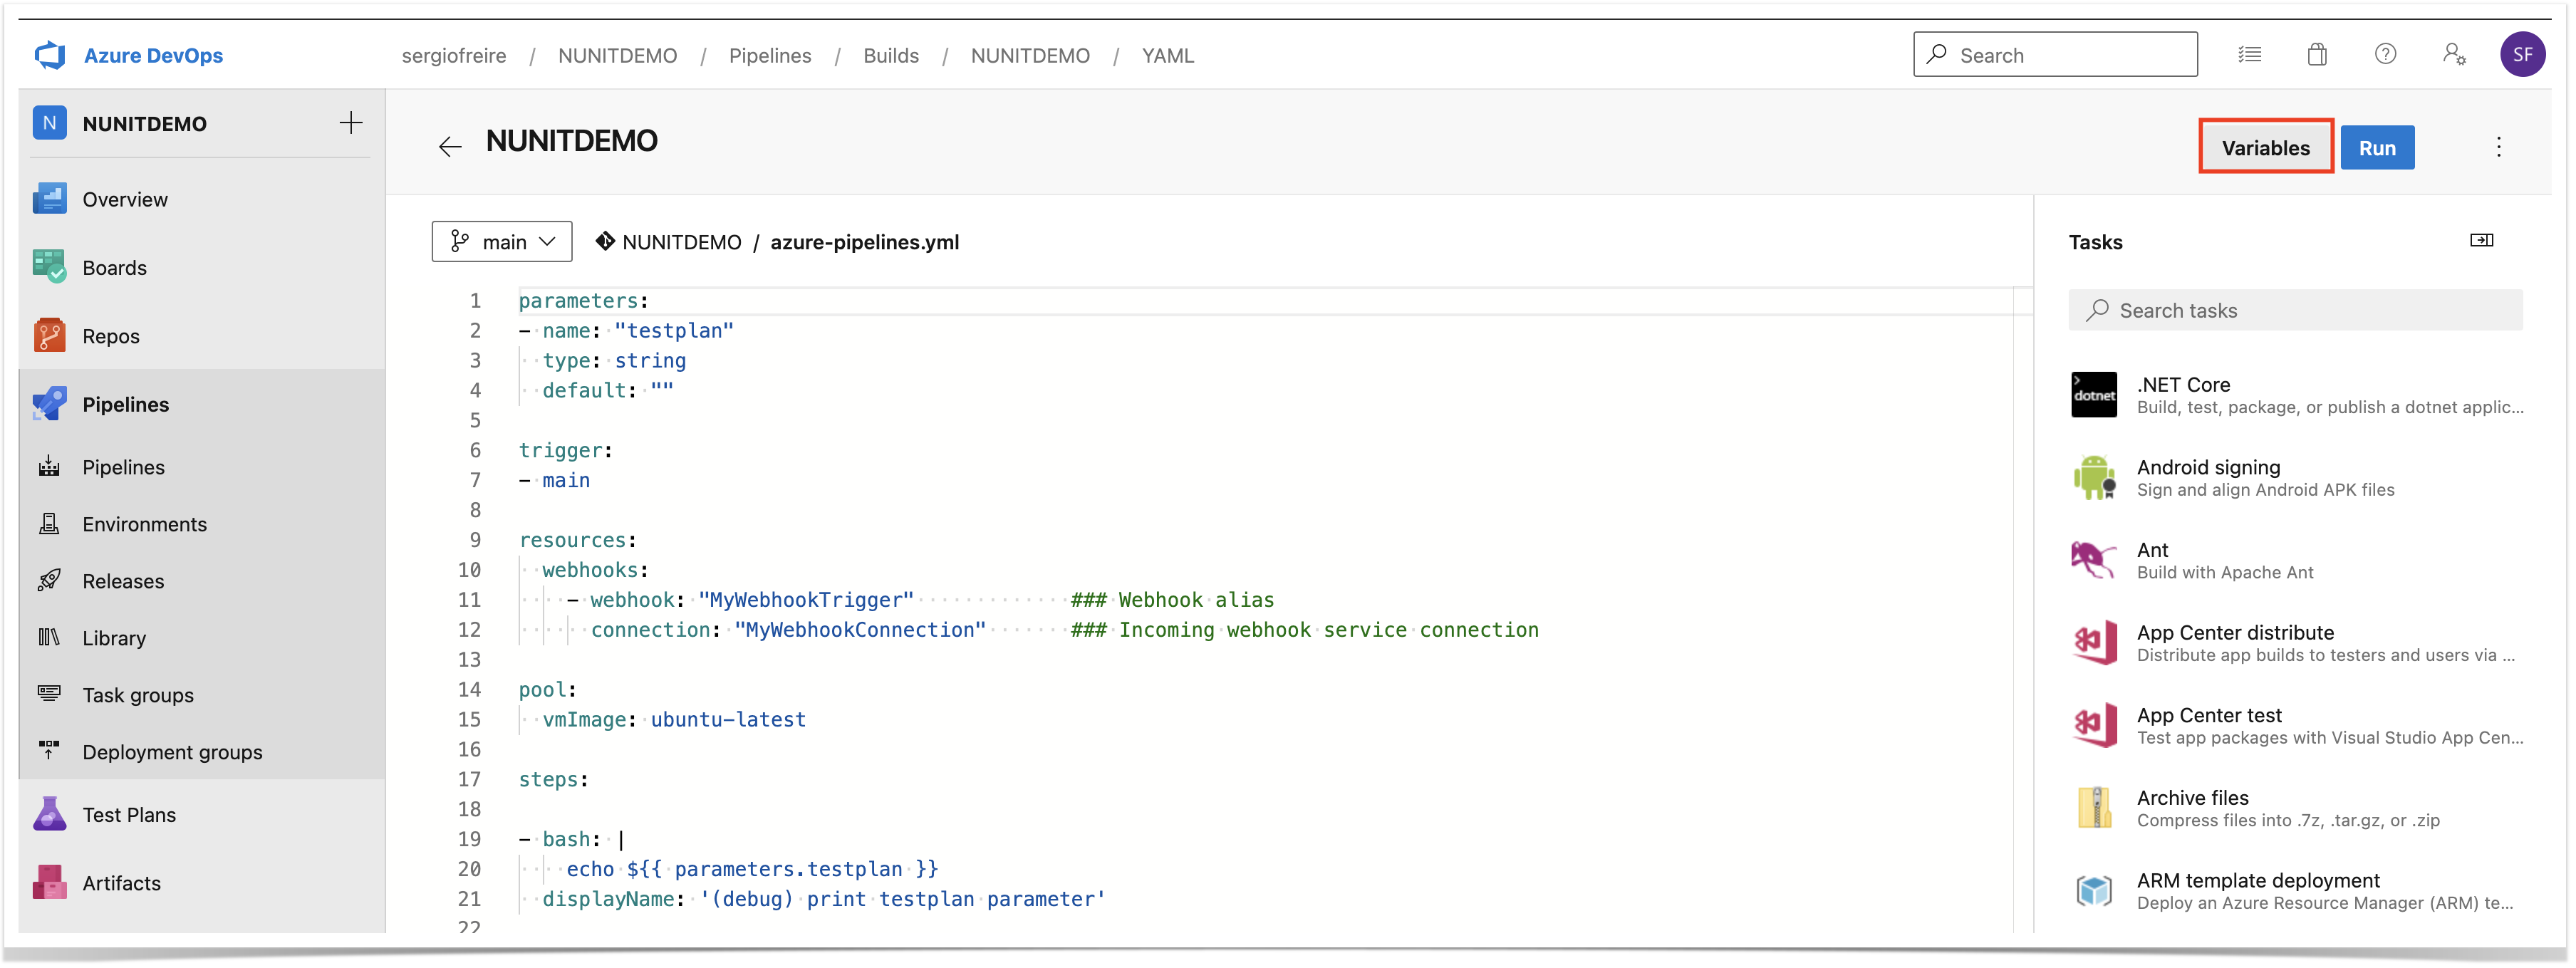
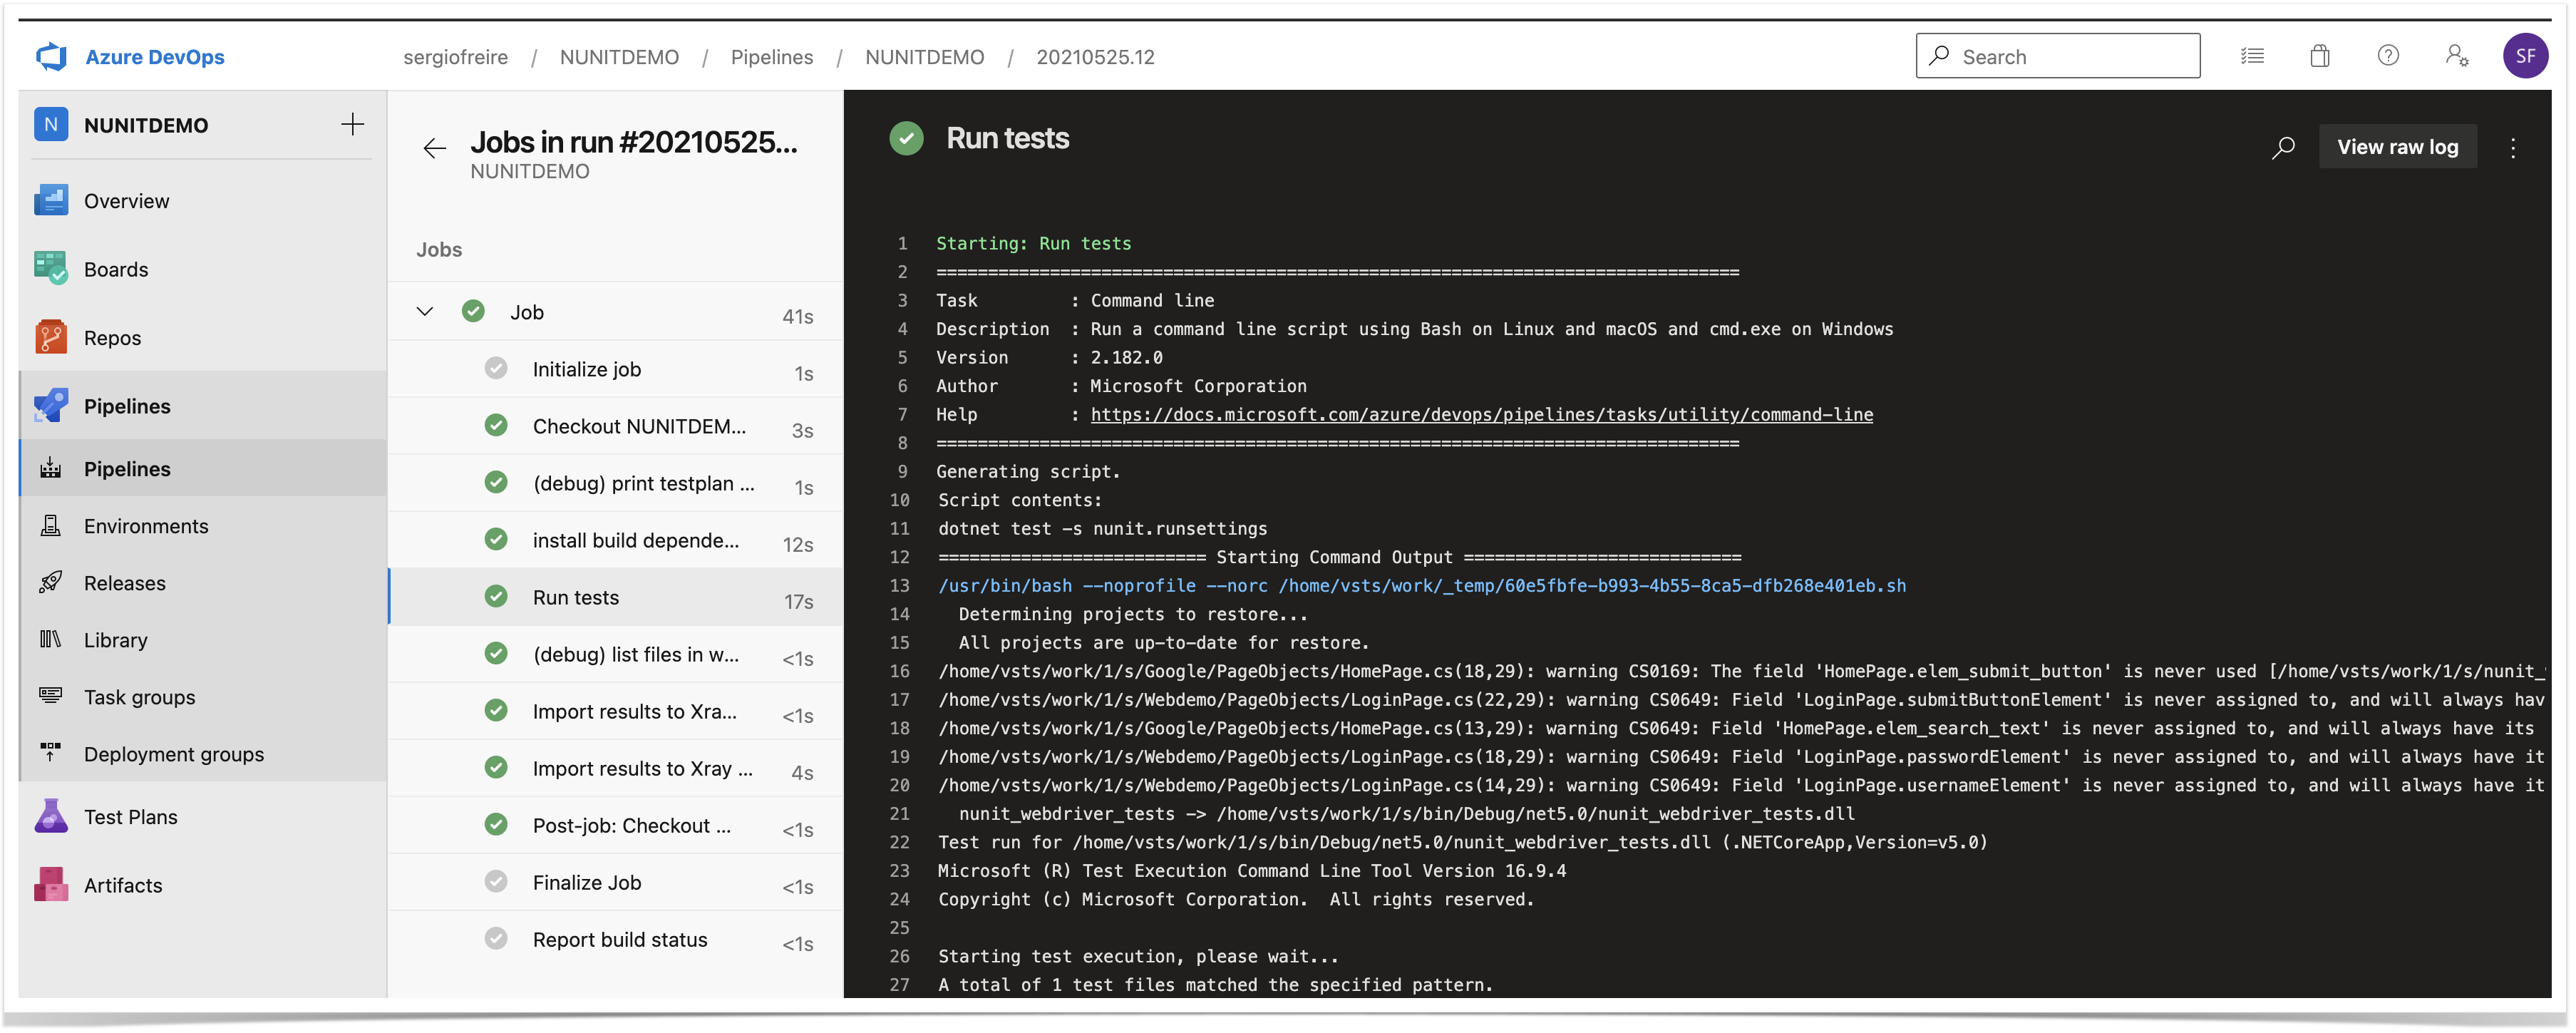
Then, in your Azure DevOps repository containing the project's code and tests, create a pipeline /azure-pipelines.yml; this pipeline will be triggered using Azure DevOps API.
In the following example, the pipeline will receive the Test Plan issue key as an input parameter. It will then run the build, including the automated tests, and in the end it will report the results back to Xray using "curl" utility.
We need to define a resources section, that contains a reference to the webhook configured earlier.
| Code Block | ||||
|---|---|---|---|---|
| ||||
parameters:
- name: "testplan"
type: string
default: ""
trigger:
- main
resources:
webhooks:
- webhook: "MyWebhookTrigger" ### Webhook alias
connection: "MyWebhookConnection" ### Incoming webhook service connection
pool:
vmImage: ubuntu-latest
steps:
- bash: |
echo ${{ parameters.testplan }}
displayName: '(debug) print testplan parameter'
- script: dotnet restore
displayName: 'install build dependencies'
- script: |
dotnet test -s nunit.runsettings
displayName: 'Run tests'
- bash: |
set -x
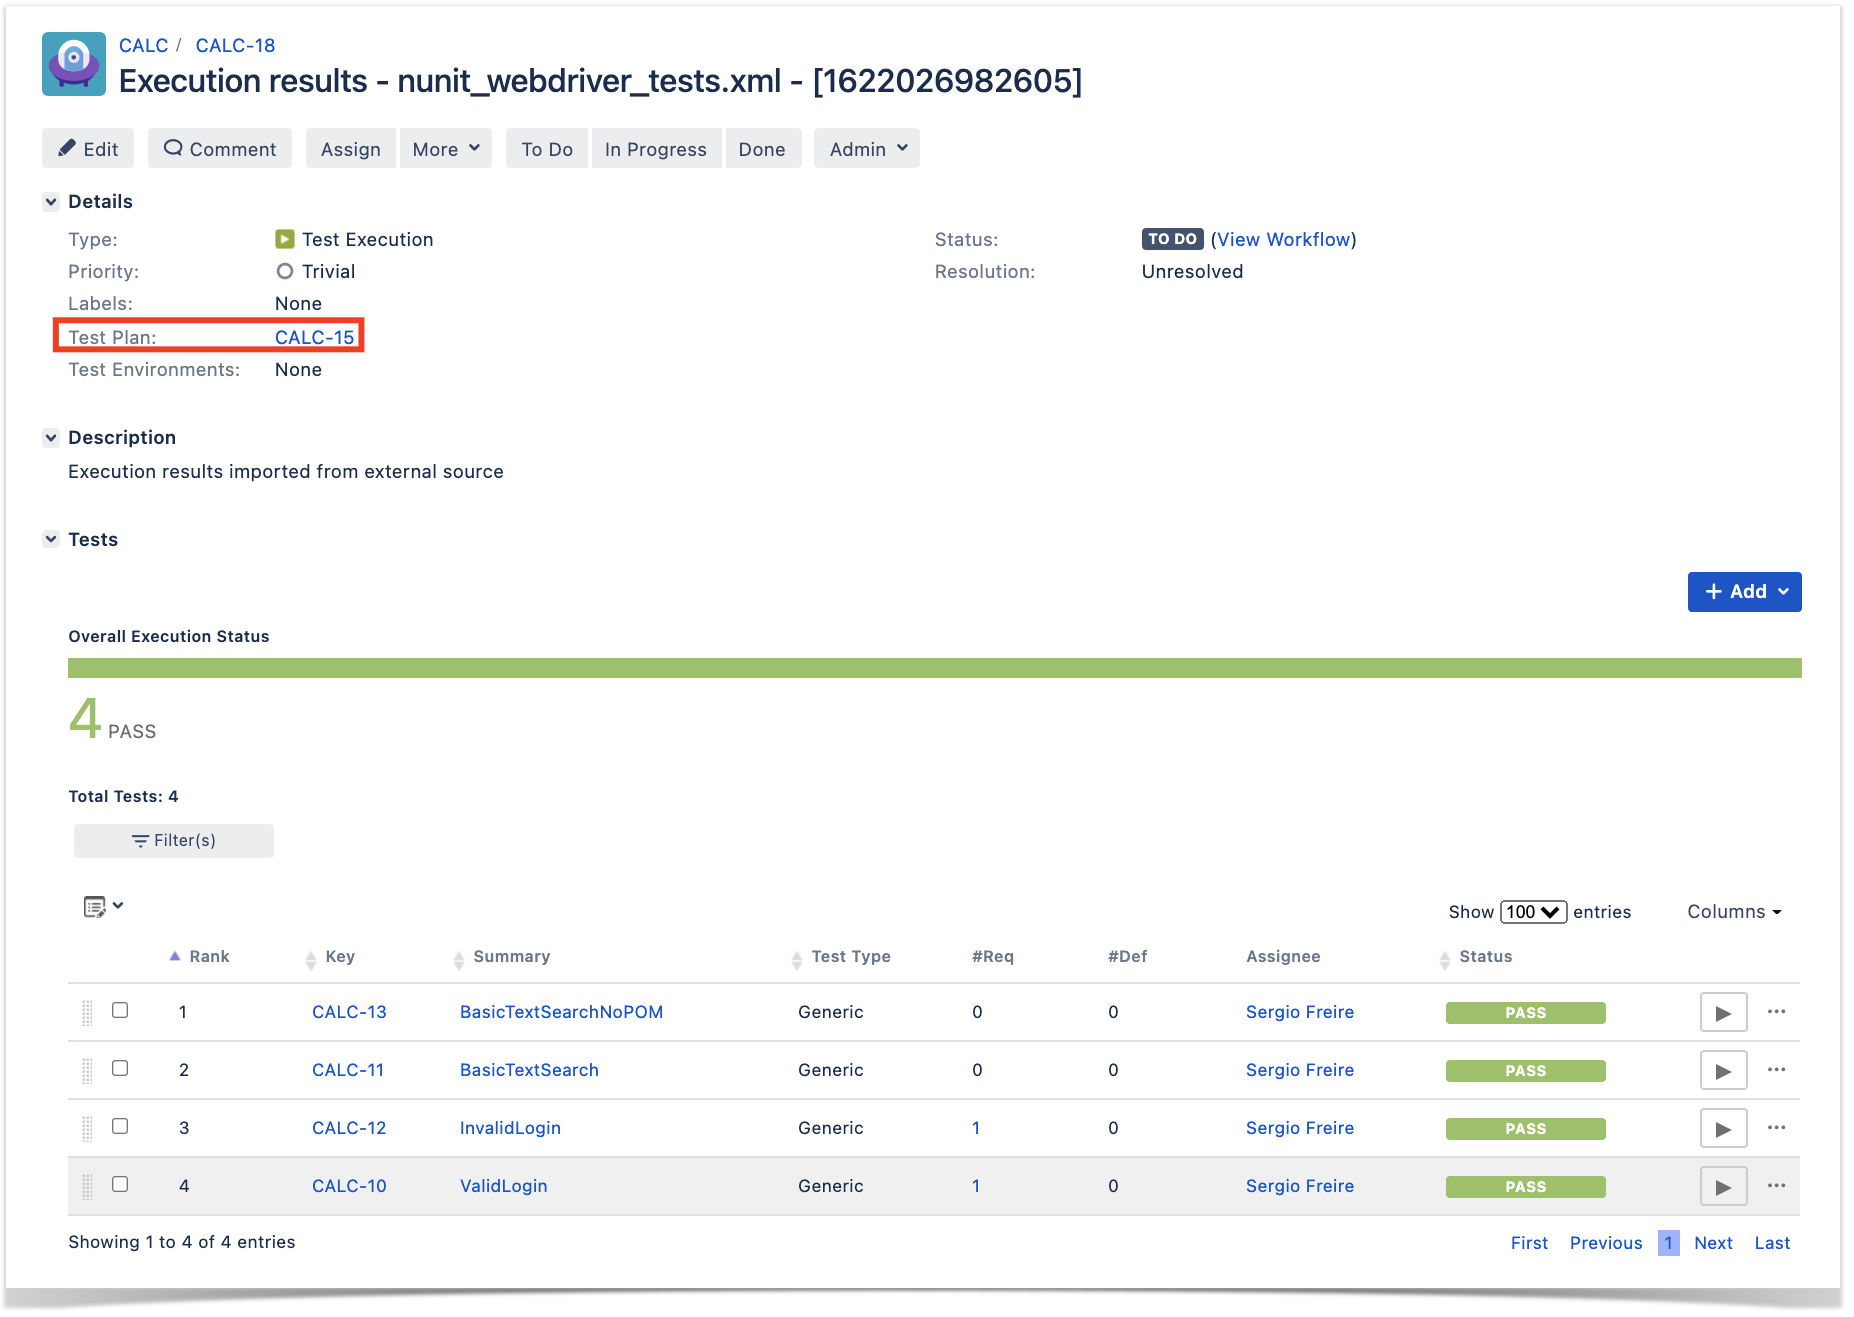
curl -o - -H "Content-Type: multipart/form-data" -u '$(jira_user):$(jira_password)' -F "file=@./bin/Debug/net5.0/TestResults/nunit_webdriver_tests.xml" "$(jira_server_url)/rest/raven/2.0/import/execution/nunit?projectKey=$(project_key)&testPlanKey=${TESTPLAN}"
displayName: 'Import results to Xray server'
|
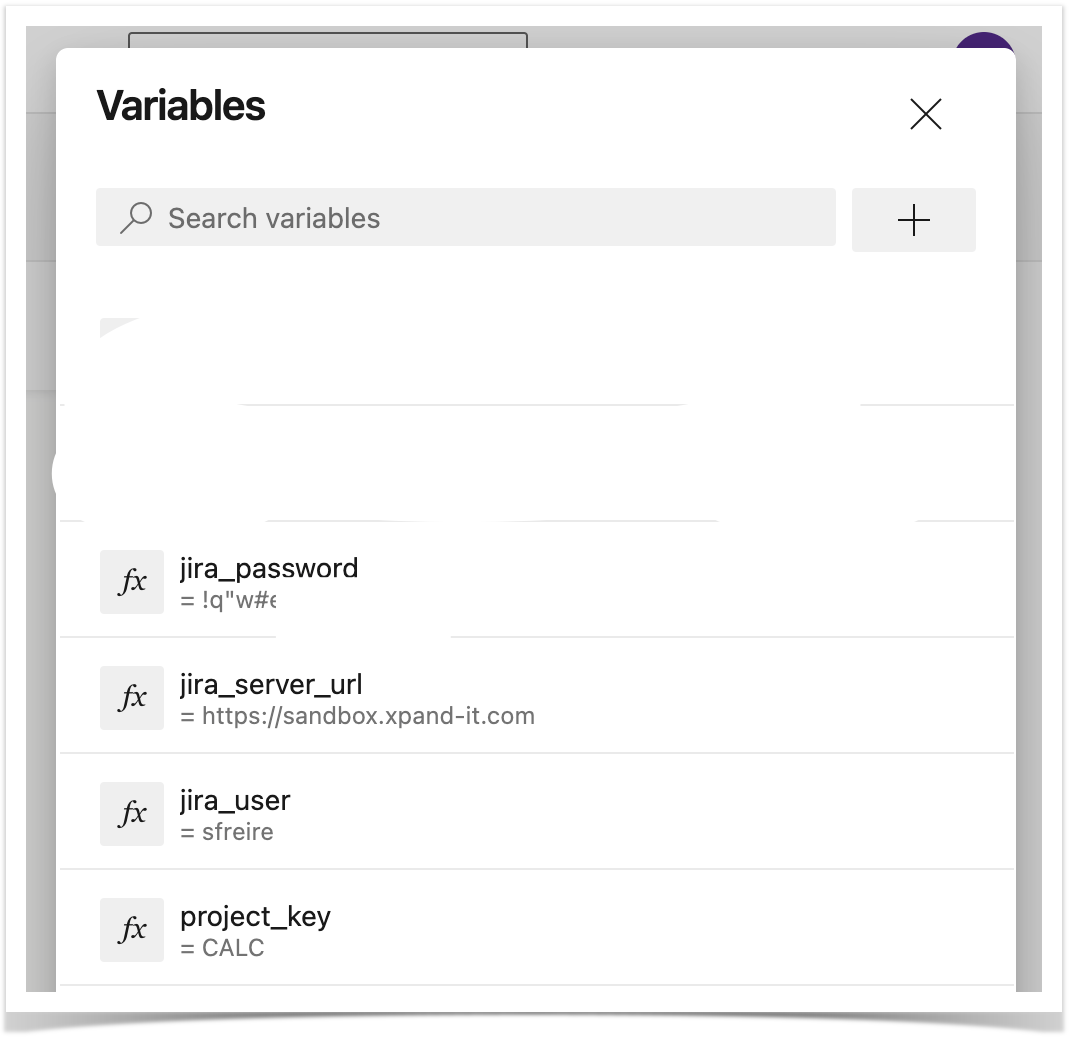
Xray endpoint's base URL and the API key credentials (i.e. client id + client secret) are defined in Azure DevOps as variables. These may be marked as secret.
Automation for Jira configuration
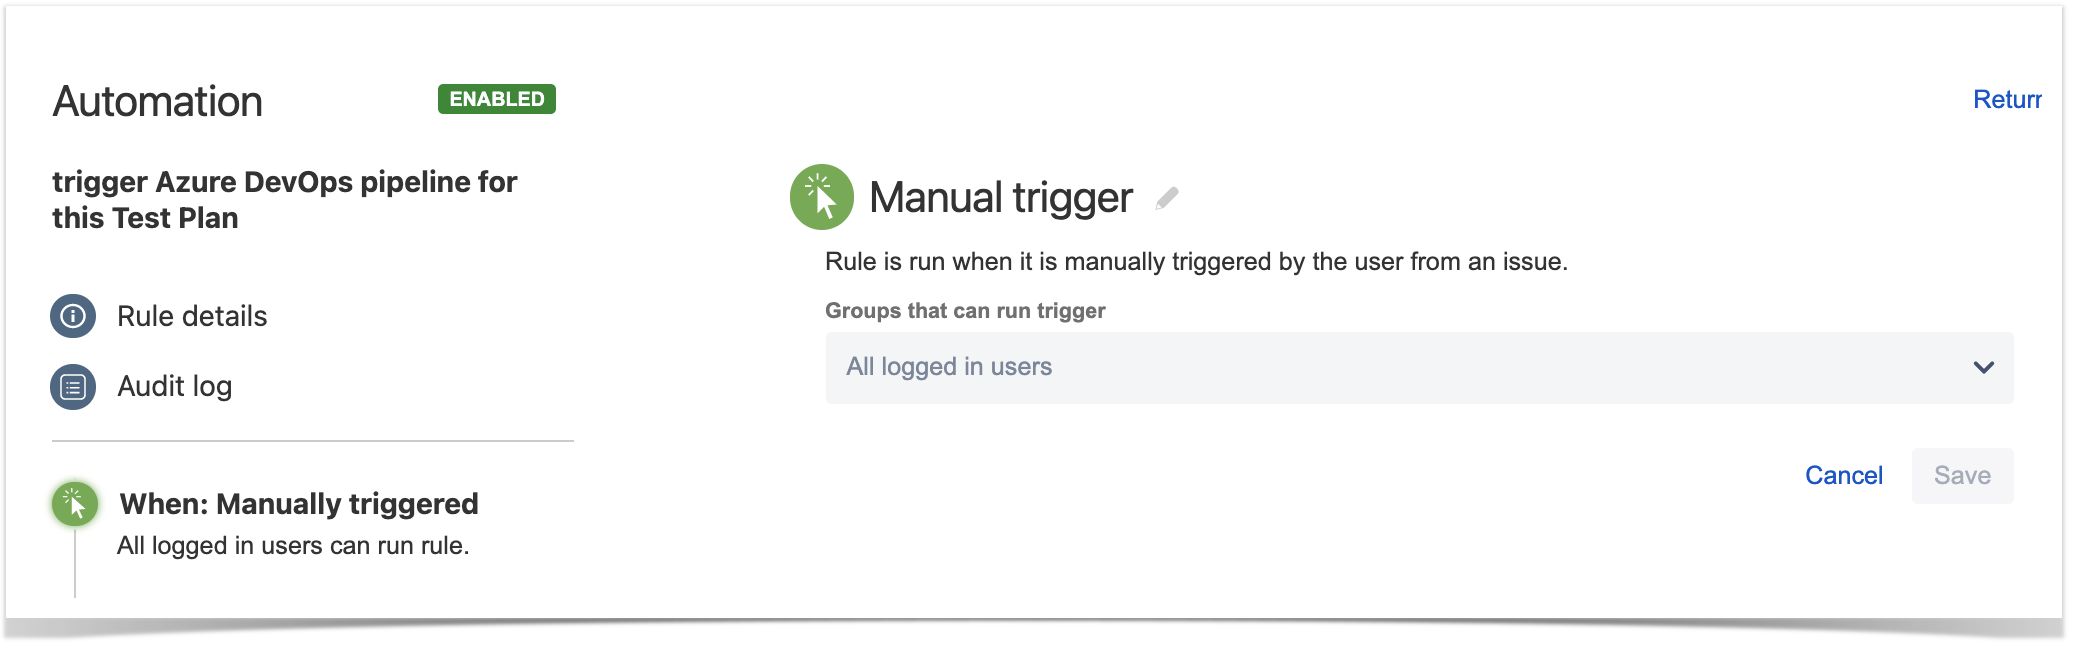
- create a new rule and define the "When" (i.e. when it to should be triggered ), to be "Manually triggered"
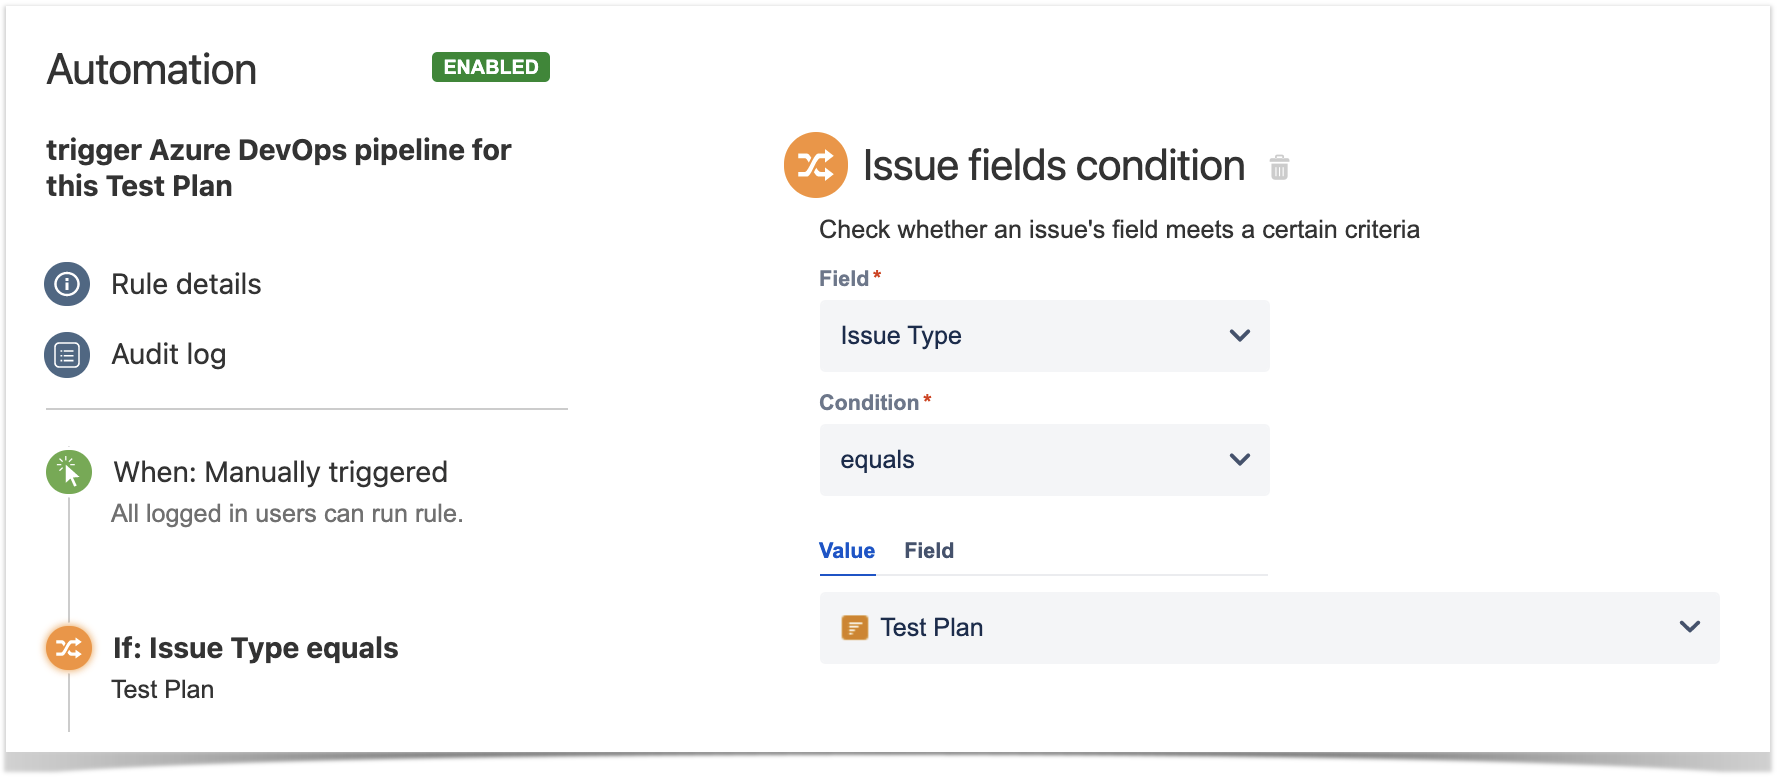
2. define the condition so that this rule can only be executed from Test Plan issue
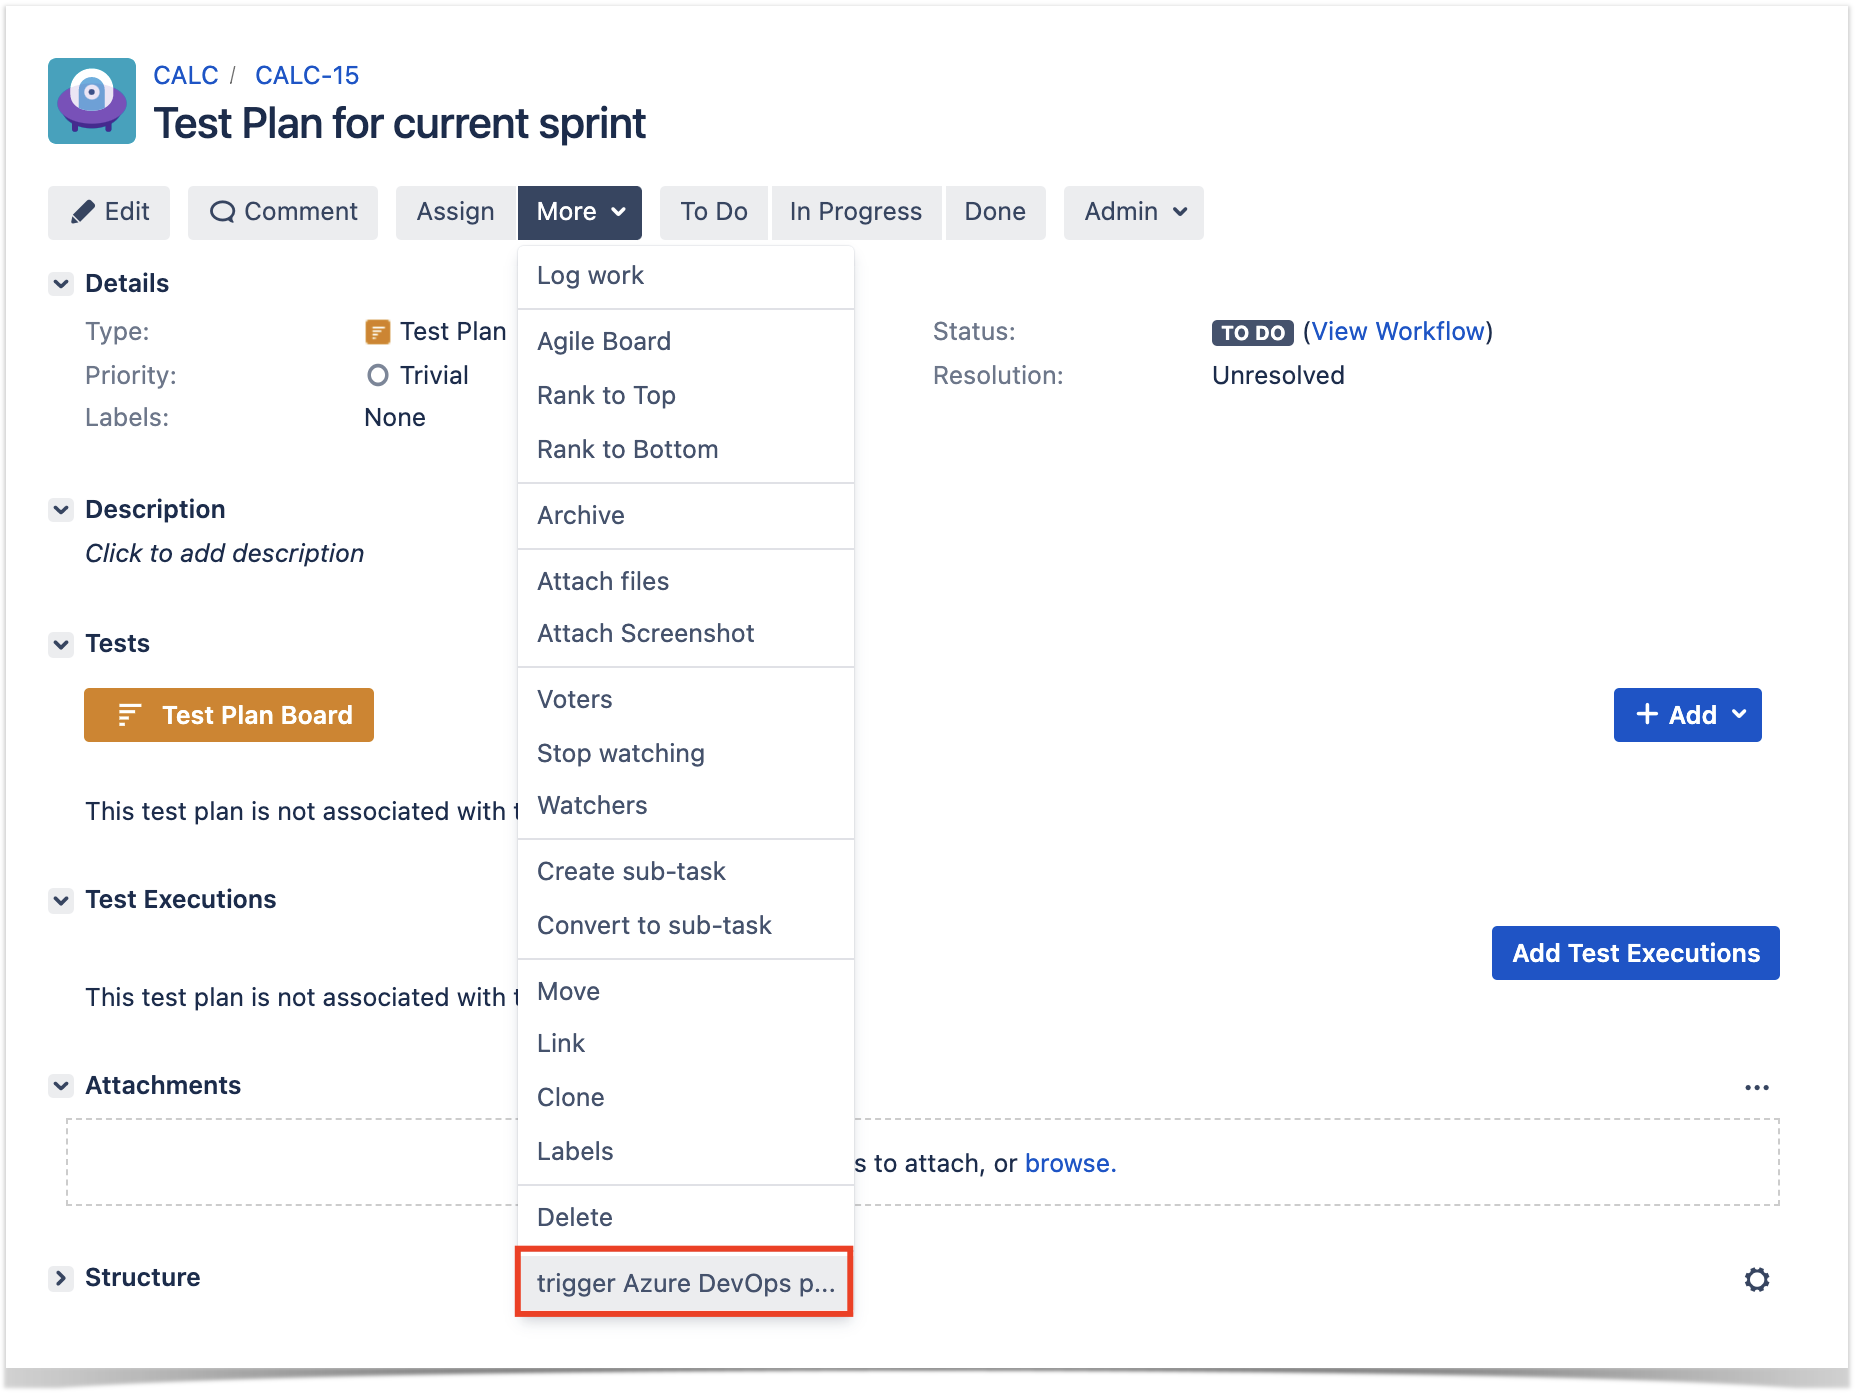
3. define an action (i.e. the "Then") as "Send web request" and configure it as follows
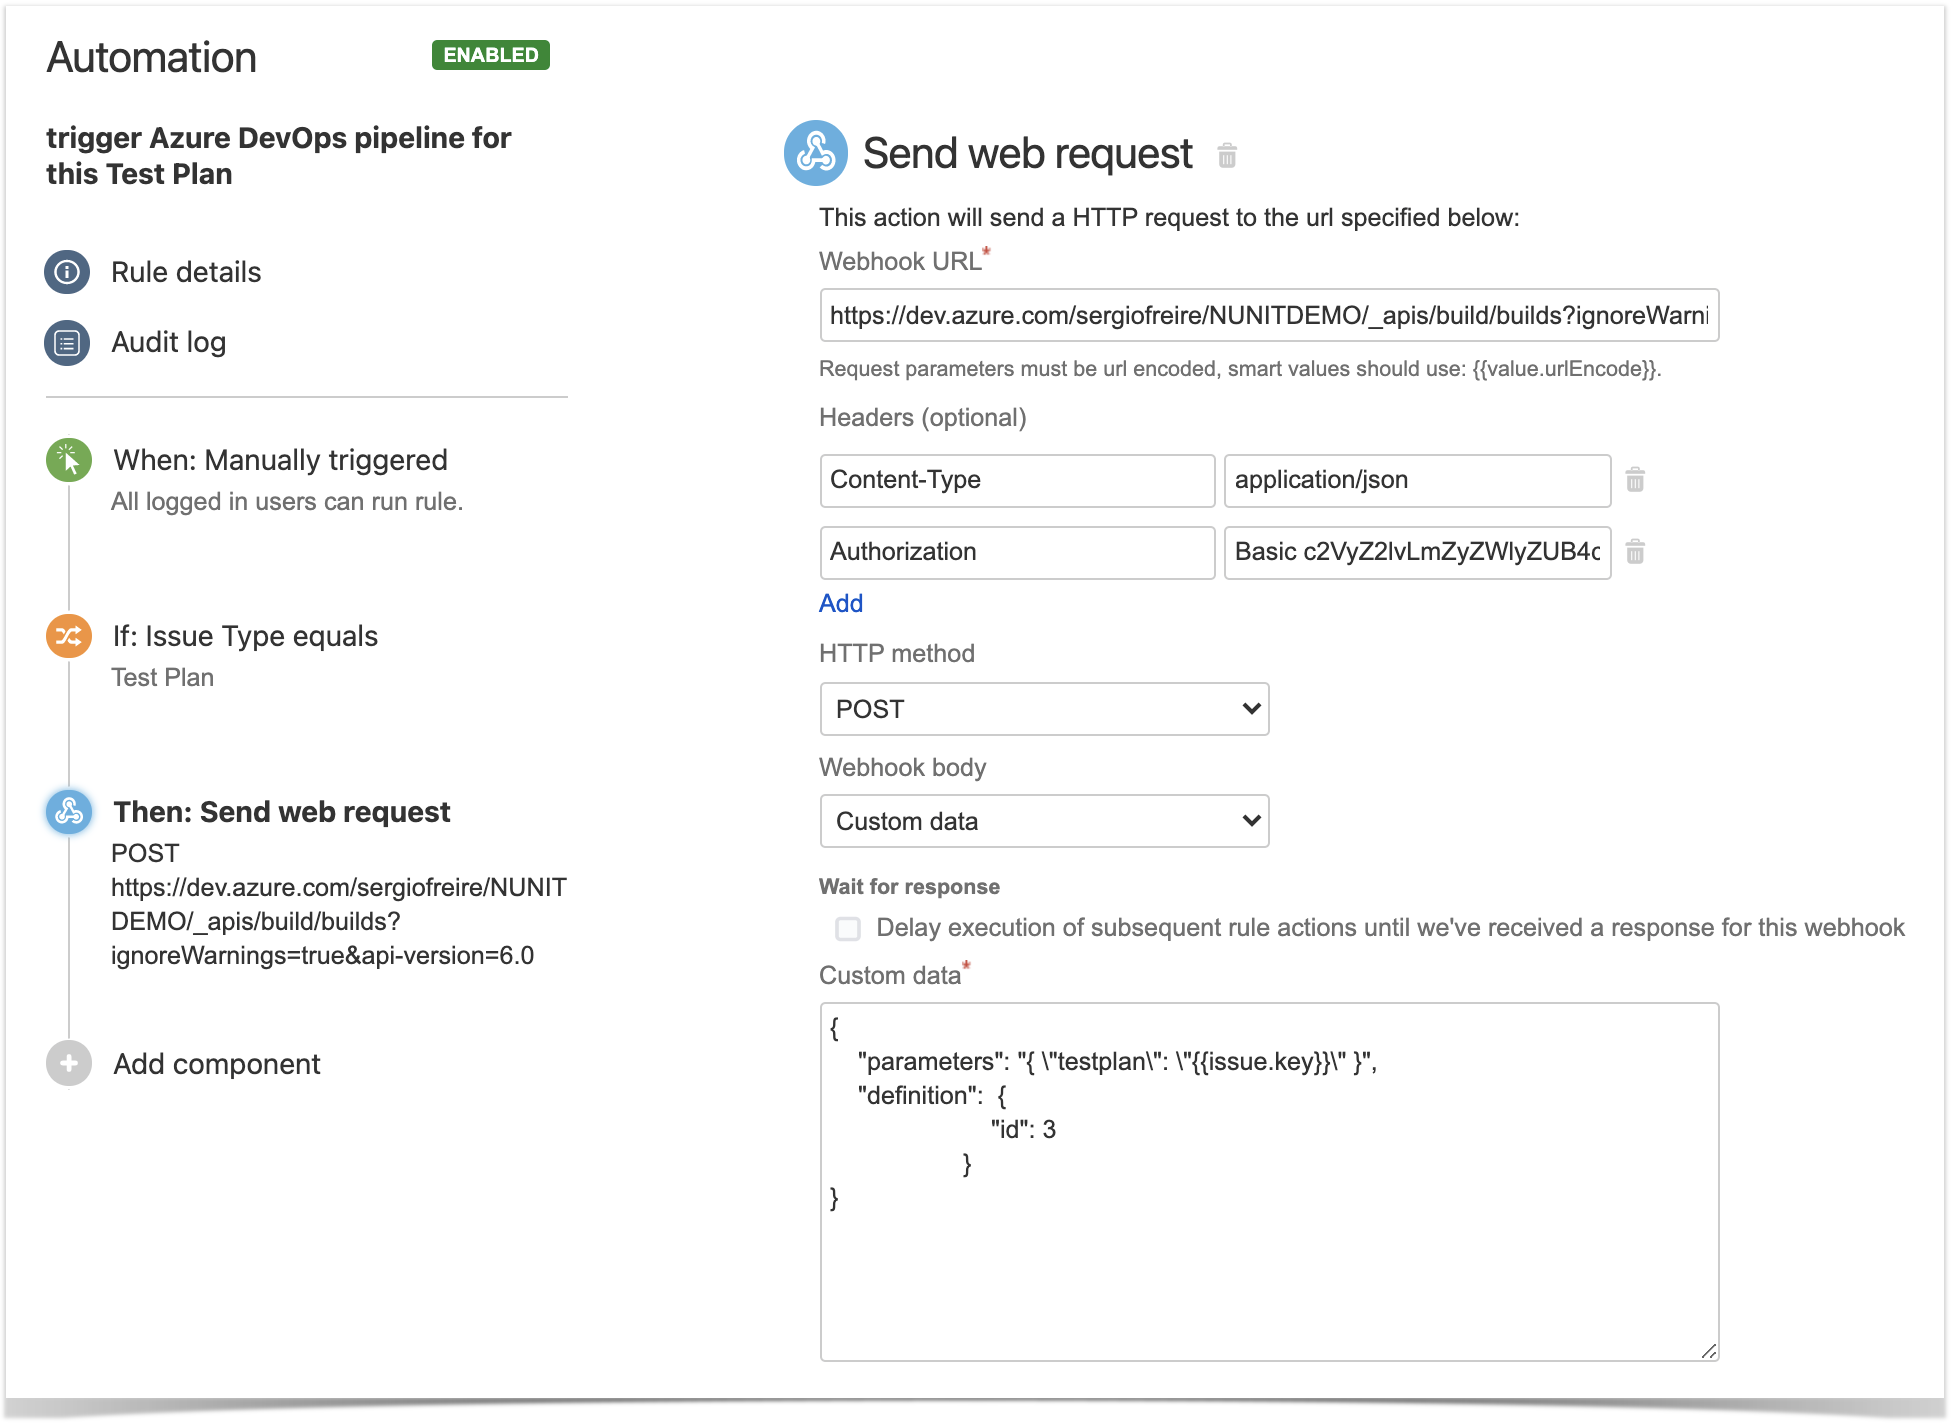
- the web request URL provided above is from Azure DevOps API, for queueing builds, and follows this syntax:
- authentication is done using the organization name plus the personal access token, created earlier in Azure DevOps, as the login:password pair used to calculate the Base64 content of the Authorization header
- the "Content-Type" header should be "application/json"
the HTTP POST body content, defined in the "Custom data" field, will be used to identify the build definition and also the original Test Plan issue key;
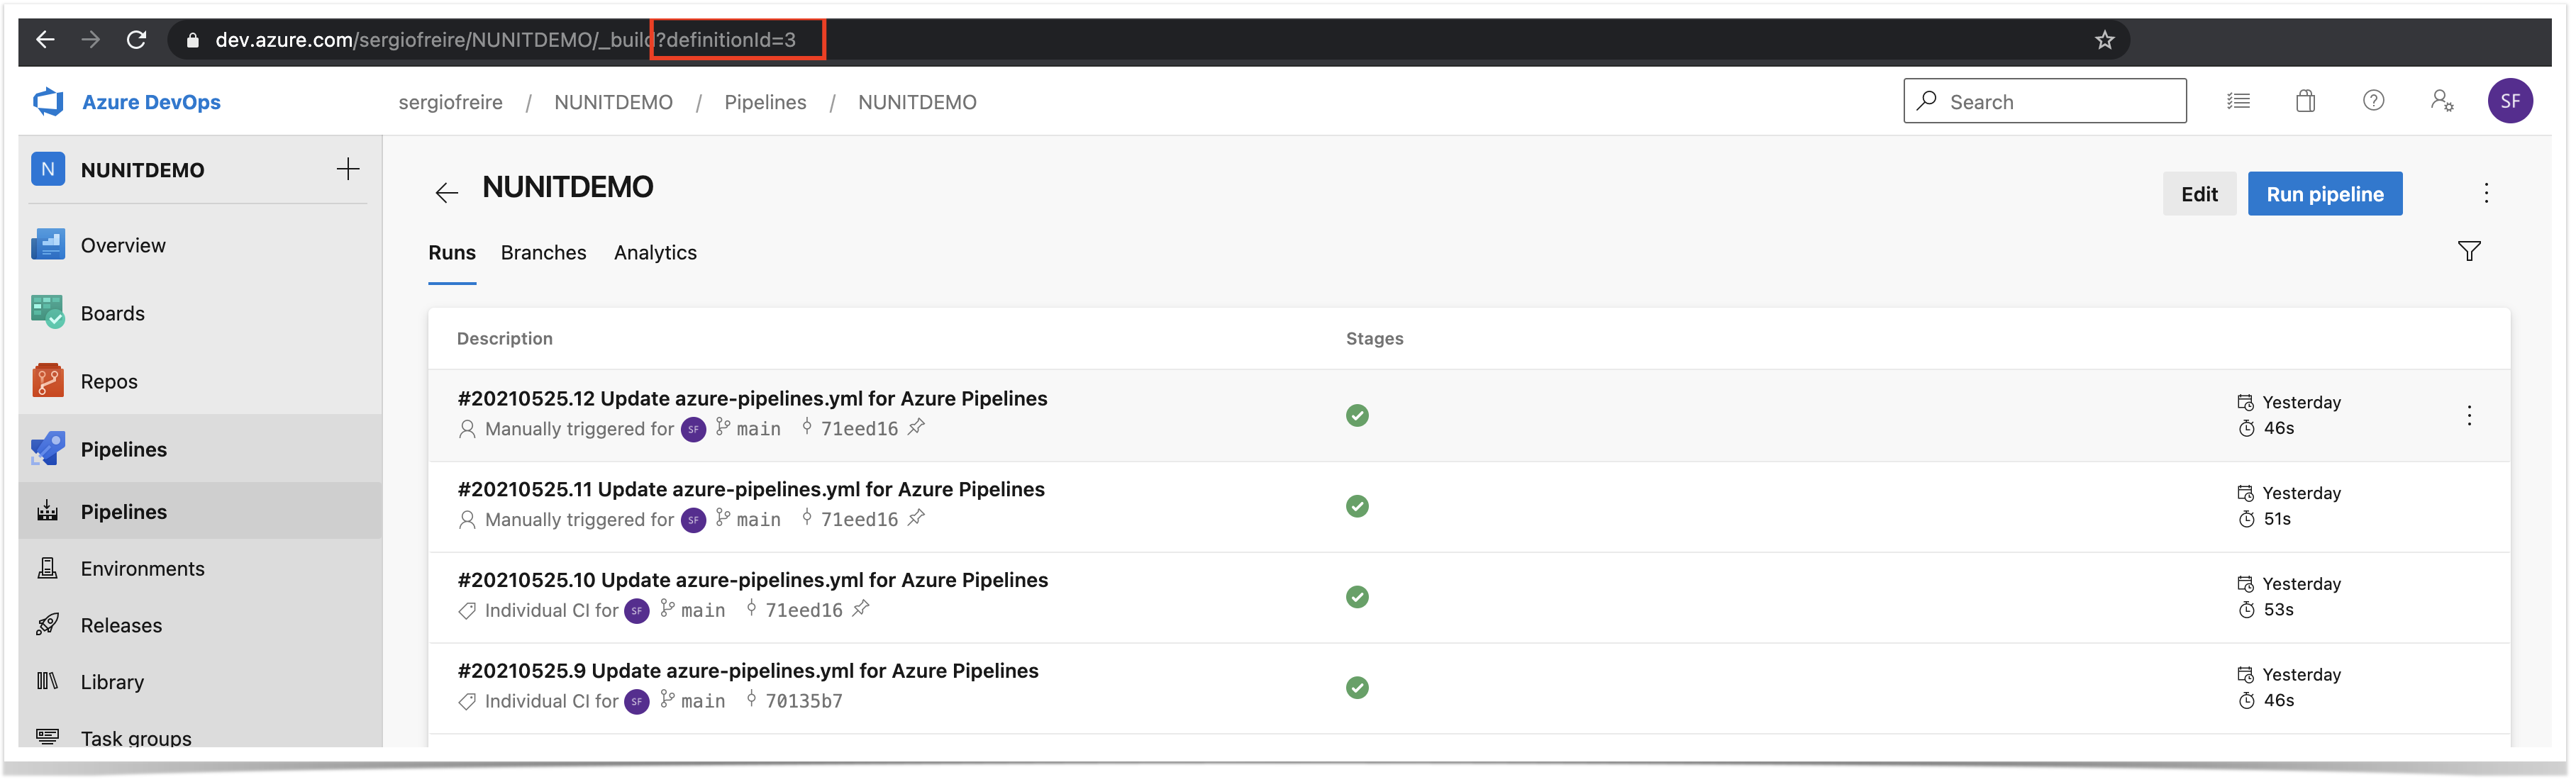
Code Block language js title custom data (i.e. HTTP body content) collapse true { "parameters": "{ \"testplan\": \"{{issue.key}}\" }", "definition": { "id": 3 } }Expand title How to find the (build) definition id? Note: to find the definition id, you can click on the pipeline in Azure DevOps and its id is shown as part of the URL
After publishing the rule, you can go to the screen of an issue and trigger a pipeline run in Azure DevOps.
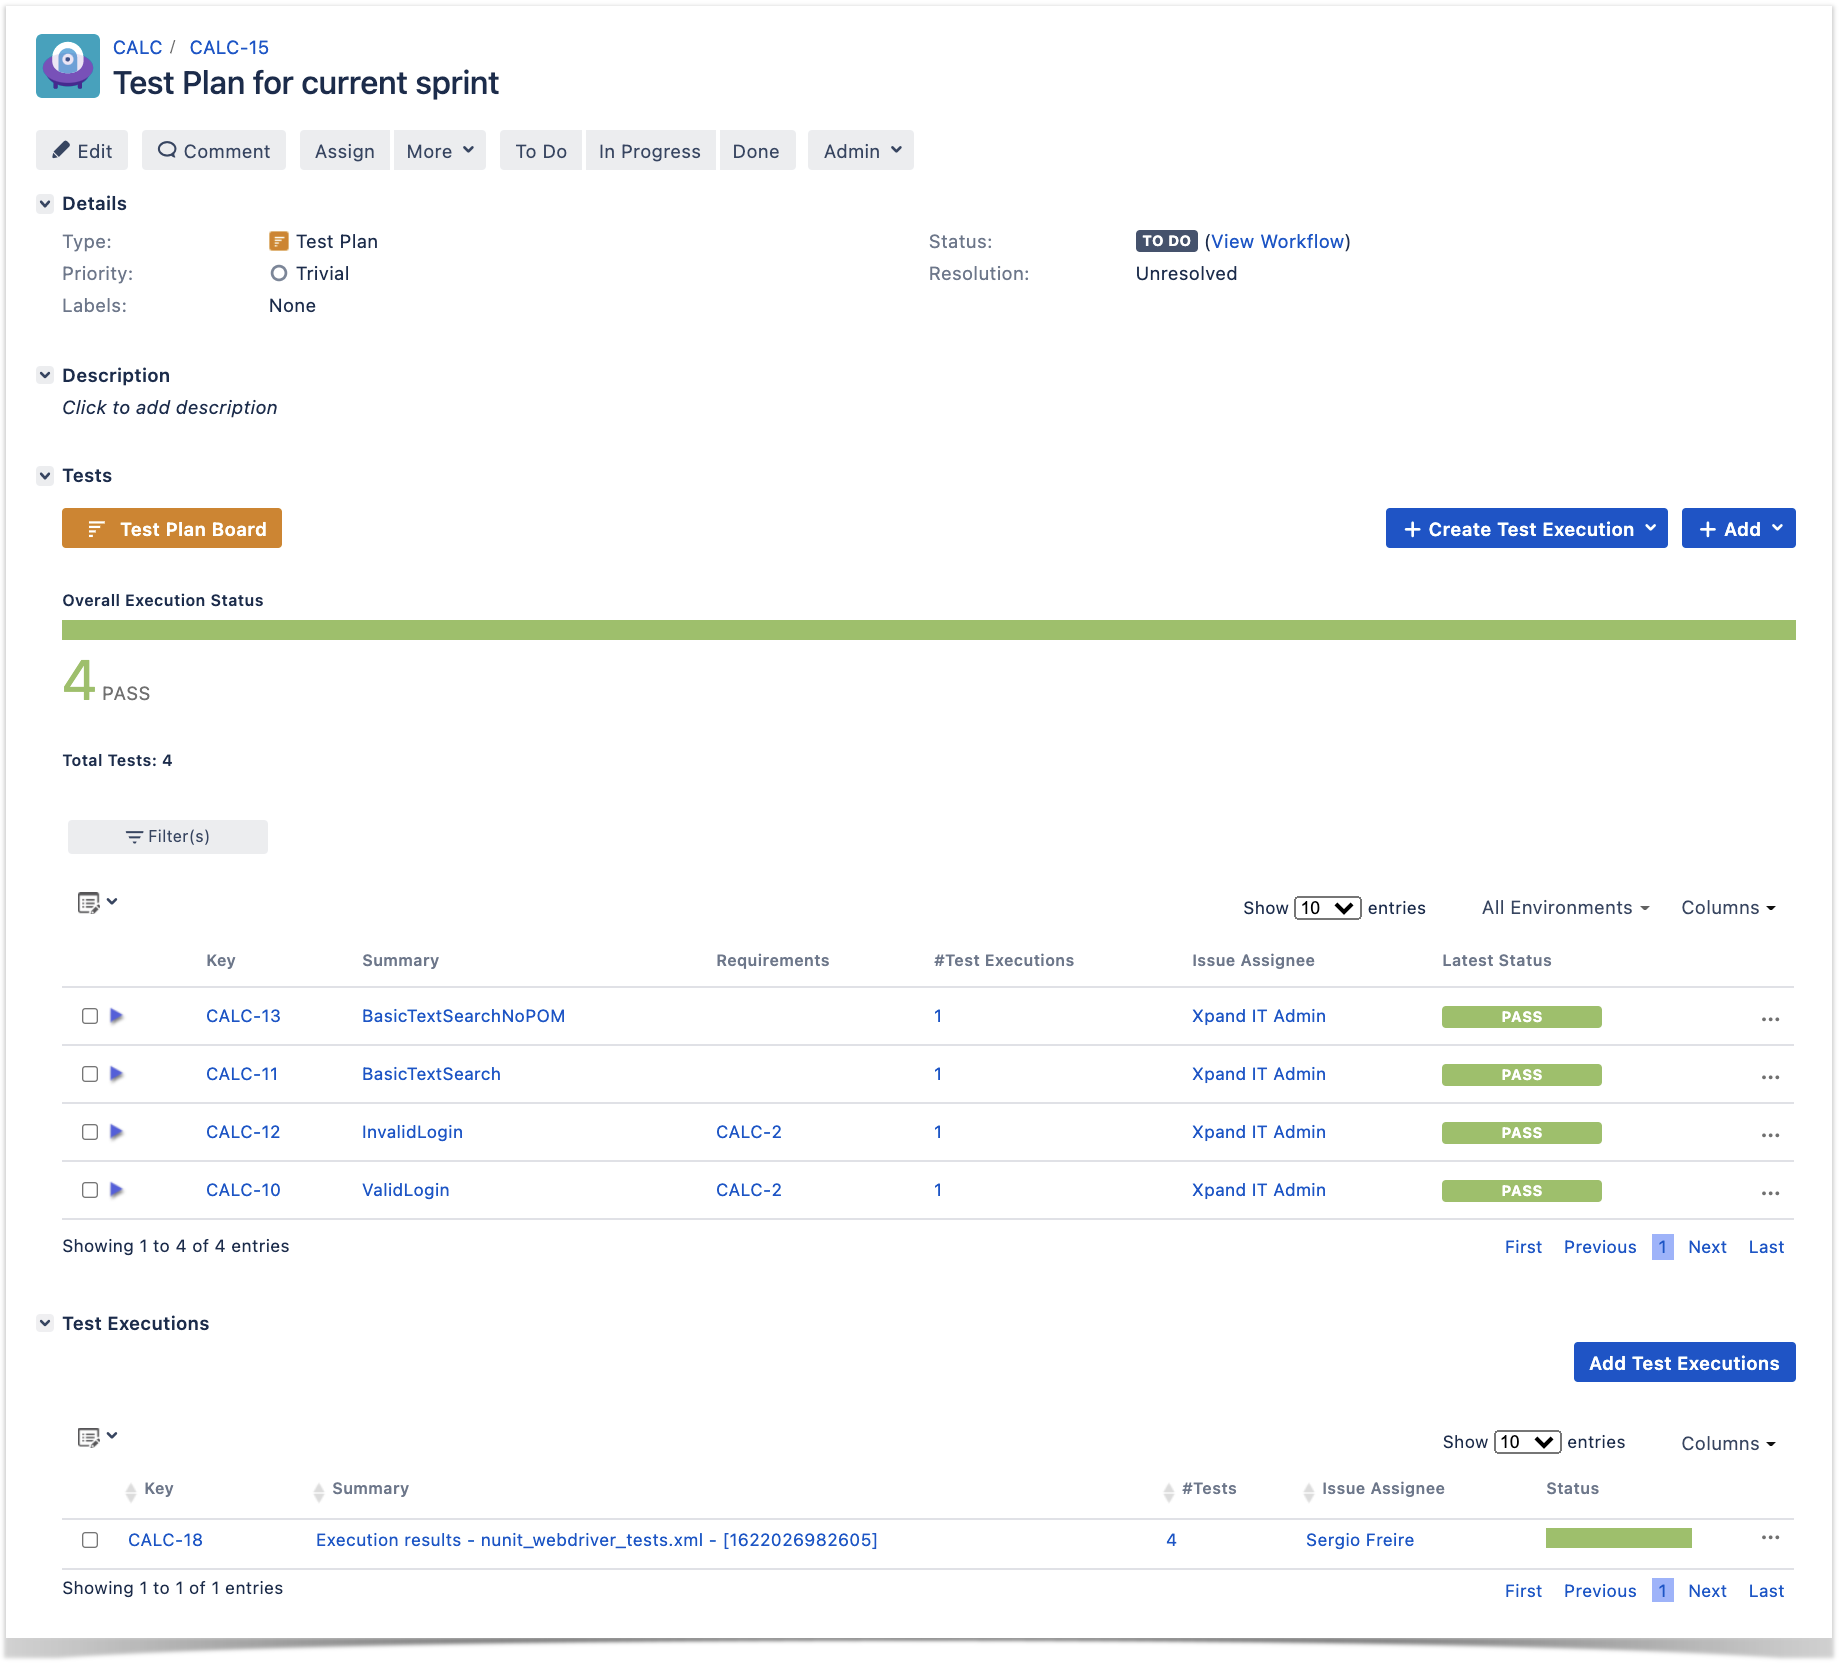
In this case, since the pipeline was configured to report results back to Xray, a new Test Execution would be created and linked back to the source Test Plan where the automation was triggered from.
Travis CI
Trigger a TravisCI project build from a Test Plan and report the results back to it
In this simple scenario, we'll implement a rule, triggered manually, that will trigger a TravisCI project/job. The action will be available from the "Automation" panel, for all Test Plan issues of the selected project.
We're assuming that:
- you just want to trigger a CI job, period; this job may be totally unrelated to the issue from where you triggered it
- the results will be submitted back to Xray, if the project is configured to do so in TravisCI
TravisCI configuration
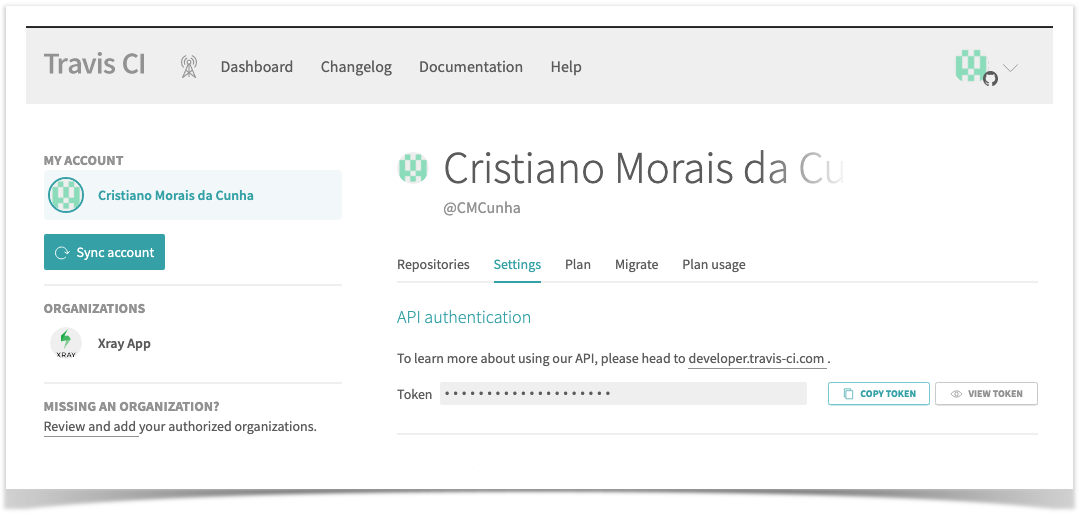
In TravisCI, we need to generate an API authentication token for some user, which can be done from the My Account settings page.
Once we have the authentication token we followed the TravisCI API documentation to configure the following steps on the Jira side.
For the Travis CI the important change we must do is in the YAML file that will configure Travis CI pipeline, we use the following configuration to achieve that:
.travis.yml
...
sudo: falselanguage: javajdk: - openjdk8cache: directories: - "$HOME/.cache" jobs: include: - stage: test and report to Xray script: - | echo "building repo..." mvn clean compile test --file pom.xml export token=$(curl -H "Content-Type: application/json" -X POST --data "{ \"client_id\": \"$CLIENT_ID\",\"client_secret\": \"$CLIENT_SECRET\" }" https://xray.cloud.xpand-it.com/api/v2/authenticate| tr -d '"') echo $token curl -H "Content-Type: text/xml" -H "Authorization: Bearer $token" --data @target/surefire-reports/TEST-com.xpand.java.CalcTest.xml "https://xray.cloud.xpand-it.com/api/v2/import/execution/junit?projectKey=$PROJECTKEY&testPlanKey=$TESTPLAN" echo "done"
For more details about this configuration please check the TravisCI tutorial documentation.
As you can see we are pushing results back to Xray with the last curl command:
curl command
...
curl -H "Content-Type: text/xml" -H "Authorization: Bearer $token" --data @target/surefire-reports/TEST-com.xpand.java.CalcTest.xml "https://xray.cloud.xpand-it.com/api/v2/import/execution/junit?projectKey=$PROJECTKEY&testPlanKey=$TESTPLAN"
Concepts
Jira Automation allows project administrators to implement rules that can make certain processes automated, guaranteeing efficiency and consistency.
The main concepts of Jira Automation follow a very simple approach for defining an automation rule: if a certain "thing" happens (trigger) and certain conditions are met, then execute one or more actions.
- Trigger: Triggers start the execution of a rule. Triggers can listen for events or be scheduled to run.
- manual
- upon field or workflow status changes
- upon releasing
- periodic
- ...
- Condition: Actions will only execute if all conditions preceding them pass.
- "If" statement
- Issue fields condition
- ...
- Action: Actions perform changes to a system.
- change fields on issues
- transition issues
- web request
- log
- ...
It's also possible to run actions on issues that are related to the issue that triggered the rule, using "branches".
| Info | ||
|---|---|---|
| ||
Automation rules run asynchronously. Some actions can run in parallel but usually they're sequential. There is no interaction with the user (except if the trigger was set off manually from Jira's UI). |
Usage Examples
Jenkins
Trigger a Jenkins project build from an issue
In this very simple scenario, we'll implement a rule, triggered manually, that will trigger a Jenkins project/job. The action will be available from within the "More" menu, in all issues of the selected project.
We're assuming that:
- you just want to trigger a CI job, period; this job may be totally unrelated to the issue from where you triggered it
- what the CI job will do, including if it will report the results back to Xray or not, is not relevant
Jenkins configuration
In Jenkins, we need to generate an API token for some user, which can be done from the profile settings page.
At the project level, we need to enable remote build triggers, so we can obtain an "authentication token" to be used in the HTTP request afterwards.
The project itself is a normal one, without parameters.
Automation for Jira configuration
- create a new rule and define the "When" (i.e. when it to should be triggered ), to be "Manually triggered"
2. define an action (i.e. the "Then") as "Send webhook" and configure it as follows
- the Webhook URL provided above follows this syntax:
- <jenkins_base_url>/job/<name_of_jenkins_project_job>/build?token=<token>
- besides the "Content-Type" header that should be "application/json", define also an "Authorization" header having the value "Basic <auth>", where the base64 encoded <auth> can be generated using your Jenkins API credentials
After publishing the rule, you can go to the screen of an issue and trigger the Jenkins project/job.
Trigger a Jenkins project build from a Test Plan and report the results back to it
In this simple scenario, we'll implement a rule, triggered manually, that will trigger a Jenkins project/job. The action will be available from within the "More" menu, for all Test Plan issues of the selected project.
We're assuming that:
- you just want to trigger a CI job, period; this job may be totally unrelated to the issue from where you triggered it
- the results will be submitted back to Xray, if the project is configured to do so in Jenkins
Jenkins configuration
In Jenkins, we need to generate an API token for some user, which can be done from the profile settings page.
At the project level, we need to enable remote build triggers, so we can obtain an "authentication token" to be used in the HTTP request afterwards.
The project itself is a normal one; the only thing relevant to mention is that this project is a parameterized one, so it receives TESTPLAN, that in our case will be coming from Jira.
Automation for Jira configuration
- create a new rule and define the "When" (i.e. when it to should be triggered ), to be "Manually triggered"
2. define the condition so that this rule can only be executed from Test Plan issue
3. define an action (i.e. the "Then") as "Send webhook" and configure it as follows
- the Webhook URL provided above follows this syntax:
- <jenkins_base_url>/job/<name_of_jenkins_project_job>/buildWithParameters?token=<token>&TESTPLAN={{issue.key}}
- besides the "Content-Type" header that should be "application/json", define also an "Authorization" header having the value "Basic <auth>", where the base64 encoded <auth> can be generated using your Jenkins API credentials
After publishing the rule, you can go to the screen of an issue and trigger the Jenkins project/job.
Azure DevOps
Trigger a Azure DevOps pipeline from a Test Plan and report the results back to it
Azure DevOps configuration
We need to create a service connection, using the "incoming webhook" template, so that we can use Azure DevOps API later on.
Create a Personal Access Token (PAT), so you can use it as the password in API requests, along with the "organization name" as username.
Then, in your Azure DevOps repository containing the project's code and tests, create a pipeline /azure-pipelines.yml; this pipeline will be triggered using Azure DevOps API.
In the following example, the pipeline will receive the Test Plan issue key as an input parameter. It will then run the build, including the automated tests, and in the end it will report the results back to Xray using "curl" utility.
We need to define a resources section, that contains a reference to the webhook configured earlier.
| Code Block | ||||
|---|---|---|---|---|
| ||||
parameters:
- name: "testplan"
  type: string
  default: ""

trigger:
- main

resources:
  webhooks:
    - webhook: "MyWebhookTrigger"             ### Webhook alias
      connection: "MyWebhookConnection"       ### Incoming webhook service connection

pool:
  vmImage: ubuntu-latest

steps:

- bash: |
    echo ${{ parameters.testplan }}
  displayName: '(debug) print testplan parameter'

- script: dotnet restore
  displayName: 'install build dependencies'

- script: |
    dotnet test -s nunit.runsettings
  displayName: 'Run tests'
- bash: |
    set -x
    curl -o - -H "Content-Type: multipart/form-data" -u '$(jira_user):$(jira_password)' -F "file=@./bin/Debug/net5.0/TestResults/nunit_webdriver_tests.xml" "$(jira_server_url)/rest/raven/2.0/import/execution/nunit?projectKey=$(project_key)&testPlanKey=${TESTPLAN}"
  displayName: 'Import results to Xray server'
|
Xray endpoint's base URL and the API key credentials (i.e. client id + client secret) are defined in Azure DevOps as variables. These may be marked as secret.
Automation for Jira configuration
- create a new rule and define the "When" (i.e. when it to should be triggered ), to be "Manually triggered"
2. define the condition so that this rule can only be executed from Test Plan issue
3. define an action (i.e. the "Then") as "Send web request" and configure it as follows
- the web request URL provided above is from Azure DevOps API, for queueing builds, and follows this syntax:
- authentication is done using the organization name plus the personal access token, created earlier in Azure DevOps, as the login:password pair used to calculate the Base64 content of the Authorization header
- the "Content-Type" header should be "application/json"
the HTTP POST body content, defined in the "Custom data" field, will be used to identify the build definition and also the original Test Plan issue key;
Code Block language js title custom data (i.e. HTTP body content) collapse true { "parameters": "{ \"testplan\": \"{{issue.key}}\" }", "definition": { "id": 3 } }Expand title How to find the (build) definition id? Note: to find the definition id, you can click on the pipeline in Azure DevOps and its id is shown as part of the URL
After publishing the rule, you can go to the screen of an issue and trigger a pipeline run in Azure DevOps.
In this case, since the pipeline was configured to report results back to Xray, a new Test Execution would be created and linked back to the source Test Plan where the automation was triggered from.
Travis CI
Trigger a TravisCI project build from a Test Plan and report the results back to it
In this simple scenario, we'll implement a rule, triggered manually, that will trigger a TravisCI project/job. The action will be available from the "Automation" panel, for all Test Plan issues of the selected project.
We're assuming that:
- you just want to trigger a CI job, period; this job may be totally unrelated to the issue from where you triggered it
- the results will be submitted back to Xray, if the project is configured to do so in TravisCI
TravisCI configuration
In TravisCI, we need to generate an API authentication token for some user, which can be done from the My Account settings page.
Once we have the authentication token we followed the TravisCI API documentation to configure the following steps on the Jira side.
For the Travis CI the important change we must do is in the YAML file that will configure Travis CI pipeline, we use the following configuration to achieve that:
.travis.yml
|
For more details about this configuration please check the TravisCI tutorial documentation.
As you can see we are pushing results back to Xray with the last curl command:
curl command
|
On this command we are passing the project key in order to report back to a specific Project on the Xray side. Further ahead we will show how it is populated.
- PROJECTKEY - The key that identifies the project on the Jira side.
- TESTPLAN - The Test Plan key used to identify the Test Plan to associate the execution with.
Once we have the authentication token, we follow the TravisCI API documentation to configure the following steps on the Jira side.
Automation configuration
On the Jira side we will use the Automation capabilities that it provides out of the box, so within the administration area go to the automation entry in the system settings and:
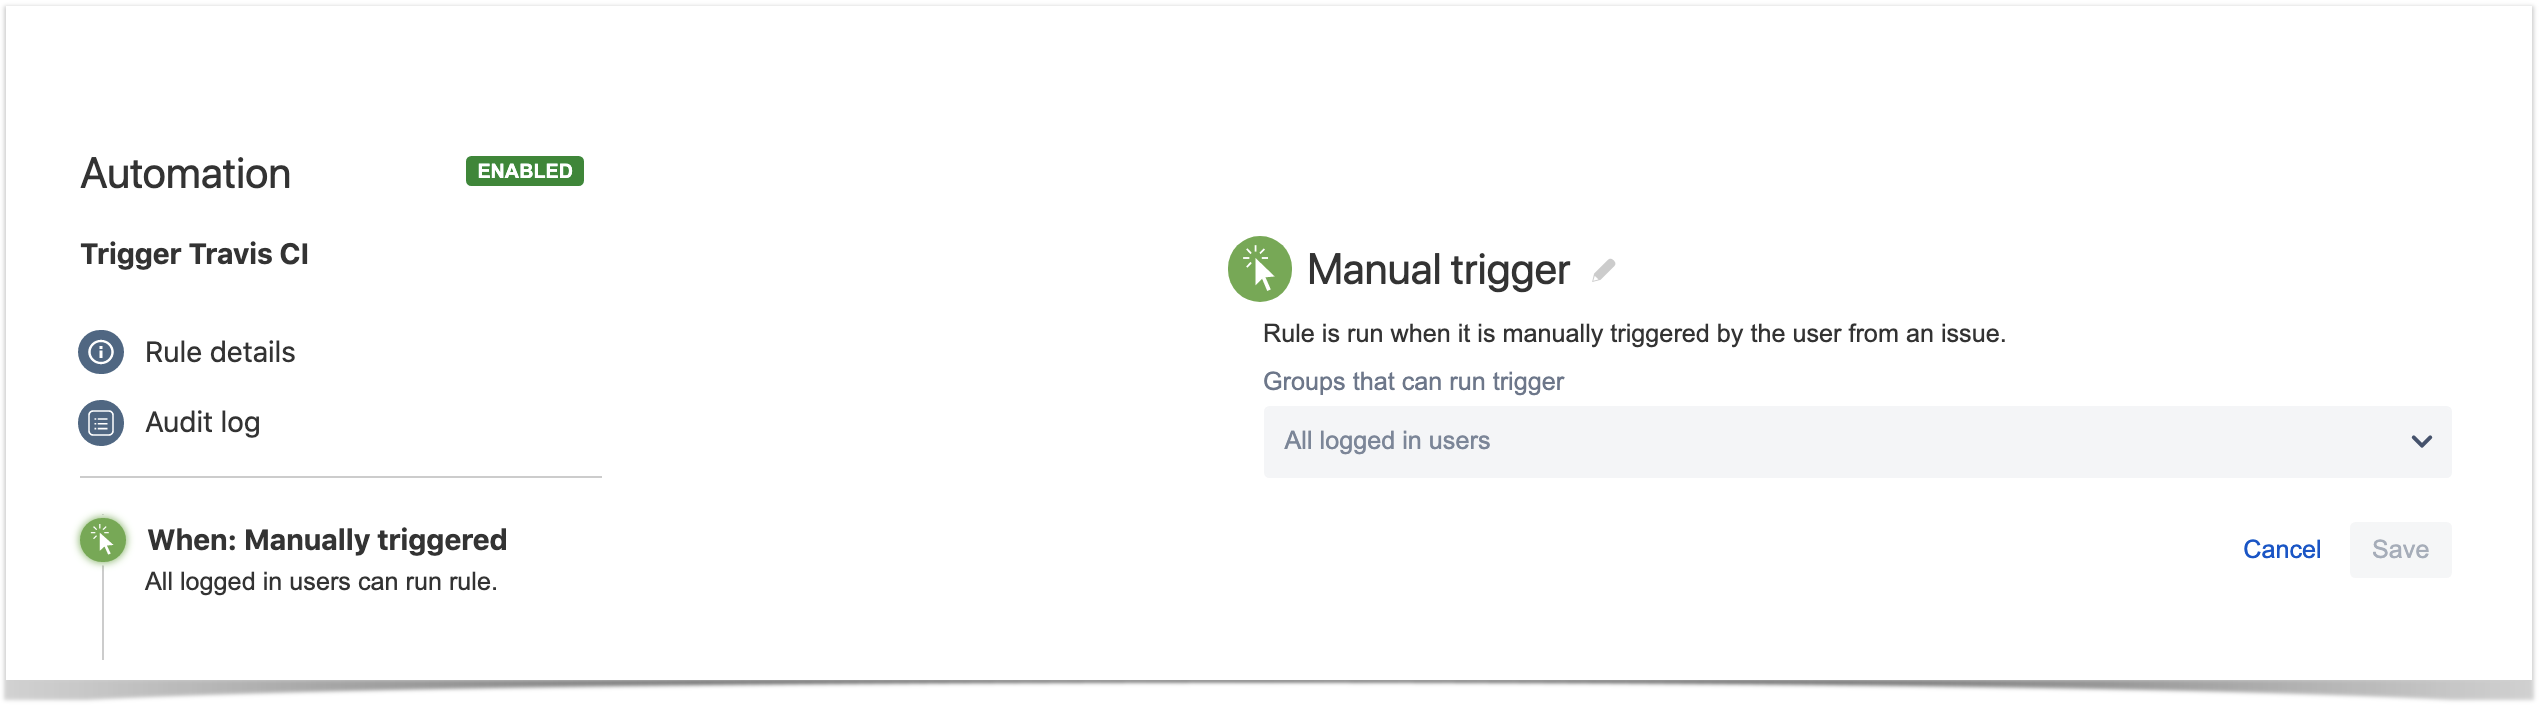
- create a new rule and define the "When" (i.e. when it to should be triggered), to be "Manually triggered"
2.Define a condition, in our case we will define that only Test Plan issue types will be allowed to trigger this pipeline, this is achieved with the following condition:
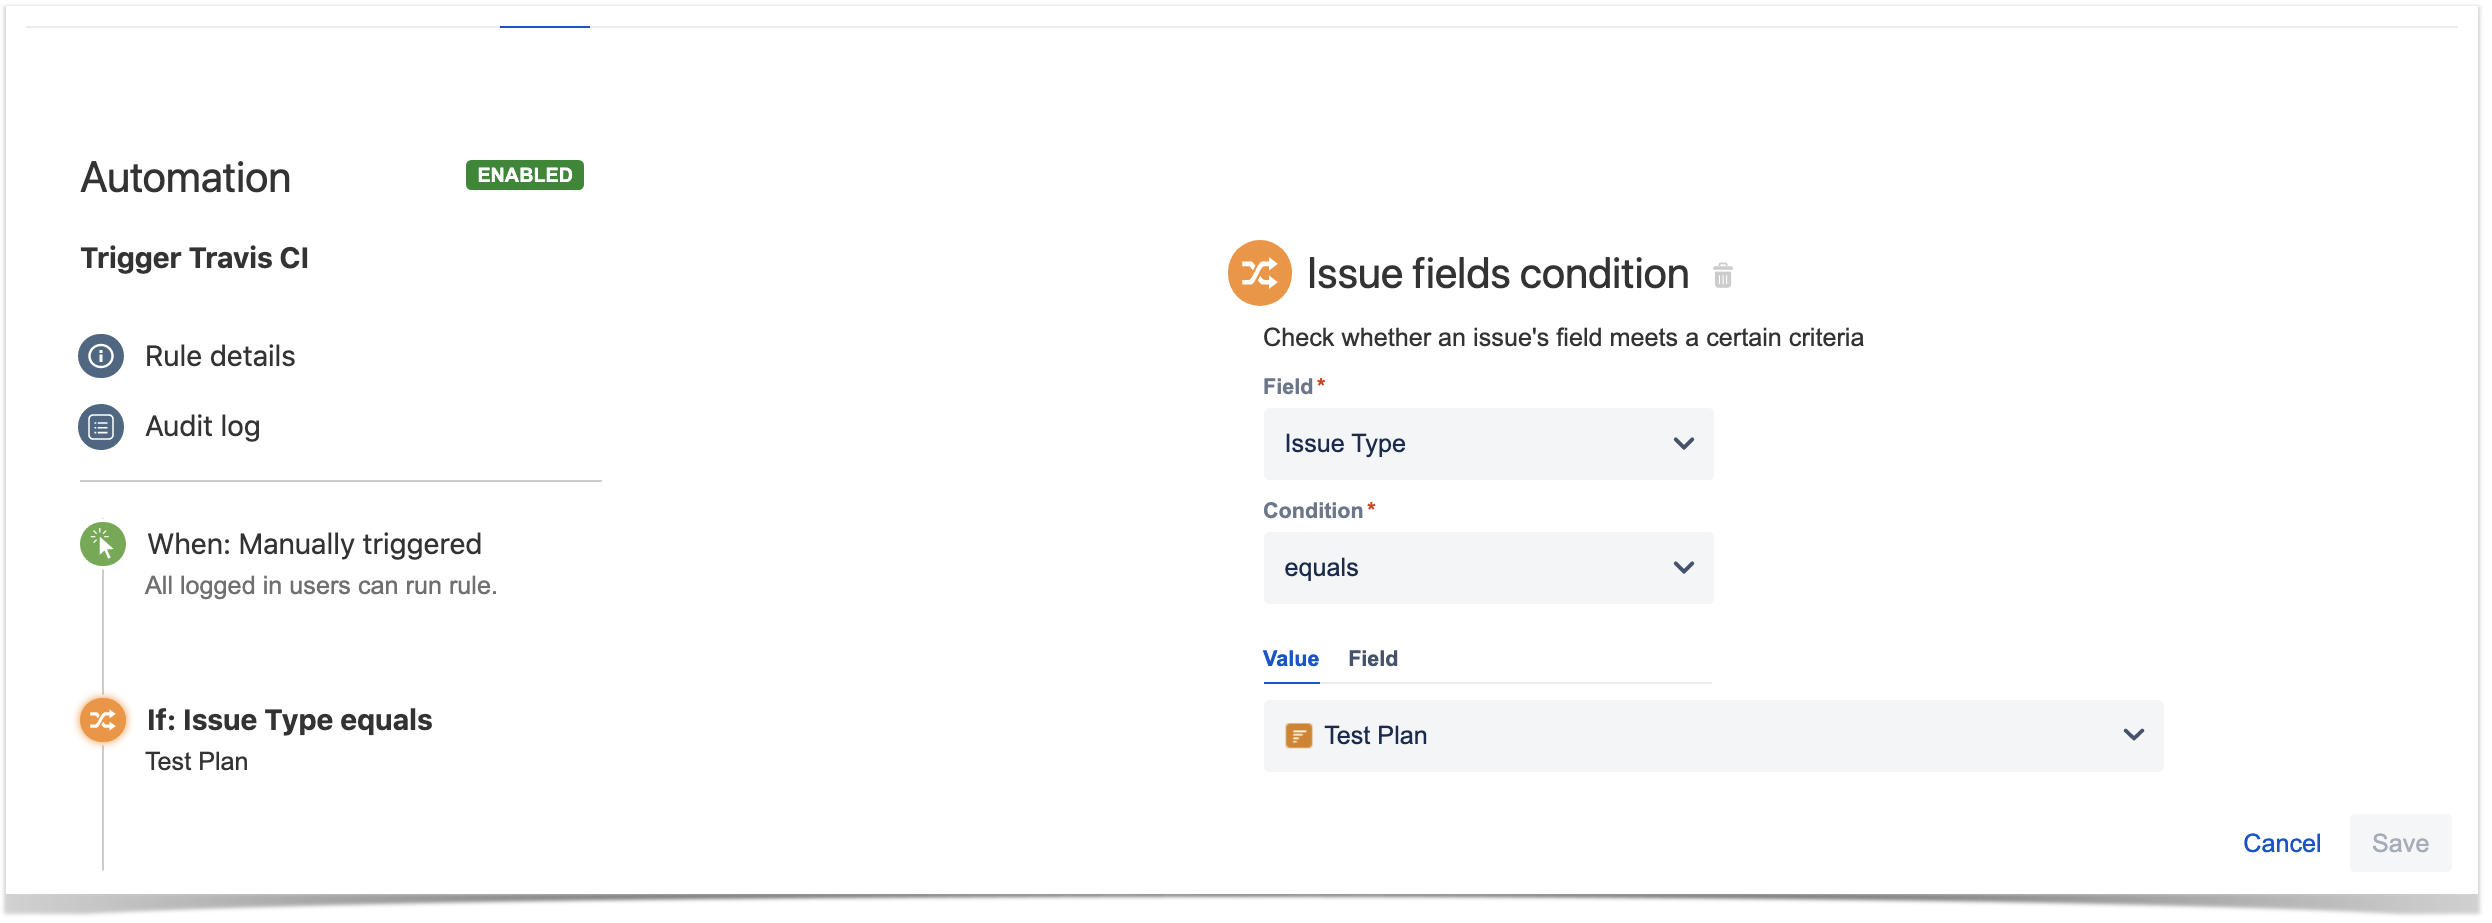
3. define an action (i.e. the "Then") as "Send webhook" and configure it as follows
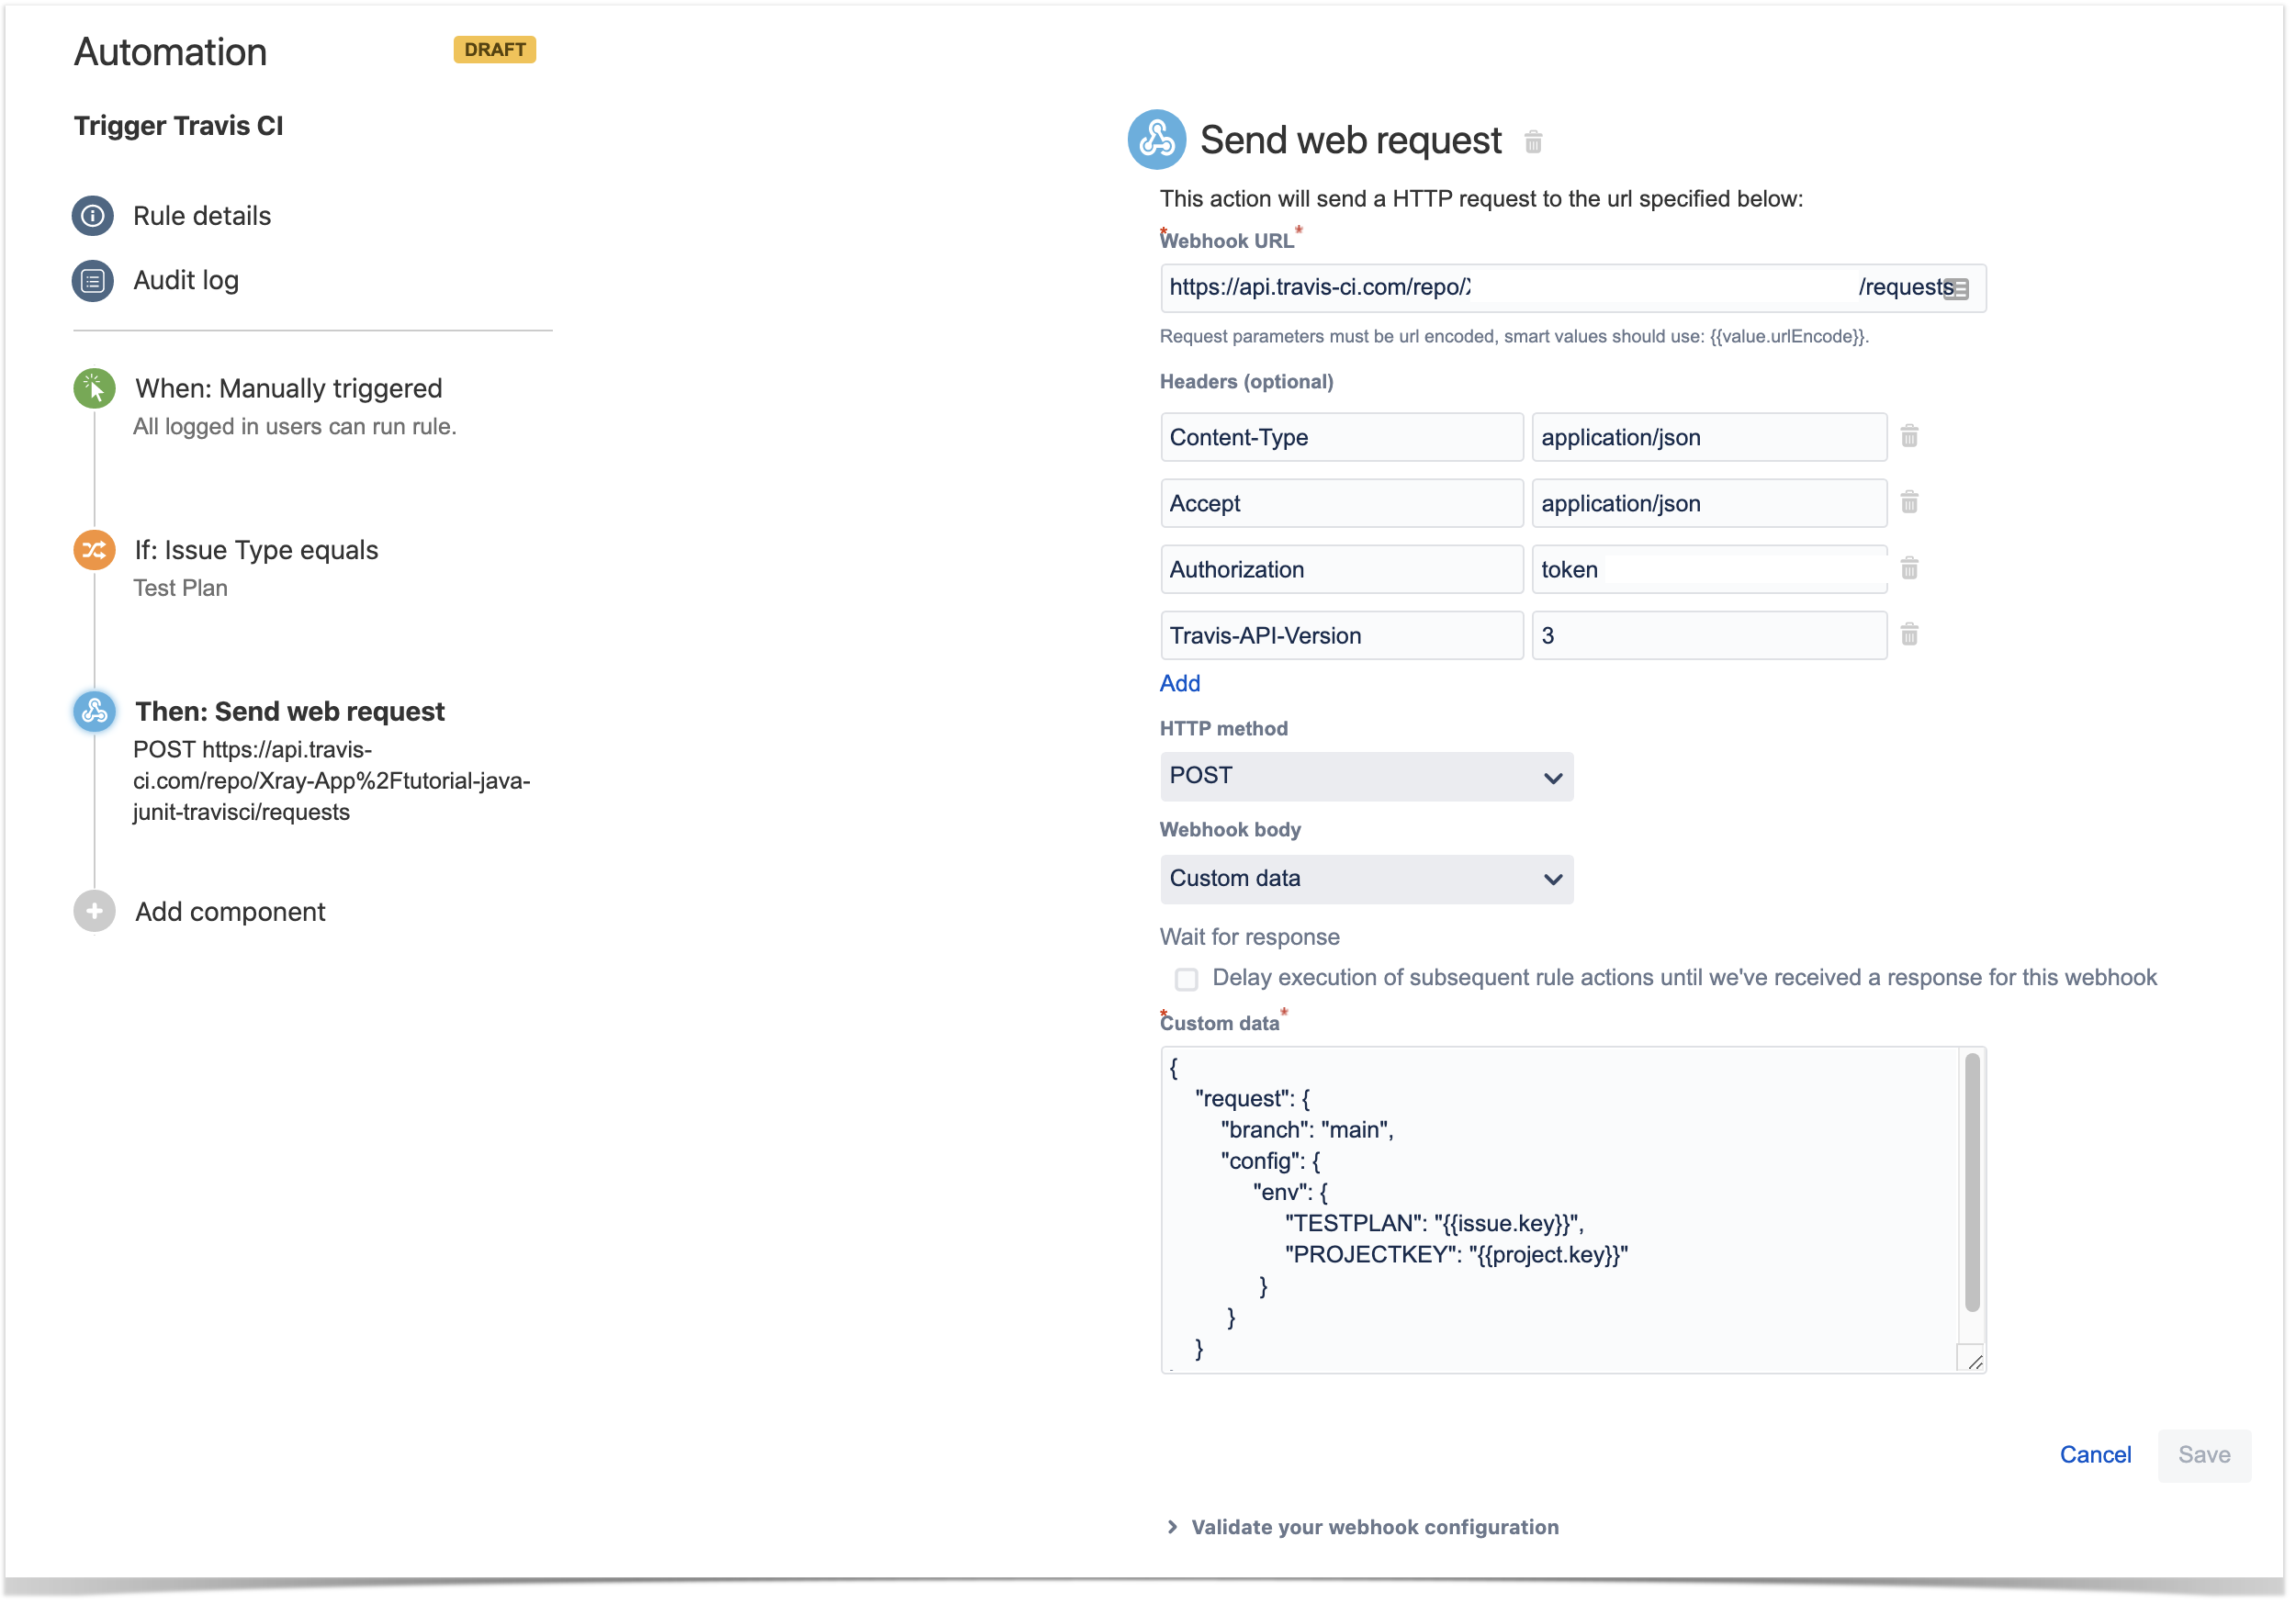
- the Webhook URL provided above follows this syntax:
- <TravisCI_API_URL>/repo/{slug|id}/requests (The %2F in the request URL is required so that the owner and repository name in the repository slug are interpreted as a single URL segment.)
- besides the "Content-Type" header that should be "application/json", define also an "Authorization" header having the value "token <token>", where you will place the authentication token obtained previously in the TravisCI page and the "Travis-API-Version" header is also mandatory and it will contain the version used.
- Custom data
- We included the simplest possible just to trigger the pipeline from the master branch.
- Added environment configuration variables to be used later in the TravisCI pipeline
- TESTPLAN - that will be automatically filled with the test plan key from where the pipeline is triggered.
- PROJECTKEY - that will be automatically filled in with the project key.
After publishing the rule, you can go to the screen of an issue and trigger the Jenkins project/job.
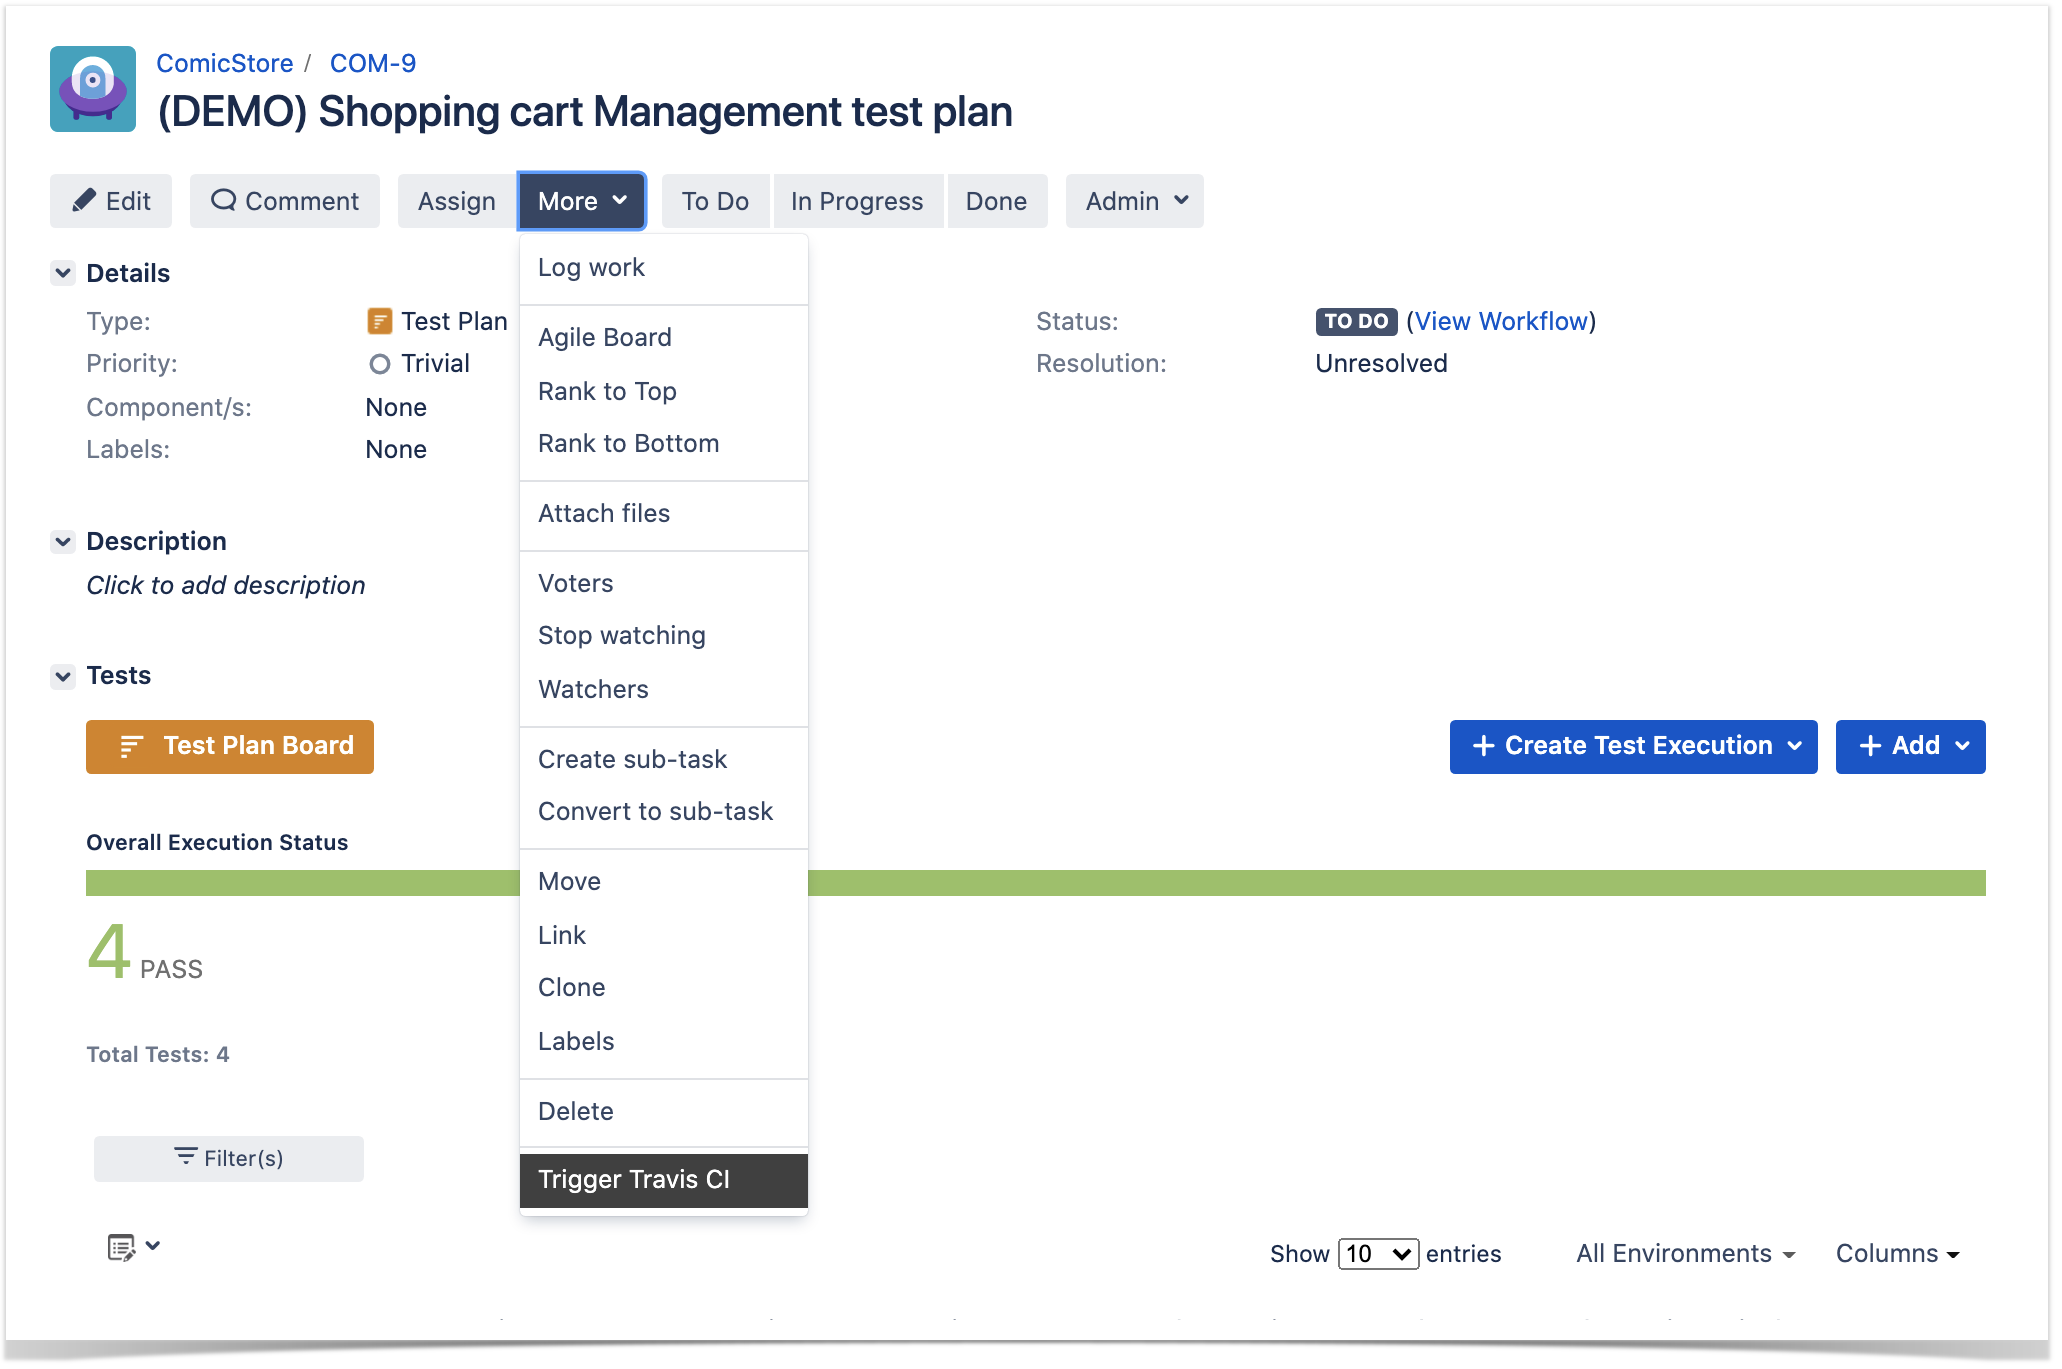
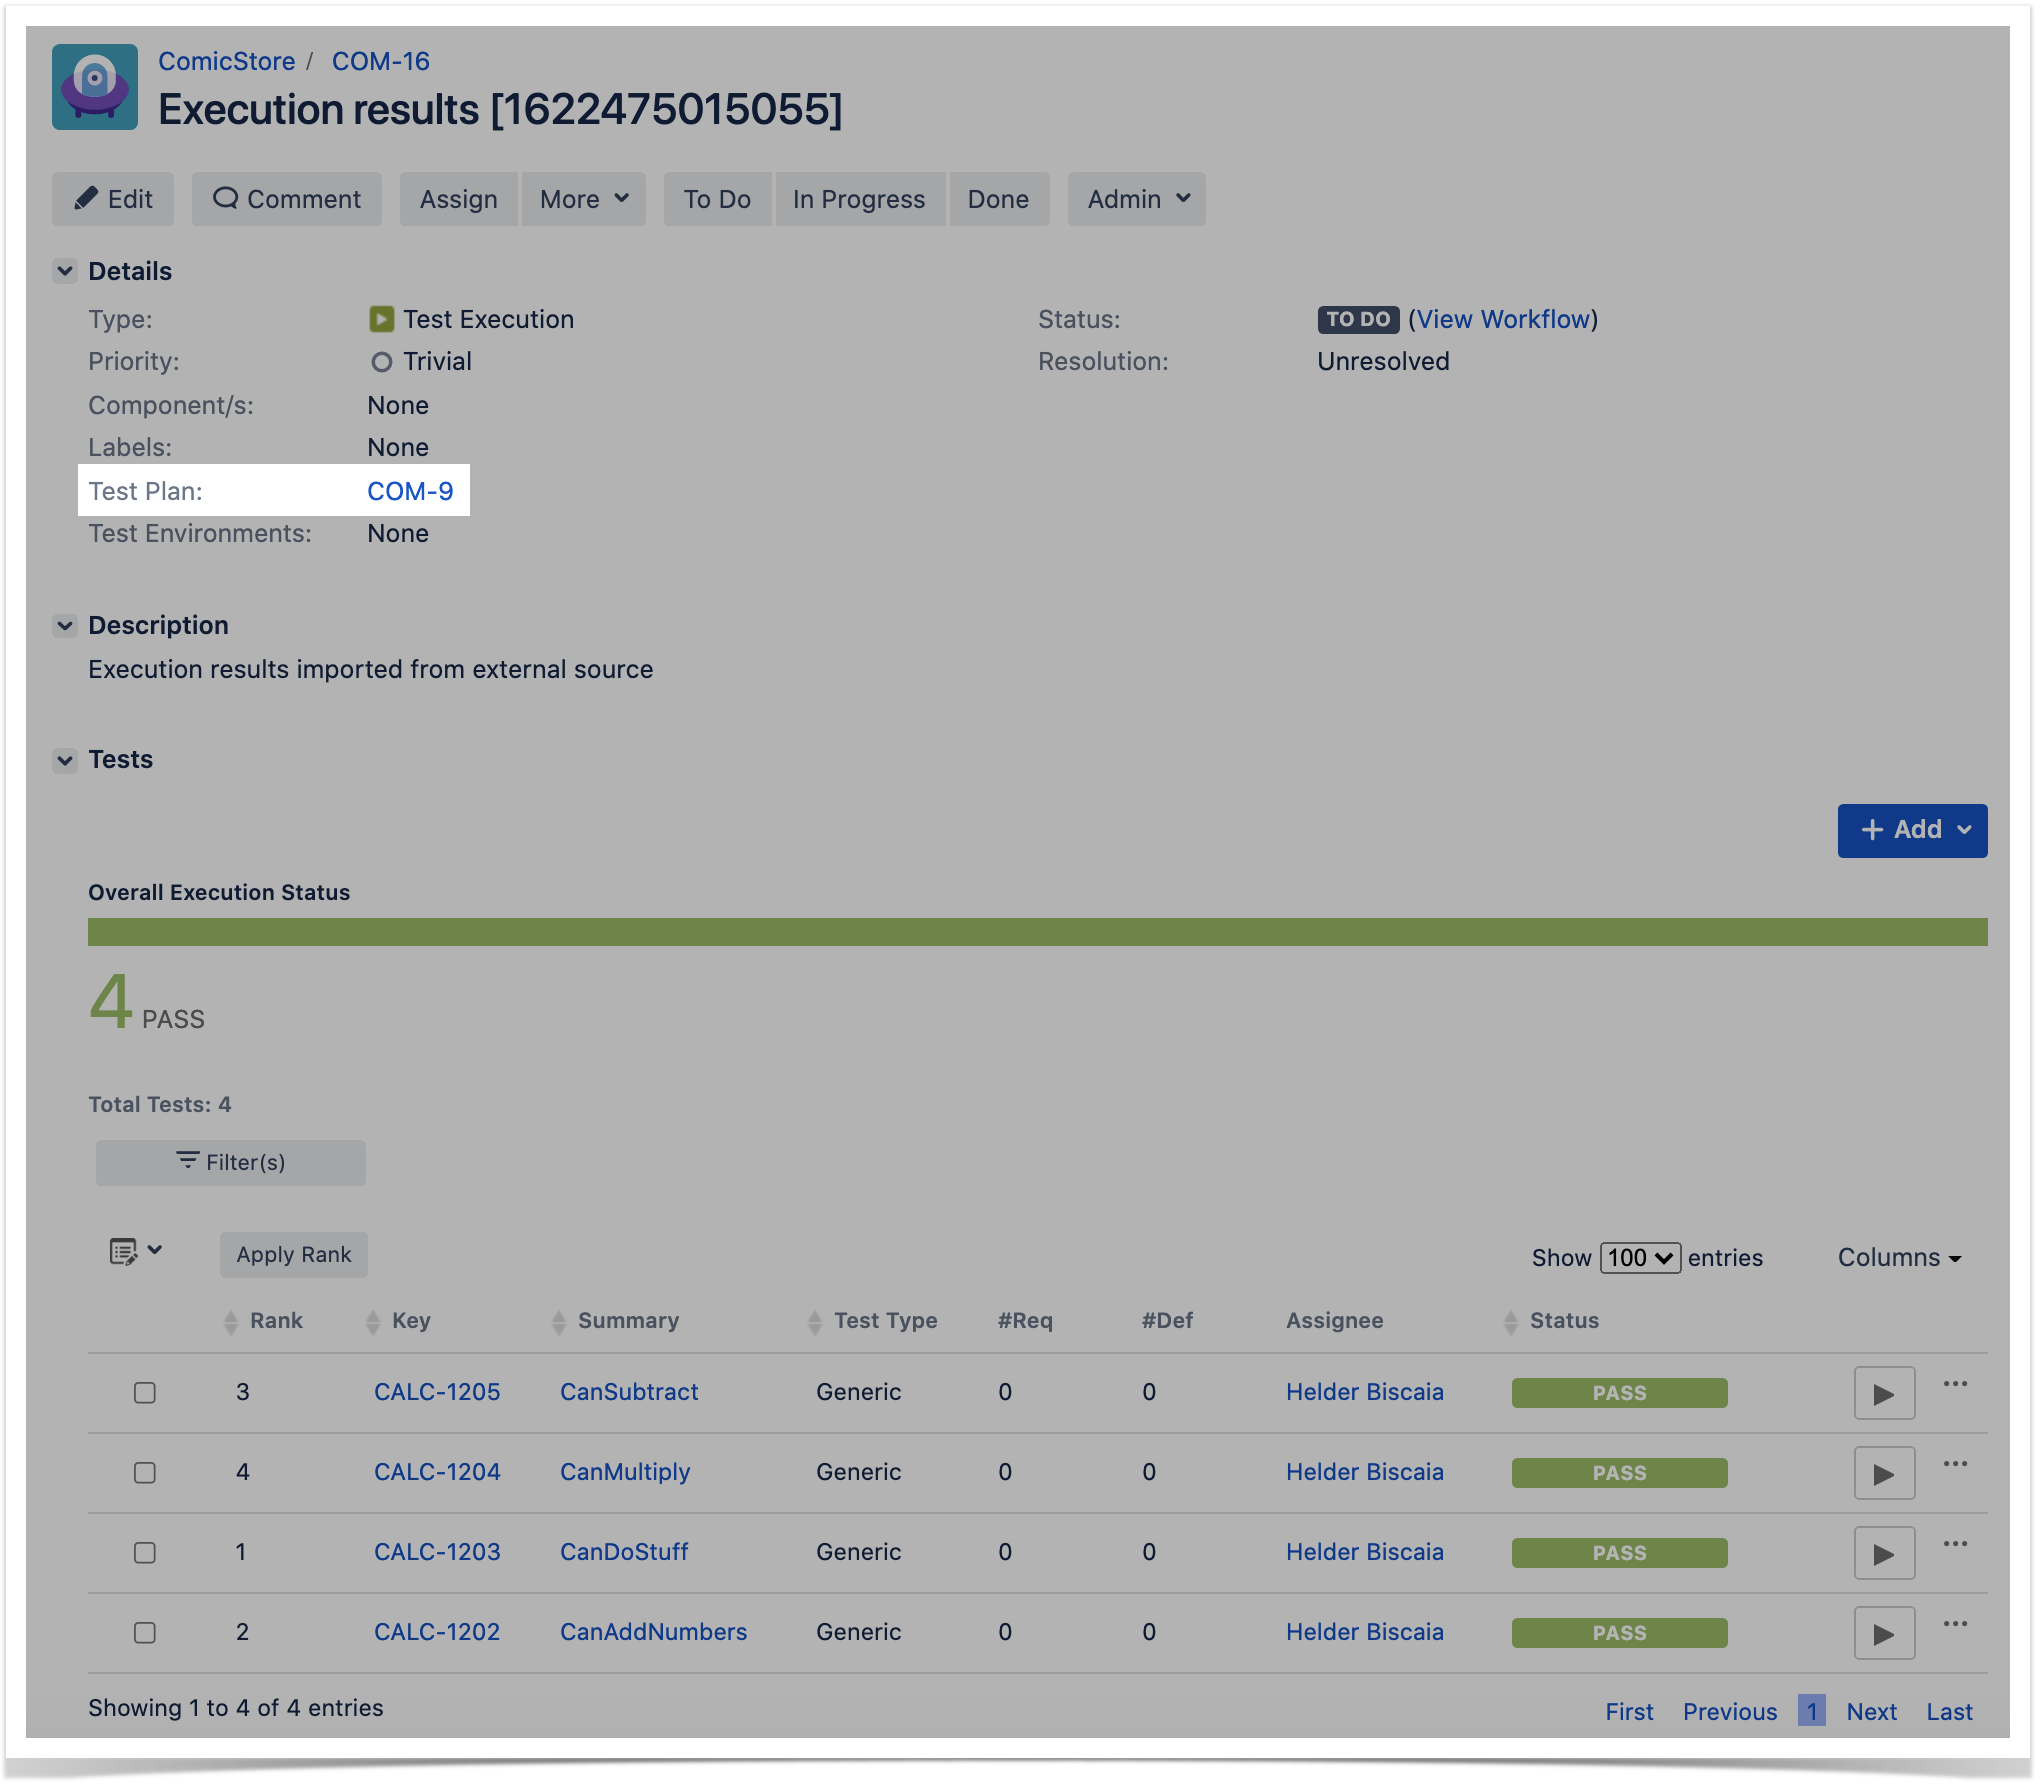
In this case, since Jenkins was configured to report results back to Xray, a new Test Execution would be created in Jira/Xray.
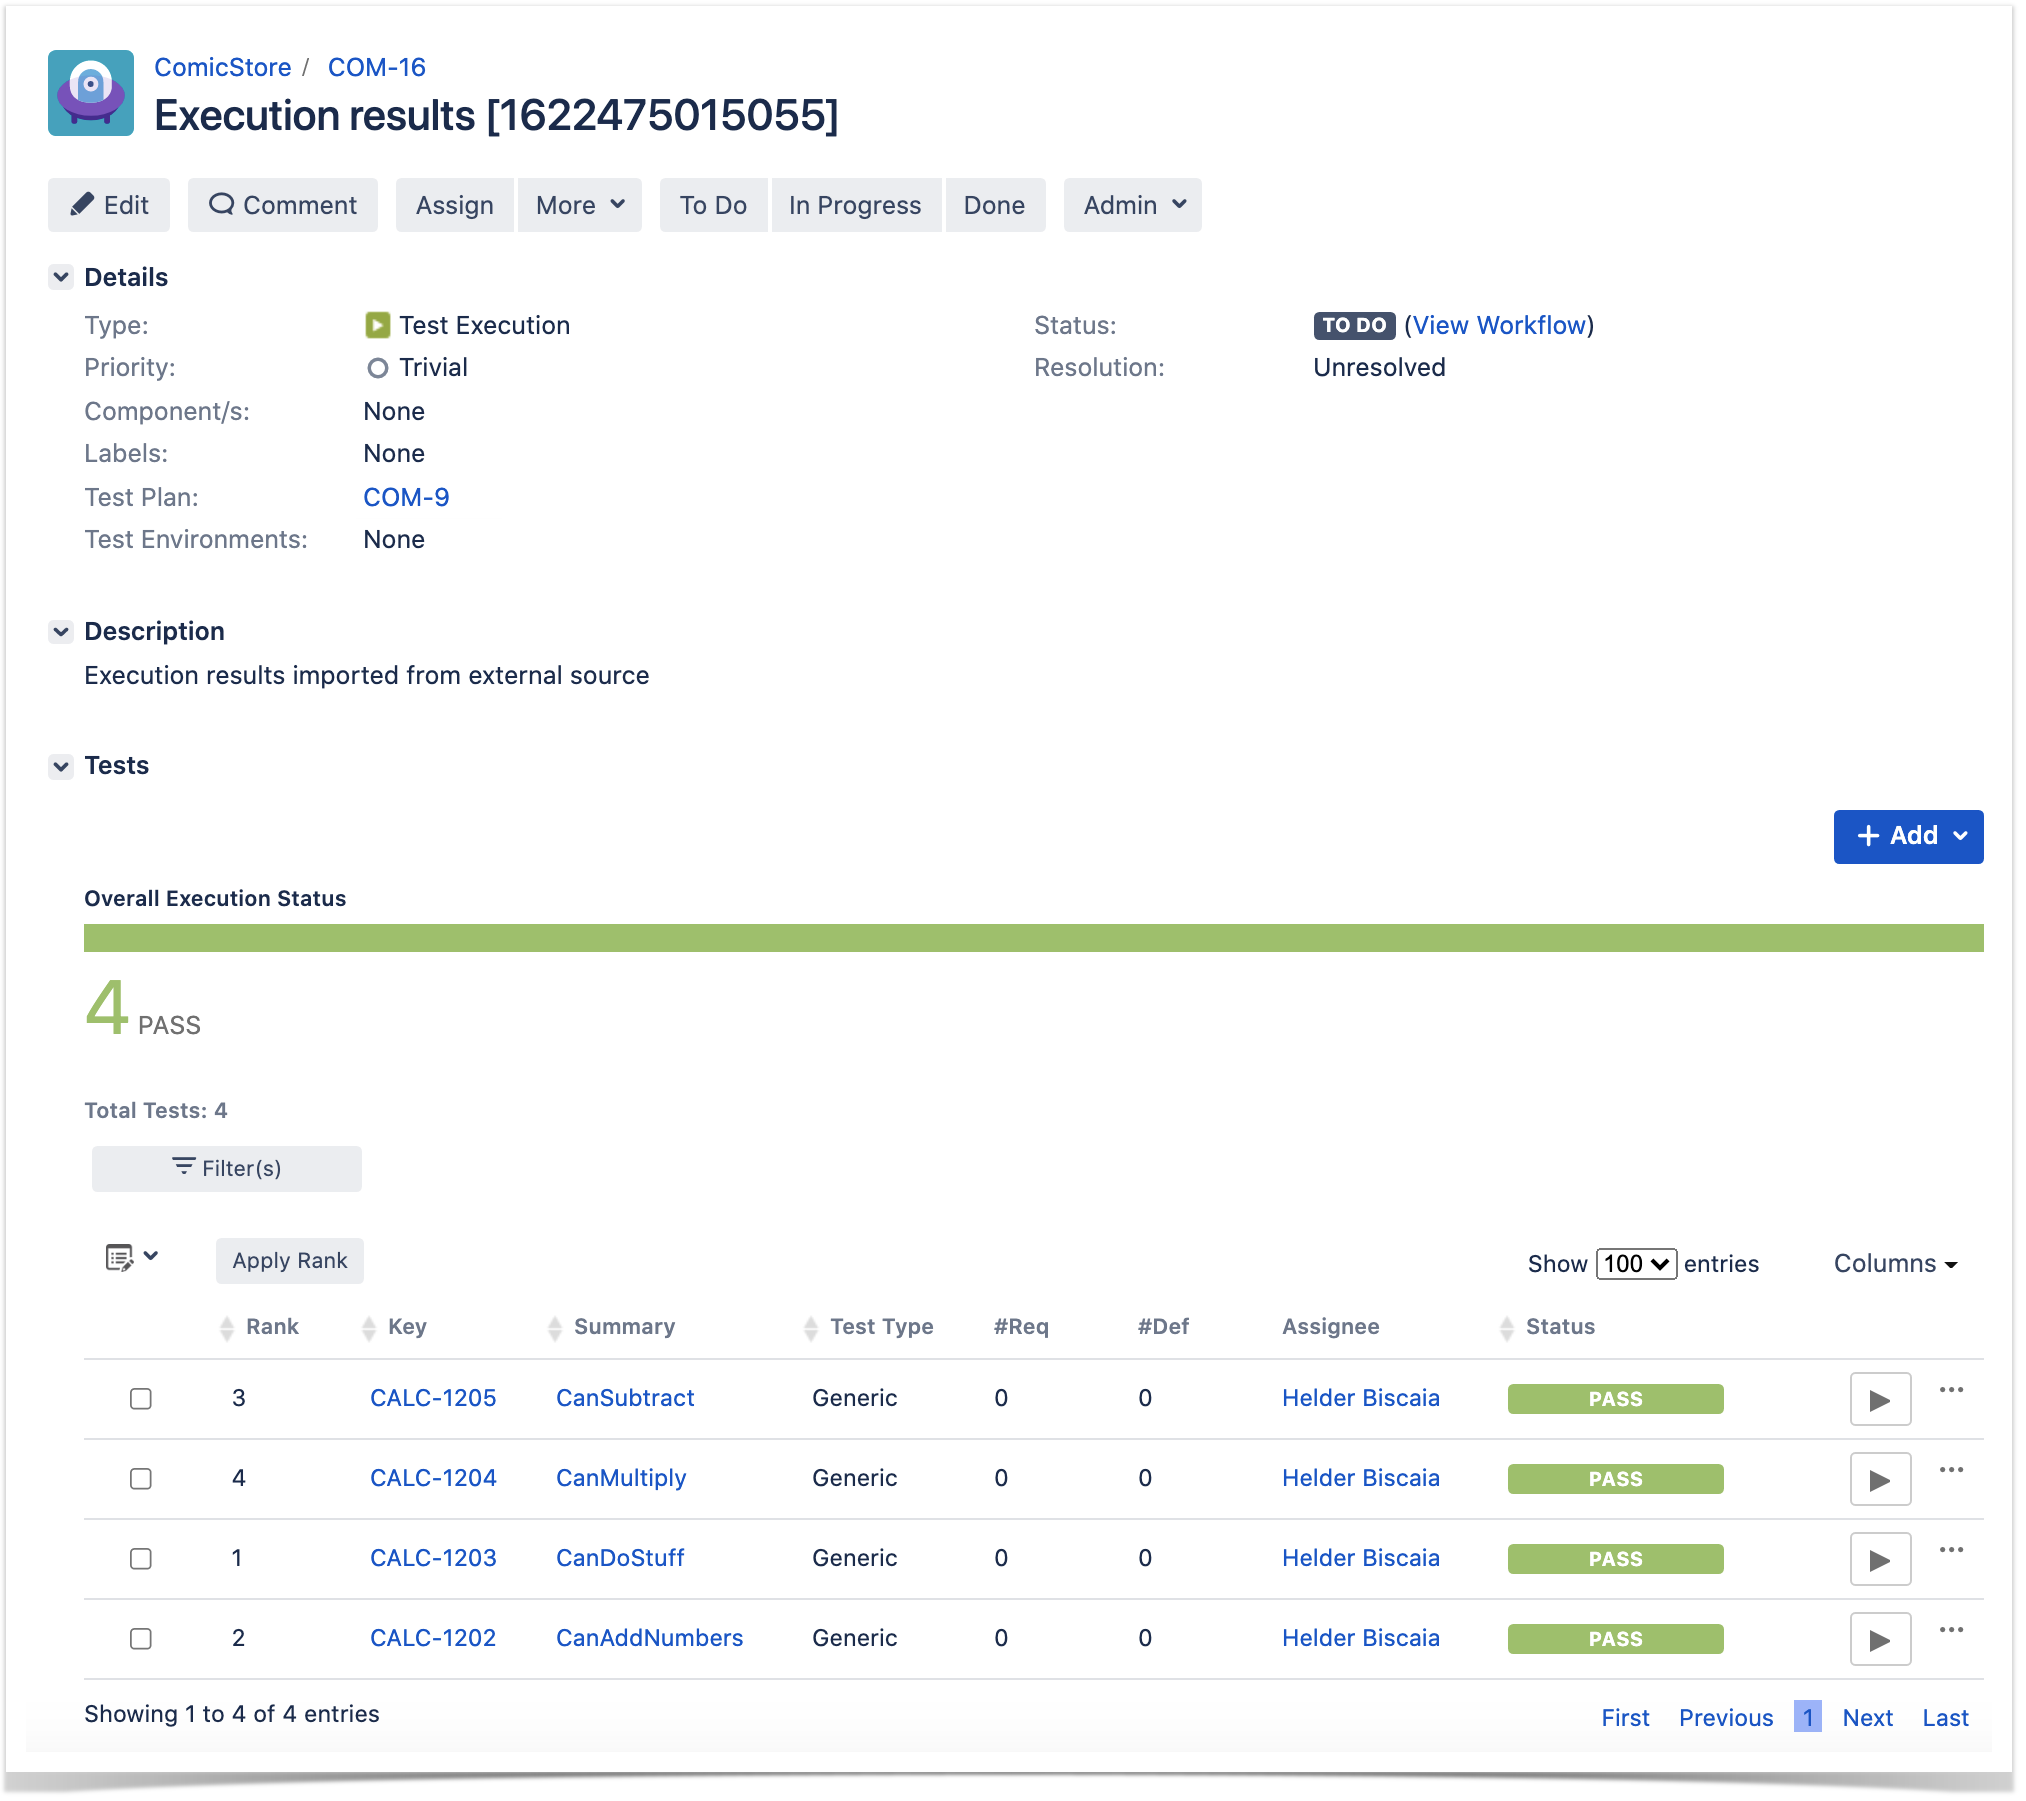
Associated with the Test Plan that we have passed along:
Generic automation of processes
Copy fields from requirement/Story to Test whenever creating a Test or linking it to a story
Sometimes it may be useful to copy some fields from the requirement/Story to the Tests that cover it.
On this command we are passing the project key in order to report back to a specific Project on the Xray side. Further ahead we will show how it is populated.
- PROJECTKEY - The key that identifies the project on the Jira side.
- TESTPLAN - The Test Plan key used to identify the Test Plan to associate the execution with.
Once we have the authentication token, we follow the TravisCI API documentation to configure the following steps on the Jira side.
Automation configuration
On the Jira side we will use the Automation capabilities that it provides out of the box, so within the administration area go to the automation entry in the system settings and:
- create a new rule and define the "When" (i.e. when it to should be triggered), to be "Manually triggered"
2.Define a condition, in our case we will define that only Test Plan issue types will be allowed to trigger this pipeline, this is achieved with the following condition:
3. define an action (i.e. the "Then") as "Send webhook" and configure it as follows
- the Webhook URL provided above follows this syntax:
- <TravisCI_API_URL>/repo/{slug|id}/requests (The %2F in the request URL is required so that the owner and repository name in the repository slug are interpreted as a single URL segment.)
- besides the "Content-Type" header that should be "application/json", define also an "Authorization" header having the value "token <token>", where you will place the authentication token obtained previously in the TravisCI page and the "Travis-API-Version" header is also mandatory and it will contain the version used.
- Custom data
- We included the simplest possible just to trigger the pipeline from the master branch.
- Added environment configuration variables to be used later in the TravisCI pipeline
- TESTPLAN - that will be automatically filled with the test plan key from where the pipeline is triggered.
- PROJECTKEY - that will be automatically filled in with the project key.
After publishing the rule, you can go to the screen of an issue and trigger the Jenkins project/job.
In this case, since Jenkins was configured to report results back to Xray, a new Test Execution would be created in Jira/Xray.
Associated with the Test Plan that we have passed along:
...
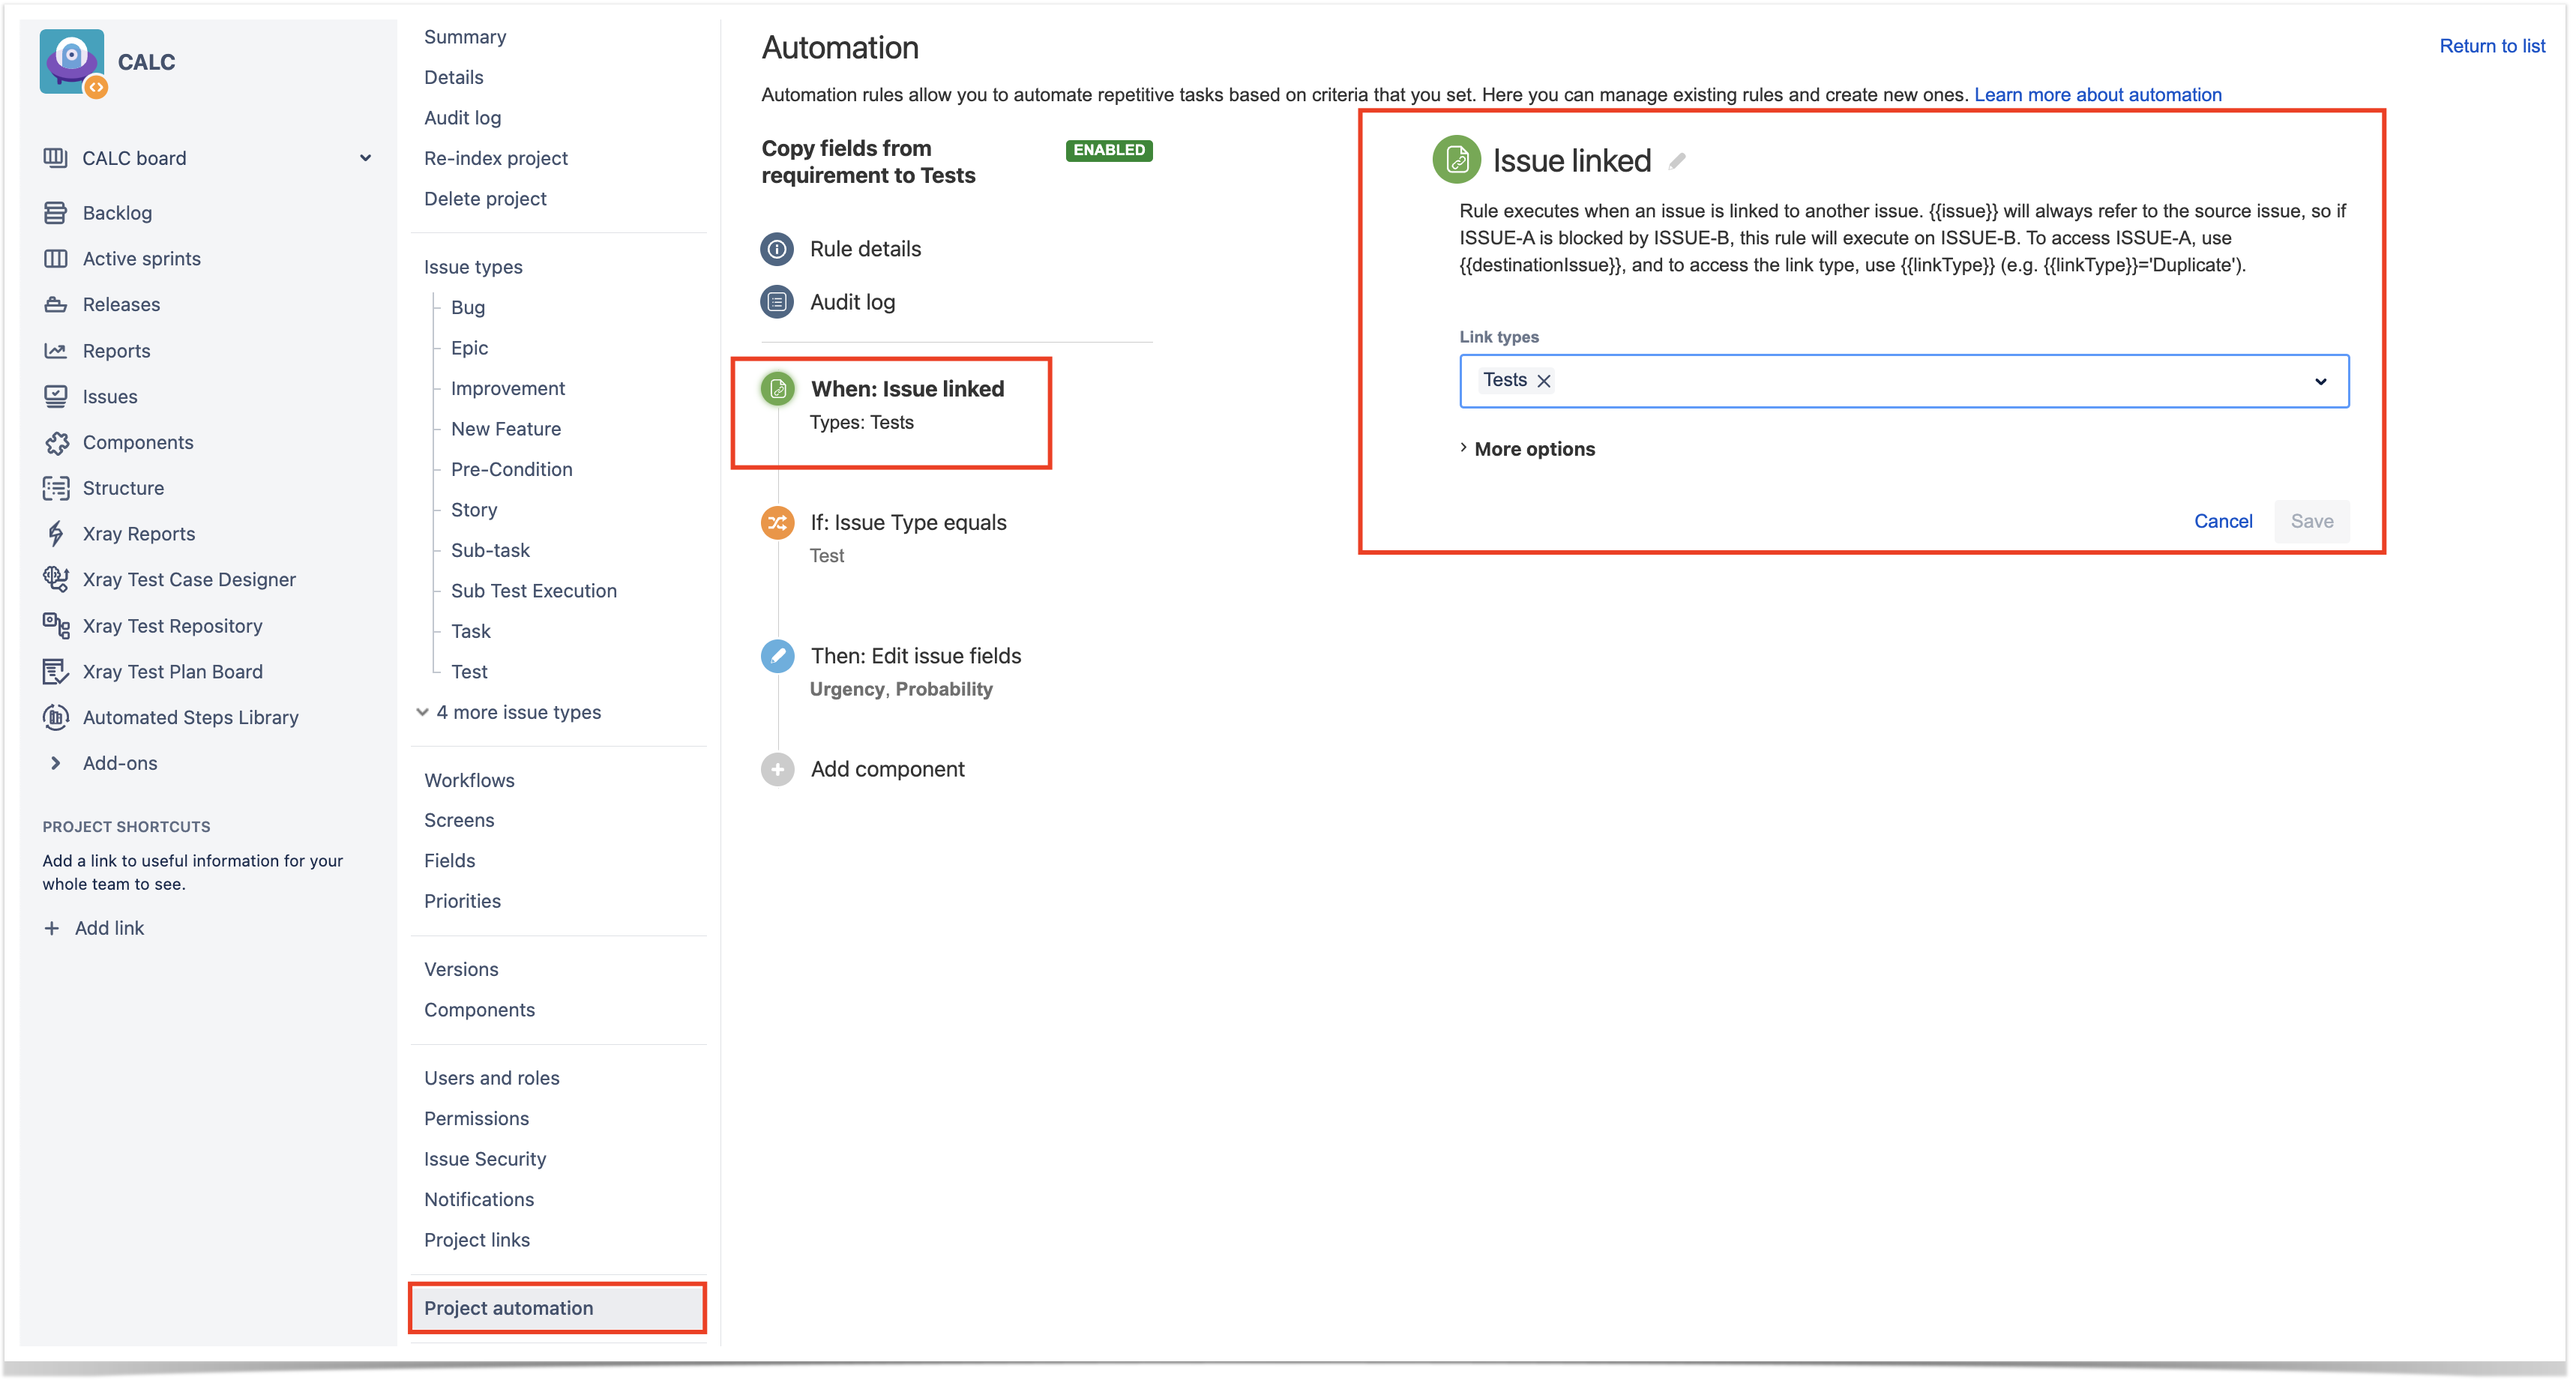
- ) to be "Issue linked". Since Xray, by default, uses the issue link type "Tests" to establish the coverage relation between a Test and the requirement, we can take advantage of that to trigger the rule whenever such issue link is created.
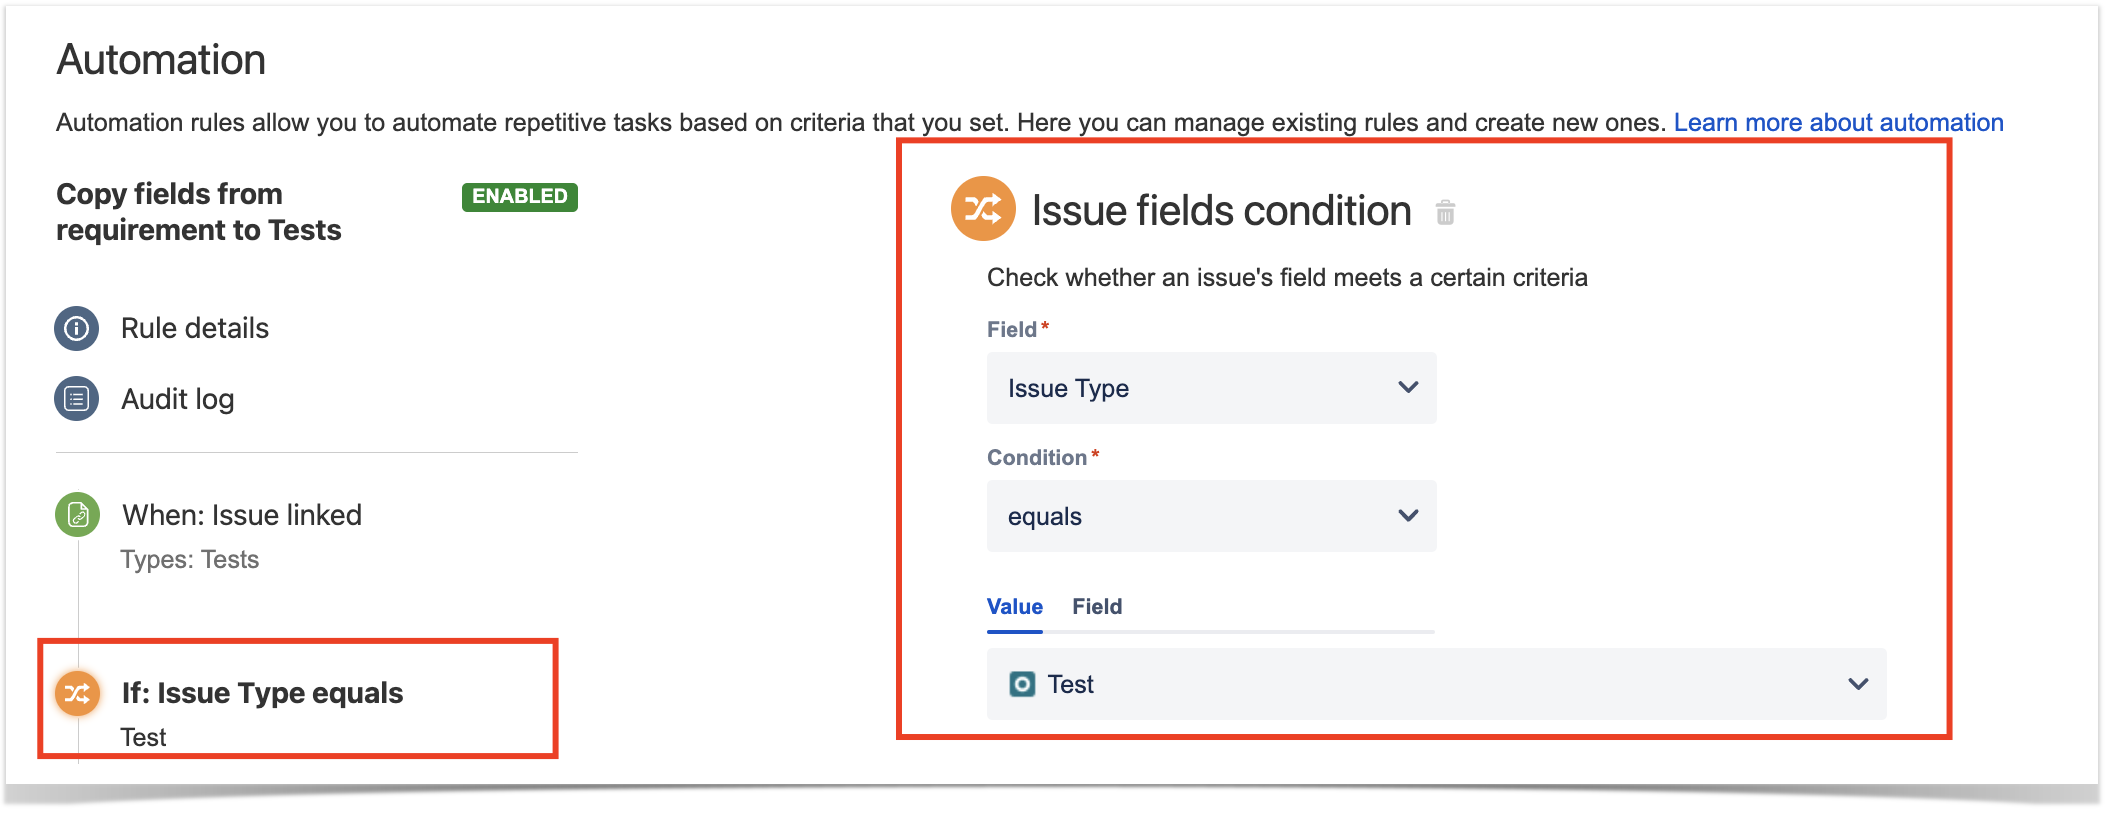
- create a condition to ensure that the rule only runs for Test issues
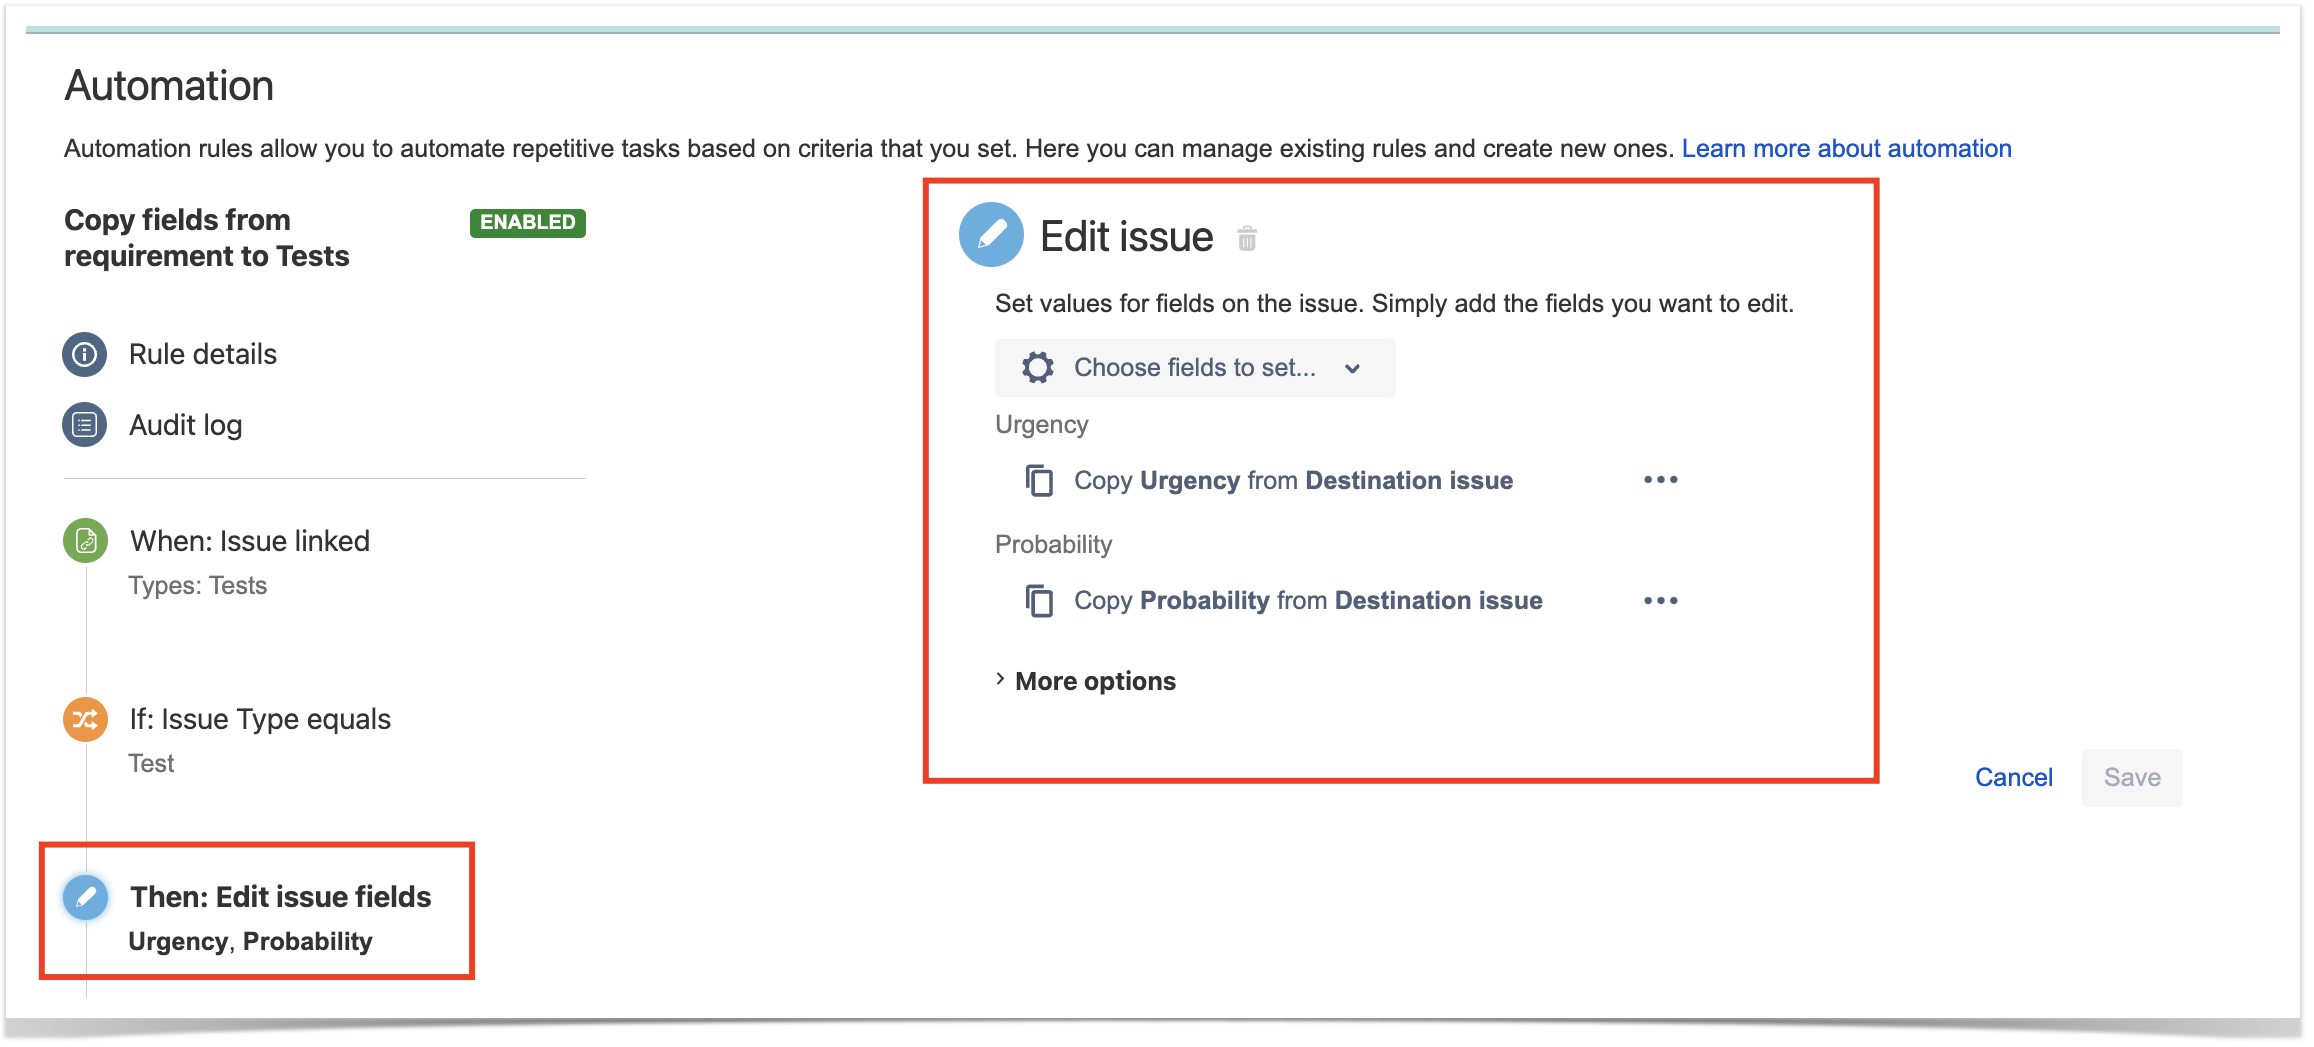
- use an "Edit issue" action to set the fields on the Test based on the fields of the linked requirement/Story (i.e., the destination issue of the linking event). In this example, we'll copy the values of Urgency and Probability custom fields.
This rule will run:
- whenever a Test is created from the requirement/Story issue screen
- whenever a Test has been initially created and later on linked to the requirement
Reopen/transitionTests linked to a requirement whenever the requirement is transitioned or changed
Whenever you change the specification of a requirement/story, you most probably will need to review the Tests that you have already specified.
The following rule tries to perform a transition of all Tests linked to a requirement.
Automation configuration
On the Jira side we will use the Automation capabilities that it provides out of the box, so within the administration area go to the automation entry in the system settings and:
- create a new rule and define the "When" (i.e. when it should be triggered) to be "Field value changed"
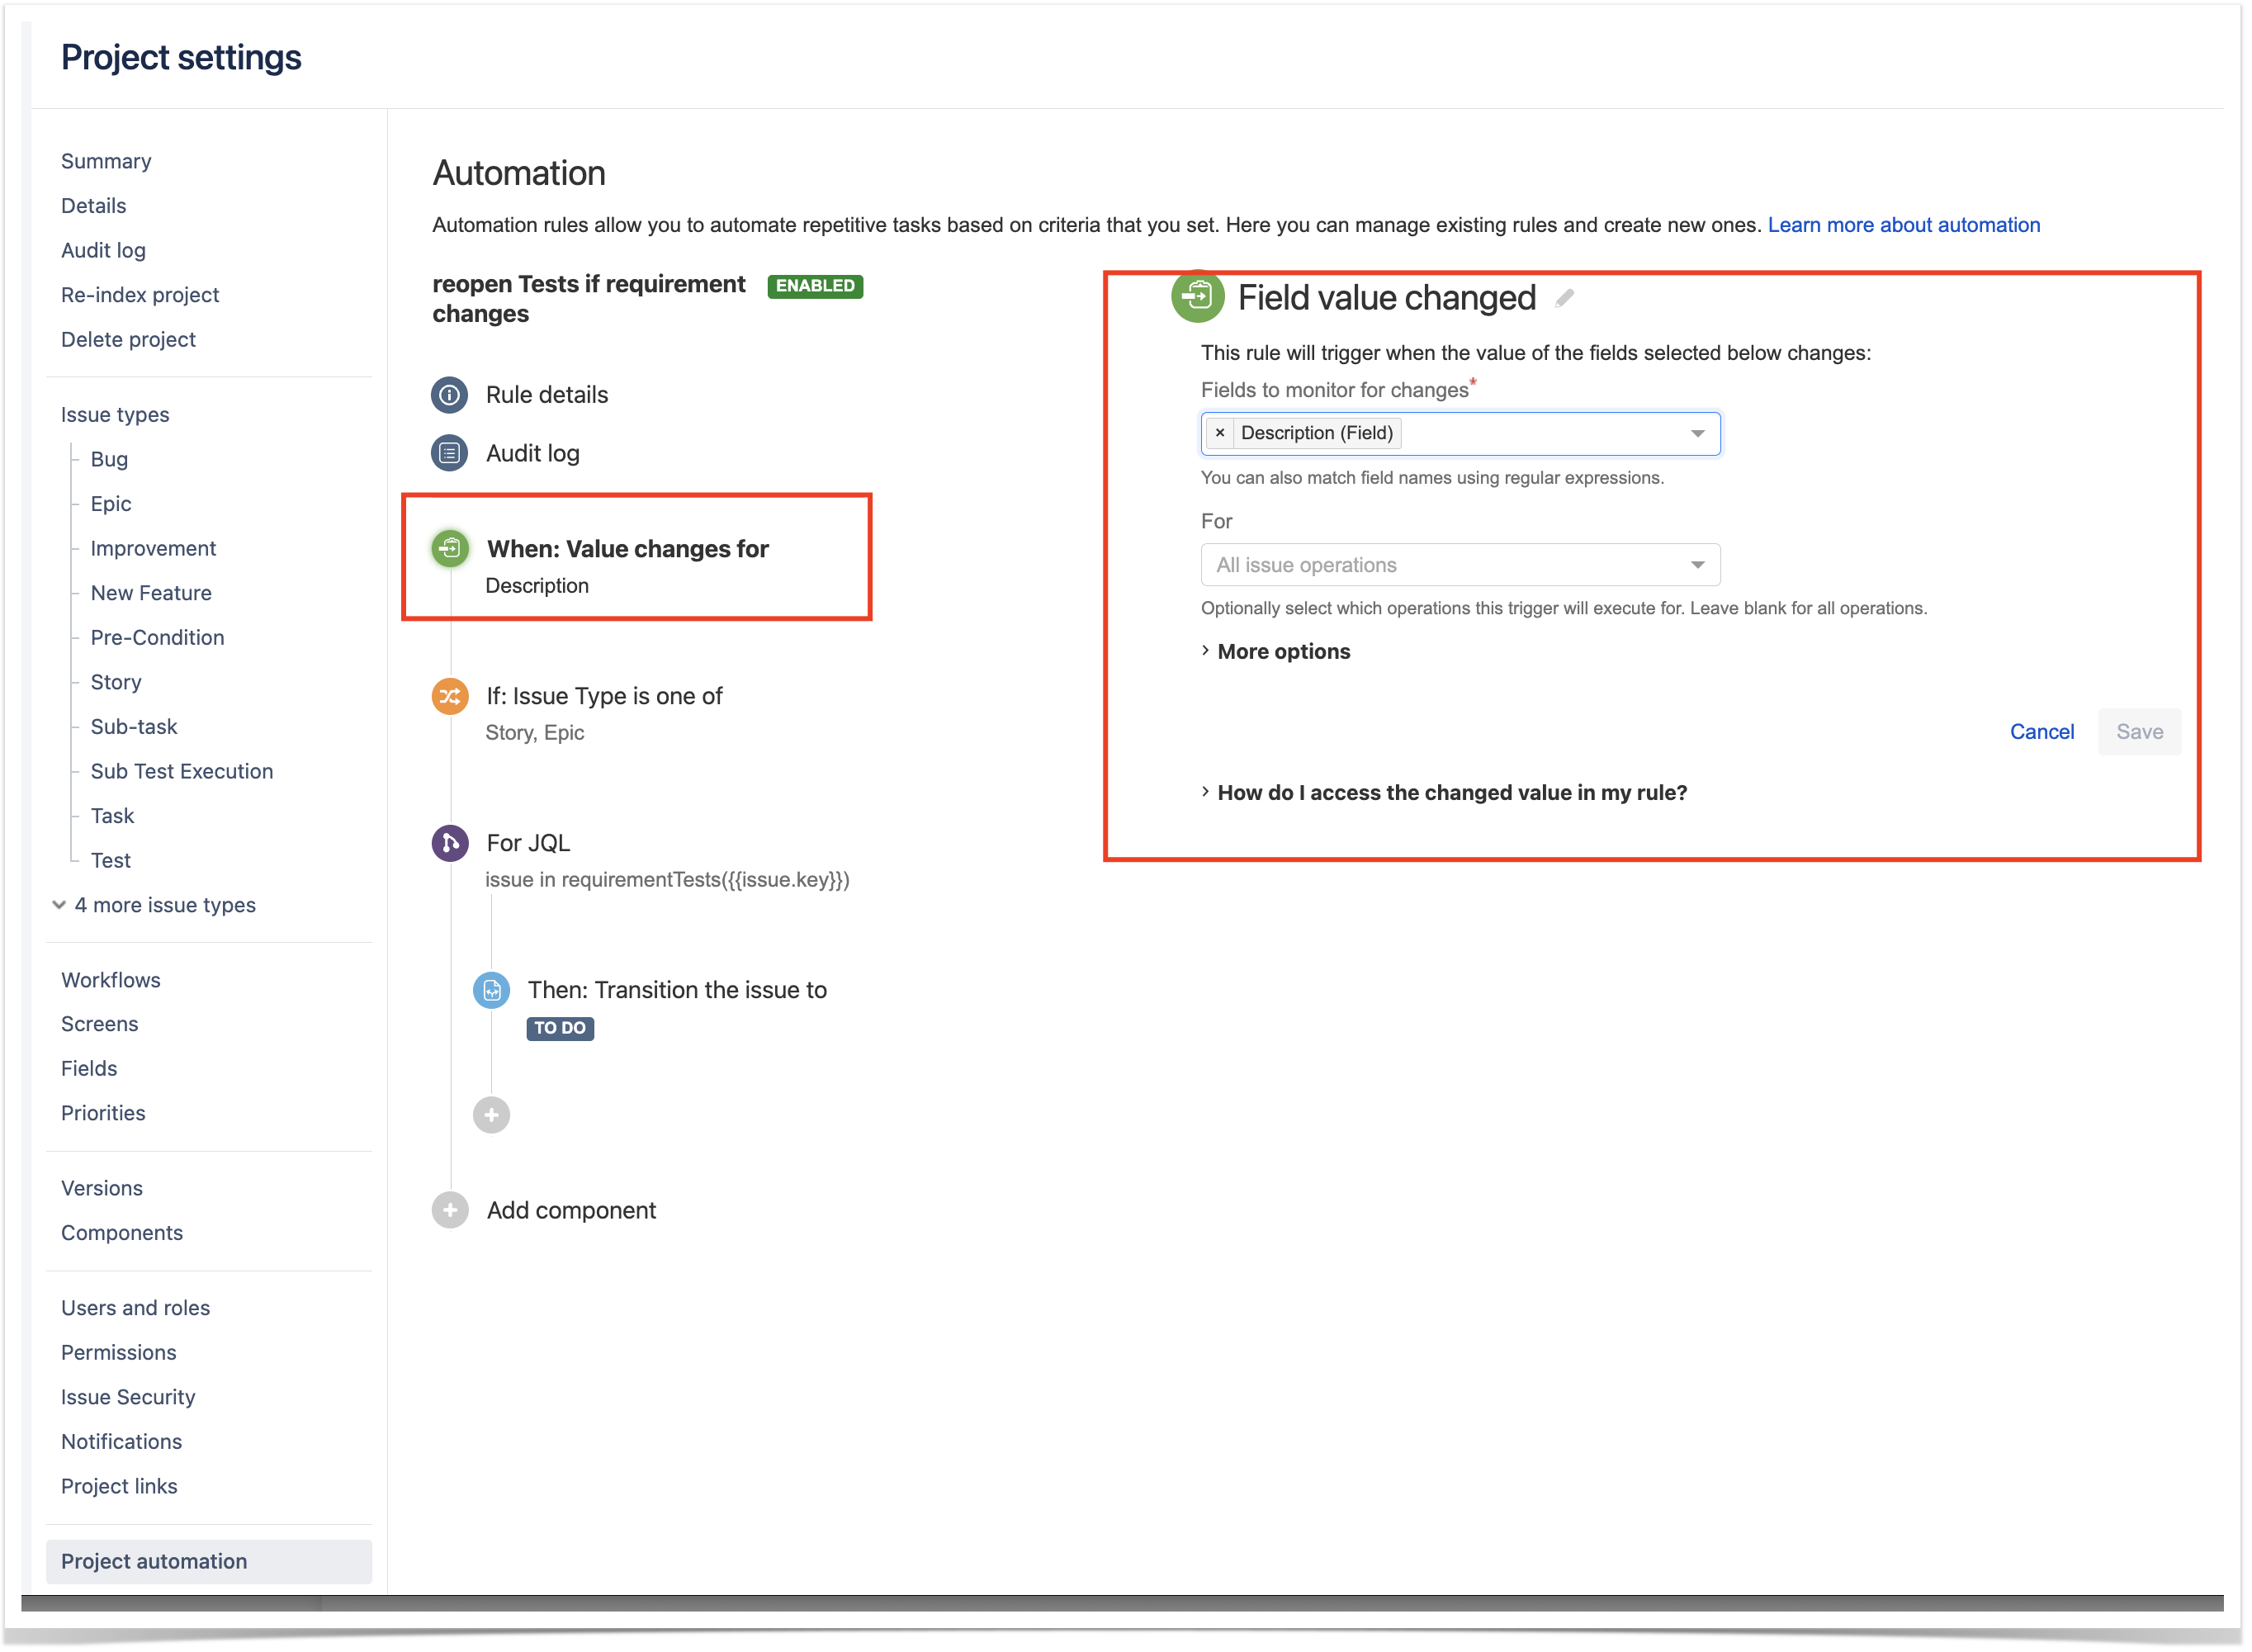
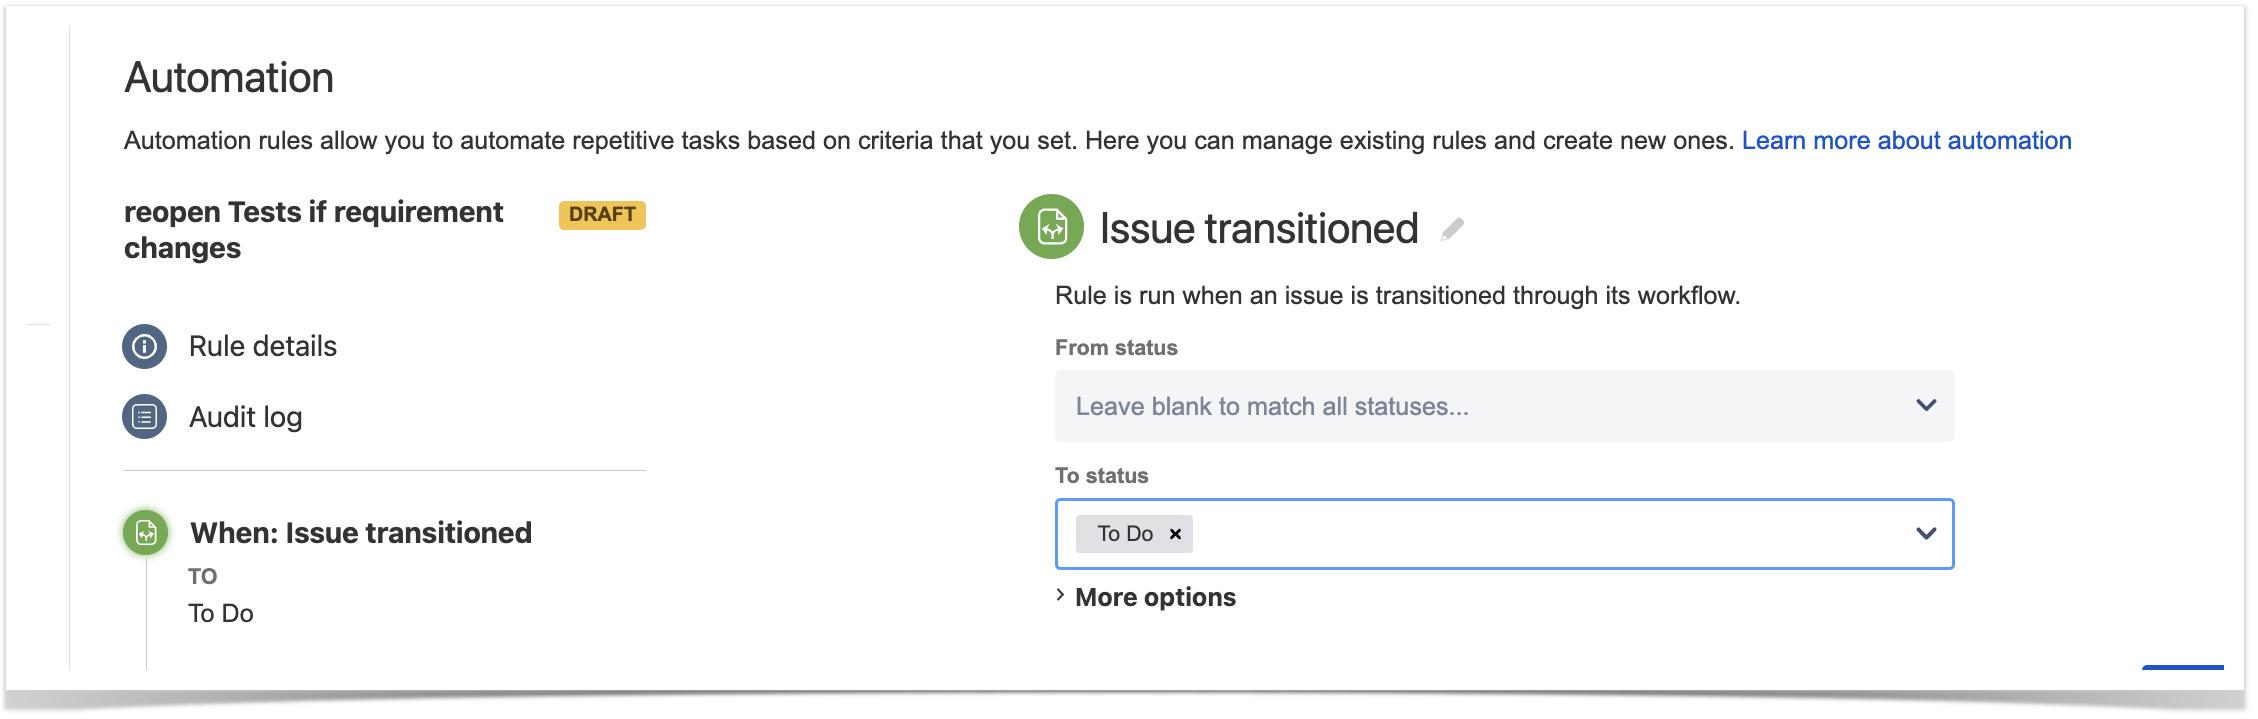
- Note: we could also define the trigger to be based on the transition of the requirement issue to a certain workflow status; in that case we would define it, for example, as shown below.
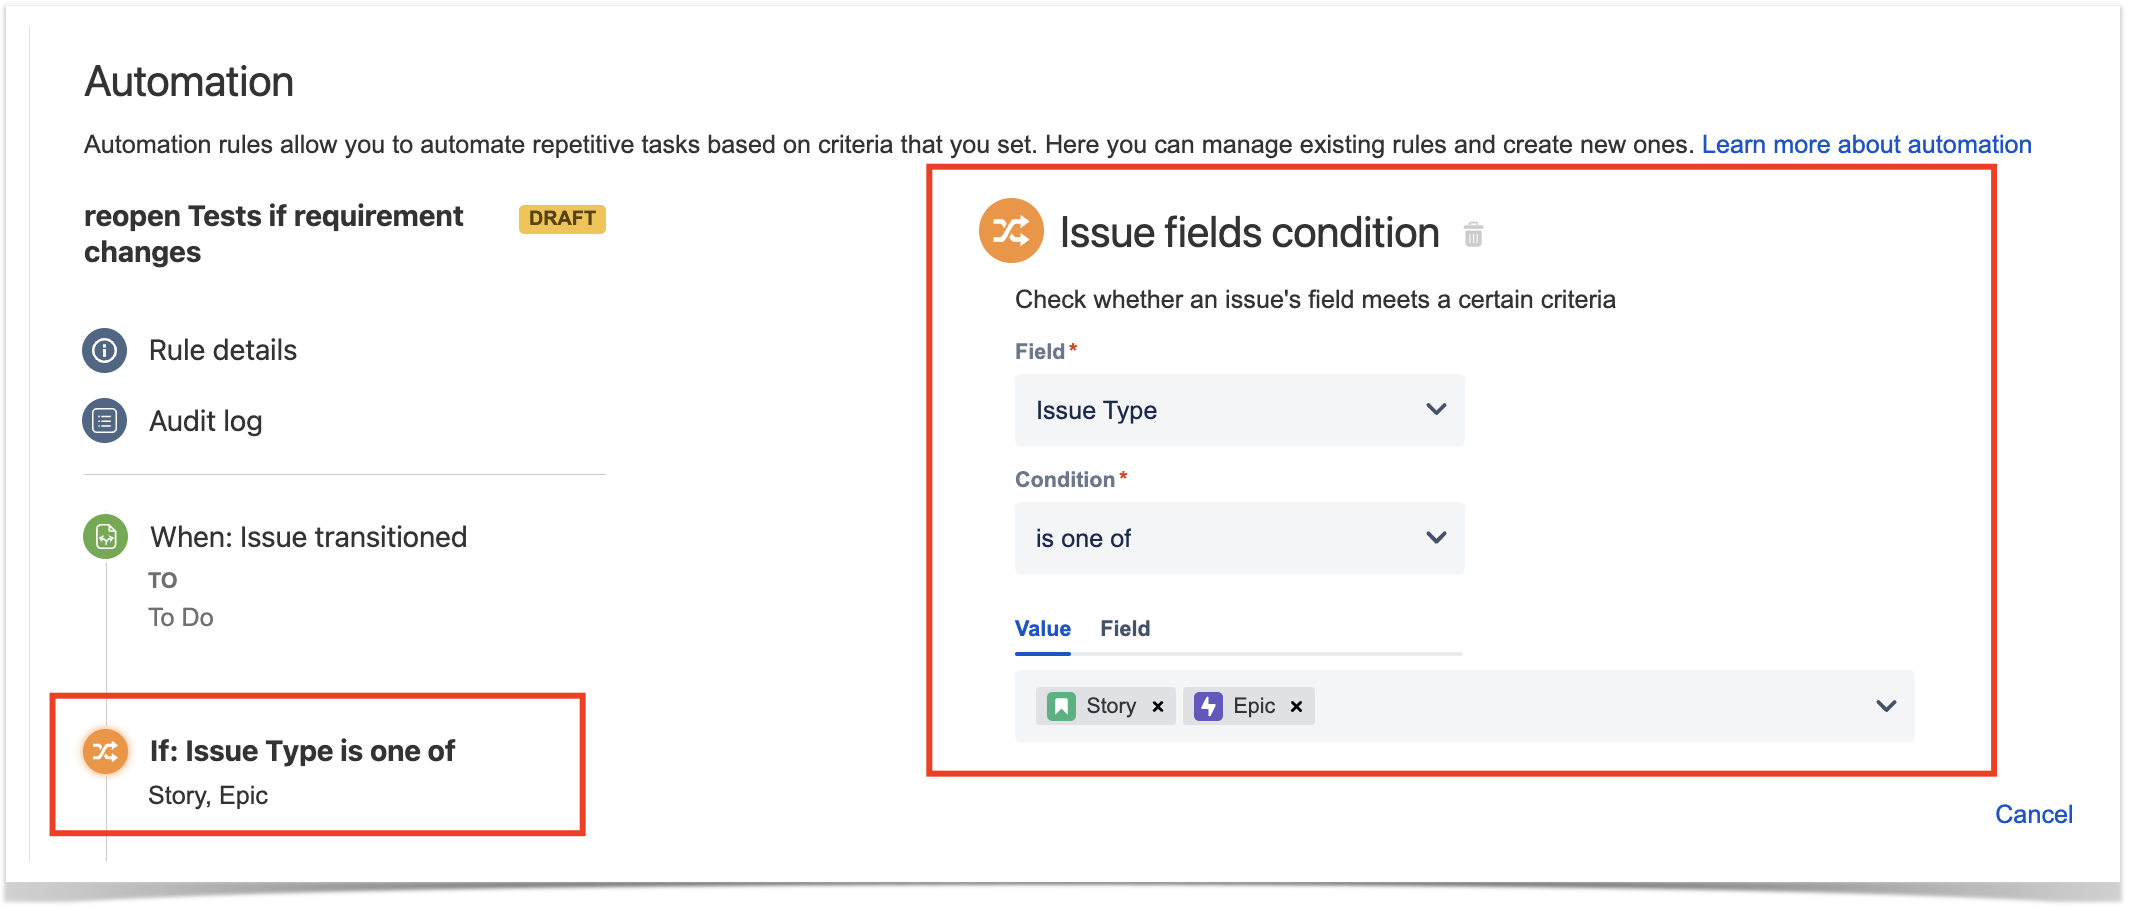
- create a condition to ensure that the rule only runs for Story and Epic issues; adjust these to include all the "requirement" issue types (i.e., the ones that you can cover with Tests)
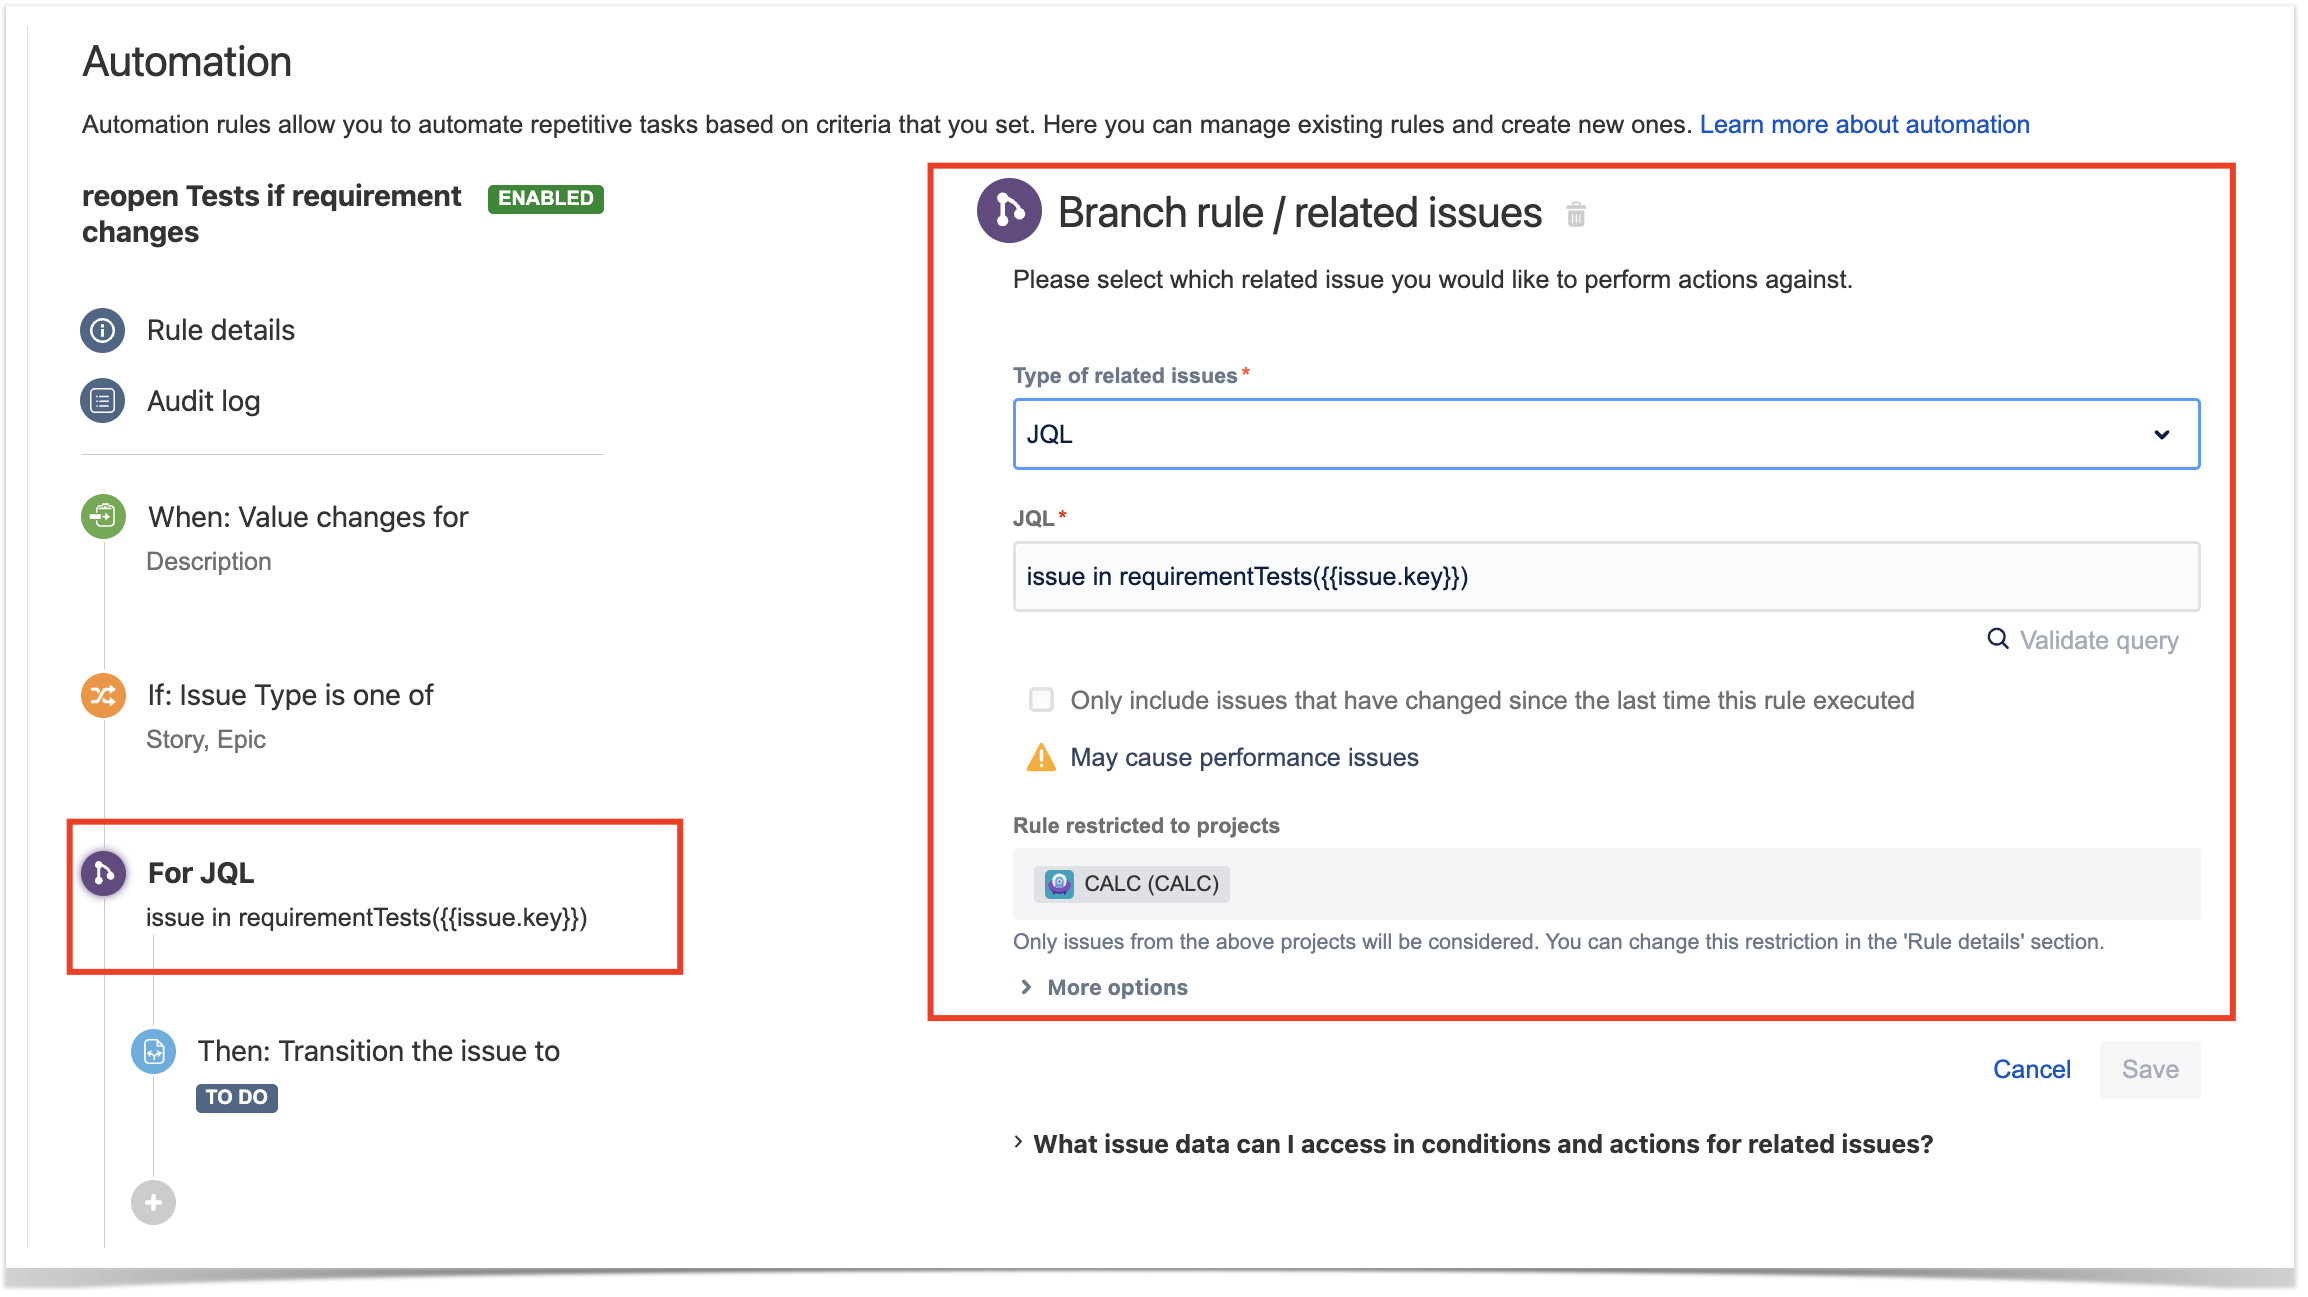
- create a "branch rule / related issues" to obtain related Tests using JQL and the
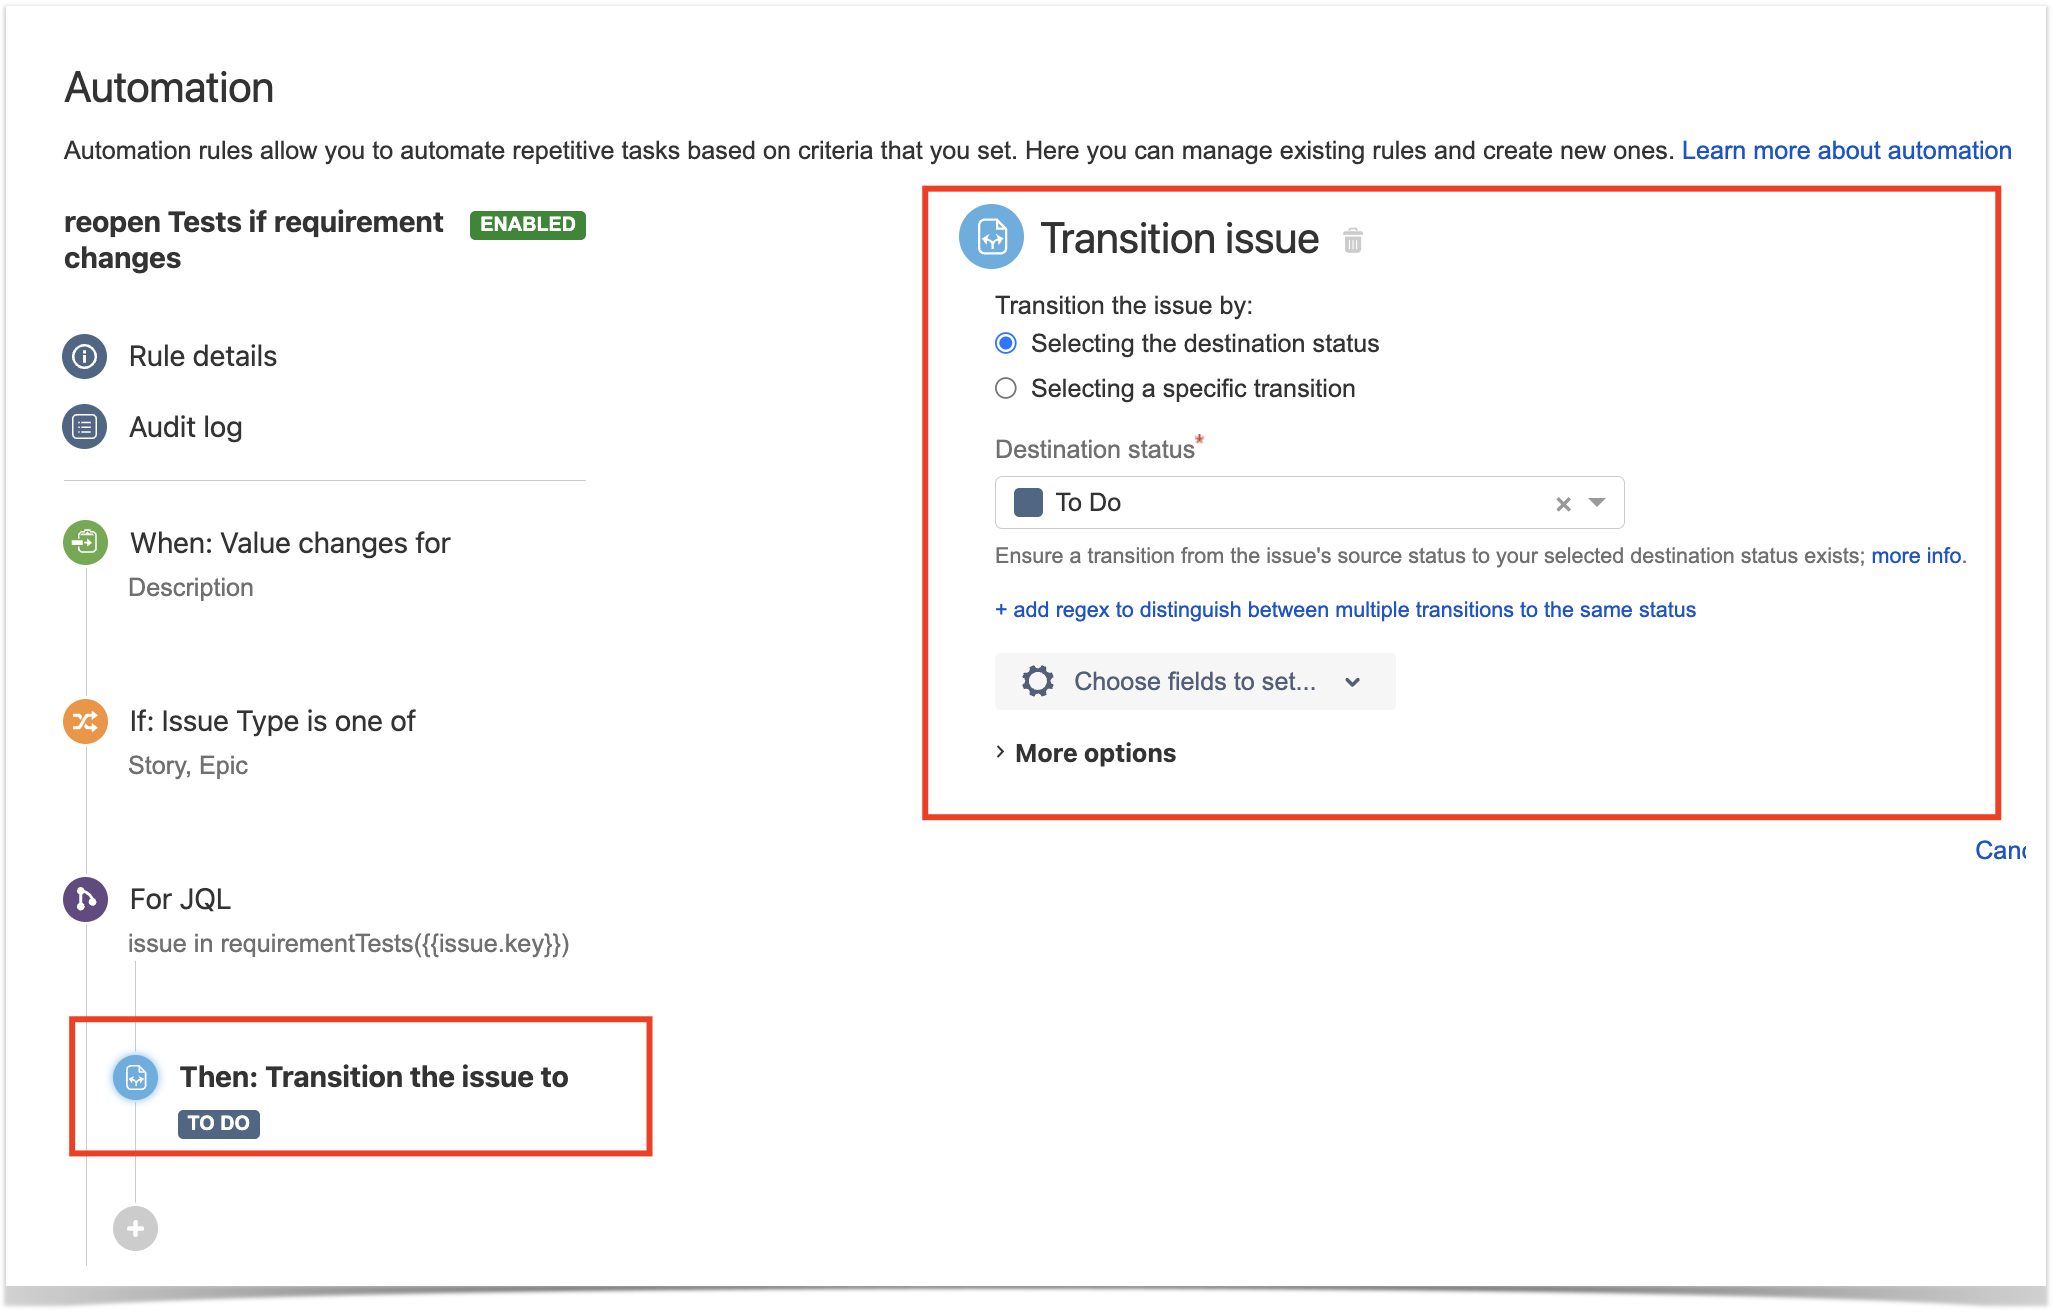
requirementTests()JQL function and run one, or more, action(s) on them - under the "For JQL" block, create a action "Transition the issue to" in order to reopen the related Test issues