Page History
...
Parameters are defined within datasets. However, it is possible to reference a parameter that is not yet defined (meaning it does not have a corresponding name within the dataset). In this case, the parameter will be highlighted in red.


| Info |
|---|
Currently, the test parameterization feature is only available for Manual Tests. Xray will support defining parameters and use datasets on BDD and generic test types as well. |
...
| Section | |||||||
|---|---|---|---|---|---|---|---|
|


Dataset scopes
...
The test dataset is the default. If there is the need to override or change this dataset you can do this at the planning or execution phases.
Dataset limits
...
The parameters will be unfolded on the execution screen, just like Test cases. For this, the dataset must have the same parameters, matched by name.


Execution
All iterations for a given test are executed within the context of the same test run. Each iteration can be expanded and the steps executed individually. The step parameters will be replaced by the corresponding iteration values. The steps affect the iteration status that, in turn, affects the overall test run status.


Please check the Execution page for more details.TODO: link to execution page
Parameterized tests vs test environments
Although test environments can be thought of as a particular case of a parameterized of parameterized tests , (given that environments can be considered parameters of test cases), datasets have might not been designed to be used with be the best choice for environmental variables that are not embedded in the test specification (e.g. manual test steps).
As such, it is not good practice to use datasets with environment variables such as Browsers, OSs, Databases, or Devices. This is because:
- Test engineers often configure a specific setup (or environment) to execute a set of tests. In this case, test engineers might want to execute the tests oriented to the environment and not the test case. This means they execute all the test cases first for one environment, and then for another one, and so on. This way, having all these environments within the same test run is not ideal as users would have to jump from one test run to the other without finishing the execution.
- Usually, test environments are independent variables or dimensions. For instance, let's consider the following test environment: Browser, Database, and OS. If a test case fails only in a specific browser, once the bug is fixed, we might not want to re-execute the same test for all databases and OS's as we are confident that the change did not affect these variables. With datasets, if one of the iterations failiteration fails, you need to re-execute all of the iterations again (if you use a different test run, of course).
- Xray does not provide reports based on parameters.
In In conclusion, if your parameters are environment variables that do not need to be included in the test specification, don't use datasets. Use test environments instead.
...
| Info | ||
|---|---|---|
| ||
We have plans to improve how test environments are managed in Xray. It will be possible to specify or generate combinations of environments for different variables (just like with combinatorial parameters) and have a central place to manage test environments. This feature also includes dedicated reports that are oriented for test environments.TODO: link to Roadmap. Please check our roadmap. |
Defining a parameterized test
...
- Create or edit a given step using either the inline view within the test issue or the steps dialog.
- When specifying a step, to reference a parameter you have two options:
- Start typing ${. If there is a default dataset defined on the test, you should see a list of the available parameters. Choose the desired parameter using the cursor keys or mouse. The parameter will be placed with the text.
- Use the toolbar button ${. After pressing this button, and if there is a default dataset defined on the test, you should see a list of the available parameters. Choose the desired parameter using the cursor keys or mouse. The parameter will be placed on the cursor position.


Creating a dataset
...
a. create an ad hoc list just for this parameter. You need to specify the values for the list.


b. use a project predefined list.


2.5. Press "Save" to create the parameter. The parameter must be placed on the dataset.


3. Adding combinatorial parameter values:
...
3.1. For text parameters, just type the value and press the check button next to the field.


3.2. For list parameters, select an option and press the check button next to the field.


4. Adding rows (filling the parameter values):
...
You can navigate between cells of the same row and also between rows using the keyboard: TAB (forward), SHIFT+TAB (backward).


4.2. To create new rows, you can press the "New" button below the table or navigate using the keyboard from the last row (a new row will be created automatically by navigating forward on the last cell of the last row).


5. Converting a seeding parameter to a combinatorial parameter:
...
5.1. Next to each column, there is an options button. Clicking this button will reveal a menu with options for Editing, Deleting, and Converting parameters.


5.2. Click on "Convert to combinatorial parameter."


6. Converting a combinatorial parameter to a seeding parameter:
...
6.1. Next to each combinatorial column, there is an options button. Clicking this button will reveal a menu with options for Editing, Deleting, and Converting parameters.

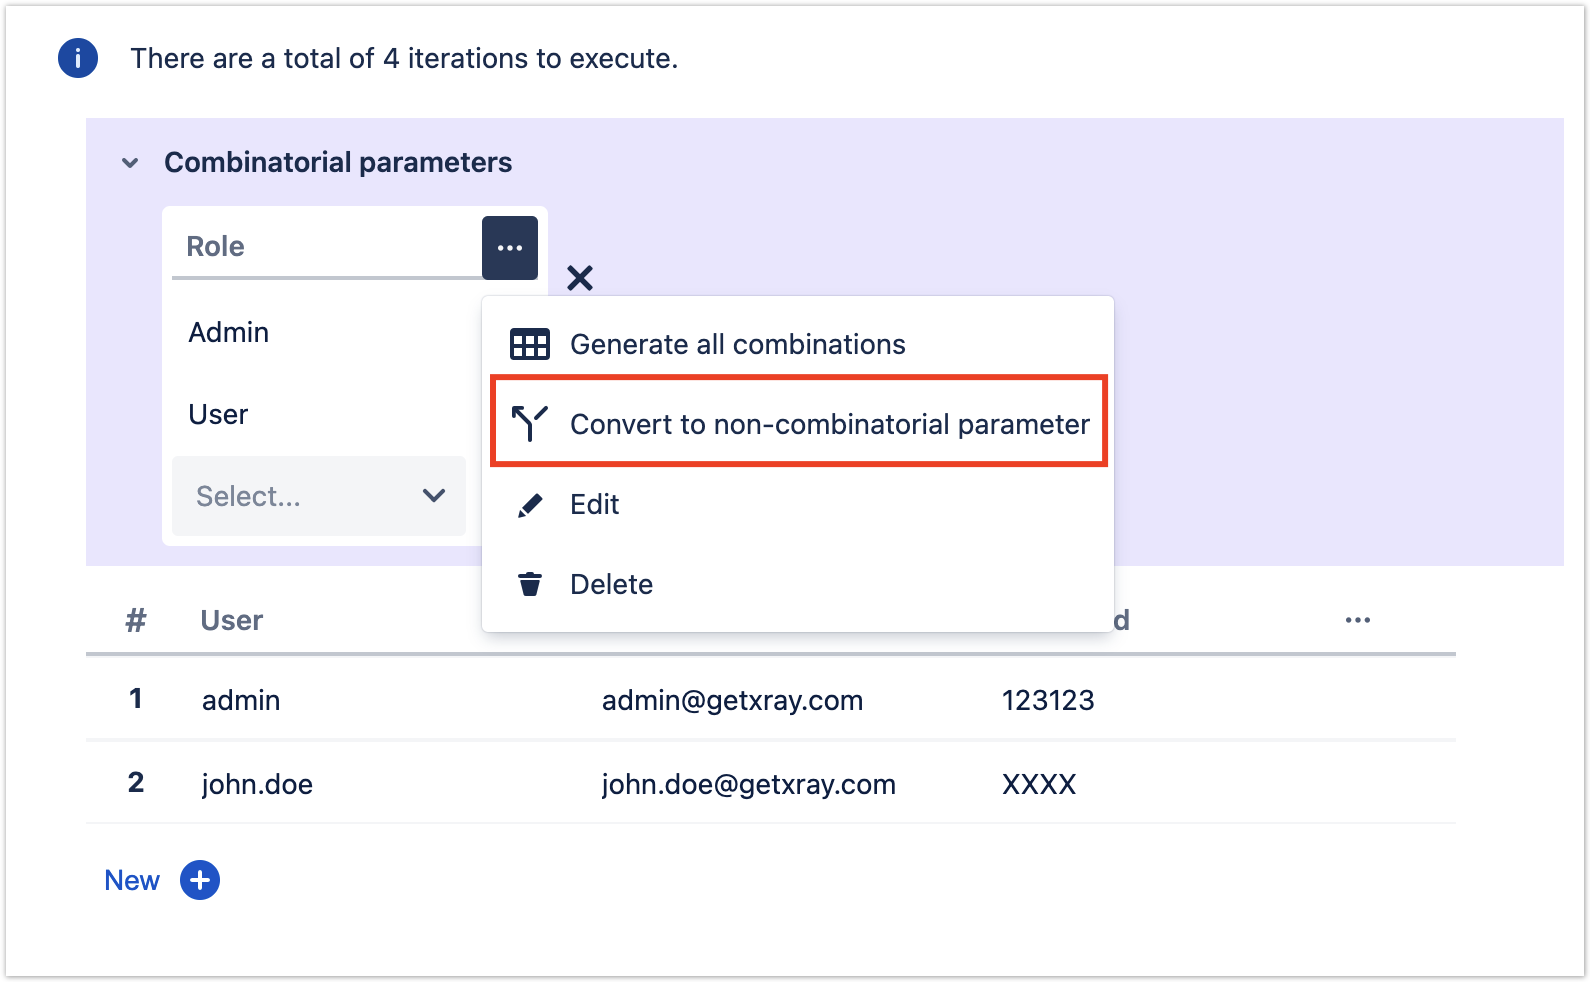
6.2. Click on the "Convert to non-combinatorial parameter".
...
7.1. Next to each combinatorial column, there is an options button. Clicking this button will reveal a menu with options for Editing, Deleting, Converting parameters, and Generating all combinations.


7.2. Click on the "Generate all combinations." A confirmation dialog will appear. Confirming the changes will apply the cartesian product between the combinational parameter values and the seeding parameter rows.


8.
...
Move left/right:
You can re-order any parameters in your dataset, by selecting the "Move left/right" option.
8.1. Open the options menu in either a Combinatorial or non-combinatorial (seeding) parameter, you will have a "Move left/right" option available. Notice that if the parameter is already place on the most outer left (right) position, the "Move left" (right) option is not available.

8.2. Select the move left/right option, This will swap the positions of the parameters.

9. After having performed all changes in the dataset, you need to press the "Save" button in order to persist the dataset into the database.
Importing a dataset from a CSV file
Besides defining a dataset by creating parameters and setting their values directly using the Xray UI, it is also possible to import an existing dataset from a CSV file.
In order to import a CSV file:
1. Open the dataset dialog.
2. Choose the "Import from CSV" option available on the Import dropdown button (located on the empty state view or on the dataset main button toolbar). A dialog will appear.
3. Select and fill the following options:
- File - find a local CSV file with the desired dataset
- CSV delimiter - defaults to "," but you can choose any other character
- File encoding - defaults to UTF-8
- Overwrite existing parameter values - if checked, this option will delete any values from existing parameters
- Create new parameters - If checked, it will create non-existing parameters automatically, based on the CSV column name. Otherwise, it will just append/update the values on the existing parameters.

4. Press "Import" to import the external dataset.
| Info | ||
|---|---|---|
| ||
You can also import combinational parameters. Any parameter with an asterisk suffix will be considered a combinational parameter. E.g., Quality*. In this case, the "Create new parameters" option must be enabled. |
Exporting a dataset to a CSV file
To export a dataset to a CSV file:
1. Open the Dataset dialog.
2. Click the options button next to the import button. Clicking this button will reveal a menu with options for Export to CSV and Delete.

3. Click the Export to CSV. A file should be downloaded.
| Info | ||
|---|---|---|
| ||
The delimiter used to generate the CSV file is a comma. The combinatorial parameters will be exported with an asterisk as a suffix |
Importing a dataset from a CSV file
Besides defining a dataset by creating parameters and setting their values directly using the Xray UI, it is also possible to import an existing dataset from a CSV file.
In order to import a CSV file:
1. Open the dataset dialog.
2. Choose the "Import from CSV" option available on the Import dropdown button (located on the empty state view or on the dataset main button toolbar). A dialog will appear.
3. Select and fill the following options:
- File - find a local CSV file with the desired dataset
- CSV delimiter - defaults to "," but you can choose any other character
- File encoding - defaults to UTF-8
- Overwrite existing parameter values - if checked, this option will delete any values from existing parameters
- Create new parameters - If checked, it will create non-existing parameters automatically, based on the CSV column name. Otherwise, it will just append/update the values on the existing parameters.

4. Press "Import" to import the external dataset.
| Info | ||
|---|---|---|
| ||
You can also import combinational parameters. Any parameter with an asterisk suffix will be considered a combinational parameter. E.g., Quality*. In this case, the "Create new parameters" option must be enabled. |
Overriding a dataset in a test plan or test execution
...
2.2. Open the dataset dialog by selecting the "Dataset" action from the test row options menu.

3. The dataset dialog is opened.
3.1. If there is a dataset defined on a parent level, it is possible to Override the parent dataset and modify its values.


3.2. Otherwise, you can start defining a new dataset at this level.
...