Page History
...
In this tutorial, we will create some UI tests as Cucumber Scenario(s)/Scenario Outline(s) and use WebDriverIO to implement the tests in JavaScript.
...
For the purpose of this tutorial, we'll use one of the a dummy website website provided provided by Heroku, in . In our case containing , it contains just a few pages to support login kind of features ; we aim to test precisely those featureswhich we will be testing.
To start using WebDriverIO please follow the Get Started documentation.
...
The test consists in validating the login feature (with valid and invalid credentials) of the demo site, for that we have created a feature file that will have the description of the test supported by a base page that contain contains all methods and functionality that is shared across all page objects, a login page, that will extend the base page, that will have all the methods for interacting with the login page and a result page that will have the methods to interact in the page that is loaded after the login operation.
We have followed the documentation and executed first the command to install the WebDriverIO test runner:
| Code Block | ||||
|---|---|---|---|---|
| ||||
npm install @wdio/cli |
Then we answer answered a series of questions that will define the code to be generated using:
| Code Block | ||||
|---|---|---|---|---|
| ||||
npx wdio config |
The output of the questionaire questionnaire will look like this:
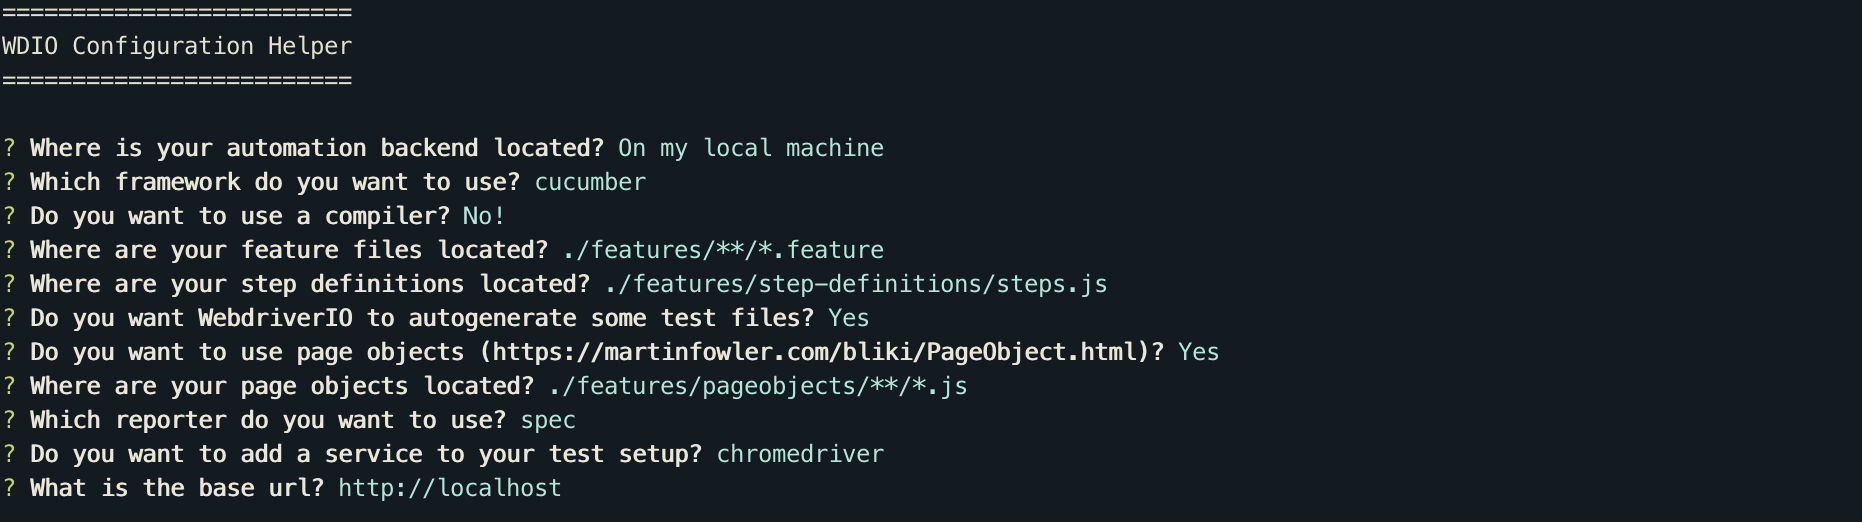
This will automatically generate the following files:
...
In case you need to interact with the Xray REST API at low-level using scripts (e.g. Bash/shell scripts), this tutorial uses auxiliary files that will handle those interactions.
| Code Block | ||||||
|---|---|---|---|---|---|---|
| ||||||
- export_features.sh - import_features.sh - import_results.sh - run_all_git_workflow.sh - run_all_standard_workflow.sh |
We Now we need to decide is which workflow we'll to use: do we you want to use Xray/Jira as the master for writing the declarative specification (i.e. the Gherkin based Scenarios), or do we you want to manage those outside using some editor and store them in Git, for example?
...
| Info | ||
|---|---|---|
| ||
Please see Testing in BDD with Gherkin based frameworks (e.g. Cucumber) for an overview of the possible workflows. The place that you'll use to edit the Cucumber Scenarios will affect your workflow. There are teams that prefer to edit Cucumber Scenarios in Jira using Xray, while there are others that prefer to edit them by writing the .feature files by hand using some IDE. |
...
If you have it, then you can just use the "Create Test" on that issue to create the Scenario/Scenario Outline and have it automatically linked back to the Story/"requirement.".
Otherwise, you can create the Test using the standard (issue) Create action from Jira's top menu.
...
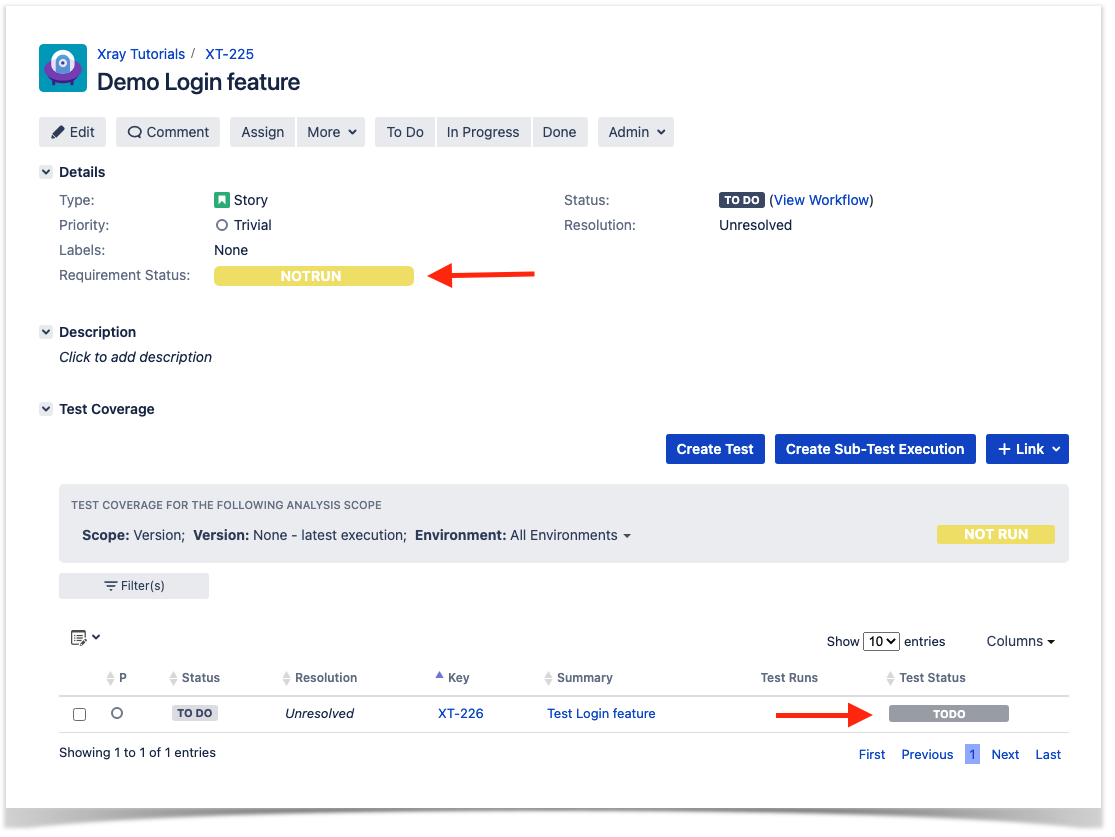
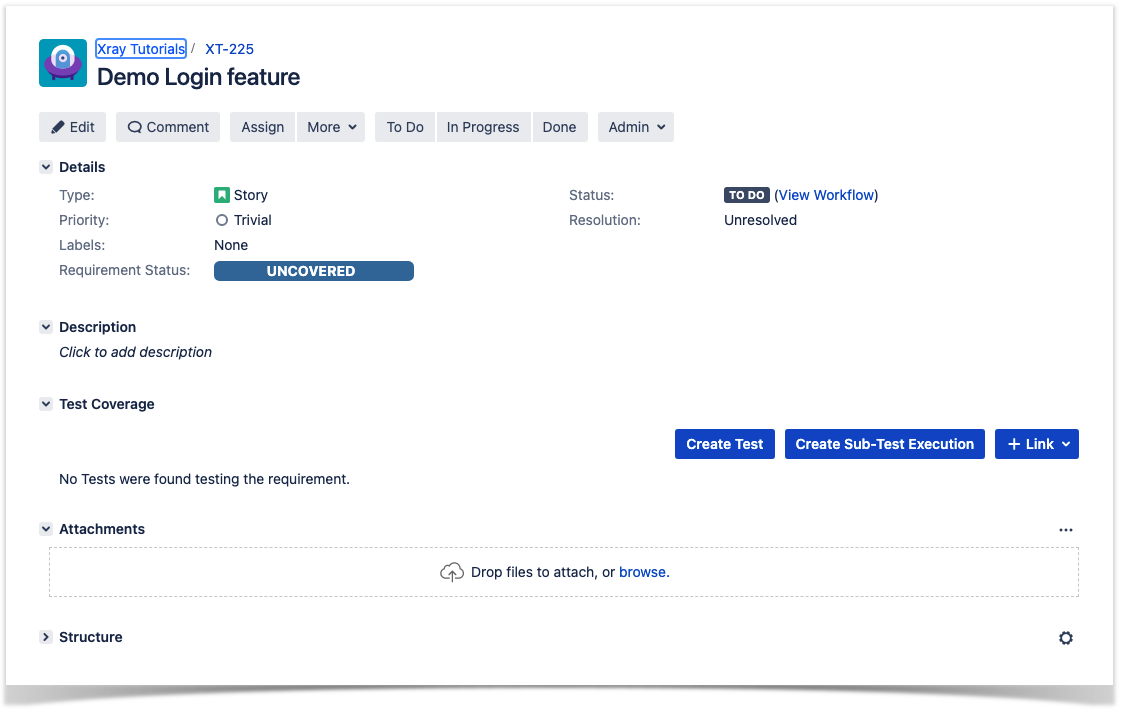
After the Test is created it will impact the coverage of related "requirement," , if any.
The coverage and the test results can be tracked in on the "requirementrequirements" side (e.g. user story). In this case, you may see that coverage changed from being UNCOVERED to NOTRUN (i.e. covered and with at least one test not run).
Additional tests could be created , and eventually linked to the same Story or linked to another one (e.g. logout).
...
The related statement's code is managed outside of Jira and stored in Git, for example.
In our source code, tests related test code is stored under steps-definitions directory, which itself can contain several other directories or files. In this case, we've only one referring to the login feature:
...
Notice that we have added an After scenario that will be executed after each scenario and after . After validating that an error occurred it will take a screenshot and attach it to the report.
...
| Code Block | ||||
|---|---|---|---|---|
| ||||
@REQ_COMXT-19225 Feature: Login feature @TEST_COMXT-29226 Scenario: Test Login feature Scenario Outline: As a user, I can log into the secure area Given I am on the login page When I login with <username> and <password> Then I should see a flash message saying <message> Examples: | username | password | message | | tomsmith | SuperSecretPassword! | You logged into a secure area! | | foobar | barfoo | Your username is invalid. | |
...
| Code Block | ||||
|---|---|---|---|---|
| ||||
#!/bin/bash BASEJIRA_URLBASEURL=https://xray192.cloud168.xpand-it.com token=$(0.168 JIRA_USERNAME=admin JIRA_PASSWORD=admin curl -H "Content-Type: application/json" -X POST -u $JIRA_USERNAME:$JIRA_PASSWORD --data @"cloud_auth.tmp/json/login-feature.json" "$BASE_URL/api/v1/authenticate"| tr -d '"') curl -H "Content-Type: application/json" -X POST -H "Authorization: Bearer $token" --data @"login-feature.json" "$BASE_URL/api/v1/import/execution/cucumber"$JIRA_BASEURL/rest/raven/2.0/import/execution/cucumber |
| Info | ||
|---|---|---|
| ||
| Info | ||
| ||
To import results, you can use two different endpointsendpoint/"formats" (endpoints described in Import Execution Results - REST):
The standard cucumber endpoint (i.e. /import/execution/cucumber) is simpler but more restrictive: you cannot specify values for custom fields on the Test Execution that will be created. This endpoint creates new Test Execution issues unless the Feature contains a tag having an issue key of an existing Test Execution. The multipart cucumber endpoint will allow you to customise customize fields (e.g. Fix Version, Test Plan) , if you wish to do so, on the Test Execution that will be created. Note that this endpoint always creates new Test Executions (as of Xray v4.2). In sum, if you want to customise the Fix Version, Test Plan and/or Test Environment of the Test Execution issue that will be created, you'll have to use the "multipart cucumber" endpoint. |
...
A new Test Execution will be created (unless you originally exported the Scenarios/Scenario Outlines from a Test Execution).

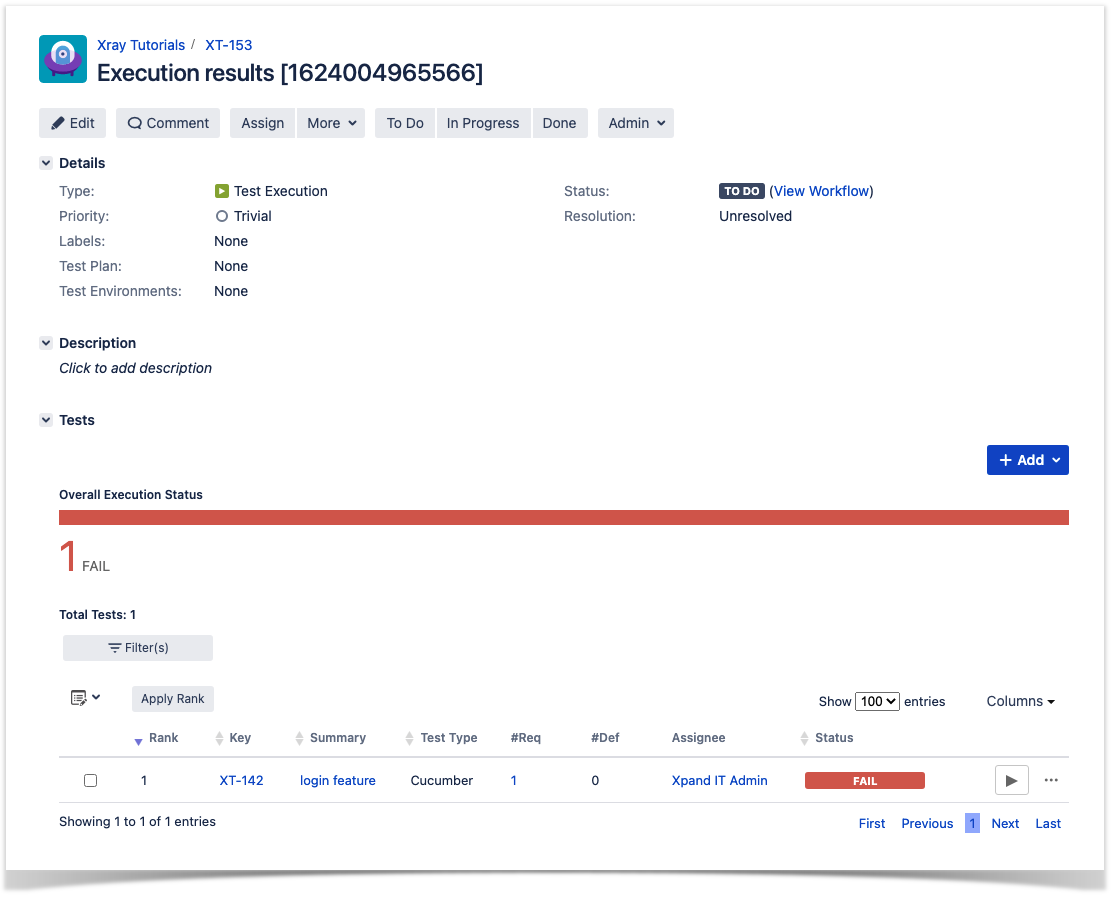
The tests have failed (on purpose).
The execution screen details of the Test Run will provide overall status information and Gherkin statement-level results, therefore we can use it to analyze the failing test.


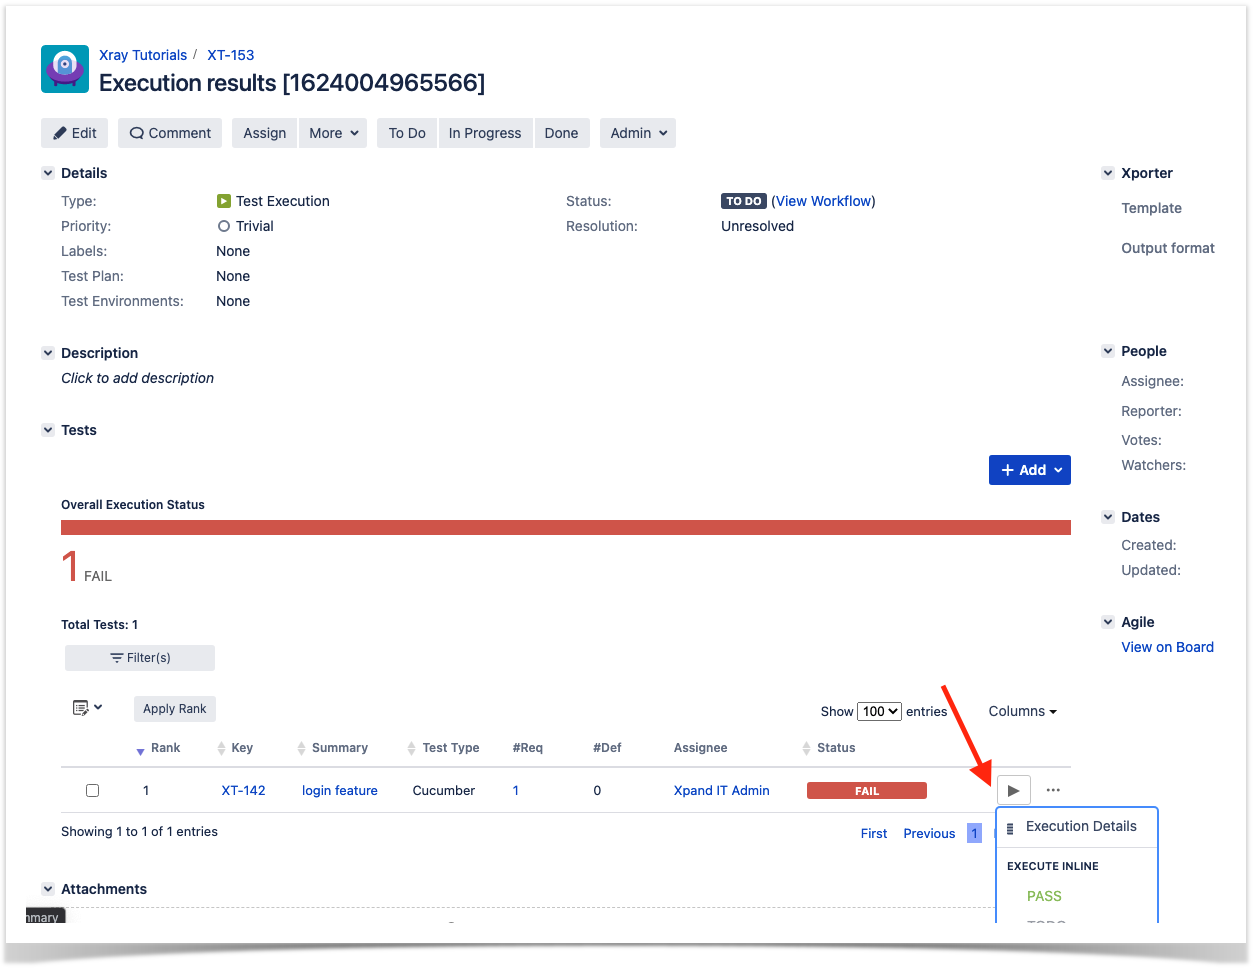
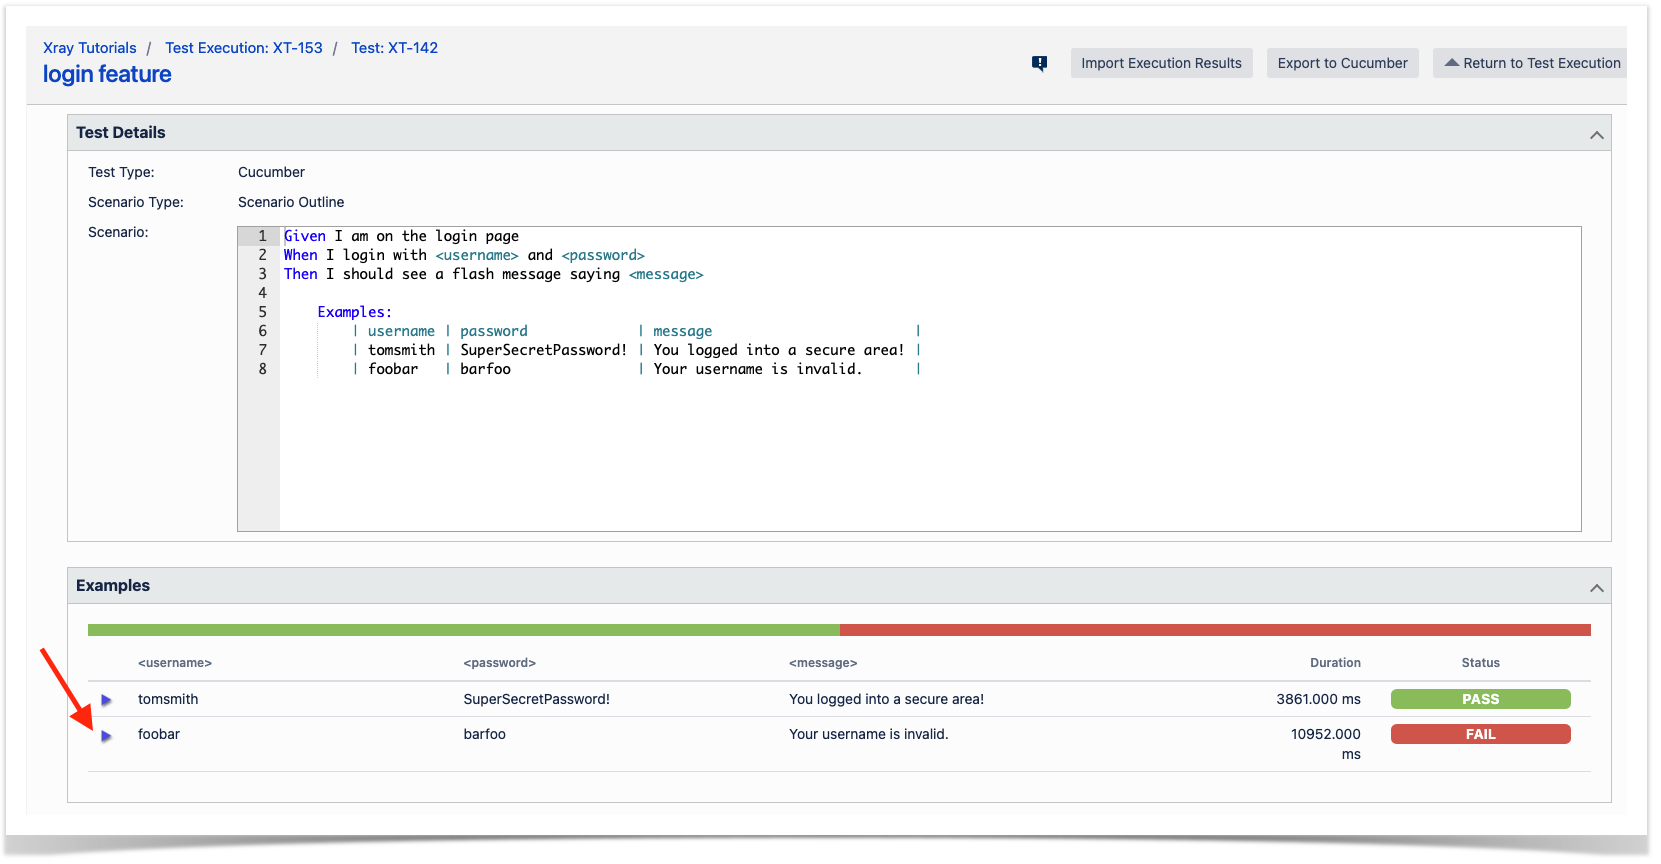
A given example can be expanded to see all Gherkin statements and, if available, it is possible to see also the attached stack trace.

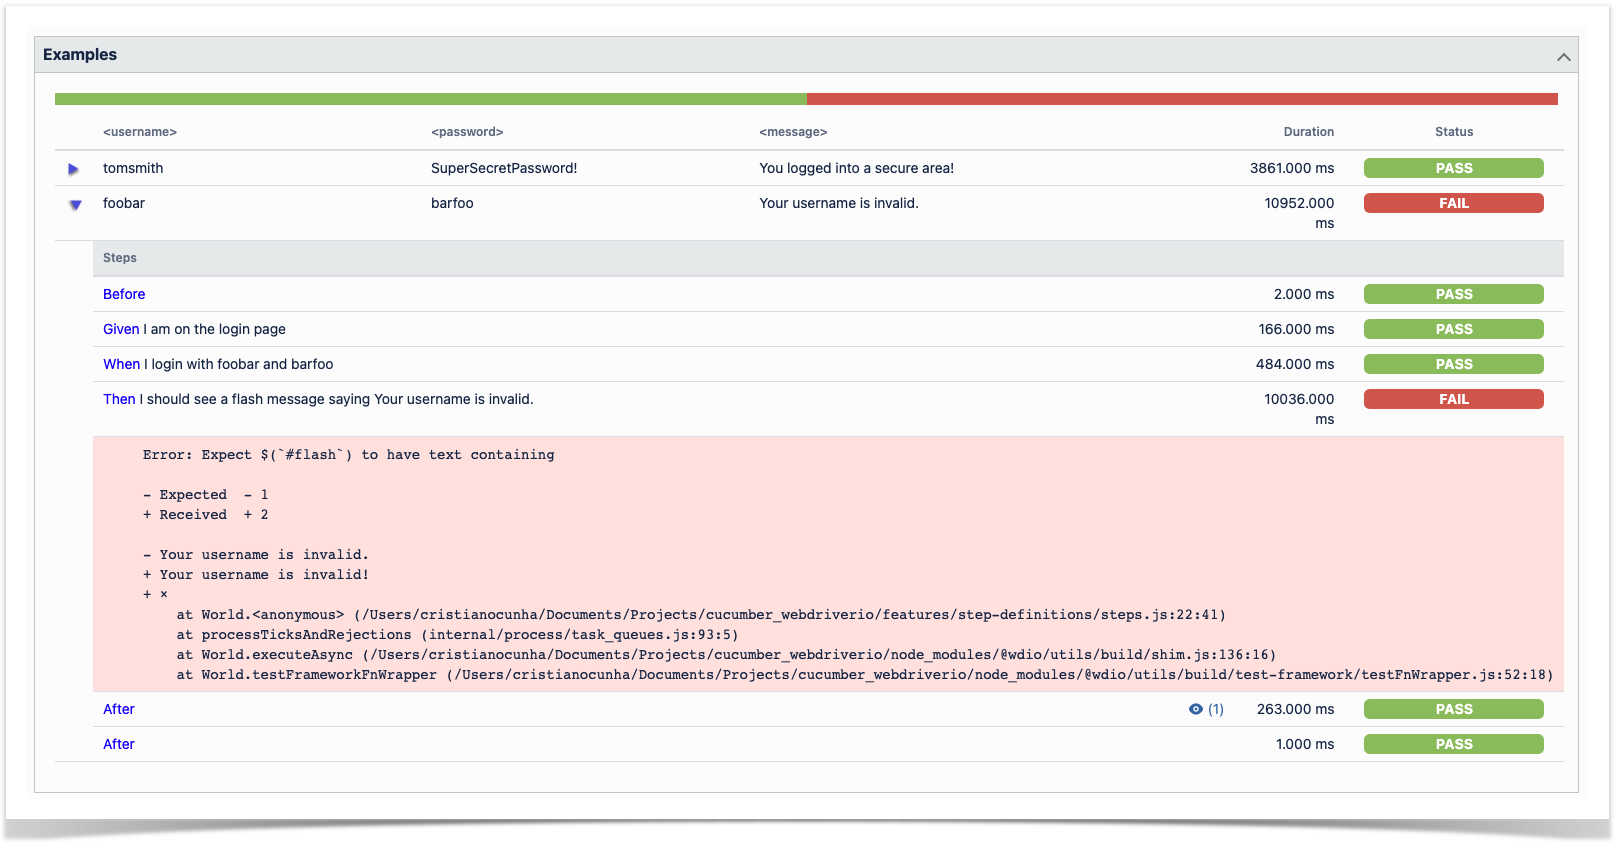
Note: in this case, the bug was on the Scenario Outline example which was expecting an invalid message.
...
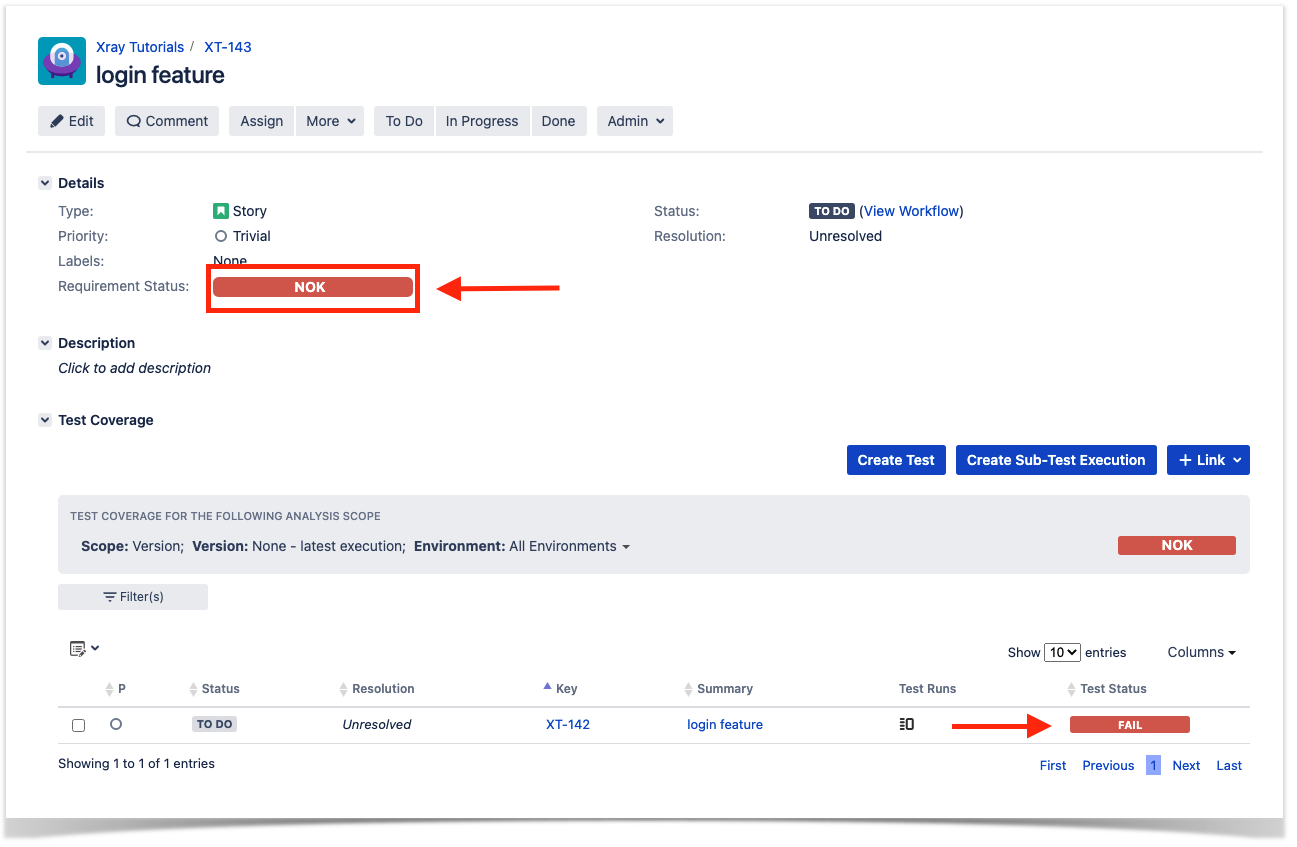
Results are reflected on the covered item (e.g. Story). On its issue screen, coverage now shows that the item is OK NOK based on the latest testing results, that this can also be tracked within the Test Coverage panel bellow.

Using Git or other VCS as master
You can edit your .feature files using your IDE outside of Jira (eventually storing them in your VCS using Git, for example) alongside with the remaining test code.
In any case, you'll need to synchronize your .feature files to Jira so that you can have visibility of them and report results against them.
...
- look at the existing "requirement"/Story issue keys to guide your testing; keep their issue keys
- specify Cucumber/Gherkin .feature files in your IDE and store it in Git, for example
- implement the code related to Gherkin statements/steps and store it in Git, for example
- import/synchronize synchronise the .feature files to Xray to provision or update corresponding Test entities
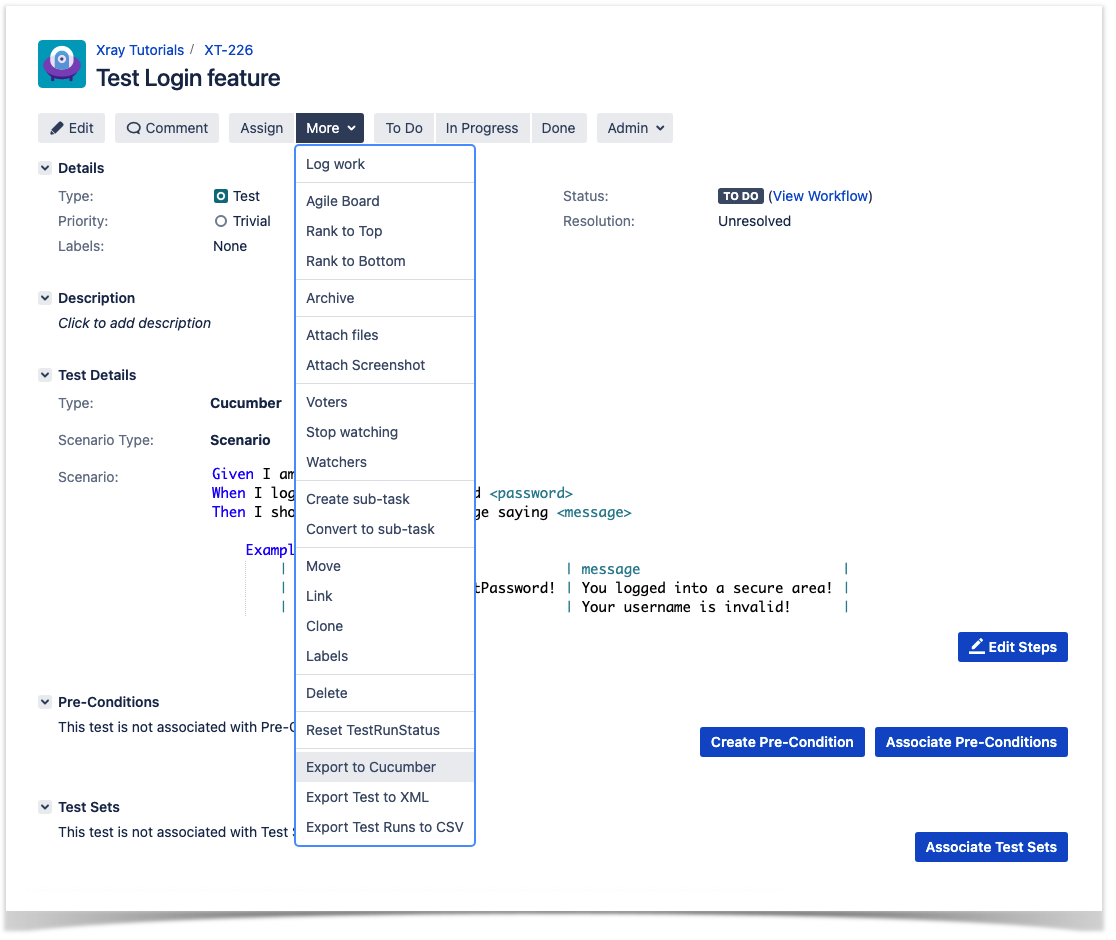
- export/generate .feature files from Jira, so that they contain references to Tests and requirements in Jira
- checkout the WebDriverIO related code from Git
- run the tests in the CI
- import the results back to Jira
...
Usually, you would start by having a Story, or similar (e.g. "requirement"), to describe the behavior behaviour of a certain feature and use that to drive your testing.

Having those to guide testing, we could then move to our code to describe and implement the Cucumber test scenarios.
Tests related Test code is stored inside the step-definitions directory. We also have other directories present, to hold for instance the page object definitions in the pageobjects directory.
In this case, we've organised organized them as follows:
step-definitions/steps.js: step implementation files, in JavaScript.Code Block language js title step-definitions/steps.js collapse true const { Given, When, Then } = require('@cucumber/cucumber'); const LoginPage = require('../pageobjects/login.page'); const SecurePage = require('../pageobjects/secure.page'); const pages = { login: LoginPage } Given(/^I am on the (\w+) page$/, async (page) => { await pages[page].open() }); When(/^I login with (\w+) and (.+)$/, async (username, password) => { await LoginPage.login(username, password) }); Then(/^I should see a flash message saying (.*)$/, async (message) => { await expect(SecurePage.flashAlert).toBeExisting(); await expect(SecurePage.flashAlert).toHaveTextContaining(message); });
pageobjects: abstraction of different pages, somehow based on the page-objects modelCode Block language js title pageobjects/page.js collapse true /** * main page object containing all methods, selectors and functionality * that is shared across all page objects */ module.exports = class Page { /** * Opens a sub page of the page * @param path path of the sub page (e.g. /path/to/page.html) */ open (path) { return browser.url(`https://the-internet.herokuapp.com/${path}`) } }Code Block language js title pageobjects/login-page.js collapse true const Page = require('./page'); /** * sub page containing specific selectors and methods for a specific page */ class LoginPage extends Page { /** * define selectors using getter methods */ get inputUsername () { return $('#username') } get inputPassword () { return $('#password') } get btnSubmit () { return $('button[type="submit"]') } /** * a method to encapsule automation code to interact with the page * e.g. to login using username and password */ async login (username, password) { await (await this.inputUsername).setValue(username); await (await this.inputPassword).setValue(password); await (await this.btnSubmit).click(); } /** * overwrite specifc options to adapt it to page object */ open () { return super.open('login'); } } module.exports = new LoginPage();Code Block language js title pageobjects/secure-page.js collapse true const Page = require('./page'); /** * sub page containing specific selectors and methods for a specific page */ class SecurePage extends Page { /** * define selectors using getter methods */ get flashAlert () { return $('#flash') } } module.exports = new SecurePage();
features/login.feature: Cucumber .feature files, containing the tests as Gherkin Scenario(s)/Scenario Outline(s). Please note that each "Feature: <..>" section should be tagged with the issue key of the corresponding "requirement"/story in Jira. You may need to add a prefix (e.g. "REQ_") before the issue key, depending on an Xray global setting.Code Block title features/login.feature collapse true @REQ_COMXT-19225 Feature: Login feature Scenario: Test Login feature Scenario Outline: As a user, I can log into the secure area Given I am on the login page When I login with <username> and <password> Then I should see a flash message saying <message> Examples: | username | password | message | | tomsmith | SuperSecretPassword! | You logged into a secure area! | | foobar | barfoo | Your username is invalid. |
...
| Code Block | ||||||
|---|---|---|---|---|---|---|
| ||||||
#!/bin/bash BASEJIRA_URLBASEURL=https://xray192.cloud168.xpand-it.com PROJECT=COM0.168 JIRA_USERNAME=admin JIRA_PASSWORD=admin PROJECT=XT FILE=features.zip zip -r features.zip$FILE features/ -i \*.feature token=$(curl -H "Content-Type: applicationmultipart/jsonform-data" -X POSTu $JIRA_USERNAME:$JIRA_PASSWORD --dataF @"cloud_auth.json"file=@$FILE" "$BASE$JIRA_URLBASEURL/apirest/v1/authenticate"| tr -d '"') curl -H "Content-Type: multipart/form-data" -H "Authorization: Bearer $token" -F "file=@features.zip" "$BASE_URL/api/v1raven/1.0/import/feature?projectKey=$PROJECT" |
...
So, you can either:
- use the UI
- use the REST API (more info here)
Code Block language bash title example of a shell script to export/generate .features from Xray collapse true #!/bin/bash token=$(curl -H "Content-Type: application/json" -X POST --data @"cloud_auth.json" httpsJIRA_BASEURL=https://xray192.cloud168.xpand-it.com/api/v1/authenticate| tr -d '"') curl -H "Content-Type: application/json" -X GET -H "Authorization: Bearer $token" "https://xray.cloud.xpand-it.com/api/v1/export/cucumber?keys=COM-192.168 JIRA_USERNAME=admin JIRA_PASSWORD=admin KEYS="XT-142" rm -f features.zip curl -u $JIRA_USERNAME:$JIRA_PASSWORD "$JIRA_BASEURL/rest/raven/2.0/export/test?keys=$KEYS&fz=true" -o features.zip rm -rf features/*.feature unzip -o features.zip -d features
- use one of the available CI/CD plugins (e.g. see an example of Integration with Jenkins)

For CI only purposepurposes, we will export the features to a new temporary directory named features/ on the root folder of your project. Please note that while implementing the tests, .feature files should be edited inside their respective folder.
...
| Code Block | ||
|---|---|---|
| ||
@REQ_COMXT-19225 Feature: Login feature @TEST_COMXT-29226 Scenario Outline: As a user, I can log into the secure area Given I am on the login page When I login with <username> and <password> Then I should see a flash message saying <message> Examples: | username | password | message | | tomsmith | SuperSecretPassword! | You logged into a secure area! | | foobar | barfoo | Your username is invalid. | |
...
| Code Block | ||||||
|---|---|---|---|---|---|---|
| ||||||
#!/bin/bash BASE_URL=https://xray.cloud.xpand-it.com token=$(curl -H "Content-Type: application/json" -X POST --data @"cloud_auth.json" "$BASE_URL/api/v1/authenticate"| tr -d '"')JIRA_BASEURL=https://192.168.0.168 JIRA_USERNAME=admin JIRA_PASSWORD=admin curl -H "Content-Type: application/json" -X POST -H "Authorization: Bearer $token" u $JIRA_USERNAME:$JIRA_PASSWORD --data @".tmp/json/login-feature.json" "$BASE_URL/api/v1$JIRA_BASEURL/rest/raven/2.0/import/execution/cucumber" |
| Info | ||
|---|---|---|
| ||
To import results, you can use two different endpoints/"formats" (endpoints described in Import Execution Results - REST):
The standard cucumber endpoint (i.e. /import/execution/cucumber) is simpler but more restrictive: you cannot specify values for custom fields on the Test Execution that will be created. This endpoint creates new Test Execution issues unless the Feature contains a tag having an issue key of an existing Test Execution. The multipart cucumber endpoint will allow you to customize fields (e.g. Fix Version, Test Plan) , if you wish to do so, on the Test Execution that will be created. Note that this endpoint always creates new Test Executions (as of Xray v4.2). In sum, if you want to customize the Fix Version, Test Plan and/or Test Environment of the Test Execution issue that will be created, you'll have to use the "multipart cucumber" endpoint. |
...
A new Test Execution will be created (unless you originally exported the Scenarios/Scenario Outlines from a Test Execution).

One of the tests fails (on purpose).
The execution screen details of the Test Run will provide overall status information and Gherkin statement-level results, therefore we can use it to analyze analyse the failing test.


Results are reflected on the covered item (e.g. Story). On its issue screen, coverage now shows that the item is OK based on the latest testing results, that can also be tracked within the Test Coverage panel bellow.

If we change the specification (i.e. the Gherkin scenarios), we need to import the .feature(s) once again.
...