
Page History

| Table of Contents |
|---|
Overview
Xray enables easy integration with TeamCity through the "Xray TeamCity Plugin", providing the means for successful Continuous Integration by allowing users to report automated testing results.
| Info | ||
|---|---|---|
| ||
| Keep in mind that some endpoints may not be available for Xray Cloud, just for Xray for Jira server. |
Release Notes
| Children Display |
|---|
Installation
The installation is made manually. For more information on how to install add-ons, please refer to how to install add-ons.
| Info | ||
|---|---|---|
| ||
The TeamCity baseline for this add-on is 2018.1 and it may not work properly with previous versions. |
Manual Installation
- Upload the plugin
| Info | ||
|---|---|---|
| ||
You may download the latest version of the TeamCity plugin from the latest Release Notes. |
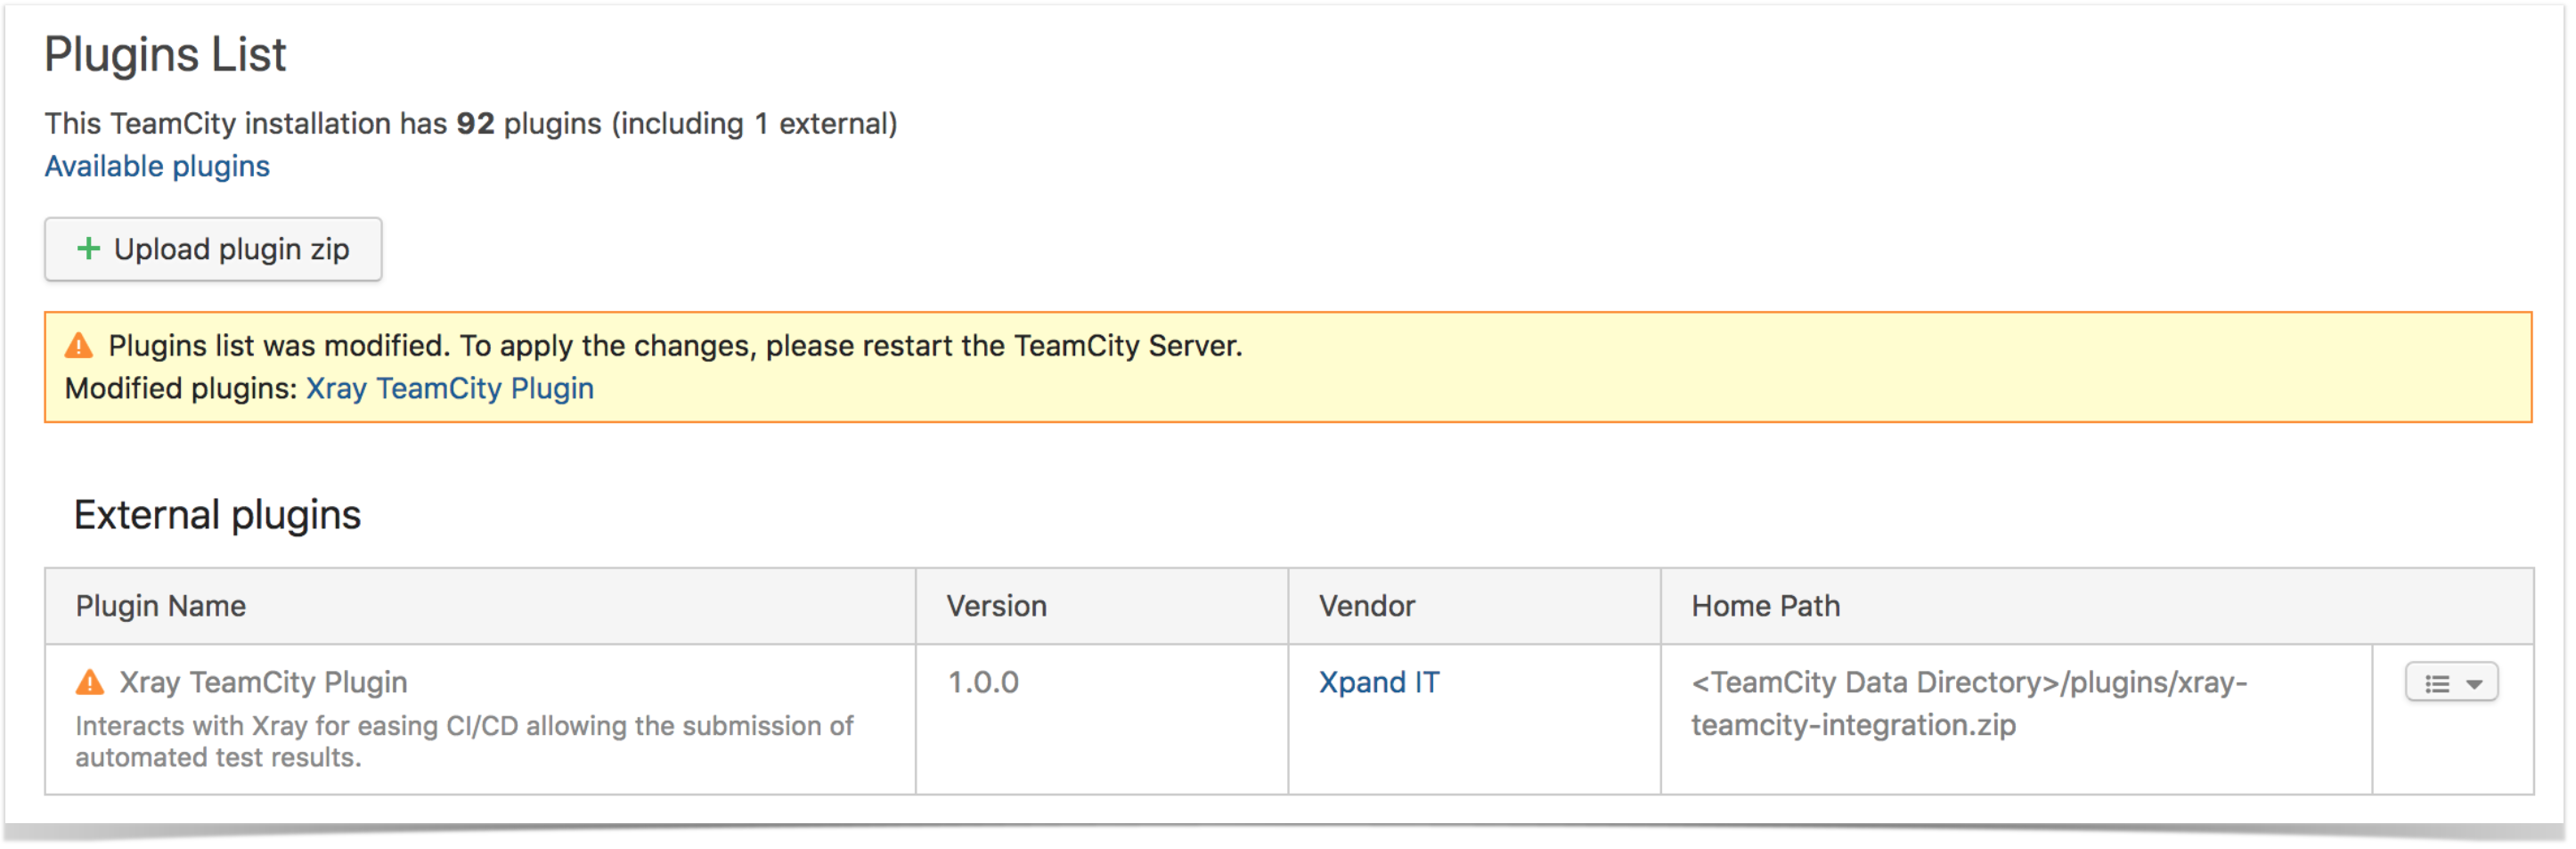
2. Restart TeamCity (if needed as shown in the screenshot below)
Configuration
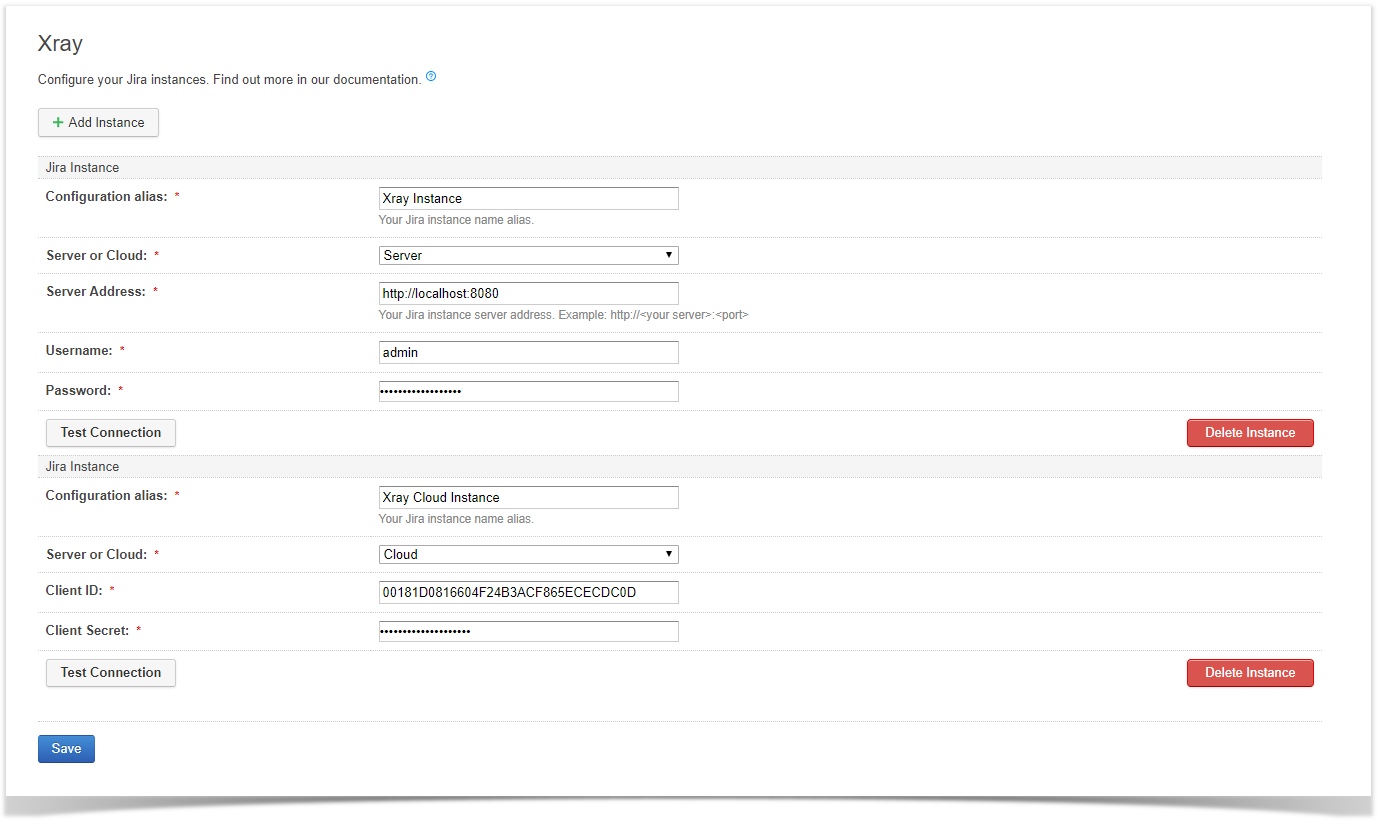
Xray for TeamCity is configured in the global settings configuration page Administration > Integrations > Xray.
Jira servers
The Jira servers configuration defines connections with Jira instances.
To add a new Jira instance connection, you need to specify some properties:
- Configuration alias: a friendly name for the configuration
- Server or Cloud: Server
- Server Address: The address of the Jira Server where Xray is running
- Authentication:
- User: username
- Password.
| Info | ||
|---|---|---|
| ||
The user present in this configuration must exist in the JIRA instance and have permission to Create Test and Test Execution Issues |
Jira Cloud
The Jira Cloud configuration defines connections with Jira Cloud.
To add a new Jira Cloud connection, you need to specify some properties:
- Configuration alias: a friendly name for the configuration
- Server or Cloud: Cloud
- Authentication:
Build Steps
Build steps are the building blocks of the build process. These need to be defined in the build configuration.
The app provides:
- one build step for exporting Cucumber Scenario/Scenario Outlines from Jira as .feature files
- one build step for importing Cucumber Tests from existing Cucumber features into Jira.
- one build step which publishes the execution results back to Jira.
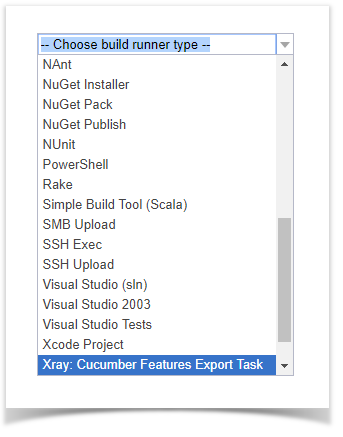
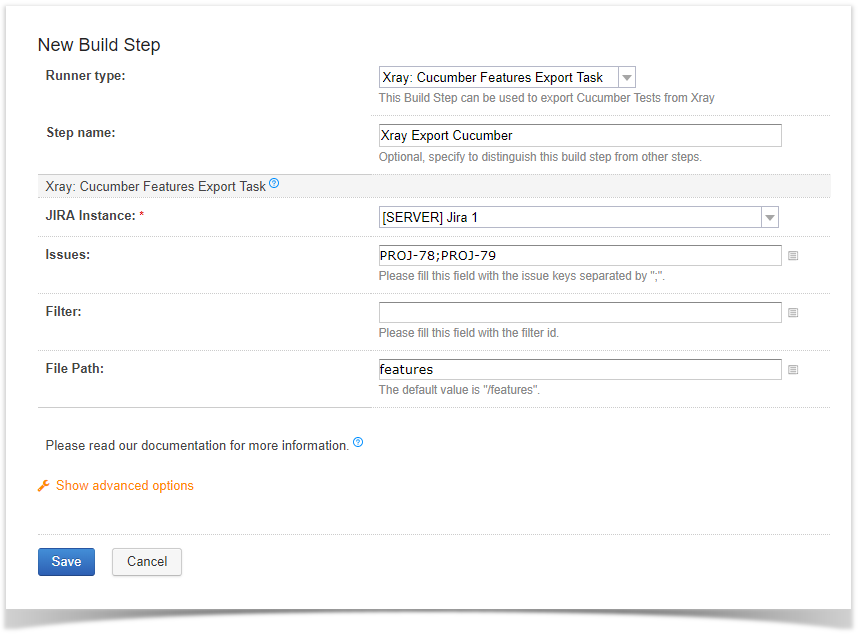
Xray: Cucumber Features Export Task
This build step will export the Cucumber Tests (i.e., Scenario/Scenario Outlines) in .feature or bundled in a .zip file. The rules for exporting are defined here.
It invokes Xray's Export Cucumber Tests REST API endpoint (see more information: server or cloud).
Configuration
Some fields need to be configured in order to export the Cucumber Tests. As input, you can either specify issue keys (see the endpoint documentation for the server or cloud) or the ID of the saved filter in Jira.
| field | description |
|---|---|
| Jira instance | The Jira instance where Xray is running |
| Issue keys | Set of issue keys separated by ";" |
Filter ID | A number that indicates the filter ID |
| File path | The relative path of the directory where the features should be exported to; normally, this corresponds to the "features" folder of the Cucumber project that has the implementation steps. Note: The directory will be created if it does not exist. |
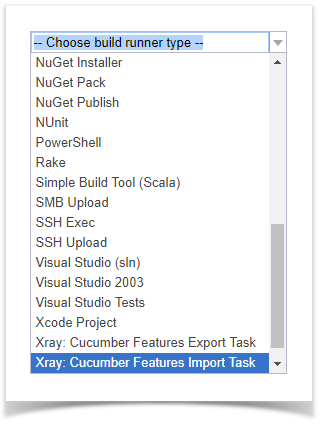
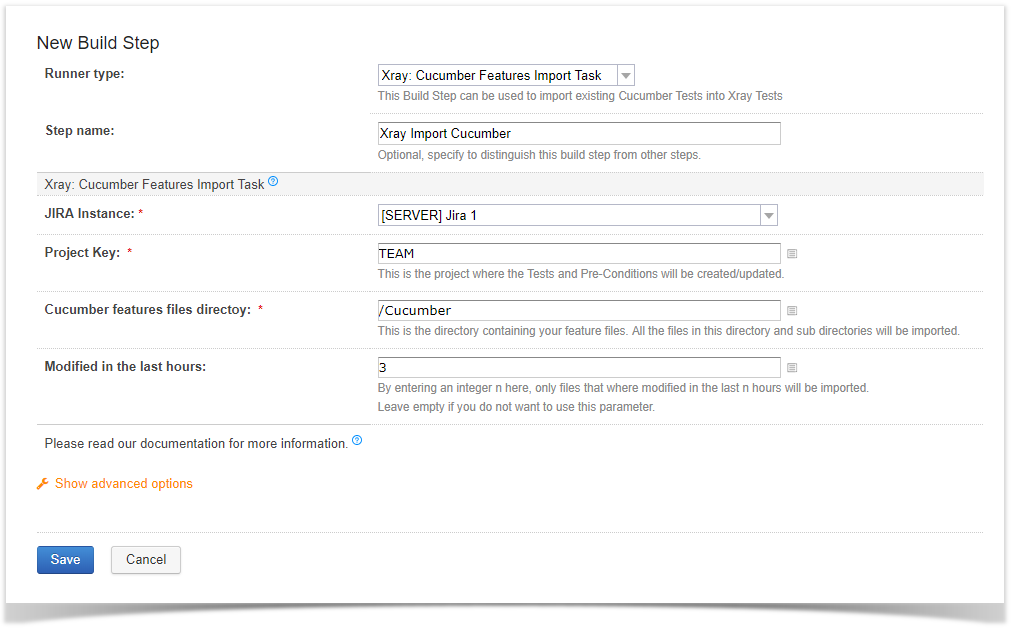
Xray: Cucumber Features Import Task
This build step is only available for the server and will import existing cucumber Tests from existing Cucumber feature files into Xray issues. This Task will import from .feature files and also from .zip files.
It invokes Xray's Import Cumcumber Tests REST API endpoint (see more information here)
| field | decription |
|---|---|
| JIRA instance | The Jira instance where Xray is running. |
| Project Key | This is the project where the Tests and Pre-Conditions will be created/updated. |
| Cucumber feature files directory | This is the directory containing your feature files. All the files in this directory and sub directories will be imported. |
| Modified in the last hours | By entering an integer n here, only files that where modified in the last n hours will be imported. Leave empty if you do not want to use this parameter. |
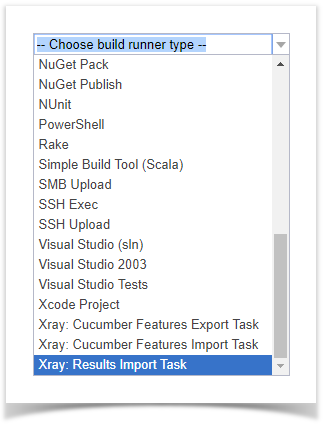
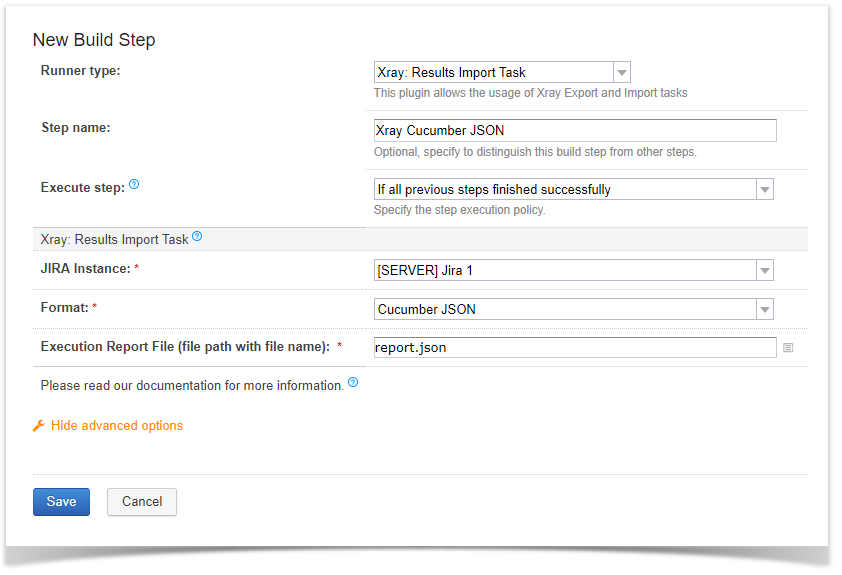
Xray: Results Import Task
The app provides easy access to Xray's Import Execution Results REST API endpoints (see more information for the server or cloud). Therefore, it mimics the endpoints input parameters.
It supports importing results in Xray's own JSON format, Cucumber, Behave, JUnit, and NUnit, among others. However, there are some endpoints in the server that may not yet be available for Xray Cloud.
These are the available endpoints.
| Server | Cloud | |
|---|---|---|
| Xray JSON | ||
| Cucumber JSON | ||
| Cucumber JSON multipart | ||
| Behave JSON | ||
| Behave JSON multipart | ||
| JUnit XML | ||
| JUnit XML multipart | ||
| NUnit XML | ||
| NUnit XML multipart | ||
| Robot XML | ||
| Robot XML multipart | ||
| Compressed .zip file | ||
| TestNG XML | ||
| TestNG XML multipart |
Using a glob expression, you can import multiple results files in the following formats:
- JUnit
- TestNG
- NUnit
- Robot framework
For those formats, the file path needs to be relative to the workspace.
Configuration
| field | description |
|---|---|
| Jira instance | The Jira instance where Xray is running |
| Format | A list of test result formats and its specific endpoint |
| Execution Report File | The results relative file path "Glob" expressions are supported for:
|
Additional fields
Depending on the chose test result format and endpoint, some additional fields may need to be configured.
| format and specific endpoint | field | description | |||||
|---|---|---|---|---|---|---|---|
Behave JSON multipart Cucumber JSON multipart NUnit XML multipart JUnit XML multipart Robot XML multipart TestNG XML multipart | Test execution fields | An object (JSON) specifying the fields for the issue. You may specify the object either directly in the field or in the file path.
| |||||
NUnit XML JUnit XML Robot XML TestNG XML | Import to Same Test Execution | When this option is check, if you are importing multiple execution report files using a glob expression, the results will be imported to the same Test Execution | |||||
| Project key | Key of the project where the Test Execution (if the Test Execution Key field wasn't provided) and the Tests (if they aren't created yet) are going to be created | ||||||
| Test execution key | Key of the Test Execution | ||||||
| Test plan key | Key of the Test Plan | ||||||
| Test environments | List of Test Environments separated by ";" | ||||||
| Revision | Source code's revision being target by the Test Execution | ||||||
| Fix version | The Fix Version associated with the test execution (it supports only one value) |
Examples
Cucumber
In a typical Cucumber Workflow, after having created a Cucumber project and the Cucumber tests specified in Jira, you may want to have a project that exports the features from Jira, executes the automated tests on a CI environment and then imports back its results.
For this scenario, the Jenkins project would be configured with a set of tasks responsible for:
- Pulling the Cucumber project
- Exporting Cucumber features from Jira to your Cucumber project
- Executing the tests in the CI environment
- Importing the execution results back to Jira
Exporting Cucumber features
To start the configuration, add the build step Xray: Cucumber Features Export Task.
After that, configure it.
In this example, we configured the task to extract the features from a set of issues (PROJ-78 and PROJ-79) to the folder that holds the Cucumber project.
Importing Cucumber features
To start the configuration, add the build step Xray: Cucumber Features Import Task.
After that, configure it.
In this example, we configured the task to import to the Project TEAM of the Xray instance all the .features and .zip files that are contained in /Cucumber directory and sub directories, which were modified in the last 3 hours.
Importing the execution results
To start the configuration, add a build step Xray: Results Import Task.
After that, you may configure it.
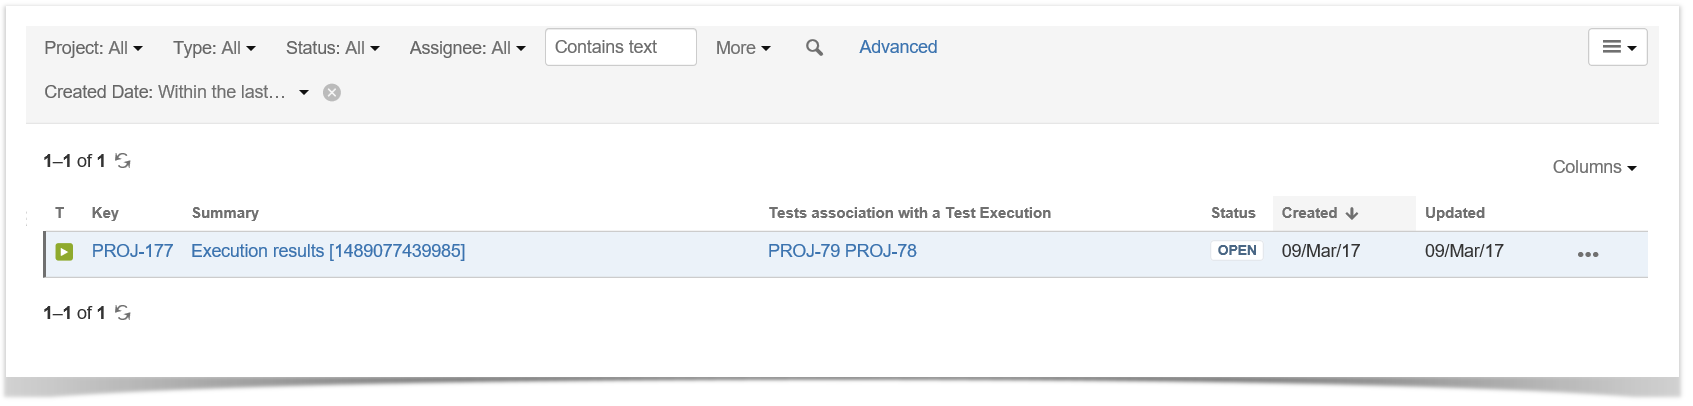
In this example, we configured the task to import the Cucumber JSON results back to Jira.
Once all configurations are done, click Save at the bottom of the page.
After running the job, the expected result is a new Test Execution issue created in the Jira instance.
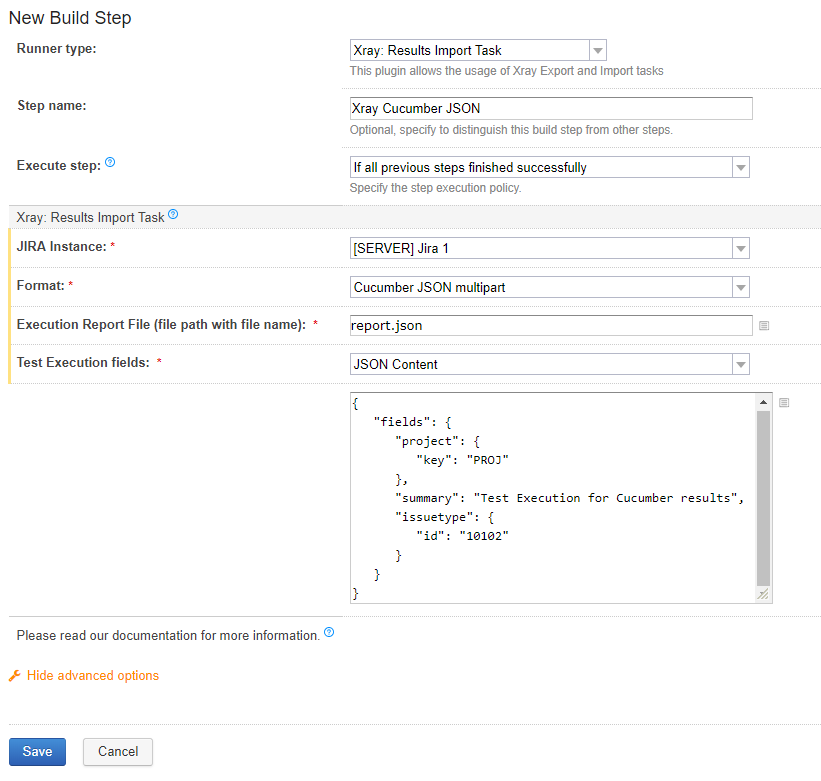
Importing the execution results with user-defined field values
For Cucumber, Behave, JUnit, Nunit and Robot, Xray for Jenkins allows you to create new Test Executions and have control over newly-created Test Execution fields. You can send two files, the normal execution result file and a JSON file similar to the one Jira uses to create new issues. More details regarding how Jira creates new issues here.
For this scenario and example, the import task needs to be configured with the Cucumber JSON Multipart format. When selecting this option, you can additionally configure the Test Execution fields in one of two ways:
- Insert the relative path to the JSON file containing the information;
- Or, insert the JSON content directly in the field.
In this example, we configured the following object:
| Code Block | ||
|---|---|---|
| ||
{
   "fields": {
      "project": {
         "key": "PROJ"
      },
      "summary": "Test Execution for Cucumber results",
      "issuetype": {
         "id": "10102"
      }
   }
} |
And configured the task to import the Cucumber JSON Multipart results back to Jira.
Once all configurations are done, click Save.
After running the job, the expected result is a new Test Execution issue created in the Jira instance, with the Test Execution fields as specified in the build step configuration.
JUnit
Apart from supporting Cucumber natively, Xray enables you to take advantage of many other testing frameworks like JUnit. In this sense, Xray for Jenkins lets you import results in other formats besides Cucumber JSON.
If you want to import JUnit XML reports, a typical Job outline would be:
- Pulling the JUnit project
- Executing the tests in the CI environment
- Importing the execution results, including Tests, to JIRA
Importing the execution results
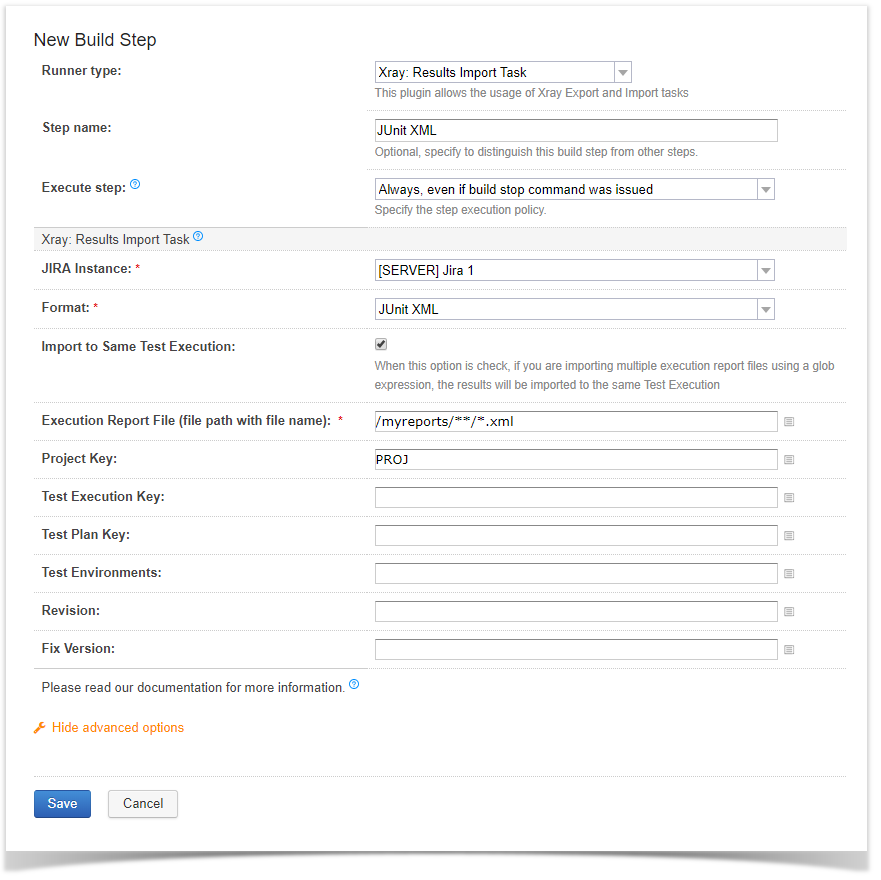
To start the configuration, add the build step Xray: Results Import Task.
After that, configure it.
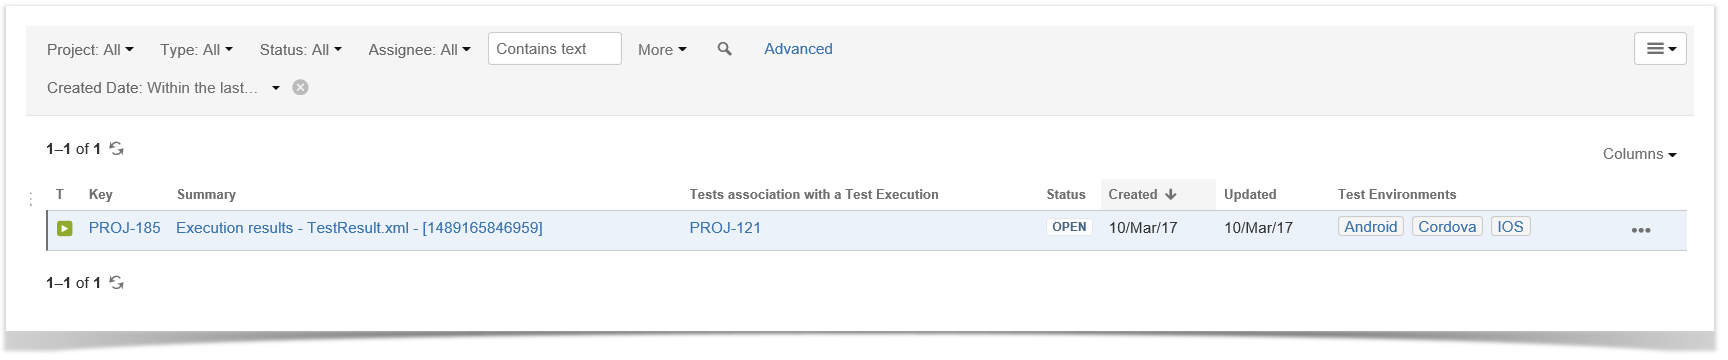
In this example, we have a configuration where the JUnit XML format is chosen.
After running the plan, the expected result is a new Test Execution issue created in the JIRA instance.
Make sure to select "Always, even if build stop command was issued" so, even some previous step fail, the tests will still be imported.
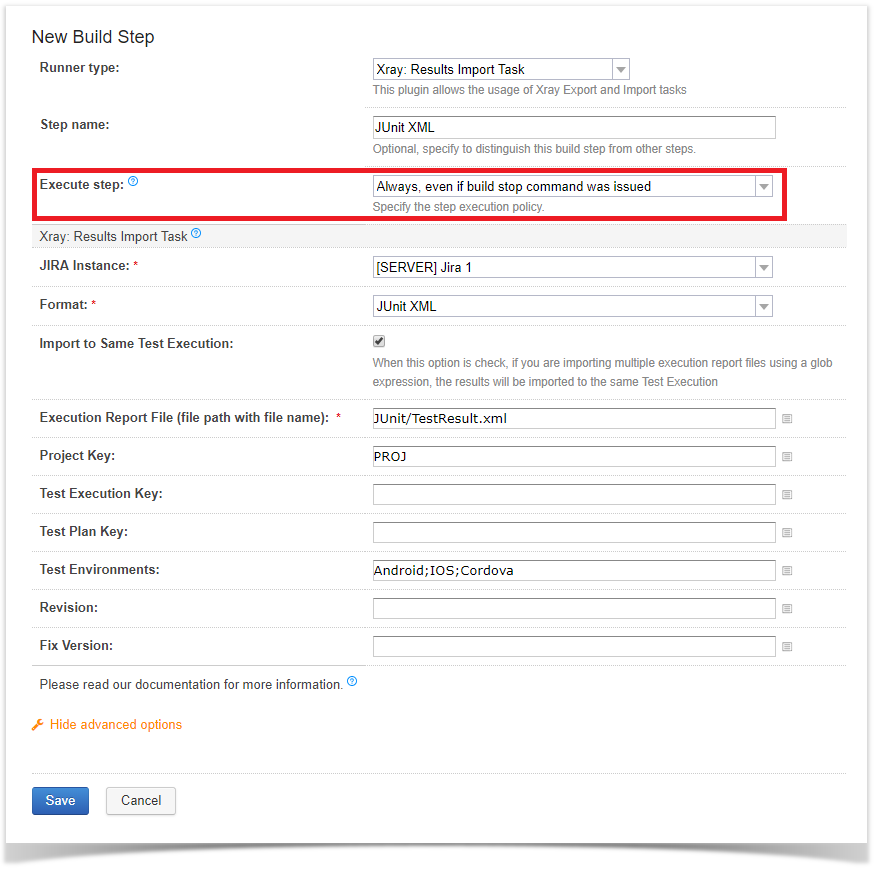
You can also import multiple results using a glob expression, like in the following example
Troubleshooting
The build process is failing with status code 403
When you check the log, it has the following:

By default, when you successively try to log into Jira with the wrong credentials, the Jira instance will prompt you to provide a CAPTCHA the next time you try to log in. It is not possible to provide this information via the build process, so it will fail with status code 403 Forbidden.
You will need to log into Jira via the browser and provide the CAPTCHA.
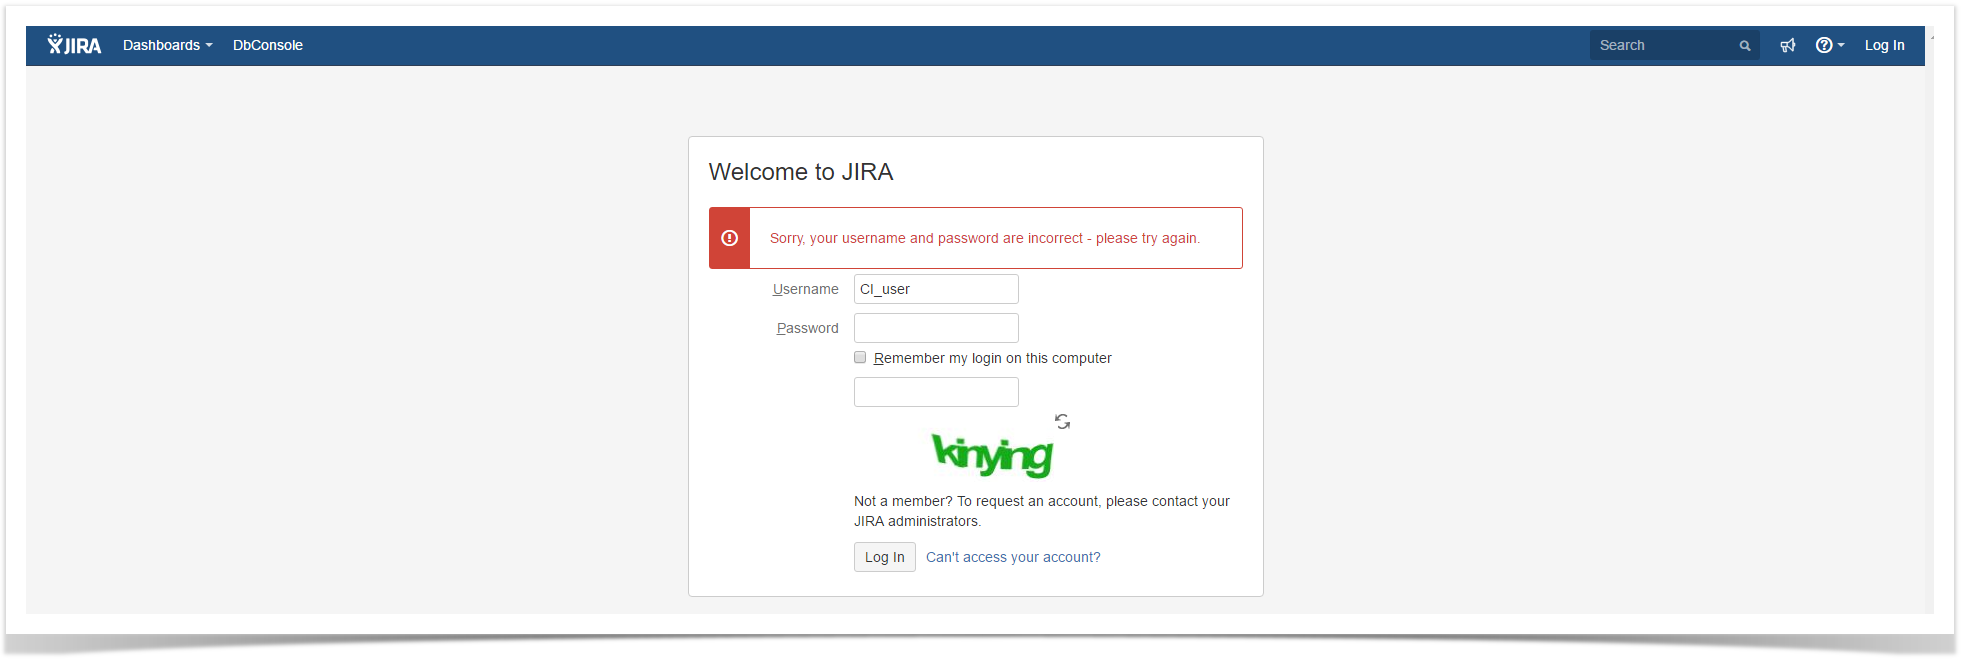
If you are a Jira administrator, you can go to Jira administration > User Management and reset the failed login.

Invalid JIRA instance
When you check the log, it has the following:
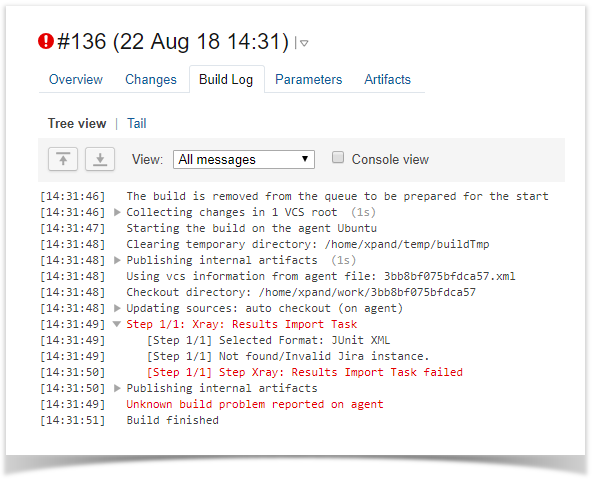
This occurs when a JIRA instance is selected in the build step configuration and that instance is later deleted in the Xray global settings.
This error is shown in the build step.
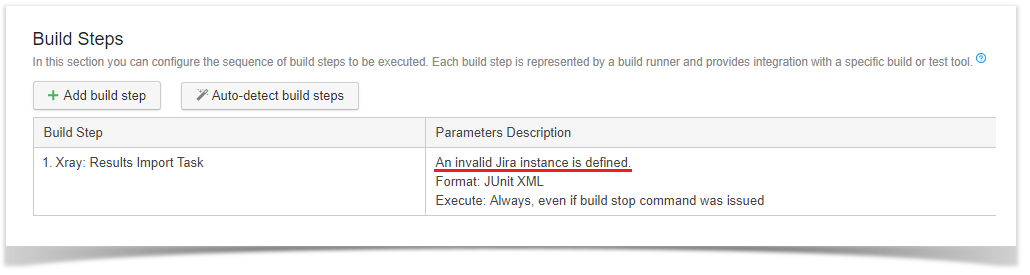
To solve this, edit the build step, select a valid JIRA Instance and save.
Xray does not provide yet a plugin for TeamCity. However, it is easy to setup TeamCity in order to integrate it with Xray.
Since Xray provides a full REST API, you may interact with Xray, for submitting results for example.
| Table of Contents |
|---|
JUnit example
In this scenario, we want to get visibility of the automated test results from some tests implemented in Java, using the JUnit framework.
This recipe could also be applied for other frameworks such as NUnit or Robot.
| Code Block | ||||||
|---|---|---|---|---|---|---|
| ||||||
package com.xpand.java;

import org.junit.After;
import org.junit.Before;
import org.junit.Test;

import static org.hamcrest.CoreMatchers.is;
import static org.junit.Assert.assertThat;

public class CalcTest {

    @Before
    public void setUp() throws Exception {

    }

    @After
    public void tearDown() throws Exception {

    }

	@Test
    public void CanAddNumbers()
    {
        assertThat(Calculator.Add(1, 1), is(2));
        assertThat(Calculator.Add(-1, 1), is(0));
    }


    @Test
    public void CanSubtract()
    {
        assertThat(Calculator.Subtract(1, 1), is(0));
        assertThat(Calculator.Subtract(-1, -1), is(0));
        assertThat(Calculator.Subtract(100, 5), is(95));
    }


    @Test
    public void CanMultiply()
    {
        assertThat(Calculator.Multiply(1, 1), is(1));
        assertThat(Calculator.Multiply(-1, -1), is(1));
        assertThat(Calculator.Multiply(100, 5), is(500));
    }


    public void CanDivide()
    {
        assertThat(Calculator.Divide(1, 1), is(1));
        assertThat(Calculator.Divide(-1, -1), is(1));
        assertThat(Calculator.Divide(100, 5), is(20));
    }


    @Test
    public void CanDoStuff()
    {
        assertThat(true, is(true));
    }


} |
In order to submit those results, we'll just need to invoke the REST API (as detailed in Import Execution Results - REST).
Run automated tests
Our project is Maven based, therefore the first Build Step compiles and runs the JUnit automated tests.
Import execution results
In order to submit the results, we'll need to add a Build Step of type "Command Line", where we'll invoke the REST API, submitting the JUnit XML report generated in the previous step.
The complete script content of the "custom script" field above is:
| No Format |
|---|
curl -H "Content-Type: multipart/form-data" -u %jira_user%:%jira_password% -F "file=@java-junit-calc/target/surefire-reports/TEST-com.xpand.java.CalcTest.xml" "%jira_base_url%/rest/raven/1.0/import/execution/junit?projectKey=CALC&fixVersion=v3.0&revision=1234" |
We're using "curl" utility that comes in Unix based OS'es but you can easily use another tool to make the HTTP request.
Notice that we're using some parameters for storing Jira's base URL along with the credentials to be used in the REST API.
Actually, these parameters can be defined at multiple levels; in our example we defined them at the "Build Configuration" level but they could also have been defined at the project level.
The parameters can be hidden, such as the password, if you defined them as being of type "Password".
Cucumber example
In this scenario, we are managing the specification of Cucumber Scenarios/Scenario Outline(s) based tests in Jira, as detailed in the "standard workflow" mentioned in Testing with Cucumber
Then we need to extract this specification from Jira (i.e. generate related Cucumber .feature files), and run it in TeamCity against the code that actually implements each step that are part of those scenarios.
Finally, we can then submit the results back to JIRA and they'll be reflected on the related entities.
Overall, our Build Configuration is composed of 3 basic steps.
Exporting Cucumber features
We start by extracting the tests specification out of JIRA and generate the proper .feature files.
The export can take as input issue keys of requirements, Test Executions, Test Plans or a filter id, which will be the one we'll use.
For this, we'll invoke the REST API (Exporting Cucumber Tests - REST) in order to obtain a .zip file containing the .feature files.
We'll be using a Build Step of type "Command Line" for this purpose, along with "curl" utility to ease making the HTTP request.
The complete script content of the "custom script" field above is:
| No Format |
|---|
curl -u %jira_user%:%jira_password% "%jira_base_url%/rest/raven/1.0/export/test?filter=11400&fz=true" -o features/features.zip
unzip -o features/features.zip -d features/ |
Notice that we're unzipping the .feature files to a local directory, so we're able to run them.
Run Cucumber scenarios
The exact syntax for running the Cucumber scenarios depends on the Cucumber implementation being used; in this case we're using Ruby's variant.
Therefore we're basically just invoking "cucumber" command with an option to generate a JSON report (e.g. "data.json").
You may have noticed a trick in the cucumber line above, in the end of the command (i.e. ".... || :"). That ensures that cucumber returns with exit code 0 (i.e. success), so the build may proceed.
Import execution results
In order to submit the results, we'll need to add a Build Step of type "Command Line", where we'll invoke the REST API, submitting the Cucumber JSON report generated in the previous step.
We also make sure this step is called always.
The complete script content of the "custom script" field above is:
| No Format |
|---|
curl -v -H "Content-Type: application/json" -X POST -u %jira_user%:%jira_password% --data @data.json "%jira_base_url%/rest/raven/1.0/import/execution/cucumber" |
You may notice that we're using some parameters related with the Jira server, that we've configured at project level.
| Info |
|---|
The user present in this configuration must exist in the JIRA instance and have permission to Create Test and Test Execution Issues |