
Page History
The Test Plan Board is a Test Plan-level test organization feature that allows users you to organize Tests in an a hierarchical way , in folders. Always keep in mind that each Test Plan has an associated (Test Plan) Board and that a Test can only belong to one folder within the Board.
This page will help you understand the Test Plan Board screen and the available operations within it, such as the ability to easily create Test Executions from a given folder or from some selected Tests.
| Info | ||
|---|---|---|
| ||
Please read theOverview of the Test Plan Board, for a more detailed explanation of the Test Plan Board, pros and cons, recommendations and additional information. |
...
| Info | ||
|---|---|---|
| ||
To edit the Board of a given Test Plan, the user you must be able to access the project (browse permisison) and have the permission to edit permission for the Test Plan issue. Also, the hierarchical test organization must also be enabled in Xray settings.
|

...
The Test Plan Board screen can be accessed from the project left side bar sidebar by choosing the Test Plan Board icon.
The following picture depicts the several key areas of the Test Plan Board screen, which includes the Board itself along with some other auxiliary folders.

T: Title section
- T1: Test Plan's issue key (with the possibility of switching to another issue)
- T2: Test Plan's Overall Execution Status
A: Folders section
- A1: "All" and "Orphans"
metafolders- meta-folders
- A2: the Test Repository itself, composed of folders and sub-folders with Tests organized within them
- A3: CRUD actions for the current selected folder (e.g. create, rename,
delte- delete)
- A4: information about the
the amount - number of Tests within in the current folder and the total Tests, including sub-folders
- number of Tests within in the current folder and the total Tests, including sub-folders
B: Tests section
- B1: path of the folder
- B2: overall execution status for this folder (takes into account the Test Environment selected)
- B3: Test Environment to consider for the computation of the overall execution status
- B4: Test filters
- B5:
Displayed - displayed Tests vs the actual total
amount - number of Tests within the current folder
- B6: ranked list of Tests within the current folder (only direct children)
- B7: calculated status for each Test, based on runs from related Test Executions
, on - in the selected Test Environment
Clicking on T1 will redirect you to the standard Test Plan issue screen.
...
To reach the Test Plan Board UI, you can simply use the proper project icon or at the top "Tests" menu.
It is also accessible right from the Test Plan issue screen.
...
Step 1: Click on the icon near the Test Plan issue key.

Step 2: Search/select the issue key of the desired Test Plan.
...
The Board presents the consolidated results for the Tests that are part of the Test Plan; in other words, you're able to see the latest status for each Test that is being tracked on the Test Plan, independently regardless of the number of runs you make for it. Thus, if If you schedule and run multiple test cycles (i.e., Test Executions), the Board will group the results from those executions and will show you the calculated status for each Test.
You can then see the overall execution status of the Test Plan, globaly, globally taking into account all the planned Test Executions you made on create in the different environments.
If you need to drill-down and see the current status for subset of Tests, you can do it at the folder level.
Overall progress
In order to track the overall progress of the Test Plan, use the top progress bar (T2) can be used.

Moving Moving the cursor over the bar elements will give information on the amount number of Tests (absolute & and percentage) that are currently in that status.
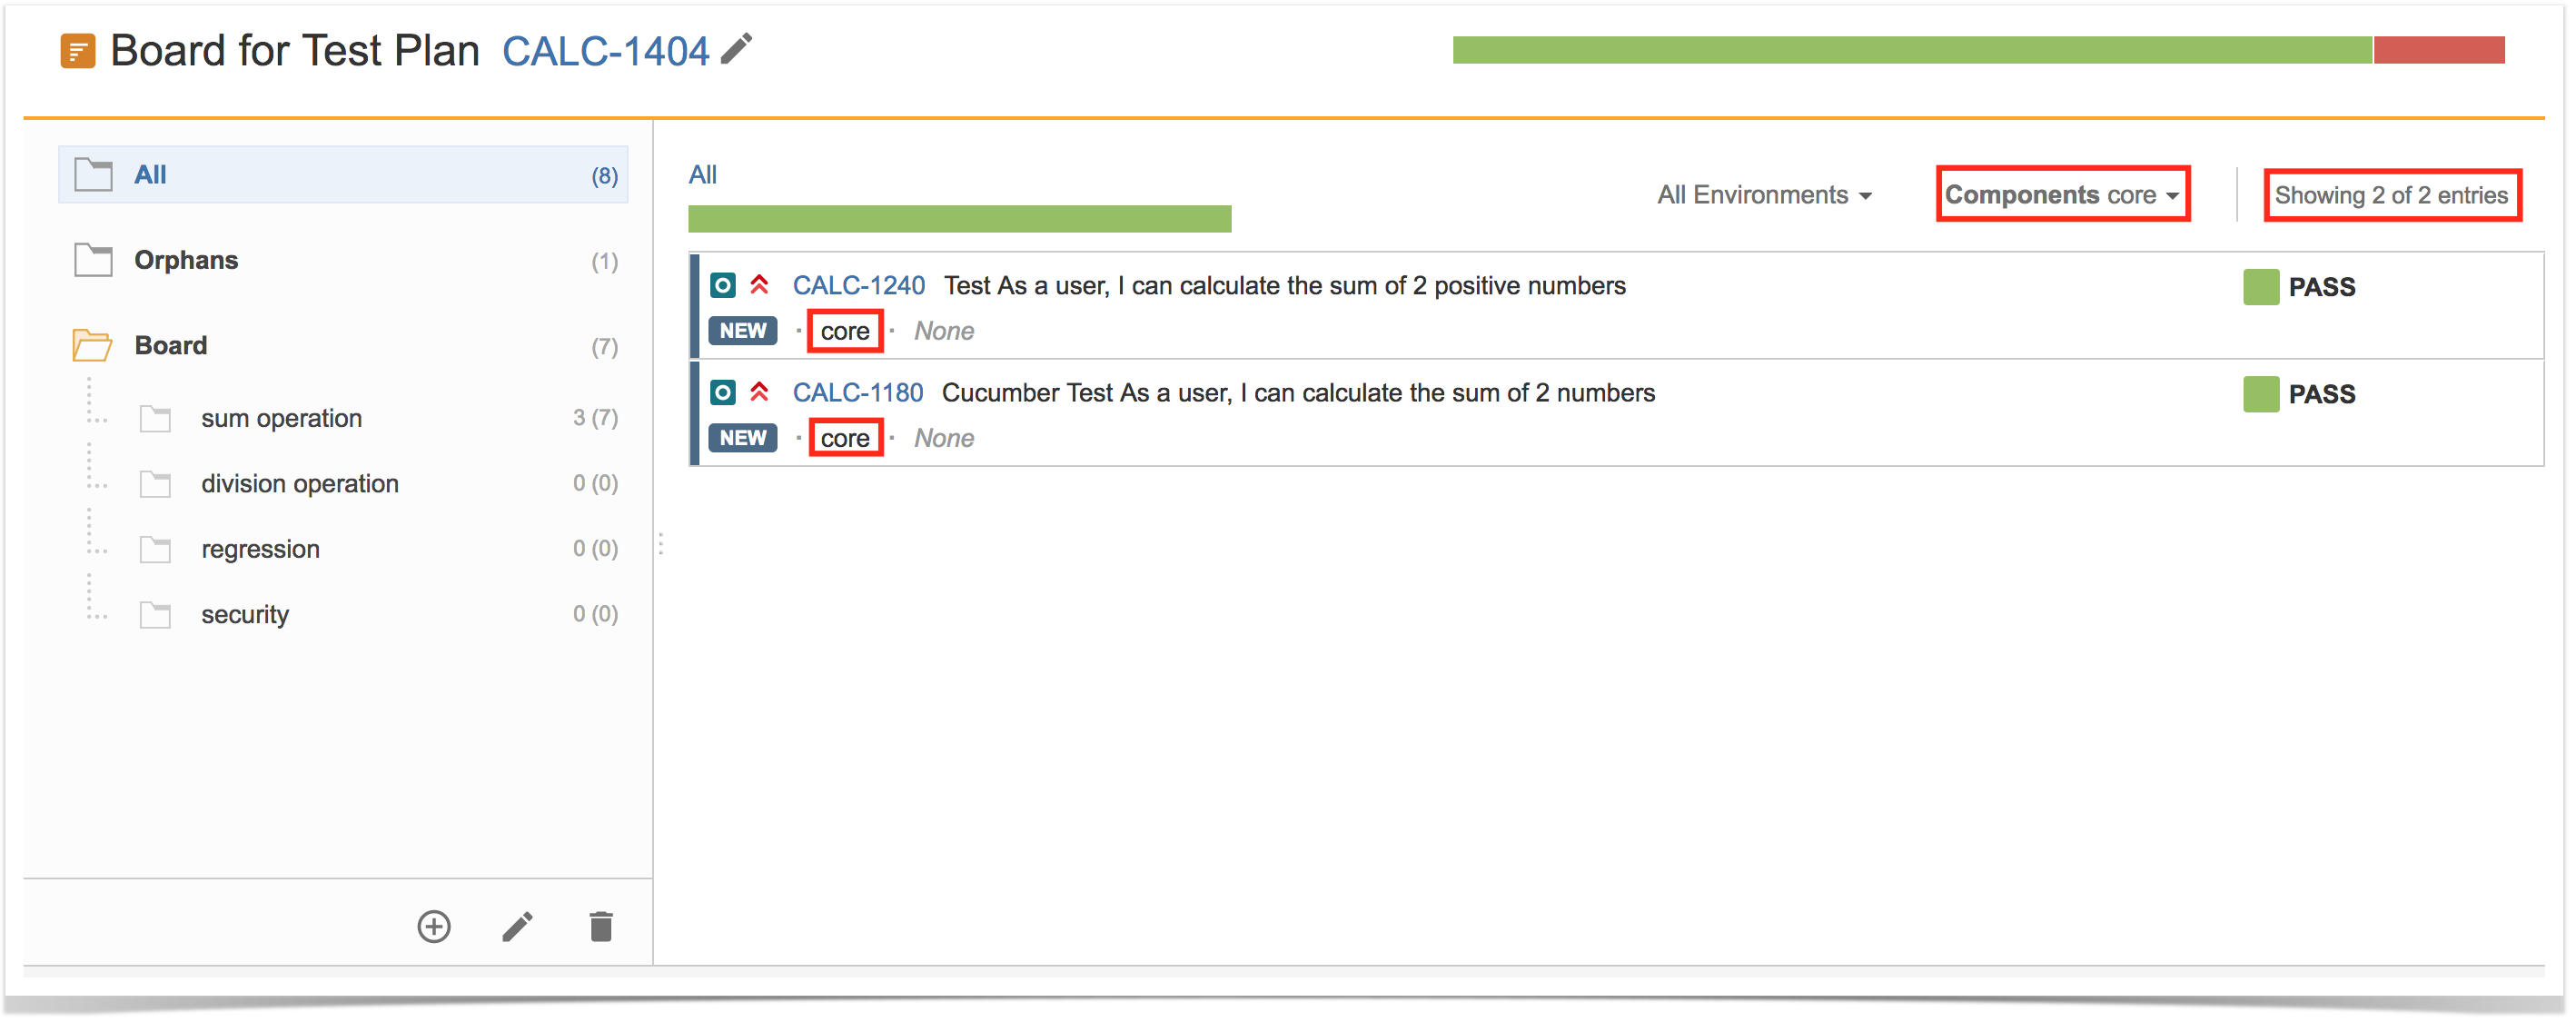
The overall execution status takes into account the joint results for all the Test Environments where in which you have ran run your Tests on (i.e., a Test will appear as PASS only if it passed in all the Test Environments for which you scheduled Test Executions).
...
By allowing you to see the progress per folder (B2), you're able to analyze the status of a subset of Tests that are part of the Test Plan.
The analysis per folder takes into account the selected Test Environment; by default, it shows the calculated status for "All Environments".
...
The values shown for each folder only take into account the immediate child Tests (i.e., the Tests that are within that folder). Thus, this bar shows the totals for the Tests that are seen "underneath" it.
...
On the right side of each Test (B7), you will be able to see the current calculated status for that Test, in the context of the Test Plan and the selected Test Environment. The status that is shown status corresponds to the last run made for that Test in the scope of the related Test Executions, taking into account the selected Test Environment.
...
Tests can be analyzed by Test Environment (i.e., taking into account the results for some given Test Environment) using the proper action (B3), so you can see the current testing status for that environment.
...
A folder can be selected by clicking on it.
After being Once selected, the user you can do some context actions or use the icons available at the bottom of the folders ' section.
Note: currently Currently, it is not possible to select multiple folders.
...
Step 1: Click on the parent folder.
Step 2: Click on the proper add icon at the bottom of folders section.

Step 3: Type the name for the folder.
Step 4: Press Enter or click outside of the selected folder.
Rename
To rename an existing folder:
Step 1: DoubleEither double-click on the folder or select the folder and then click the proper edit icon at the bottom of the folders ' section after selecting the folder.

Step 2: Type the new name for the folder.

Step 3: Press Enter or click outside of the selected folder

Remove
Users You can easily remove an existing folder, and its descendant folders.
Tests that were in one of the removed folders will not be erased; Tests will be removed from the Test Repository and will appear in to the Orphans meta-folder, so they can be organized in the Test Repository again, if needed.
...
Step 1: Click on the parent folder.
Step 2: Click on the proper remove icon at the bottom of folders section.

Step 3: Confirm removal of folder.

Expand/Collapse
Folders can be expanded or collapsed easily just by clicking in the folder's icon.


Expand/Collapse All
...
Step 1: Click on the parent folder.
Step 2: Use the context action Expand All or Collapse All.


Moving to another folder
A folder, including its descendants, can be moved to another folder just by using dragdragging-and-drop dropping to the destination folder.
...
Dragging the folder directly on top of some an existing folder , will add append it to the list of current child folders.
It is possible also to You can also move directly to a given position/rank by choosing the interim space between the existent folders.
...
A folder can be ranked within its parent folder by using drag-and-drop.
Note: if If you wish to rank it as the last one (iei.e., move it to the last position) within some a parent folder, you just need to drag it to the parent folder.


Add Tests
Create Test here
You can create a Test and associate it automatically with the selected Test Plan Board folder.
In order to create a Test in a folder,
Step 1: Click on the folder.
Step 2: Use the context action Create Test here.

Step 3: Fill out the Test fields and click Create. You have created a brand-new Test and associated it with the selected folder.


Move into
Users can "add" Tests, that are already part of the Test Plan, to an existing Users can "add" Tests to an existent folder based on some filters or JQL.
This action in fact corresponds to "moving" them from any folder they may already be in (including the Orphans) to the destination folder. Thus, if you "add" a Test that is currently is in some folder within the Board, to some a destination folder, then it will be essentially be moved from the source folder to the destination folder. Note that Tests the Test must already be part of the Test Plan.
If you want to add Tests to the Test Plan, then you need to go to the Test Plan issue screen and use the "Add Tests" button there.
In order to "add" Tests to a folder:
Step 1: Click on the folder.
Step 2: Use the context action "Add Tests".

Step 3: Choose the Tests you want using the provided filters, a previously saved filter, or by JQL.

Note: if If you try to add non-Test issues or Tests that are not part of the Test Plan (e.g., by using a saved filter), an error message will be showndisplayed.

Create Test Set
Users can easily create a Test Set with all the Tests in a given folder and its descendant folders.
...
Step 1: Click on the folder.
Step 2: Use the context action "Create Test Set".

Step 3: Fill out the Test Set fields and click "Create". Your brand-new Test Set is created with all the Tests, in the proper order.
...
In order to add Tests from a folder, including its descendants, to some an existing Test Set(s):
Step 1: Click on the folder.
Step 2: Use the context action "Add to Test Set".

Step 3: Choose the Test Set(s) key(s) and select "add Add selected". The Test Set(s) will now be updated.


Create Test Execution
Users You can easily create a Test Execution with all the Tests in a given folder and its descendant folders. This Test Execution will automatically be linked to the Test Plan.
The ranking of the Tests within the Test Execution will respect the ranking they have in the Board folder.
...
Step 1: Click on the folder.
Step 2: Use the context action "Create Test Execution".

Step 3: Fill out the Test Execution fields and click "Create". Your brand-new Test Execution is created with all the Tests, in the proper order.


Add to Test
...
Execution(s)
Users You can add Tests to an existing Test Execution with all the Tests in a given folder and its descendant foldersand its descendant folders.
Note that the destination Test Execution will not be automatically linked to the Test Plan. If you want to link it, you will have to do it manually.
The ranking of the Tests within the Test Execution will respect the ranking they have in the Test Repository folder. If Tests already exist in the destination Test Execution, their ranking in the Test Execution is not changed.
In order to add Tests from a folder, including its descendants, to some an existing Test Execution(s):
Step 1: Click on the folder.
Step 2: Use the context action "Add to Test Execution".

Step 3: Choose the Test Execution(s) key(s) and select "add Add selected". The Test Execution(s) will now be updated.
...
Tests can be selected by clicking on them. Multiple selection is possible by using the "Ctrl" key (on Windows) or the "Cmd" key (on OS X). The "shift" keys can be used to select a list of Tests from the currently selected test to the clicked one. If you want to select more than one Test and the Tests are listed consecutively, use the "Shift" key to quickly select an entire group. Click the first Test in the list you want to select, hold down the "Shift" key, scroll down to the last Test you want and click it. This selects the first item, the last item and all items in between.
You can also filter the list of visible Tests to make it easier It is also possible to filter the list of visibile Tests, making it easier for you to pick the Tests you need.
...
Filtering visible Tests
The list of visibile visible Tests can be filtered, so you can easily see and obtain the relevant Tests you need. Note that the filter remains is applied even if you change to another folder.
Filtering Tests is quite useful, for example for , when creating the structure of the Board based on a subset of Tests from the All or Orphans meta-folders.

Moving to another folder
You can move Tests can be moved to another folder just by using drag-and-drop to the destination folder.
Users You can also use this operation for "movingadding" Tests (i.e. adding moving Tests) from the meta-folders (i.e. All, Orphans) to folders within the Test Repository.
...
Tests can be ranked within a folder by using drag-and-drop.

Create Test Set
A new Test Set can be created containing the selected Tests. For this, Use the context action " Create Test Set to create a new Test Set " should be used.containing the selected Tests.

Add to Test Set(s)
Selected Tests can be added to an existing Test Set. For this, Use the context action "Add to Test Set" should be used. to add selected Tests to an existing Test Set.

Create Test Execution
A new Test Execution can be created containing the selected Tests. For this, the context action "Create Test Execution" should be usedUse the context action Create Test Execution to create a new Test Execution containing the selected Tests.
Note that when creating a Test Execution from a folder, or selection of Tests, this Test Execution will be linked to the Test Plan.

Add to Test Execution(s)
Selected Tests can be added Use the context action Add to Test Execution to add selected Tests to an existing Test Execution. For this, the context action "Add to Test Execution" should be used
Note that the destination Test Execution will not be automatically linked to the Test Plan. If you want to link it, you will have to do it manually.

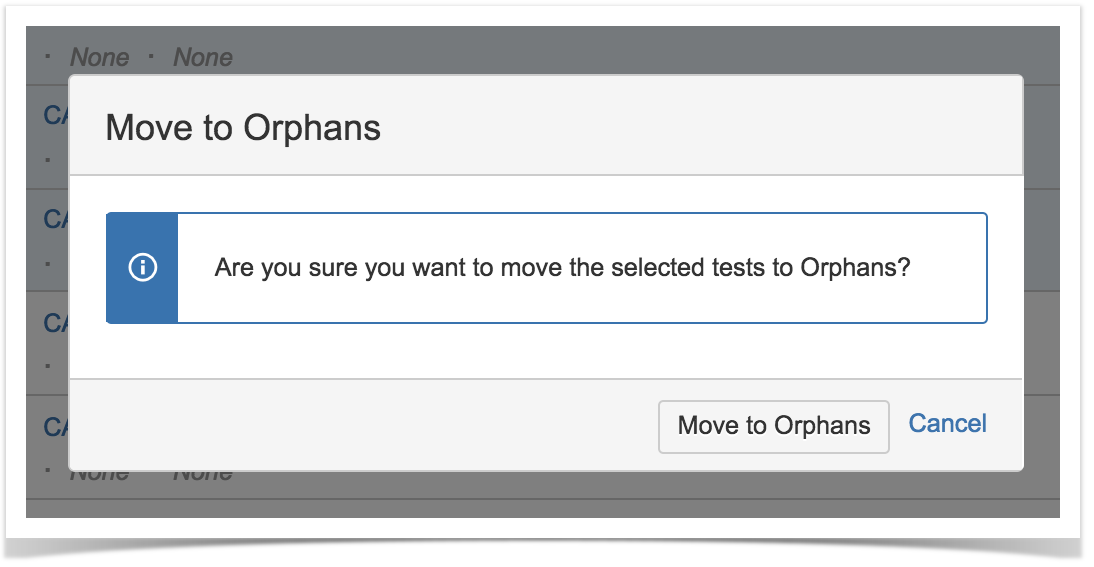
Move to Orphans
Users You can move Tests to the Orphans folder; this , which is is equivalent to removing them from the Board.
In order to move Tests fo to the Orphans meta-folder:
Step 1: Select the Tests you want.
Step 2: Use the context action "Move to Orphans"

Step 3: Confirm by clicking on "Move to Orphans".
How ranking works
...
when creating, or adding Tests to
...
, Test Sets, Test Executions or Test Plans
Whenever creating a Test Set, Test Execution or Test Plan, or adding Tests to some an existing one, Xray will respect the order of that the Tests taking into account the ranking they have in the Board.
The algorithm starts by adding the Tests of the folder, respecting their rank in the folder, and then iterates through the child folders; each . Each child folder is processed in the same way.
If a Test already exists in the destination entity (e.g., Test Set/Execution), then it is not added again and the current ranking is maintained.
...