Page History
...
With AltWalker, automation code related to our model can be implemented in Python, C#, or other. In this approach, GraphWalker is only responsible for generating the path through the modelsçmodels.

Let's clarify Starting by clarifing some key concepts, using the information provided by GraphWalker's documentation that explains them clearly:
...
In MBT, especially in the case of State Transition Model-Based Testing, we start from a given vertex but then the path, that describes the sequence of edges and vertices visited, can be quite different each time the tool generates it. Besides, the The stop condition is not composed by one or more well-known and fixed expectations; it's based on some more graph/model related criteria.
When we "execute the model," , it will walk the path (i.e. go over from vertex to vertex through a given edge) and performing perform checks in the vertices. If those checks are successful until the stop condition(s) is achiviedachieved, we can say that it was successful; otherwise, the model is not a good representation of the system as it is and we can say that it "failed.".
Example
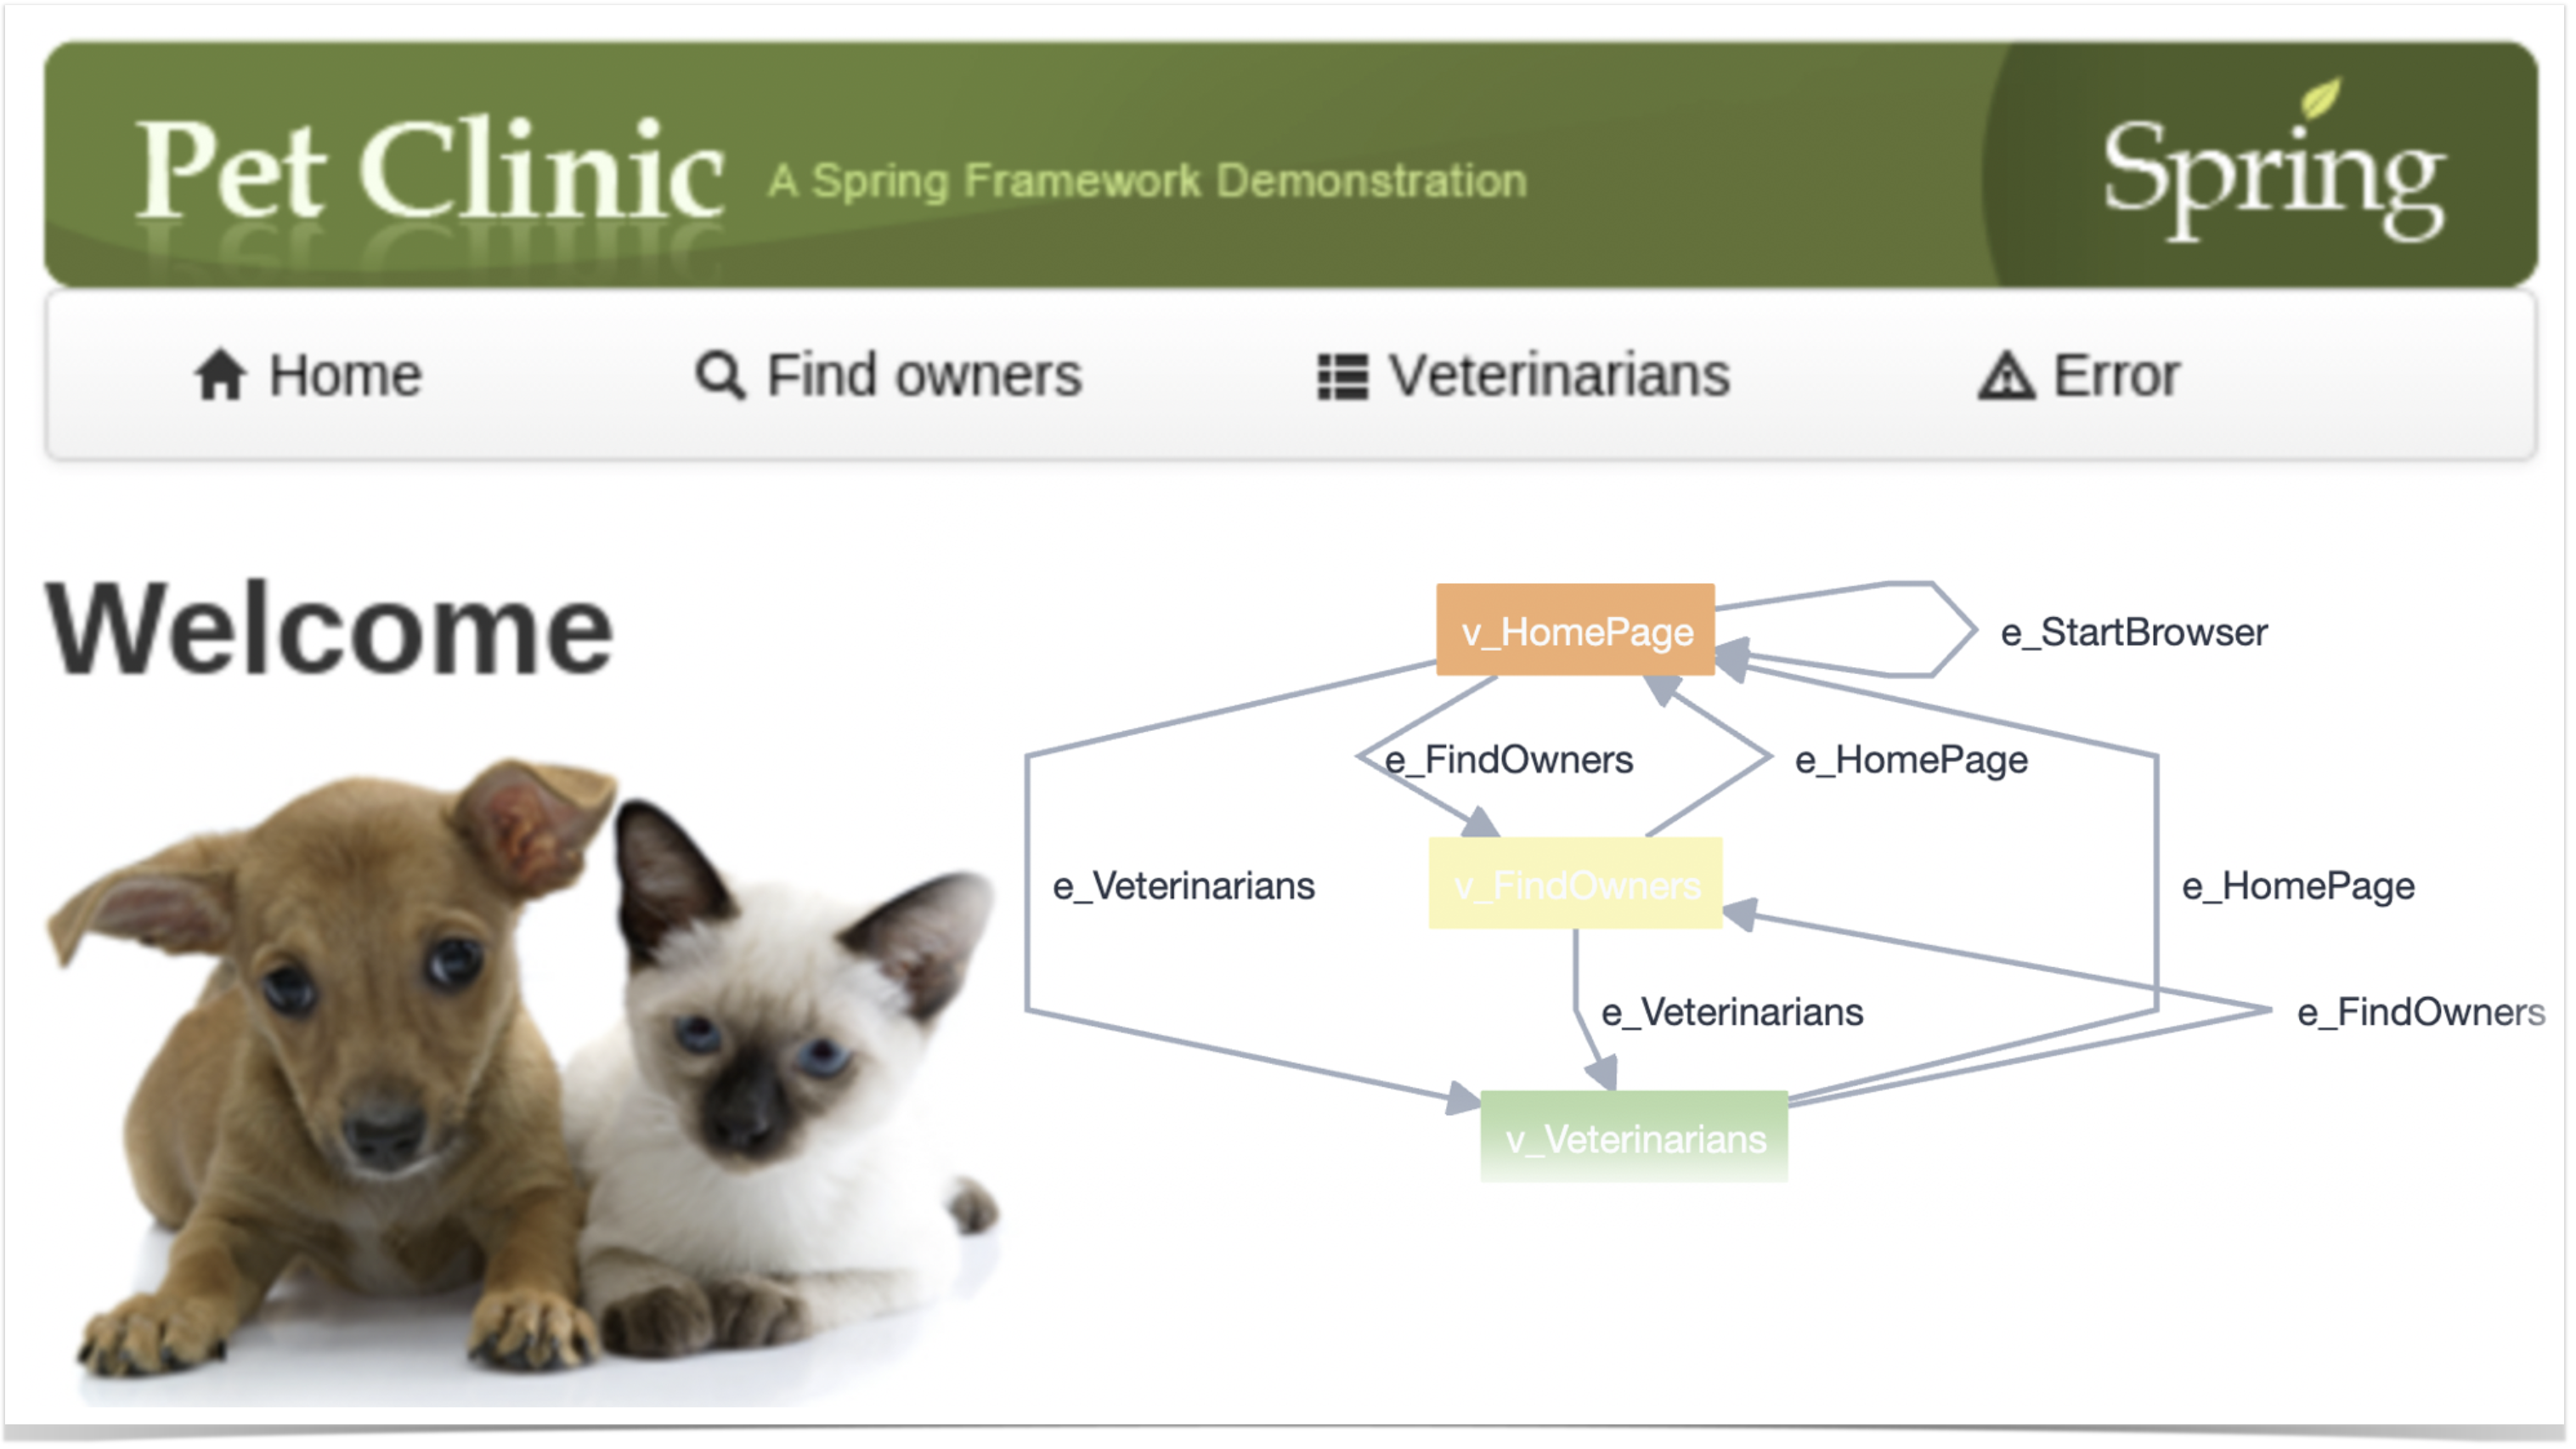
In this This tutorial , is based on an example provided by the GraphWalker community (please check GraphWalker wiki page describing it) which targets the well-known PetClinic sample site.
...
As mentioned earlier, models can be built using AltWalker's Model-Editor (or GraphWalker Studio) or directly in the IDE (for VSCode there's a useful extension to preview it). In the visual editors, namelly namely in AltWalker's Model-Editor, we can use it to load previously saved model(s) like the ones in petclinic_full.json. In this case, the JSON file contains several models; we could also have one JSON file per model.
...
| Info | ||
|---|---|---|
| ||
As detailed in AltWalker's documentation, if we start from scratch (i.e. without a model), we can initialize a project for our automation code using something like: $ altwalker init -l python test-project When we have the model, we can generate the test package containing a skeleton for the underlying test code. $ altwalker generate -l python path/for/test-project/ -m path/to/models.json If we do have a model, then we can pass it to the initialization command: $ altwalker init -l python test-project -m path/to/model-name.json During implementation, we can check our model for issues/inconsistencies, just from a modeling perspective: $ altwalker check -m path/to/model-name.json "random(vertex_coverage(100))" We can also check verify if the test package contains the implementation of the code related to the vertices and edges. $ altwalker verify -m path/to/model-name.json tests Check the full syntax of AltWalker's CLI (i.e. "altwalker") for additional details. |
The main test package is stored in tests/test.py. The implementation follows the Page Objects Model using pypom package and each page is stored in a proper class under a specific pages directory.
Besides, faker is also used to generate test data that will be used by the model (e.g. whenever filling data on the edges).
Actions performed in the The Java class that implements the edges and vertices of this model is defined in the class NewOwnerTest. Actions performed in the edges are quite simple. Assertions are also simple as they're only focused on the state/vertex they are at.
| Code Block | ||||||
|---|---|---|---|---|---|---|
| ||||||
import unittest

from selenium import webdriver
from selenium.webdriver.firefox.options import Options

from tests.pages.base import BasePage
from tests.pages.home import HomePage
from tests.pages.find_owners import FindOwnersPage
from tests.pages.owners import OwnersPage
from tests.pages.new_owner import NewOwnerPage
from tests.pages.veterinarians import VeterinariansPage
from tests.pages.owner_information import OwnerInformationPage

import sys
import pdb
from faker import Faker

debugger = pdb.Pdb(skip=['altwalker.*'], stdout=sys.stdout)
fake = Faker()

HEADLESS = False
BASE_URL = "http://localhost:9966/petclinic"

driver = None


def setUpRun():
    """Setup the webdriver."""

    global driver

    options = Options()
    if HEADLESS:
        options.add_argument('-headless')

    print("Create a new Firefox session")
    driver = webdriver.Firefox(options=options)

    print("Set implicitly wait")
    driver.implicitly_wait(15)
    print("Window size: {width}x{height}".format(**driver.get_window_size()))

def tearDownRun():
    """Close the webdriver."""

    global driver

    print("Close the Firefox session")
    driver.quit()

class BaseModel(unittest.TestCase):
	"""Contains common methods for all models."""

	def setUpModel(self):
		global driver
		print("Set up for: {}".format(type(self).__name__))
		self.driver = driver

	def v_HomePage(self):
		page = HomePage(self.driver)
		self.assertEqual(page.heading_text, "Welcome", "Welcome heading should be present")
		self.assertTrue(page.is_footer_present, "footer should be present")

	def v_FindOwners(self):
		page = FindOwnersPage(self.driver)
		self.assertEqual("Find Owners",page.heading_text, "Find Owners heading should be present")
		self.assertTrue(page.is_footer_present, "footer should be present")

	def v_NewOwner(self):
		page = NewOwnerPage(self.driver)
		self.assertEqual( "New Owner",page.heading_text, "New Owner heading should be present")
		#$x("/html/body/table/tbody/tr/td[2]/img").shouldBe(visible);
		self.assertTrue(page.is_footer_present, "footer should be present")

	def v_Owners(self):
		page = OwnersPage(self.driver)
		self.assertEqual("Owners",page.heading_text, "Owners heading should be present")
		self.assertGreater(page.total_owners_in_list, 9, "Owners in listing >= 10")

	def v_Veterinarians(self):
		page = VeterinariansPage(self.driver)
		self.assertEqual(page.heading_text,"Veterinarians", "Veterinarians heading should be present")
		self.assertTrue(page.is_footer_present, "footer should be present")

	def v_OwnerInformation(self, data):
		page = OwnerInformationPage(self.driver)
		self.assertEqual(page.heading_text, "Owner Information", "Owner Information heading should be present")
		data["numOfPets"] = page.number_of_pets
		print(f"numOfPets: {page.number_of_pets}")
		self.assertTrue(page.is_footer_present, "footer should be present")

	def e_DoNothing(self, data):
		#debugger.set_trace()
		pass

	def e_FindOwners(self):
		page = BasePage(self.driver)
		page.click_find_owners()


class PetClinic(BaseModel):
	def e_StartBrowser(self):
		page = HomePage(self.driver, BASE_URL)
		page.open()

	def e_HomePage(self):
		page = HomePage(self.driver)
		page.click_home()

	def e_Veterinarians(self):
		page = HomePage(self.driver)
		page.click_veterinarians()

	def e_FindOwners(self):
		page = HomePage(self.driver)
		page.click_find_owners()

class FindOwners(BaseModel):

	def e_AddOwner(self):
		page = FindOwnersPage(self.driver)
		page.click_add_owner()

	def e_Search(self):
		page = FindOwnersPage(self.driver)
		page.click_submit()


class OwnerInformation(BaseModel):
	def e_UpdatePet(self):
		page = OwnerInformationPage(self.driver)
		page.click_submit()

	def e_AddPetSuccessfully(self):
		page = OwnerInformationPage(self.driver)
		page.fillout_pet(fake.name(),fake.past_date().strftime("%Y/%m/%d"), "dog")
		page.click_submit()

	def e_AddPetFailed(self):
		page = OwnerInformationPage(self.driver)
		page.fillout_pet("",fake.past_date().strftime("%Y/%m/%d"), "dog")
		page.click_submit()

	def e_AddNewPet(self):
		page = OwnerInformationPage(self.driver)
		page.click_add_new_pet()

	def e_EditPet(self):
		page = OwnerInformationPage(self.driver)
		page.click_edit_pet()

	def e_AddVisit(self):
		page = OwnerInformationPage(self.driver)
		page.click_add_visit()

	def v_NewPet(self):
		page = OwnerInformationPage(self.driver)
		self.assertEqual(page.heading_text, "New Pet", "New Pet heading should be present")
		self.assertTrue(page.is_footer_present, "footer should be present")

	def v_NewVisit(self):
		page = OwnerInformationPage(self.driver)
		self.assertEqual(page.heading_text, "New Visit", "New Visit heading should be present")
		self.assertTrue(page.is_visit_visible, "visit should be present")

	def e_VisitAddedSuccessfully(self):
		page = OwnerInformationPage(self.driver)
		page.clear_description()
		page.set_description(fake.name())
		page.click_submit()

	def e_VisitAddedFailed(self):
		page = OwnerInformationPage(self.driver)
		page.clear_description()
		page.click_submit()

	def v_Pet(self):
		page = OwnerInformationPage(self.driver)
		self.assertEqual(page.heading_text, "Pet", "Pet heading should be present")

class Veterinarians(BaseModel):
	def e_Search(self):
		page = VeterinariansPage(self.driver)
		page.search_for("helen")

	def v_SearchResult(self):
		page = VeterinariansPage(self.driver)
		self.assertTrue(page.is_text_present_in_vets_table, "Helen Leary")
		self.assertTrue(page.is_footer_present, "footer should be present")

	def v_Veterinarians(self):
		page = VeterinariansPage(self.driver)
		self.assertEqual(page.heading_text,"Veterinarians", "Veterinarians heading should be present")
		self.assertGreater(page.number_of_vets_in_table, 0, "At least one Veterinarian should be listed in table")

class NewOwner(BaseModel):

	def e_CorrectData(self):
		page = NewOwnerPage(self.driver)
		page.fill_owner_data(first_name=fake.first_name(), last_name=fake.last_name(), address=fake.address(), city=fake.city(), telephone=fake.pystr_format('##########'))
		#page.fill_telephone(fake.pystr_format('##########'))
		page.click_submit()

	def e_IncorrectData(self):
		page = NewOwnerPage(self.driver)
		page.fill_owner_data()
		#page.fill_telephone("12345678901234567890")
		page.fill_telephone(fake.pystr_format('####################'))
		page.click_submit()

	def v_IncorrectData(self):
		page = NewOwnerPage(self.driver)
self.assertTrue(page.error_message, "numeric value out of bounds (<10 digits>.<0 digits> expected") |
In the previous examplecode, we can see that the class NewOwnerTest extends ExecutionContext; this ties the model with the path generator and provides a context for tracking the internal state and history of the model.
The @GraphWalker annotation is used to specify the path generator and stop conditions. This is used for online path generation during test execution.
If follows this syntax:
...
each model is a class. Each one of those classes must contain methods corresponding to the related edges and vertices; methods should be named in the same way as the names assigned for the edges and for the vertices in the model.
To run the tests using a random path generator and stopping upon 100% of vertex coverage, we can use AltWalker CLI tool such as:
| Code Block | ||||
|---|---|---|---|---|
| ||||
altwalker online tests -m models/petclinic_full.json "random(vertex_coverage(100))" |
However, that would only produce some debug output to the console.
If we aim to integrate this in CI/CD, or even have visibility of it in a test management tool such as Xray, we need to generate a JUnit XML report.
However, AltWalker (as of v0.2.7) does not yet provide a built-in JUnit reporter.
Luckily, we can implement our own code to run AltWalker as it provides an open API. This code is available in the script run_with_custom_junit_report.py, which can be found the repository the sample code of this tutorial.
| Code Block | ||||
|---|---|---|---|---|
| ||||
from altwalker.planner import create_planner
from altwalker.executor import create_executor
from altwalker.walker import create_walker
from custom_junit_reporter import CustomJunitReporter
import sys
import pdb
import click

def _percentege_color(percentage):
    if percentage < 50:
        return "red"

    if percentage < 80:
|
such as:
...
| Info | ||||||
|---|---|---|---|---|---|---|
| ||||||
Tests using the model can also be created and executed programmatically similar to other tests, using JUnit or other testing framework. More info here and here. The flow would be something like:
Code Block | | |||||
|
To run the tests online with GraphWalker we can use Maven, since there is a specific plugin for assisting on this. This will produce a single JUnit XML report stored in the target/graphwalker-reports/ directory.
...
| language | bash |
|---|---|
| title | example of a Bash script to run the tests |
print(statistics)
        _echo_statistics(statistics)
        reporter.set_statistics(statistics)
        junit_report = reporter.to_xml_string()
        print(junit_report)
        with open('output.xml', 'w') as f:
            f.write(junit_report)
        with open('output_allinone.xml', 'w') as f:
            f.write(reporter.to_xml_string(generate_single_testcase=True, single_testcase_name="PetClinicAllinOne"))

        #debugger.set_trace()
        if planner:
            planner.kill()

        if executor:
            executor.kill()
|
This code makes use of a custom reporter that can generate JUnit XML reports in two different ways:
- mapping each model to a JUnit <testcase> element, which ultimately will be translated to a Test issue in Xray per each model
- mapping the whole run to a single JUnit <testcase> element, considering the whole run as successful or not; in this case, it will be lead to a single Test issue in Xray
The previous runner's code above produces these two reports, so we can evaluate them.
...
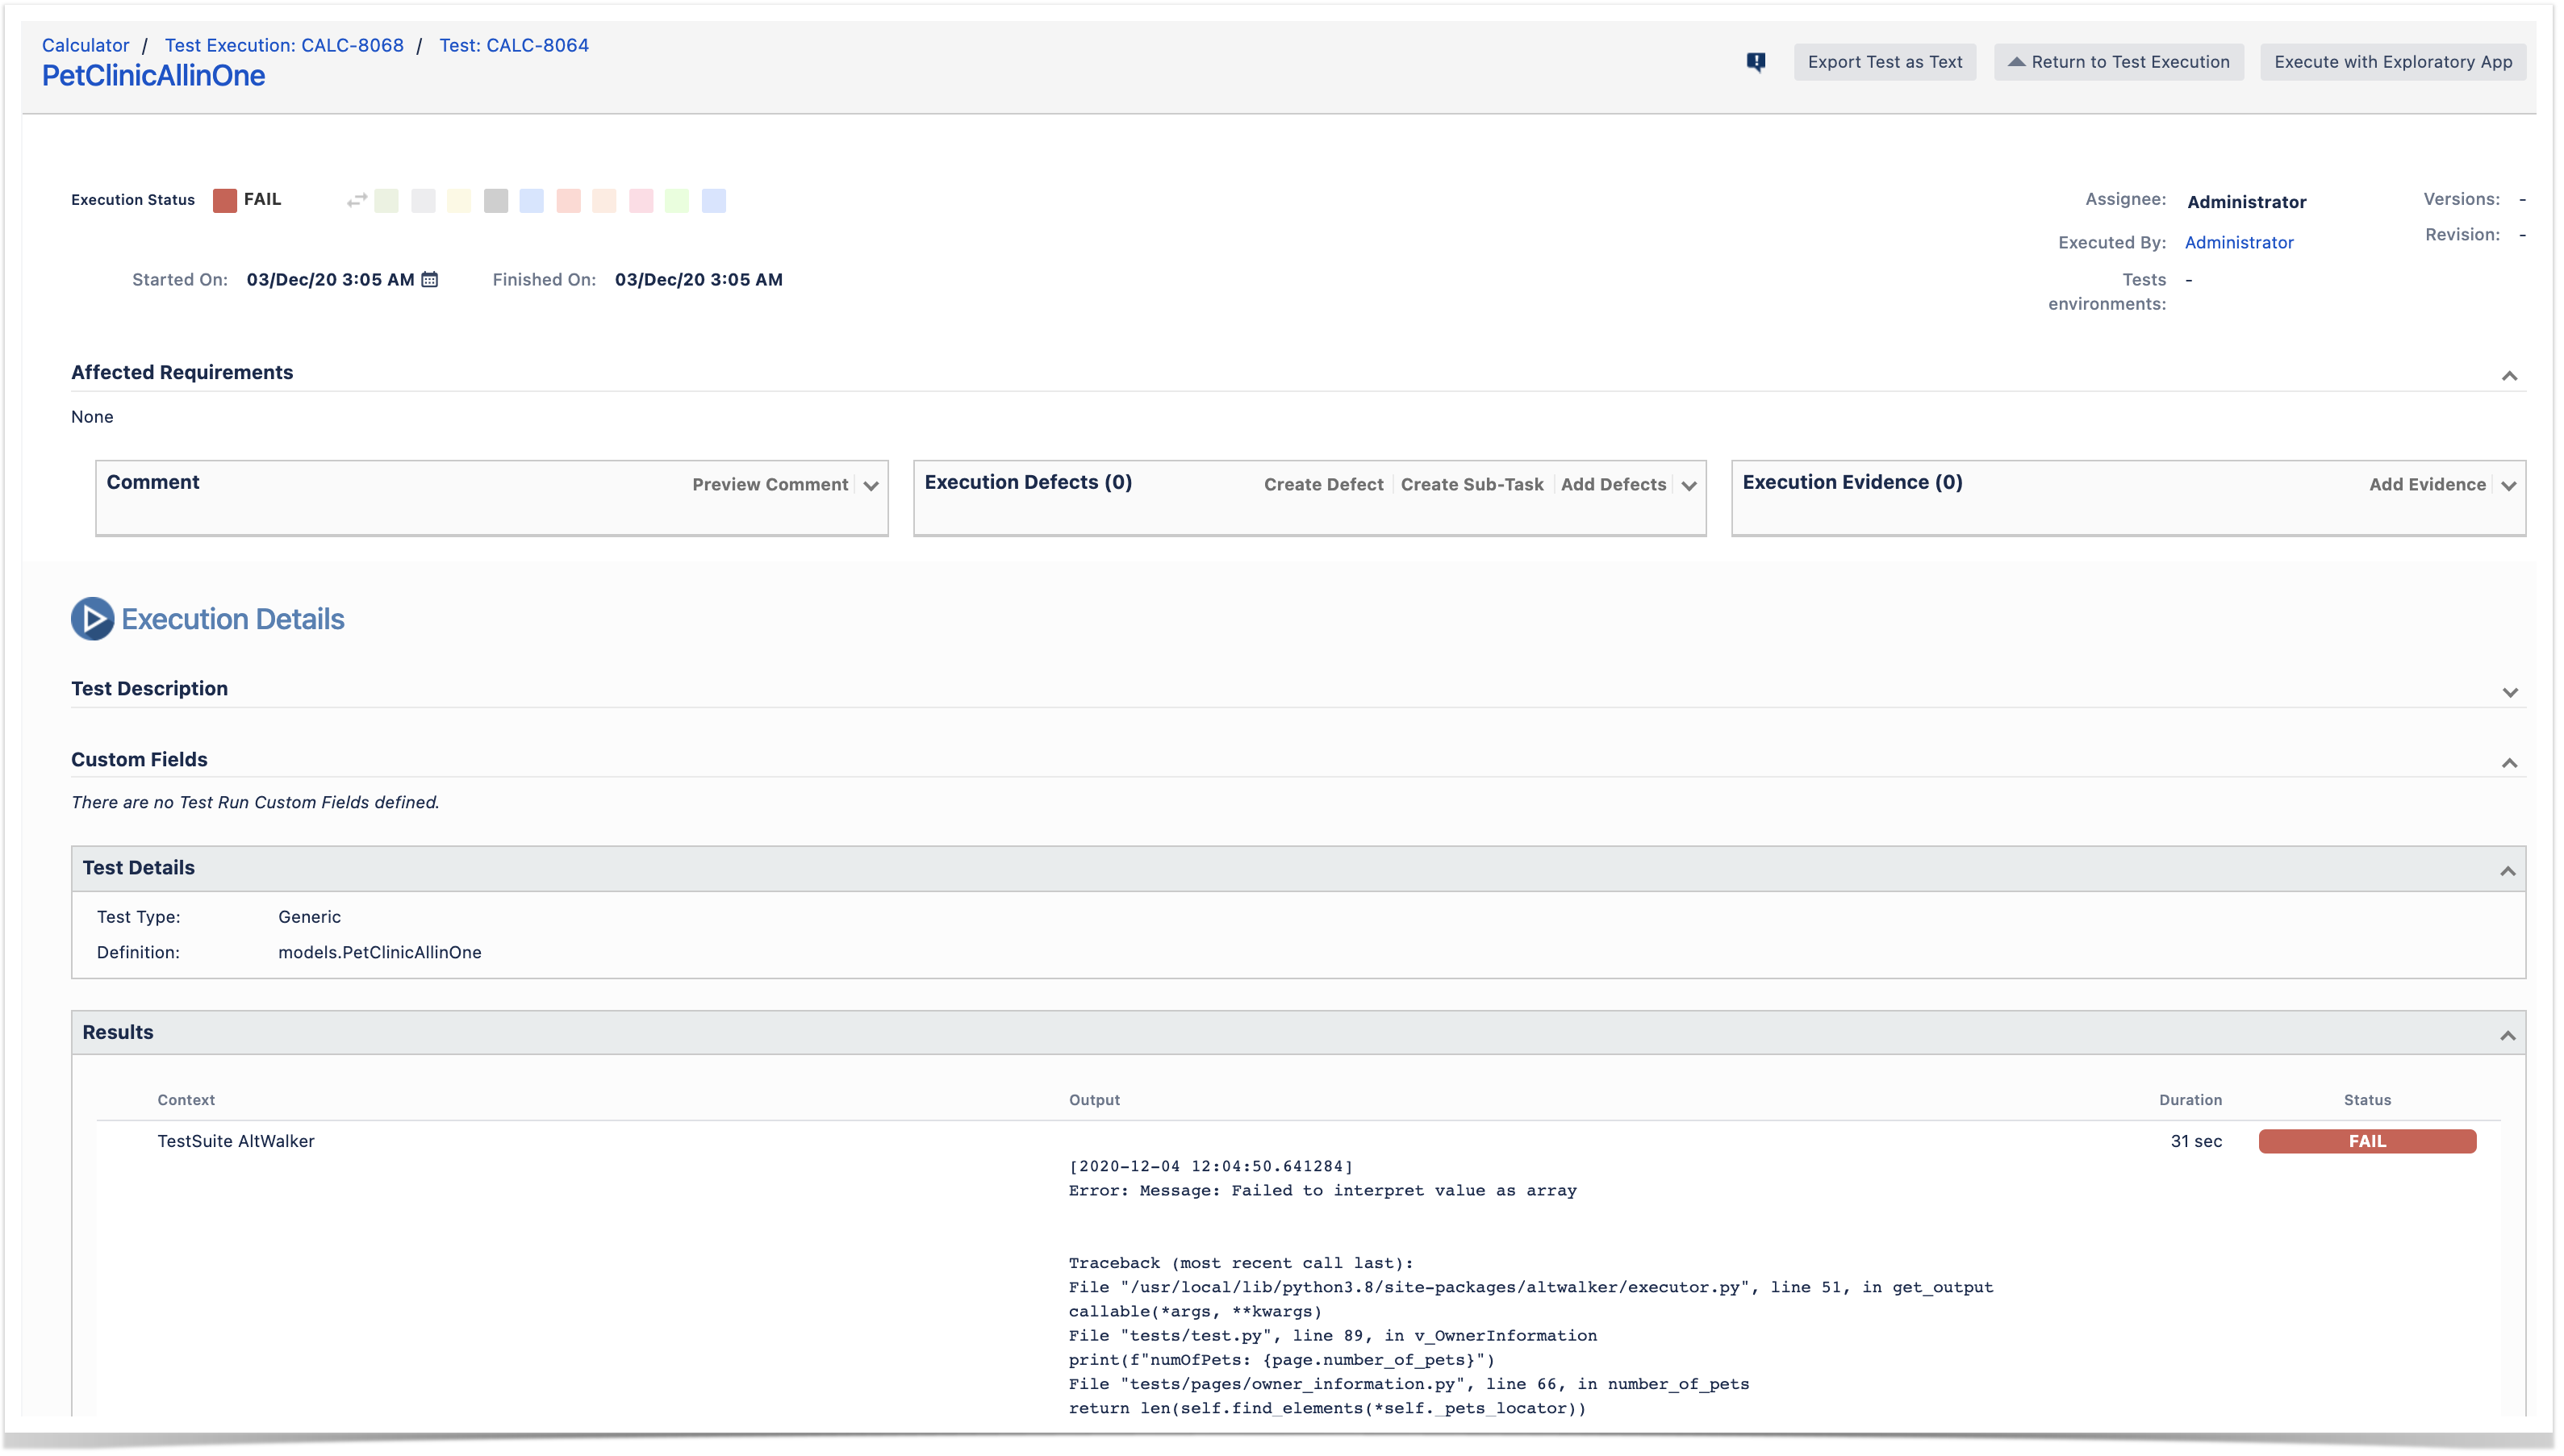
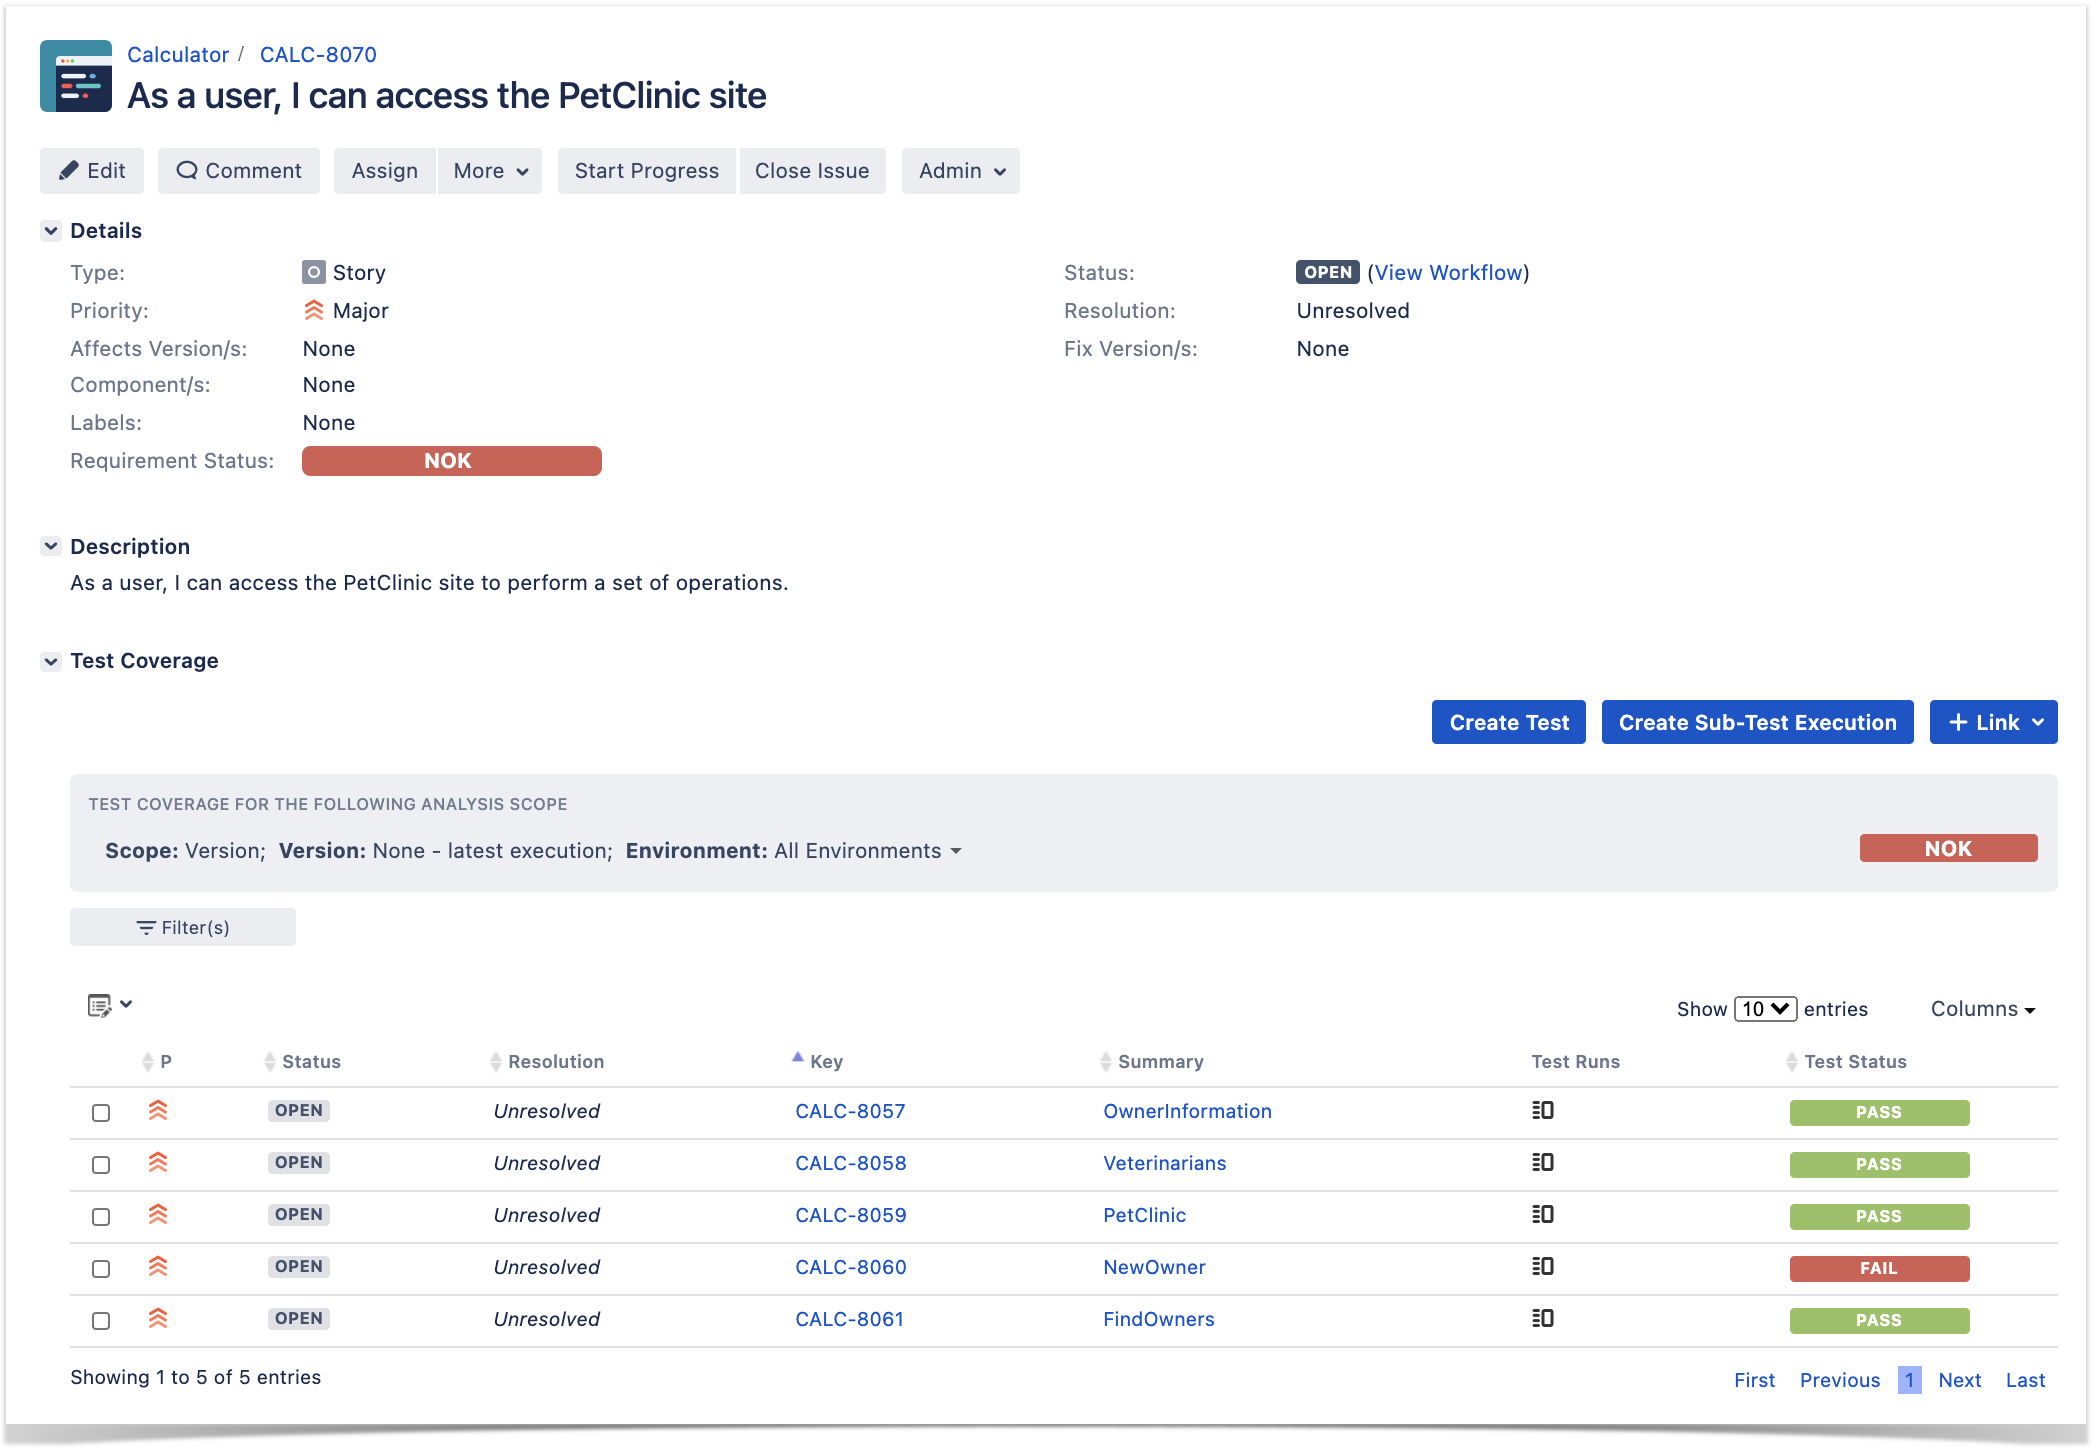
After successfully running the tests and generating the JUnit XML report, it can be imported to Xray (either by the REST API or through the Import Execution Results action within the Test Execution, or even by using a CI tool of your choice).
...
| Code Block | ||||
|---|---|---|---|---|
| ||||
REPORT_FILE=$(ls target/graphwalker-reports/TEST-GraphWalker-*.xml | sort | tail -n 1)#!/bin/bash # if you wish to map the whole run to single Test in Xray/Jira #REPORT_FILE=output_allinone.xml # if you wish to map each model as a separate Test in Xray/Jira REPORT_FILE=output.xml curl -H "Content-Type: multipart/form-data" -u admin:admin -F "file=@$REPORT_FILE" http://jiraserver.example.com/rest/raven/1.0/import/execution/junit?projectKey=CALC |

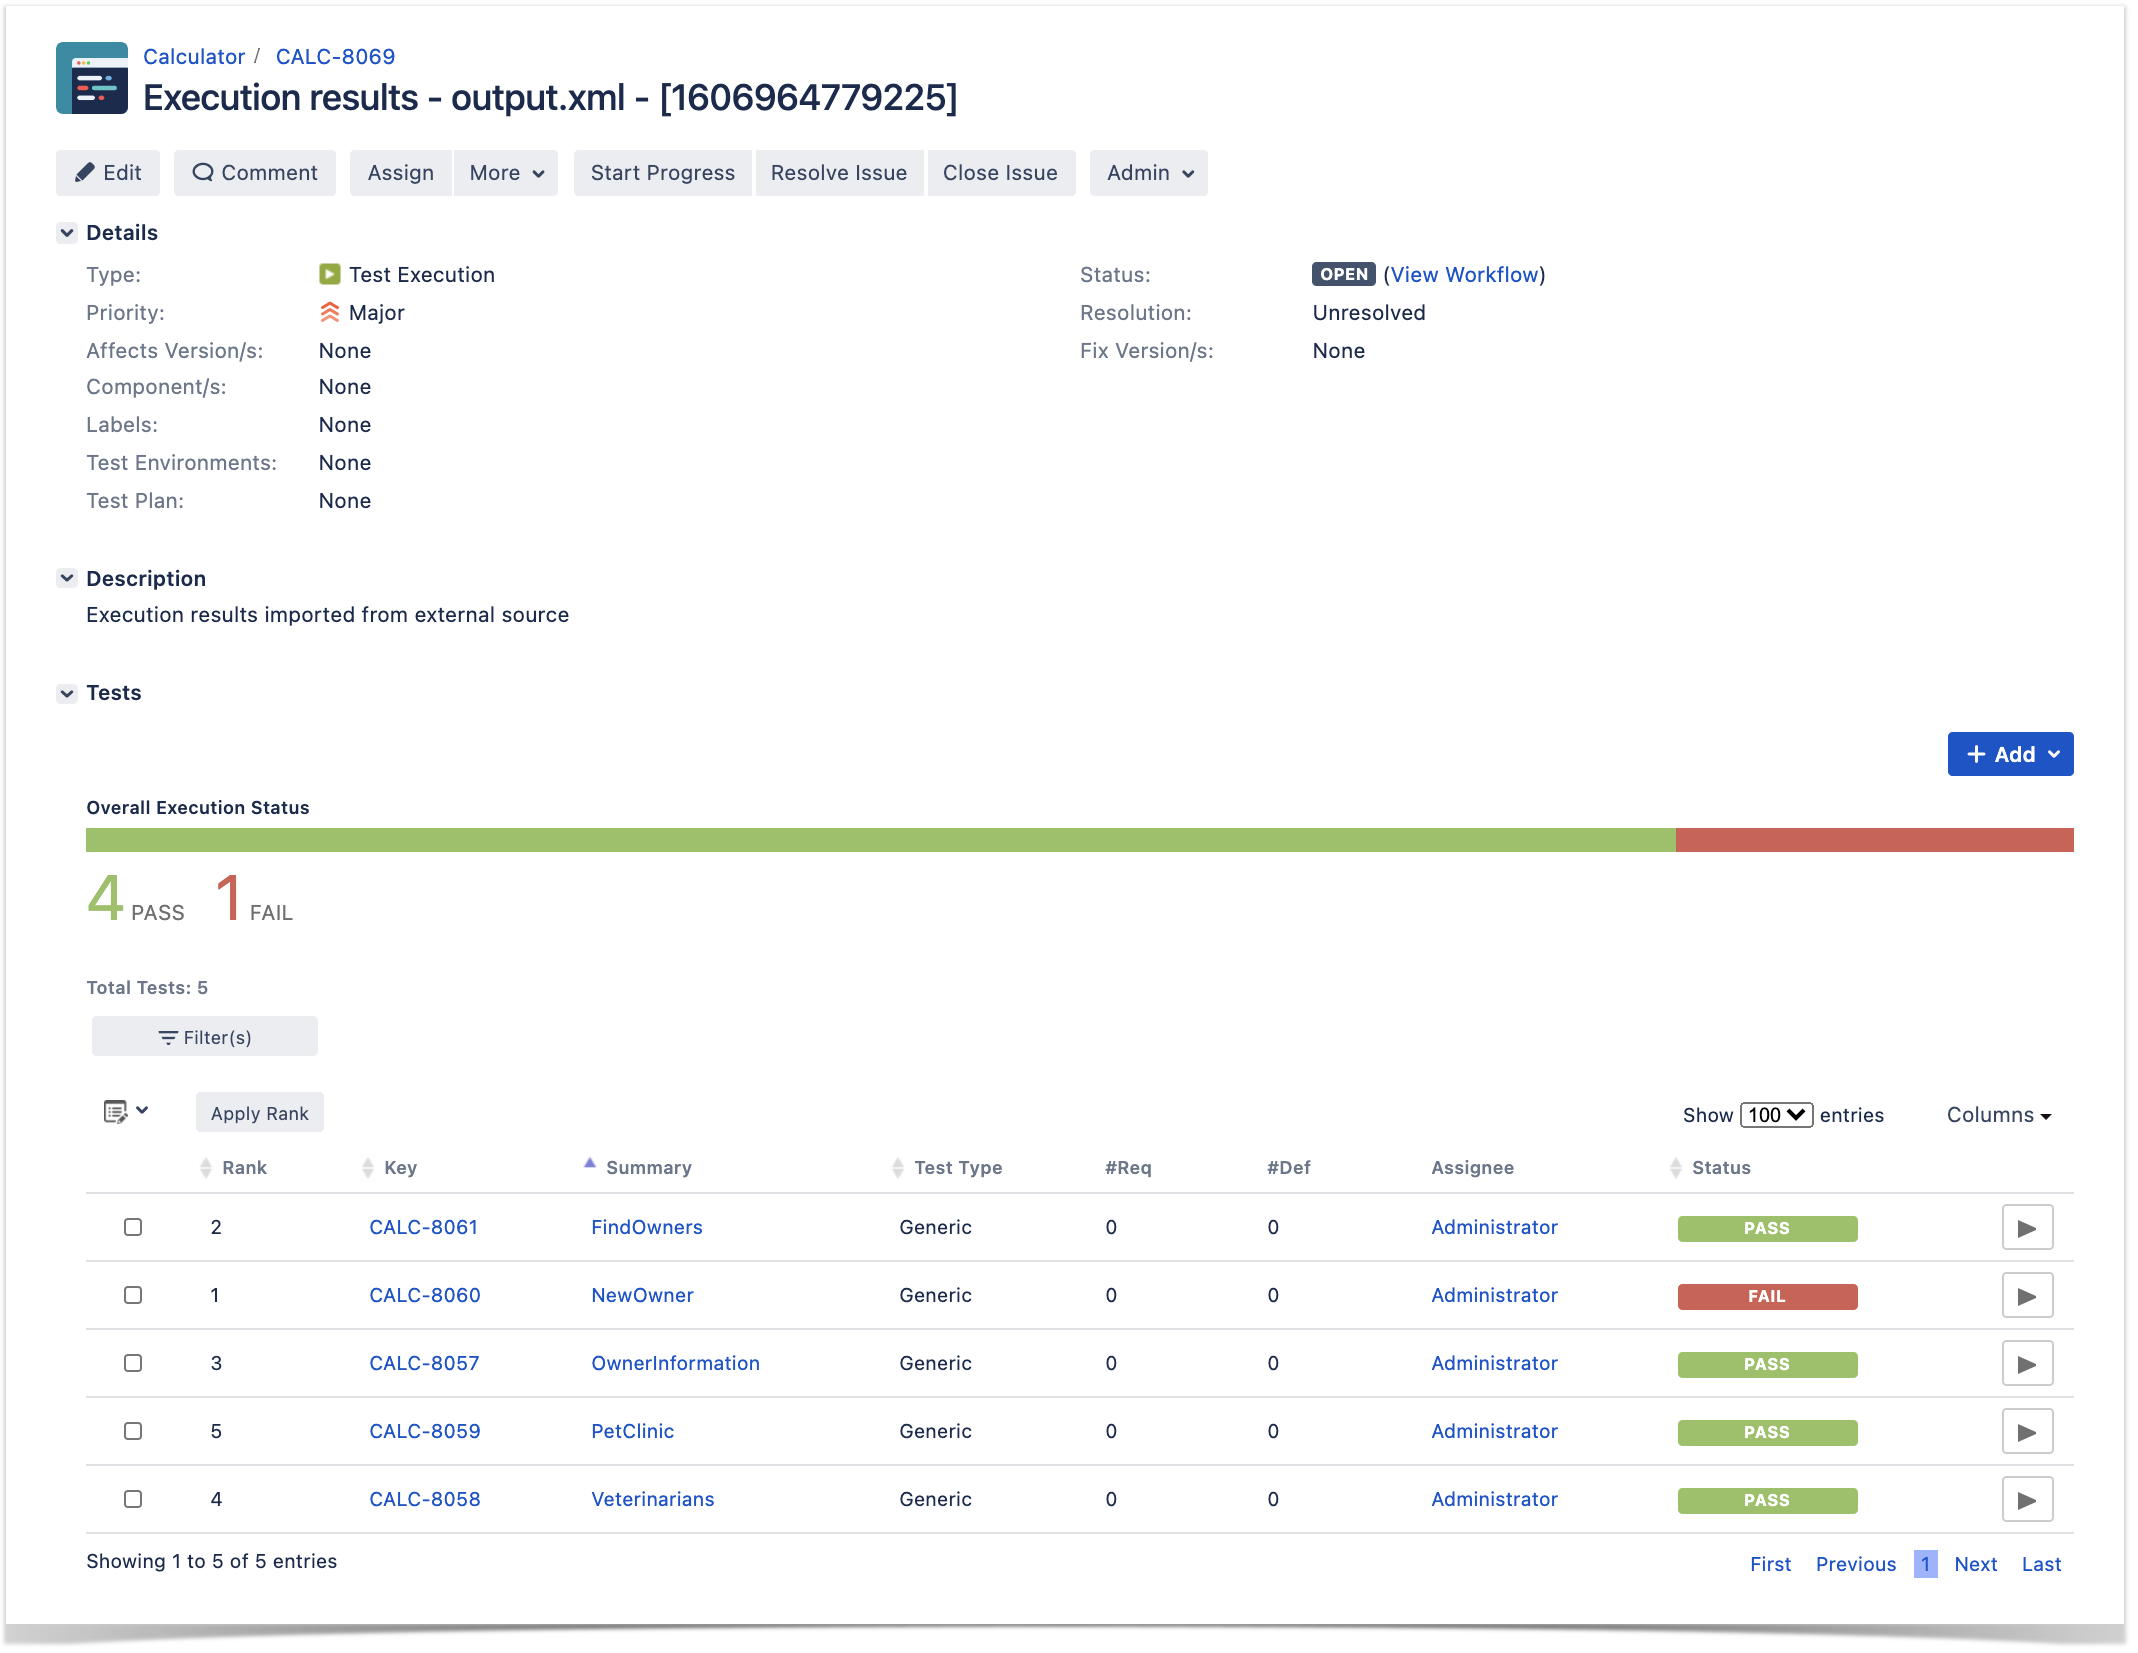
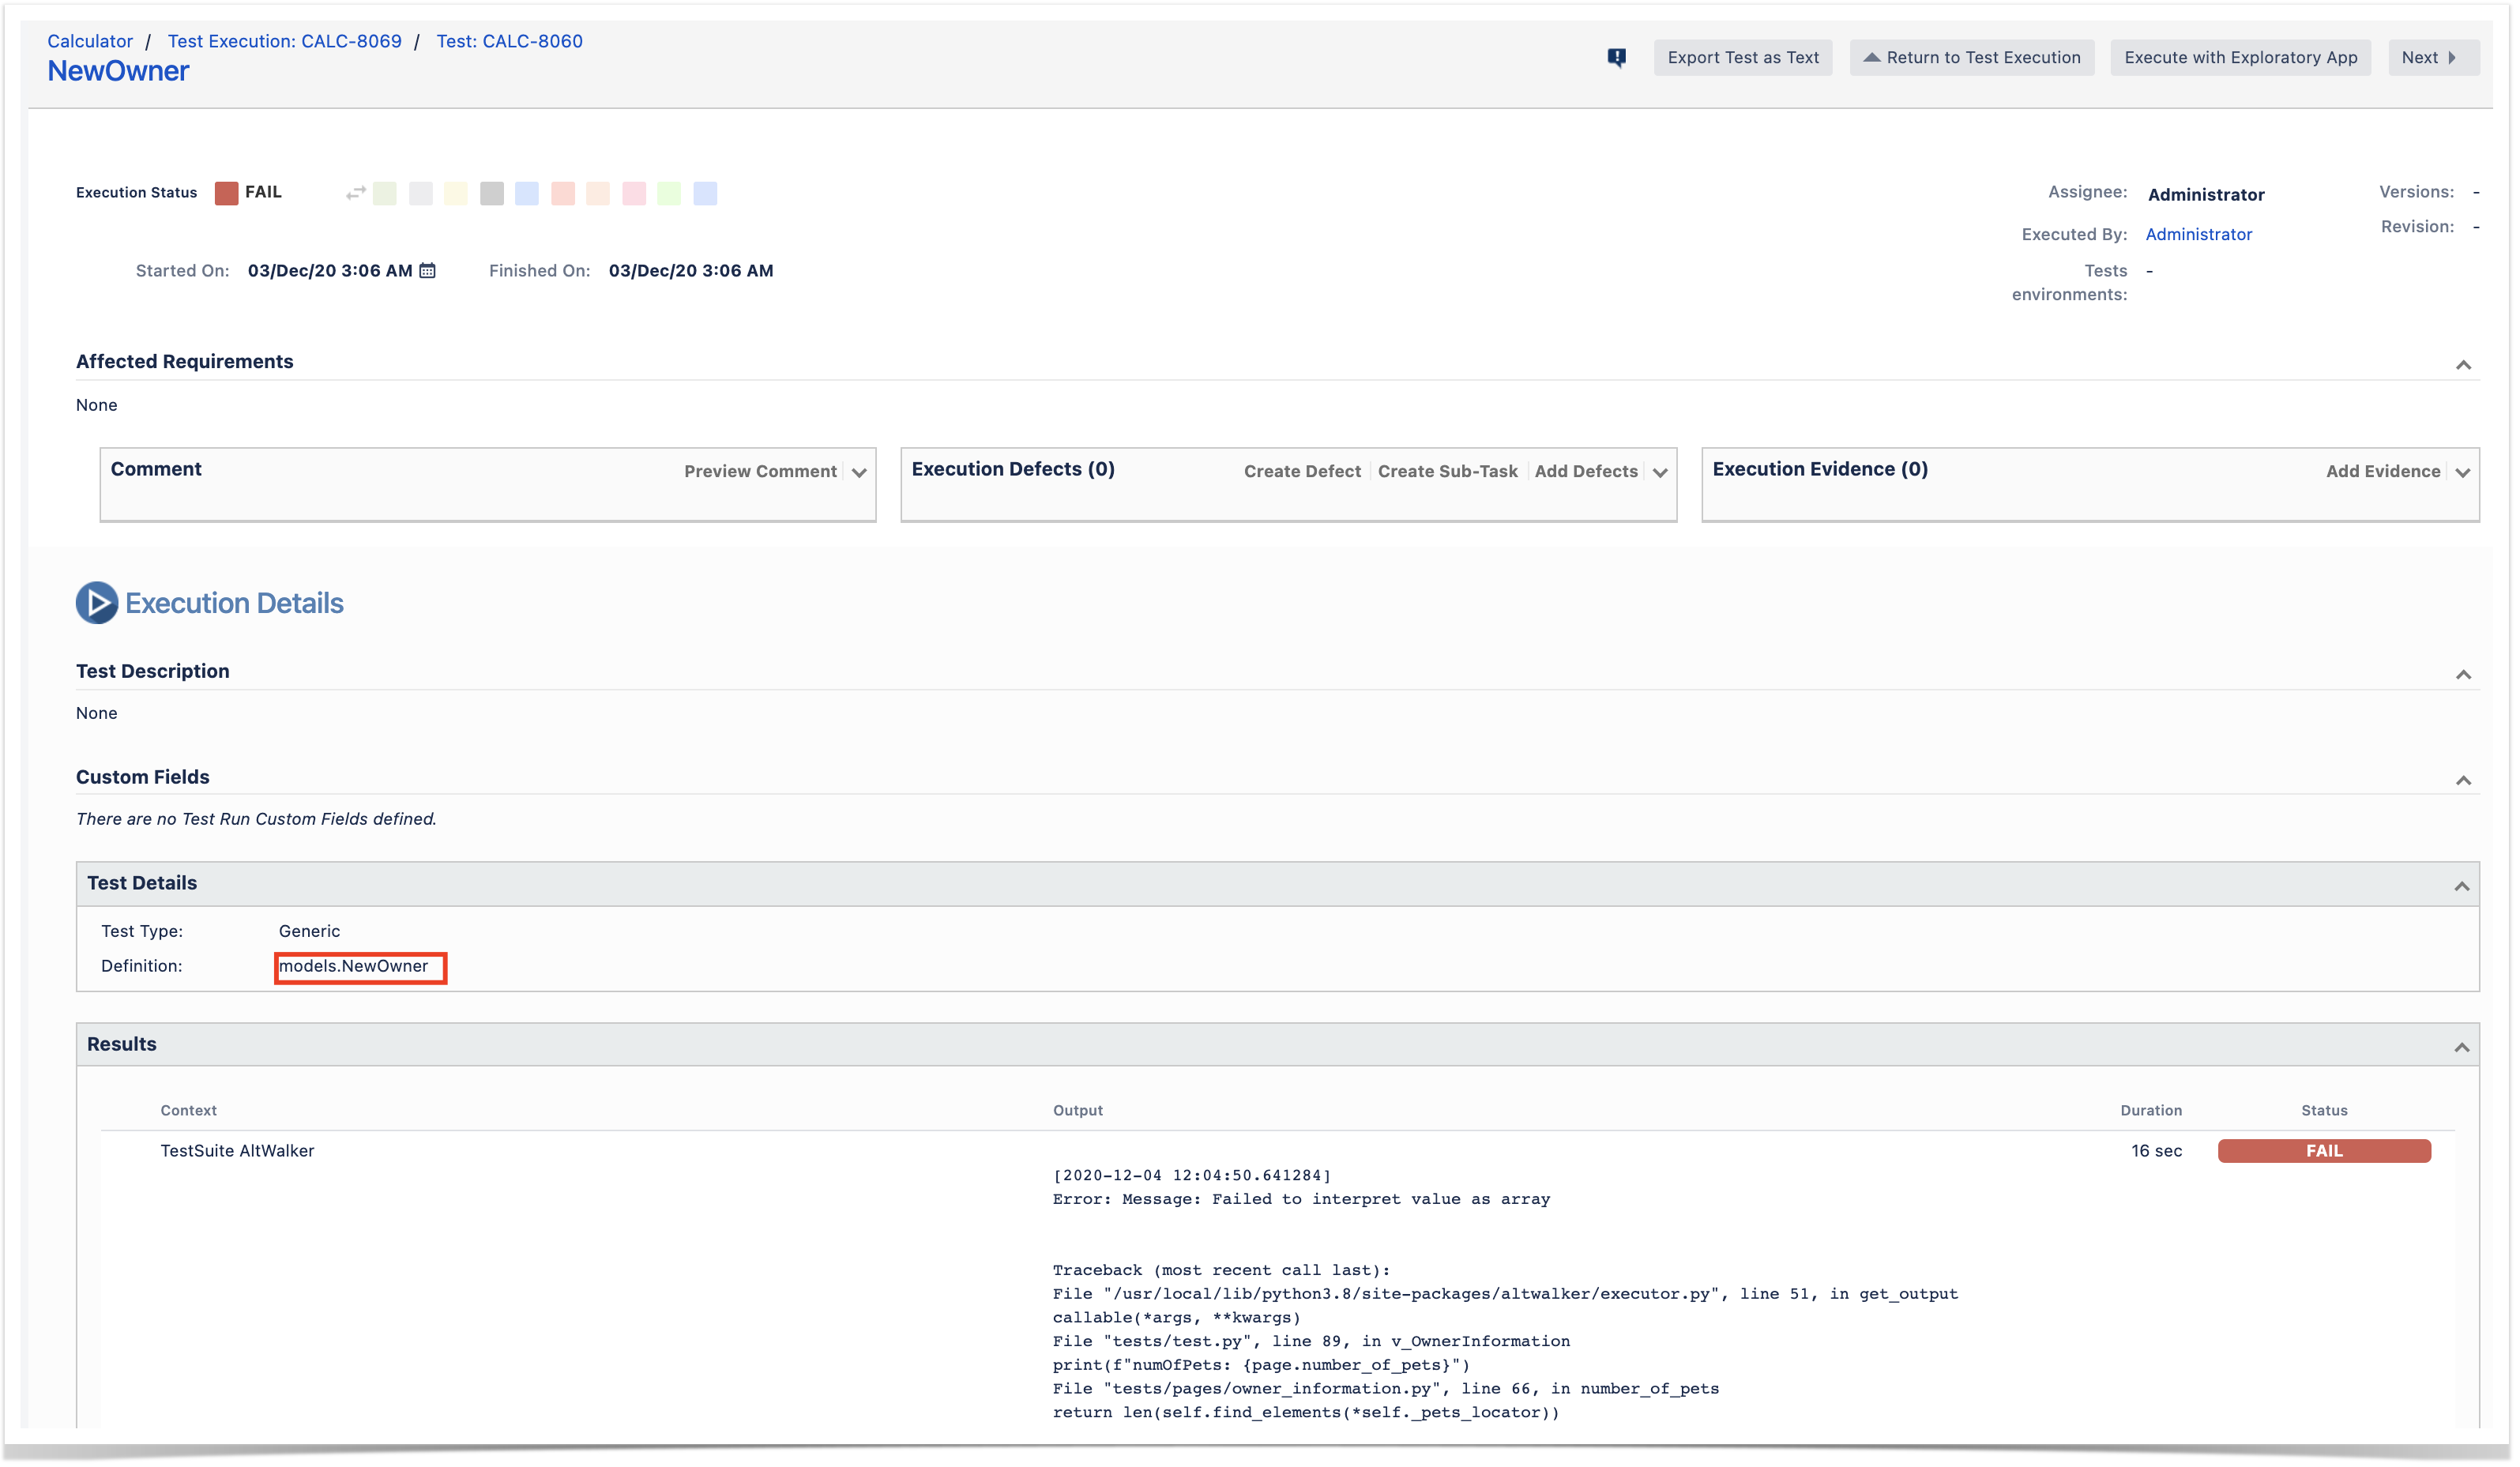
Each model is mapped to JUnit's testcase <testcase> element which in turn is mapped to a Generic Test in Jira, and the Generic Test Definition field contains the name of the package and the class that implements the model related methods for edges and verticesunique identifier of our test; in this case it's "model.<name_of_model>". The summary of each Test issue is filled out with has the name of the classmodel.
The Execution Details page also shows information about the Test Suite, which will be just "GraphWalkerAltWalker".

Tips
| Info | ||
|---|---|---|
| ||
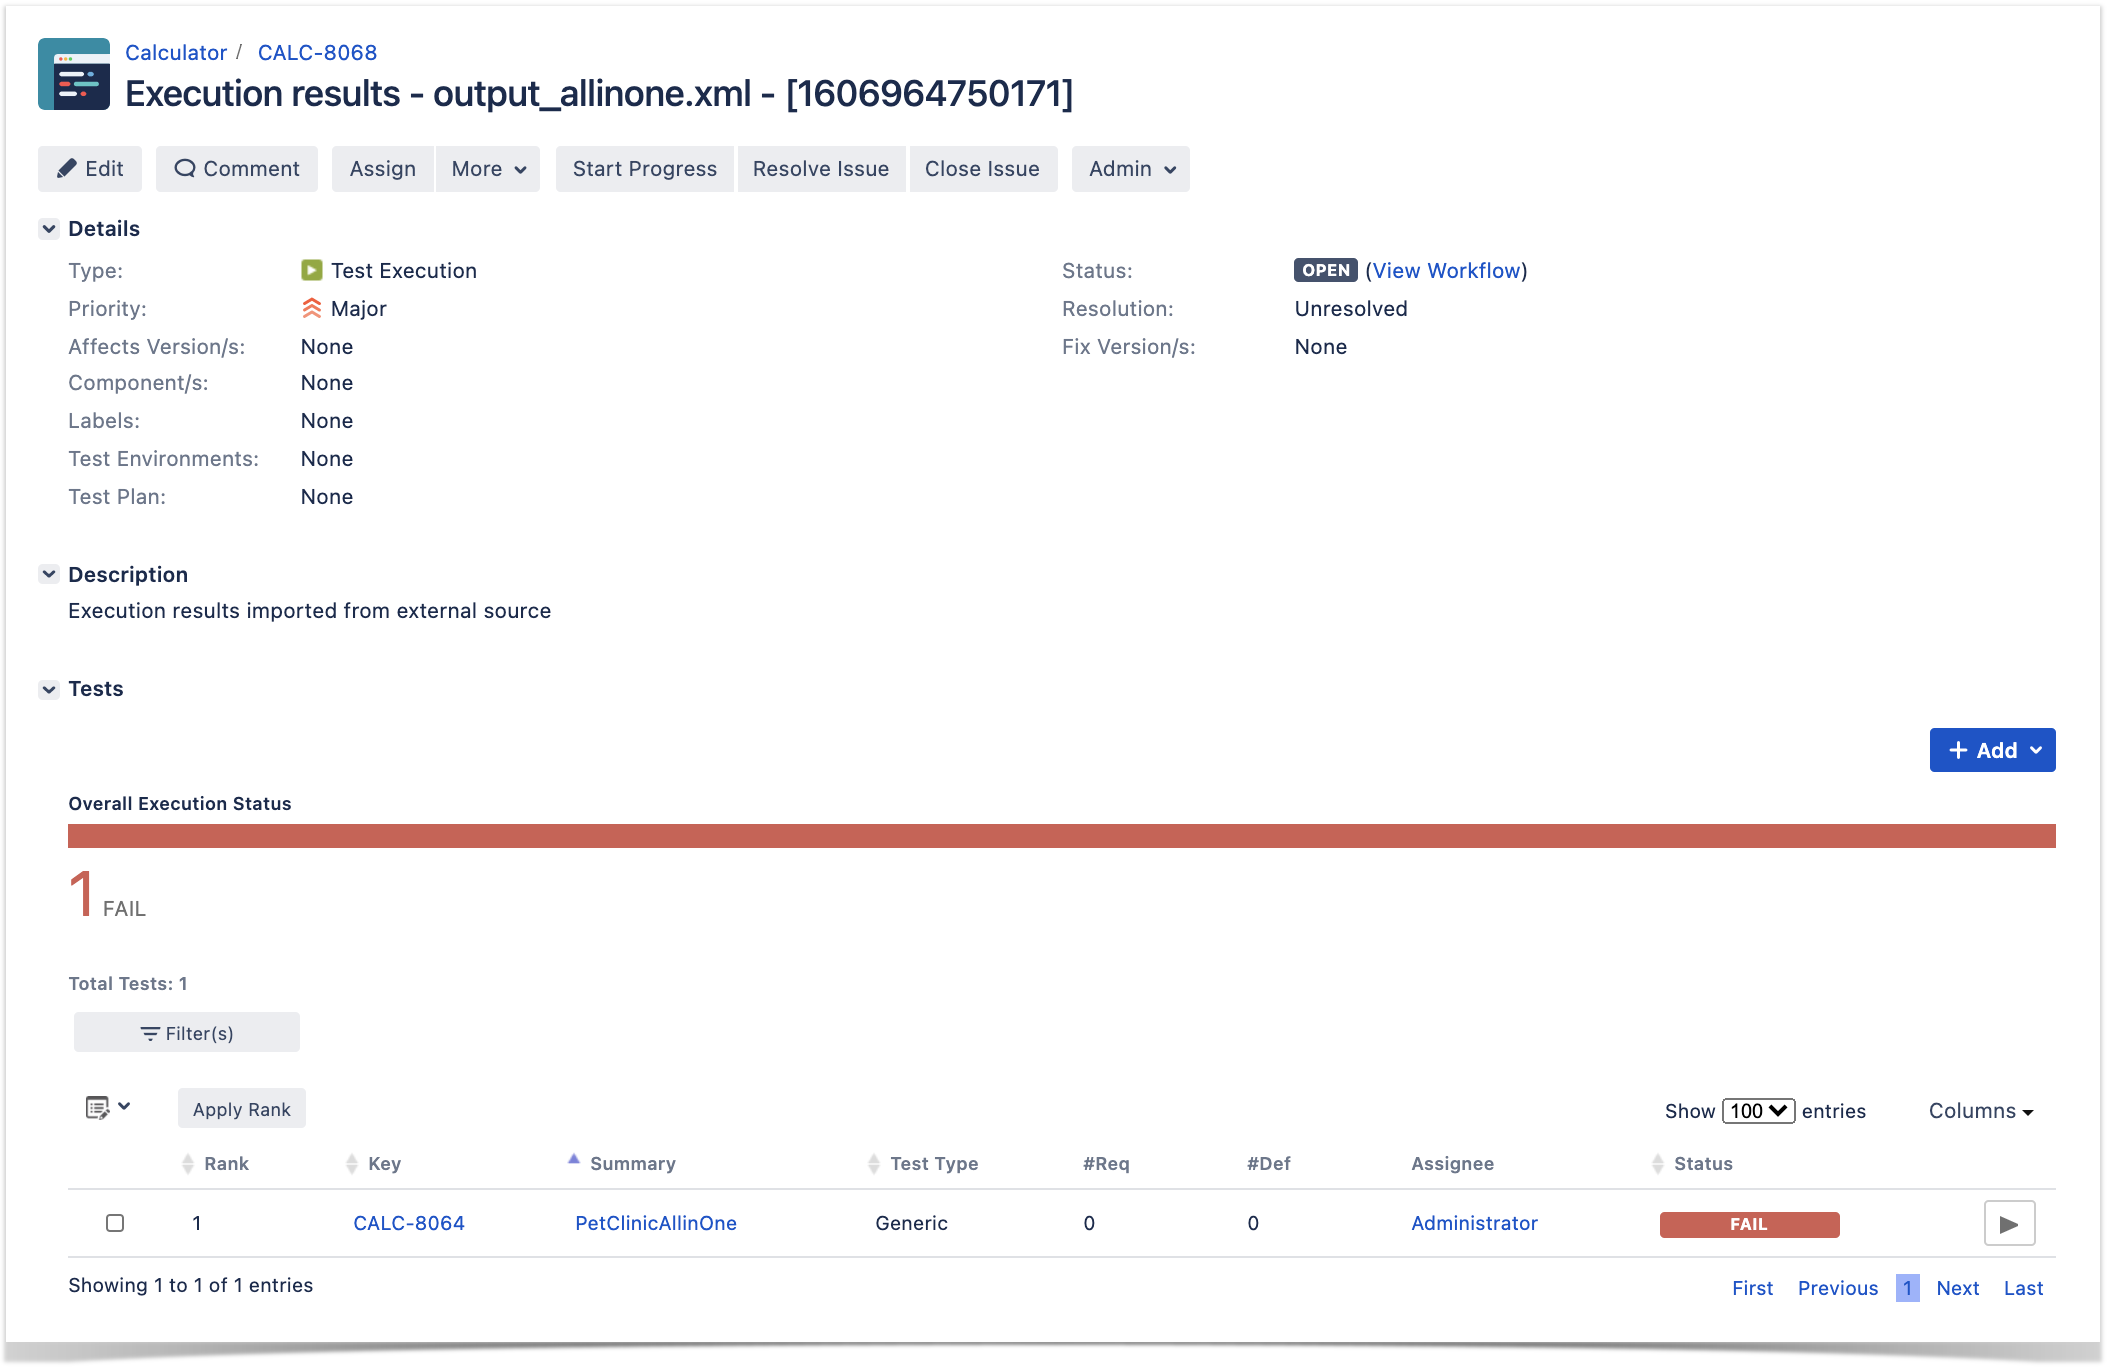
If we generate the JUnit XML report with a single <testcase> element for the whole run of our model, we would have just one Test created in Xray. It would be globally passed/failed. Our complete model is abstracted to a Test issue having a Generic Test Definition (i.e. its unique identifier) as something as "models.<customizable_in_the_reporter>".
|
Tips
- Use MBT not to replace existing test scripts but in cases where you need to provide greater coverage
- Discuss the model(s) with the team and the ones that can be most valuable for your use case
- Use MBT not to replace existing test scripts but in cases where yoou need to provide greater coverage
- Discuss the model(s) with the team and the ones that can be most useful for your use case
- You can control the seed of the random generator used by GraphWalker, so you can easily reproduce bugs (i.e. by reproducing the generated path)
- You can use GraphWalker Player to see the graph being walked in real-time. You can use a sample HTML file that contains the code to connect to a WebSocket server that you need to instantiate in the runner side (example) .
- Example:
- open the file index.html in your browser, using an URL such as "file:///Users/you/index.html?wsURI=localhost:8887?wsURI=localhost:8887"
- execute GraphWalker, using the custom runner
mvn exec:java -Dexec.mainClass="com.company.runners.WebSocketApplication"
- Multiple runs of your tests can be grouped and consolidate consolidated in a Test Plan, so you can have an updated overview of their current state
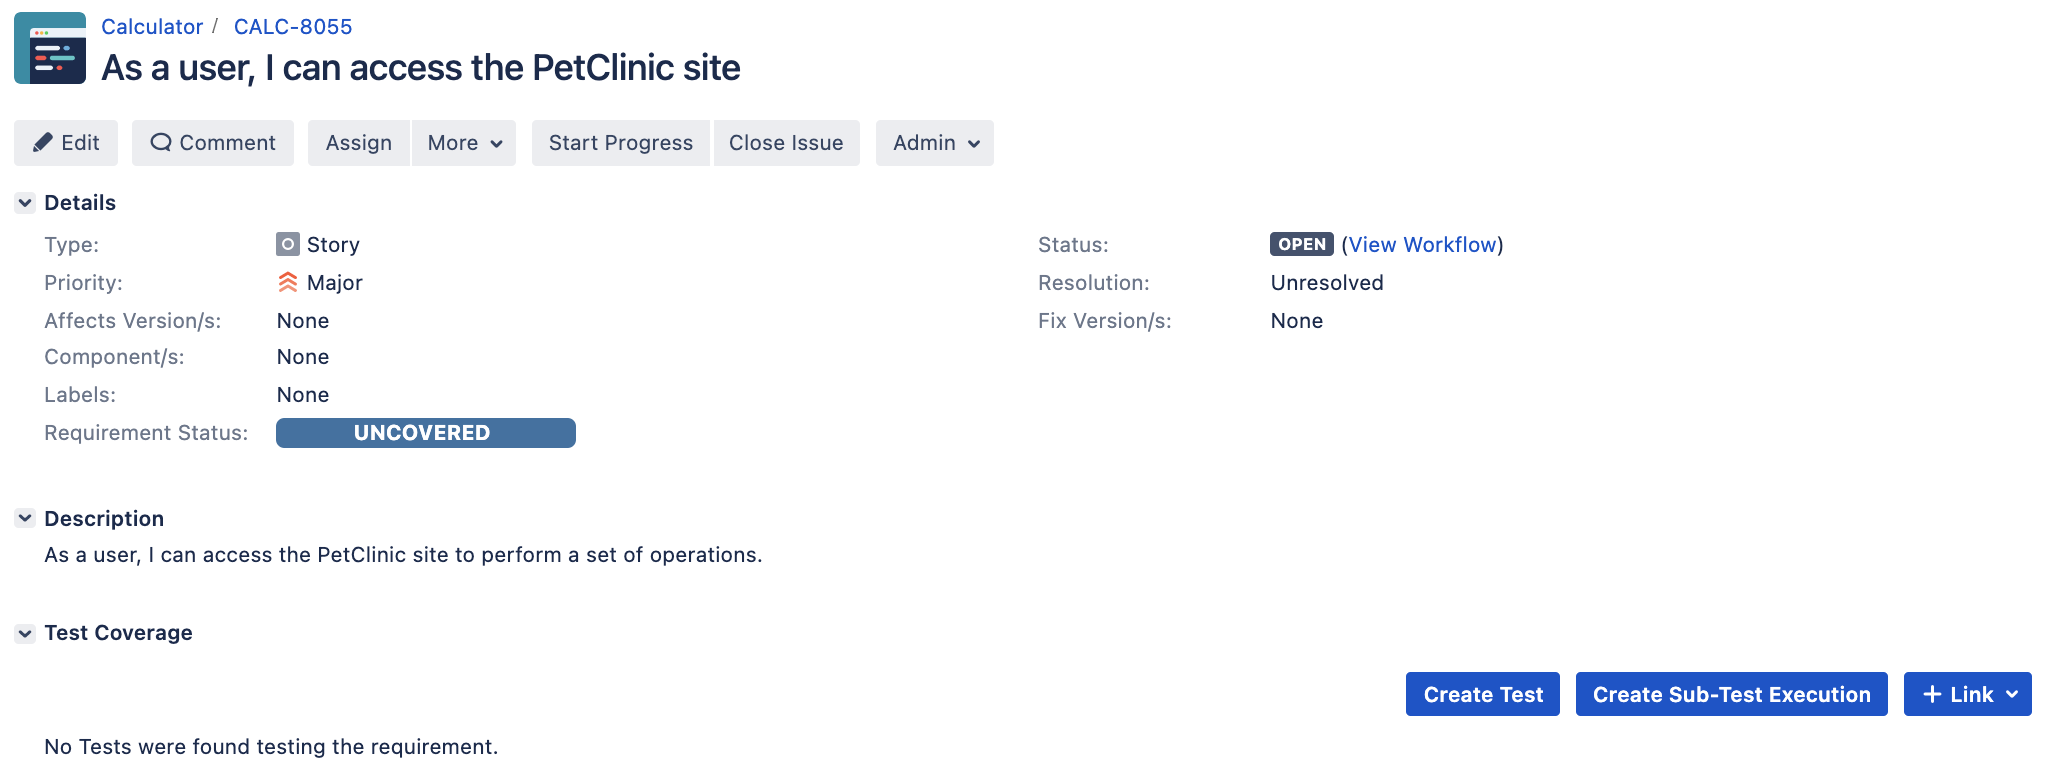
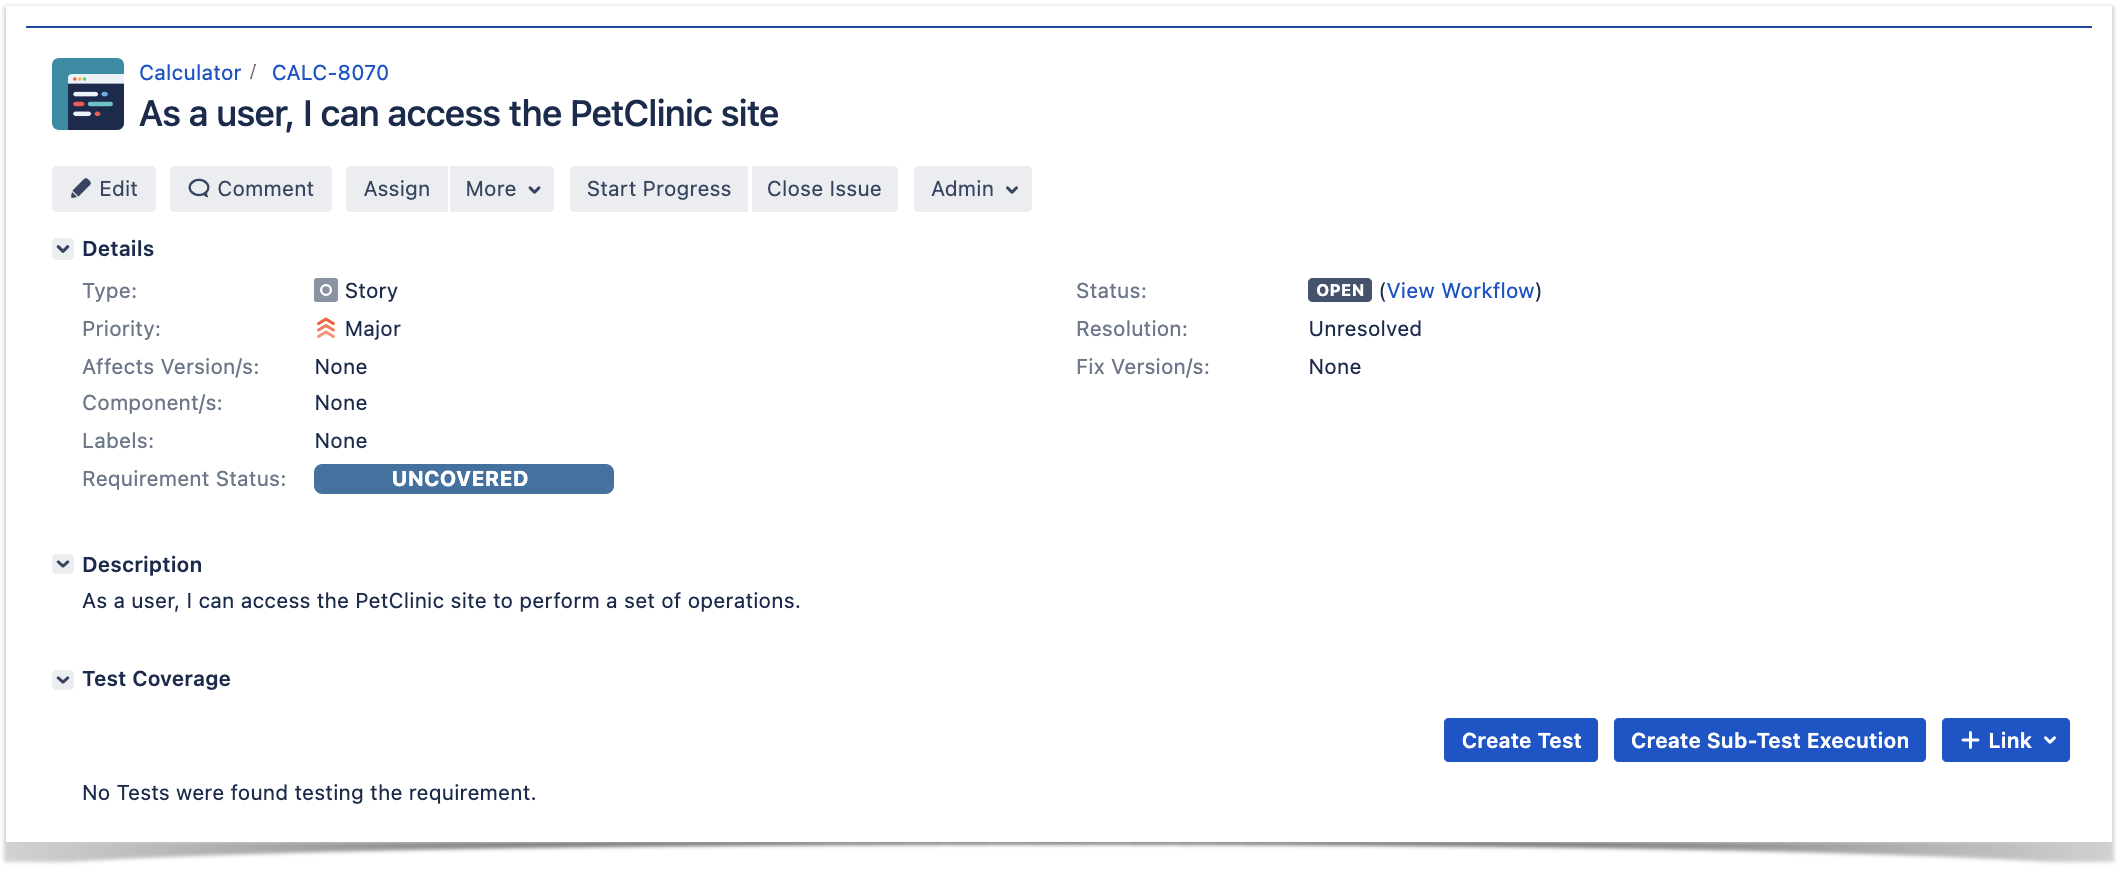
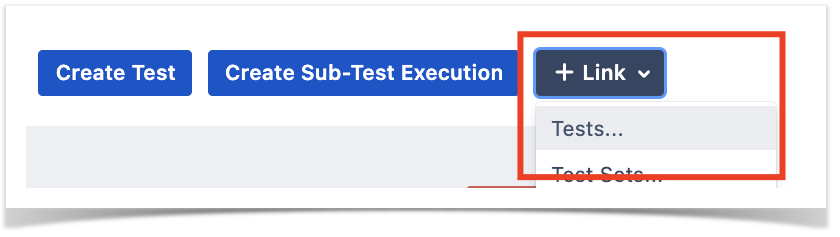
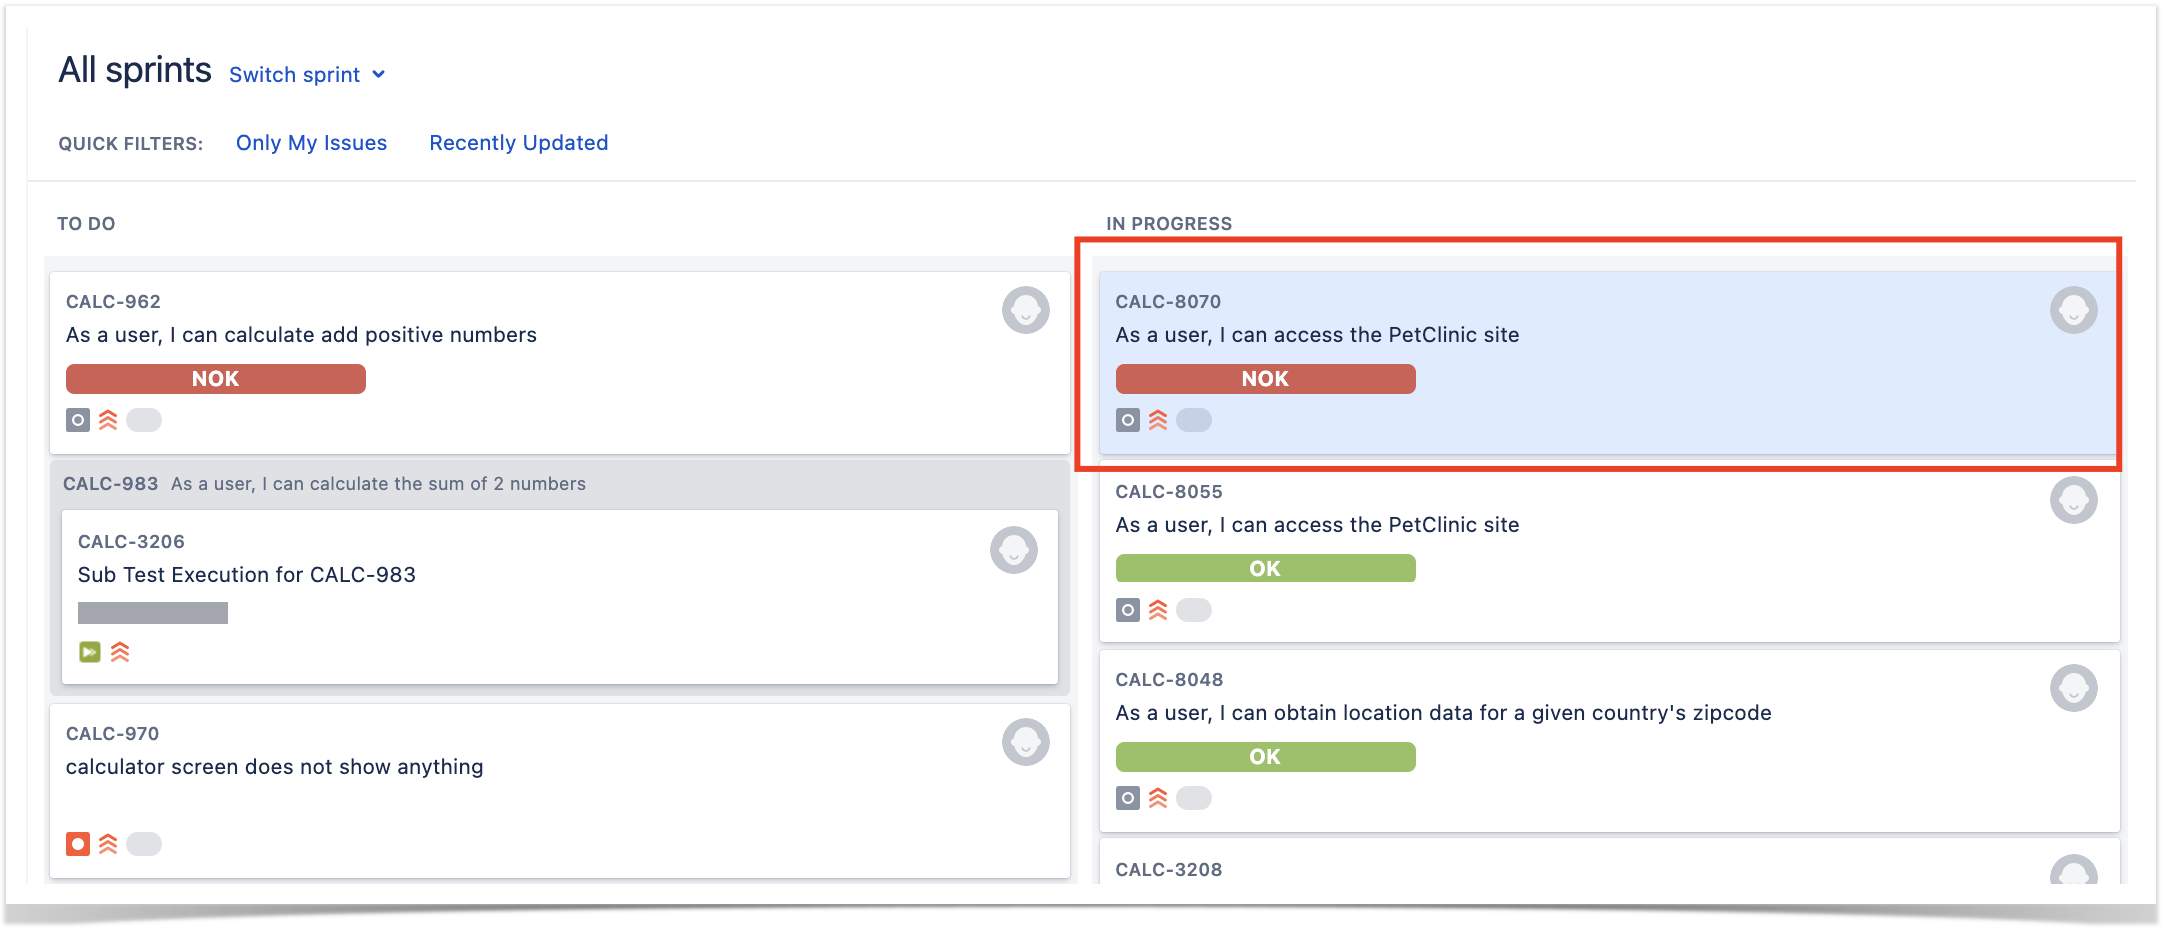
- After importing the results, you can link the corresponding Test issues with an existing requirement or user story and thus truck coverage directly on the respective issue, or even on an Agile board


References
- AltWalker
- Visual model editor for AltWalker and GraphWalker
- AltWalker Model Visualizer for VSCode
- Actions and Guards (from AltWalker's documentation)
- AltWalker examples (Python and C#/.NET)
- AltWalker CLI
- Port of PetClinic MBT example to AltWalker and Python (code for this tutorial)
- GraphWalker models for testing the PetClinic site (source-code)
...