
Page History
| Info | ||
|---|---|---|
| ||
|
| Widget Connector | ||
|---|---|---|
|
| Note | ||||||
|---|---|---|---|---|---|---|
| ||||||
|
Overview
Playwright is a recent browser automation tool that provides an alternative to Selenium.
Prerequisites
| Expand | ||
|---|---|---|
For this example we will use Playwright Test Runner, that accommodate the needs of the end-to-end testing. It does everything you would expect from the regular test runner. Playwright Test Runner is still fairly new as you can see in the official documentation:
If you want, you can use other runners (e.g. Jest, AVA, mocha). What you need:
|
Implementing tests
To start using the Playwright Test Runner, follow the Get Started documentation.
The test consists of validating the login feature (with valid and invalid credentials) of the demo site, for which we have created a page object that will represent the loginPage...
| Code Block | ||||||
|---|---|---|---|---|---|---|
| ||||||
const config = require ("../config.json");

// models/Login.js
class LoginPage {

    constructor(page) {
      this.page = page;
    }

    async navigate() {
      await this.page.goto(config.endpoint);
    }

    async login(username, password) {
        await this.page.fill(config.username_field, username);
        await this.page.fill(config.password_field, password);
        await this.page.click(config.login_button);
    }

    async getInnerText(){
        return this.page.innerText("p");
    }

  }
module.exports = { LoginPage }; |
...plus a configuration file where we have the identifiers that will match the elements in the page
| Code Block | ||||||
|---|---|---|---|---|---|---|
| ||||||
{
    "endpoint" : "httphttps://salabsrobotwebdemo.thecodepenguinonrender.com:18080/",
    "login_button" : "id=login_button",
    "password_field" :"input[id=\"password_field\"]",
    "username_field" : "input[id=\"username_field\"]"
} |
Now we can define the test that will assert if the operation is successful or not.
| Code Block | ||||||||||
|---|---|---|---|---|---|---|---|---|---|---|
| ||||||||||
const { test, expect } = require('@playwright/test');
const { LoginPage } = require('./models/Login');

test.describe("Login validations", () => {

    test('Login with valid credentials', async({ page }) => {
        const loginPage = new LoginPage(page);
        await loginPage.navigate();
        await loginPage.login("demo","mode");
        const name = await loginPage.getInnerText();
        expect(name).toBe('Login succeeded. Now you can logout.');
    });

    test('Login with invalid credentials', async({ page }) => {
        const loginPage = new LoginPage(page);
        await loginPage.navigate();
        await loginPage.login("demo","mode1");
        const name = await loginPage.getInnerText();
        expect(name).toBe('Login failed. Invalid user name and/or password.');
    });
}) |
The Playwright Test Runner provides a Jest like way of describing test scenarios, here you can see that it uses 'test, test.describe, expect'.
These are simple tests that will validate the login functionality by accessing the demo site, inserting the username and password (in one test with valid credentials and in another with invalid credentials), clicking the login button and validating if the page returned is the one that matches your expectation.
For the below example we will do a small change to force a failure, so in the login.spec.js file remove "/or" from the expectation on the Test ' Login with invalid credentials', this is the end result:
| Code Block | ||||||||||
|---|---|---|---|---|---|---|---|---|---|---|
| ||||||||||
const { test, expect } = require('@playwright/test');
const { LoginPage } = require('./models/Login');

test.describe("Login validations", () => {

    test('Login with valid credentials', async({ page }) => {
        const loginPage = new LoginPage(page);
        await loginPage.navigate();
        await loginPage.login("demo","mode");
        const name = await loginPage.getInnerText();
        expect(name).toBe('Login succeeded. Now you can logout.');
    });

    test('Login with invalid credentials', async({ page }) => {
        const loginPage = new LoginPage(page);
        await loginPage.navigate();
        await loginPage.login("demo","mode1");
        const name = await loginPage.getInnerText();
        expect(name).toBe('Login failed. Invalid user name and password.');
    });
}) |
Once the code is implemented (and we will make it fail on purpose on the 'Login with invalid credentials' test due to missing word, to show the failure reports), can be executed with the following command:
| Code Block | ||||||
|---|---|---|---|---|---|---|
| ||||||
npx playwright test --browser=chromium --reporter=junit,line |
First, define one extra parameter: "browser" in order to execute the tests only with the chrome browser (chromium), otherwise the default behavior is to execute the tests for the three available browsers (chromium, firefox and webkit).
The results are immediately available in the terminal.
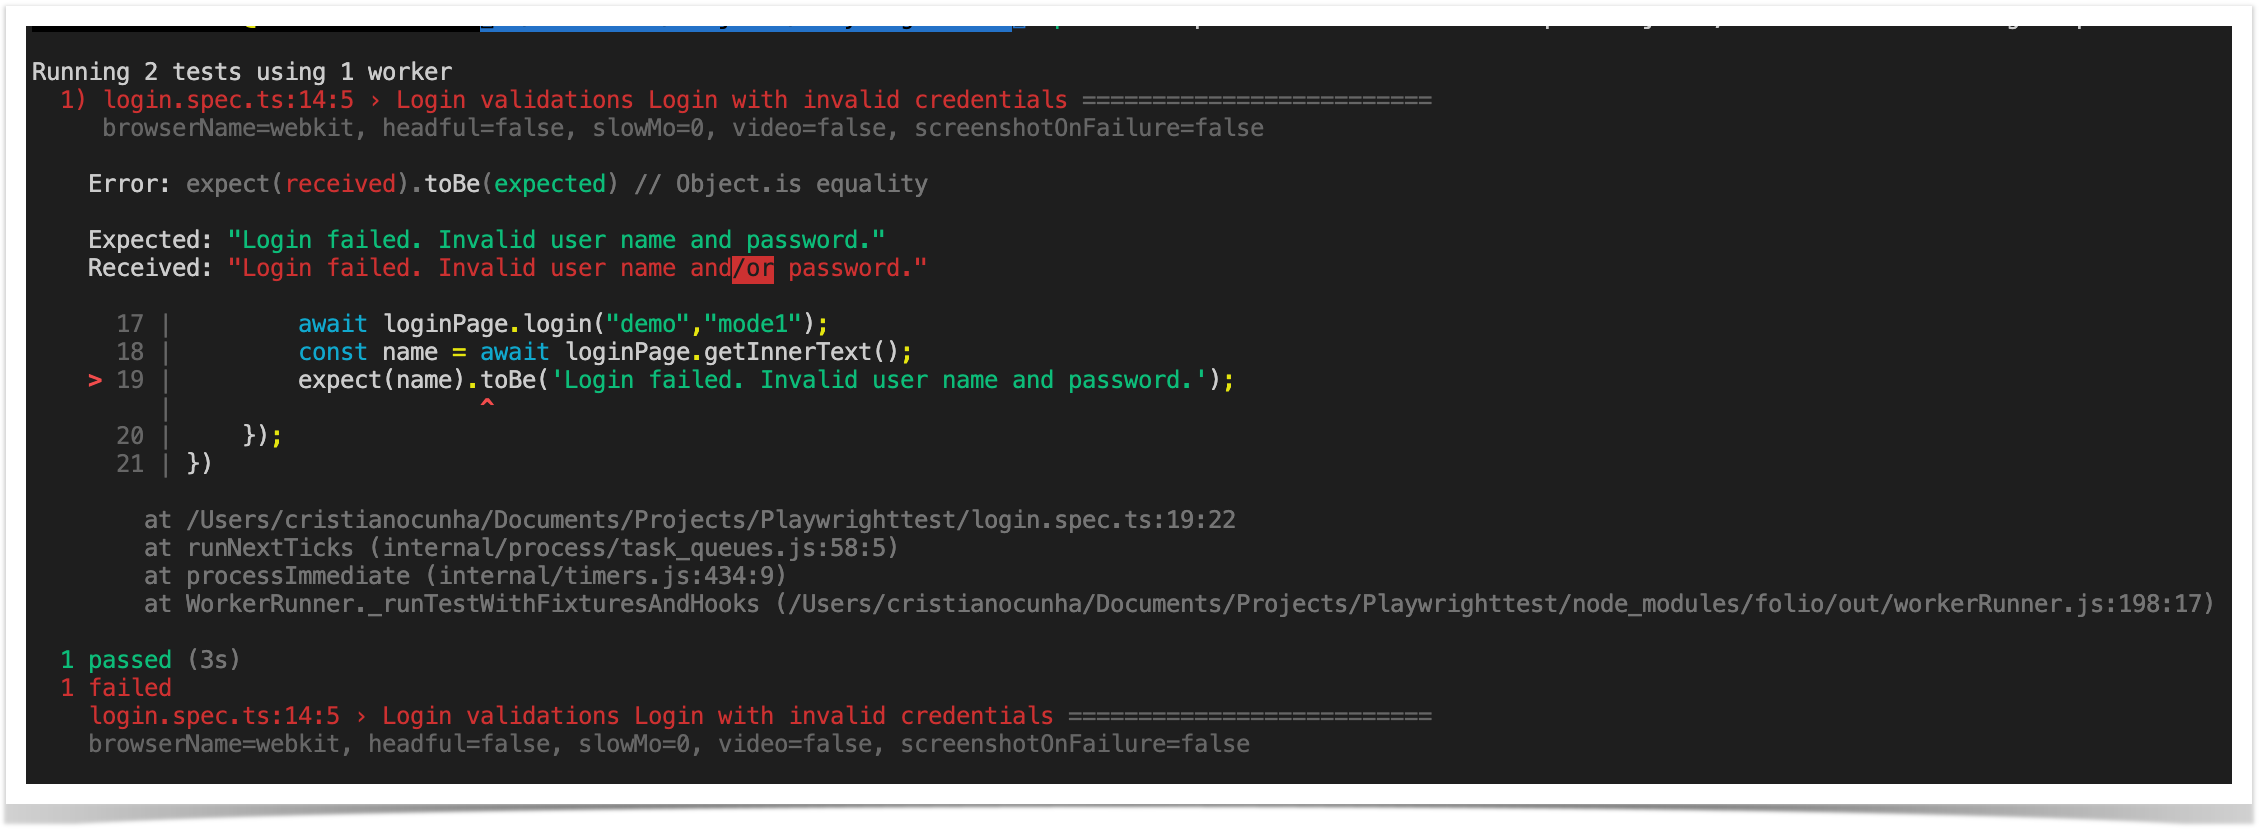
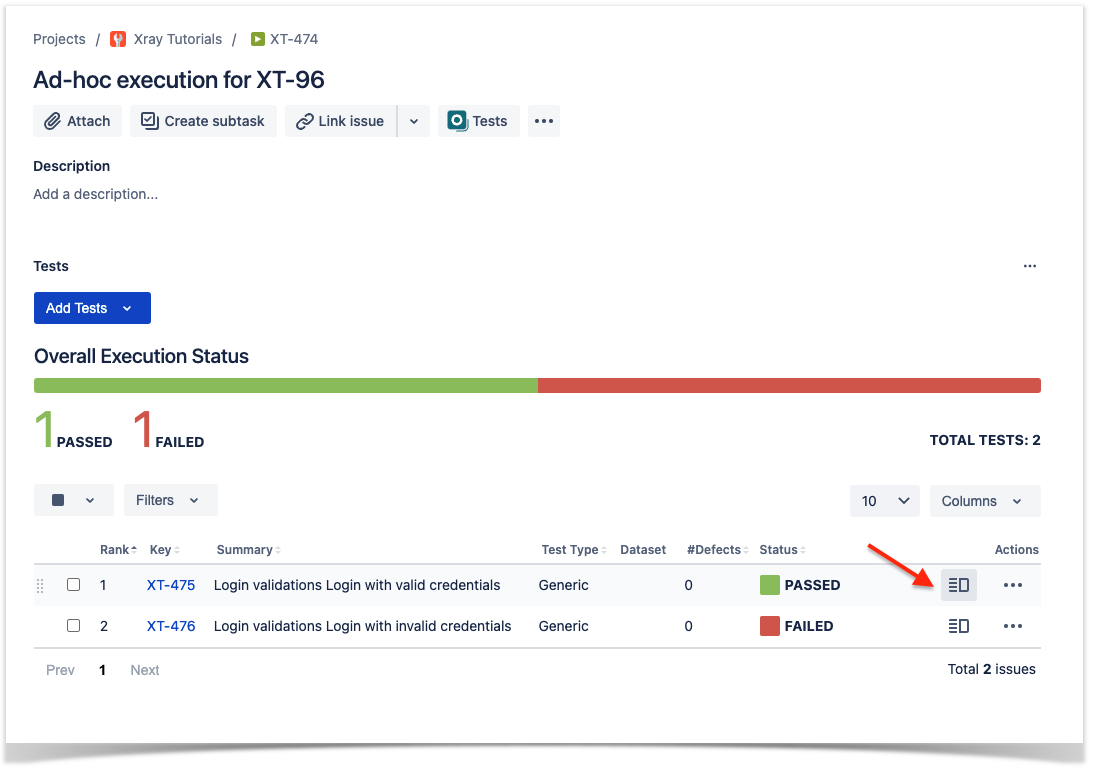
In this example, one test has failed and the other one has succeed, the output generated to the terminal is the above one and the corresponding Junit report is below:
| Code Block | ||||||||
|---|---|---|---|---|---|---|---|---|
| ||||||||
<testsuites id="" name="" tests="2" failures="1" skipped="0" errors="0" time="3.024">
<testsuite name="login.spec.js" timestamp="1623863508251" hostname="" tests="2" failures="1" skipped="0" time="2.667" errors="0">
<testcase name="Login validations Login with valid credentials" classname="login.spec.js:6:5 › [chromium] Login validations Login with valid credentials" time="1.754">
</testcase>
<testcase name="Login validations Login with invalid credentials" classname="login.spec.js:14:5 › [chromium] Login validations Login with invalid credentials" time="0.913">
<failure message="login.spec.js:14:5 Login with invalid credentials" type="FAILURE">
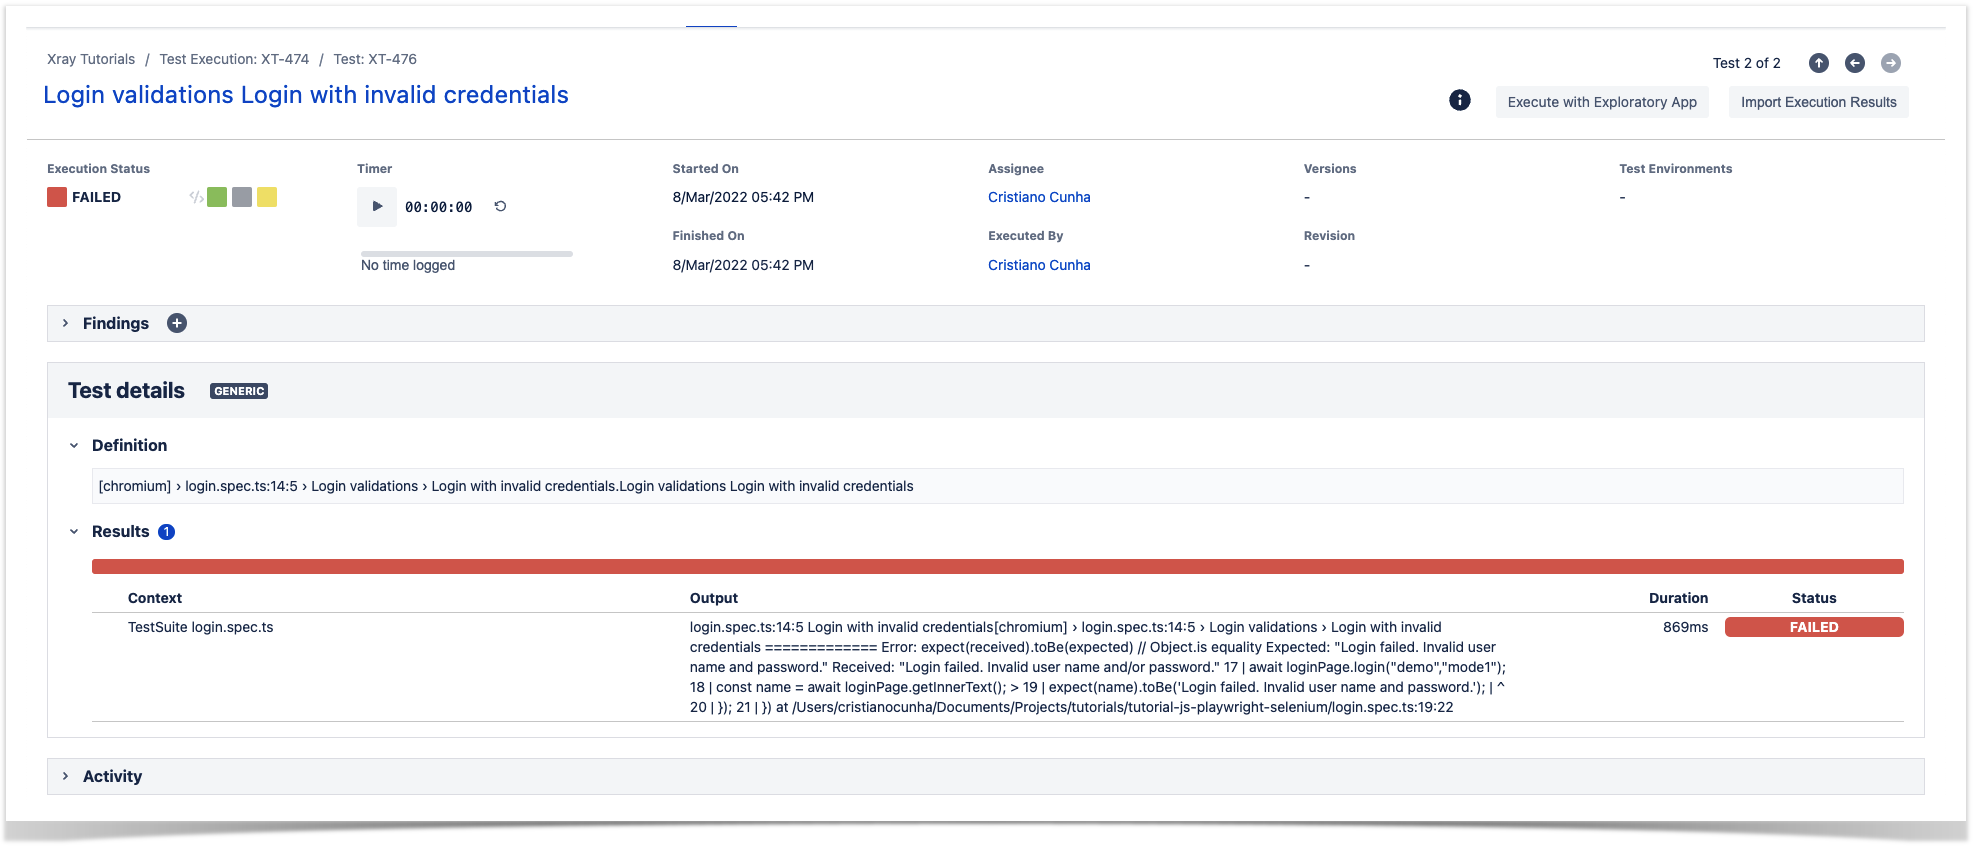
login.spec.js:14:5 › [chromium] Login validations Login with invalid credentials =================
Error: expect(received).toBe(expected) // Object.is equality
Expected: "Login failed. Invalid user name and/or password"
Received: "Login failed. Invalid user name and/or password."
17 | await loginPage.login("demo","mode1");
18 | const name = await loginPage.getInnerText();
> 19 | expect(name).toBe('Login failed. Invalid user name and/or password');
| ^
20 | });
21 | })
at /Users/cristianocunha/Documents/Projects/Playwrighttests/tutorial-js-playwright-selenium/login.spec.js:19:22
at WorkerRunner._runTestWithBeforeHooks (/Users/cristianocunha/Documents/Projects/Playwrighttests/tutorial-js-playwright-selenium/node_modules/@playwright/test/lib/test/workerRunner.js:290:13)
</failure>
</testcase>
</testsuite>
</testsuites> |
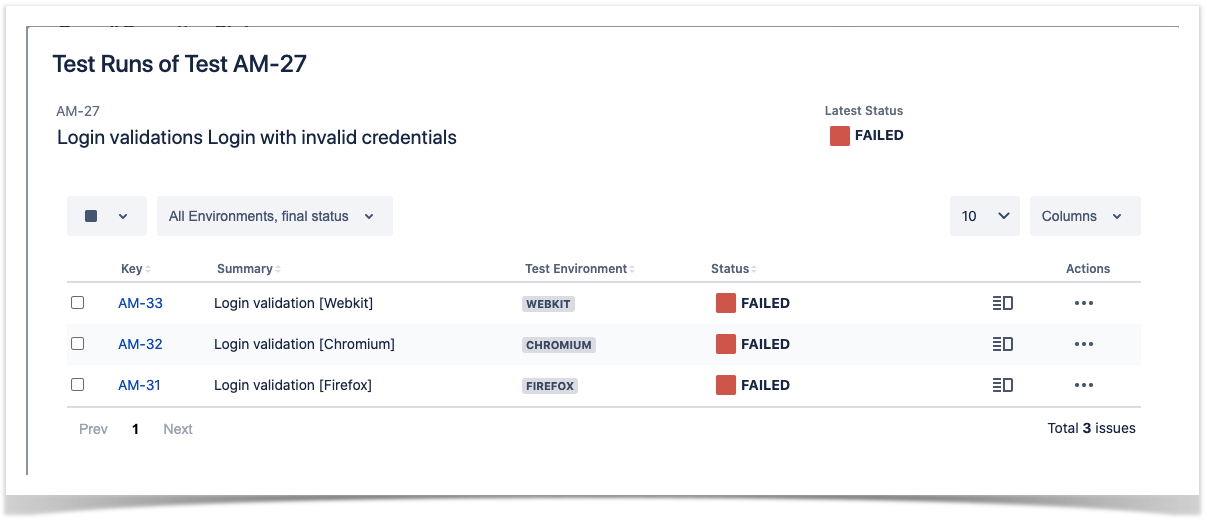
Repeat this process for each browser type in order to have the reports generated for each browser.
Notes:
- By default it will execute tests for the 3 browser types available (that is why we are forcing it to execute for only one browser)
- By default all the tests will be executed in headless mode
- Folio command line will search and execute all tests in the format: "**/?(*.)+(spec|test).[jt]s"
- In order to get the Junit test report please follow this section.
Integrating with Xray
| Anchor | ||||
|---|---|---|---|---|
|
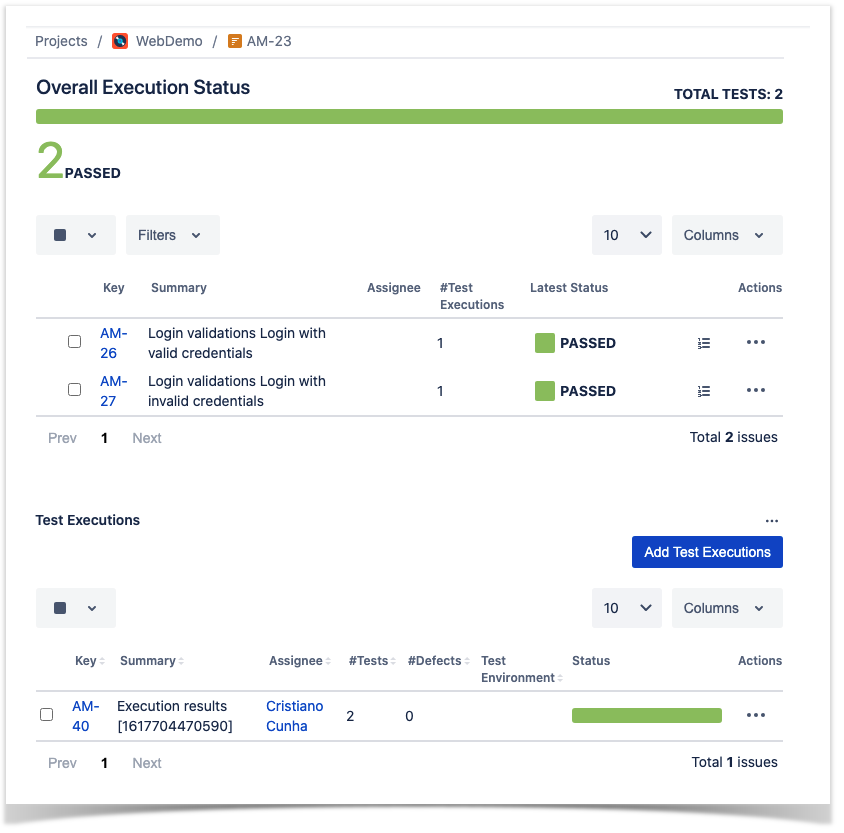
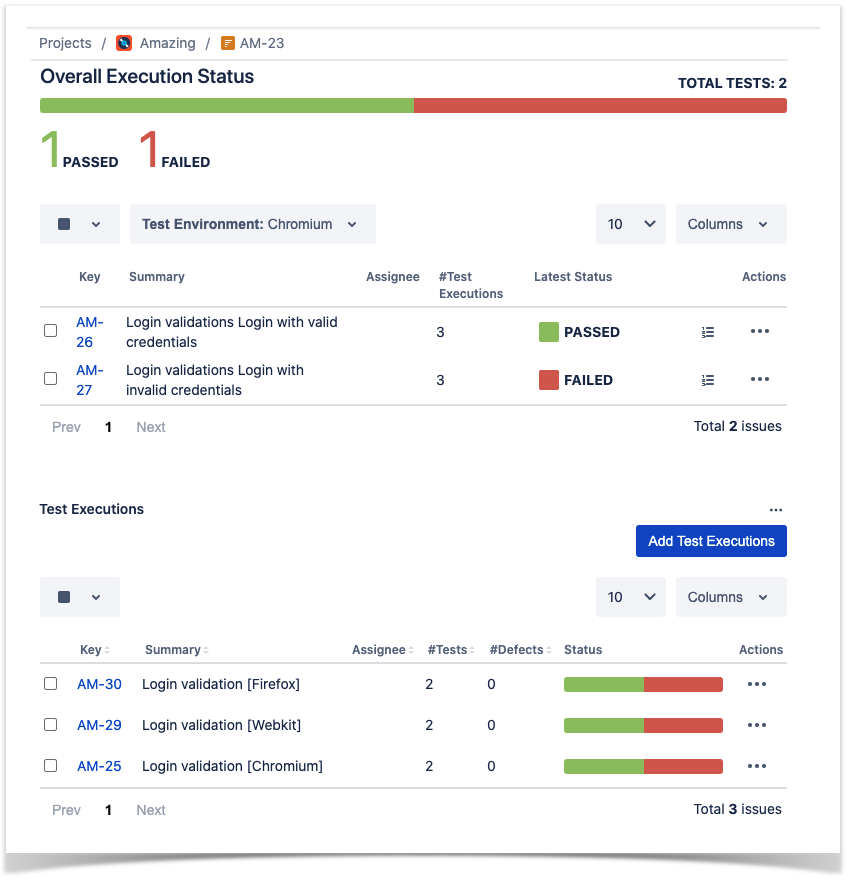
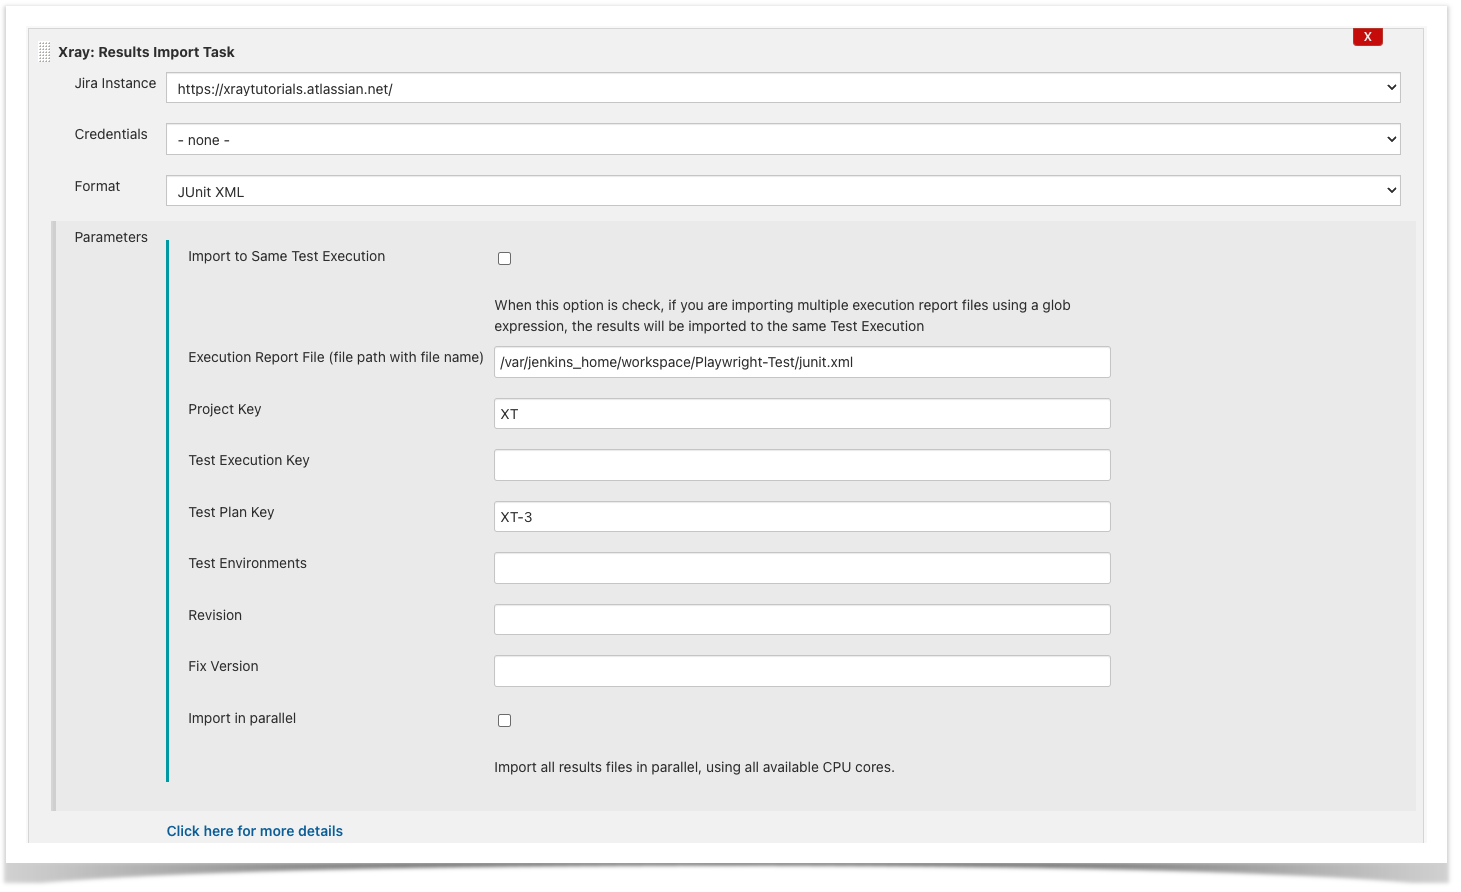
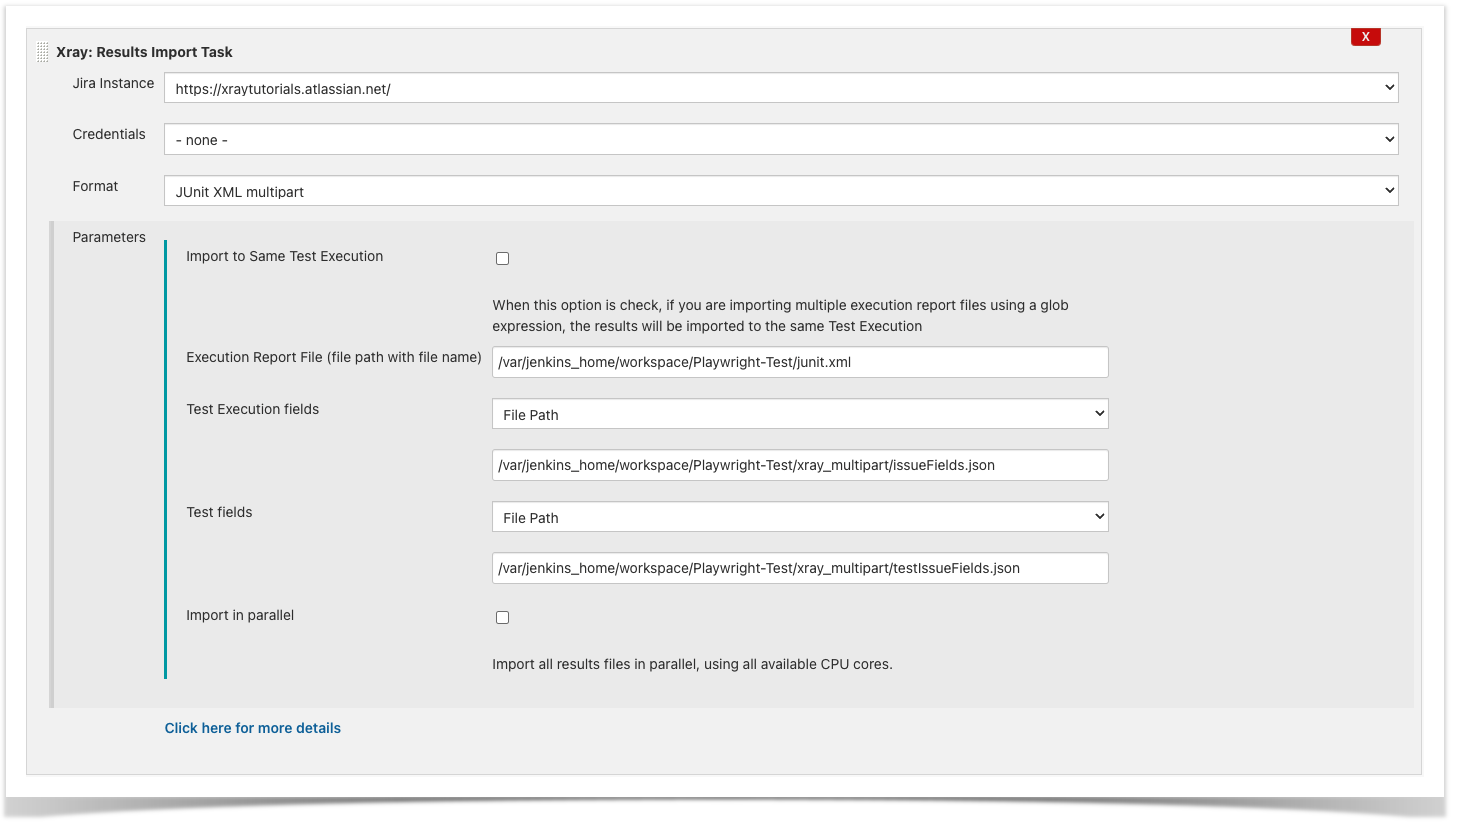
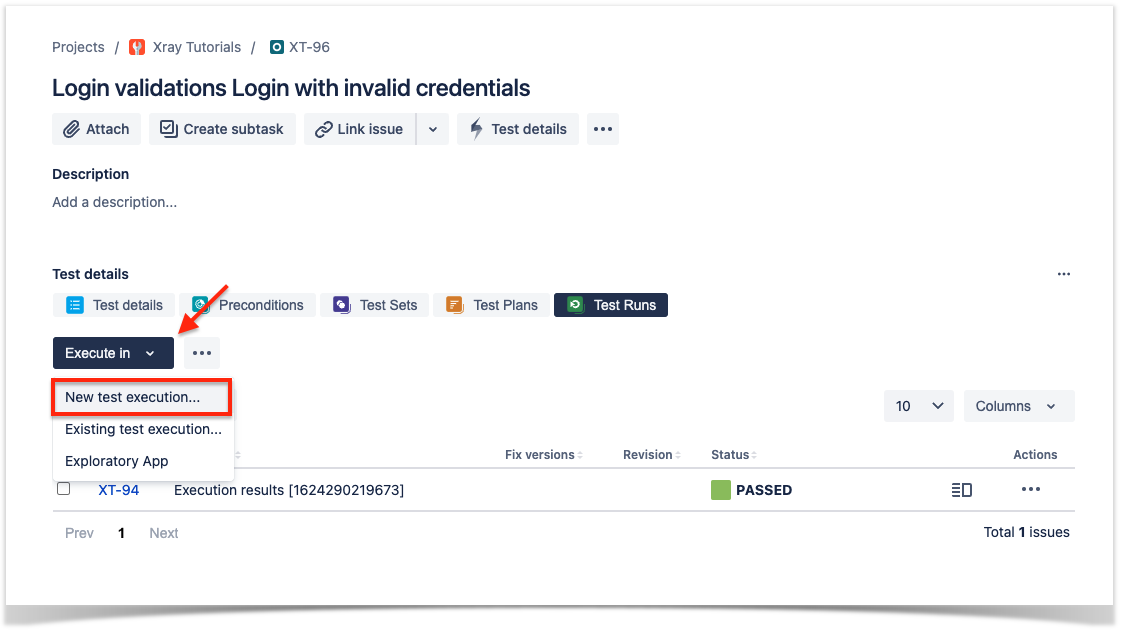
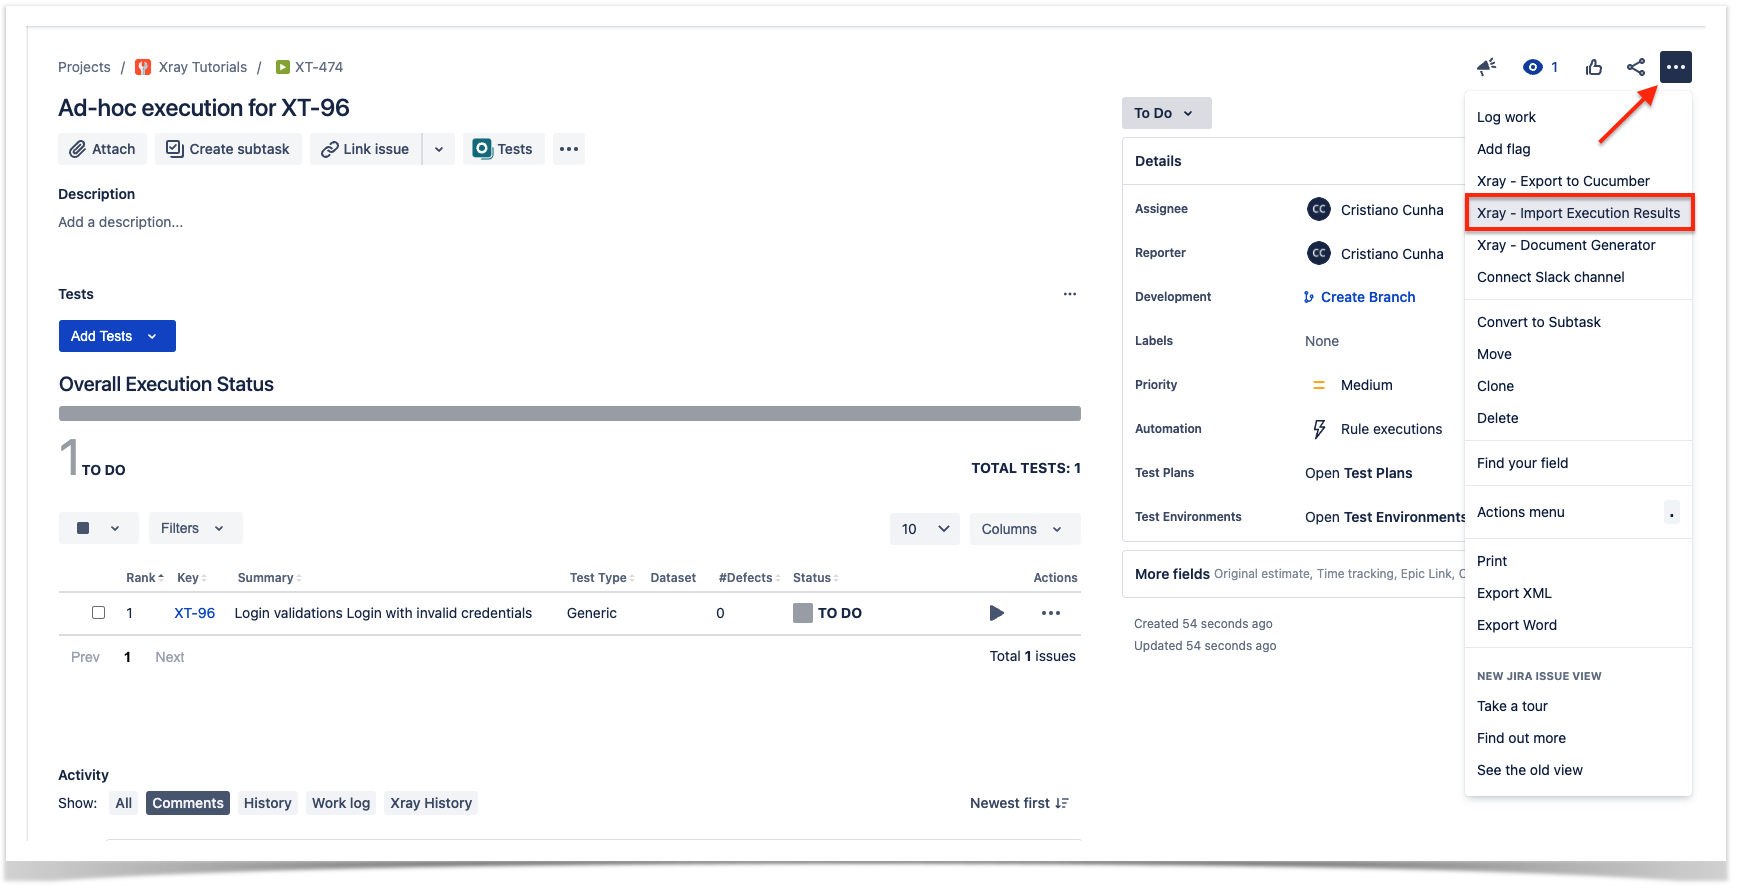
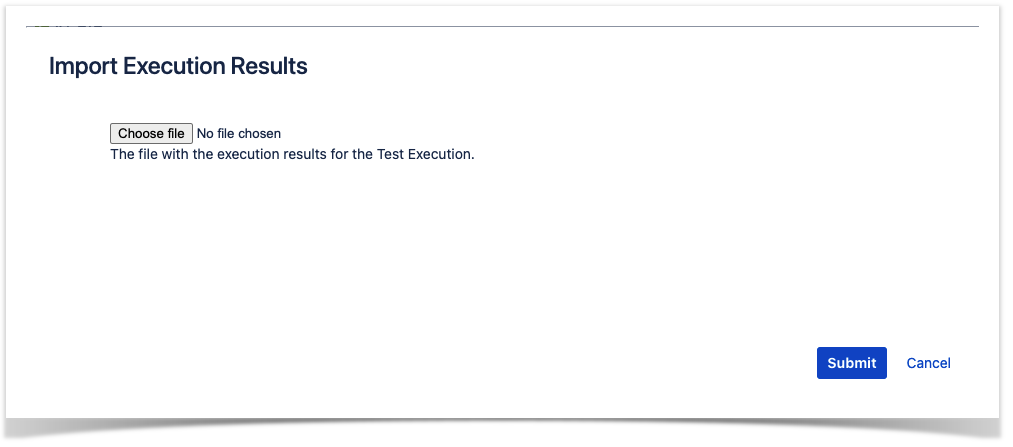
As we saw in the above example, where we are producing Junit reports with the result of the tests, it is now a matter of importing those results to your Jira instance. You can do this by simply submitting automation results to Xray through the REST API, by using one of the available CI/CD plugins (e.g. for Jenkins) or using the Jira interface to do so.
| UI Tabs | ||||||||||||||||||||||||||||||||||||||||||||||||||||||||||||||||||
|---|---|---|---|---|---|---|---|---|---|---|---|---|---|---|---|---|---|---|---|---|---|---|---|---|---|---|---|---|---|---|---|---|---|---|---|---|---|---|---|---|---|---|---|---|---|---|---|---|---|---|---|---|---|---|---|---|---|---|---|---|---|---|---|---|---|---|
|

Passing additional test related information to Xray
We manage to have our contribution to Playwright approved and the end result is that you can use the native Junit reporter to enrich the Junit report with information that will be treated by Xray natively.
Now you can use the testInfo object to add properties in the Junit report, adding information that is natively supported by Xray.
Configurating the test reporter
To use it start by including a configuration file 'playwright.config.js' with the following content:
| Code Block | ||||||
|---|---|---|---|---|---|---|
| ||||||
// JUnit reporter config for Xray
const xrayOptions = {
  // Whether to add <properties> with all annotations; default is false
  embedAnnotationsAsProperties: true,

  // By default, annotation is reported as <property name='' value=''>.
  // These annotations are reported as <property name=''>value</property>.
  textContentAnnotations: ['test_description'],

  // This will create a "testrun_evidence" property that contains all attachments. Each attachment is added as an inner <item> element.
  // Disables [[ATTACHMENT|path]] in the <system-out>.
  embedAttachmentsAsProperty: 'testrun_evidence',

  // Where to put the report.
  outputFile: './xray-report.xml'
};

const config: PlaywrightTestConfig = {
  reporter: [ ['junit', xrayOptions] ]
};

module.exports = config; |
This configuration setup properties with particular annotations that are natively interpreted by Xray.
On the tests we can now add information using the testInfo object available:
| Code Block | ||||||
|---|---|---|---|---|---|---|
| ||||||
const { test, expect } = require('@playwright/test');
const { LoginPage } = require('./models/Login');
test.describe("Login validations", () => {
test('Login with valid credentials', async({ page }, testInfo) => {
const loginPage = new LoginPage(page);
await loginPage.navigate();
await loginPage.login("demo","mode");
const name = await loginPage.getInnerText();
//Adding Xray properties
testInfo.annotations.push({ type: 'test_key', description: 'XT-92' });
testInfo.annotations.push({ type: 'test_summary', description: 'Successful login.' });
testInfo.annotations.push({ type: 'requirements', description: 'XT-41' });
testInfo.annotations.push({ type: 'test_description', description: 'Validate that the login is successful.' });
expect(name).toBe('Login succeeded. Now you can logout.');
});
test('Login with invalid credentials', async({ page }, testInfo) => {
const loginPage = new LoginPage(page);
await loginPage.navigate();
await loginPage.login("demo","mode1");
const name = await loginPage.getInnerText();
//Adding Xray properties
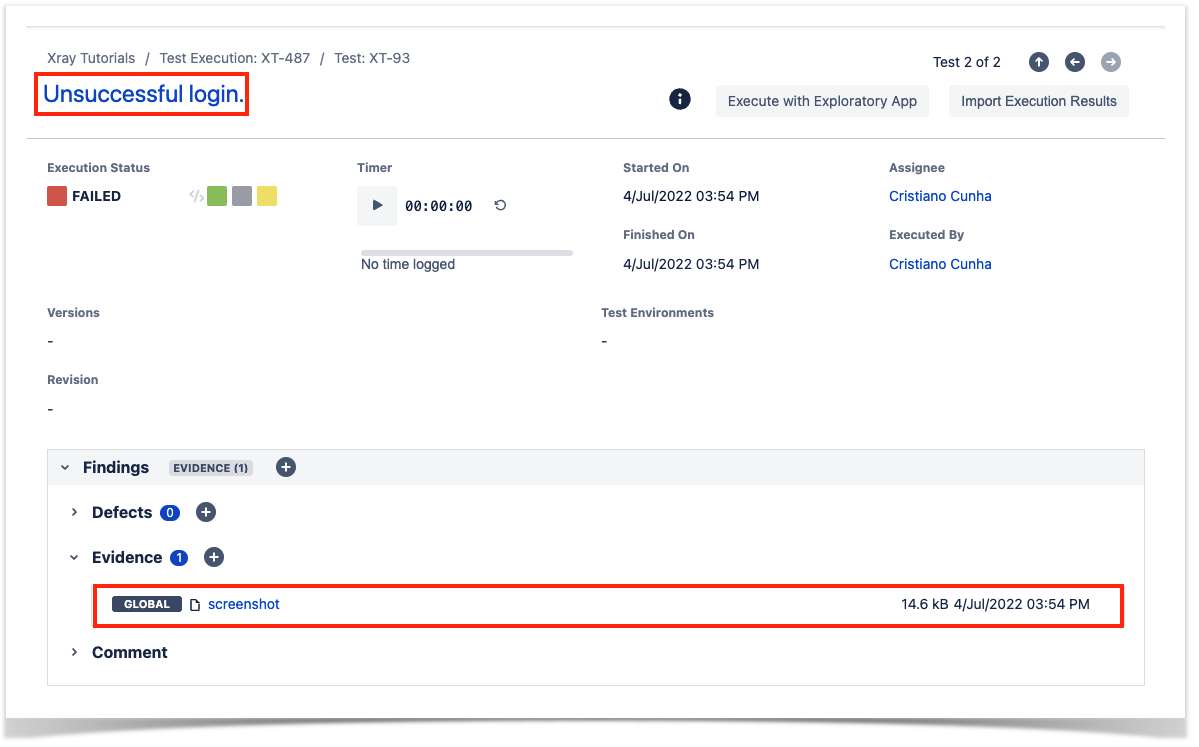
testInfo.annotations.push({ type: 'test_key', description: 'XT-93' });
testInfo.annotations.push({ type: 'test_summary', description: 'Unsuccessful login.' });
testInfo.annotations.push({ type: 'requirements', description: 'XT-41' });
testInfo.annotations.push({ type: 'test_description', description: 'Validate that the login is unsuccessful.' });
// Capture a screenshot and attach it.
const path = testInfo.outputPath('tmp_screenshot.png');
await page.screenshot({ path });
testInfo.attachments.push({ name: 'screenshot.png', path, contentType: 'image/png' });
expect(name).toBe('Login failed. Invalid user name and password.');
});
}) |
We added several properties in the test to showcase the capabilities of these annotations but you can use only the ones that are useful in your case.
All annotations will be added as <property> elements on the JUnit XML report. The annotation type is mapped to the name attribute of the <property>, and the annotation description will be added as a value attribute.
Resuming the annotations we are using:
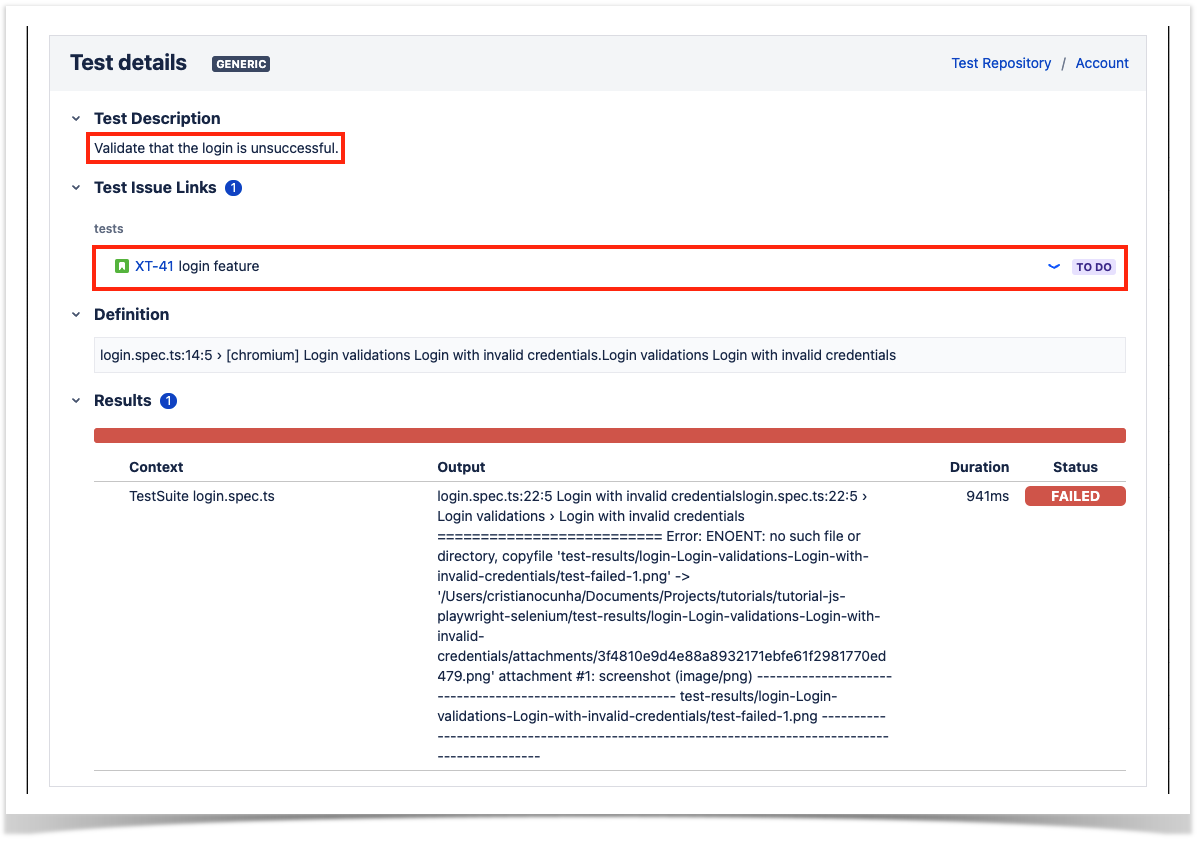
- test_key: Link to the test in Xray with the specified key.
- test_summary: Redefine the summary of the test.
- test_description: Redefine the test description.
- requirements: Link to one or several requirements in Xray.
There's a special way to add attachments, using the testInfo object; as an example, in the following test we are adding the screenshot to the test:
| Code Block | ||
|---|---|---|
| ||
test('Login with invalid credentials', async({ page }, testInfo) => {
  ...
  const path = testInfo.outputPath('tmp_screenshot.png');
  await page.screenshot({ path });

  testInfo.attachments.push({ name: 'screenshot.png', path, contentType: 'image/png' });\
... |
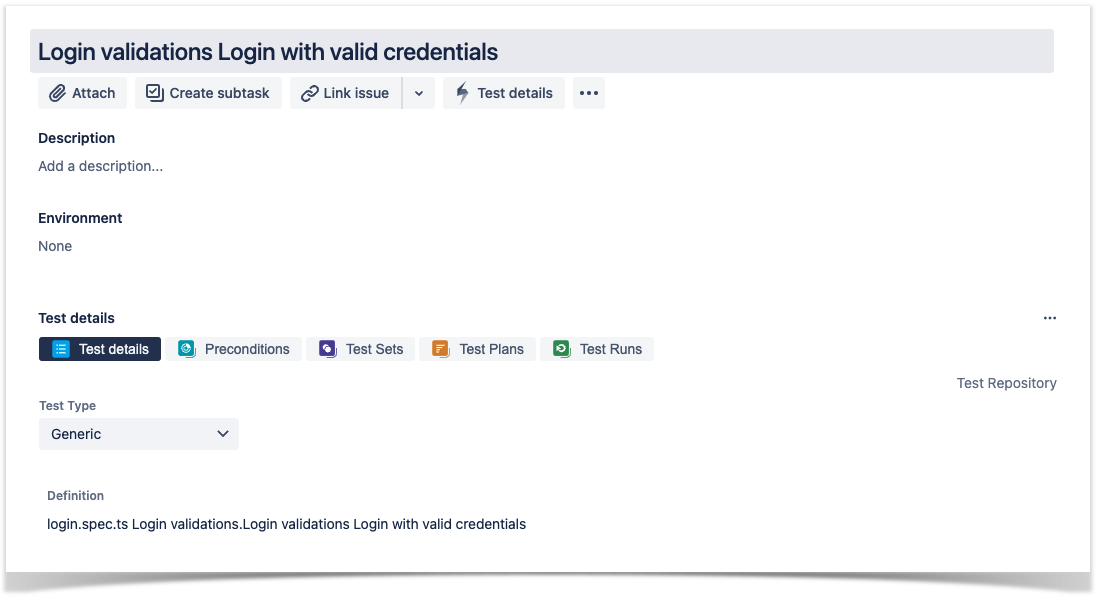
Seeing additional test information in Xray
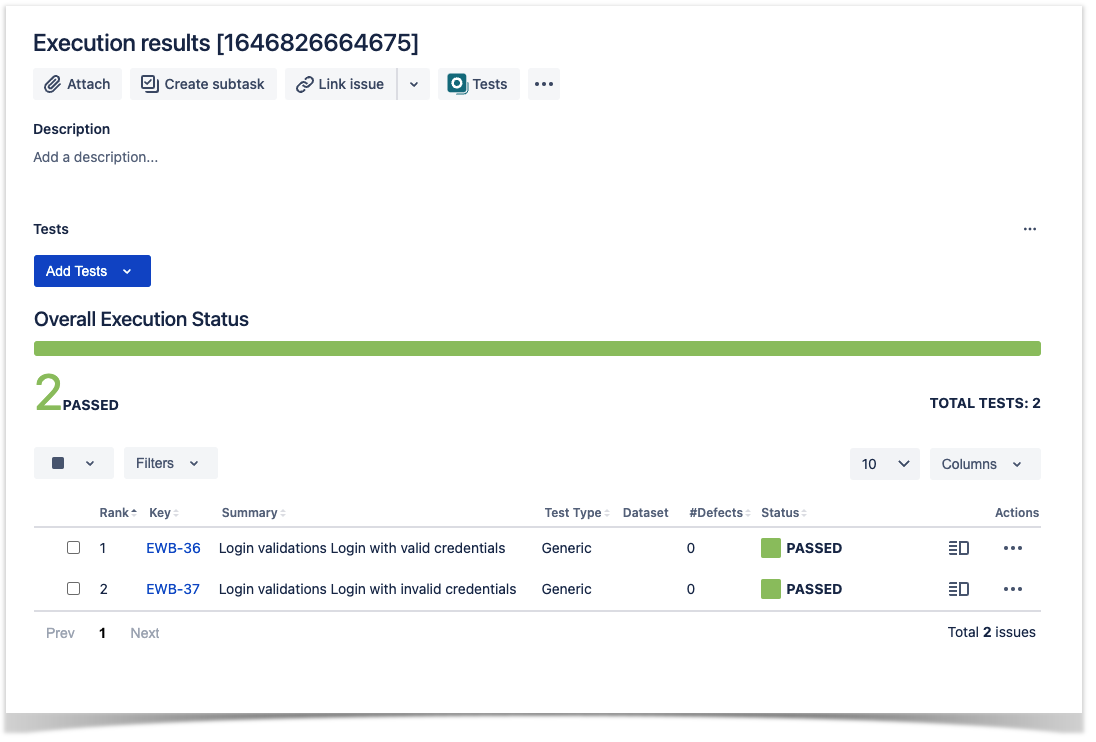
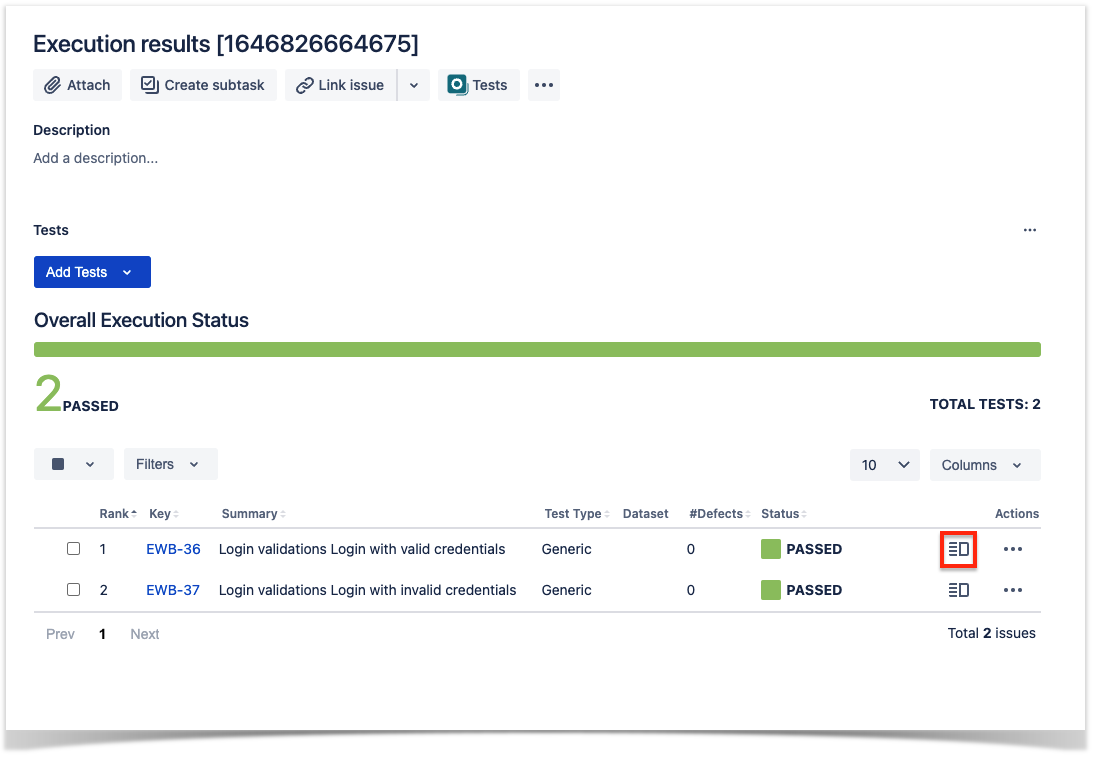
If you are using the Junit reporter defined above the results uploaded to Xray have now the information provided within the test.
To import these results you should use exactly the same approach as described here because the report generated will be a valid Junit report with extra information.
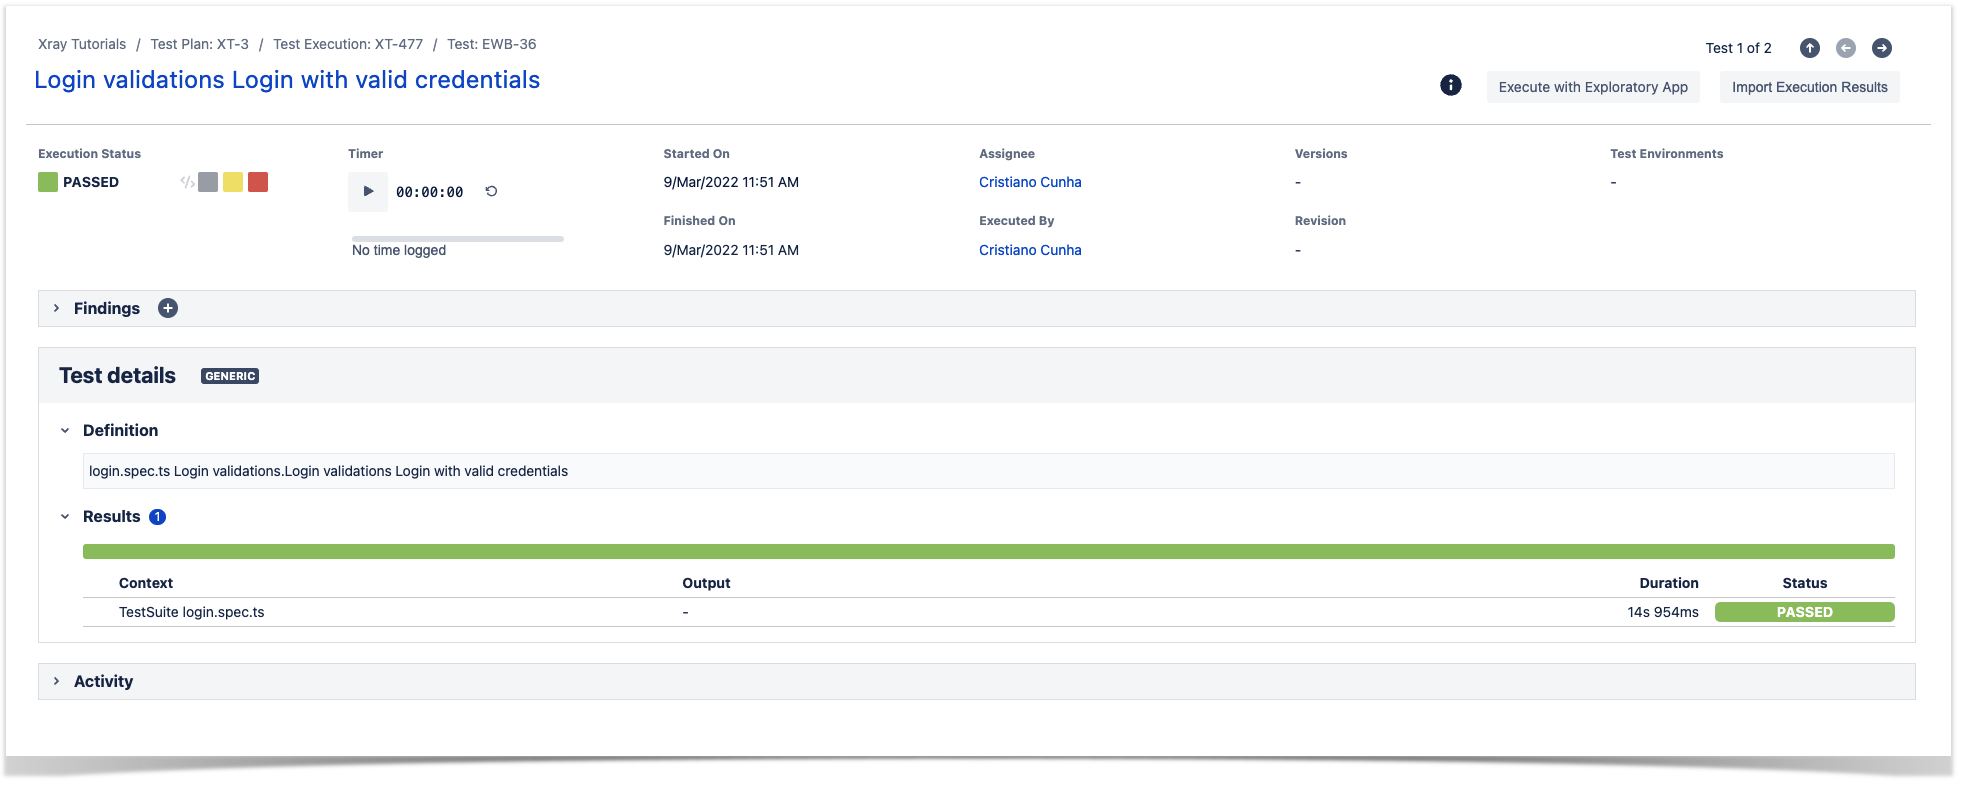
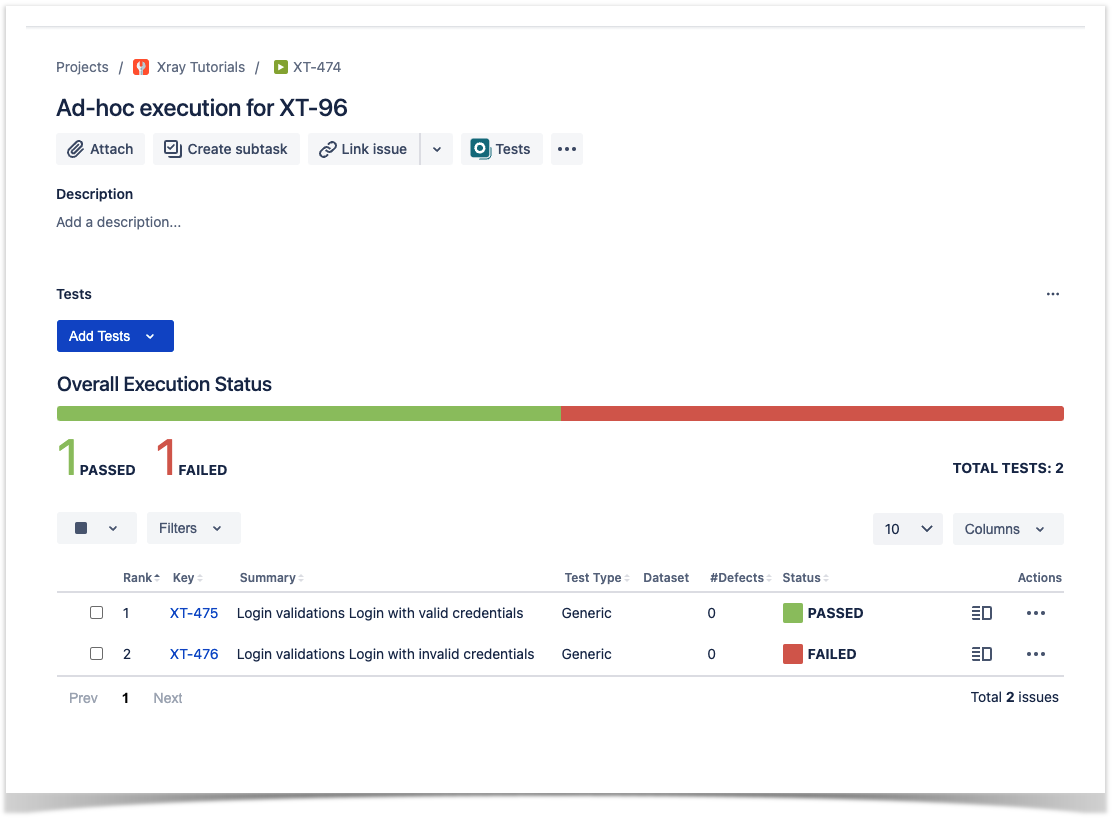
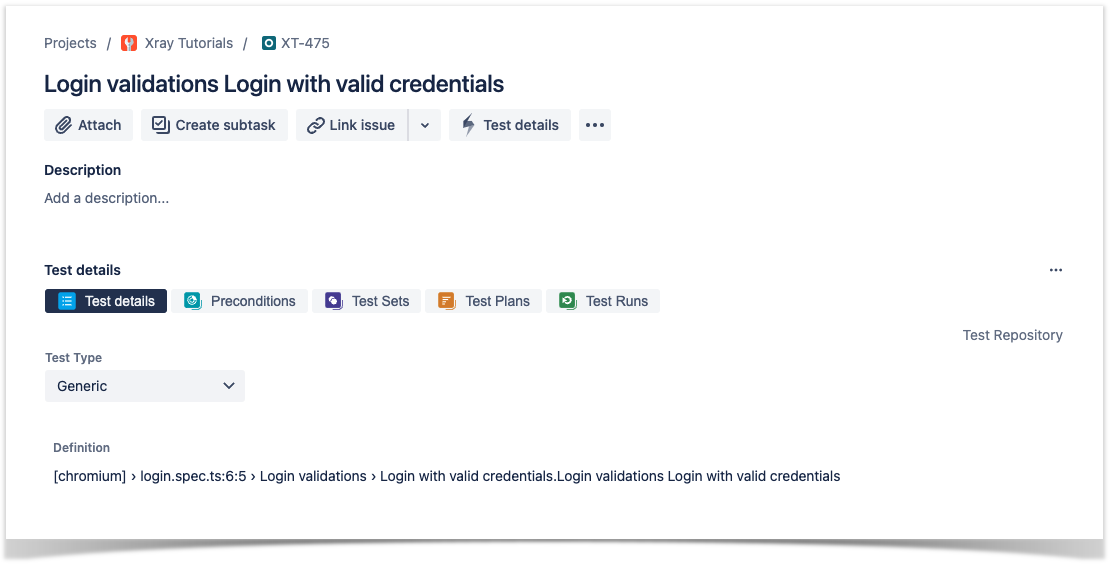
Once imported we can see the redefinition of the summary, the screenshot added, the redefinition of the test description and the link added to the requirement.
Tips
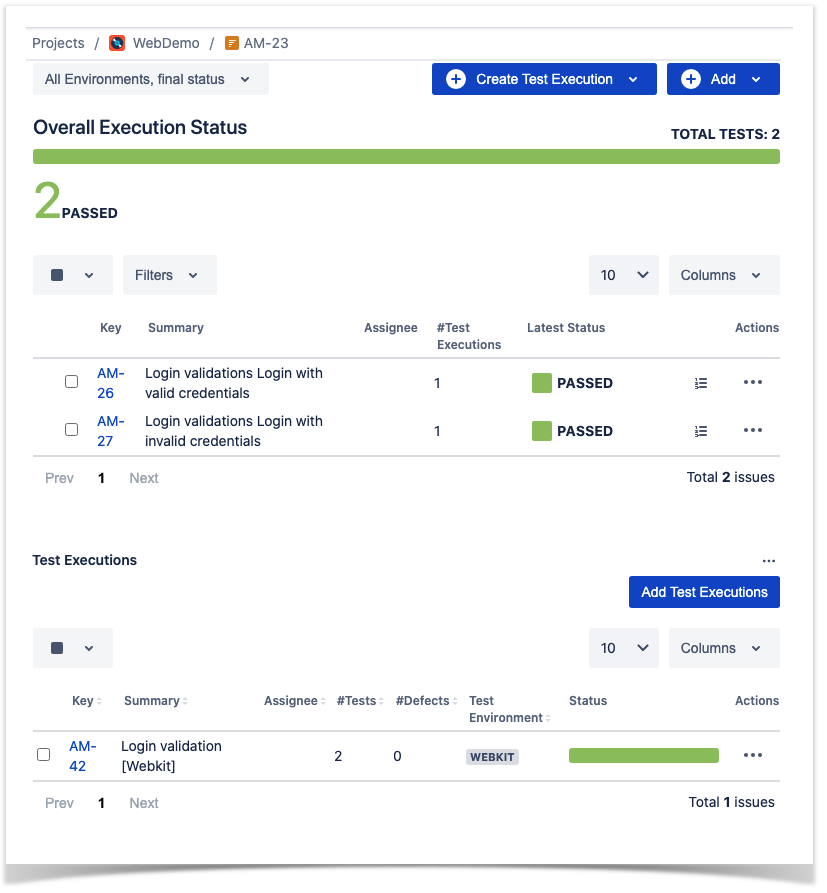
- after results are imported in Jira, Tests can be linked to existing requirements/user stories, so you can track the impact of their coverage.
- results from multiple builds can be linked to an existing Test Plan in order to facilitate the analysis of test result trends across builds.
- results can be associated with a Test Environment, in case you want to analyze coverage and test results by that environment later on. A Test Environment can be a testing stage (e.g. dev, staging, prepod, prod) or an identifier of the device/application used to interact with the system (e.g. browser, mobile OS).
References
| Table of Contents | ||
|---|---|---|
|
| CSS Stylesheet |
|---|
.toc-btf {
    position: fixed;
} |
| Table of Contents | ||
|---|---|---|
|
| CSS Stylesheet |
|---|
.toc-btf {
    position: fixed;
} |