
Page History
A Test Execution is an issue type that aggregates a user-determined collection of Tests. It monitors and verifies if those Tests are working as expected in a target context and environment. Through the The Overall Execution Status, updated as each test is being performed, the user is informed informs you about the progress of the Test Execution, including which tests passed, failed, are being executed or waiting to be performed.
An association between a Test Execution issue and a Test issue is called a Test Run. Hence, a Test Execution is composed of a list of Test Runs.
A Test Execution issue can be assigned to a Tester. It is also possible to assign individual Test Runs to several Testers.
...
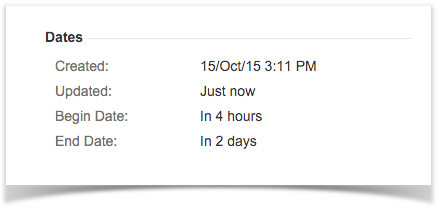
- Begin Date - the date the Test Execution is planned to start start. This is a normal Jira custom field.
- End Date - the date the Test Execution is planned to end end. This is a normal Jira custom field
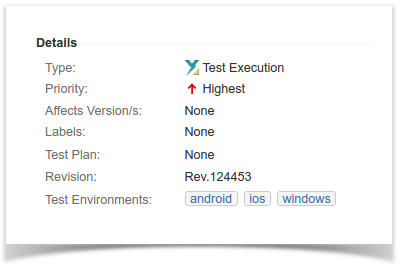
- Revision - the current source code and documentation version used in the Test Execution. This is a normal Jira custom field.
- Test Environments - environments in which the Test Run is executed.
These custom fields are located in the native Jira sections. The revision can be found in the Details section of the Test Execution issue while the Begin and End dates are located in the Dates section.
| Section | ||||||||||
|---|---|---|---|---|---|---|---|---|---|---|
|
right column (issue details).
| Section |
|---|
|

SectionsSections
Xray contributes an additional section to the Test Execution view issue screen.
...
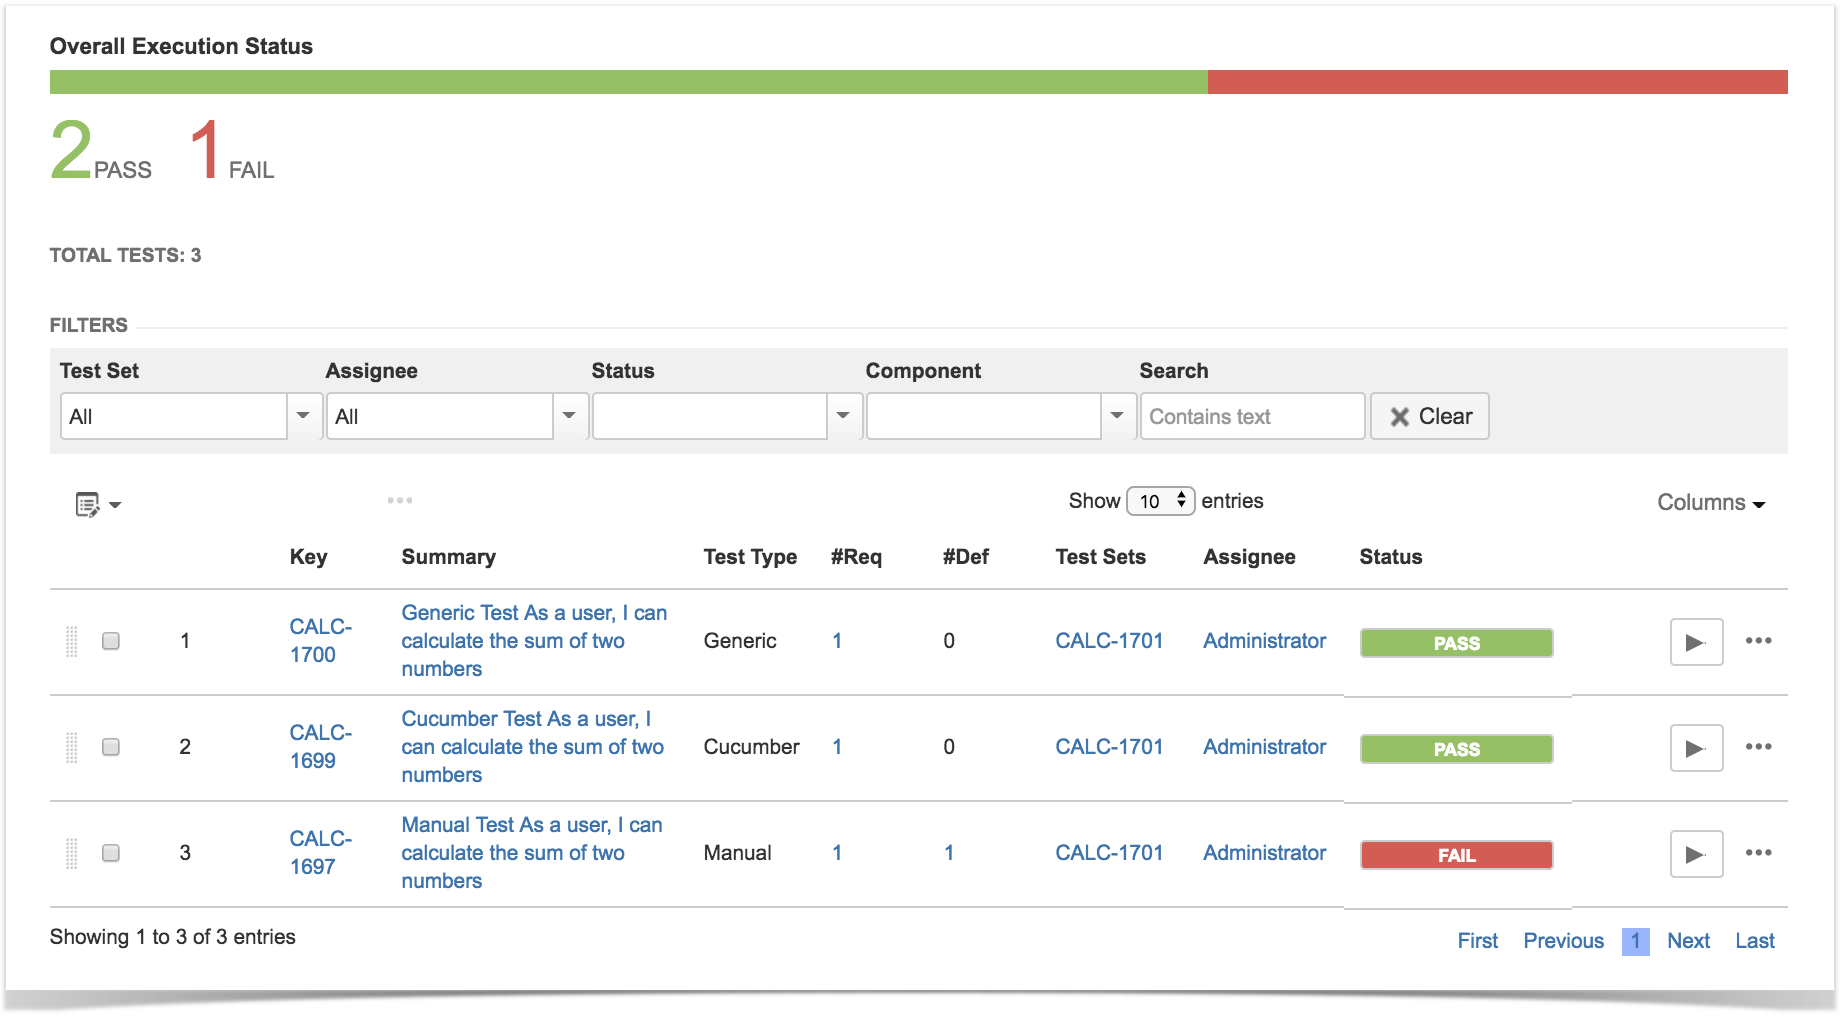
It is possible to filter tests by status in Test Execution Progress Bar as shown in the image below:


Test Run Filters
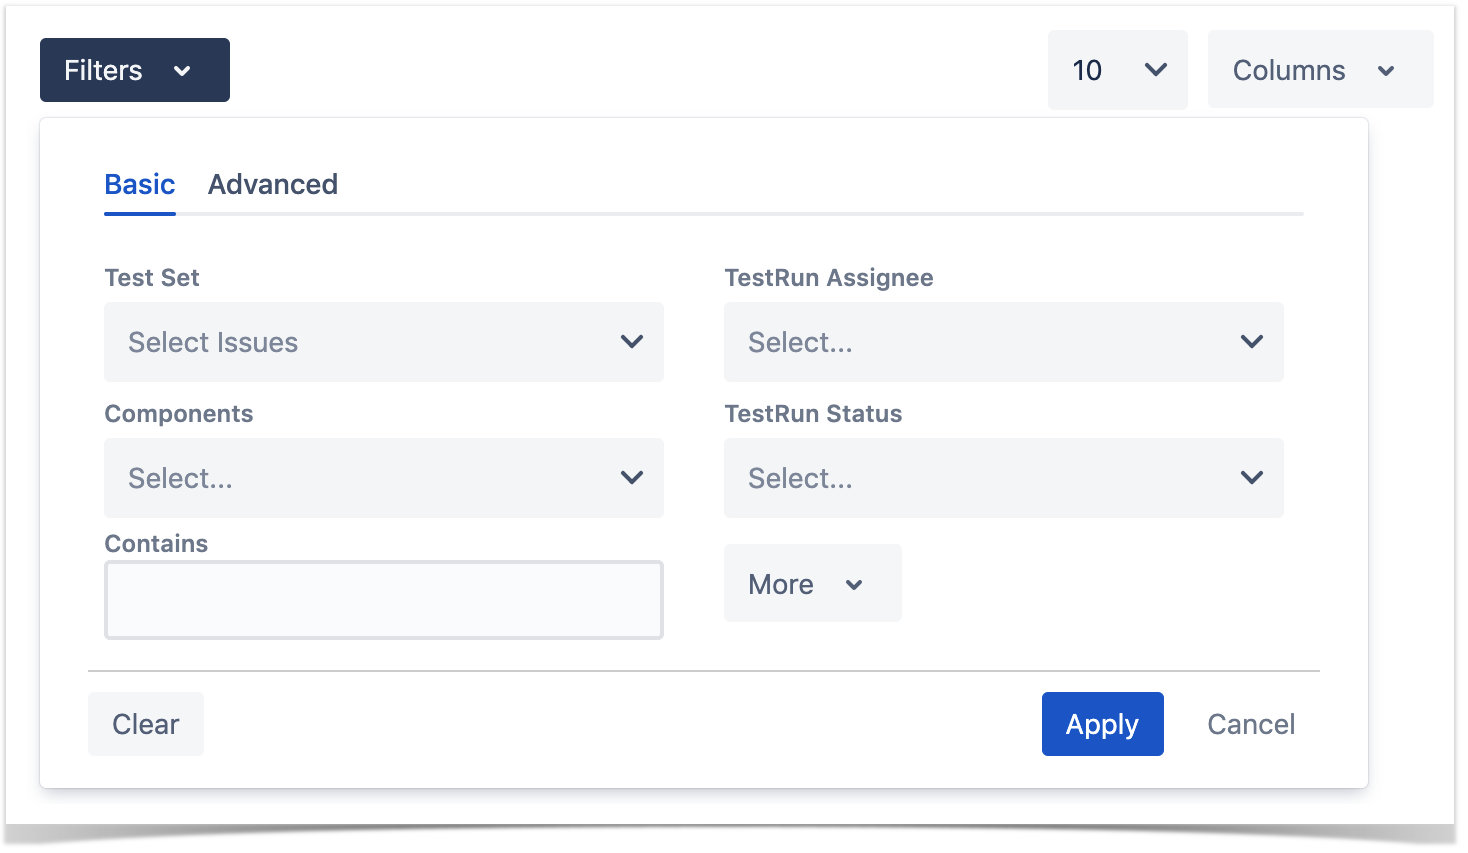
A filter section is also present above the Test Runs table to allow you to filter Test Runs by by Assignee, Status, Test Set, Components or open text.
Test Runs Table
It is also possible to add other fields to the filter by clicking on the More button and selecting the wanted fields.

Test Runs Table
This table has all the The Tests section provides a table with all Test Runs created for the Test execution issue. Each row in this table represents a Test Run and contains a set of actions that can be performed over on a Test Run.
The Columns table can be configured by you. It also provides You can configure the Columns, perform bulk operations and drag-and-drop to change rank of Test Runs.
When Xray is installed, the default columns are: Rank, Key Key, Summary, Test Type, #Req, #Def, Test Sets, Assignee and Status where Rank and Status are Dataset, Status and Action, where the Status is fixed and cannot be removed or changed.
The #Req column provides the number of Requirements that are tested with each Test issue.
The #Def column provides the number of Defects created during the Test Execution or already related to the Test issue. For more information on how the calculation is done for this field, please refer to Defects Count.
.

Actions
| Table of Contents | ||||
|---|---|---|---|---|
|
| Info | ||
|---|---|---|
| ||
Now it is possible to filter tests by clicking on "Overall Execution Status" in Test Execution Progress Bar |
Create
Create
To create a To create a new Test Execution Issue,
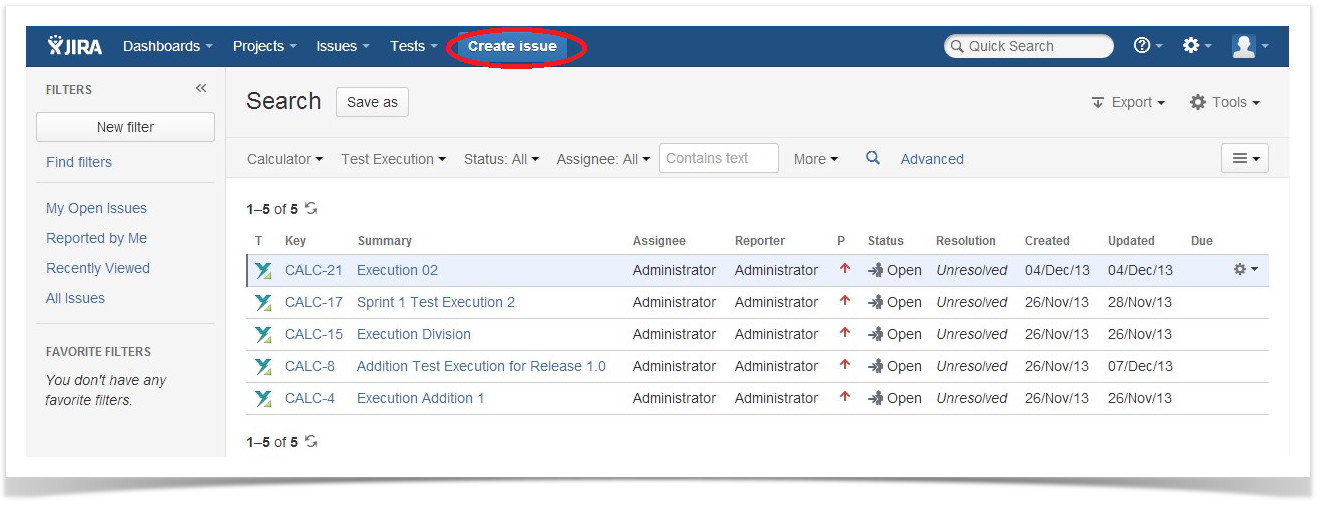
Step 1: Click the Create Issue at at the top of the screen to open the Create Issue dialog box / page or by pressing the key "C" on the keyboard.

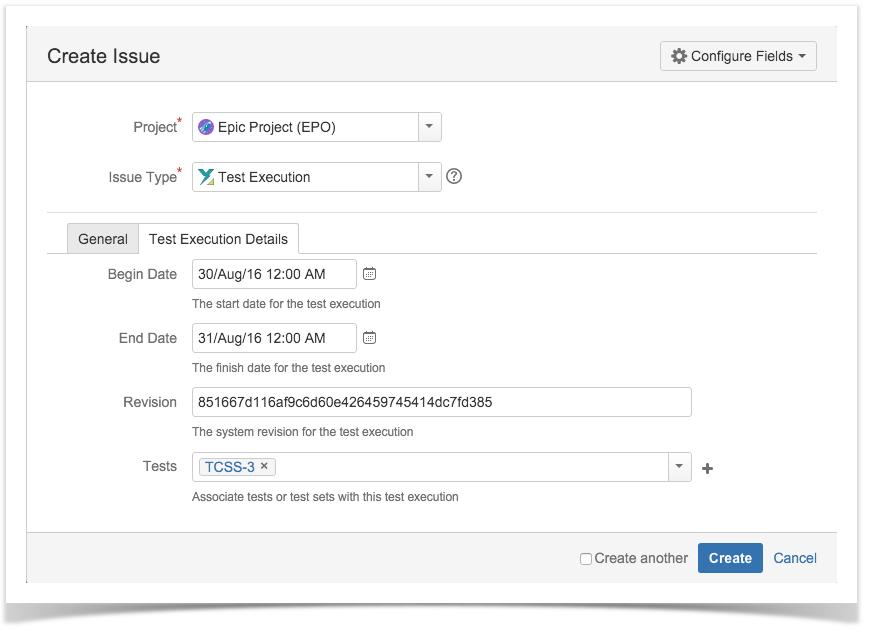
Step 2: Select the Project and on Issue Type, select Test Execution.
Step 3: Under the General tab, type Type a Summary for the test execution and fill all appropriate fields — mandatory fields are marked with an asterisk.
Step 4: Under the Test Execution Details tab, you In the Create Issue dialog you can populate the Test Execution custom fields provided by Xray, namely, the Begin/End date and the Revision. In this tab, you can also associate Tests or Test Sets to create Test Runs.
Optional: To create a series of similar test executions – within the same Project – select the check Create another checkbox at the bottom of the dialog.
Step 5: When you are satisfied with the content of your test execution, click the Create button.
Step 5a: If you selected the checked Create another checkbox, a new Create Issue dialog appears. This issue is automatically pre-populated with your previous test execution details, while leaving with the Summary field blank.

Edit
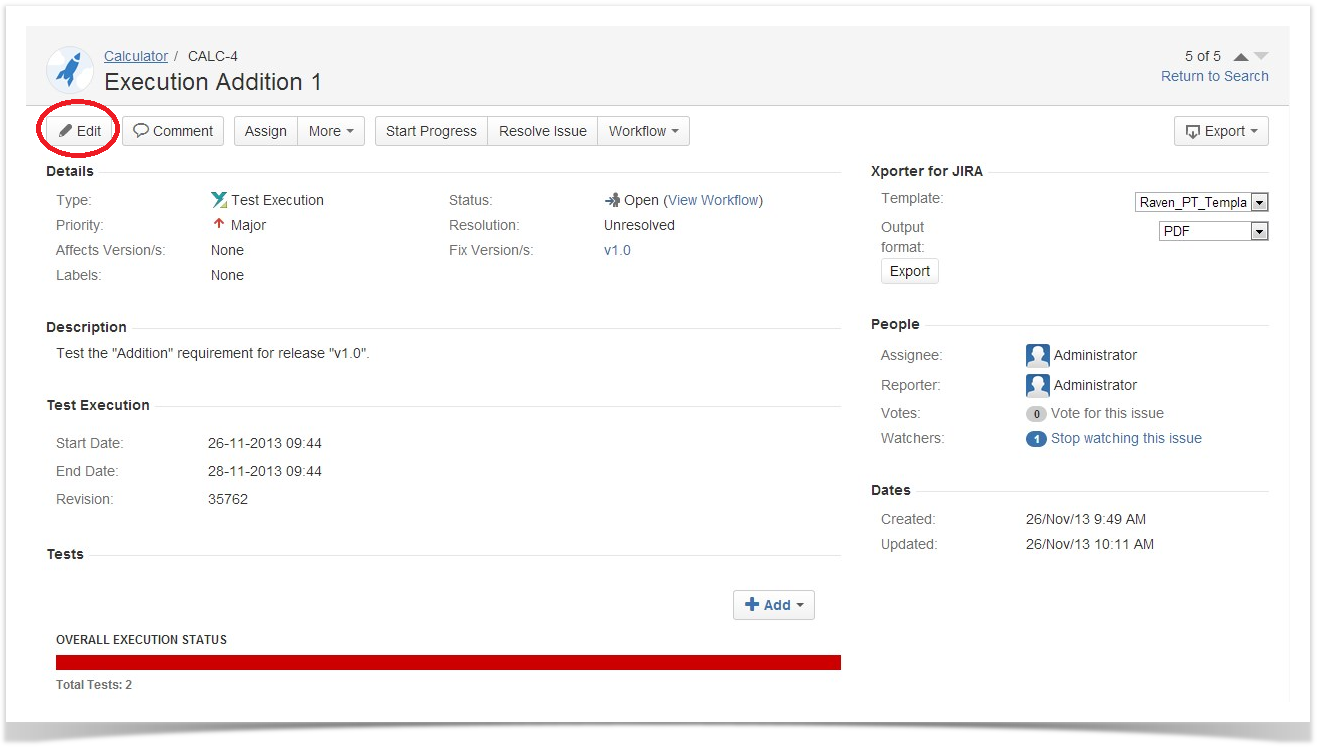
The Edit Issue dialog box / page is similar to the Create Issue dialog box / page, and can be accessed through the following steps:
Step 1: Locate the Test Execution you want to edit.
Step 2: Click the Edit button (at the top-left of the 'view issue' page) to open the Edit Issue dialog box / page.
Alternatively, hover over a field and click the pencil icon to edit it inline. Hover over a field and click on it to edit it inline.

Step 3: Modify your Test Execution details in the appropriate fields using either the General or Test Execution Details tab of the Edit Issue view.
Step 4: Click the Update button out of the edit field to save your changesit.
Clone
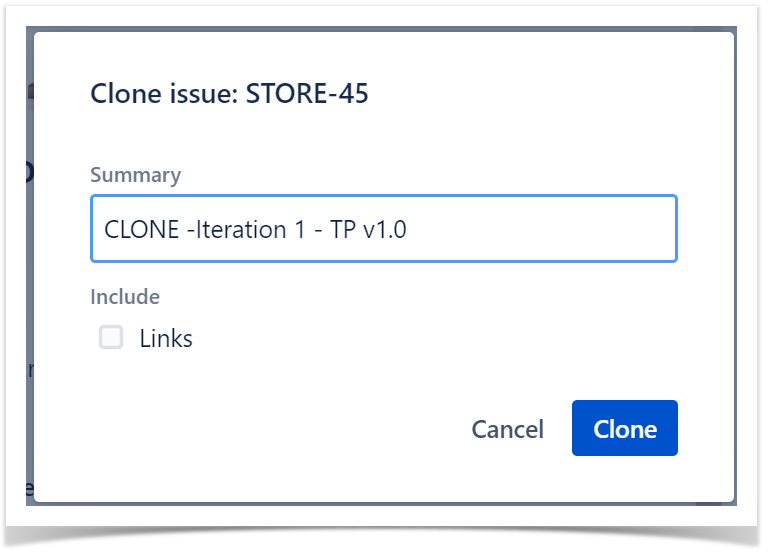
When cloning a Test Execution issue, all the Test issue associations will also be cloned. However, a new Test Run is created for each Test so that the new Test Execution issue has no execution state. Also:
- If the test execution contains links to other issue(s), you can select whether or not to include the links in the new clone test execution.
- If the test execution contains sub-tasks, you can select whether or not to create the sub-tasks in the new clone test execution.
- If the test execution contains attachments, you can select whether or not to include the attachments in the new clone test execution.
Test Environment associations will be cloned as well.
After this, an additional dialog will be shown.
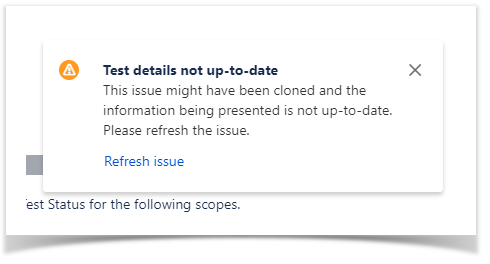
And after the issue is created, its page will be opened.
On some occasions the cloned issue page may open before the Xray information is actually cloned and as a result the new Test Execution will appear empty.
When this happens the following information will be shown:
Adding Tests
Tests and Test Sets can be associated with Test Execution issues.
Add Tests
To add Test issues to a Test ExecutionTo clone an existing Test Execution issue:
Step 1: Open the Test Execution you Test Execution you wish to cloneassociate a Test with.
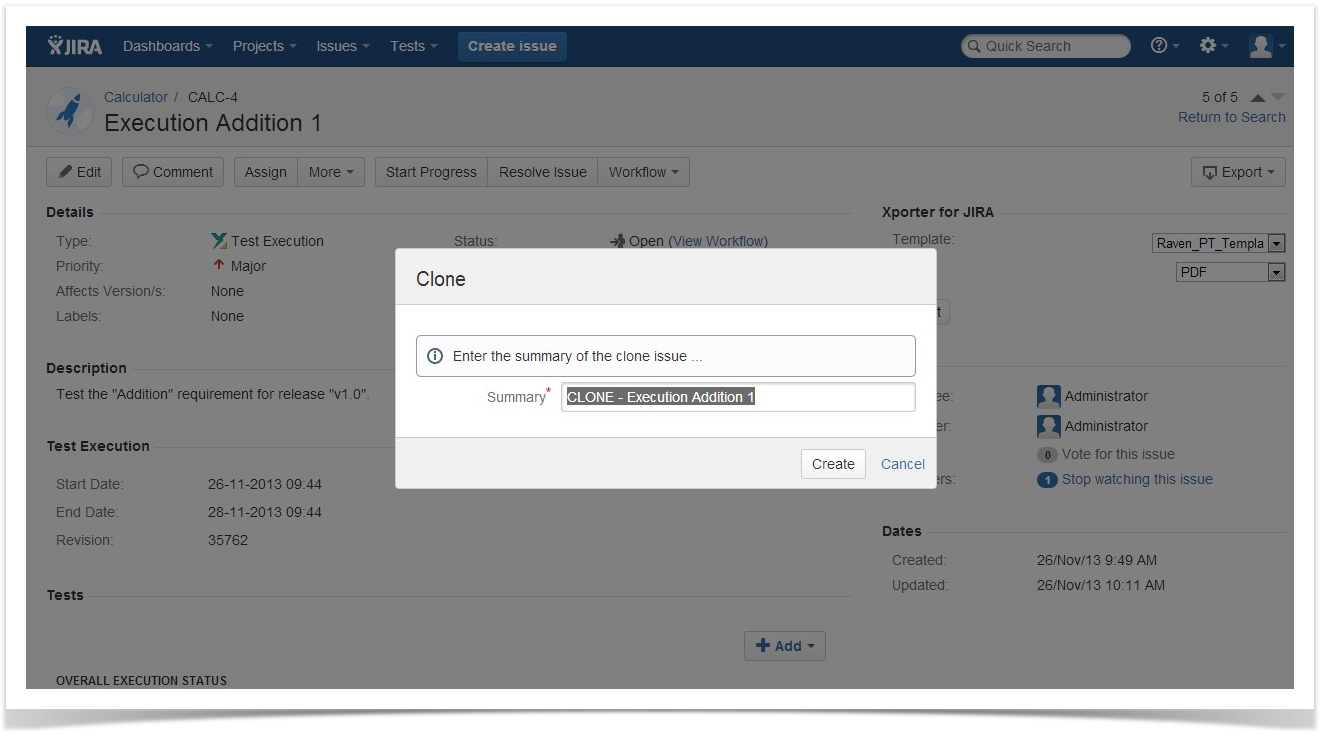
Step 2: Select More > Clone. The Clone Issue screen will appear.Select Add Tests > Existing Tests (under the Tests section on the view page) to open the Add Tests dialog box.

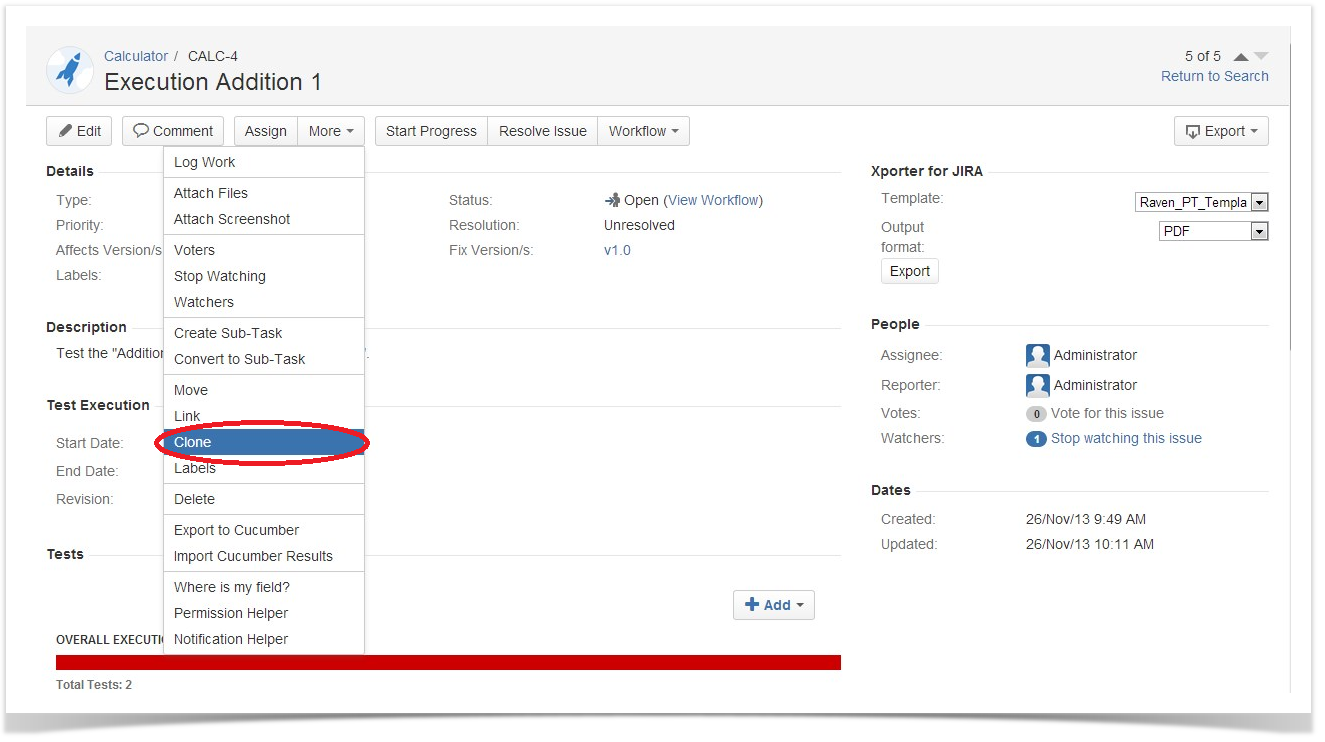
Step 3: Edit the clone Test Set's Summary if you wish.
Step 4: Click Create.
Adding Tests
...
Select or search the Test issues to be associated with the Test Execution
...
:
To select the Tests to be associated, you can, under the Select tab:
- Input the desired Test Issue Key on the Tests field.
- Click on the Down Arrow on the Tests field and select the Test from its History Search list.

To search for Tests to be associated, you can, under the Search tab:
- Select the desired Project and any other desired field such as Contains, Label, Fix Version, Component, Covering, Covering Fix Version, Saved Filters and Workflow Status
- Click on the Search button after filling the browse fields to get a list of matching entries

To search for Tests to be associated you can: under the JQL tab:
- Write the desired JQL search
- Click on the Search button perform the JQL search and to get a list of the matching entries (more details about JQL here)

Step 4: Click Add Selected.
Add Tests from Test Sets
When adding a Test Set issue to a Test Execution, all the Test issues associated with that Test Set are added to the Test Execution. The Test Set issue is not directly associated with the Test Execution, so changes to the Test Set after it was added will not affect the Test Execution.
Step 1: Open the Test Execution with which you want to associate a Test Set.
Step 2: Select Add Tests> Tests from Test Sets (under the Tests tab on the view page) to open the Add Test Sets dialog box.

Step 3: Select or search the Test Set issues to be associated with the Test Execution.
To select the Test Sets to be associated, you can, under the Select tab:
- Input the desired Test Set Issue Key on the Test Sets field.
- Click on the Down Arrow on the Test Sets field and select the Test Set from its History Search list.
- Click on the Search tab to use the Find Jira issues browser.

To search for Test
Add Tests
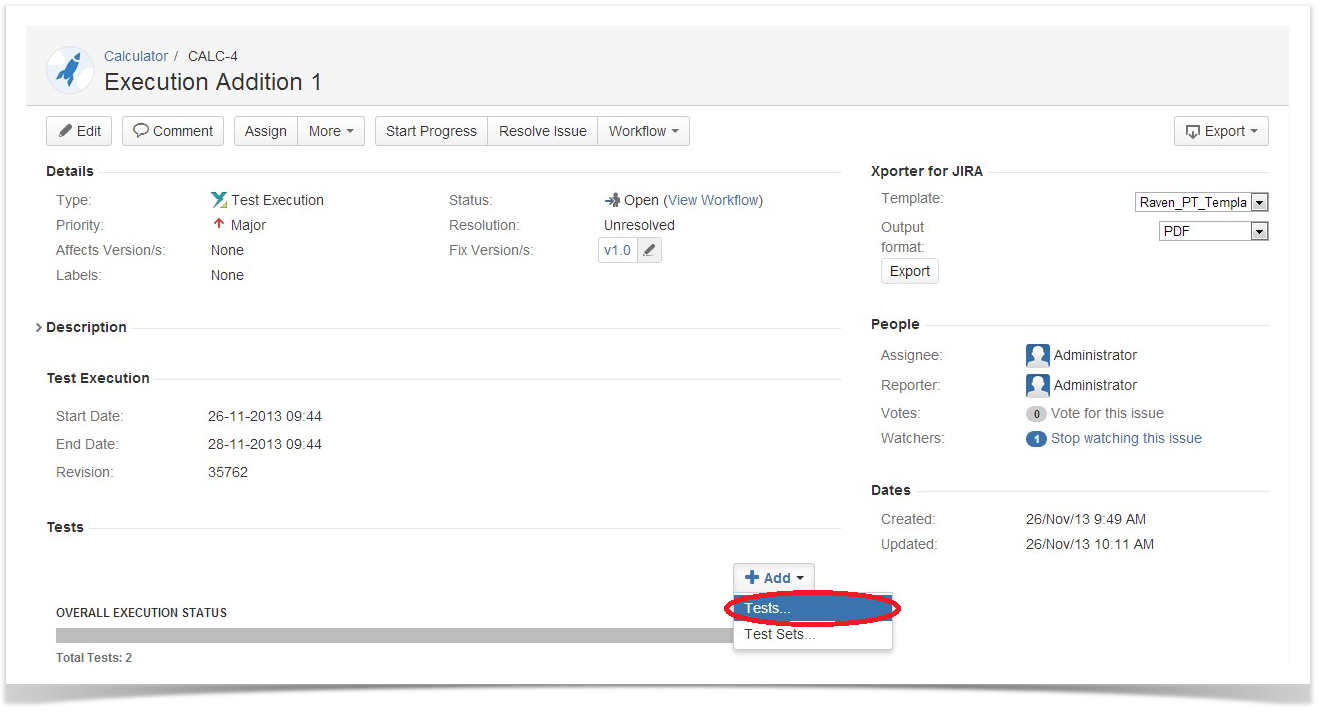
To add Test issues to a Test Execution:
Step 1: Open the Test Execution you wish to associate a Test with.
Step 2: Select Add > Tests (under the Tests tab on the view page) to open the Add Tests dialog box.
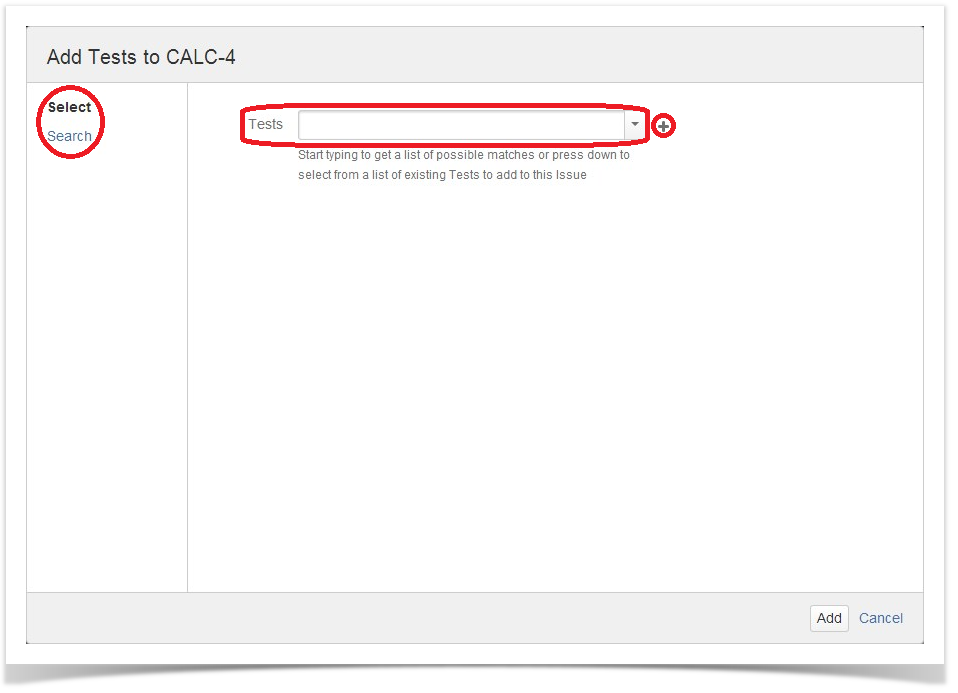
Step 3: Select or search the Test issues to be associated with the Test Execution:
Select Test Issues - In order to select the Tests to be associated, you can, under the Select tab:
- Input the desired Test Issue Key on the Tests field.
- Click on the Down Arrow on the Tests field and select the Test from its History Search list.
- Click on the + button wich will prompt an Issue Selector Pop-Up.
- Click on the Search tab to use the Find Jira issues browser.
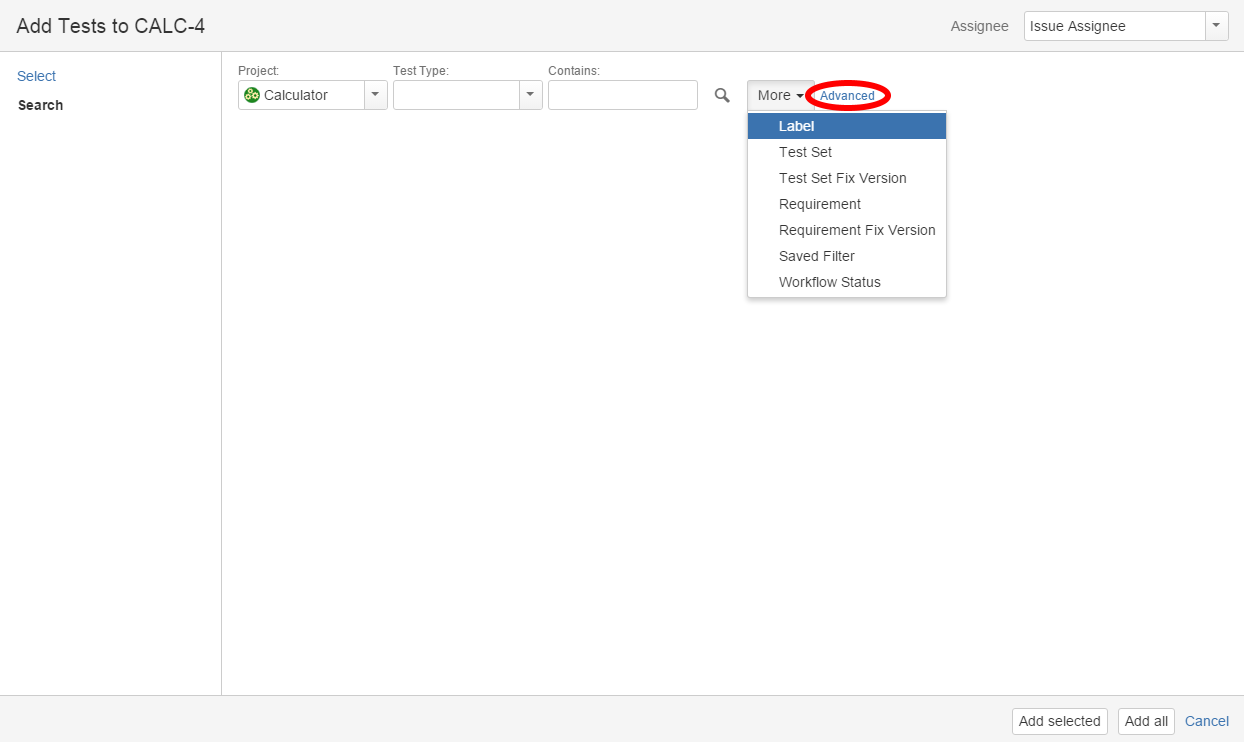
Search Test Issues - In order to search for Tests to be associated, you can, under the Search tab:
- Browse for the desired Test Project, Type or terms it Contains.
- Click on the More button to add more browse fields such as Label, Test Set, Test Set Fix Version, Requirement, Requirement Fix Version, Saved Filter and Workflow Status.
- Click on the Magnifier button after filling out the browse fields to get a list of matching entries
- Click on the Advanced button to perform a JQL search.
Step 4: Click Add.
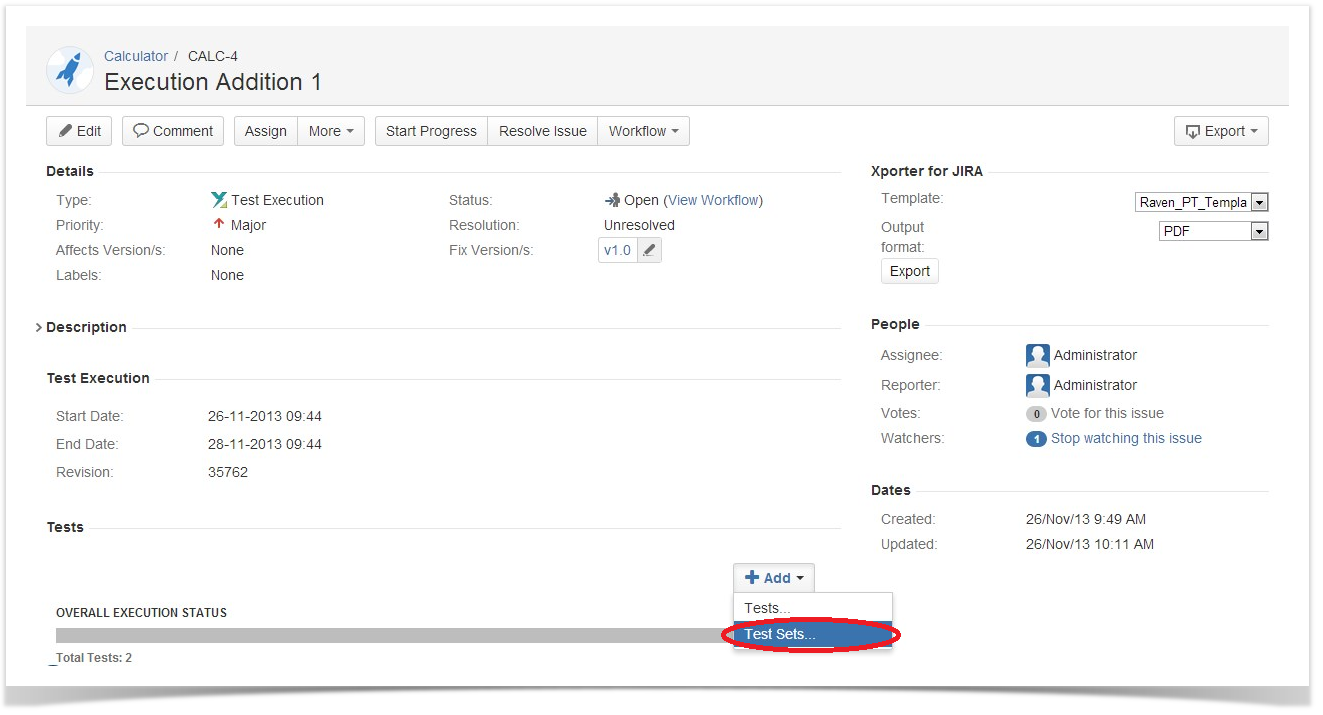
Add Tests from Test Sets
When adding a Test Set issue to a Test Execution, all the Test issues associated with the Test Set are added to the Test Execution. The Test Set issue is not directly associated with a Test Execution, so changes to the Test Set after it was added will not affect the Test Execution.
Step 1: Open the Test Execution you wish to associate a Test Set with.
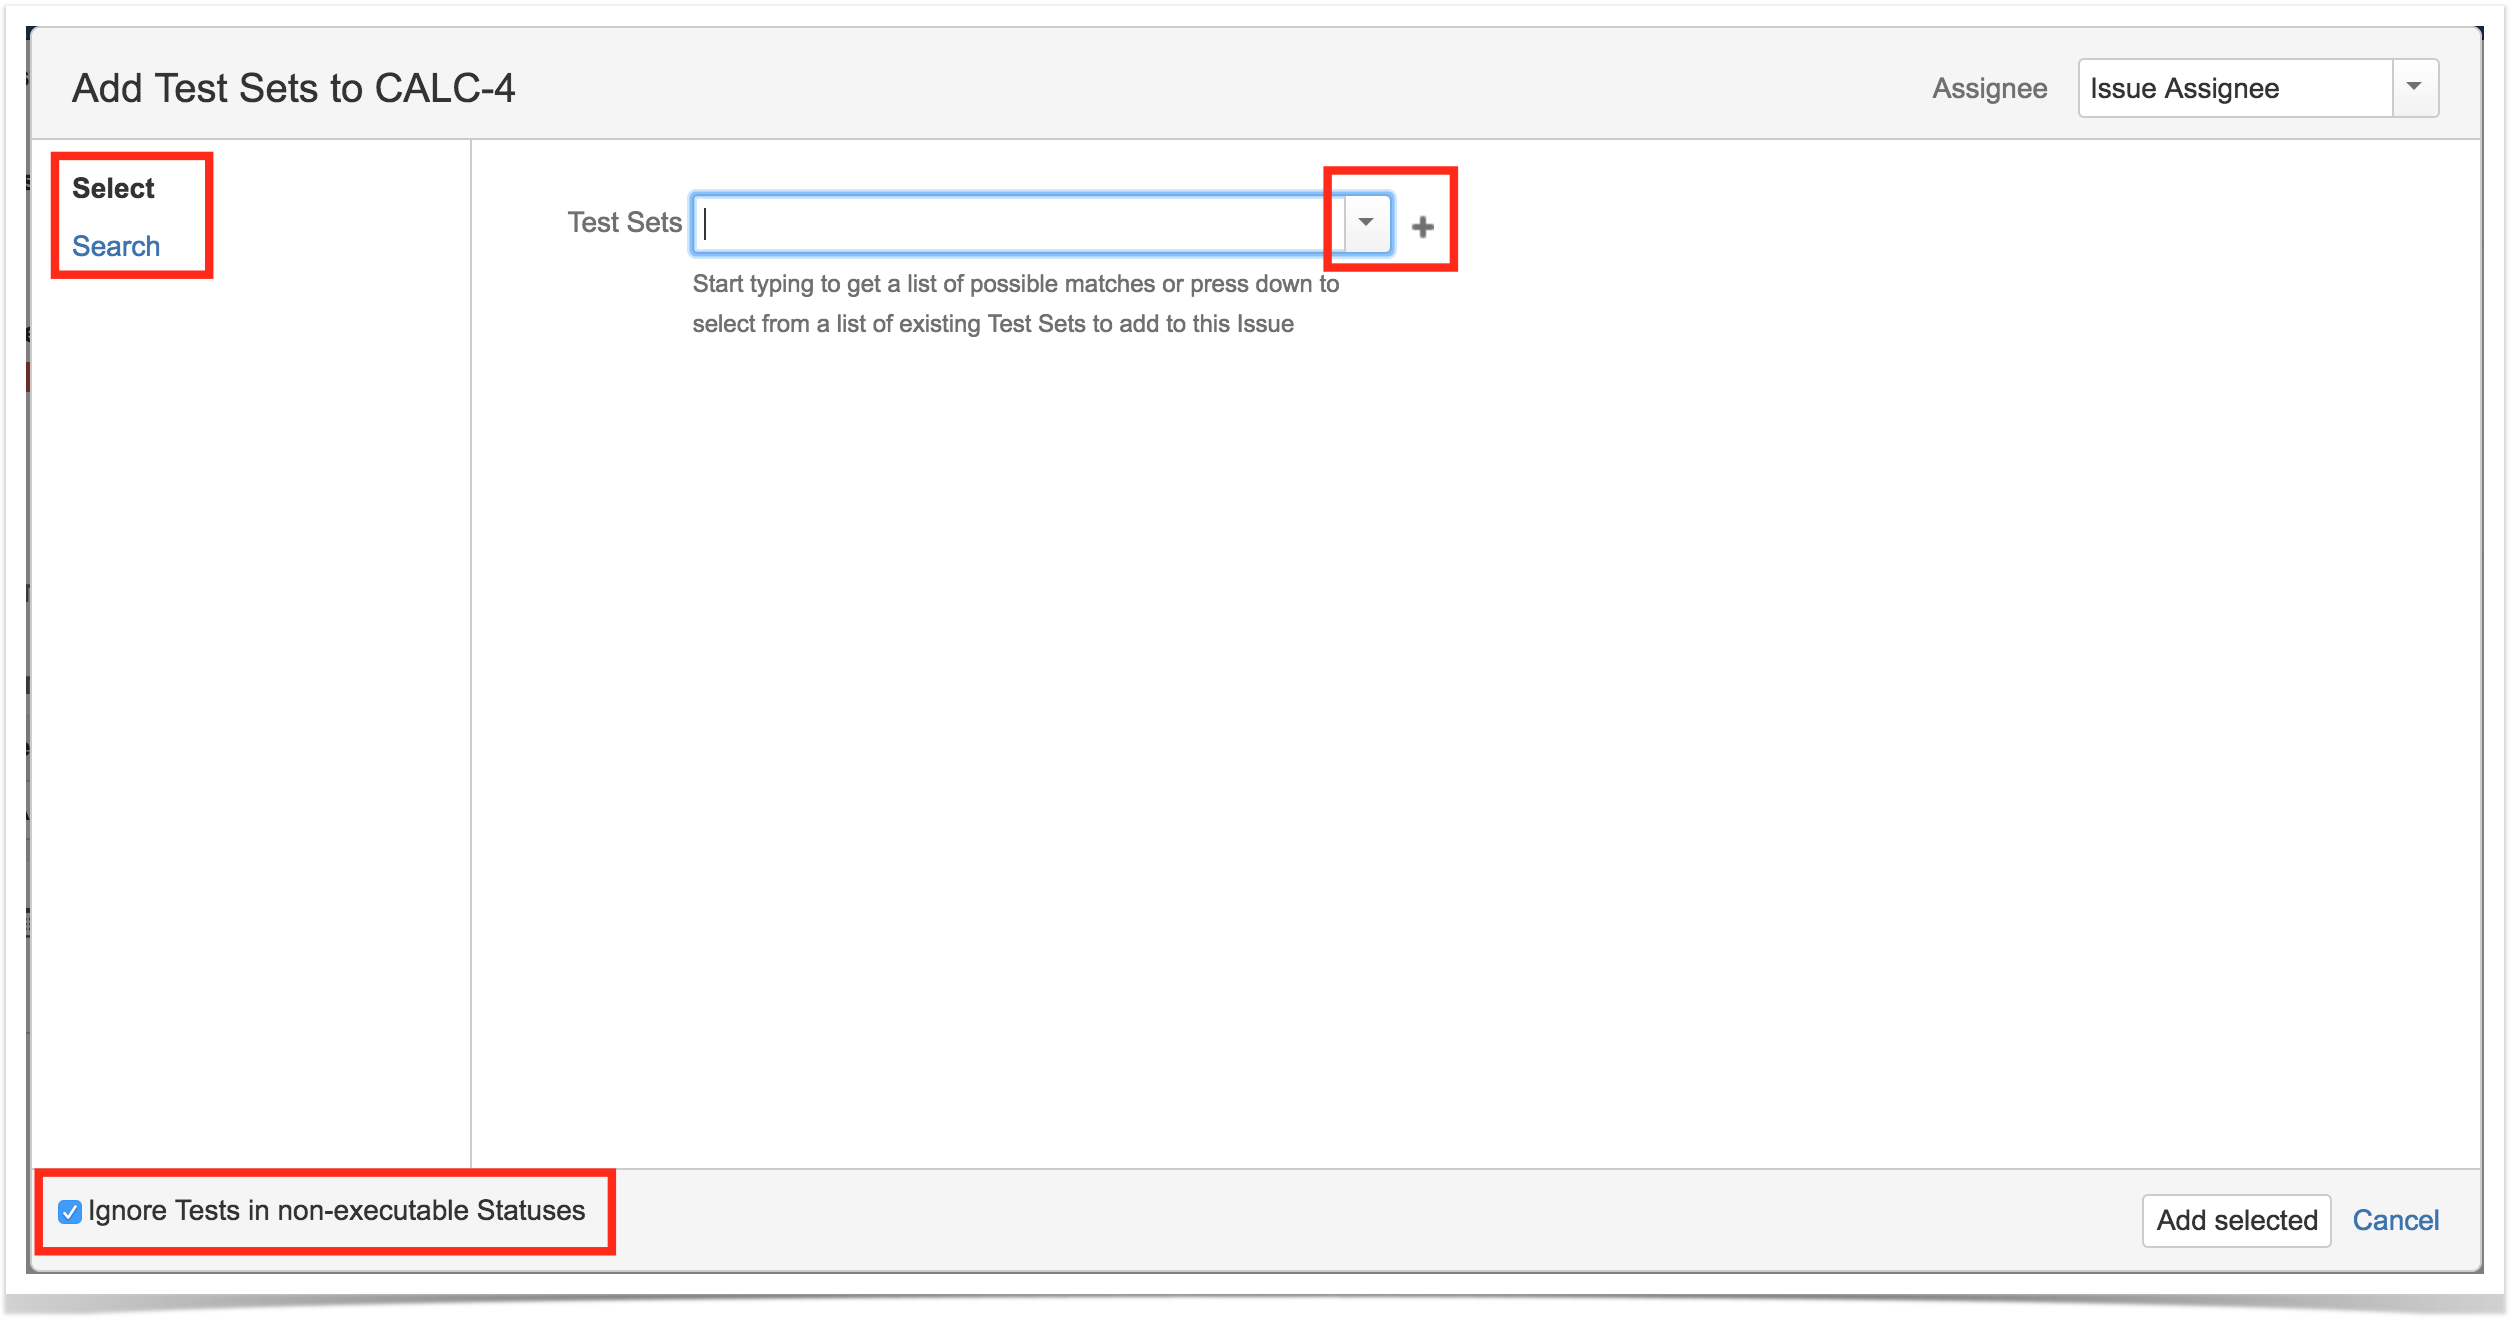
Step 2: Select Add > Tests (under the Tests tab on the view page) to open the Add Test Sets dialog box.
Step 3: Select or search the Test Set issues to be associated with the Test Execution.
Select Test Set Issues - In order to select the Test Sets to be associated, you can, under the SelectSearch tab:
- Input Select the desired Project and any other desired field such as Contains, Label, Fix Version, Component, Covering, Covering Fix Version, Saved Filters and Workflow Status
- Click on the Search button after filling the browse fields to get a list of matching entries

To search for Test Sets to be associated you can: under the JQL tab:
- Write the desired JQL search desired Test Set Issue Key on the Test Sets field.
- Click on the Down Arrow on the Test Sets field and select the Test Set from its History Search list.
- Click on the + button wich will prompt an Issue Selector Pop-Up.
- Click on the Search tab to use the Find Jira issues browser.
| Info | ||
|---|---|---|
| ||
Notice the setting for ignoring Tests in non-executable statuses at the bottom-left side. By default it will be selected, therefore restricting the shown Tests available for adding accordingly to the configuration "Disallow executions of Tests with workflow statuses". |
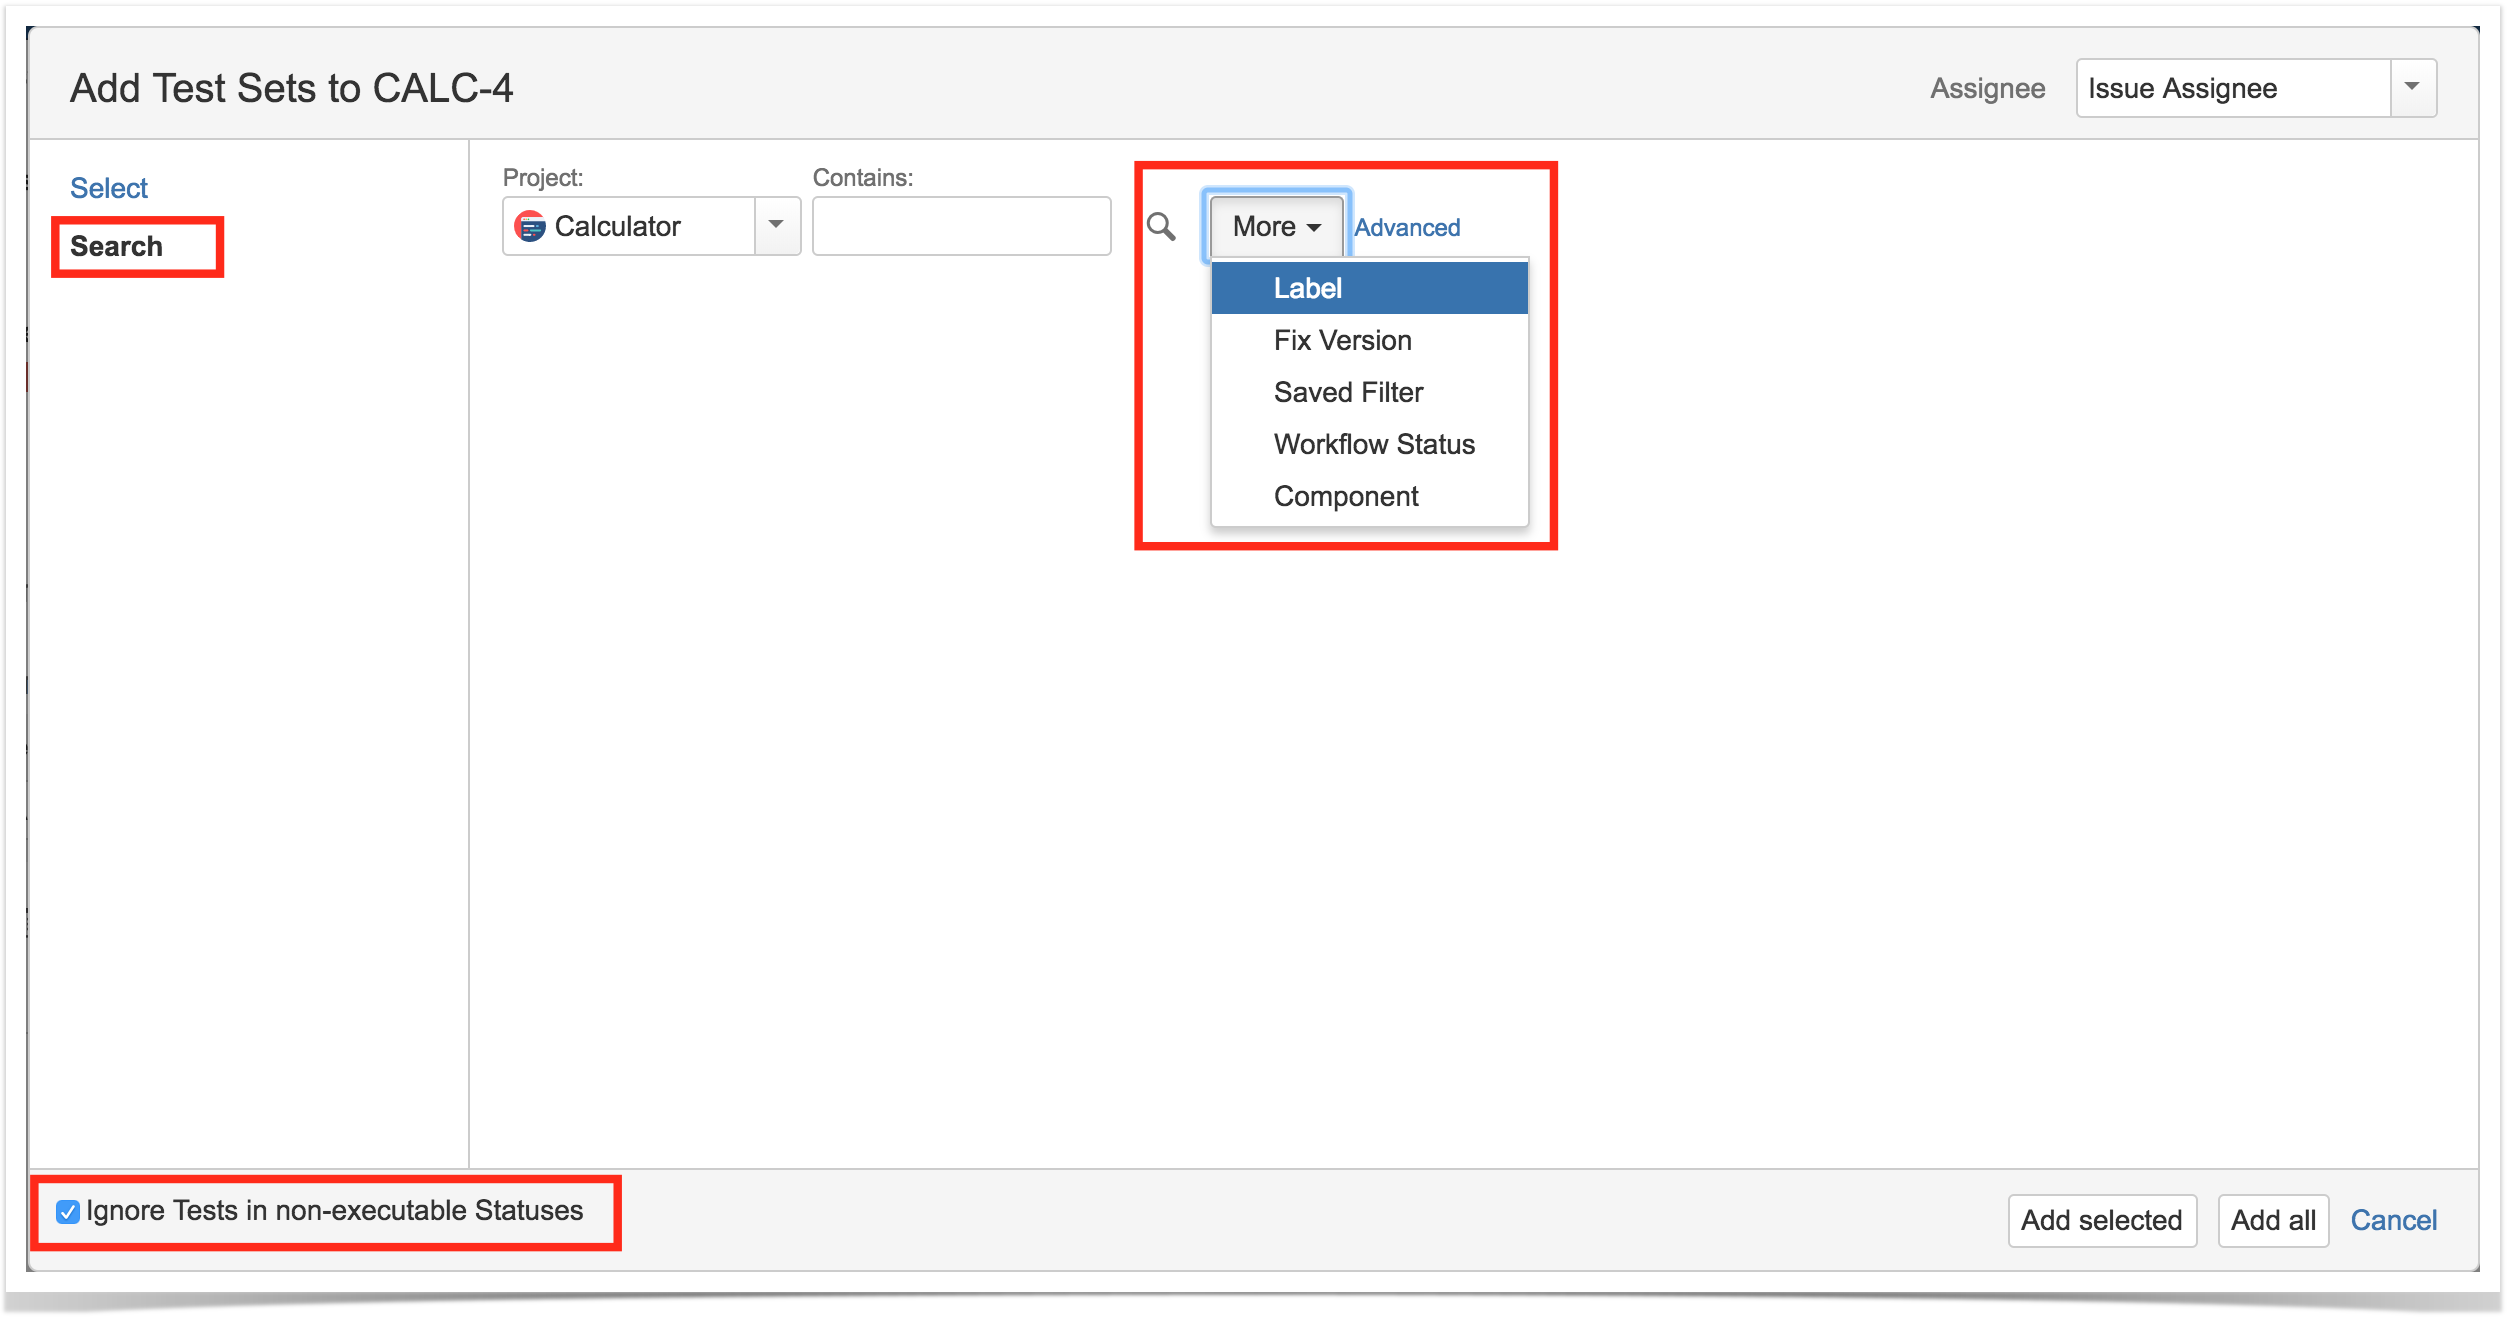
Search Test Sets Issues - In order to search for Test Sets to be associ.ated, you can, under the Search tab:
- Browse for the desired Test Set Project or terms it Contains.
- Click on the More button to add more browse fields such as Label, Fix Version, Saved Filter and Workflow Status.
- Click on the Magnifier button after filling out the browse fields to get a list of matching entries.
- Click on the Advanced button to perform a JQL search.
| Info | ||
|---|---|---|
| ||
Notice the setting for ignoring Tests in non-executable statuses at the bottom-left side. By default it will be selected, therefore restricting the shown Tests available for adding accordingly to the configuration "Disallow executions of Tests with workflow statuses". |
Step 4: Click Add.
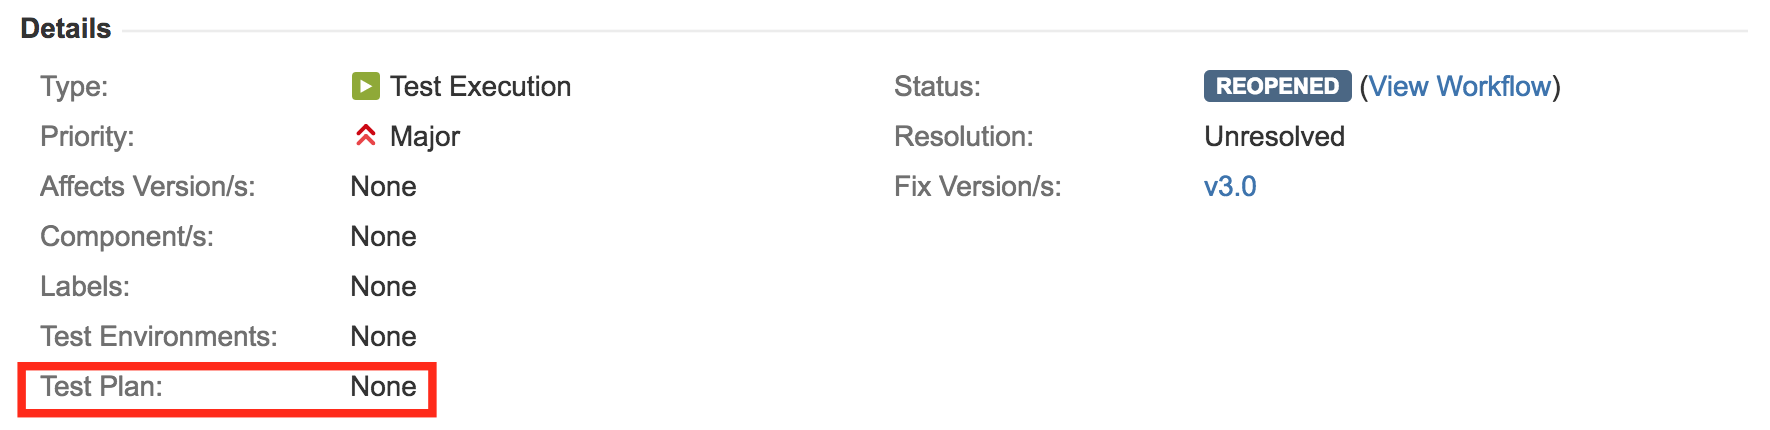
Associate with a Test Plan
You can associate Test Executions with Test Plans by editing the custom field Test Plan in the Test Execution issue view page, or directly in the create issue screen in the Test Execution Details tab.
If the Test Execution is associated with a Test Plan and contains Tests that are not in the Test Plan, a warning message will be displayed telling you how many tests in the Test Execution are not in the Test Plan with a button to add these tests to the Test Plan.

There will be one warning message for each Test Plan associated with the Test Execution that does not contain all the Tests in the Test Execution.
Remove Tests
button perform the JQL search and to get a list of the matching entries (more details about JQL here)

Step 4: Click Add Selected.
Associate with a Test Plan
You can associate Test Executions with Test Plans by editing the field Test Plans in the Test Plans section in Test Execution issue details. Note that with this method, only the Test Execution will be associated with the Test Plan; the Tests will not be associated. To inline edit the Associated Test Plans field, just hover over the field view area, click it and add or remove the Test Plans.


If the Test Execution is associated with a Test Plan and contains Tests that are not in the Test Plan, a warning message will be displayed telling you how many tests in the Test Execution are not in the Test Plan. A Add Tests button will be shown in case you want to add these tests to the Test Plan.

There will be one warning message for each Test Plan associated with the Test Execution that does not contain all the Tests in the Test Execution.
Remove Tests
| Section | ||
|---|---|---|
|

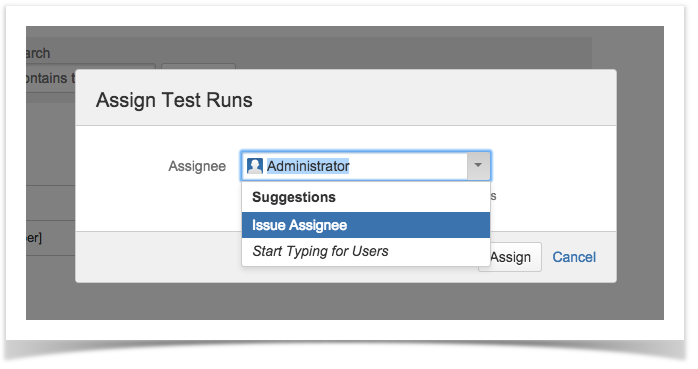
Assigning Work
| Section | ||||
|---|---|---|---|---|
There are two ways to distribute work between Testers.
| ||||
| Section | ||||
|
Assigning Work
|

| Info |
|---|
After assigning a Test Run, an email notification is sent to the new assignee if the corresponding setting is enabled in the Global or Project Settings. |
Change Test Run Rank
| Section | ||||
|---|---|---|---|---|
| ||||
| Section | ||||
There are two ways to distribute work between Testers.
|

...
Execute Test
...
There are two ways to change the rank of a Test Run:
Drag-and-Drop
To execute a Test from a Test Execution:
Step
...
1: Open the
...
Test Execution you want to run.
Step 2: Hover over the desired Test
...
Run (under the Tests section on the view page)
...
Step 3: Click the
...
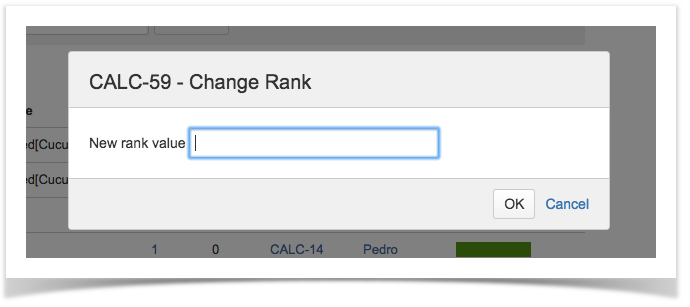
Change Rank Action
This action allows users to change the Rank of a Test run between pages.
Step 1: Open the Test Execution issue.
Step 2: Hover over the desired Test Run (under the Tests section on the view page)
Step 3: Click the gear that appears in the last column. The actions menu should pop up with the available actions.
Step 4: Click the Move To action. The change rank dialog appears.
Step 5: Enter the desired index number (1-based) and click OK.
Execute button that appears in the last column; it will open the Execution page.

You can see a detailed explanation of the execution screen here.
Note: If you do not have permission to execute the Test Run, the Run option will not be available.
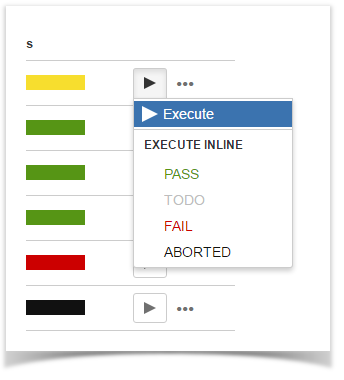
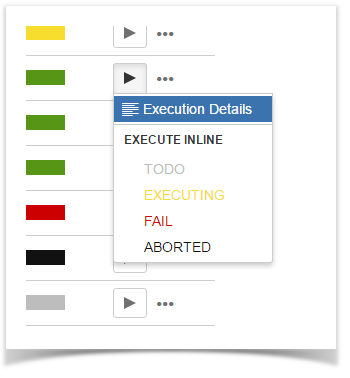
Execute Test Inline
To execute Test Runs inline from the Test Execution view screen, this option must be enabled in the Xray administration page. The option to set the Test Run status manually without having to execute all Test Steps (or Examples, in the case of Cucumber Tests) must also be enabled in the Xray administration page.
If the above options are enabled and you have permission to execute the Test, the context menu for executing Test Runs, accessed by the Gear button on each Test, will show the available transitions.
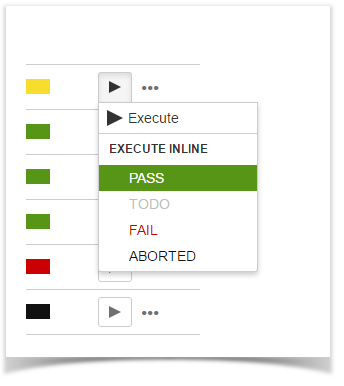
When executing inline Tests, the status of the manual steps (or Examples, in the case of Cucumber Tests) can be changed automatically. The following rules are applied:
- PASS: All step statuses will be changed to PASS independent of their current status.
- FAIL: All step statuses will remain unchanged, even if they are all PASS. This is because a Test might fail due to a Precondition.
- TODO: All step statuses will be changed to TODO.
- EXECUTING: The Test Execution status will be changed to EXECUTING.
- CUSTOM: The Test Execution status will be changed to the specified custom status.
To execute a Test Run inline:
Step 1: Open the Test Execution issue you want to run.
Step 2: Click on the status field located in the Status column of the Test Runs table and select one of the available statuses.

View Test Run Details
You can always view and modify the Test Run details after execution. If you do not have permission to execute the Test Run, you can still view the execution details in read-only mode, provided you have permission to browse the Test Execution issue.
To view the execution details from a Test Run:
Step 1: Open the Test Execution you want to view.
Step 2: Hover over the desired Test Run (under the Tests section on the view page).
Step 3: Click the Execute button that appears in the last column; it will open the Execution page where you can view the details.

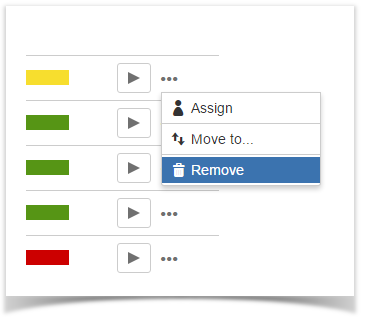
Bulk Operations
Xray provides the following bulk operations on the Test Runs table.
- Assign - Assigns all the selected Test Runs to a particular user.
- Change Rank - Changes the Rank of a Test Run between pages.
- Delete - Deletes all the selected Test Runs.
To execute these bulk actions:
Step 1: Open the Test Execution issue.
Step 2: Select the desired Test Runs. This can be done by using the checkbox that appears on each Test Run row or by using the Bulk dropdown button options to select all Test Runs or the ones on the current page.

Step 3: Click the bulk actions located on the actions column header and choose one of the available actions.

Note: Bulk Execution of Test Runs is limited to a maximum of 100 Test Runs.
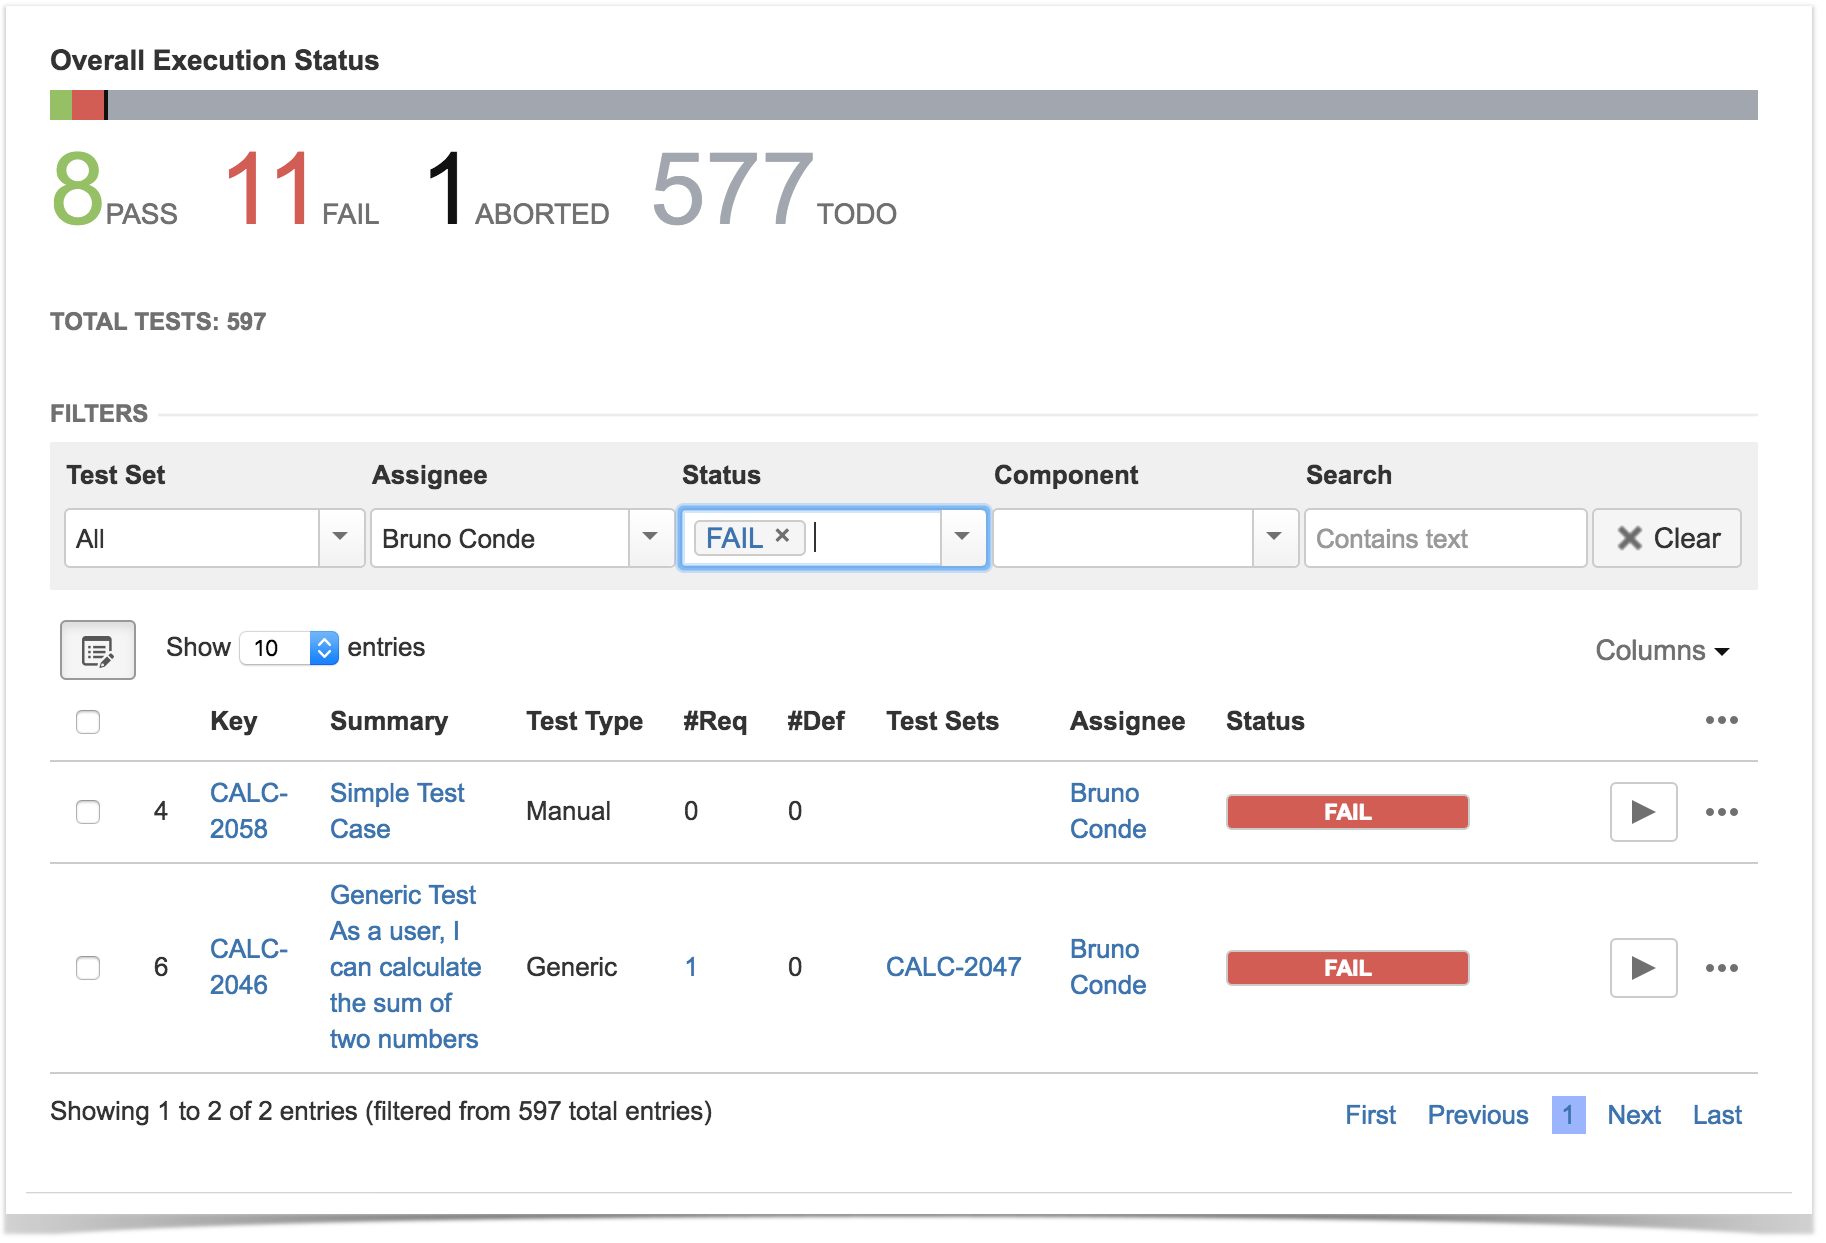
Filter Test Runs
To filter the Test Runs table, select the desired filters in the filters section above the Test Runs table.
- Test Set - show only Test Runs that are associated with a specific Test Set issue.
- Assignee - show only Test Runs that are assigned to a specific user.
- Status - show only Test Runs with a specific status.
- Contains Text - show only Test Runs with Tests containing the entered text. This will query Test issues with the JQL keyword text ~ ...

To add more more fields to the filter you can click the More button.


If you want, you can clear the filter in order to see all Test Runs once again. This will also reset the filters that are displayed back to the original.
![]()
Configure Test Run Columns
In the Columns menu, it's possible to choose the columns that will be seen in the table.
Columns of the respective Test issue of each Test Run can be added.
Xray specific fields from the Test are also available, such as:
- Test Type: The Test Type of the Test Runs' Test
- Definition: The definition of the unstructured Test of the Test Run (if the Test Run's Test is of another kind other than unstructured, no value will be shown)
In addition, it's possible to add Test Run specific columns.
The following columns can be added:
- Test Run Assignee: Assignee of the Test Run
- Test Run Comment: Comment in the Test Run
- Test Run Executed By: User that executed the Test Run
- Test Run Started: Start date of the Test Run
- Test Run Finished: Finish date of the Test Run
- Test Run Progress: Status progress of the Test Run Steps or Iterations
Test Run custom fields can also be added, they are prefixed by "TestRun", so, for example, a Test Run custom field named "User", can be found under the name "TestRun User".
More info in Test Runs.
Export to Cucumber
Cucumber Test Executions in Jira can be exported as .feature files ready to be executed in Cucumber. The generated .feature files follow the rules defined in Export Rules and take into account the context of the Jira Test Execution issue.
A single Cucumber feature file should be generated and prompted to be downloaded for the Cucumber Test contained on the Test Execution, unless the target Test Execution contains multiple Cucumber Tests or the Cucumber Test is associated with multiple Requirements. In this case, a FeatureBundle zip file will be generated containing a single Cucumber feature file for every Requirement associated with the target Cucumber Test contained on the Test Execution.
To export a Test Execution issue containing Cucumber Tests to .feature files,
Step 1: Open the Test Execution issue view page.
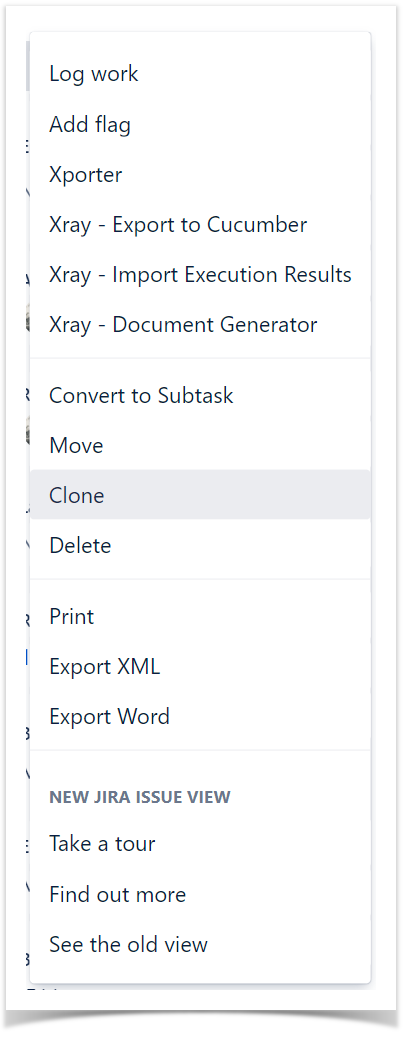
Step 2: Select ... > Xray - Export to Cucumber. The file will be downloaded from the browser.

Import Automated Test Results
Importing from Test Execution view issue screen
Automated Test results can be imported back to Jira using the Test Execution view issue screen. The Test results can be imported from JSON/XML external files that must follow an Import Results specific scheme.
When importing results, only the Tests contained in the intersection between the Tests in the JSON/XML file and the Tests in the selected Test Execution are updated; all others, if any, are ignored. After importing, a new entry with the result of the operation is registered in the Activity Log of the Test Run.
To import Automated Test results to a Test Execution issue containing automated Tests,
Step 1: Open the Test Execution issue view page.
Step 2: Select ... > Xray - Import Execution Results. The Import Execution Results dialog will open.

Step 3: Click the Choose file button to navigate to the local disk and select the JSON/XML/ZIP file with the automated execution results for the Test Execution.
Step 4: Click Submit.

Importing from the Execution Details Page
You can also import the Execution Results from the Execution Details page:
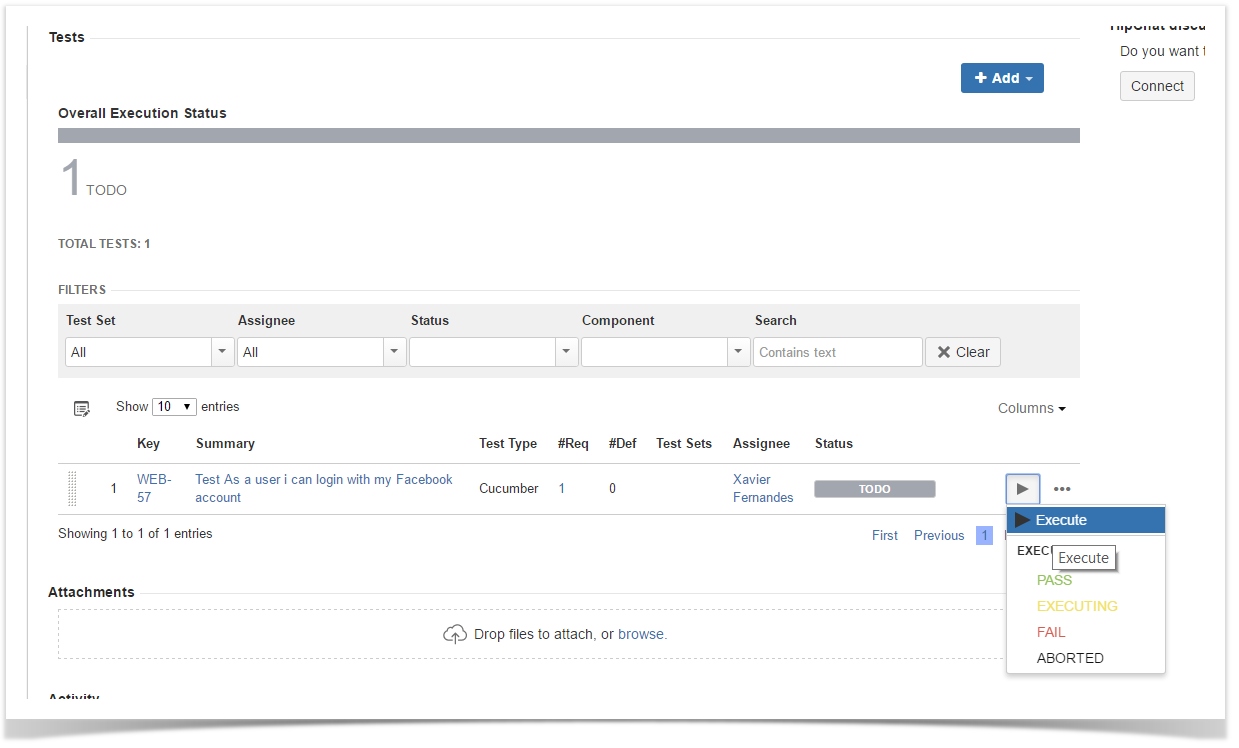
Step1: From Test Execution view issue screen, go to the Execution Details page by clicking Execute.
![]()
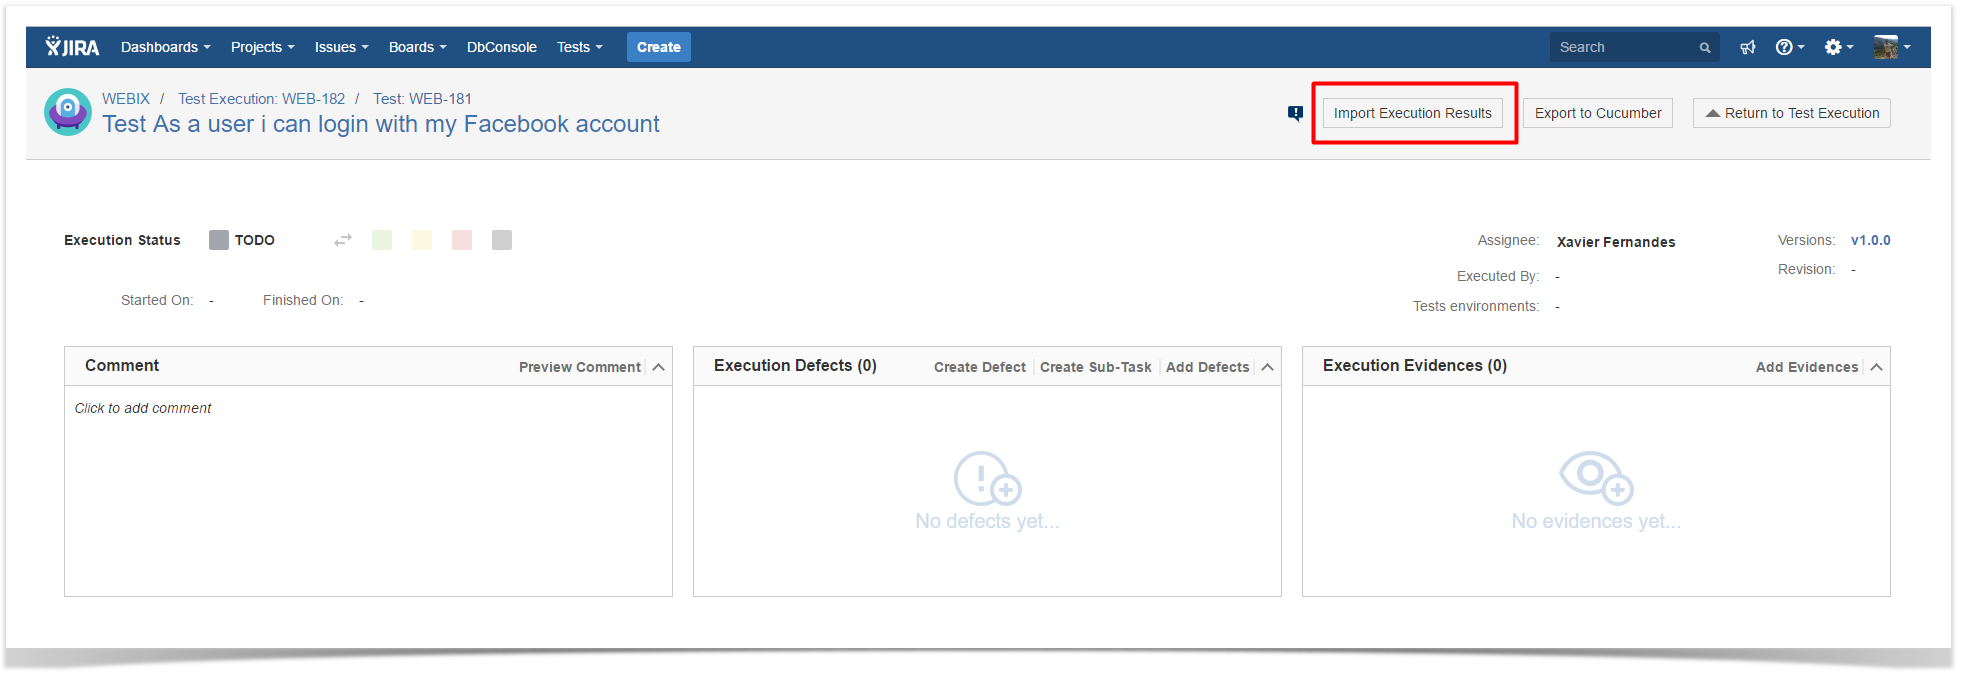
Step 2: Click Import Execution Results.

Step 3: Click the Choose file button to navigate the local disk and select the JSON/XML/ZIP file with the automated execution results for the Test Execution.
Step 4: Click Submit.
Archive Test Runs
Xray provides you with a way to explicitly archive test runs one at a time or in bulk as well as way to check all the archived test runs for a specific test execution. For more information about Test Run Archive check here.
Archive a Single Test Run
To archive a single Test Run,
Step 1: Click on the ... at the end of the row that contains the test run you wish to archive.
Step 2: Click on the Archive option that appears.
Step 3: Click the Archive button on the confirmation dialog.


Bulk archive Test Runs
To archive multiple test runs at the same time,
Step 1: Selected the test runs you wish to archive by clicking on the checkbox at the left of each test run.
Step 2: Click on the bottom that appears at the top of the table and then Archive.
Step 3: Click the Archive button on the confirmation dialog.


View archived Test Runs
To view the archived test runs of a test execution,
Step 1: Click on the Show Archived... that appears in warning message. After this a dialog will appear that shows all archived test runs for the test execution you are on.

There are 2 actions that can be performed on the archived Test Runs:
- Restore - By clicking on the ... at the end of the archived test run row and then Restore.
- Delete - By clicking on the ... at the end of the archived test run row and then Delete.
Both of these actions can be performed in bulk by selecting the test runs using the checkbox on the left then
Step 1: Selecting the archived test runs by clicking on the checkbox at the left of each test run.
Step 2: Click on the bottom that appears at the top of the table and then the desired action.
Step 3: Confirm the action on the dialog that appears.


Xray History
Any changes made to the Test Execution data are recorded on the Xray History section. These include:
- Linking the Test Execution with other entities (Tests and Test Plans)
- Changing Test Environments

...
Execute Test
To execute a Test from a Test Execution:
Step 1: Open the Test Execution you wish to run.
Step 2: Hover over the desired Test Run (under the Tests section on the view page)
Step 3: Click the Execute button that appears in the last column. The actions menu should pop up with the available actions.
Step 4: Click Run action to open the Execution page to start the execution.
You can see a detailed explanation of the execution screen here.
Note: If you does not have permission to execute the Test Run, the "Run" option will not be available.
| Info | ||
|---|---|---|
| ||
This action may trigger some email notification(s) depending on your Xray settings. For more info on email notifications and how to set-up them, please have a look at Test Run Email Notifications. |
Execute Test Inline
To execute Test Runs inline from the Test Execution view screen, this option must be enabled in the Xray administration page. The option for setting the Test Run status manually without having to execute all Test Steps (or Examples, in the case of Cucumber Tests) must also be enabled in the Xray administration page.
Given that the above options are enabled and you have permission to execute the Test, the context menu for executing Test Runs, accessed by the Gear button on each Test, must show the available transitions.
When executing inline Tests, the status of the manual steps (or Examples, in the case of Cucumber Tests) can be changed automatically. The following rules are applied:
- PASS: All step statuses will be changed to PASS independently of their current status.
- FAIL: All step statuses will remain unchanged, even if they are all PASS. This is because a Test might fail due to a Pre-Condition.
- TODO: All step statuses will be changed to TODO.
- ABORTED: The Test Execution status will be changed to ABORTED.
- EXECUTING: The Test Execution status will be changed to EXECUTING.
- BLOCKED: The Test Execution status will be changed to BLOCKED.
- CUSTOM: The Test Execution status will be changed to the chosen custom status.
To execute a Test Run inline:
Step 1: Open the Test Execution issue you wish to run.
Step 2: Click the Execute button located in the last column of the Test Runs table and select one of the available statuses.
| Info | ||
|---|---|---|
| ||
This action may trigger some email notification(s) depending on your Xray settings. For more info on email notifications and how to set-up them, please have a look at Test Run Email Notifications. |
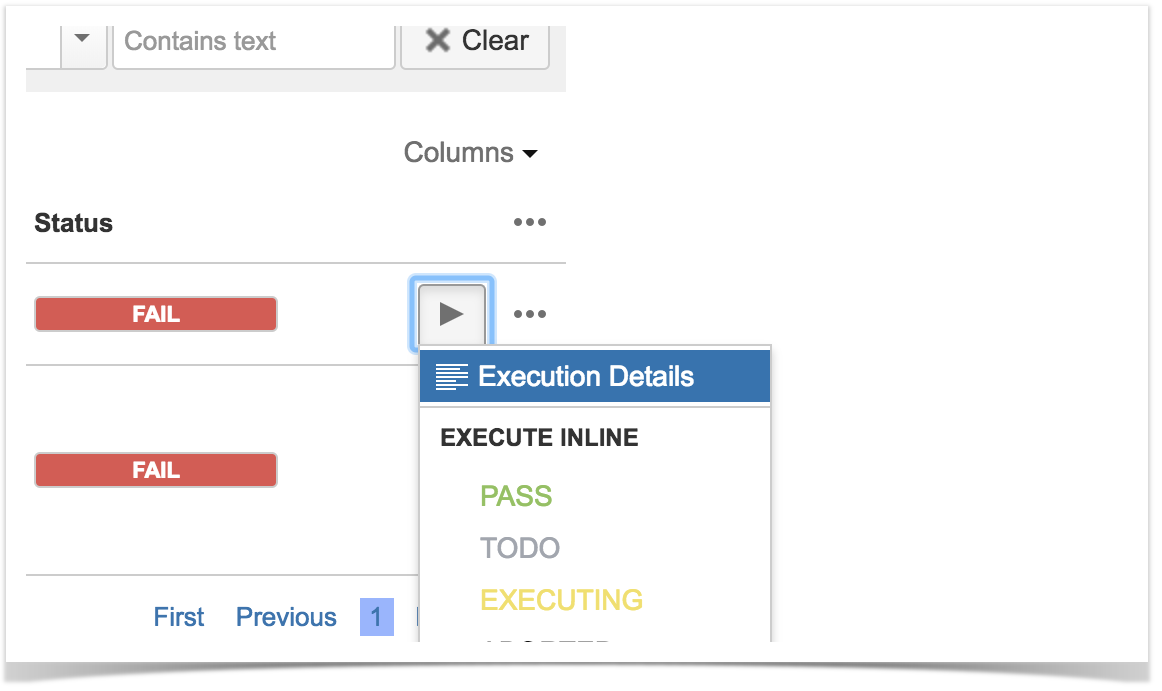
View Test Run Details
You can always view and modify the Test Run details after execution. If you do not have permission to execute the Test Run, you can still view the execution details in read-only mode, given that you have permission to browse the Test Execution issue.
To view the execution details from a Test Run:
Step 1: Open the Test Execution you wish to view the execution details.
Step 2: Hover over the desired Test Run (under the Tests section on the view page).
Step 3: Click the Execute button that appears in the last column. The actions menu should popup with the available actions.
Step 4: Click the Execution Details action to open the Execution page and view the details.
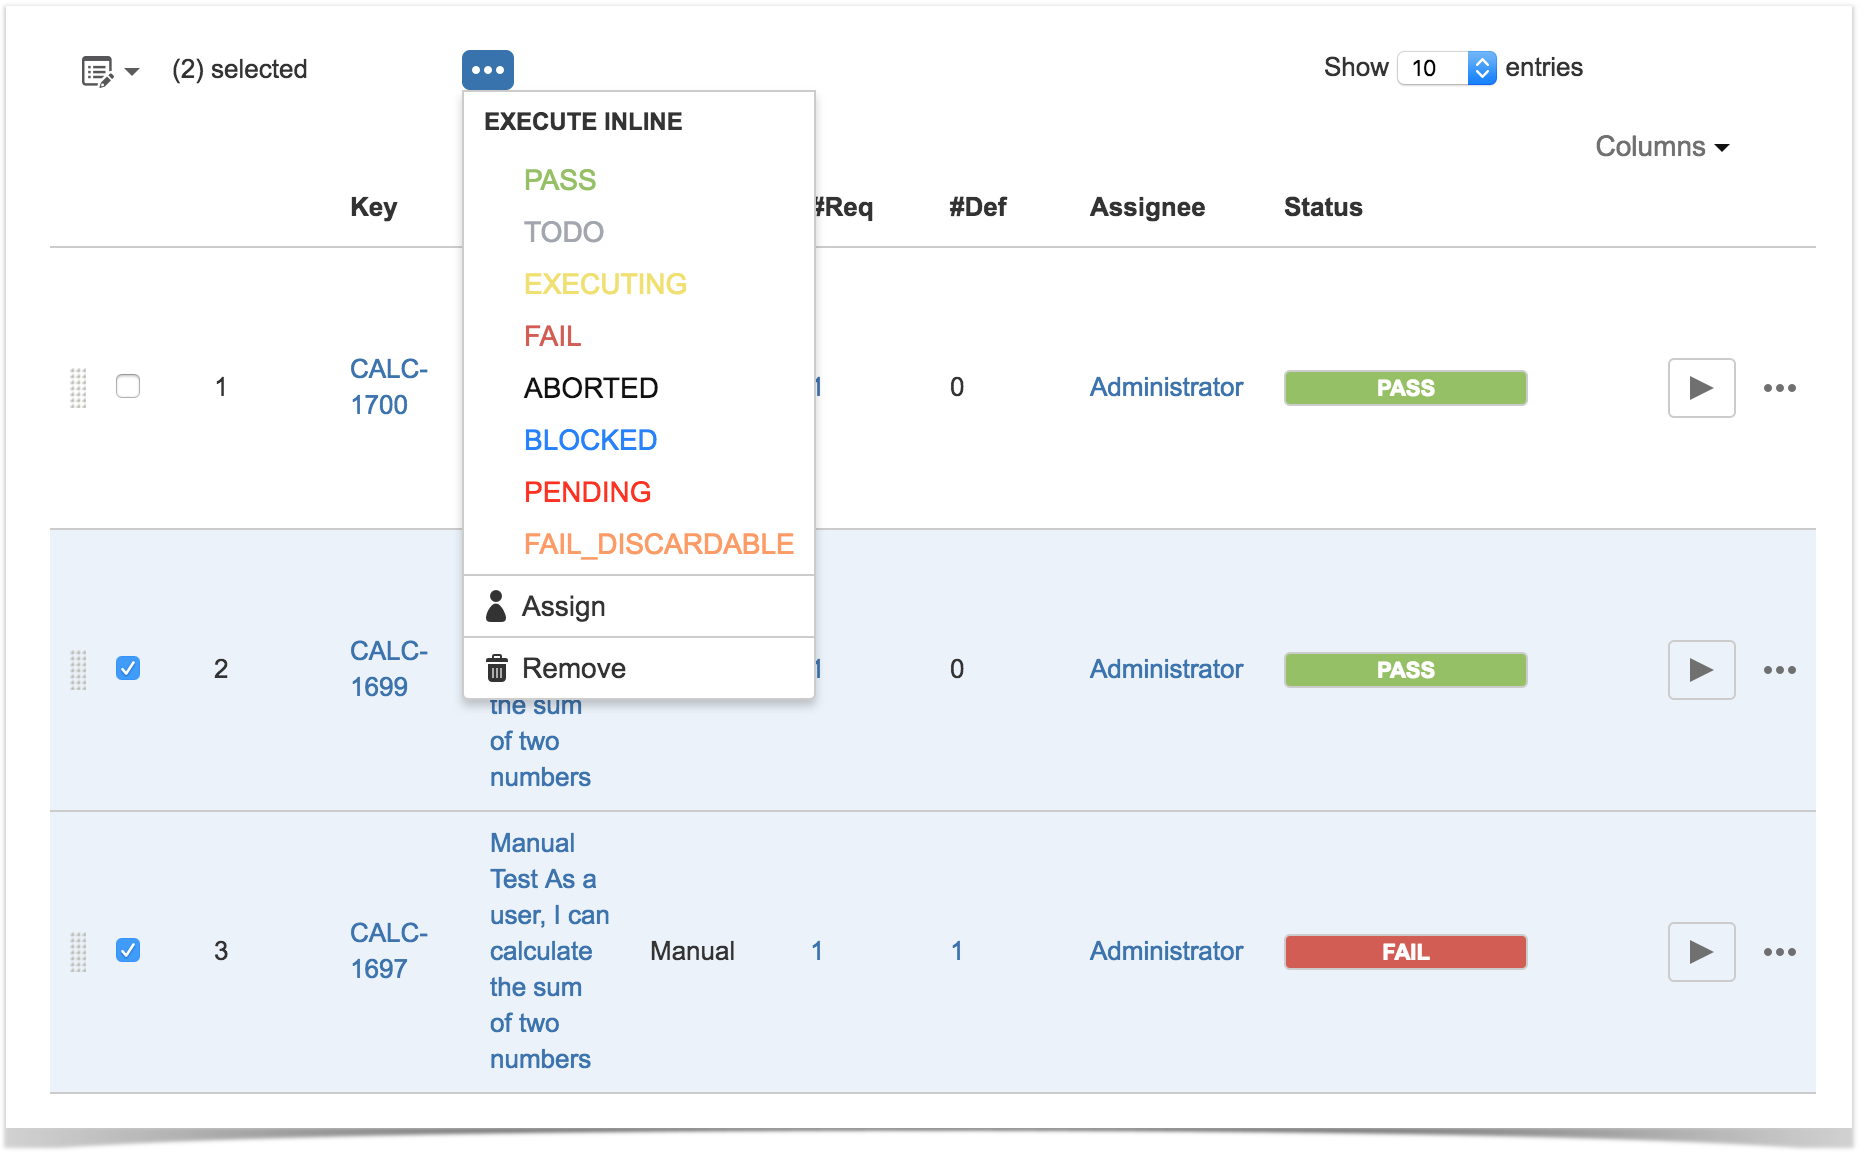
Bulk Operations
Xray provides the following bulk operations on the Test Runs table.
- Execute Inline - Executes inline all the selected Test Runs.
- Assign - Assigns all the selected Test Runs to a particular user.
- Remove - Deletes all the selected Test Runs.
To execute these bulk actions:
Step 1: Open the Test Execution issue.
Step 2: Select the desired Test Runs. This can be done by using the checkbox that appears on each Test Run row or, since v3.1, by using the Bulk dropdown button options for easy selecting all Test Runs or the ones in the current page.

| Info | ||
|---|---|---|
| ||
As of v3.1, the selection will be preserved even if you navigate between pages. |
Step 3: Click the bulk actions gear located on the actions column header and choose one of the available actions.
| Info | ||
|---|---|---|
| ||
Bulk operations may trigger some email notification(s) depending on your Xray settings. For more info on email notifications and how to set-up them, please have a look at Test Run Email Notifications. |
Filter Test Runs
To filter the Test Runs table, select the desired filters in the filters section above the Test Runs table.
- Test Set - show only Test Runs that are associated with a specific Test Set issue.
- Assignee - show only Test Runs that are assigned to a specific user.
- Status - show only Test Runs with a specific status.
- Contains Text - show only Test Runs with Tests containing the entered text. This will query Test issues with the JQL keyword text ~ ...

Since v3.1, the filters will be stored in the user and Test Execution context, and will be applied whenever going into the execution screen from one of the filtered Tests.
The execution screen shows a small notice, so you can quickly identify that the filter has been applied thus affecting the navigation options (Previous/Next) available in the execution screen.
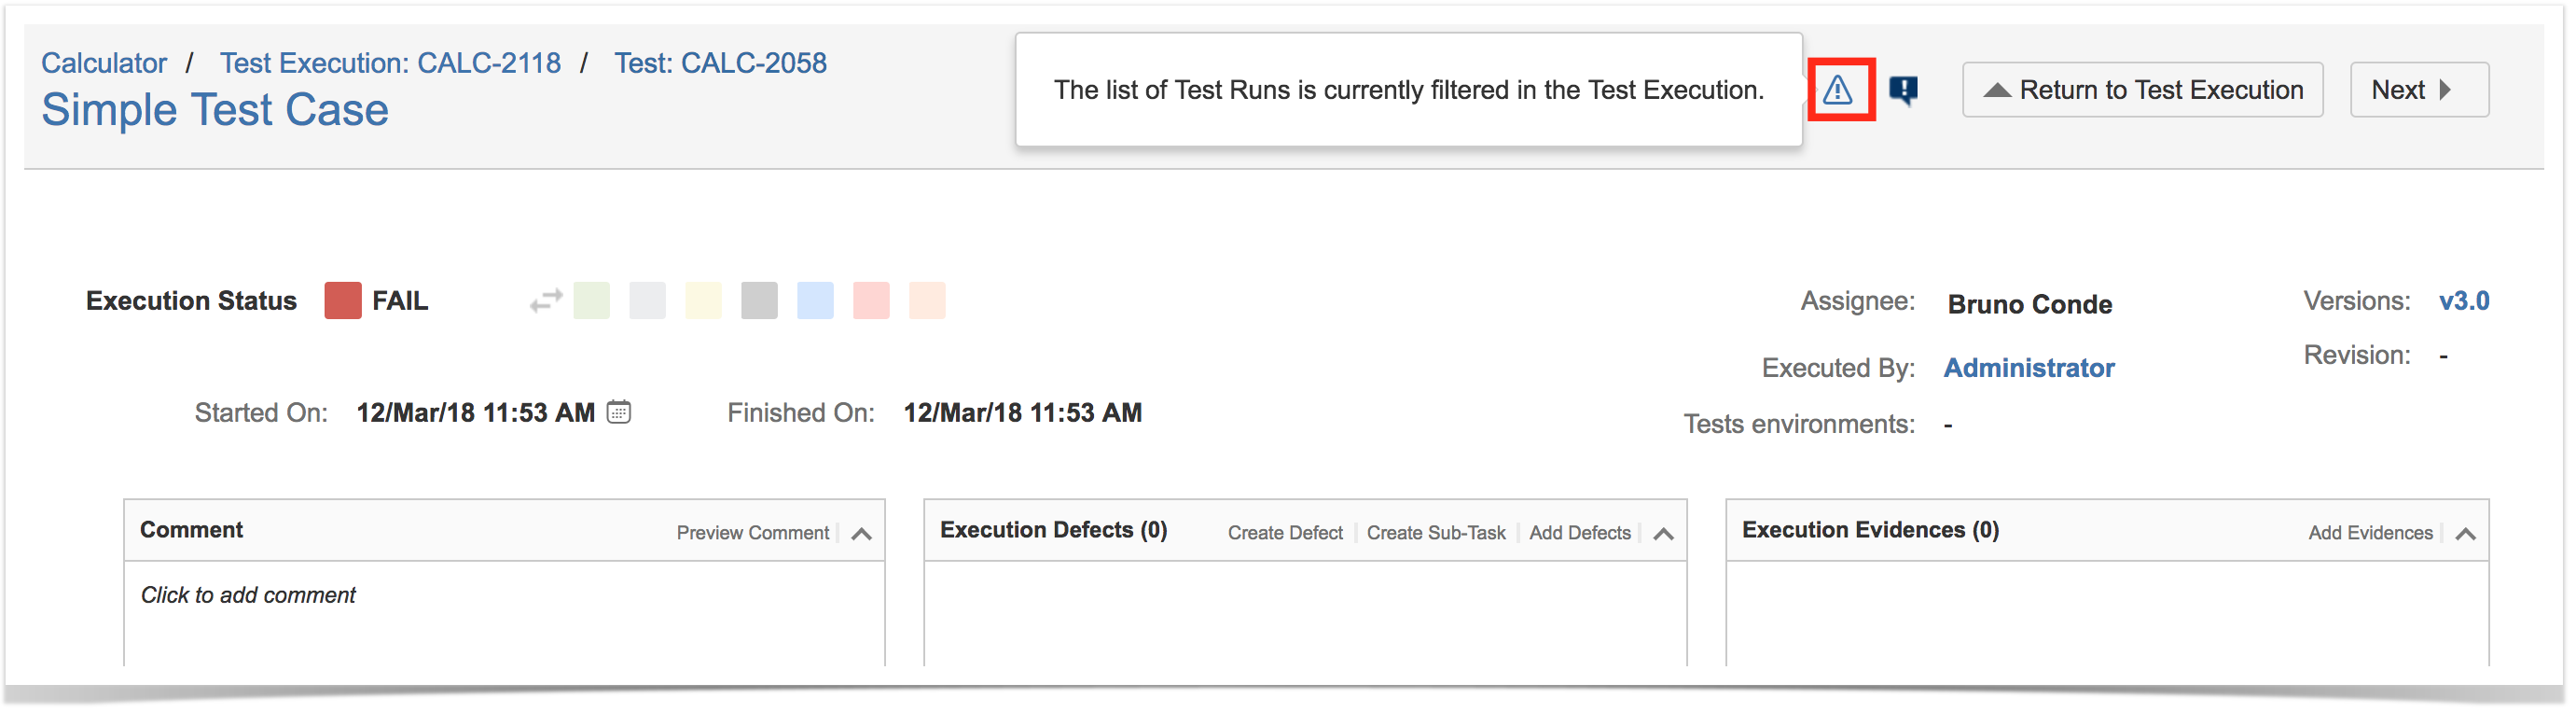
If you decide to come back to the Test Execution issue screen, the filter will remain. If you wish, you can clear the filter in order to see all Test Runs once again.

Configure Test Run Columns
More info in Test Runs.
Export to Cucumber
Cucumber Test Executions in JIRA can be exported to feature files ready to be executed in Cucumber. The generated feature files follow the rules defined in Export Rules and take into account the context of the Jira Test Execution issue.
A single Cucumber feature file should be generated and prompted to be downloaded for the Cucumber Test contained on the Test Execution, unless the target Test Execution contains multiple Cucumber Tests or the Cucumber Test is associated with multiple Requirements. In this case, a FeatureBundle zip file will be generated containing a single Cucumber feature file for every Requirement associated with the target Cucumber Test contained on the Test Execution.
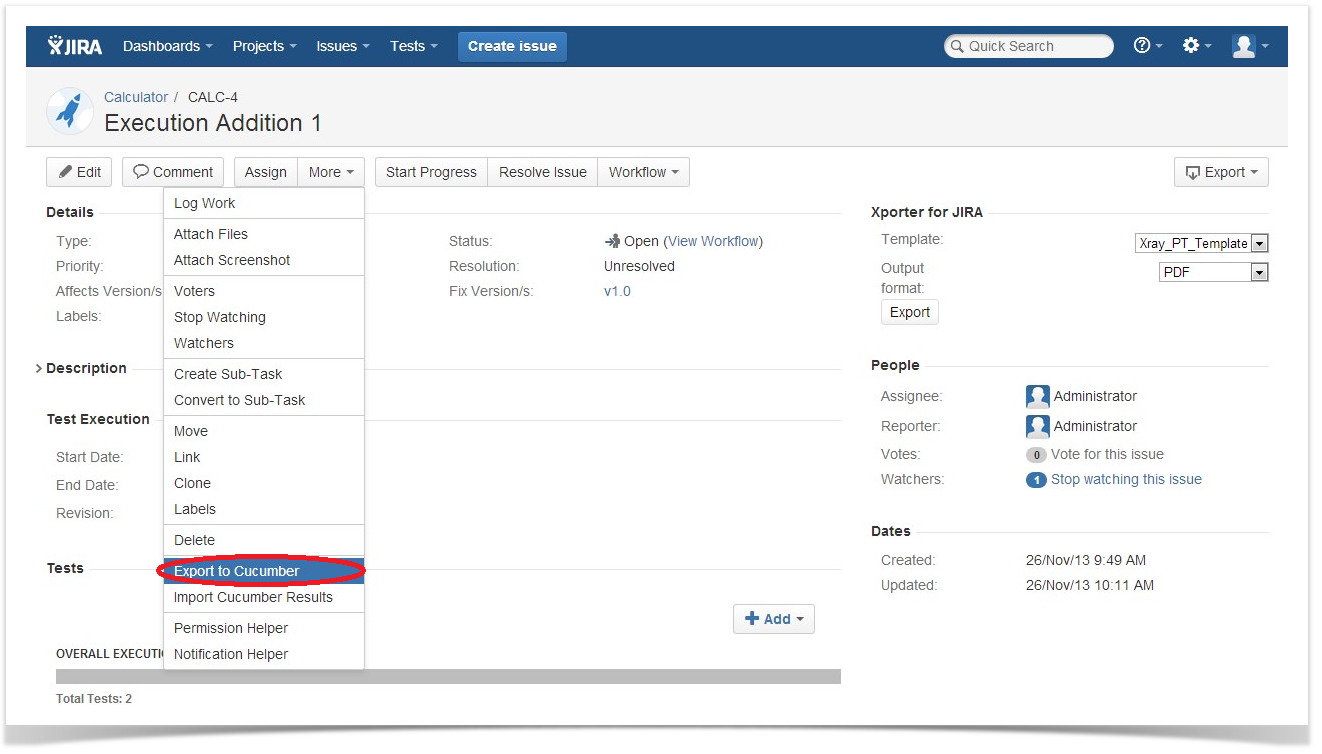
To export a Test Execution issue containing Cucumber Tests to feature files,
Step 1: Open the Test Execution issue view page.
Step 2: Select More > Export to Cucumber. The file will be downloaded from the browser.
Export Test Runs to CSV
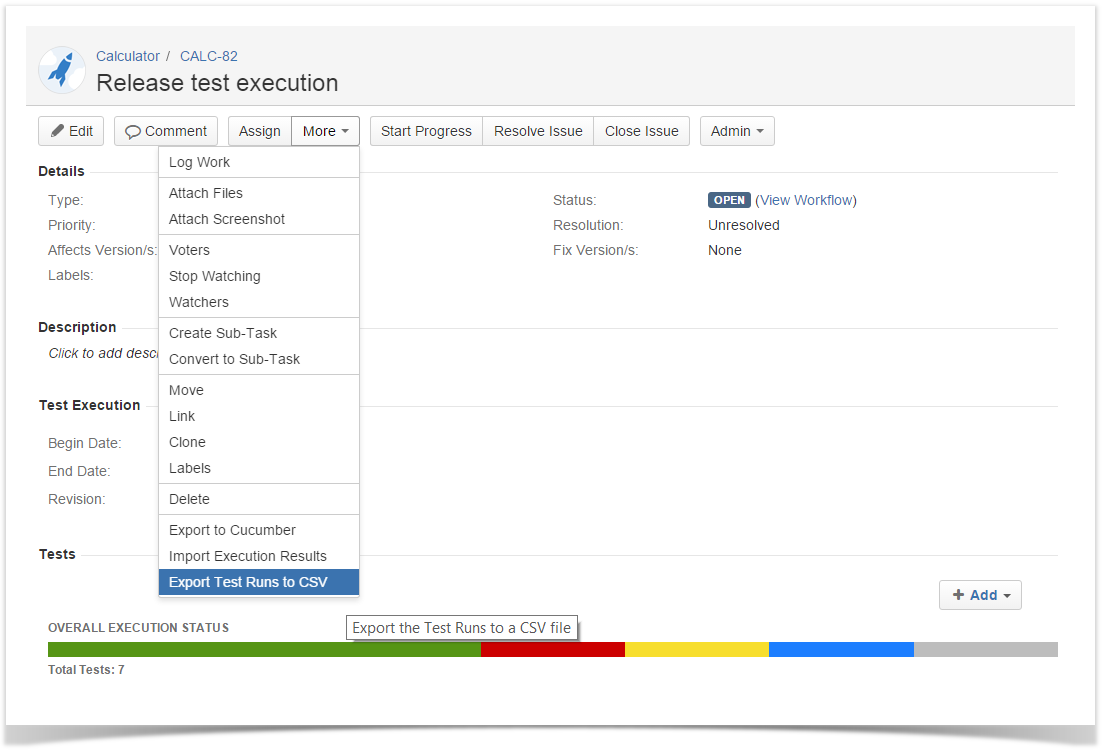
Xray Test Runs can be exported to CSV. The Xray export action will export to CSV the most relevant fields for Test Runs such as:
- Test Key
- Test Execution Key
- Executed By
- Assignee
- Start
- Finish
- Defects issue keys (list separated by ",")
- Attachment Jira links (list separated by ",")
- Comment
- Status
To export a Test Run to CSV,
...
Step 2: Select More > Export Test Runs to CSV. The resulting CSV file will be downloaded to the browser.
Import Automated Test Results
Importing from Test Execution view issue screen
Automated Test results can be imported back to Jira using the Test Execution view issue screen. The Test results can be imported from JSON/XML external files that must follow an Import Results specific scheme.
When importing results, only the Tests contained in the interception between the Tests in the JSON/XML file and the Tests in the selected Test Execution are updated, while the remaining, if any, are ignored. After importing, a new entry with the result of the operation is registered in the Activity Log of the Test Run.
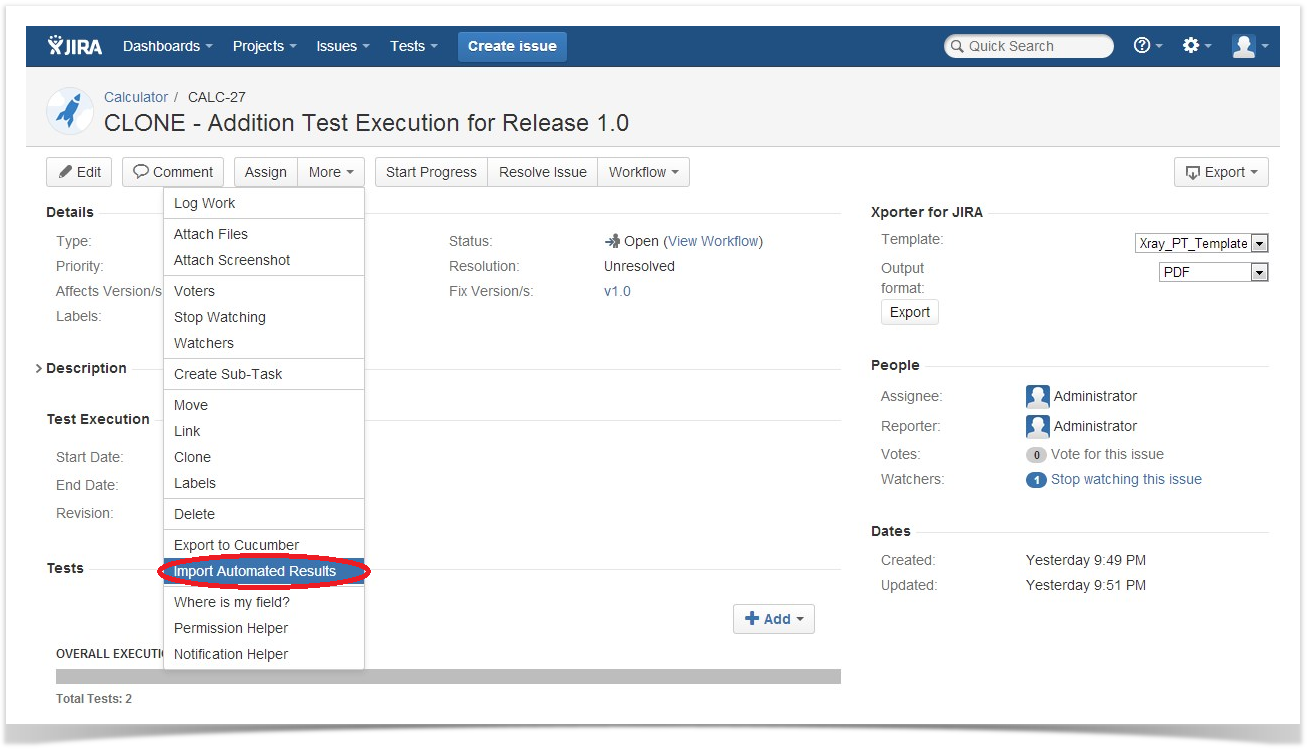
To import Automated Test results to a Test Execution issue containing automated Tests,
Step 1: Open the Test Execution issue view page.
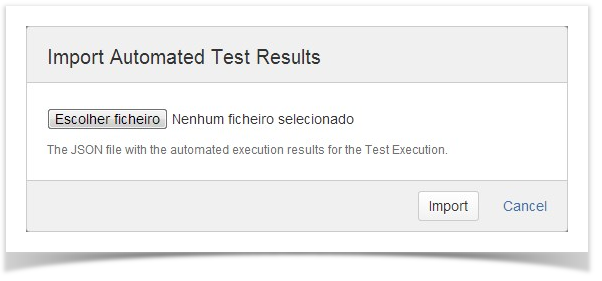
Step 2: Select More > Import Automated Results. The Import Automated Test Results dialog will be prompted.
Step 3: Click the Browse button to navigate to the local disk and select the JSON/XML/ZIP file with the automated execution results for the Test Execution.
Step 4: Click Import.
Importing from the Execution Details Page
You can also import the Automated Test results from the Execution Details page:
Step1: From Test Execution view issue screen, go to the Execution Details page by clicking Execute (or by
clicking Execution Details if the test has been previously executed).
Step 2: Click the Import Execution Results button.
Step 3: Click the Browse button to navigate the local disk and select the JSON/XML/ZIP file with the automated execution results for the Test Execution.
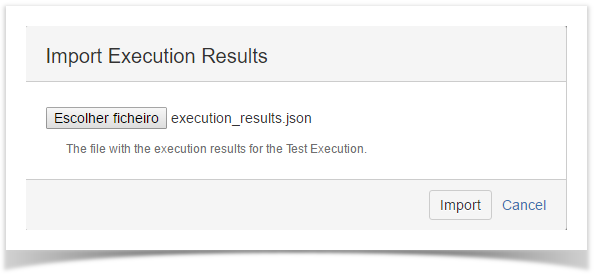
Step 4: Click Import.
Now it is possible to filter tests by clicking on "Overall Execution Status" in Test Plans Progress Bar.
| Info |
|---|
Now it is possible to view the associated Test Plans of a given Test in the Execution Details view page as shown below. |

