What you'll learn
- How to configure the remote jobs triggering feature
- How to trigger remote jobs from Test Plans
- How to configure and validate shipping the test results in Jira
Overview

RJT allows users to configure and invoke remote jobs in different CI/CD tools without leaving Xray improving tester performance and streamlining the workflow.
Most pipelines are triggered by a commit action but sometimes we have the necessity to trigger a remote job to perform some actions, such as:
- Validate a change in a specific feature
- Validate a new deployment or new environment
- Validate new tests on the fly
- Run automation from Xray Test Plan or Test Execution
The remote job can perform all sort of tasks, including building, deploying the project to an environment, and/or running automated tests.
Most common use is to trigger the execution of automated tests.
In this example we are configuring a Remote Job Trigger for Jenkins that execute Playwright tests and send the execution results back to Xray.
Prerequisites
Configure a new RJT for Jenkins in Xray
This example requires configuration in both sides (Xray and Jenkins) so that we can take most advantage of the combination of both tools.
The jenkinsfile will configure a multi-step pipeline that extracts the Playwright test code, execute it and ship the execution results back to Xray.
Configure Jenkins using a jenkinsfile
We use a jenkinsfile to configure the pipeline in Jenkins.
On the above jenkinsfile we are defining two parameters that will be passed when the build is invoked.
The parameters received can be used in the remaining steps of the pipeline. In order to define what are the parameters we have added a parameters section with he name of the parameter and a possible default value.
Within the step to run the tests we have added a function to make sure that the next step is performed even if the actual step will fail. This is important to assure that the results are sent to Xray.
Using the catchError method in case of an error, we are forcing the step to continue the Pipeline execution from the statement following the catchError step.
The behavior of the step when an exception is thrown can be configured to print a message, set a build result other than failure, change the stage result, or ignore certain kinds of exceptions that are used to interrupt the build.
Once the jenkinsfile is uploaded in Jenkins it is ready to start to perform the tasks defined in the stages and steps.
We are going to dive into the last part of the jenkinsfile, where we send the results back to Xray, in another section.
Configure a Remote Jobs Trigger in Xray for Jenkins
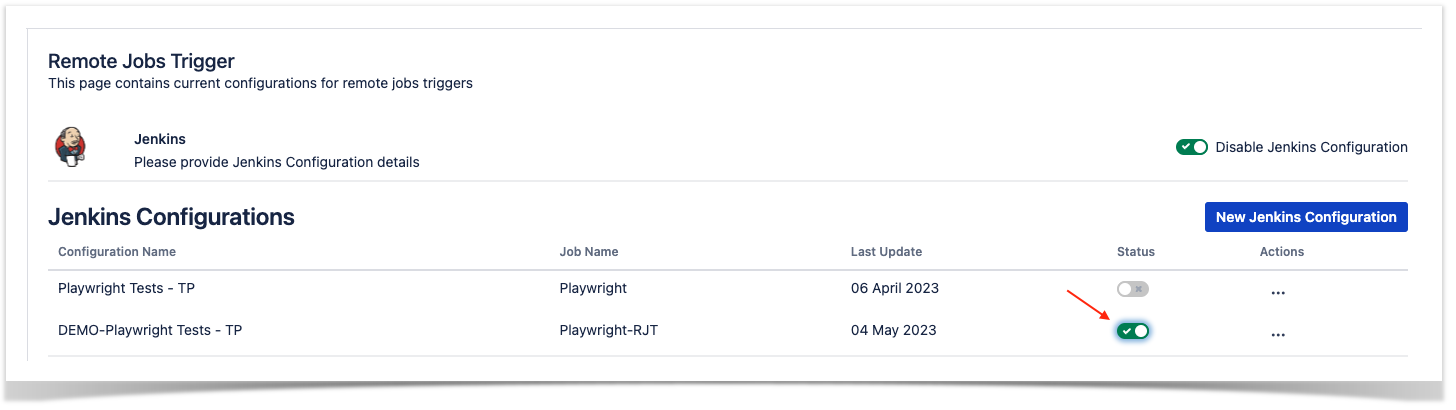
In order to use the configuration of a RJT in Xray you need to access the Project Settings area and click on the Remote Jobs Trigger option.
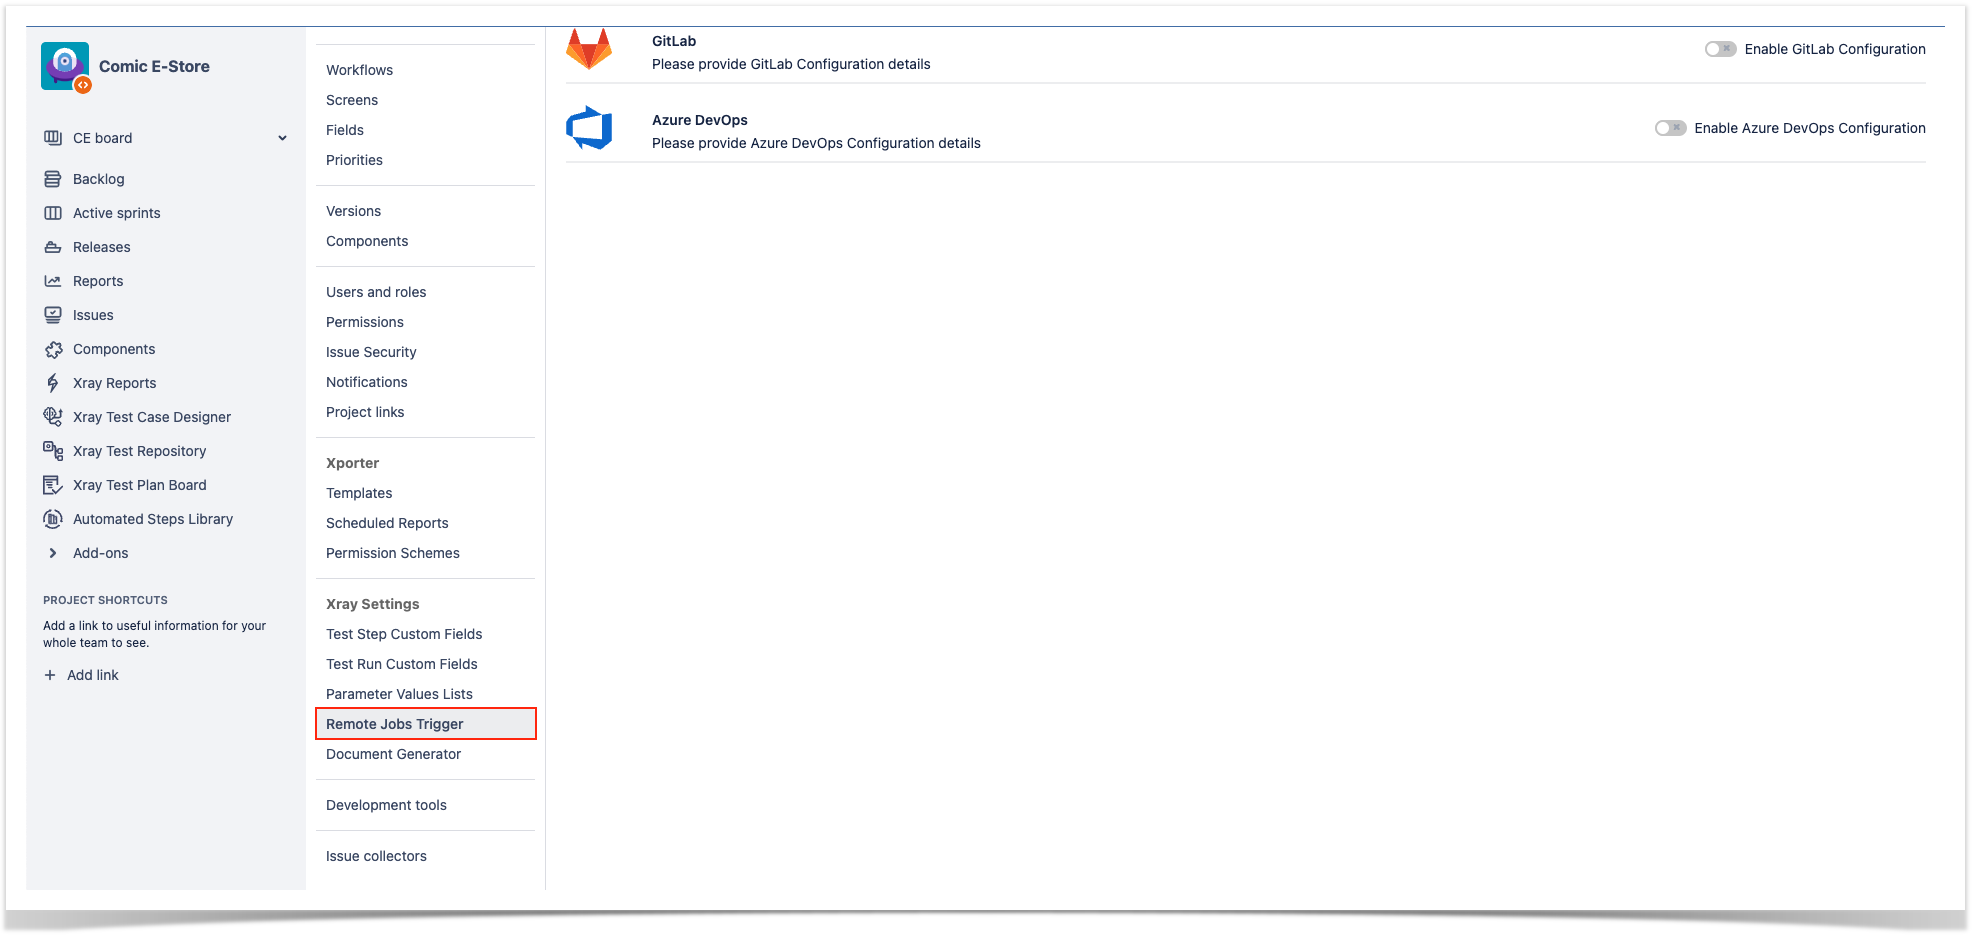
This will open the Remote Jobs Trigger configuration page where we can configure remote jobs for Jenkins, Bamboo, GitLab, GitHub and Azure DevOps. You can activate and deactivate the configurations by switching the toggles next to each.
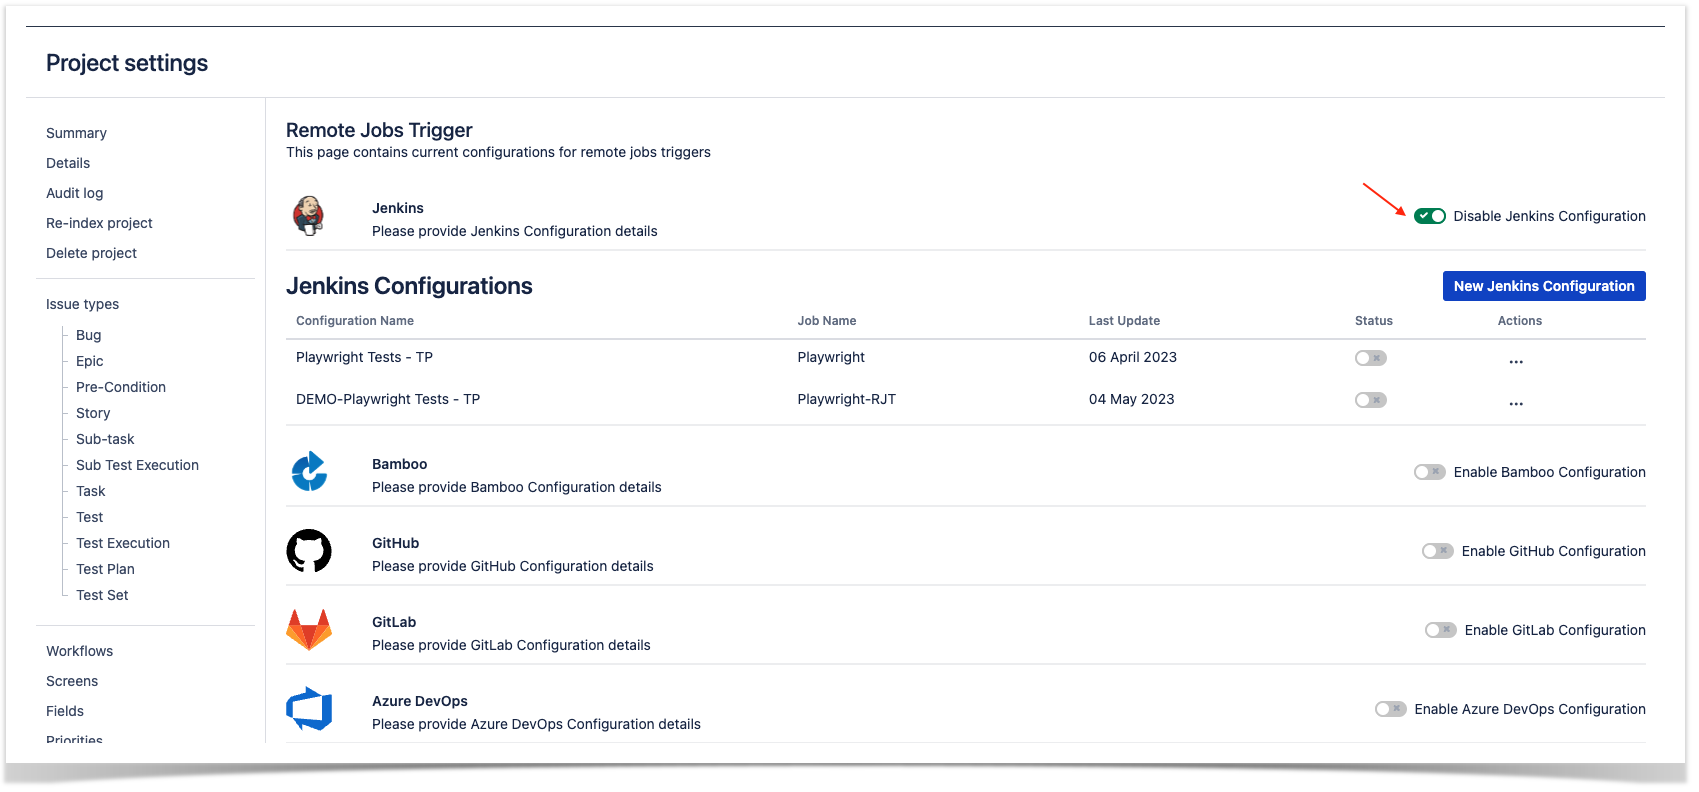
Once you have activated the configuration that you are interested, in our case Jenkins Configuration, click the New Jenkins Configuration to configure your new job. This opens a new form that must filled with proper information.
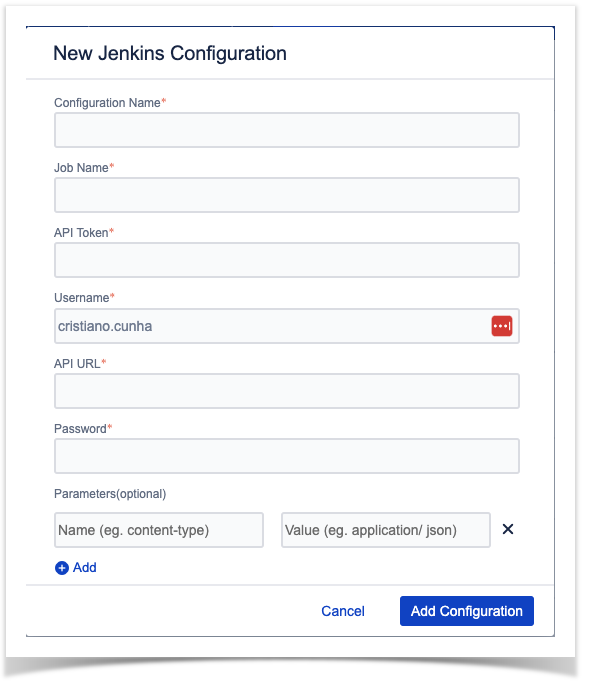
Fill the Configuration Name and the Job Name with meaningful information that allows you to know what is the purpose of the job just by reading the name.
Next we have the API Token, this can be defined in the Pipeline configuration in Jenkins. Access your project page in Jenkins and scroll down to the Build Triggers area.
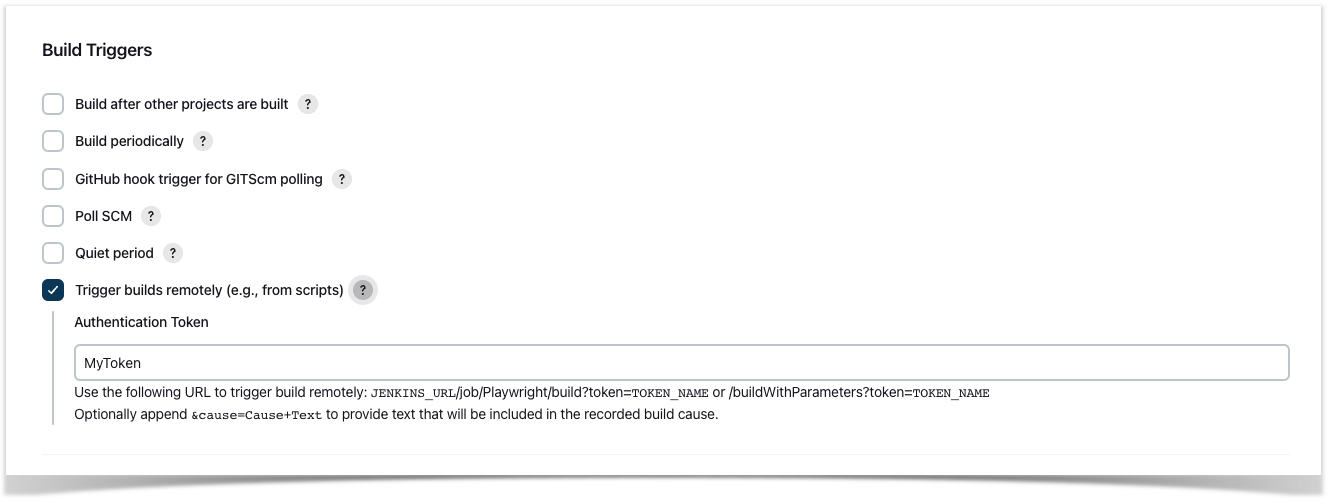
The Authentication Token defined in Jenkins must be the same defined in Xray API Token of the Remote Jobs Trigger configuration, in our case 'MyToken'.
In the Username field define the name of the user with proper permissions to invoke the Jenkins Job. Make sure it has the right permissions in Jenkins or the job will return an authentication error when used.
Fill the API URL with the endpoint of your Jenkins instance and in the Password field put the password used by the user identified by the Username above.
Finally we have reached the last configuration fields available: Parameters (Optional), that is a list of key/value pairs that you have defined in you Jenkins pipeline and want to pass from Xray.
You can define static ones or you can use dynamic filled fields available in Xray (more info here). In our case we want to pass the Project key and the Test Plan key so that we can use them when shipping the execution results back to Xray.
For that we use the following options available from Xray:
- ${PROJECT_KEY} that will be filled with the key of the project from where the job is called.
- ${ISSUE_KEY} that will be filled with the issue key, in our case the Test Plan key, from where the job was started from.
The configuration with all the fields filled will look like this:

Once done click the Save button and activate the configuration by switching the Status toggle to on:
Trigger
Once the configuration is done and active you can navigate to the Test Plan from where you want to trigger the job, there you will see that a new button is available to trigger the job you just have configured.
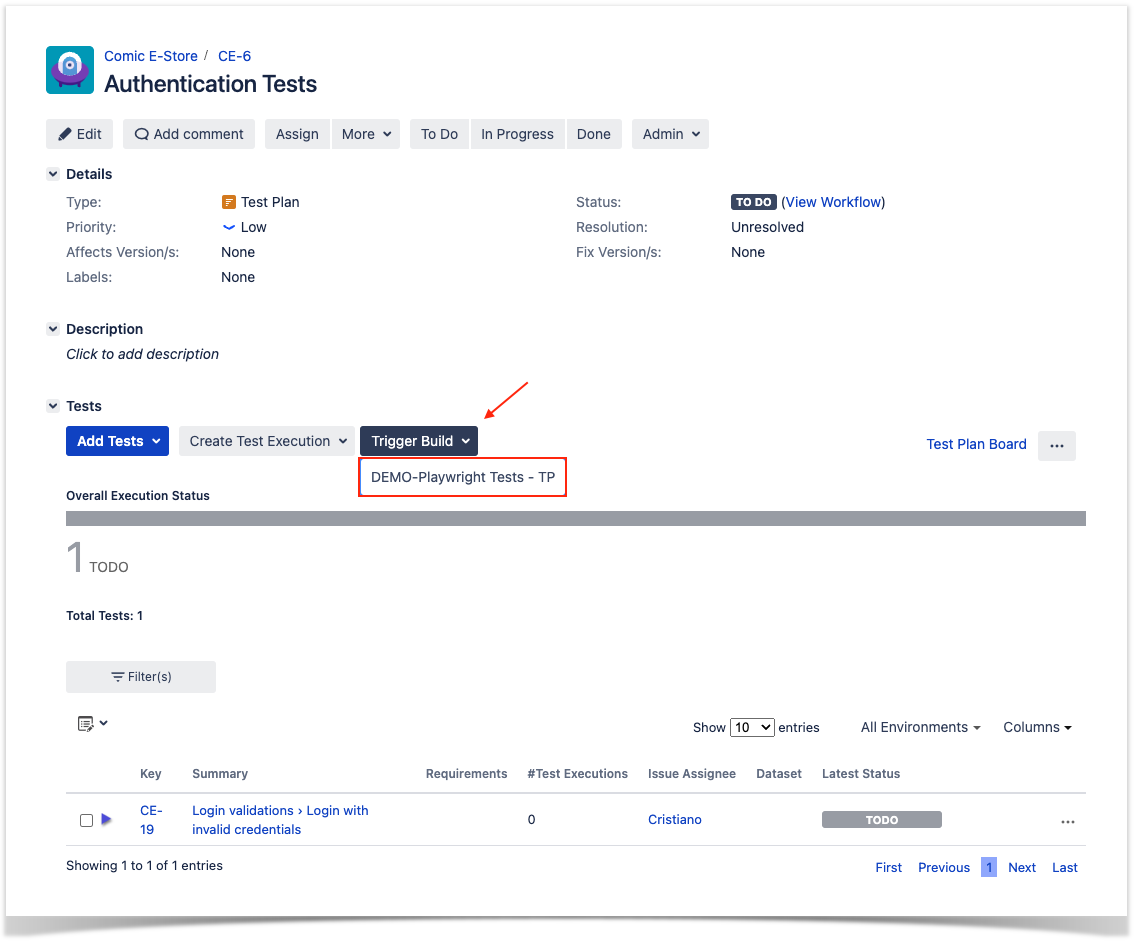
When you choose to call the Remote Jobs Trigger job a new confirmation window will appear with the status of the invocation, either success or failure.
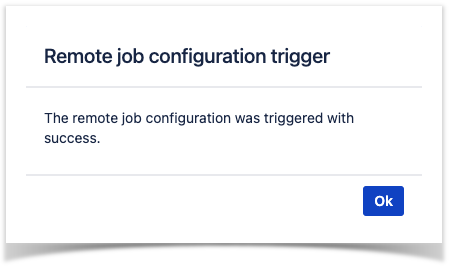
Notice that the status is of the invocation of the job only (not the status of the execution of the job). If you get a failure status please review the configuration in the previous sections.
Send results back to Xray
In the above example we have defined a job in another tool and invoked it from Xray. This job will execute the Playwright tests and generate a Junit report.
Now we need to have those results back into Xray for full visibility. The following section will show you two ways you can use to have those results shipped back into Xray.
Steps
Xray has Jenkins steps available that enable you to import the results to Xray.
Let us look into more detail over the step XrayImportBuilder available in Jenkins and that can be used in your pipeline definition.
Remember that in our jenkinsfile we have defined parameters in the beggining of the file and one step to import the results into Xray.
With this options we are saying to the Pipeline that we are going to receive two parameters:
- projectKey
- testPlanKey
On the import step we are using those parameters to define what is the Jira Project that we are import into and what is the Test Plan we will associate the result to.
Let's look into the step in more detail, explaining each option:
- $class: the class used in this step ('XrayImportBuilder').
- endpointName: Xray supports multiple formats but for this case we are using '/junit'
- importFilePath: has the file name with the Junit test results that we want to import (xray-report.xml).
- importToSameExecution:
- projectKey: The key from the project that we want to import into (in our case passed from the parameter of the Xray Remote Jobs Triggering job).
- testPlanKey: The key from the Test Plan that we want to import into (in our case passed from the parameter of the Xray Remote Jobs Triggering job).
- fixVersion: fixVersion to be associated to the results imported.
- revision: Revision that we want to associate to the execution results imported.
- serverInstance: The server instance id define in Jenkins when we have configured the Jira instance available.
API
Once you have the report file available you can upload it to Xray through a request to the REST API endpoint for JUnit. To do that, follow the first step in the instructions in v1 or v2 (depending on your usage) to obtain the token we will be using in the subsequent requests.
JUnit XML results
We will use the API request with the definition of some common fields on the Test Execution, such as the target project, project version, etc.
In the first version of the API, the authentication used a login and password (not the token that is used in Cloud).
curl -H "Content-Type: multipart/form-data" -u admin:admin -F "file=@junit.xml" 'http://<LOCAL_JIRA_INSTANCE>/rest/raven/1.0/import/execution/junit?projectKey=COM&testPlanKey=COM-9'
With this command, you will create a new Test Execution in the referred Test Plan with a generic summary and two tests with a summary based on the test name.
On Xray, you can see the tests and you can identify which tests are failing or passing. Below you can see two tests (for valid and invalid credentials):
You can also notice that the summary is now defined based on the files we used for uploading the test results.
Tips
- after results are imported in Jira, Tests can be linked to existing requirements/user stories, so you can track the impact of their coverage.
- results from multiple builds can be linked to an existing Test Plan in order to facilitate the analysis of test result trends across builds.
- results can be associated with a Test Environment, in case you want to analyze coverage and test results by that environment later on. A Test Environment can be a testing stage (e.g. dev, staging, preprod, prod) or an identifier of the device/application used to interact with the system (e.g. browser, mobile OS).