
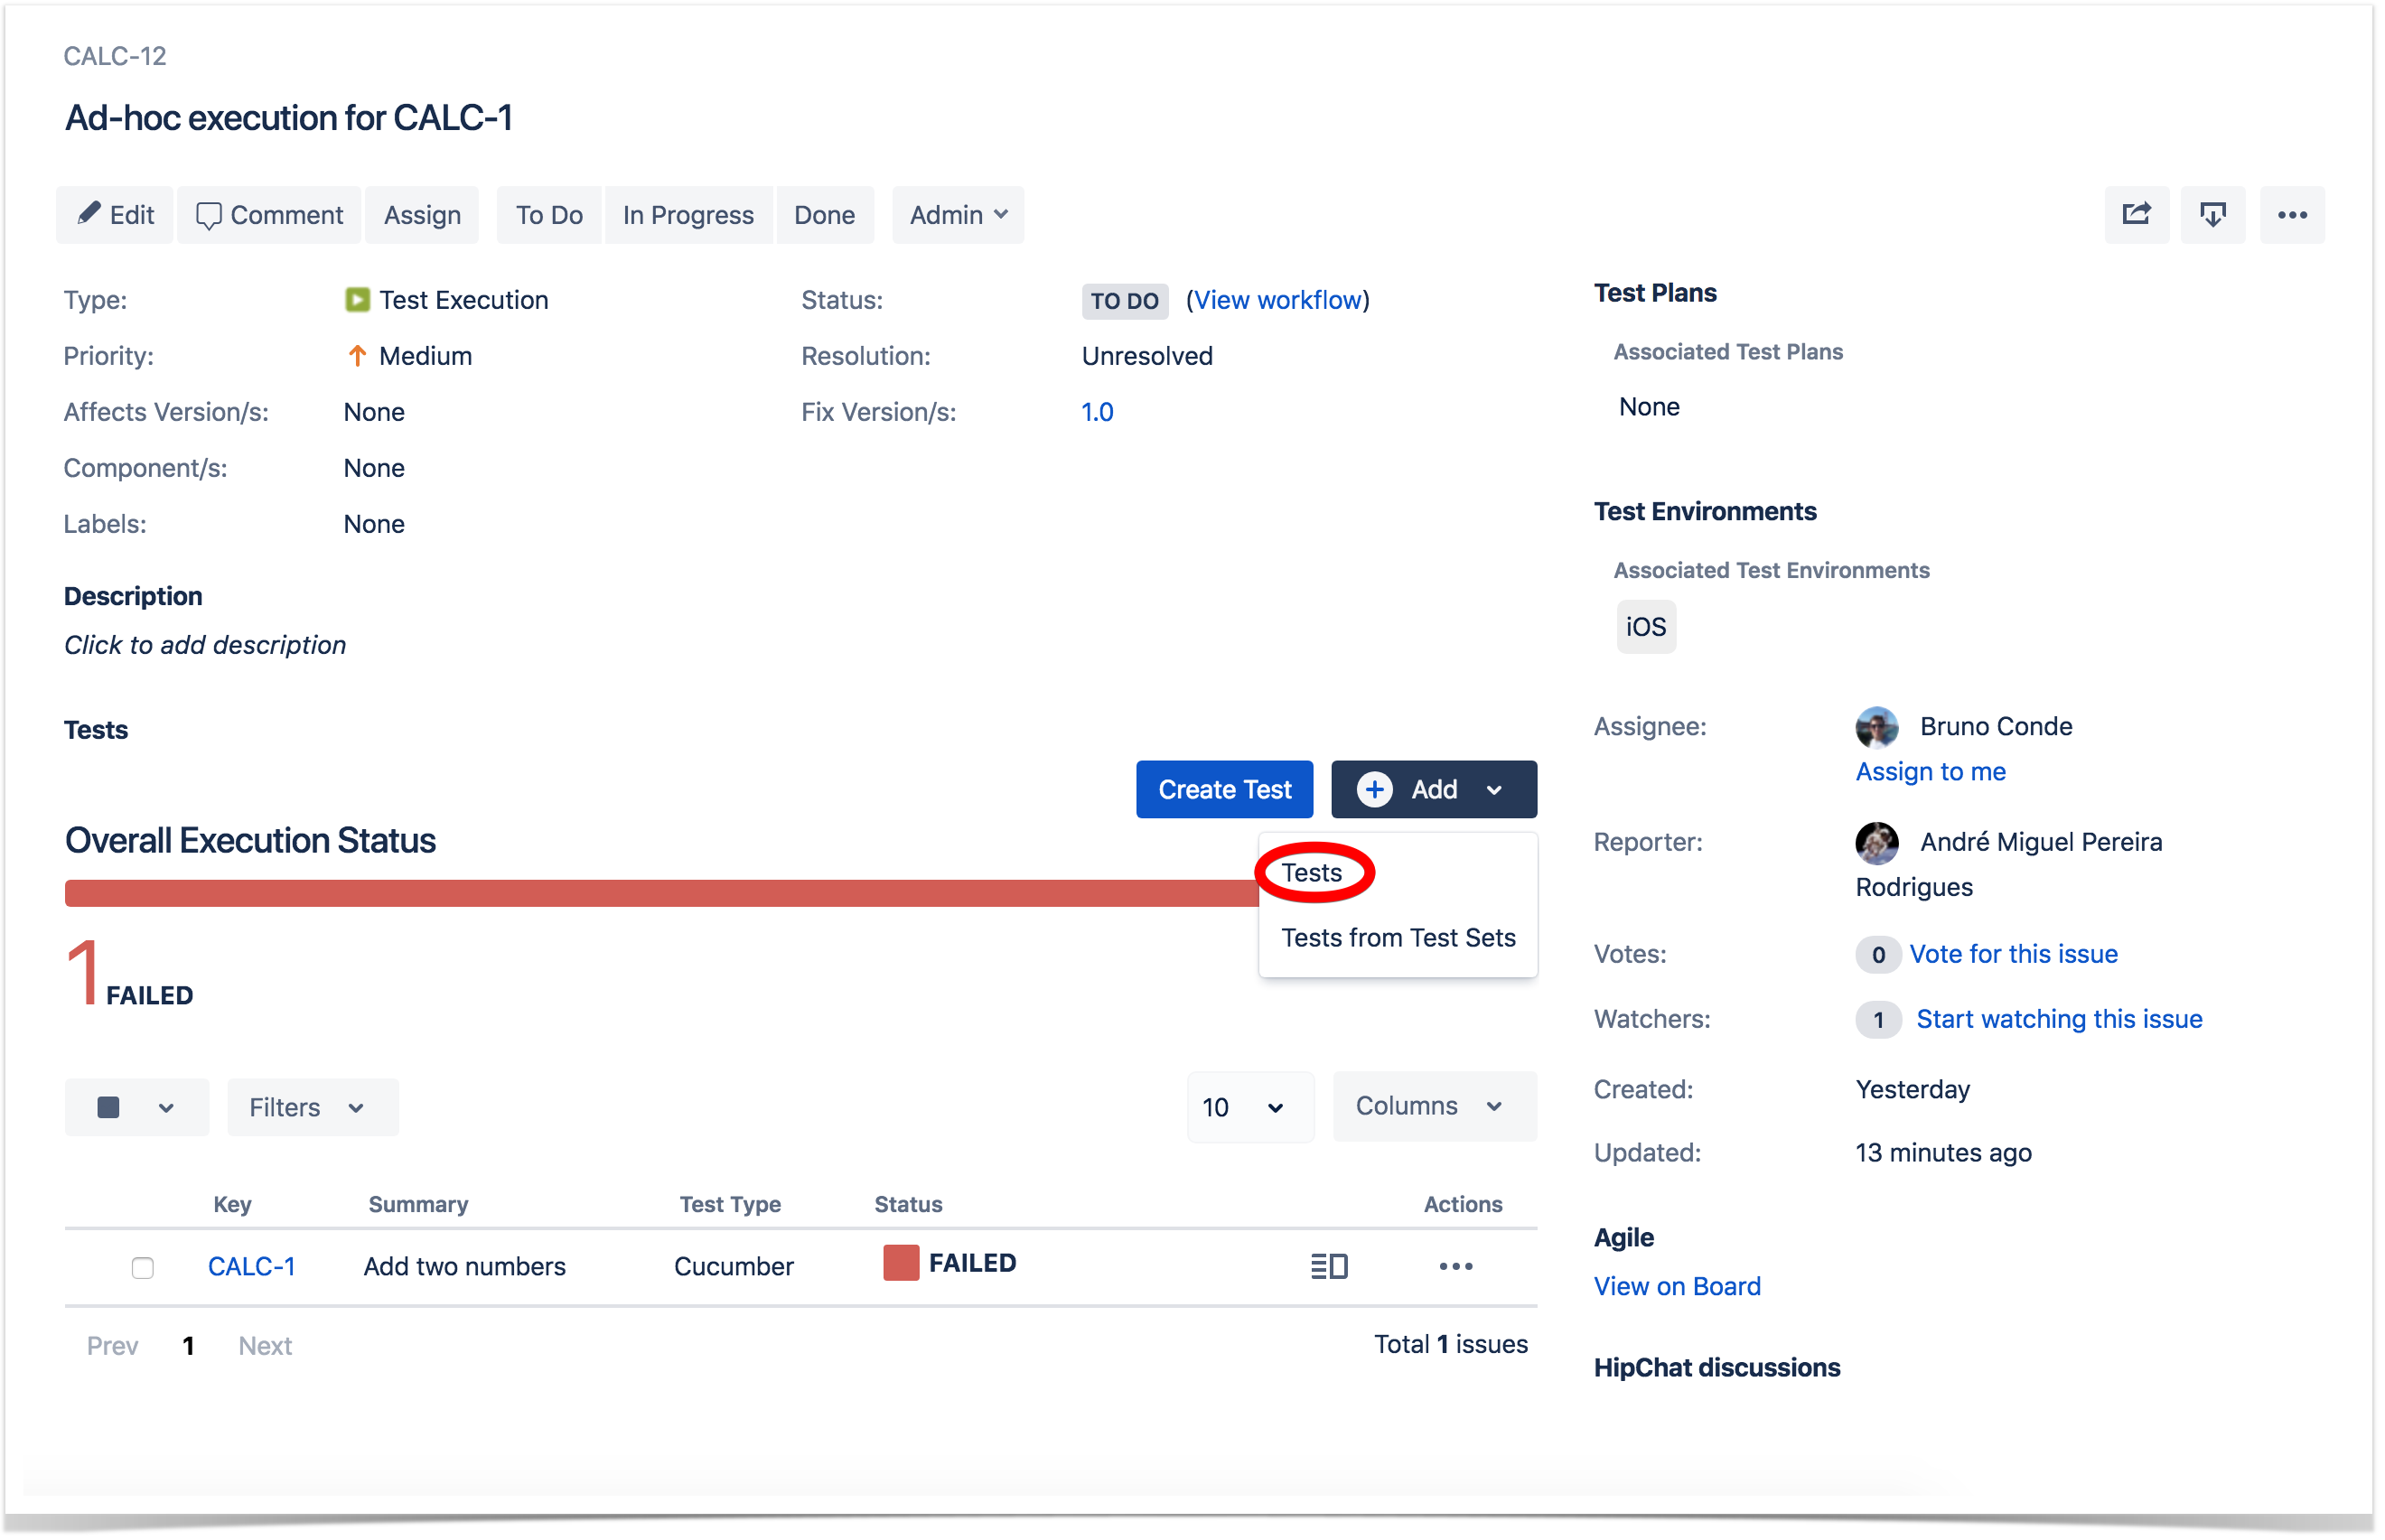
A Test Execution is an issue type that aggregates a user-determined collection of Tests. It monitors and verifies if those Tests are working as expected in a target context and environment. Through the Overall Execution Status, updated as each test is being performed, the user is informed about the progress of the Test Execution, including which tests passed, failed, are being executed or waiting to be performed.
An association between a Test Execution issue and a Test issue is called a Test Run. Hence, a Test Execution is composed of a list of Test Runs.
A Test Execution issue can be assigned to a Tester. It is also possible to assign individual Test Runs to several Testers.
Sub Test Execution
You can create a Test Execution as a Sub-Task in the Requirement Issue View Page. Learn more here.
Fields
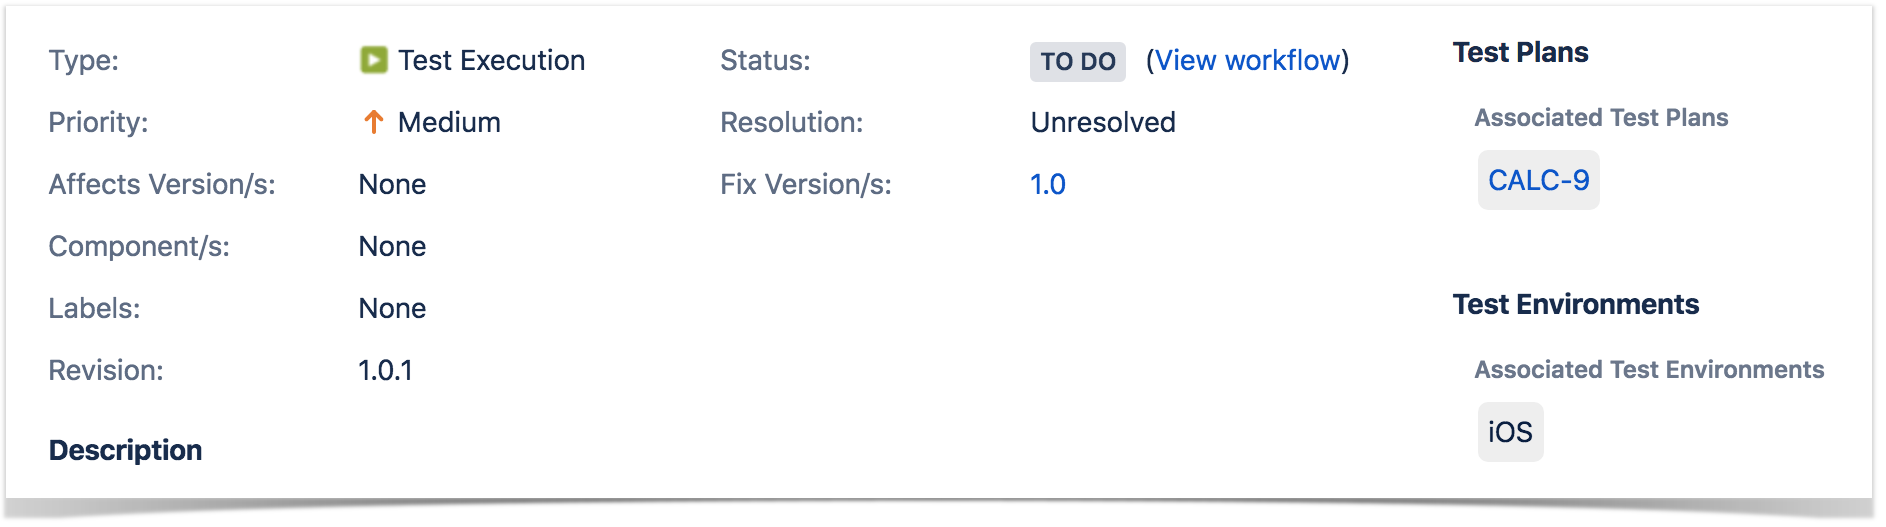
A Test Execution has the following custom fields:
- Begin Date - is date that Test Execution is planned to start. This is a normal Jira custom field.
- End Date - is date that Test Execution is planned to end. This is a normal Jira custom field
- Revision - the current source code and documentation version used in the Test Execution. This is a normal Jira custom field.
- Test Environments - environments in which the Test Run is executed.
These custom fields are located in the native Jira sections. The revision can be found in the Details section of the Test Execution issue while the Begin and End dates are located in the Dates section.

Sections
Xray contributes an additional section to the Test Execution view issue screen.
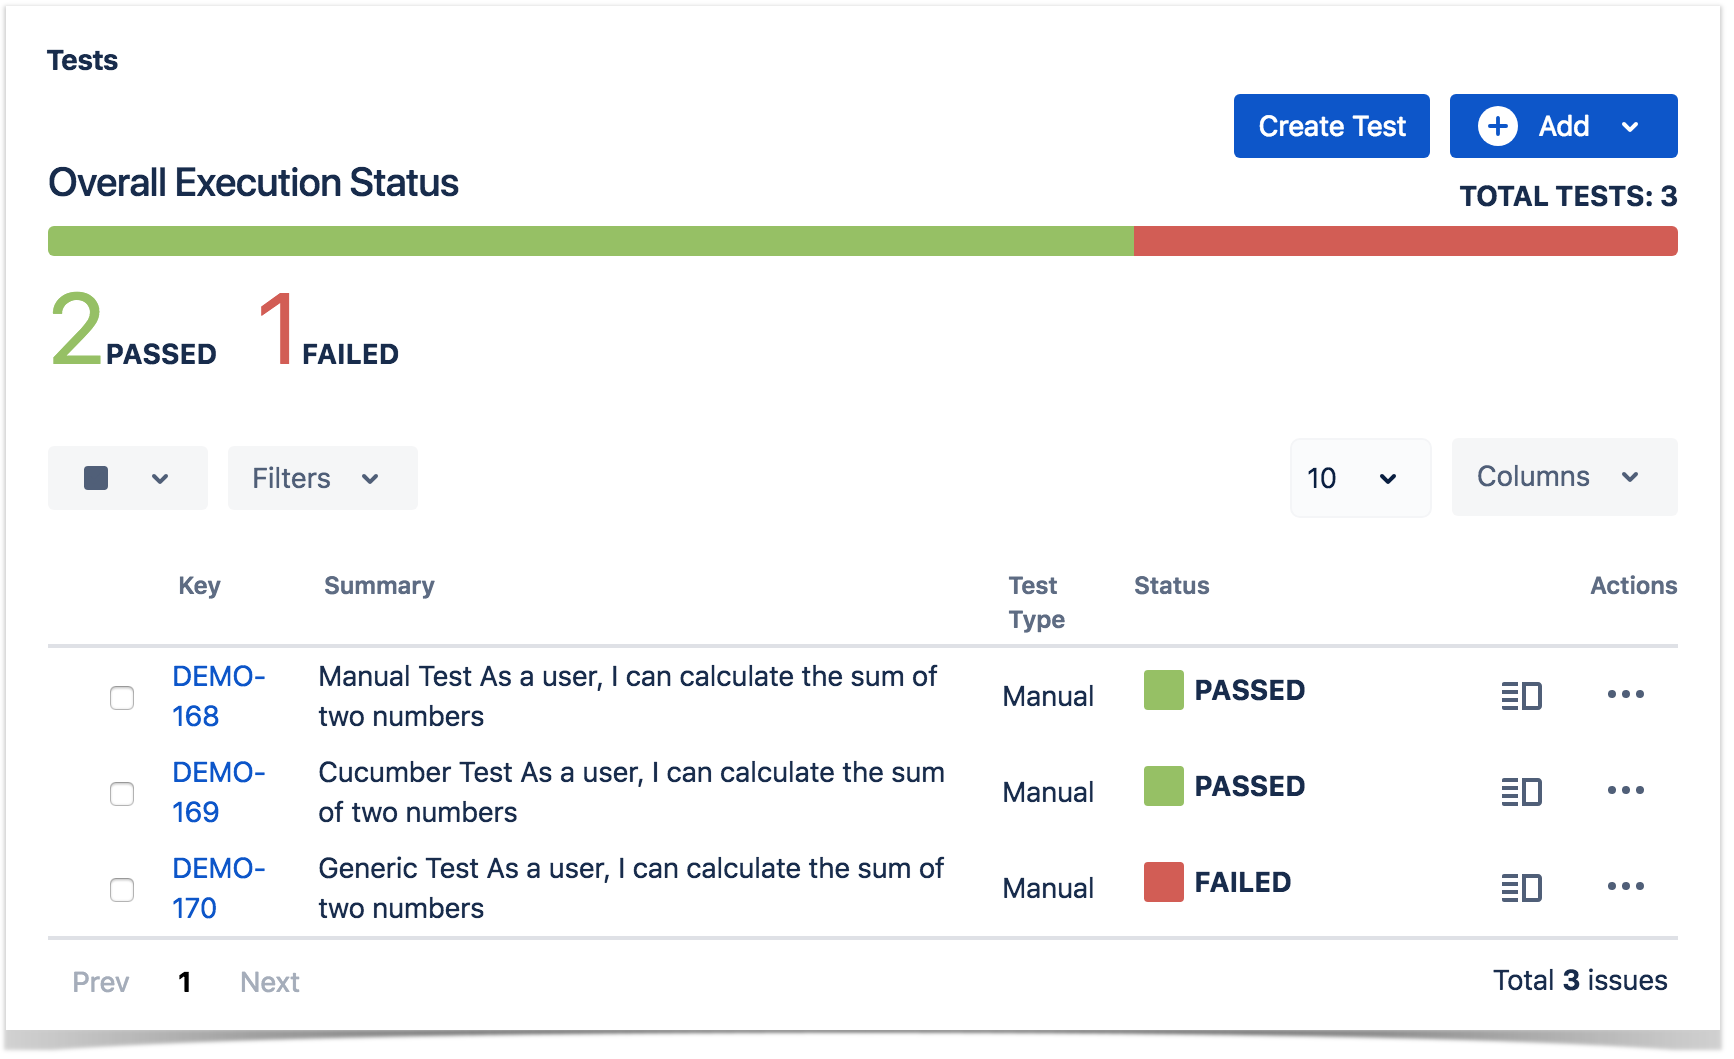
Tests Section
The Tests section provides the following views:
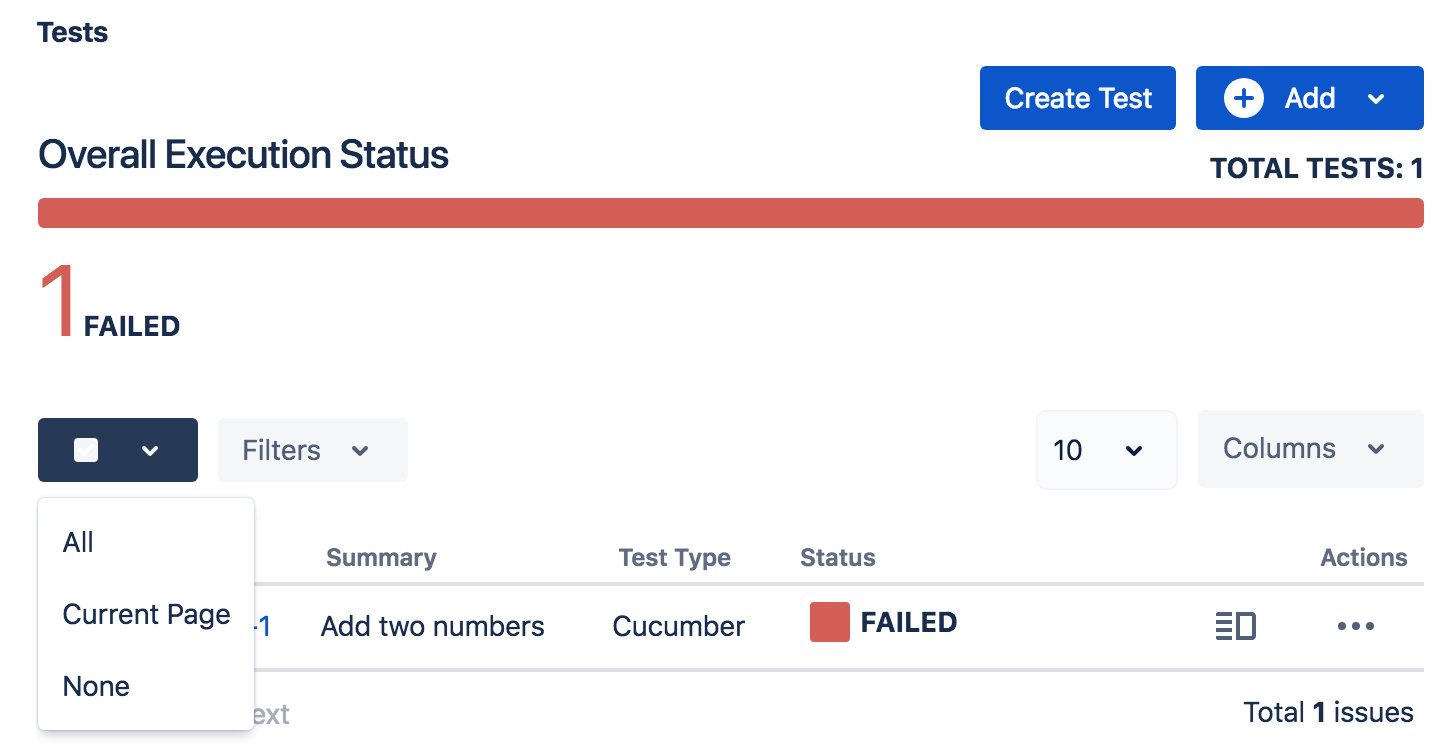
Overall Execution Status
This view has a colored progress bar where you can clearly see the status of a Test Execution. Final statuses float to the left side; the last status color to appear is the TODO status.
It is possible to filter tests by status in Test Execution Progress Bar as shown in the image below:
Test Run Filters
A filter section is also present above the Test Runs table to allow you to filter Test Runs by Assignee, Status, Test Set, or open text.
Test Runs Table
The Tests section provides a table with all Test Runs created for the Test execution issue. Each row in this table represents a Test Run and contains a set of actions that can be performed over a Test Run.
The Columns table can be configured by you. It also provides bulk operations and change rank of Test Runs.
When Xray is installed, the default columns are: Key, Summary, Test Type, and Status where the Status is fixed and cannot be removed.
Actions
Create
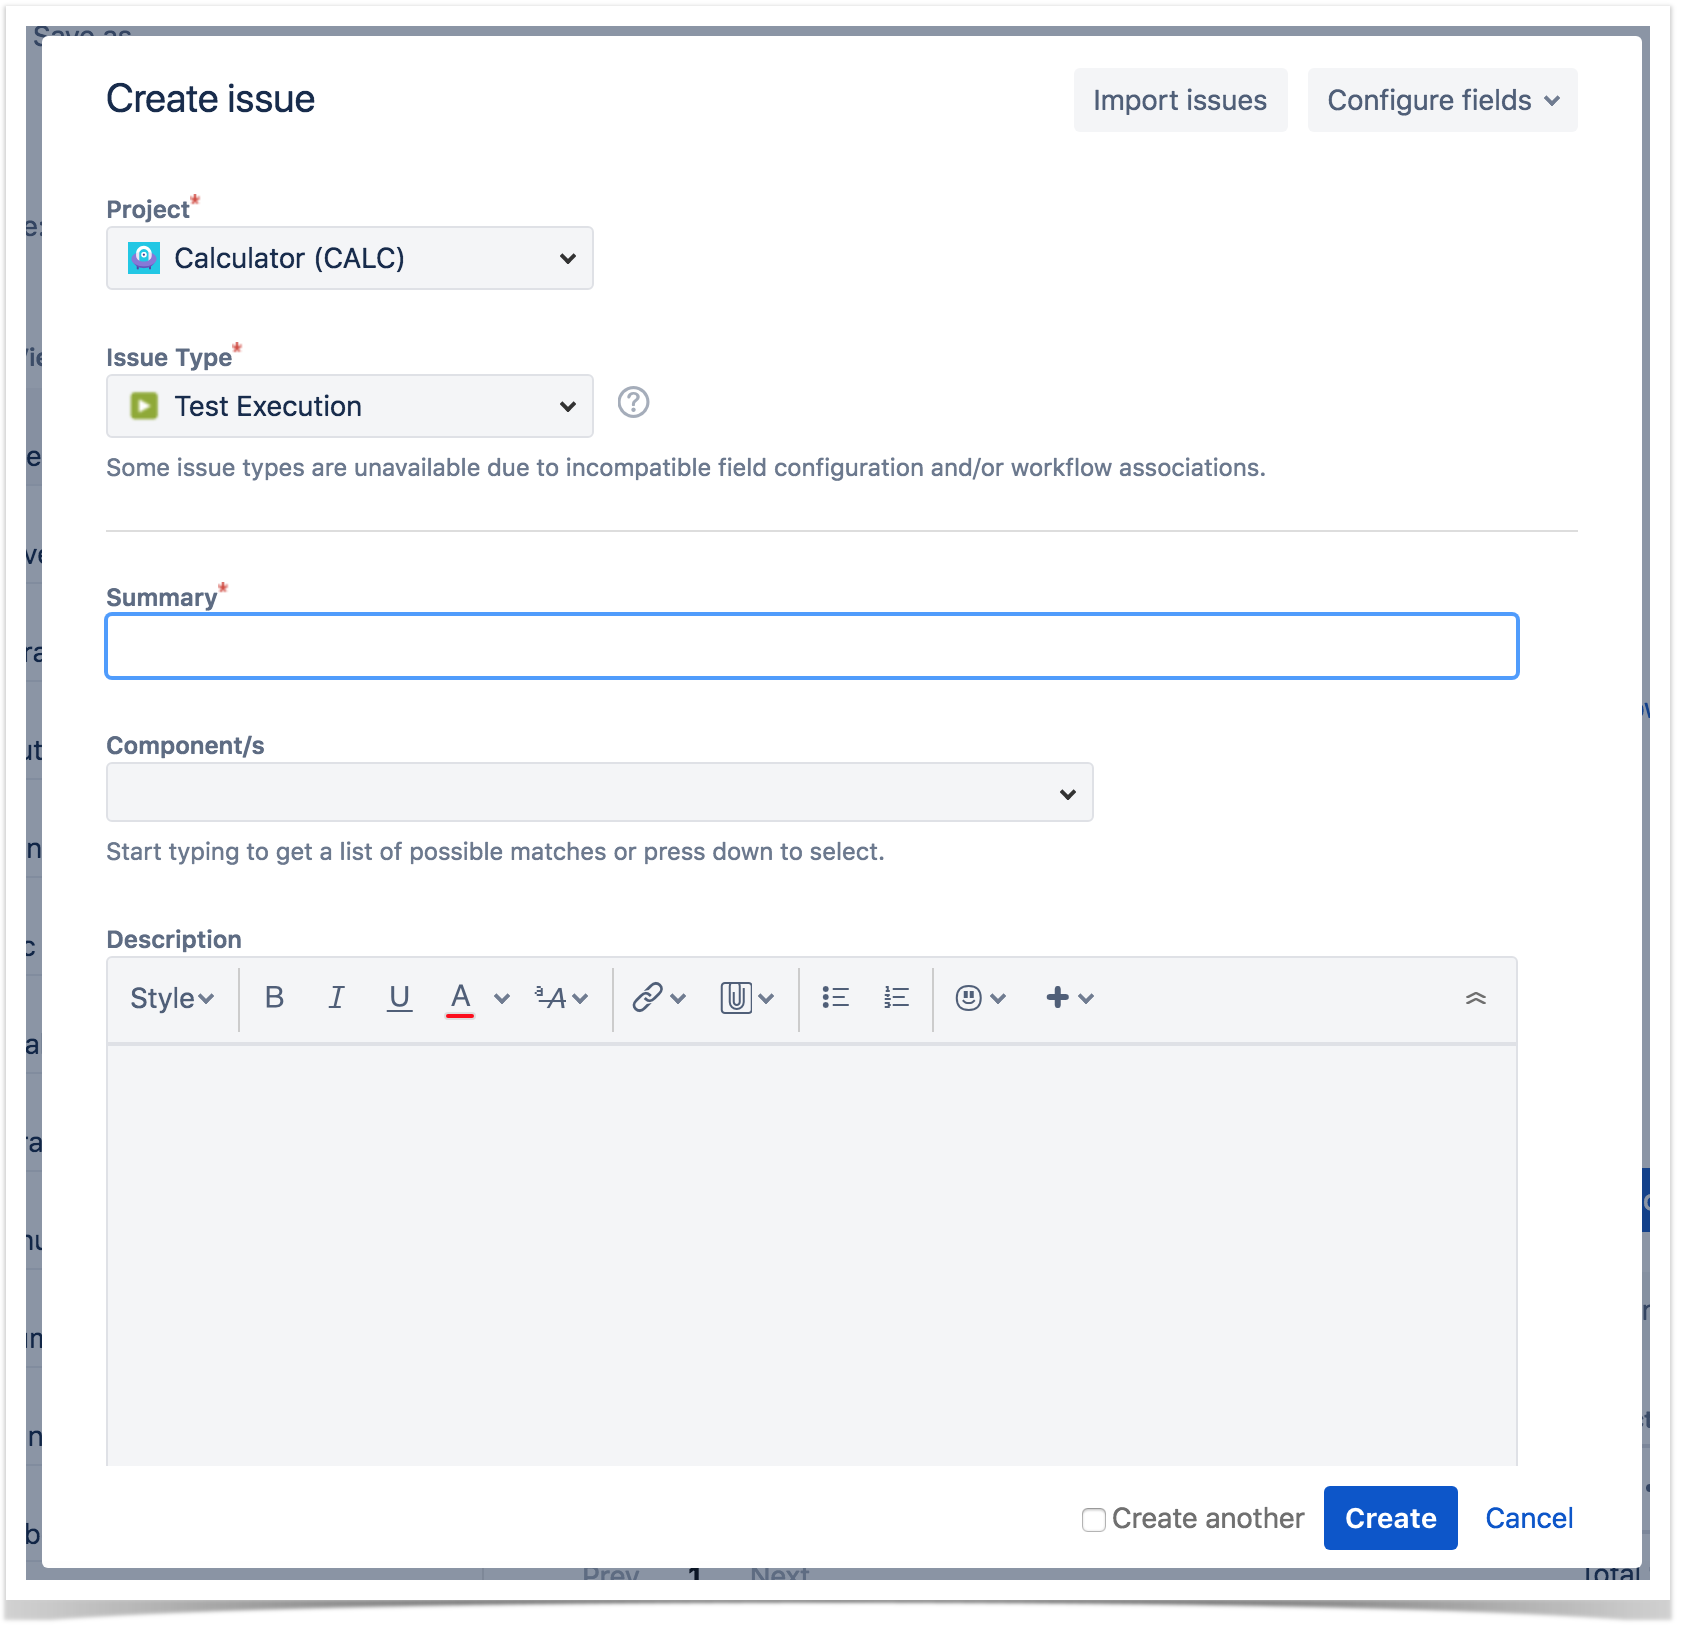
To create a new Test Execution Issue,
Step 1: Click the + at the left of the screen to open the Create Issue dialog box / page or by pressing the key "C" on the keyboard.

Step 2: Select the Project and on Issue Type, select Test Execution.
Step 3: Type a Summary for the test execution and fill all appropriate fields — mandatory fields are marked with an asterisk.
Step 4: In the Create Issue dialog you can populate the Test Execution custom fields provided by Xray, namely, the Begin/End date and the Revision.
Optional: To create a series of similar test executions – within the same Project – select the Create another checkbox at the bottom of the dialog.
Step 5: When you are satisfied with the content of your test execution, click the Create button.
Step 5a: If you selected the Create another checkbox, a new Create Issue dialog appears. This issue is automatically pre-populated with your previous test execution details, while leaving the Summary field blank.
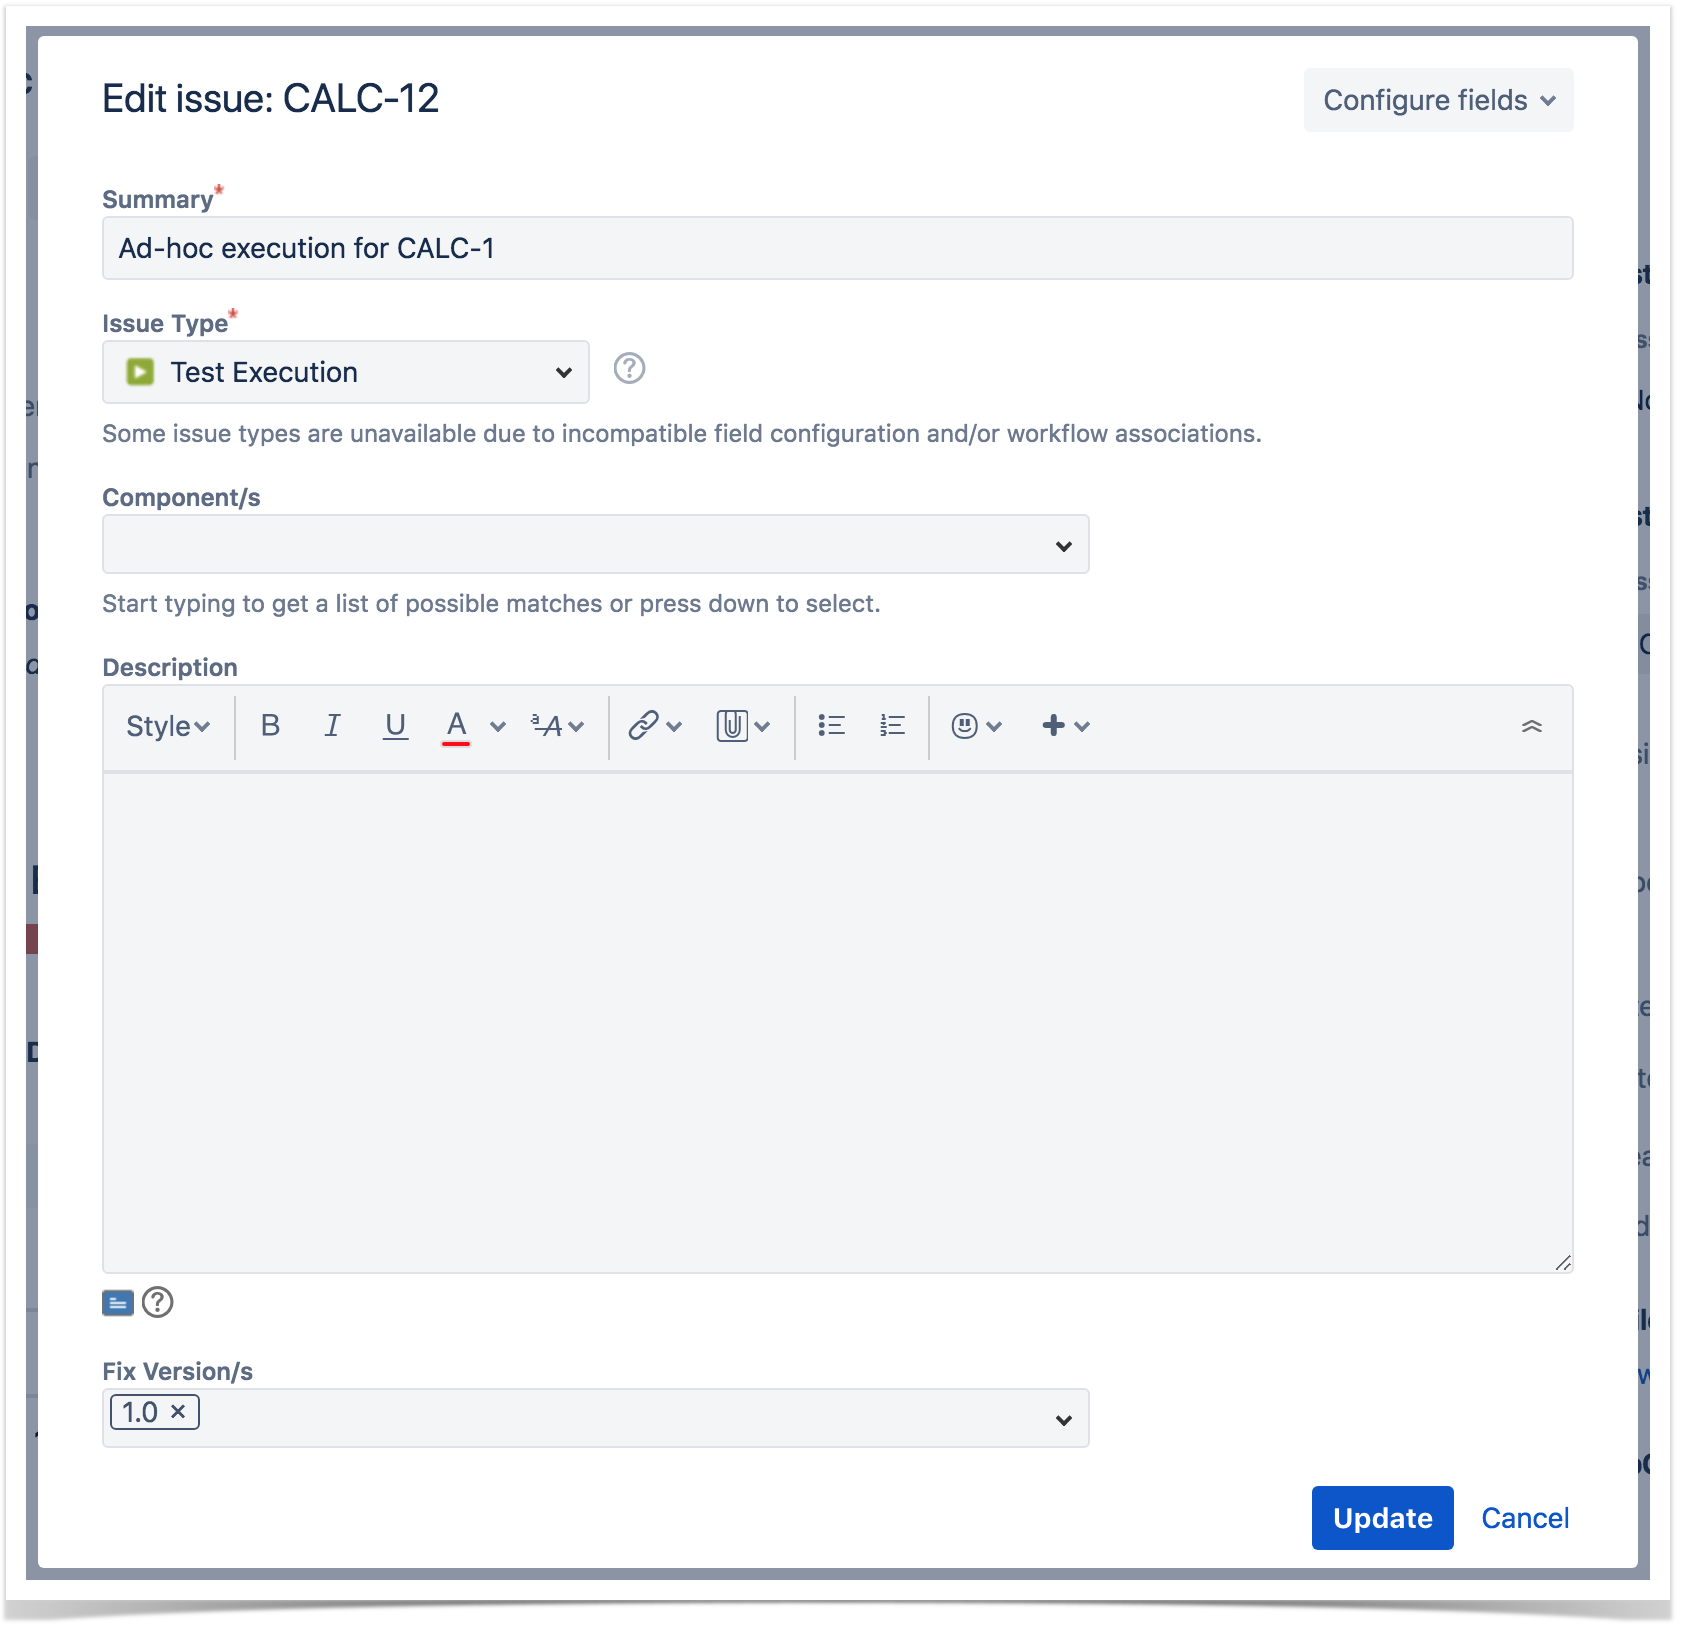
Edit
The Edit Issue dialog box / page is similar to the Create Issue dialog box / page, and can be accessed through the following steps:
Step 1: Locate the Test Execution you want to edit.
Step 2: Click the Edit button (at the top-left of the 'view issue' page) to open the Edit Issue dialog box / page.
Alternatively, hover over a field and click the pencil icon to edit it inline.
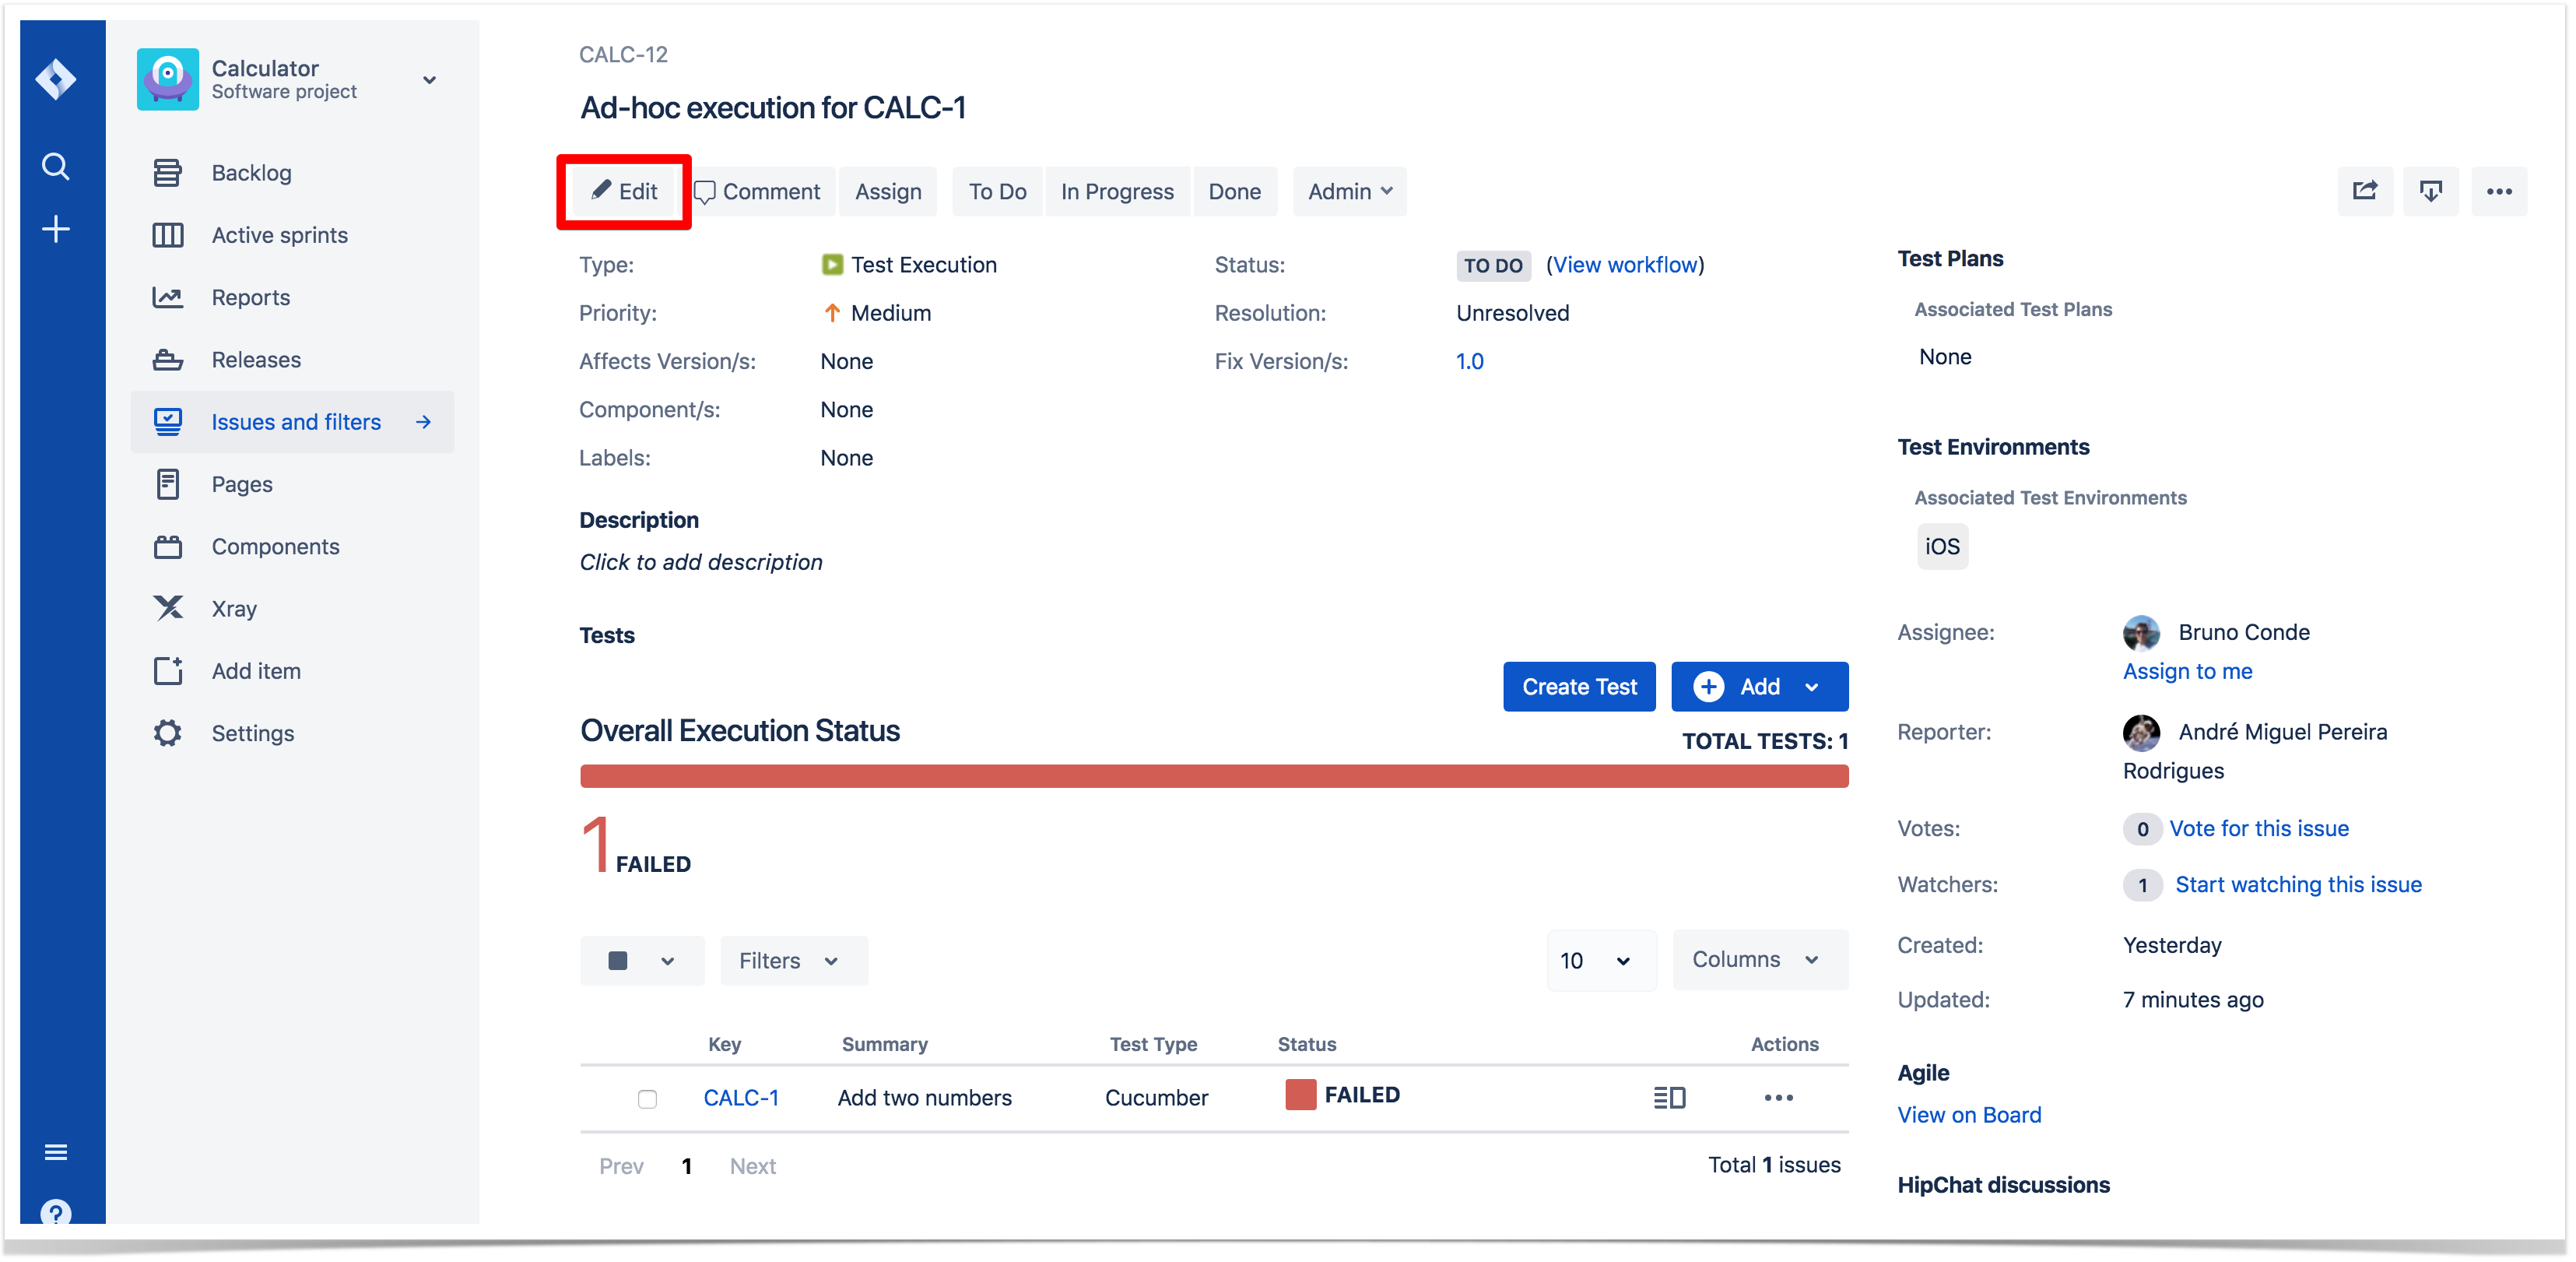
Step 3: Modify your Test Execution details in the appropriate fields of the Edit Issue dialog box.
Step 4: Click the Update button to save your changes.
Adding Tests
Tests and Test Sets can be associated with Test Execution issues.
Add Tests
To add Test issues to a Test Execution:
Step 1: Open the Test Execution you wish to associate a Test with.
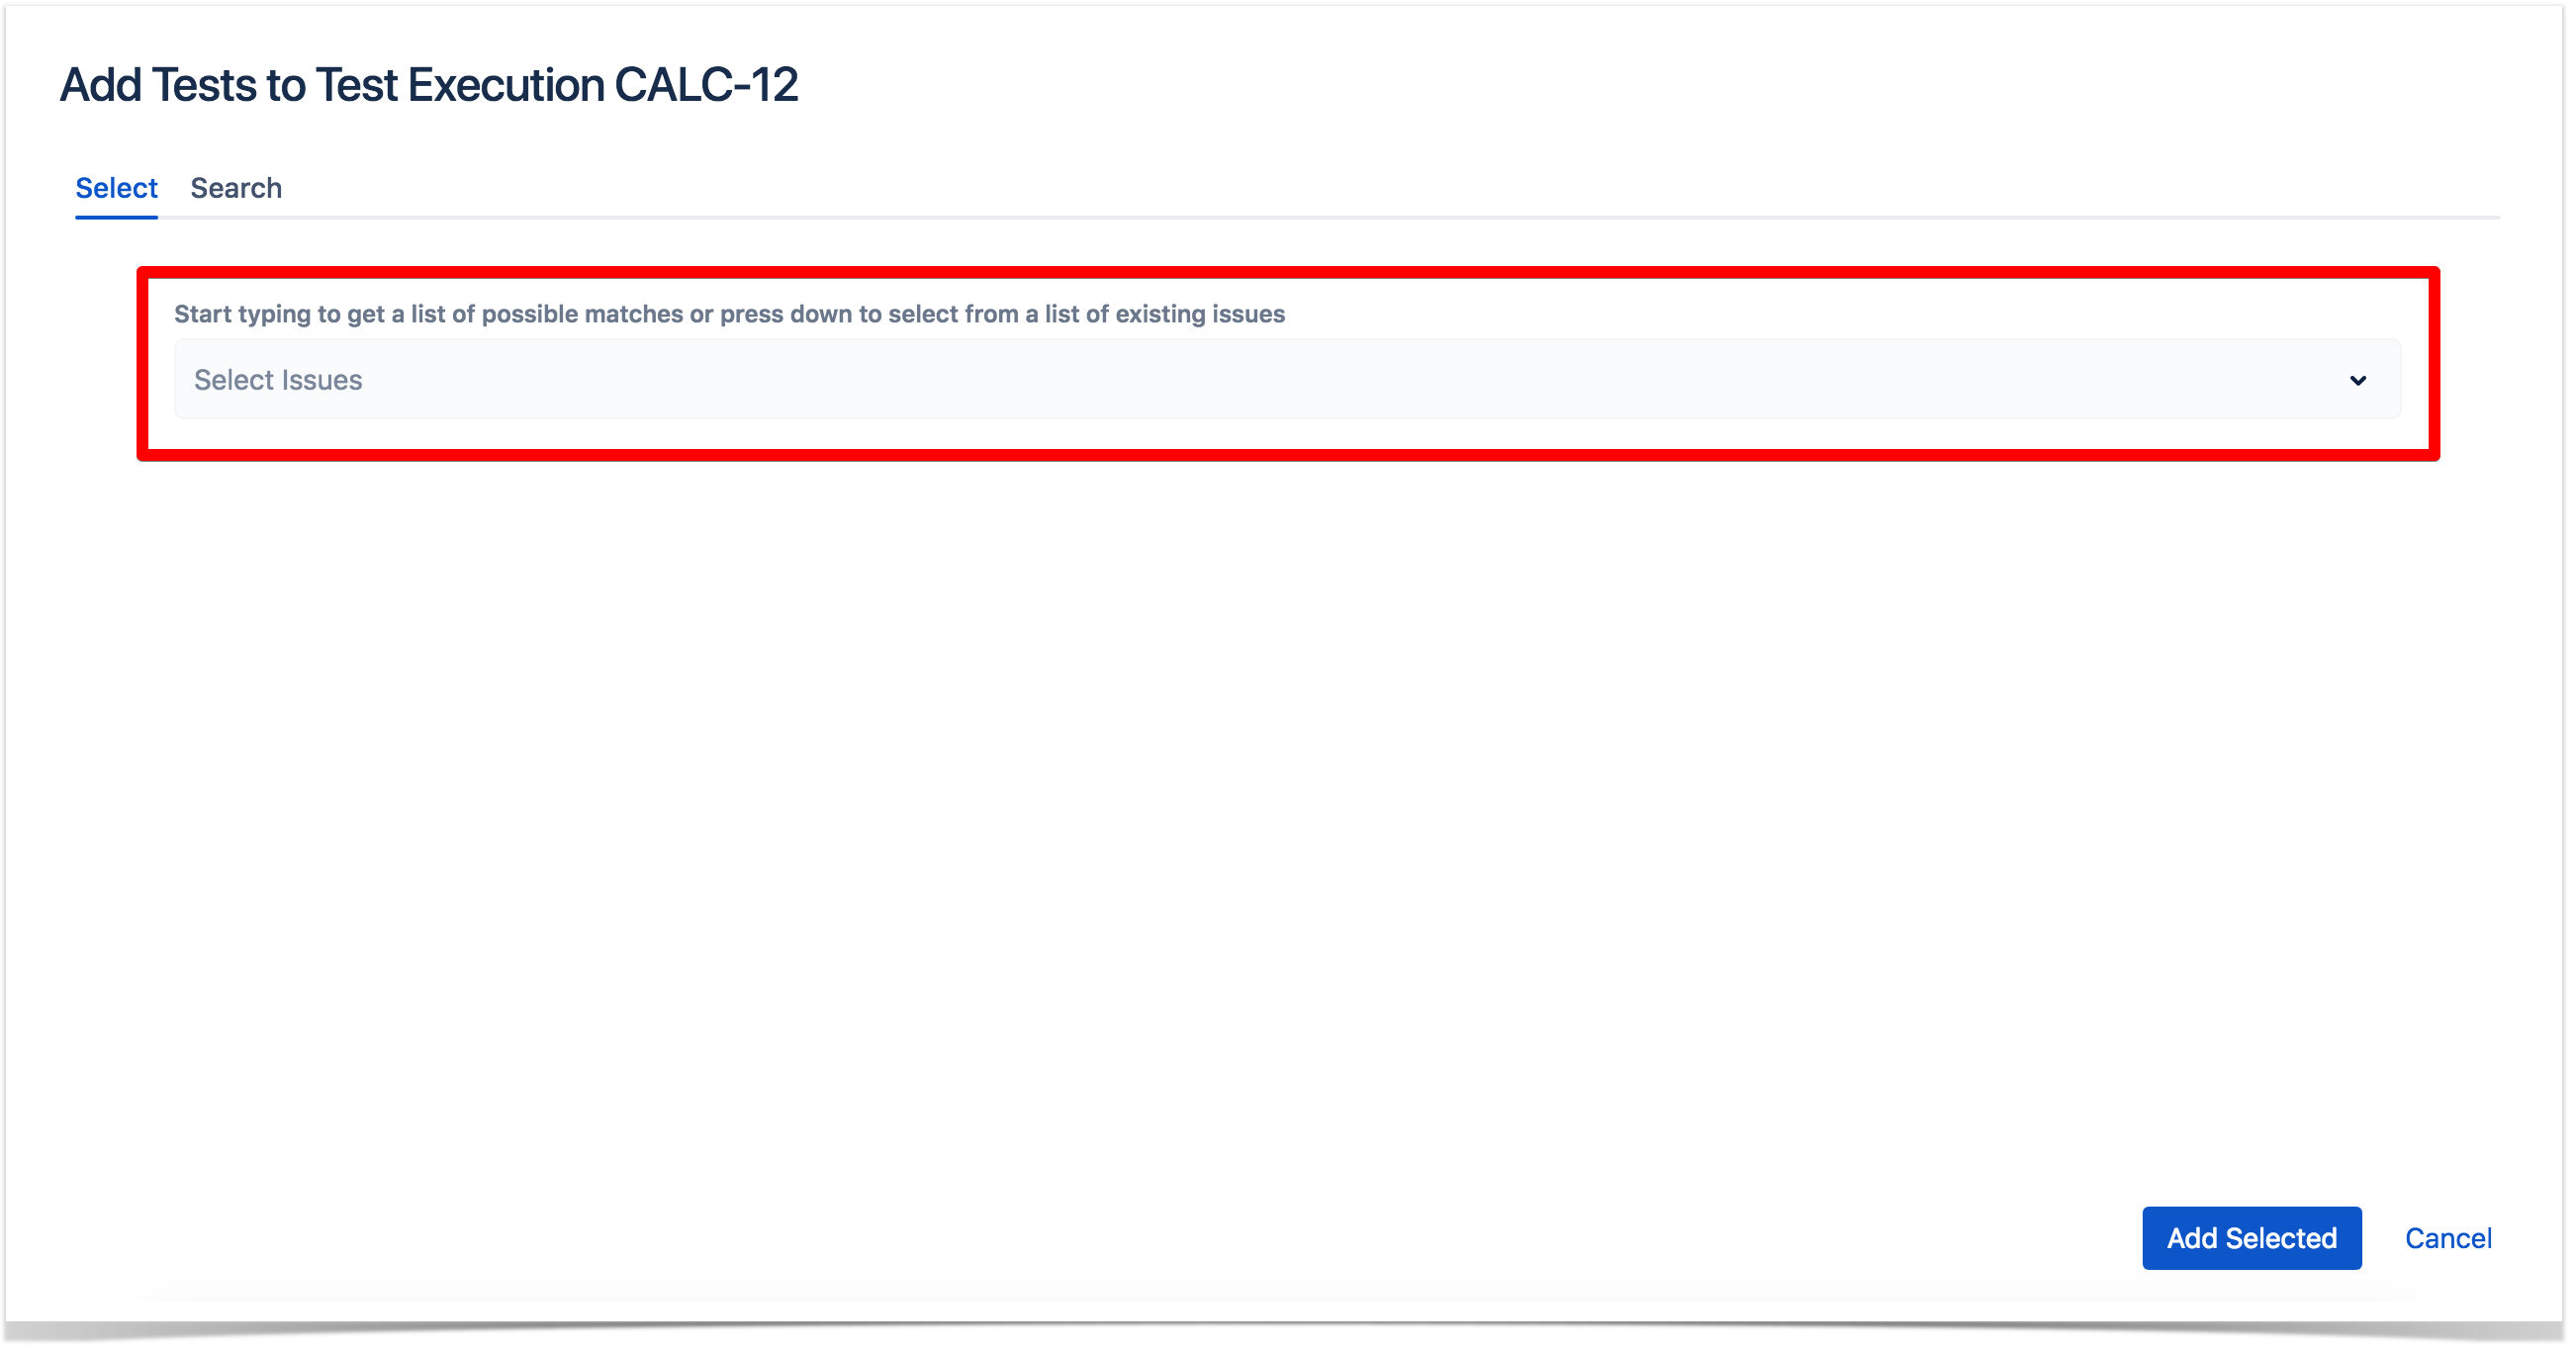
Step 2: Select Add > Tests (under the Tests tab on the view page) to open the Add Tests dialog box.
Step 3: Select or search the Test issues to be associated with the Test Execution:
Select Test Issues - In order to select the Tests to be associated, you can, under the Select tab:
- Input the desired Test Issue Key on the Tests field.
- Click on the Down Arrow on the Tests field and select the Test from its History Search list.
- Click on the Search tab to use the Find Jira issues browser.
Search Test Issues - In order to search for Tests to be associated, you can, under the Search tab:
- Browse for the desired Test Project, Type or terms it Contains.
- Click on the More button to add more browse fields such as Label, Component, Fix Version, Covering, Covering Fix Version, Saved Filter and Workflow Status.
- Click on the Magnifier button after filling out the browse fields to get a list of matching entries
- Click on the Advanced button to perform a JQL search.
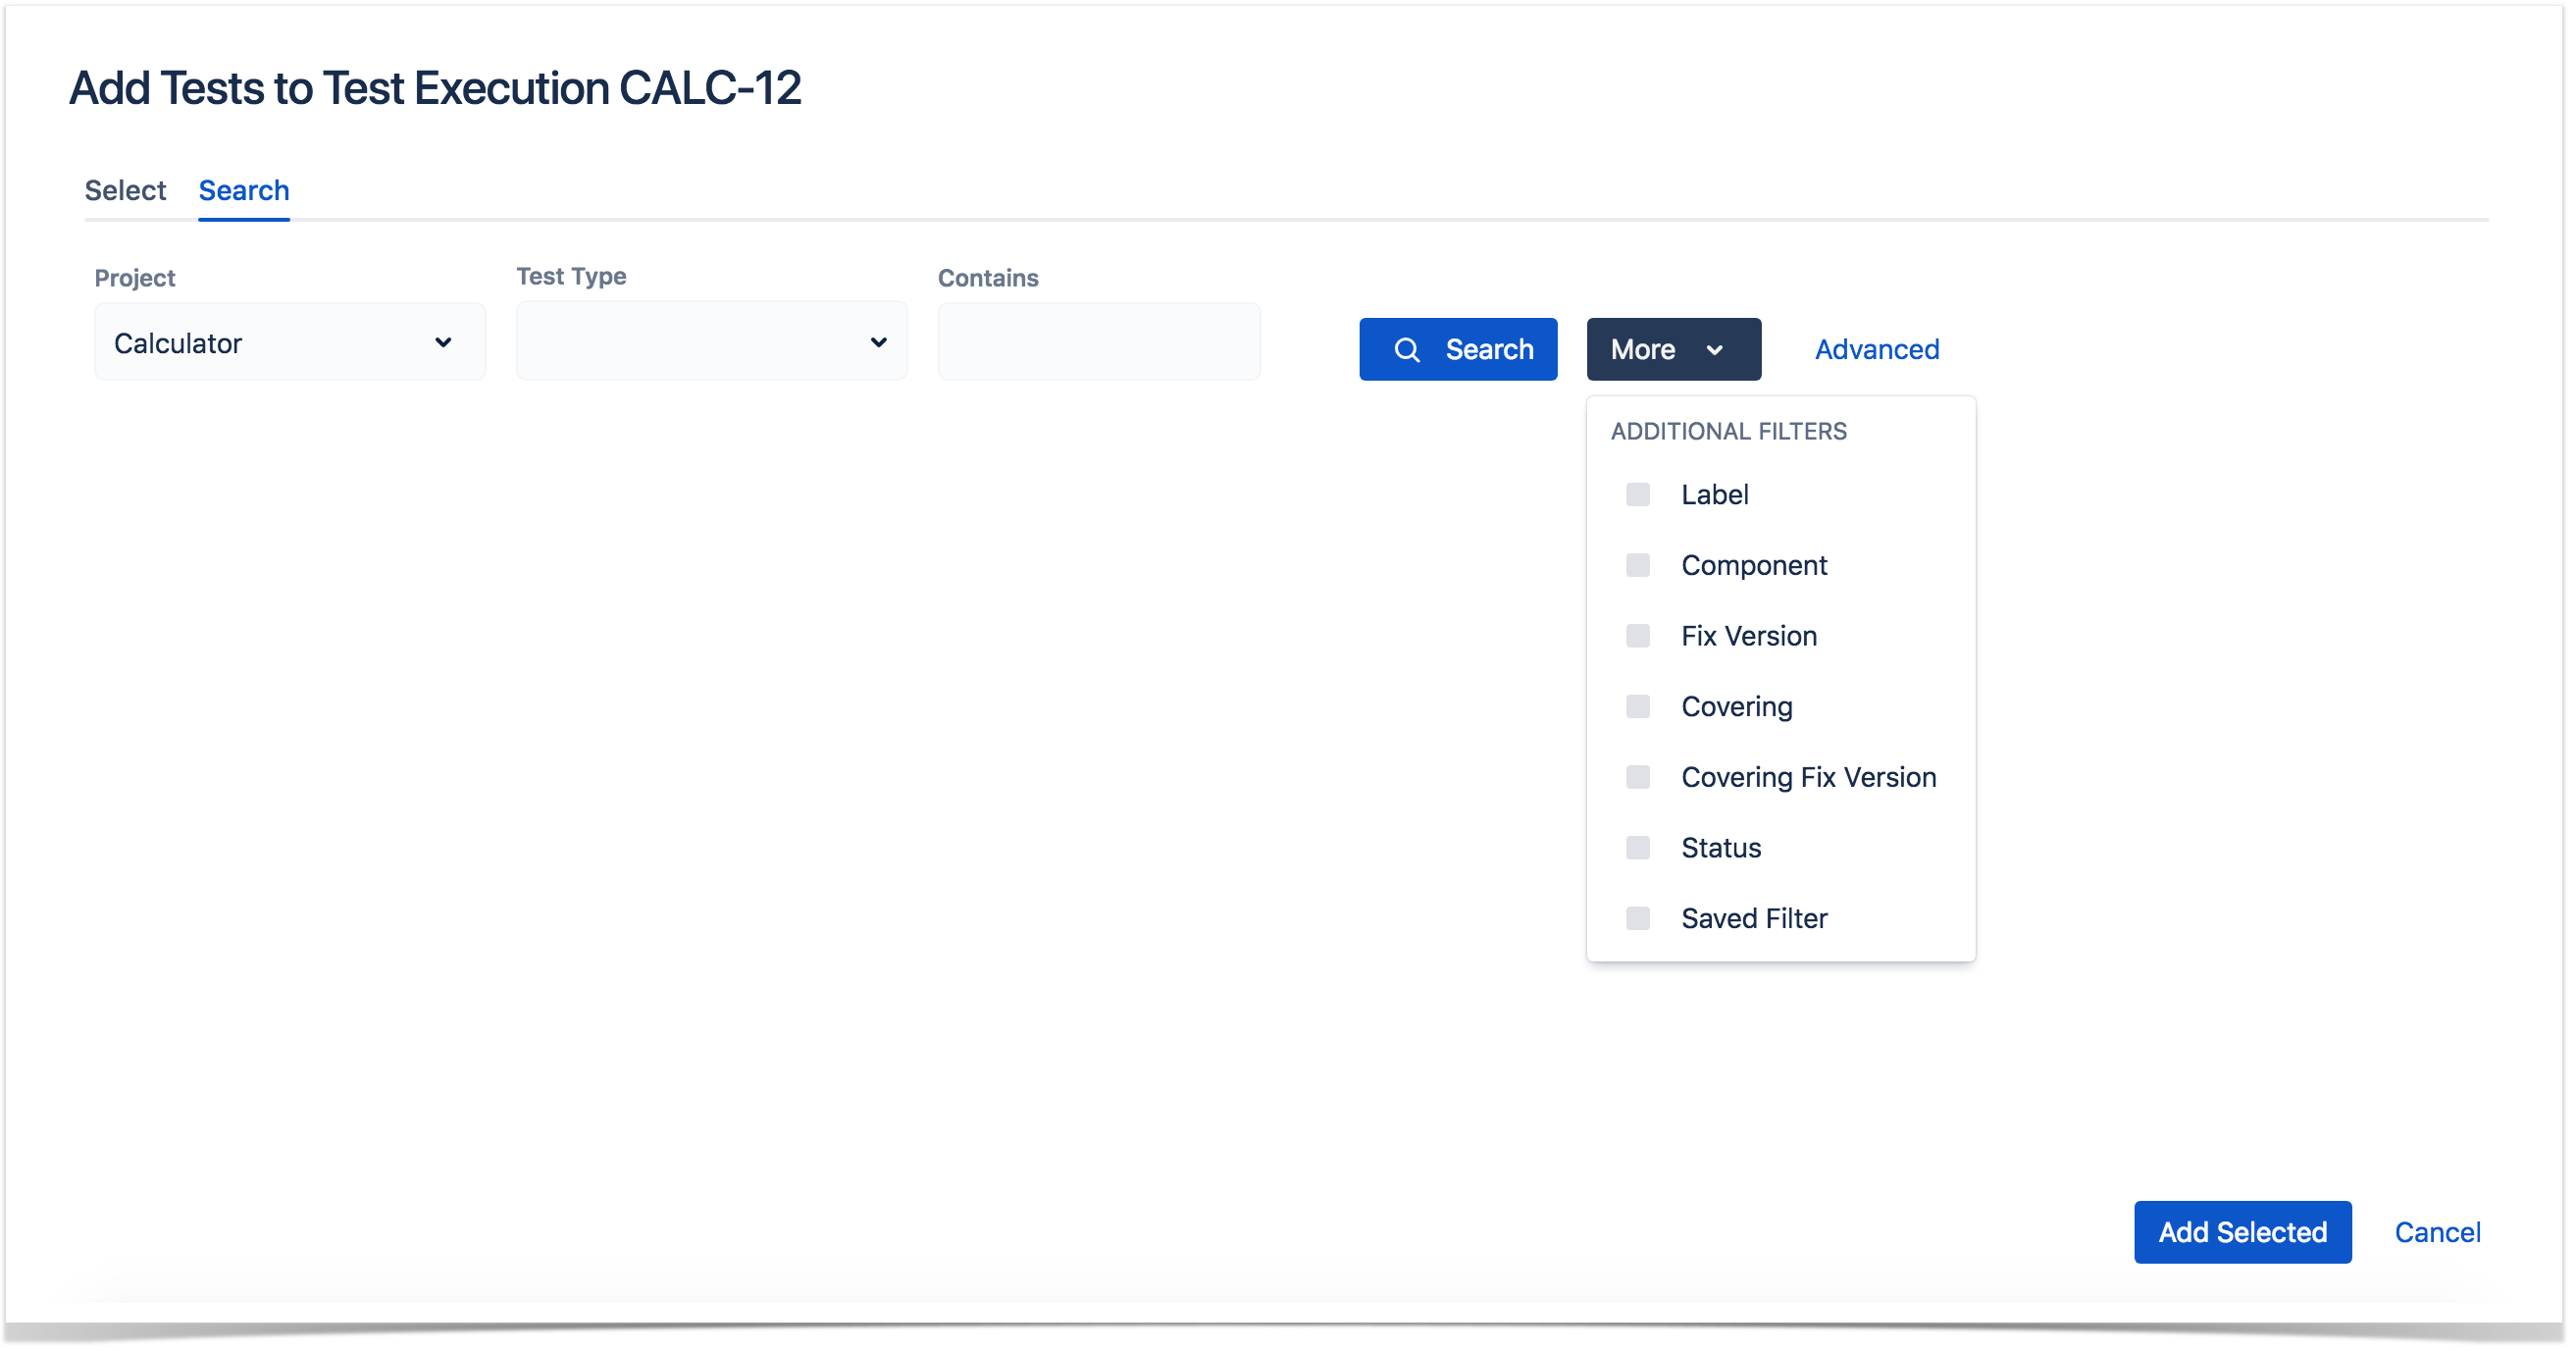
Step 4: Click Add.
Add Tests from Test Sets
When adding a Test Set issue to a Test Execution, all the Test issues associated with the Test Set are added to the Test Execution. The Test Set issue is not directly associated with a Test Execution, so changes to the Test Set after it was added will not affect the Test Execution.
Step 1: Open the Test Execution you wish to associate a Test Set with.
Step 2: Select Add > Tests (under the Tests tab on the view page) to open the Add Test Sets dialog box.
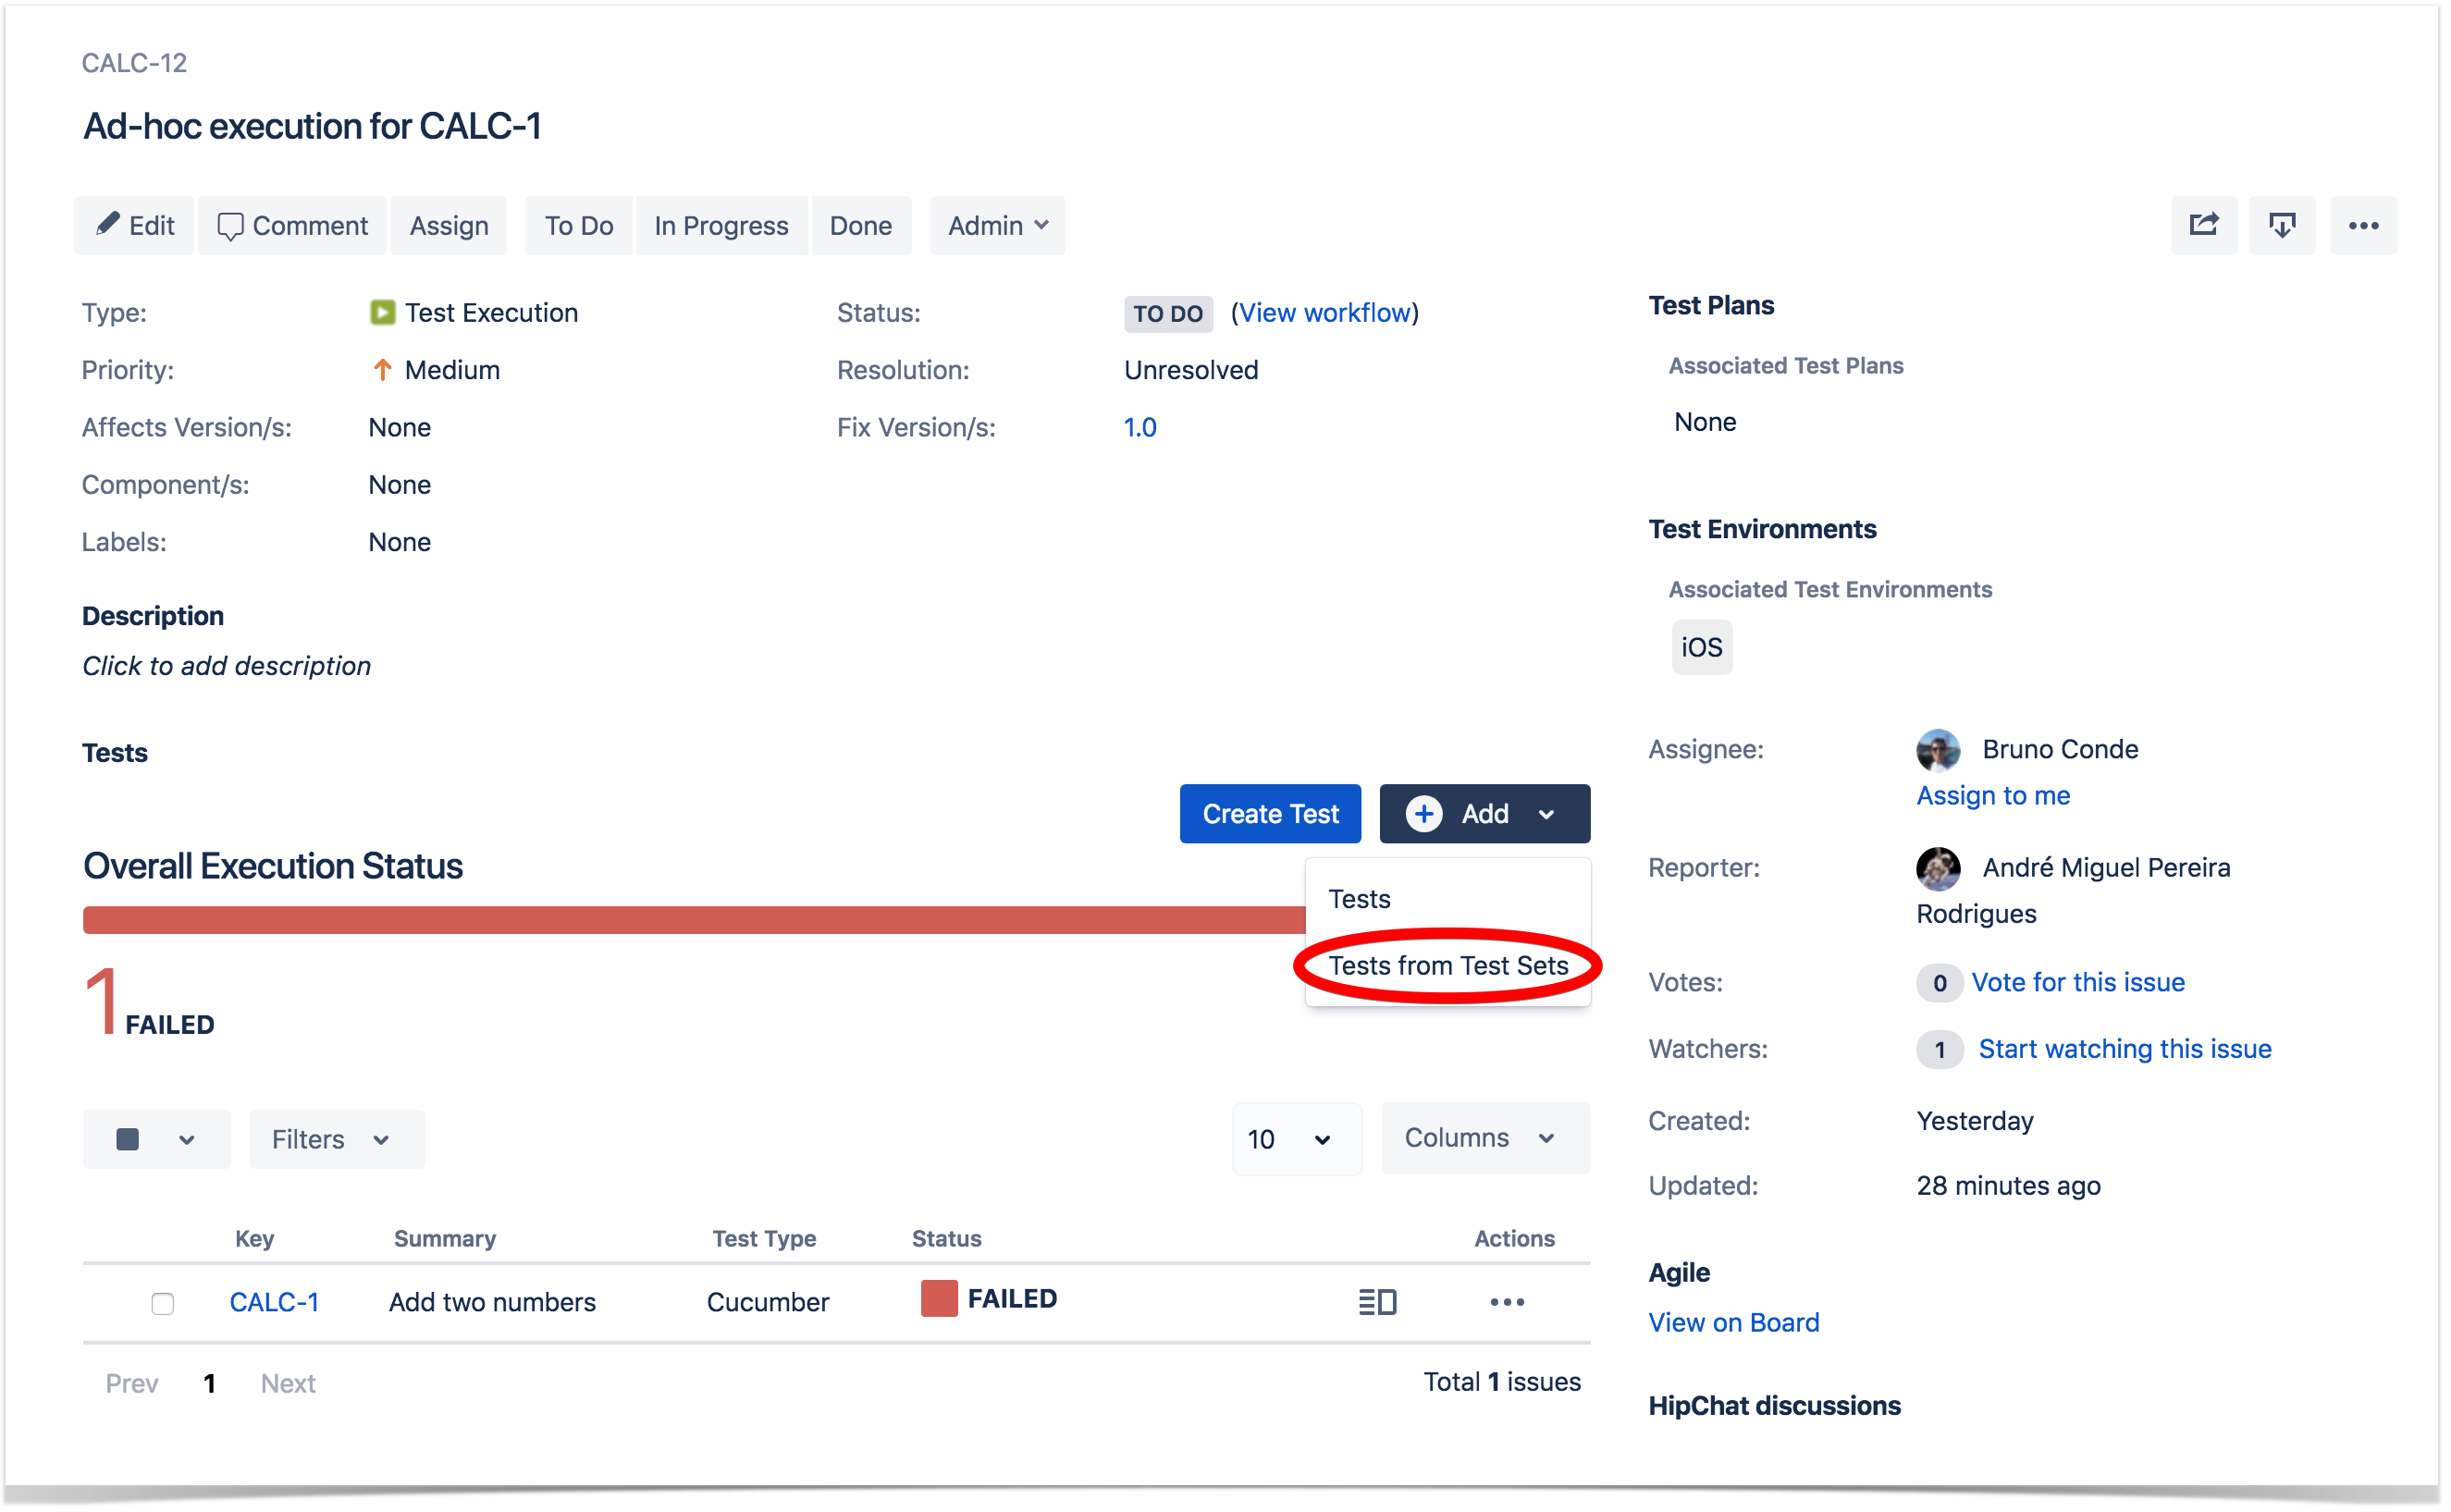
Step 3: Select or search the Test Set issues to be associated with the Test Execution.
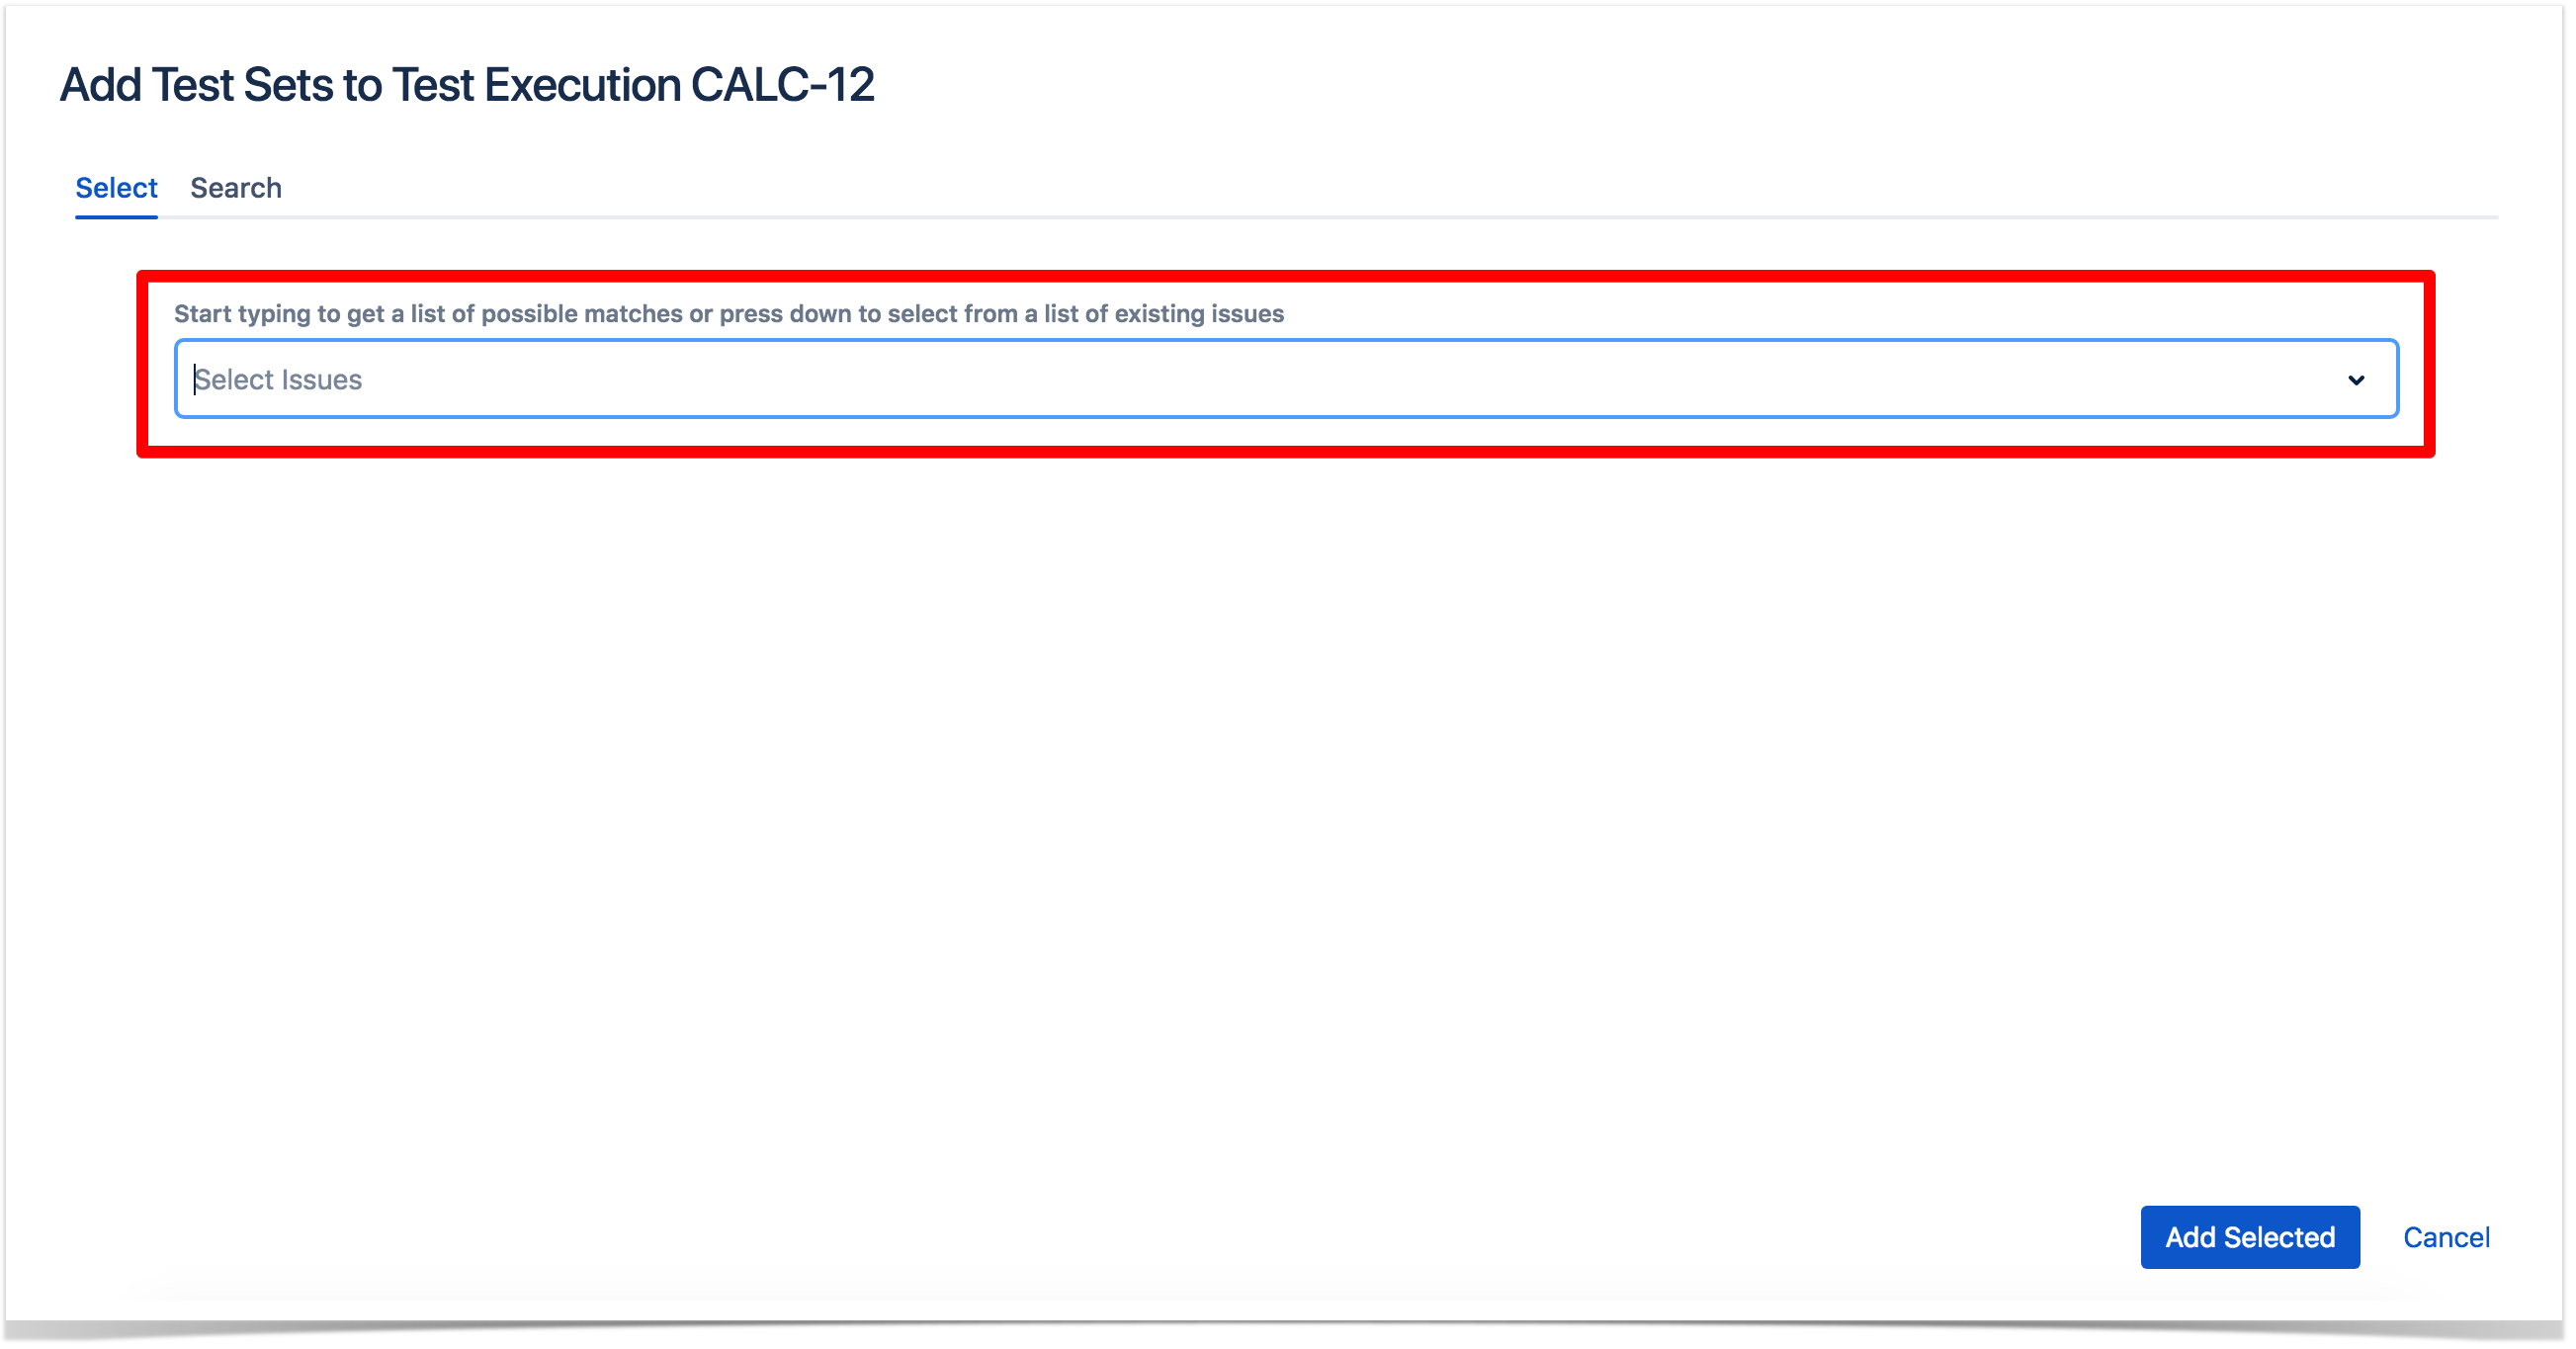
Select Test Set Issues - In order to select the Test Sets to be associated, you can, under the Select tab:
- Input the desired Test Set Issue Key on the Test Sets field.
- Click on the Down Arrow on the Test Sets field and select the Test Set from its History Search list.
- Click on the Search tab to use the Find Jira issues browser.
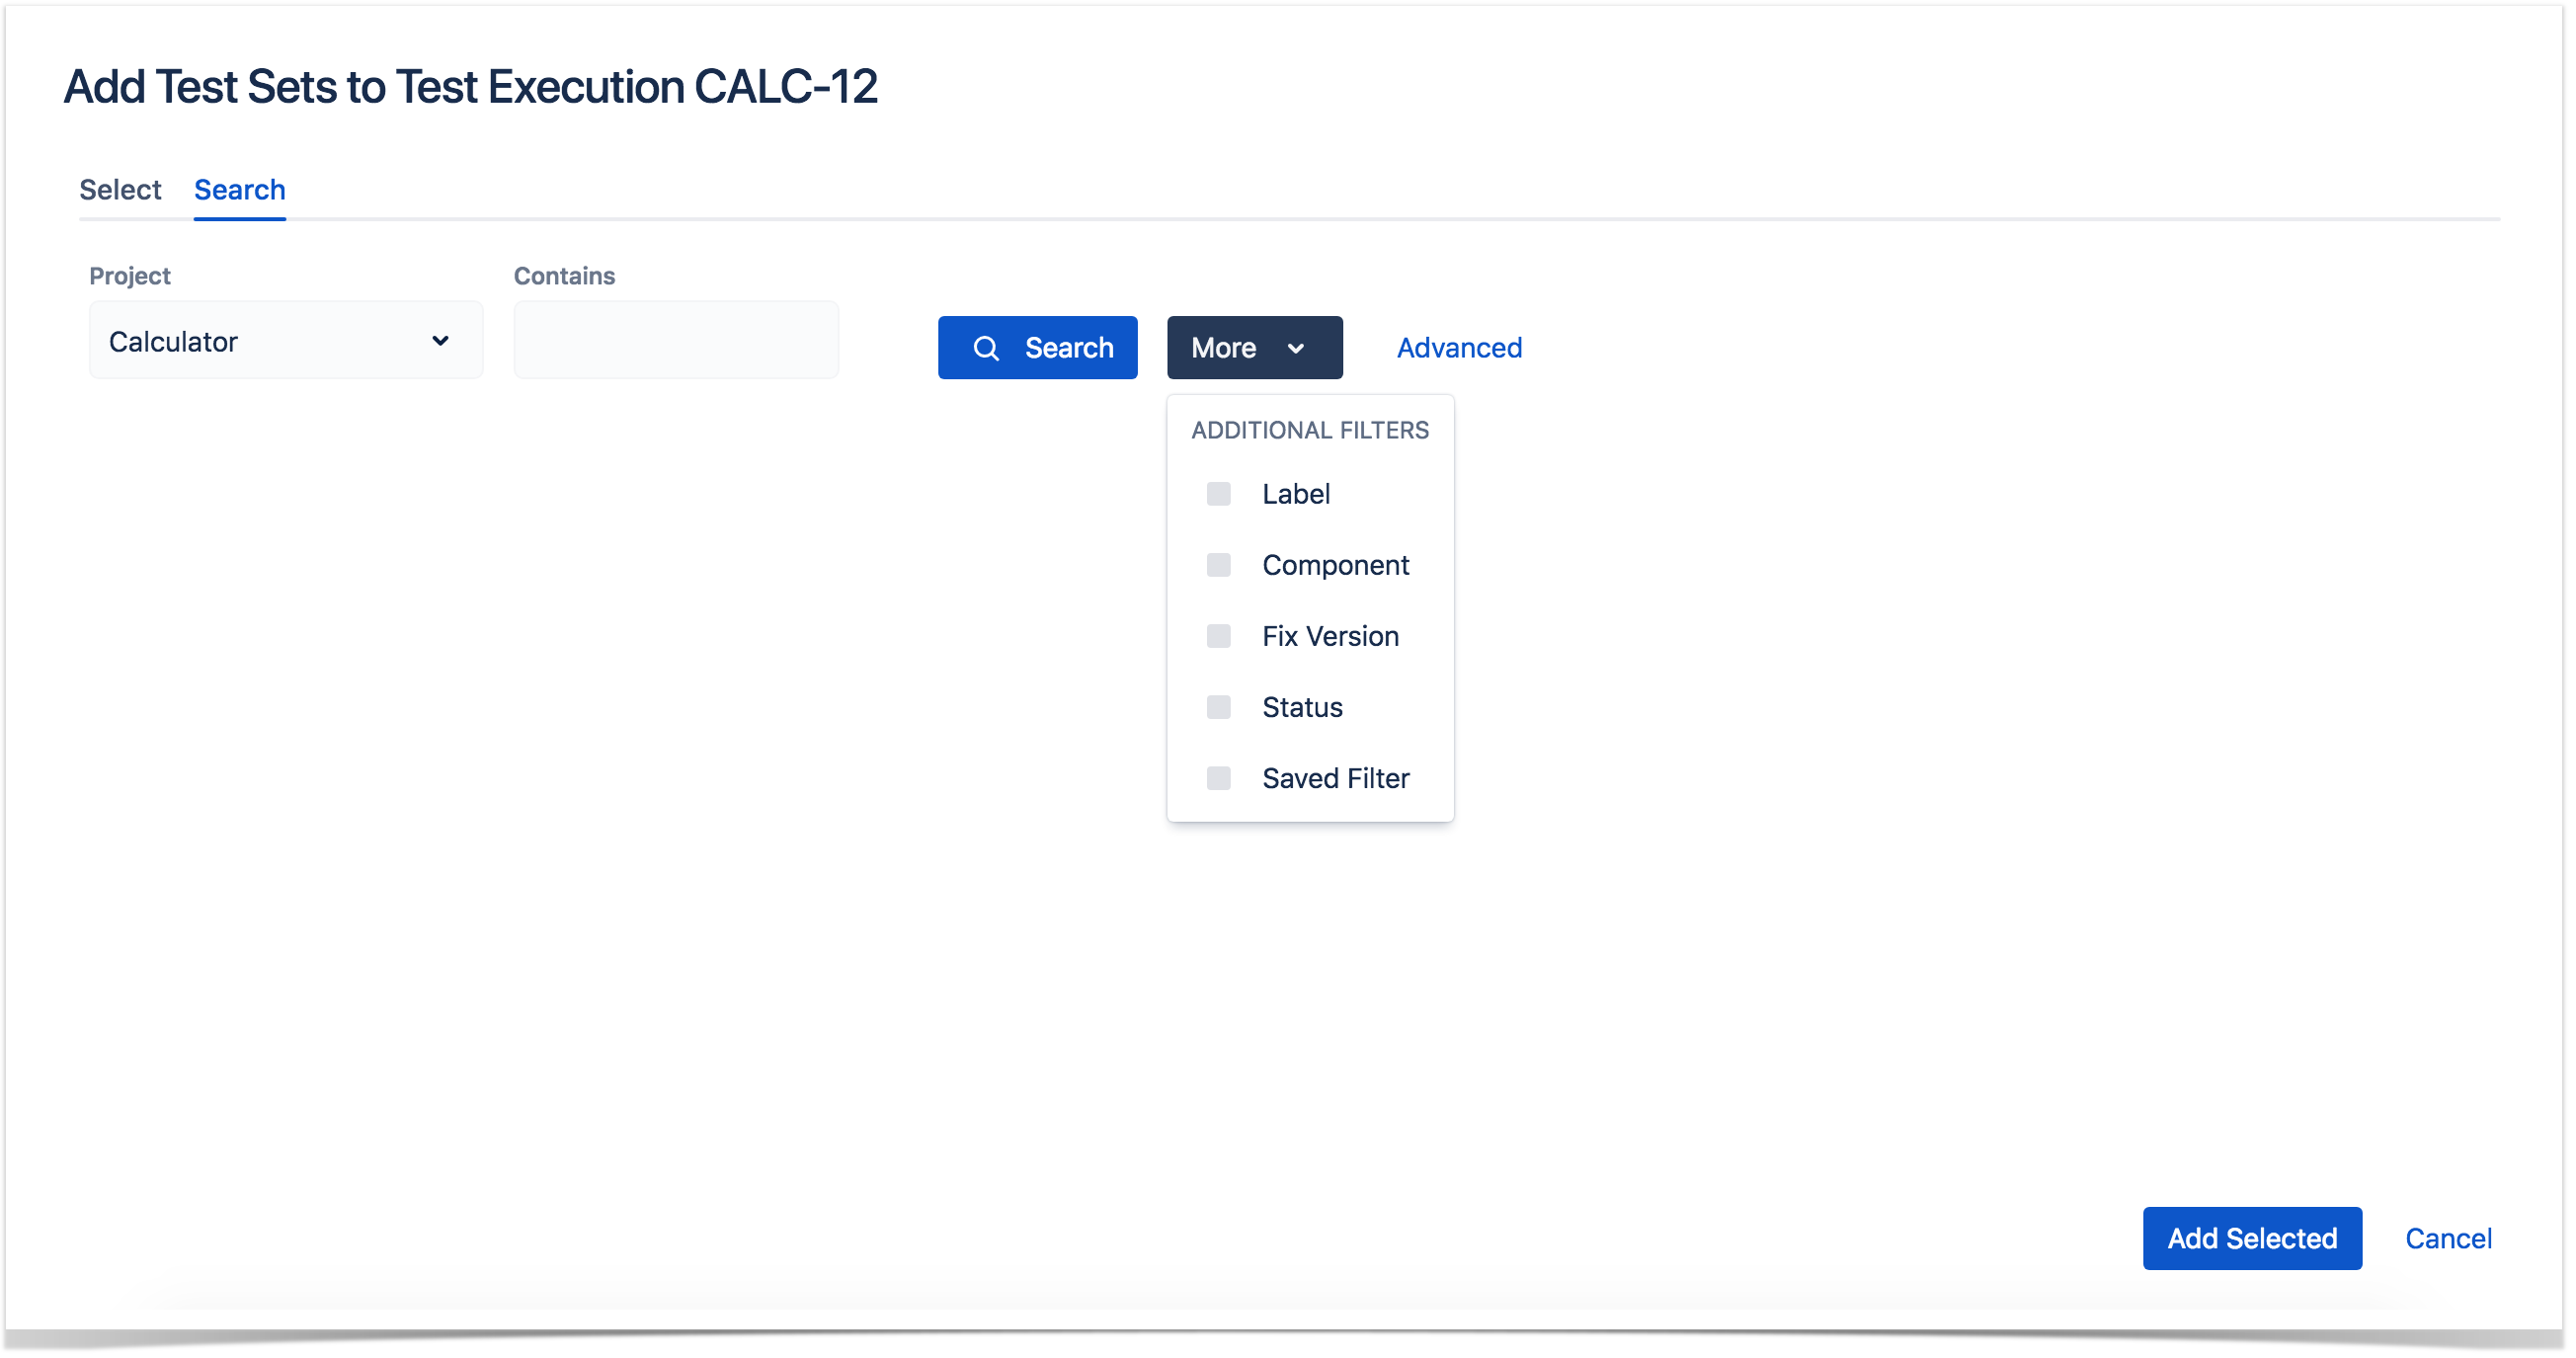
Search Test Sets Issues - In order to search for Test Sets to be associated, you can, under the Search tab:
- Browse for the desired Test Set Project or terms it Contains.
- Click on the More button to add more browse fields such as Label, Component, Fix Version, Saved Filter and Workflow Status.
- Click on the Search button after filling out the browse fields to get a list of matching entries.
- Click on the Advanced button to perform a JQL search.
Step 4: Click Add.
Associate with a Test Plan
You can associate Test Executions with Test Plans by editing the field Associated Test Plans in the Test Plans section in Test Execution issue view page. Note that with this method, only the Test Execution shall be associated with the Test Plan; the Tests will not be associated. To inline edit the Associated Test Plans field, just hover over the field view area, click it and add or remove the Test Plans you wish to associate to the Test Execution.


If the Test Execution is associated with a Test Plan and contains Tests that are not in the Test Plan, a warning message will be displayed telling you how many tests in the Test Execution are not in the Test Plan with a button to add these tests to the Test Plan.

There will be one warning message for each Test Plan associated with the Test Execution that does not contain all the Tests in the Test Execution.
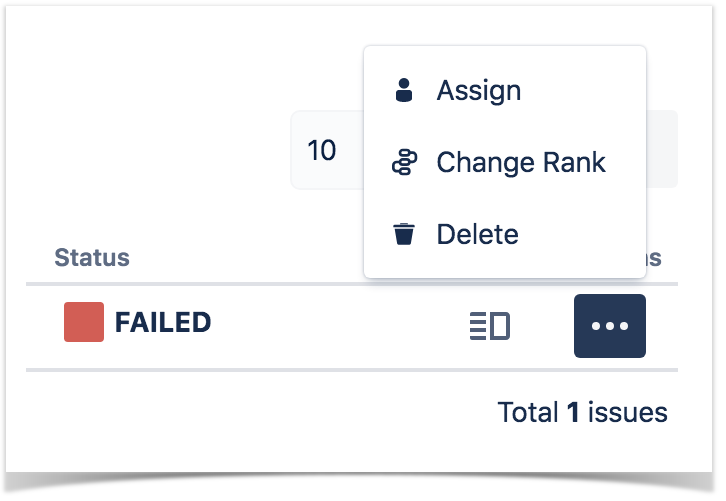
Remove Tests
To remove Tests from the Test Execution (i.e. delete Test Runs):
Step 1: Open the Test Execution issue.
Step 2: Hover over the desired Test Run (under the Tests section on the view page)
Step 3: Click the Actions button that appears in the last column. The actions menu should pop up with the available actions.
Step 4: Click Delete action. A confirmation message appears.
Step 5: Choose Remove to delete the Test Run or Cancel to abort this action.
Assigning Work
There are two ways to distribute work between Testers.
- A Test Execution issue can be created per Tester by assigning the issue to a specific Tester, or
- Within a Test Execution issue, you can assign individual Test Runs to Testers. Test Runs are assigned to the Test Execution issue assignee by default. Only users with permission to assign the Test Execution issue can assign Test Runs.
To assign individual Test Runs to testers,
Step 1: Open the Test Execution issue.
Step 2: Hover over the desired Test Run (under the Tests section on the view page)
Step 3: Click the Actions button that appears in the last column. The actions menu should pop up with the available actions.
Step 4: Click the Assign action. The assign dialog appears.
Step 5: Start typing to find the user to assign the Test Run and click Assign to complete the action or Cancel to abort it.

Change Test Run Rank
There are two ways to change the rank of a Test Run:
Drag-and-Drop
Step 1: Open the Test Execution issue.
Step 2: Hover over the desired Test Run row (under the Tests section on the view page) and the drag handle column.
Step 3: Click the drag handle and move the Test Run up or down in the current page.
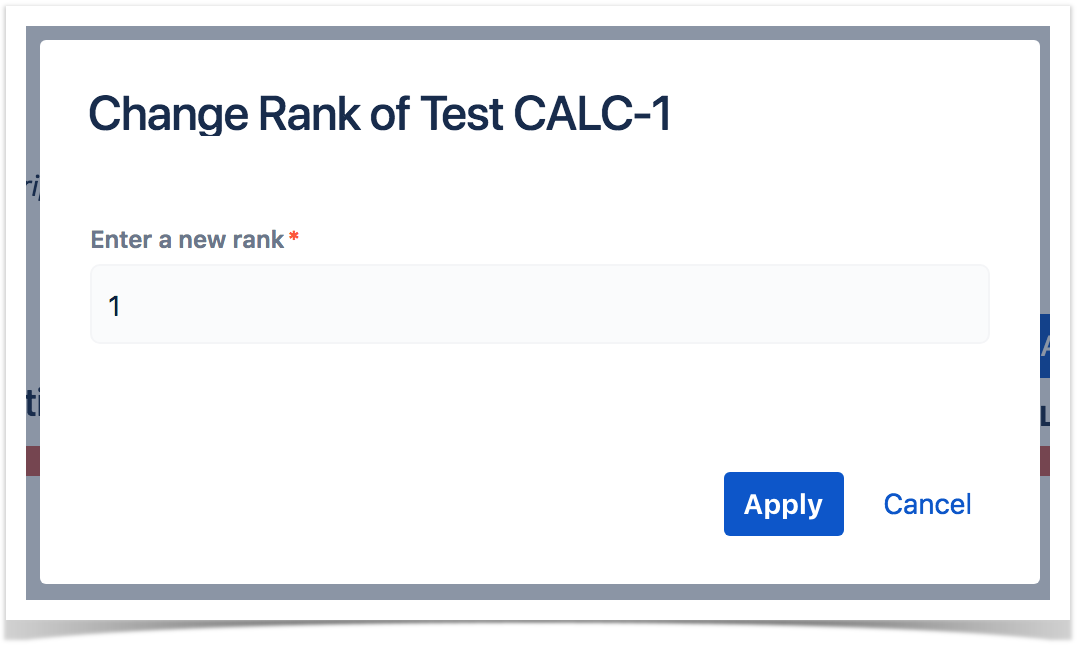
Change Rank Action
This action allows users to change the Rank of a Test run between pages.
Step 1: Open the Test Execution issue.
Step 2: Hover over the desired Test Run (under the Tests section on the view page)
Step 3: Click the Actions button that appears in the last column. The actions menu should pop up with the available actions.
Step 4: Click the Change Rank action. The change rank dialog appears.
Step 5: Enter the desired index number (1-based) and click OK.
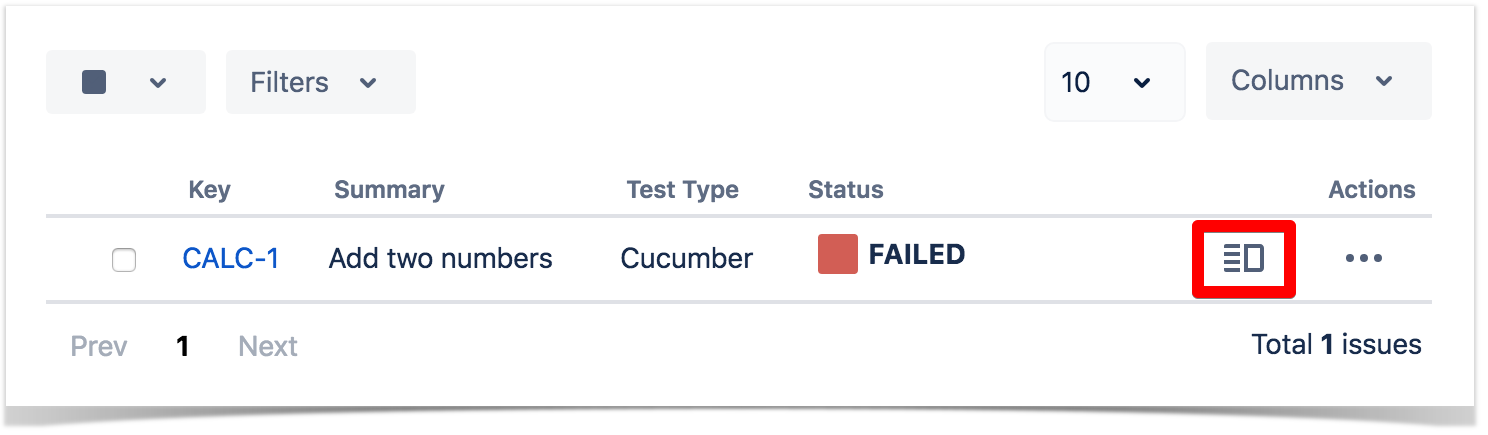
Execute Test
To execute a Test from a Test Execution:
Step 1: Open the Test Execution you wish to run.
Step 2: Hover over the desired Test Run (under the Tests section on the view page)
Step 3: Click the Execute button that appears in the last column, it will open the Execution page.
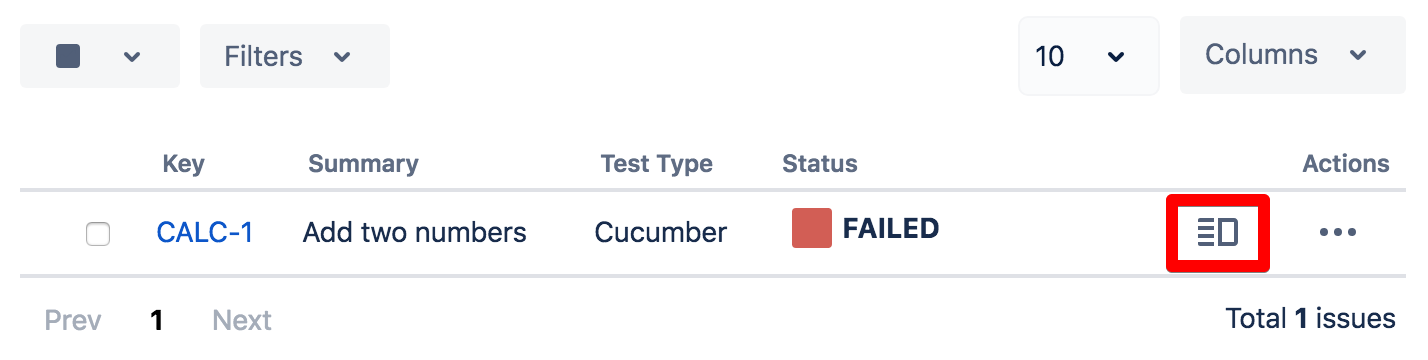
You can see a detailed explanation of the execution screen here.
Note: If you does not have permission to execute the Test Run, the "Run" option will not be available.
Execute Test Inline
To execute Test Runs inline from the Test Execution view screen, this option must be enabled in the Xray administration page. The option for setting the Test Run status manually without having to execute all Test Steps (or Examples, in the case of Cucumber Tests) must also be enabled in the Xray administration page.
Given that the above options are enabled and you have permission to execute the Test, the context menu for executing Test Runs, accessed by the Gear button on each Test, must show the available transitions.
When executing inline Tests, the status of the manual steps (or Examples, in the case of Cucumber Tests) can be changed automatically. The following rules are applied:
- PASS: All step statuses will be changed to PASS independently of their current status.
- FAIL: All step statuses will remain unchanged, even if they are all PASS. This is because a Test might fail due to a Pre-Condition.
- TODO: All step statuses will be changed to TODO.
- EXECUTING: The Test Execution status will be changed to EXECUTING.
- CUSTOM: The Test Execution status will be changed to the chosen custom status.
To execute a Test Run inline:
Step 1: Open the Test Execution issue you wish to run.
Step 2: Click on the status field located in the Status column of the Test Runs table and select one of the available statuses.

View Test Run Details
You can always view and modify the Test Run details after execution. If you do not have permission to execute the Test Run, you can still view the execution details in read-only mode, given that you have permission to browse the Test Execution issue.
To view the execution details from a Test Run:
Step 1: Open the Test Execution you wish to view the execution details.
Step 2: Hover over the desired Test Run (under the Tests section on the view page).
Step 3: Click the Execute button that appears in the last column, it will open the Execution page where you can view the details.
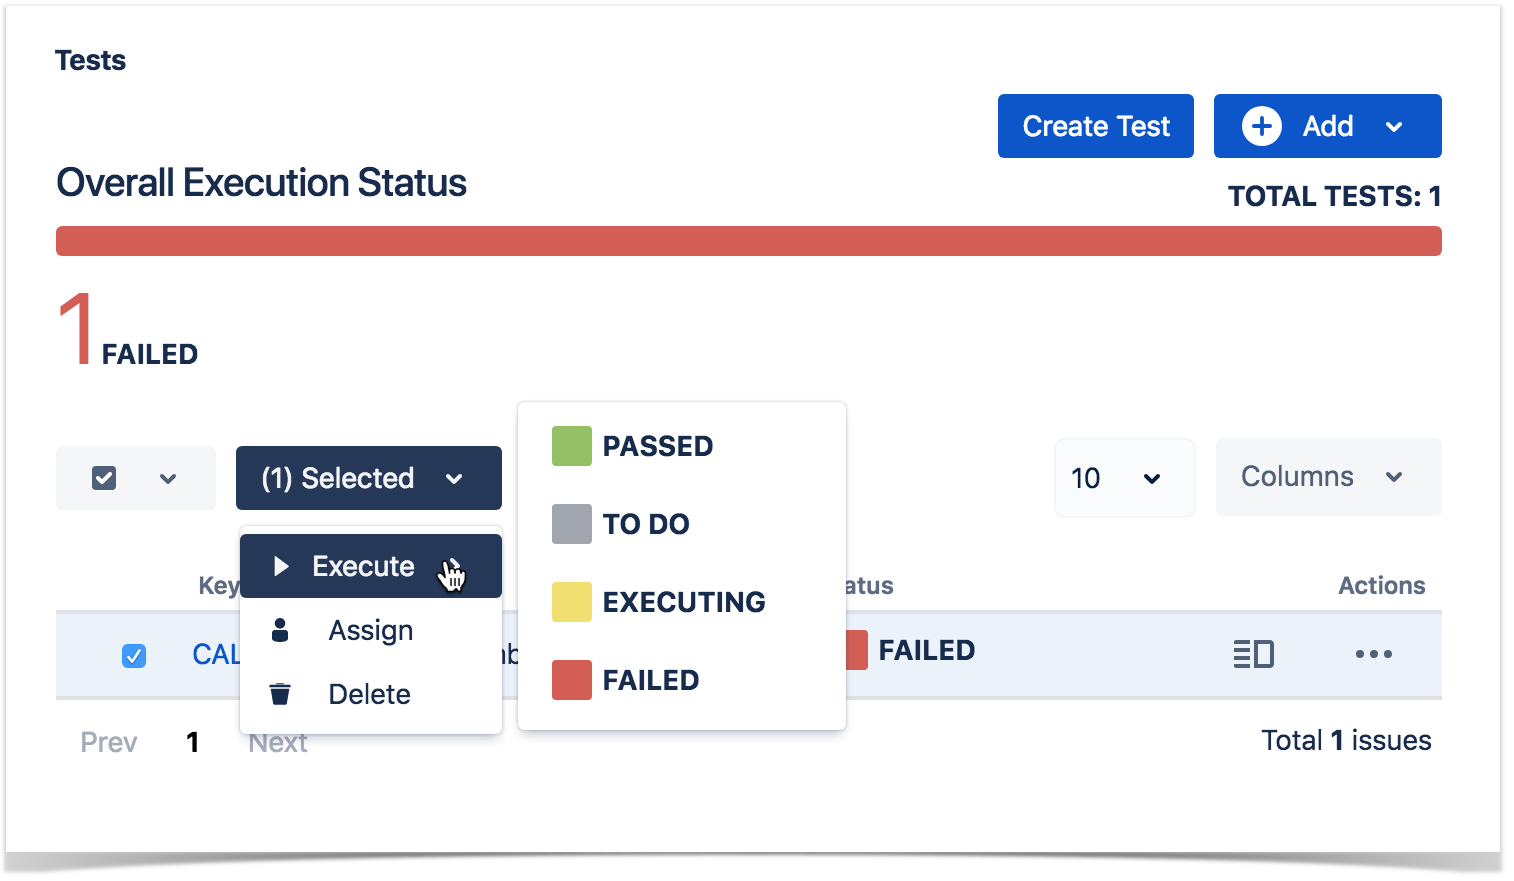
Bulk Operations
Xray provides the following bulk operations on the Test Runs table.
- Assign - Assigns all the selected Test Runs to a particular user.
- Change Rank - Change the Rank of a Test Run between pages.
- Delete - Deletes all the selected Test Runs.
To execute these bulk actions:
Step 1: Open the Test Execution issue.
Step 2: Select the desired Test Runs. This can be done by using the checkbox that appears on each Test Run row or by using the Bulk dropdown button options for easy selecting all Test Runs or the ones in the current page.
Step 3: Click the bulk actions located on the actions column header and choose one of the available actions.
Filter Test Runs
To filter the Test Runs table, select the desired filters in the filters section above the Test Runs table.
- Test Set - show only Test Runs that are associated with a specific Test Set issue.
- Assignee - show only Test Runs that are assigned to a specific user.
- Status - show only Test Runs with a specific status.
- Contains Text - show only Test Runs with Tests containing the entered text. This will query Test issues with the JQL keyword text ~ ...
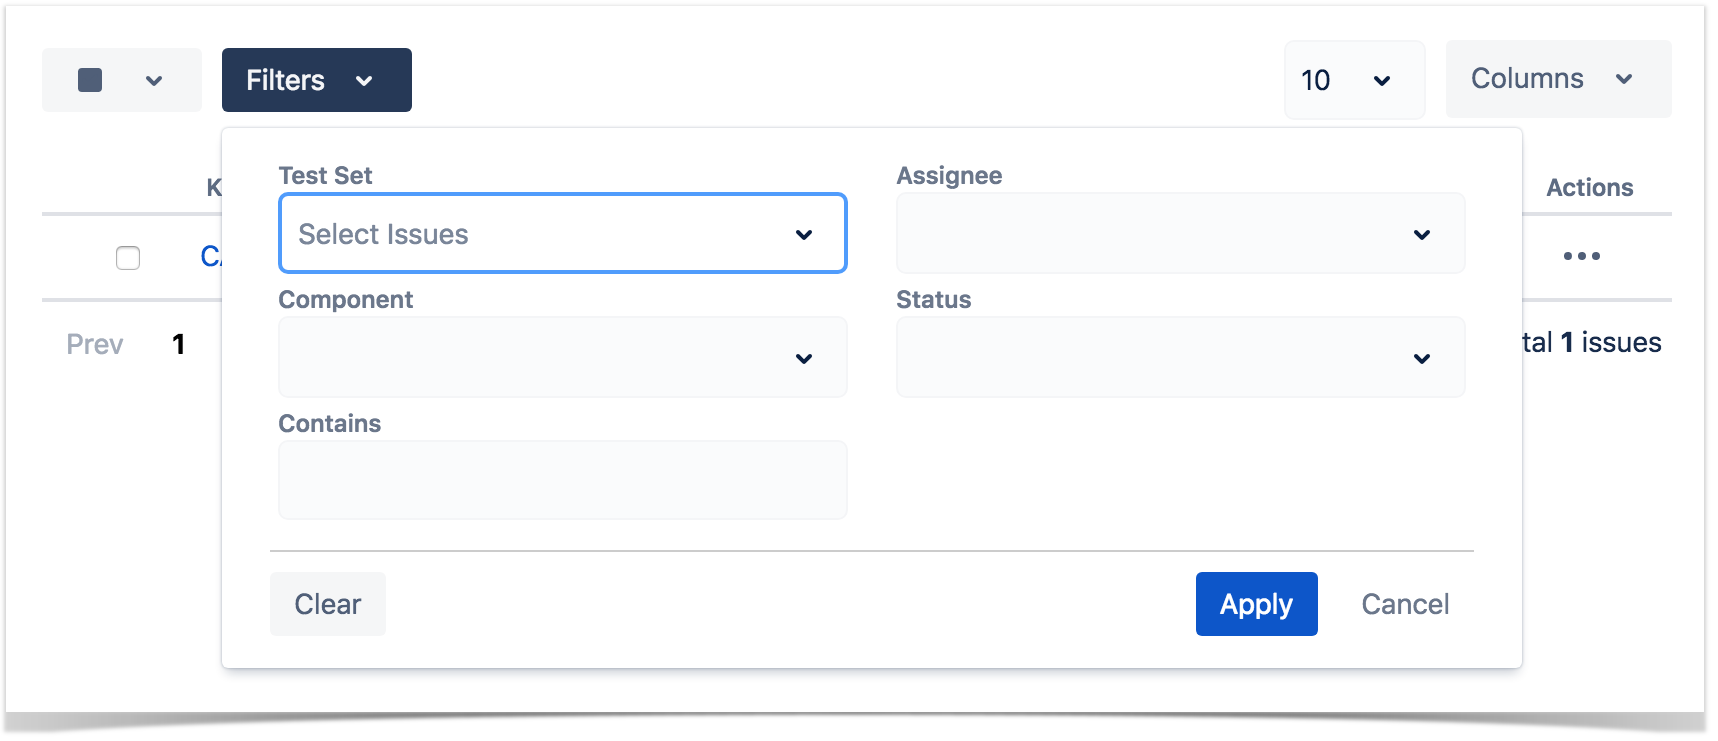
The filters will be stored in the user and Test Execution context, and will be applied whenever going into the execution screen from one of the filtered Tests.
If you wish, you can clear the filter in order to see all Test Runs once again.
![]()
Configure Test Run Columns
More info in Test Runs.
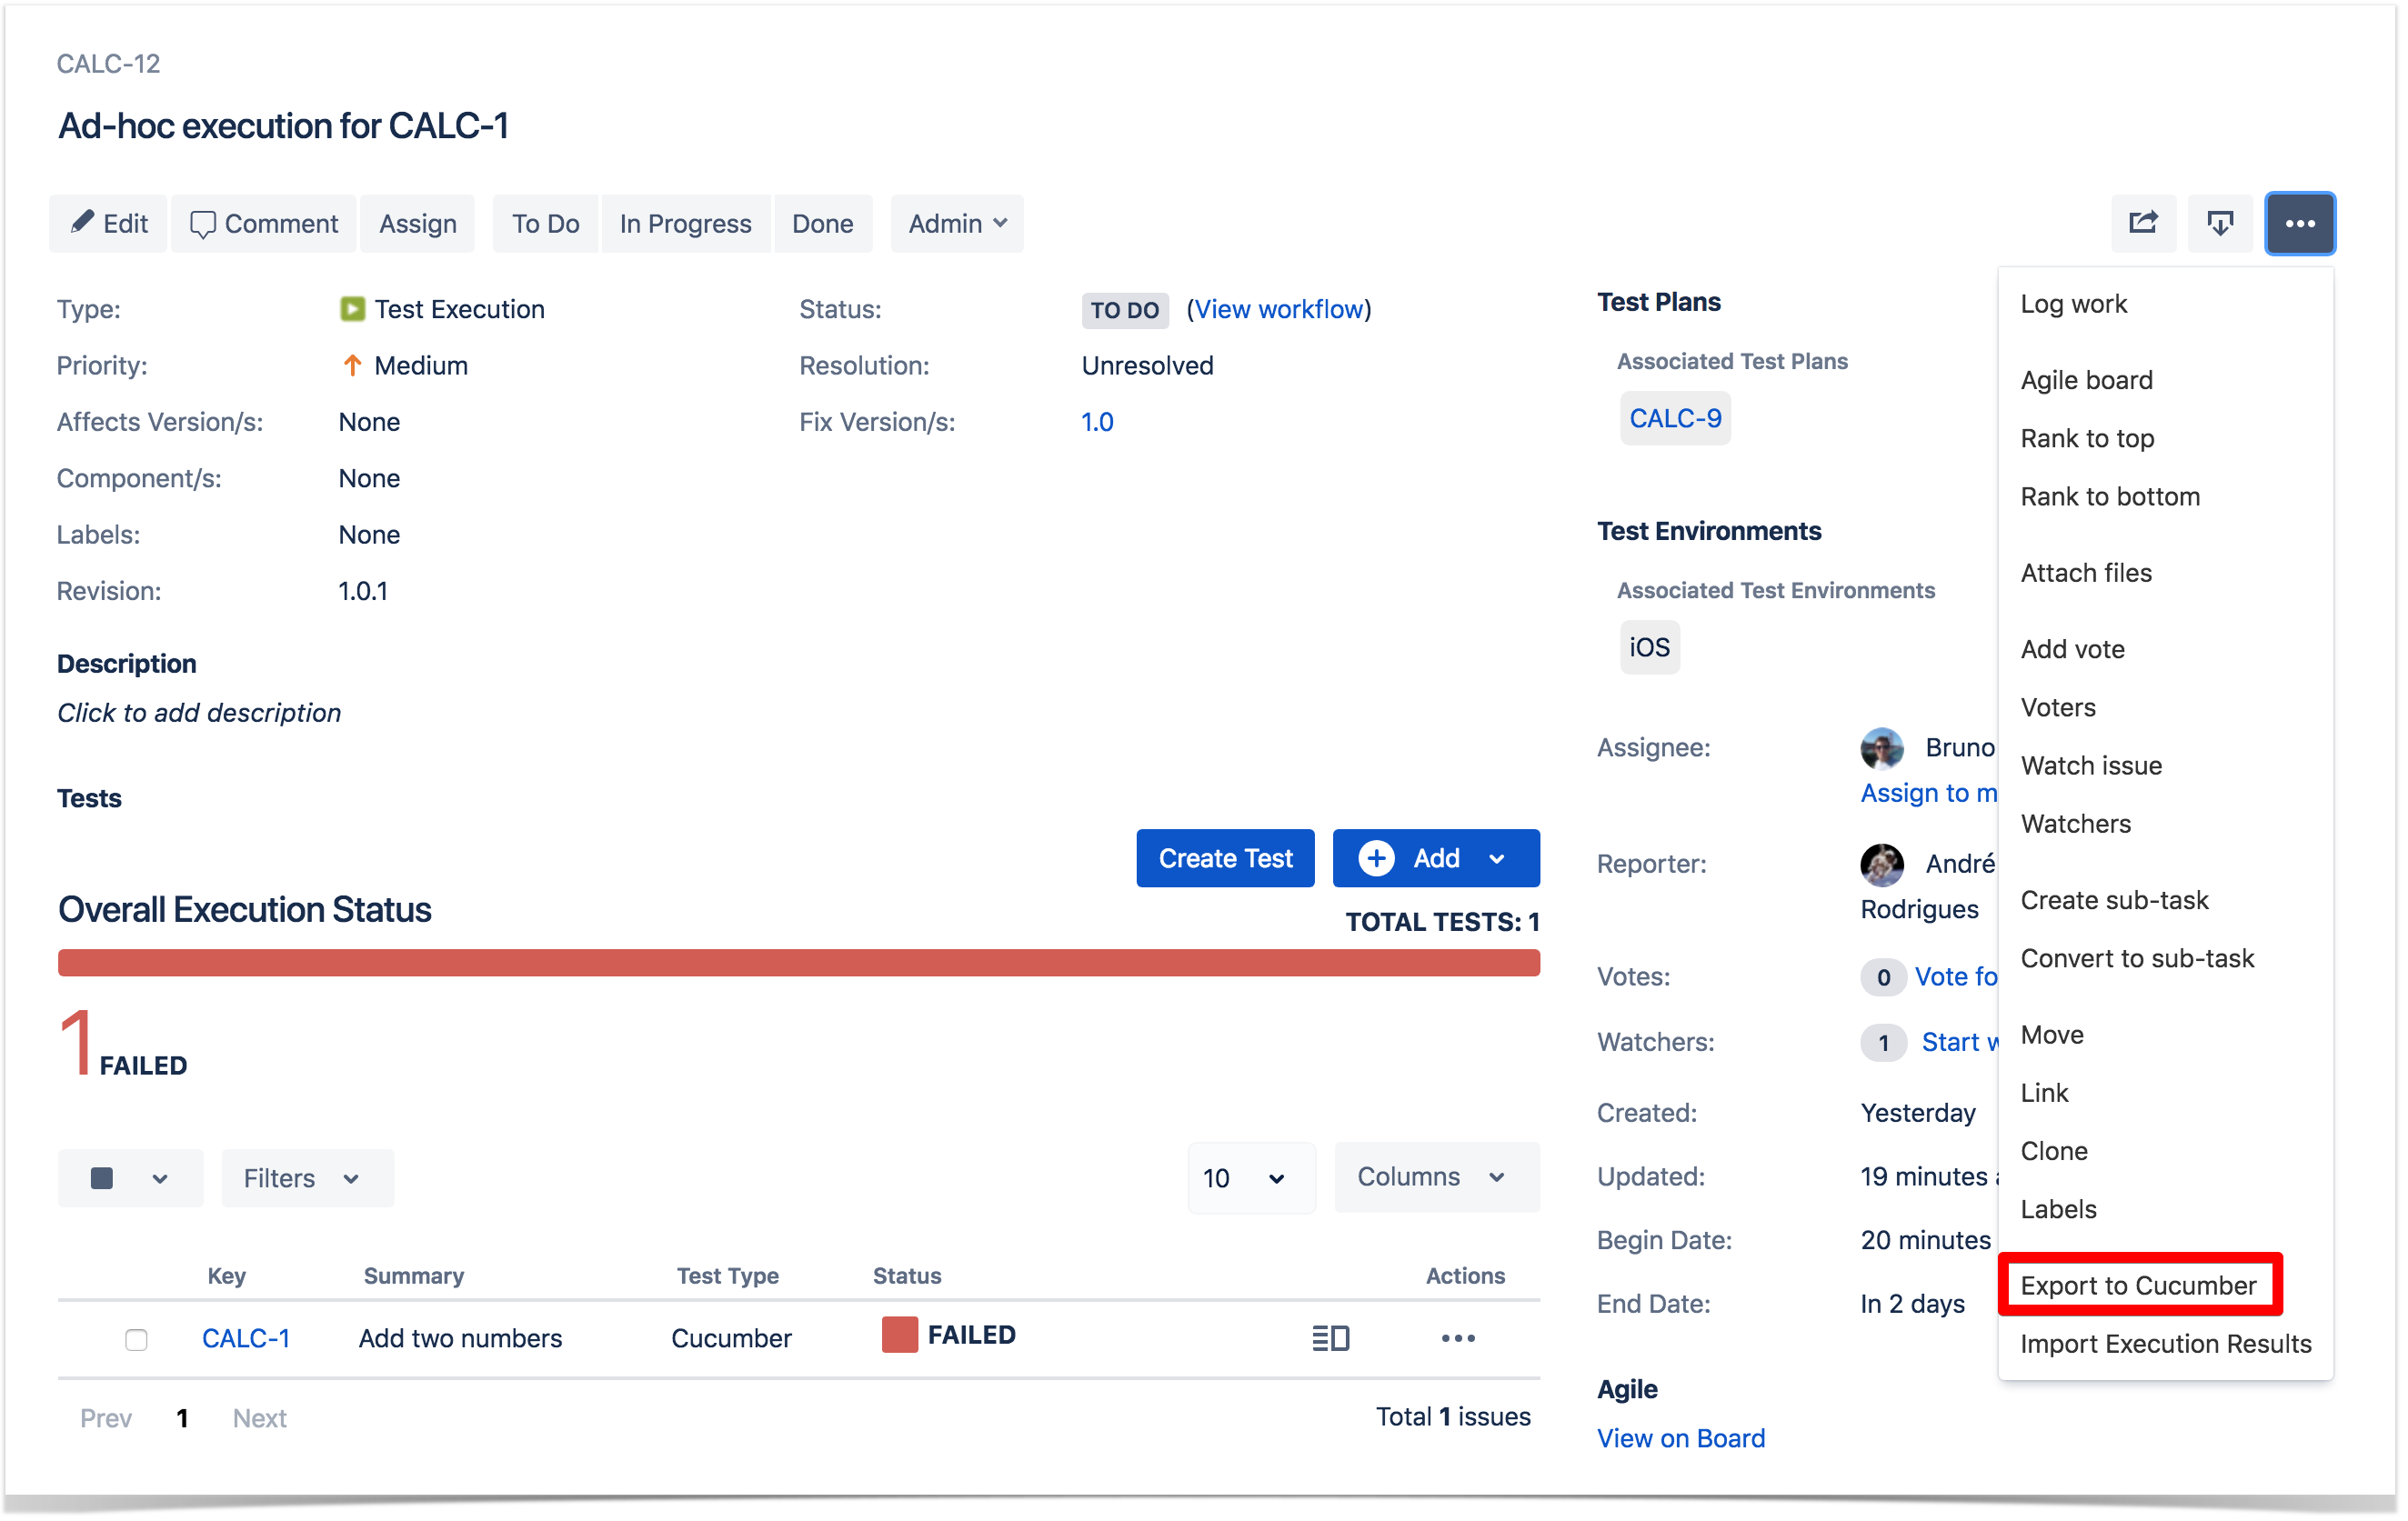
Export to Cucumber
Cucumber Test Executions in JIRA can be exported to feature files ready to be executed in Cucumber. The generated feature files follow the rules defined in Export Rules and take into account the context of the Jira Test Execution issue.
A single Cucumber feature file should be generated and prompted to be downloaded for the Cucumber Test contained on the Test Execution, unless the target Test Execution contains multiple Cucumber Tests or the Cucumber Test is associated with multiple Requirements. In this case, a FeatureBundle zip file will be generated containing a single Cucumber feature file for every Requirement associated with the target Cucumber Test contained on the Test Execution.
To export a Test Execution issue containing Cucumber Tests to feature files,
Step 1: Open the Test Execution issue view page.
Step 2: Select ... > Export to Cucumber. The file will be downloaded from the browser.
Import Automated Test Results
Importing from Test Execution view issue screen
Automated Test results can be imported back to Jira using the Test Execution view issue screen. The Test results can be imported from JSON/XML external files that must follow an Import Results specific scheme.
When importing results, only the Tests contained in the interception between the Tests in the JSON/XML file and the Tests in the selected Test Execution are updated, while the remaining, if any, are ignored. After importing, a new entry with the result of the operation is registered in the Activity Log of the Test Run.
To import Automated Test results to a Test Execution issue containing automated Tests,
Step 1: Open the Test Execution issue view page.
Step 2: Select ... > Import Execution Results. The Import Execution Results dialog will be prompted.
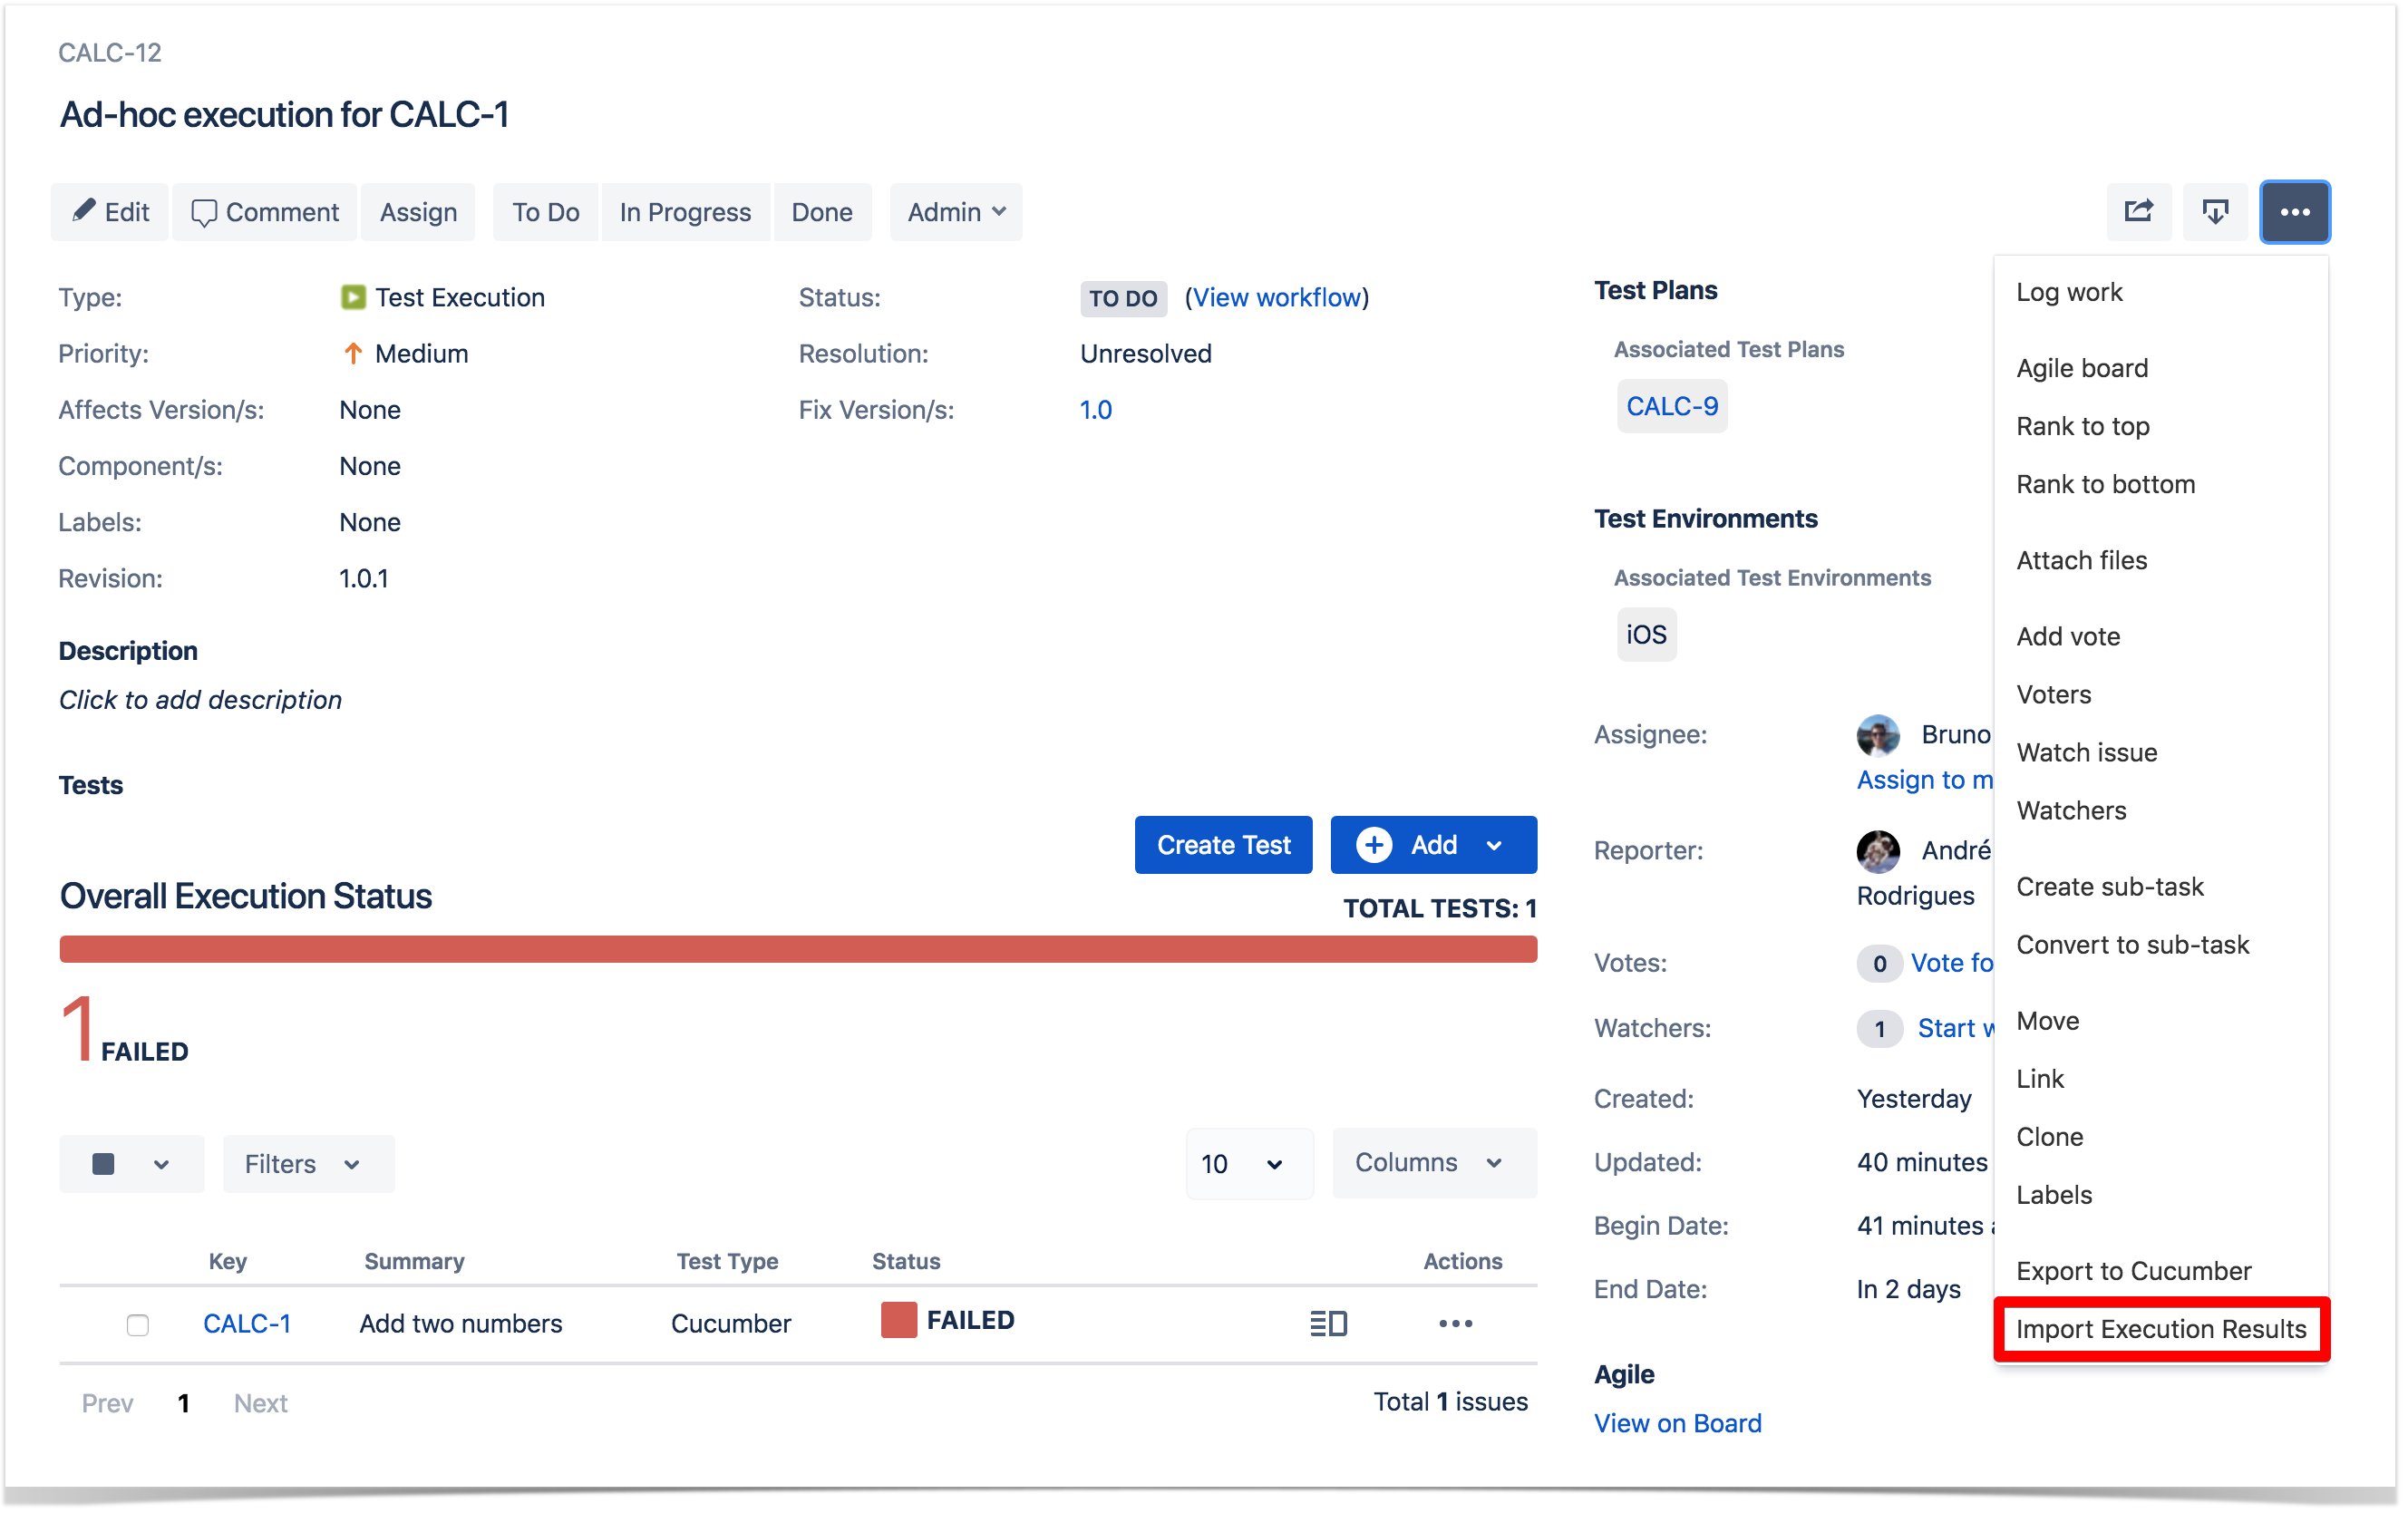
Step 3: Click the Choose file button to navigate to the local disk and select the JSON/XML/ZIP file with the automated execution results for the Test Execution.
Step 4: Click Submit.

Importing from the Execution Details Page
You can also import the Execution Results from the Execution Details page:
Step1: From Test Execution view issue screen, go to the Execution Details page by clicking Execute.
Step 2: Click the Import Execution Results button.
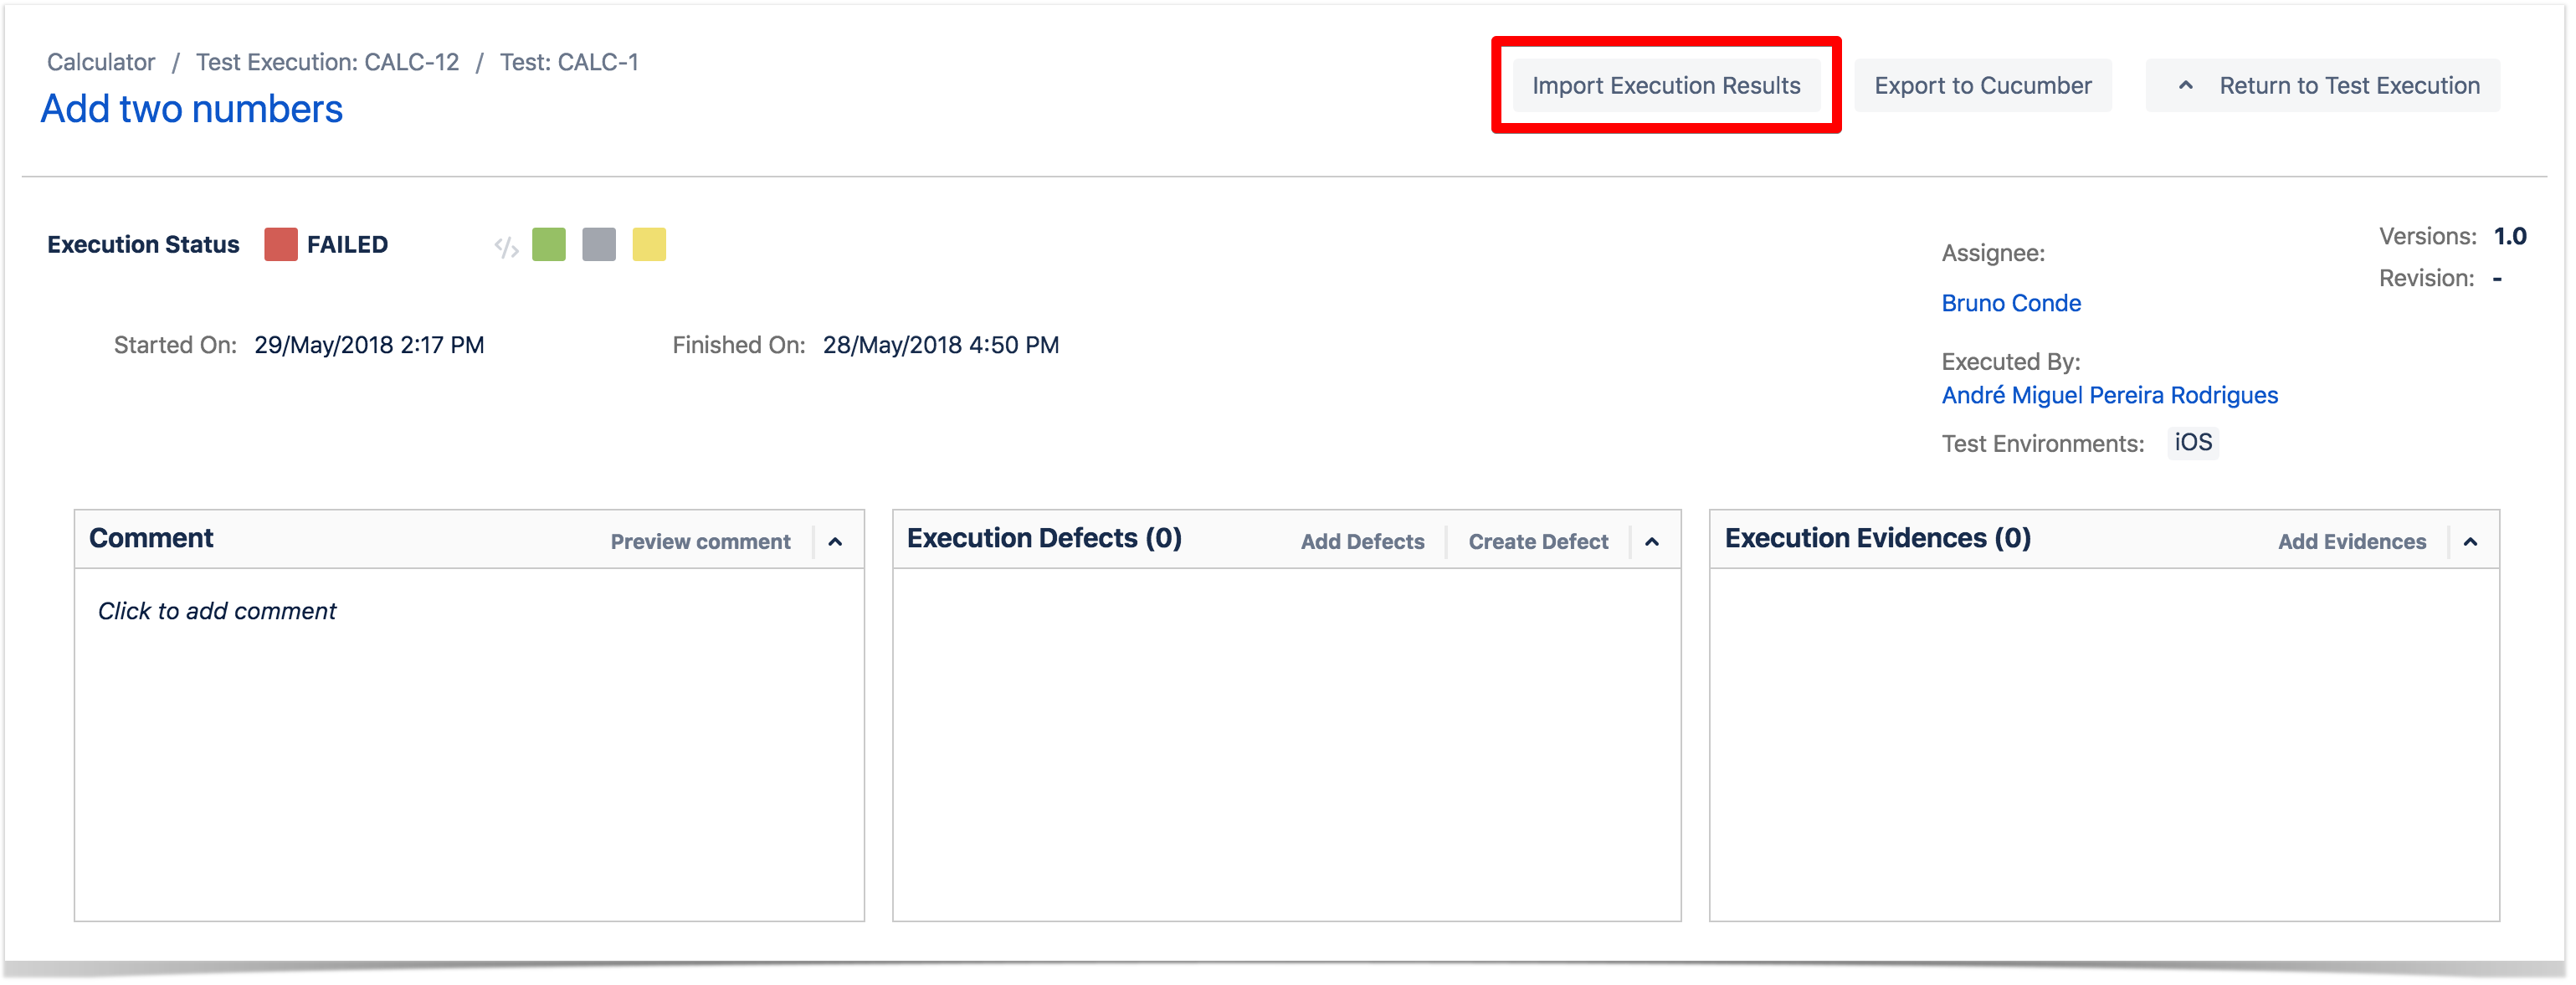
Step 3: Click the Choose file button to navigate the local disk and select the JSON/XML/ZIP file with the automated execution results for the Test Execution.
Step 4: Click Import.