
Overview
With the acquisition of "Automation for Jira" app by Atlassian, Jira Cloud now provides built-in automation capabilities allowing easy implementation of automated Jira processes and workflows.
This way, users can implement rules that are triggered upon some event, executed if certain condition(s) are met and, that perform certain action(s).
Rules can also be triggered manually or may be scheduled.
Since Xray uses issue types for most of its entities, you can take advantage of it to implement some rules related to Xray.
Automation rules are available and, can be created, from the project settings, namely from the "Automation" tab.
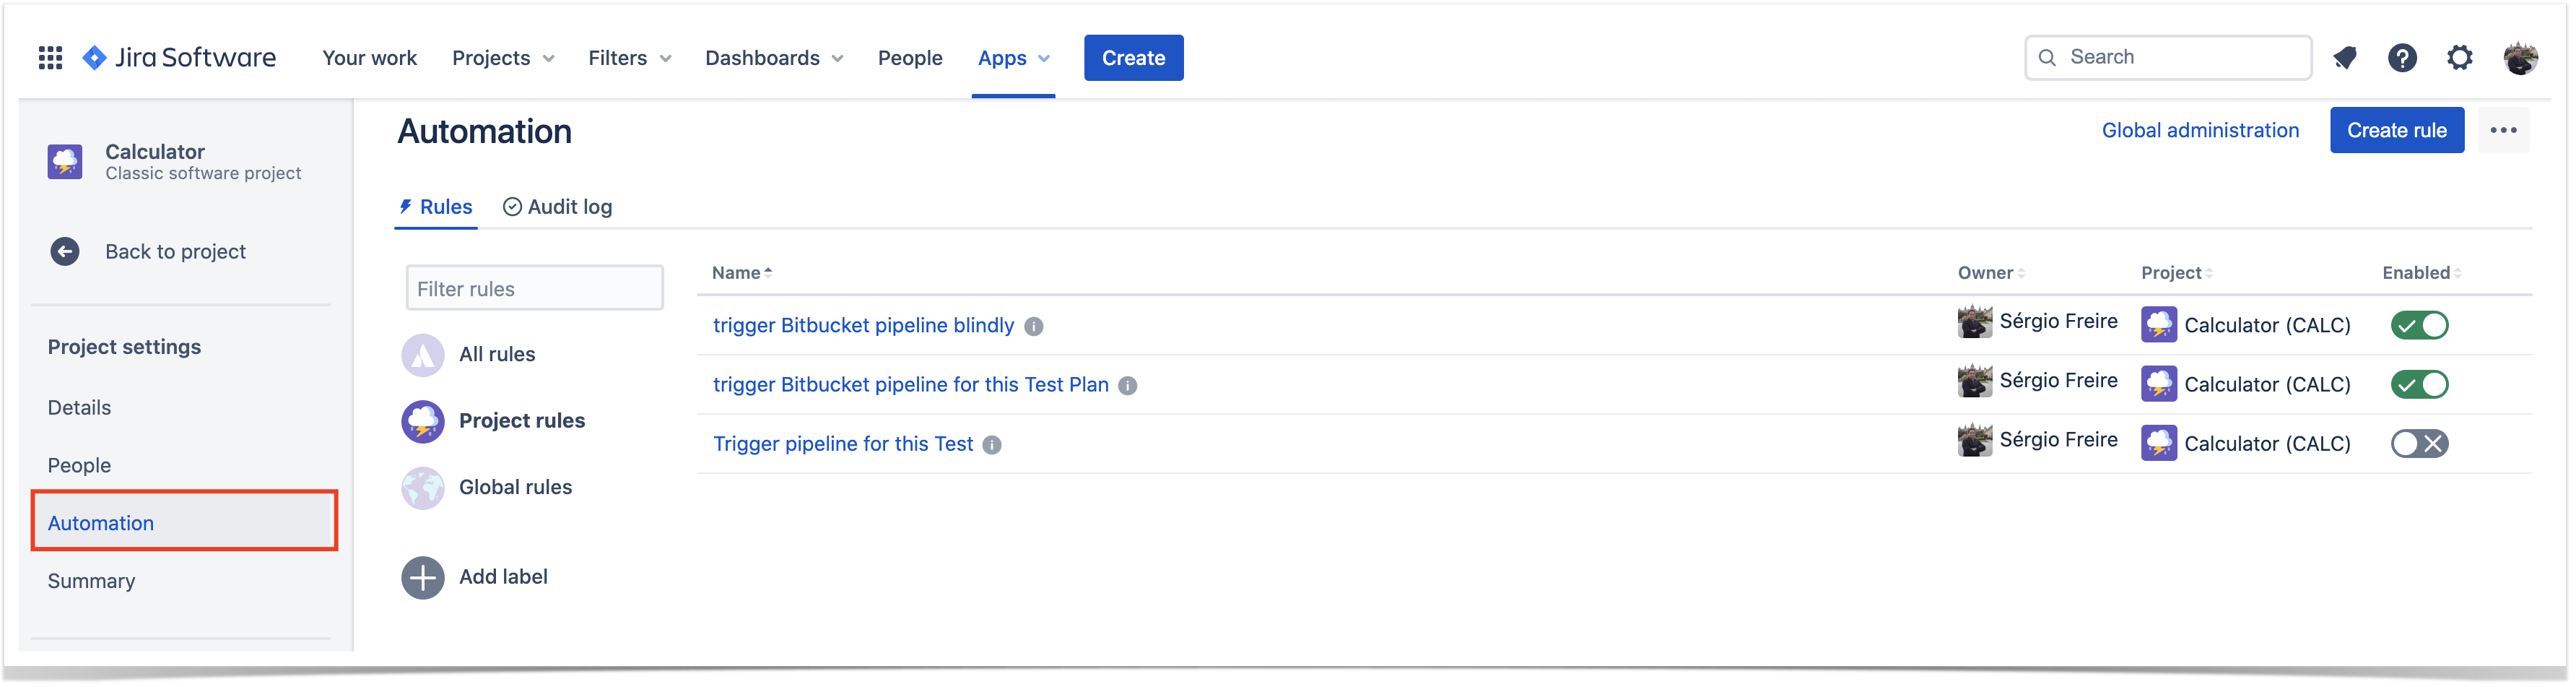
This document highlights some examples around triggering test automation but you may implement other automation rules related to your processes.
Please note
The following examples are provided as-is, no warranties attached; use them carefully.
Please feel free to adapt them to your needs.
Note: We don't provide support for Jira Cloud's Automation capabilities; if you have doubts concerning its usage, please contact Atlassian. If you have specific needs related to Xray, feel free to reach out Xray support and share them with us.
Usage Examples
Jenkins
Trigger a Jenkins project build from an issue
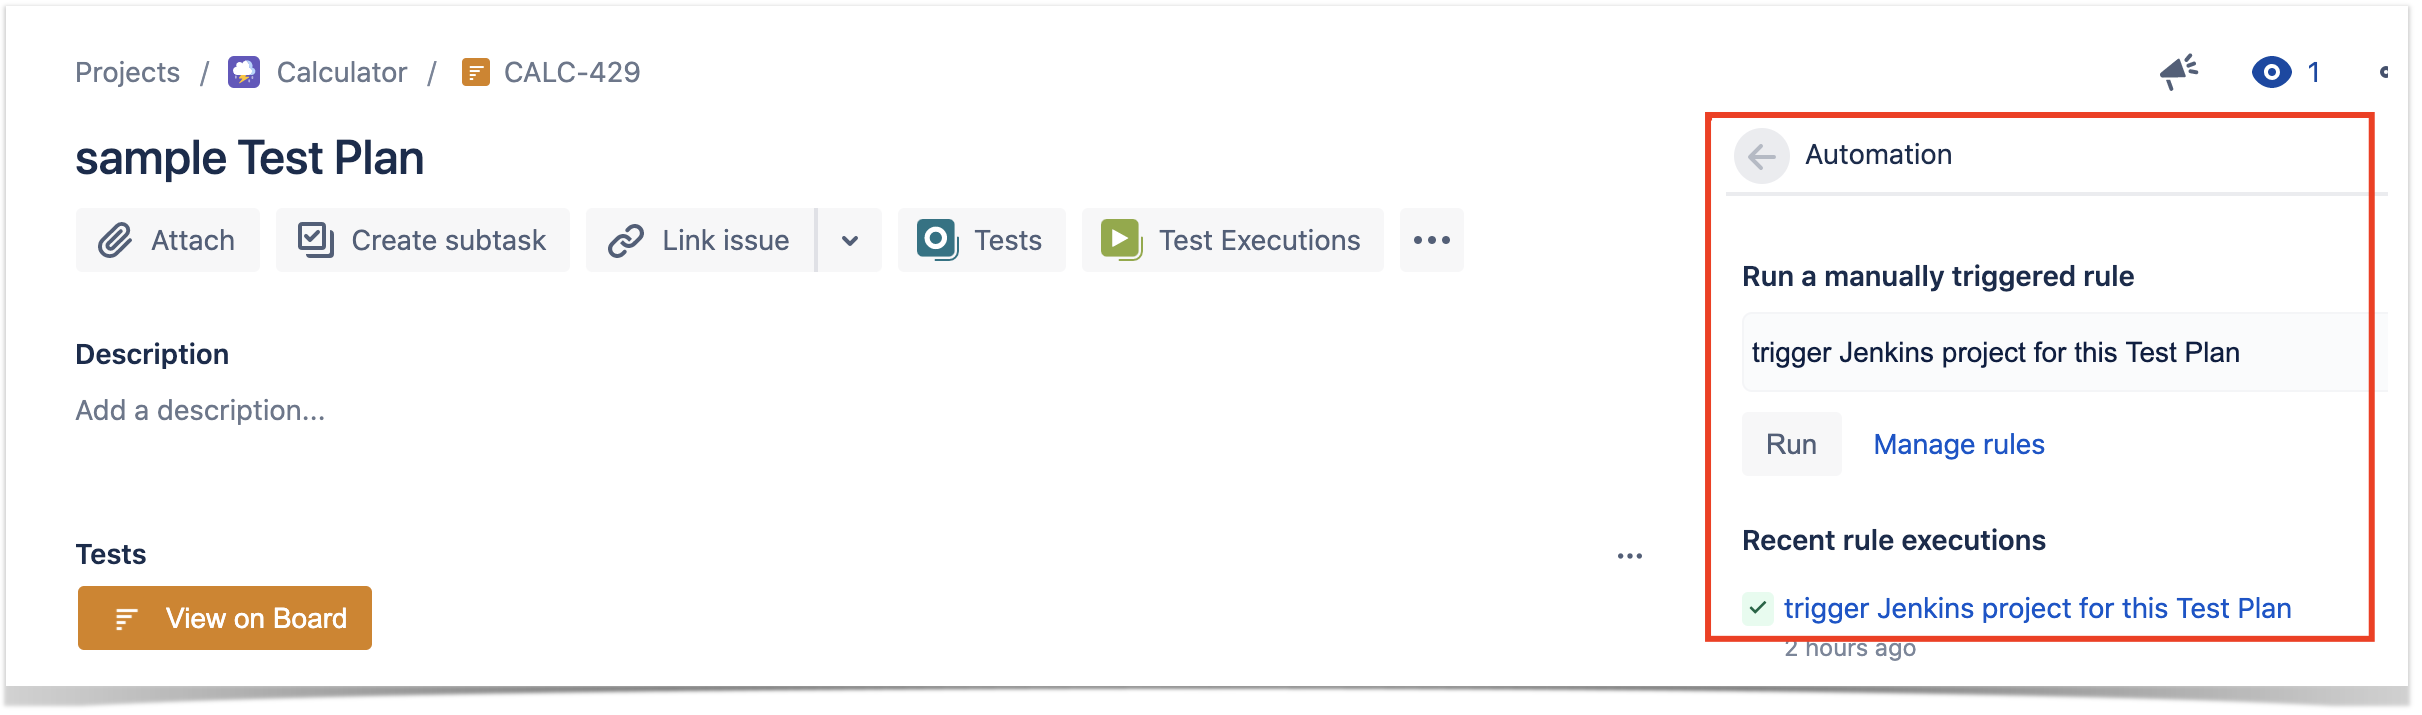
In this very simple scenario, we'll implement a rule, triggered manually, that will trigger a Jenkins project/job. The action will be available from the "Automation" panel, in all issues of the selected project.
We're assuming that:
- you just want to trigger a CI job, period; this job may be totally unrelated to the issue from where you triggered it
- what the CI job will do, including if it will report the results back to Xray or not, is not relevant
Jenkins configuration
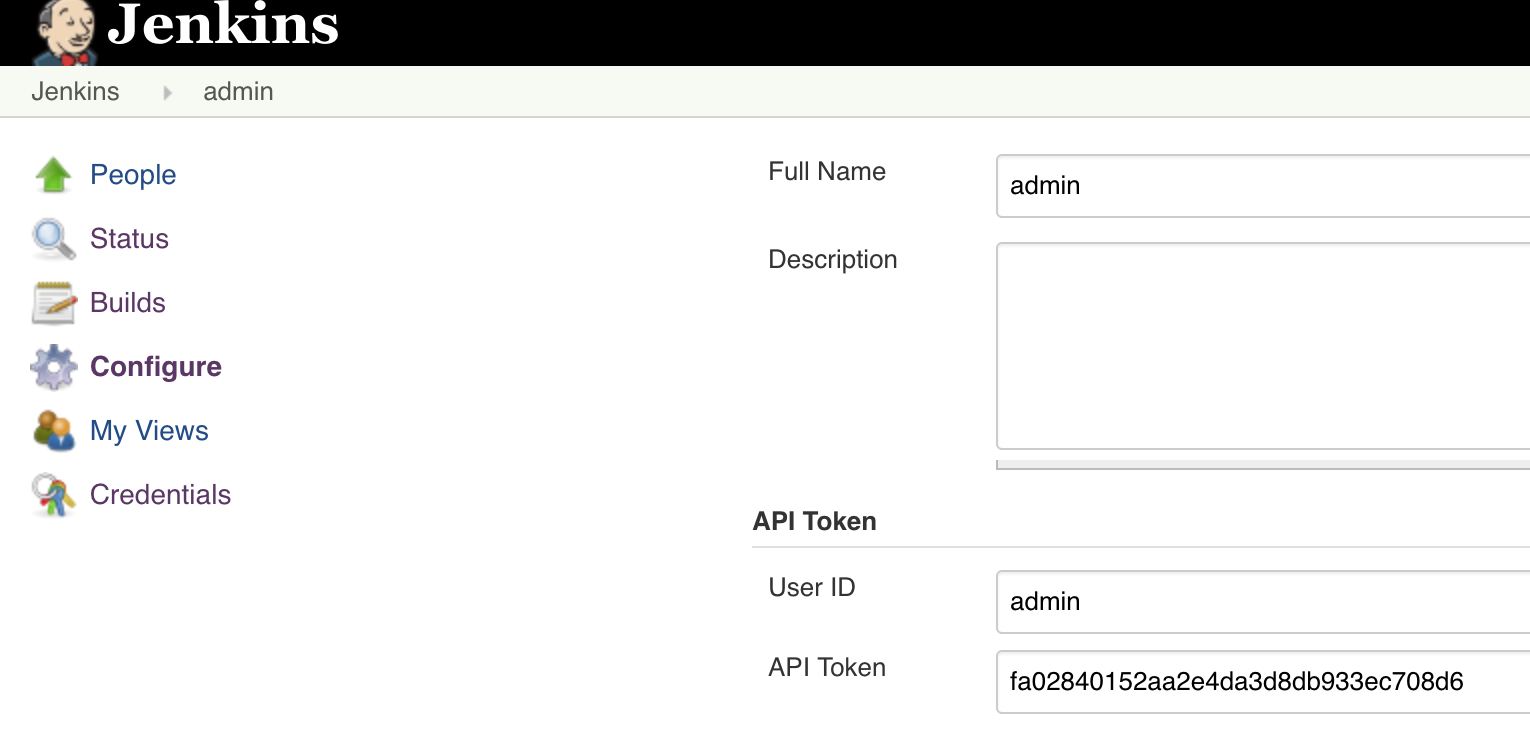
In Jenkins, we need to generate an API token for some user, which can be done from the profile settings page.
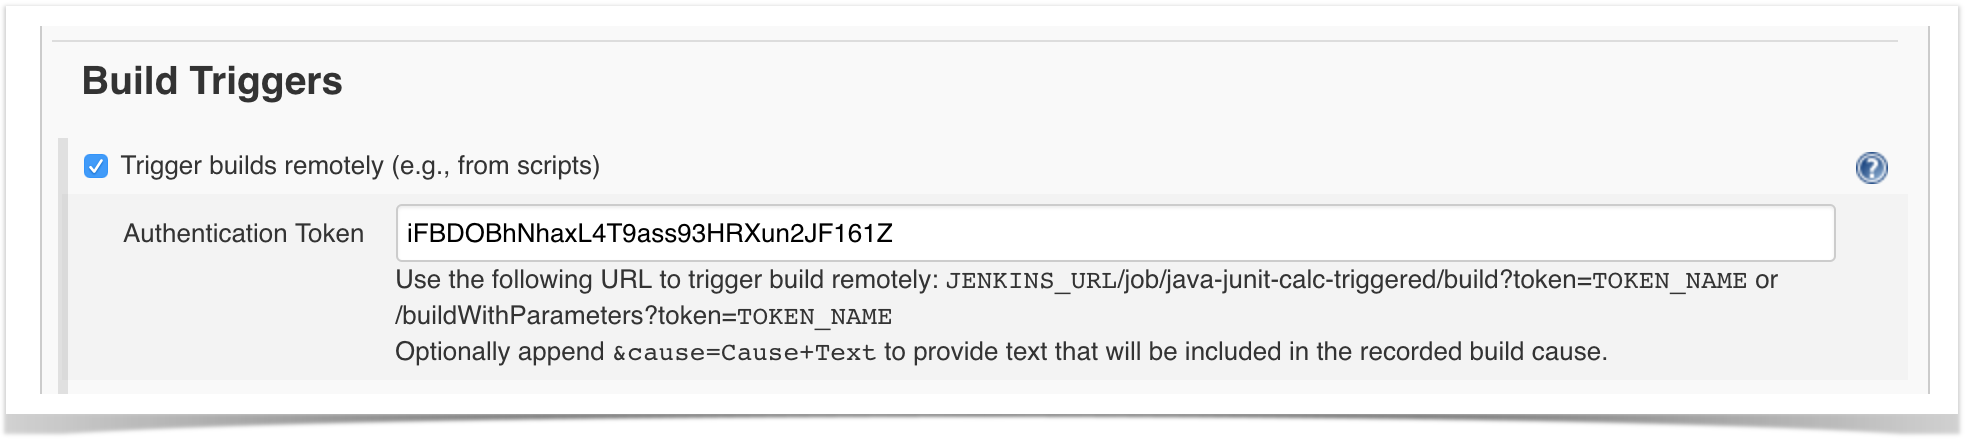
At the project level, we need to enable remote build triggers, so we can obtain an "authentication token" to be used in the HTTP request afterwards.

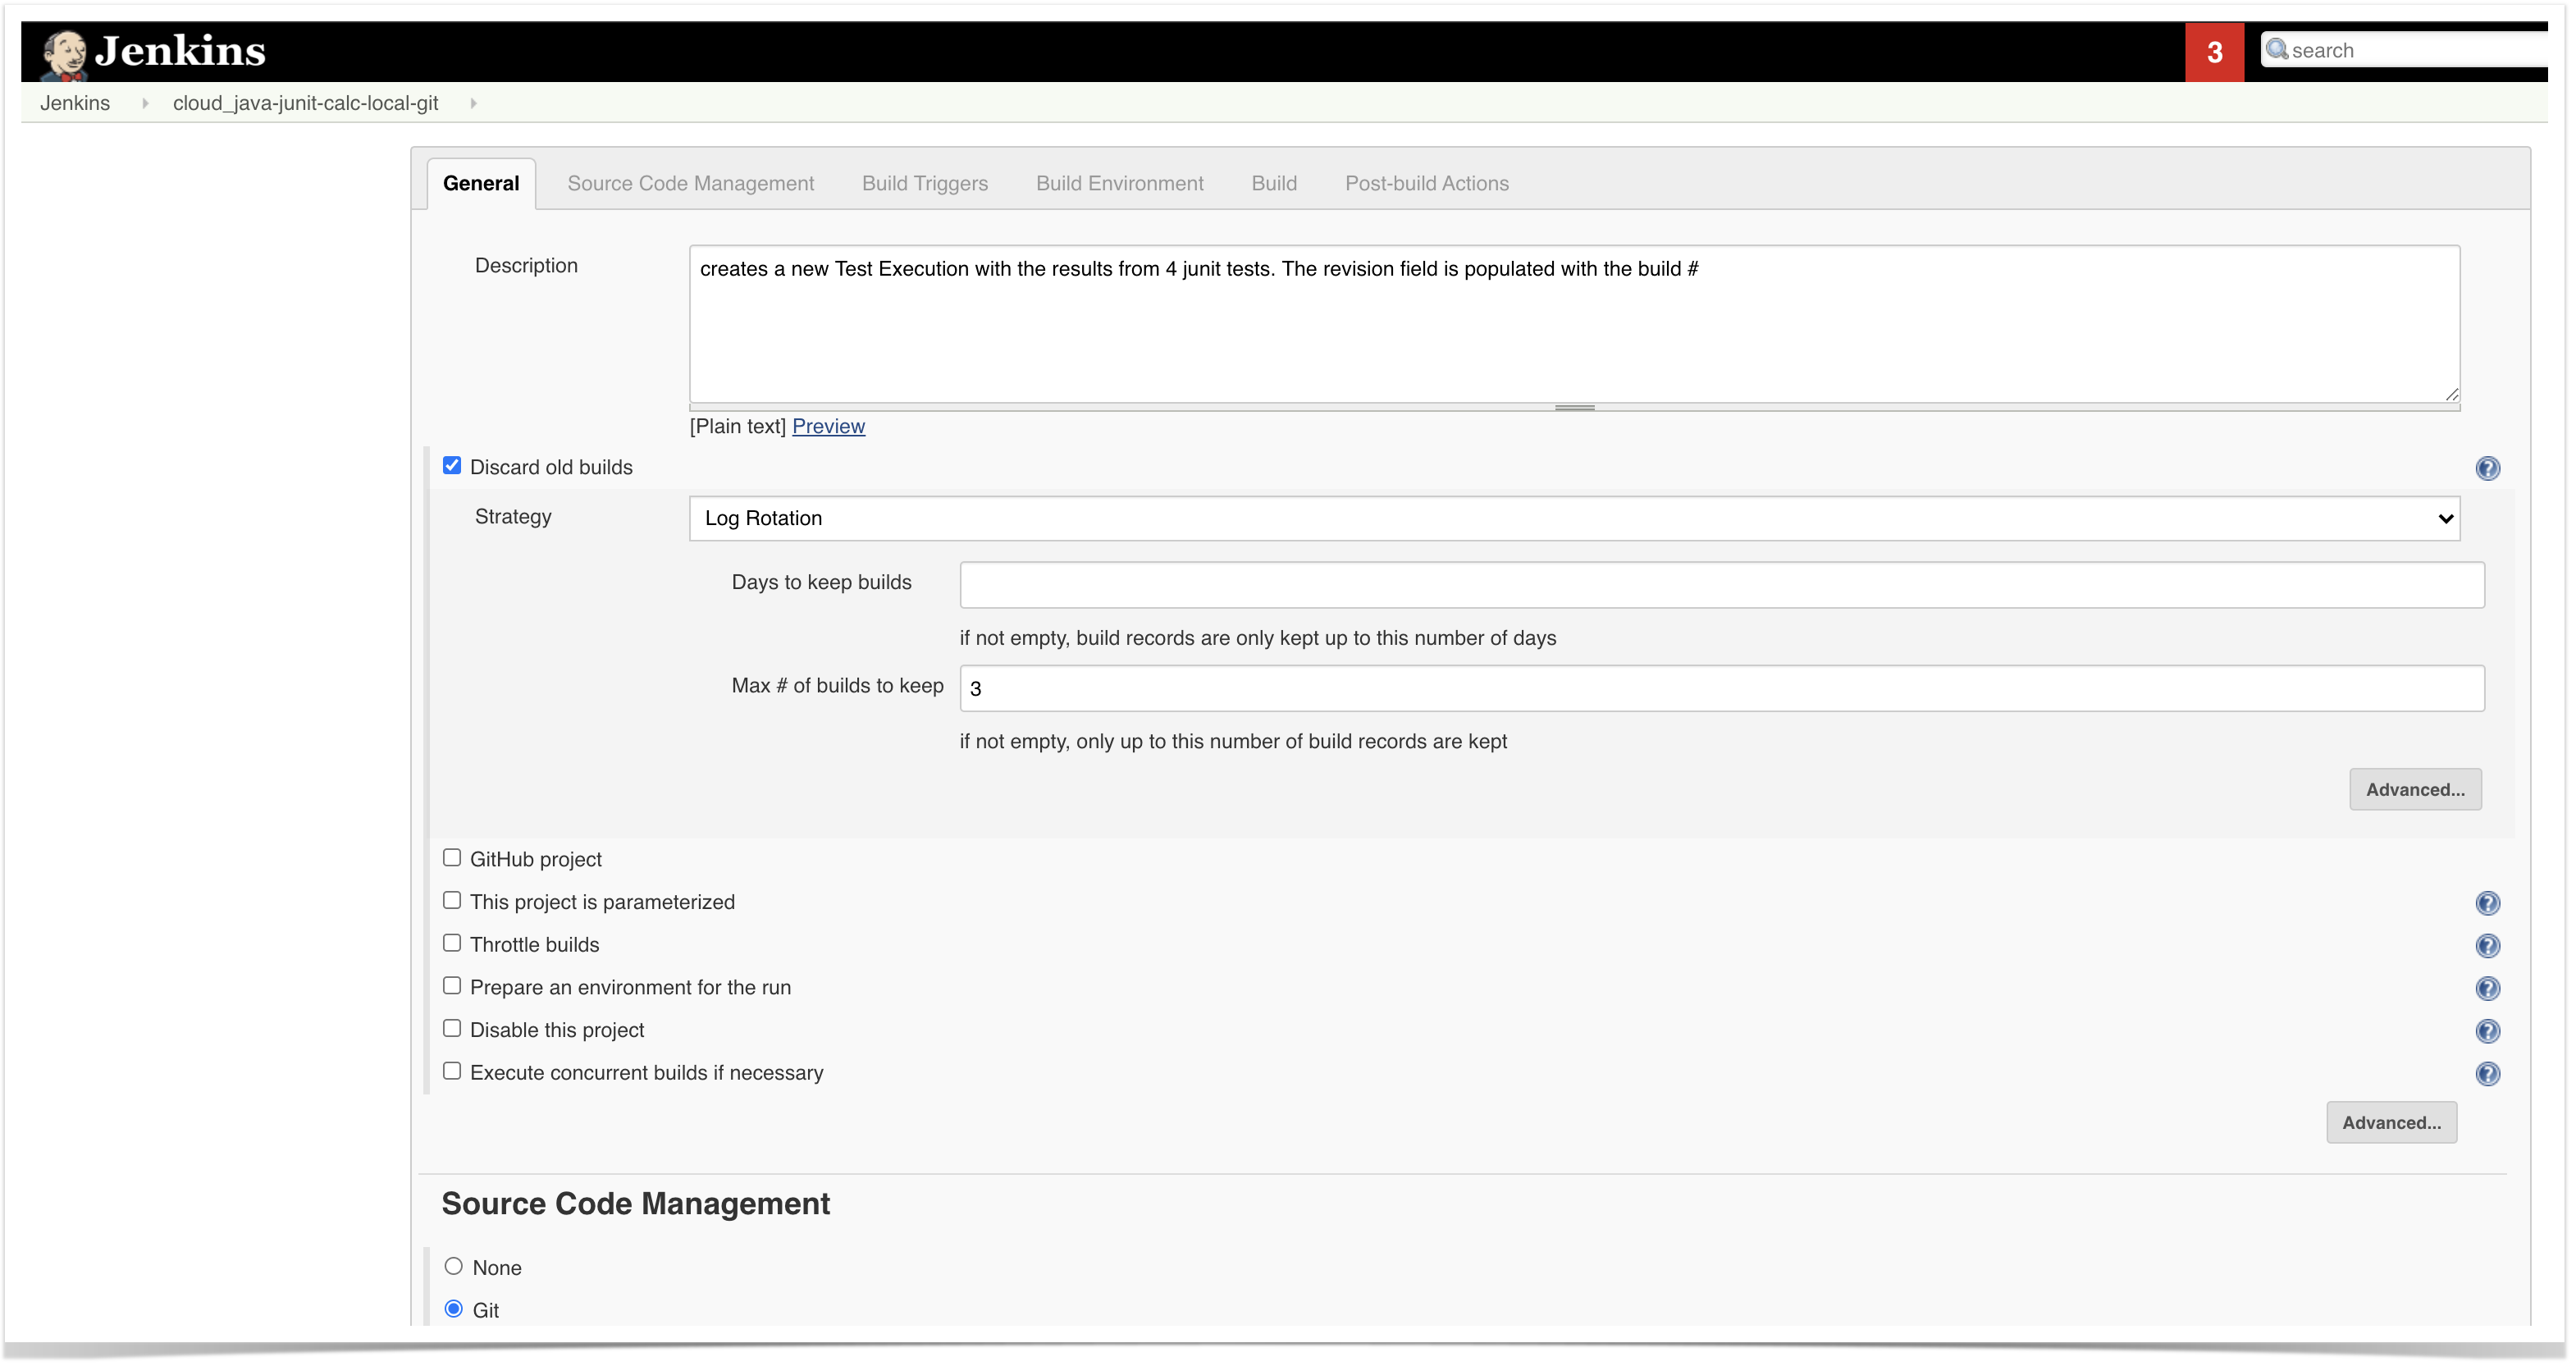
The project itself is a normal one, without parameters.
Automation configuration
- create a new rule and define the "When" (i.e. when it to should be triggered), to be "Manually triggered"
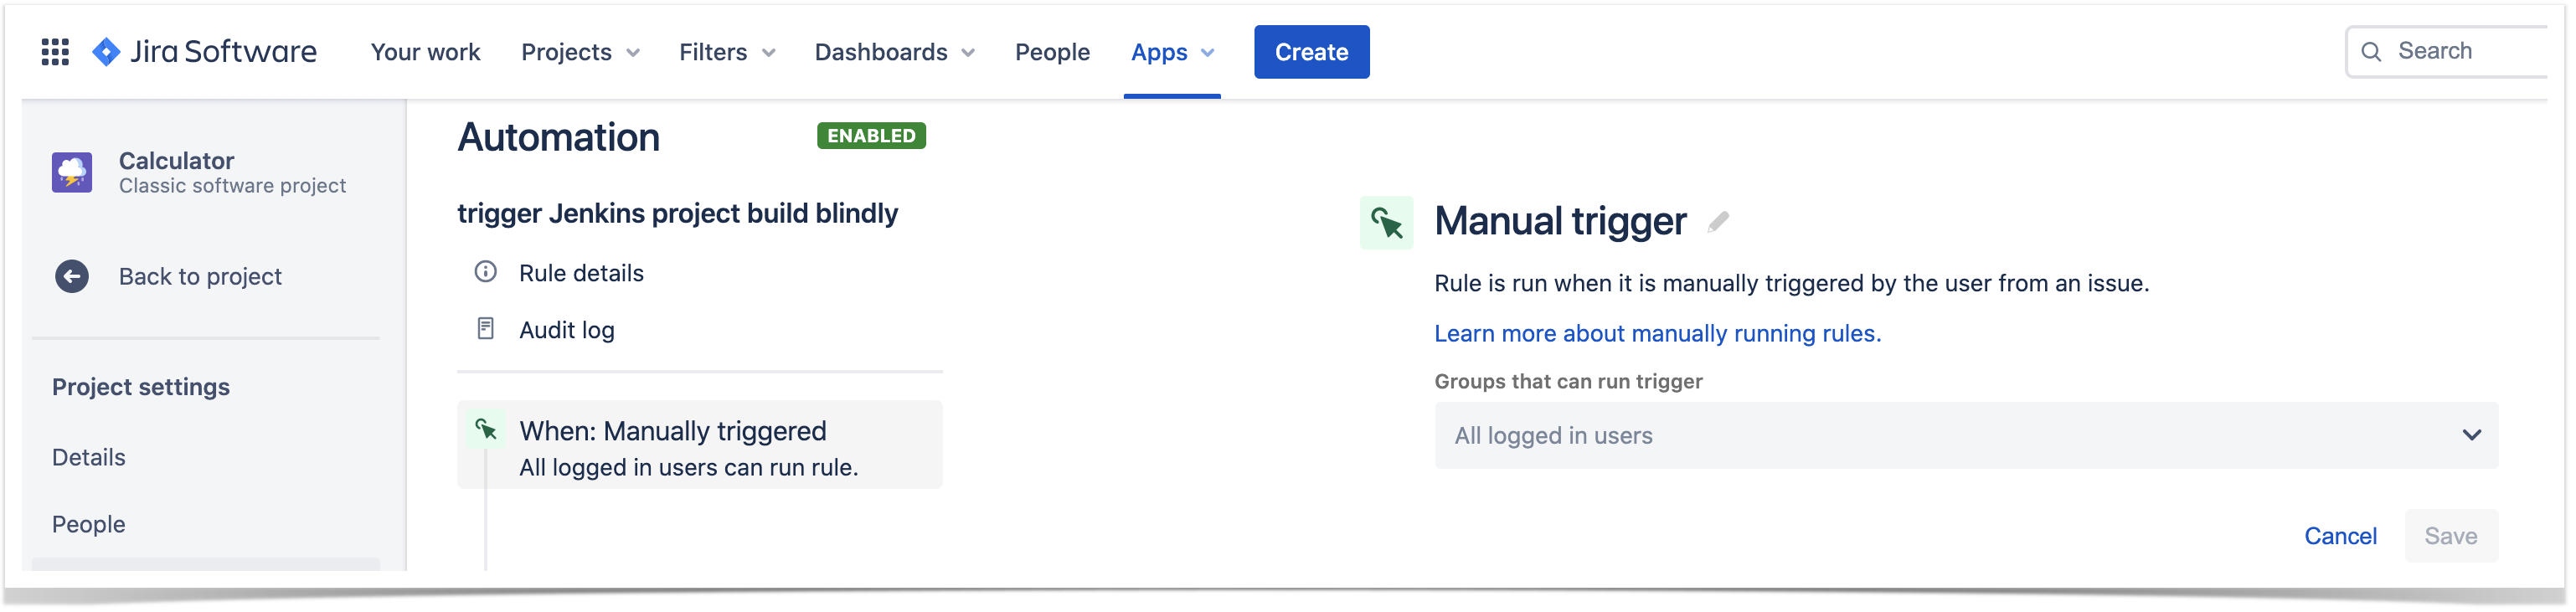
2. define an action (i.e. the "Then") as "Send webhook" and configure it as follows
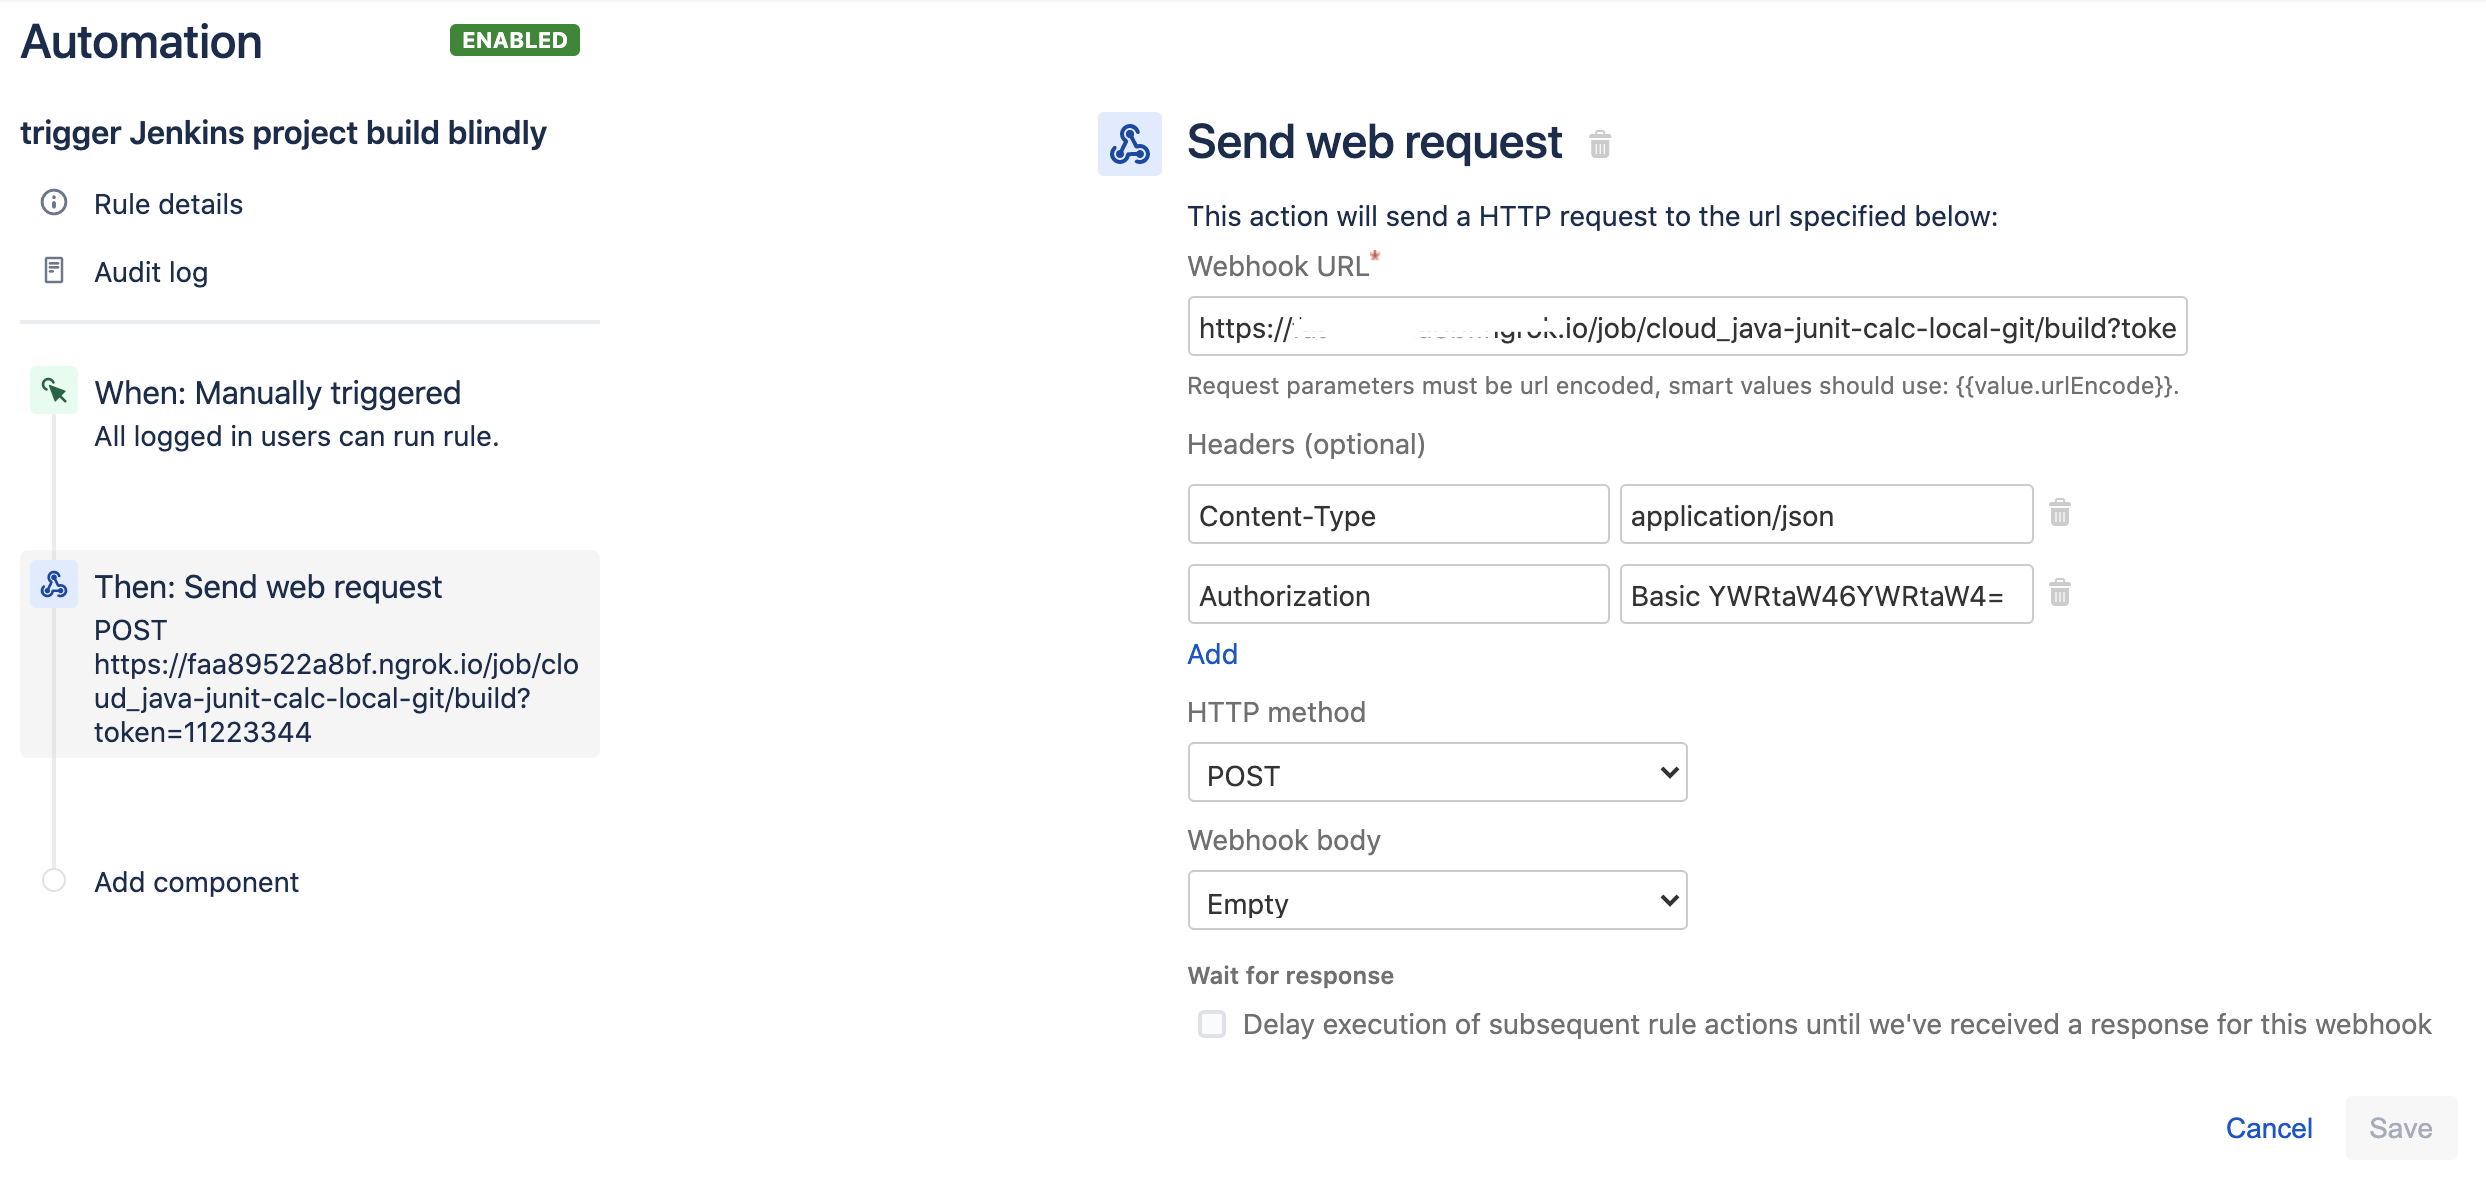
- the Webhook URL provided above follows this syntax:
- <jenkins_base_url>/job/<name_of_jenkins_project_job>/build?token=<token>
- besides the "Content-Type" header that should be "application/json", define also an "Authorization" header having the value "Basic <auth>", where the base64 encoded <auth> can be generated using your Jenkins API credentials
After publishing the rule, you can go to the screen of an issue and trigger the Jenkins project/job.
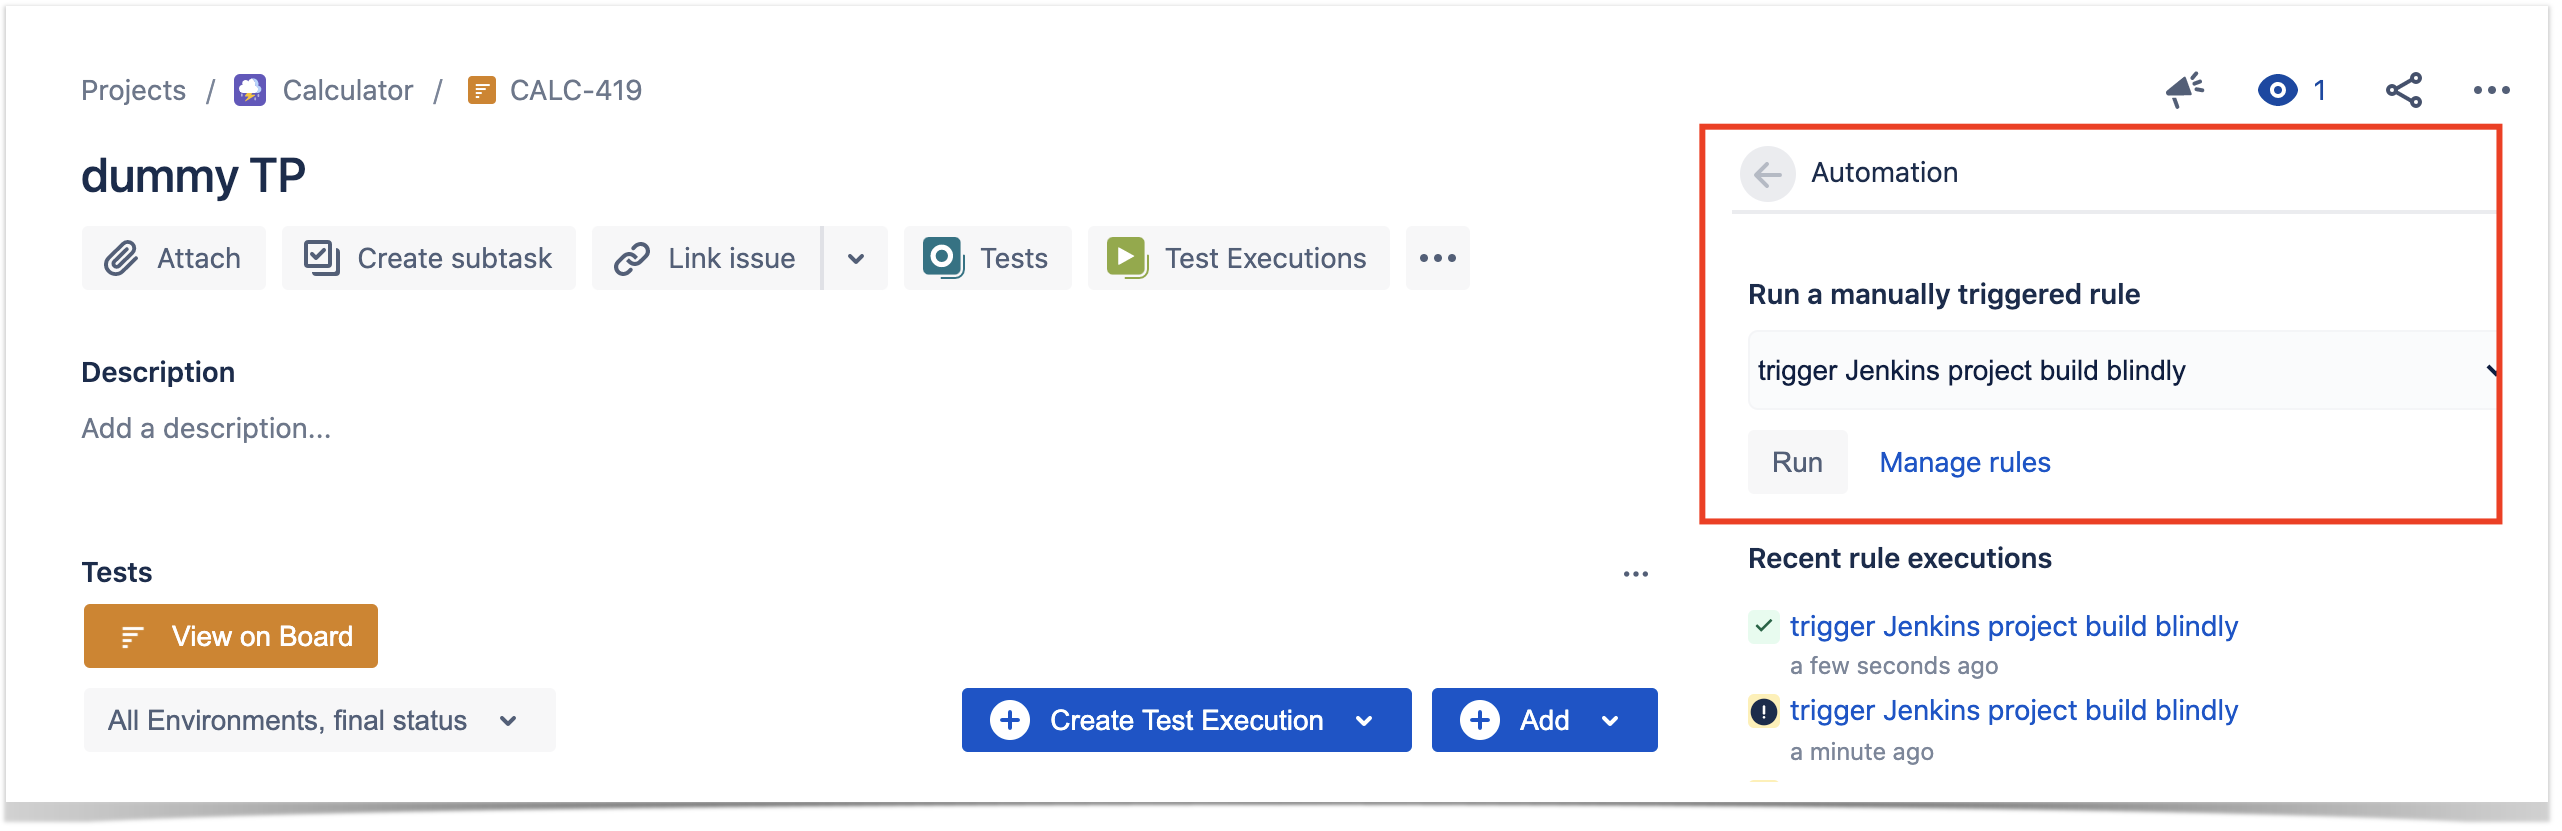
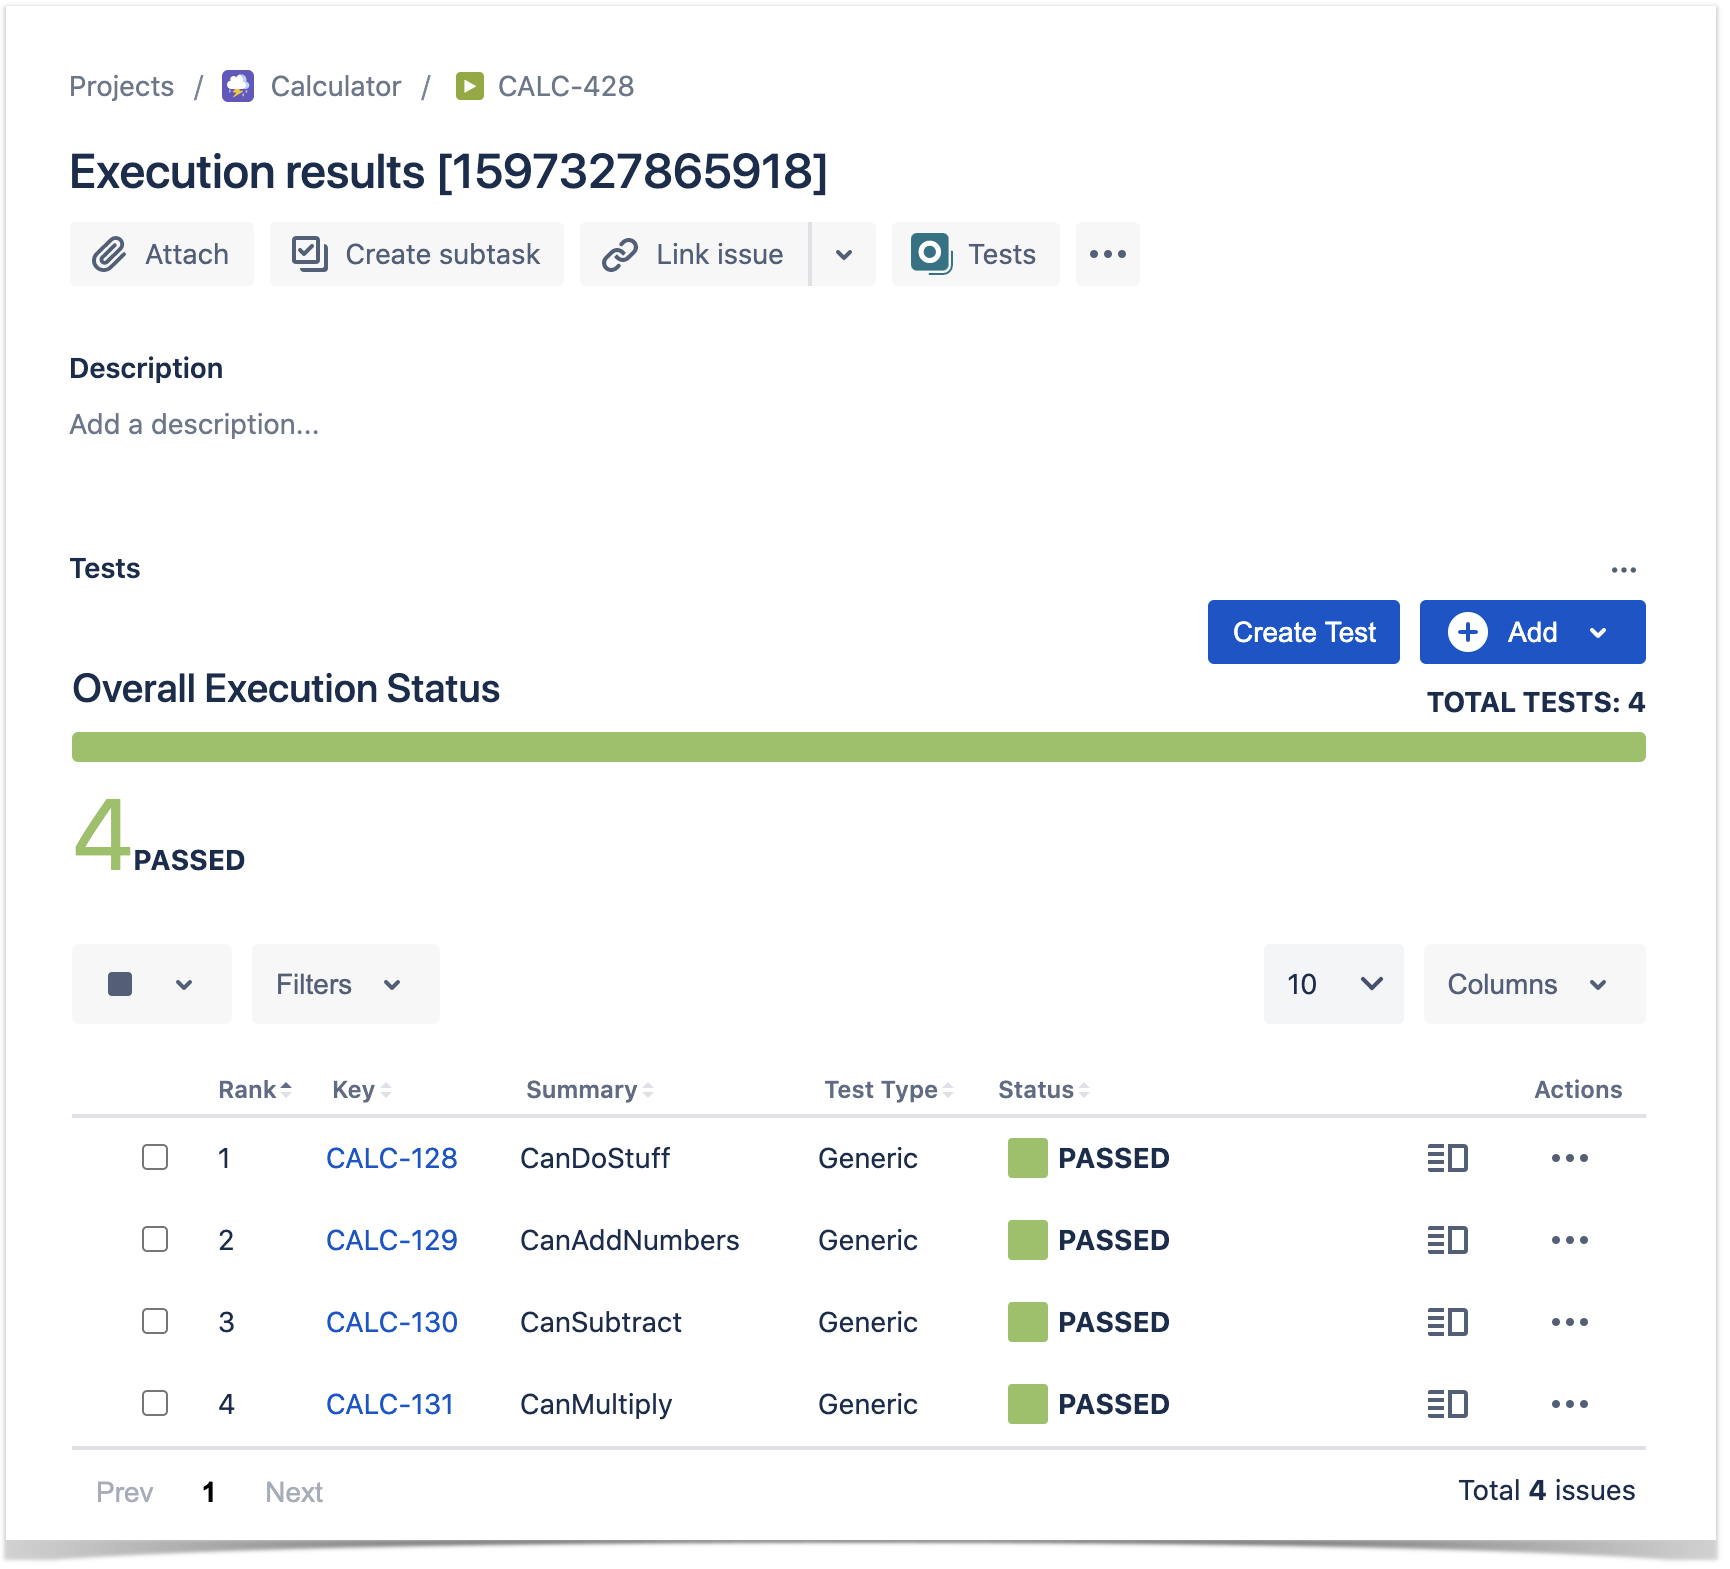
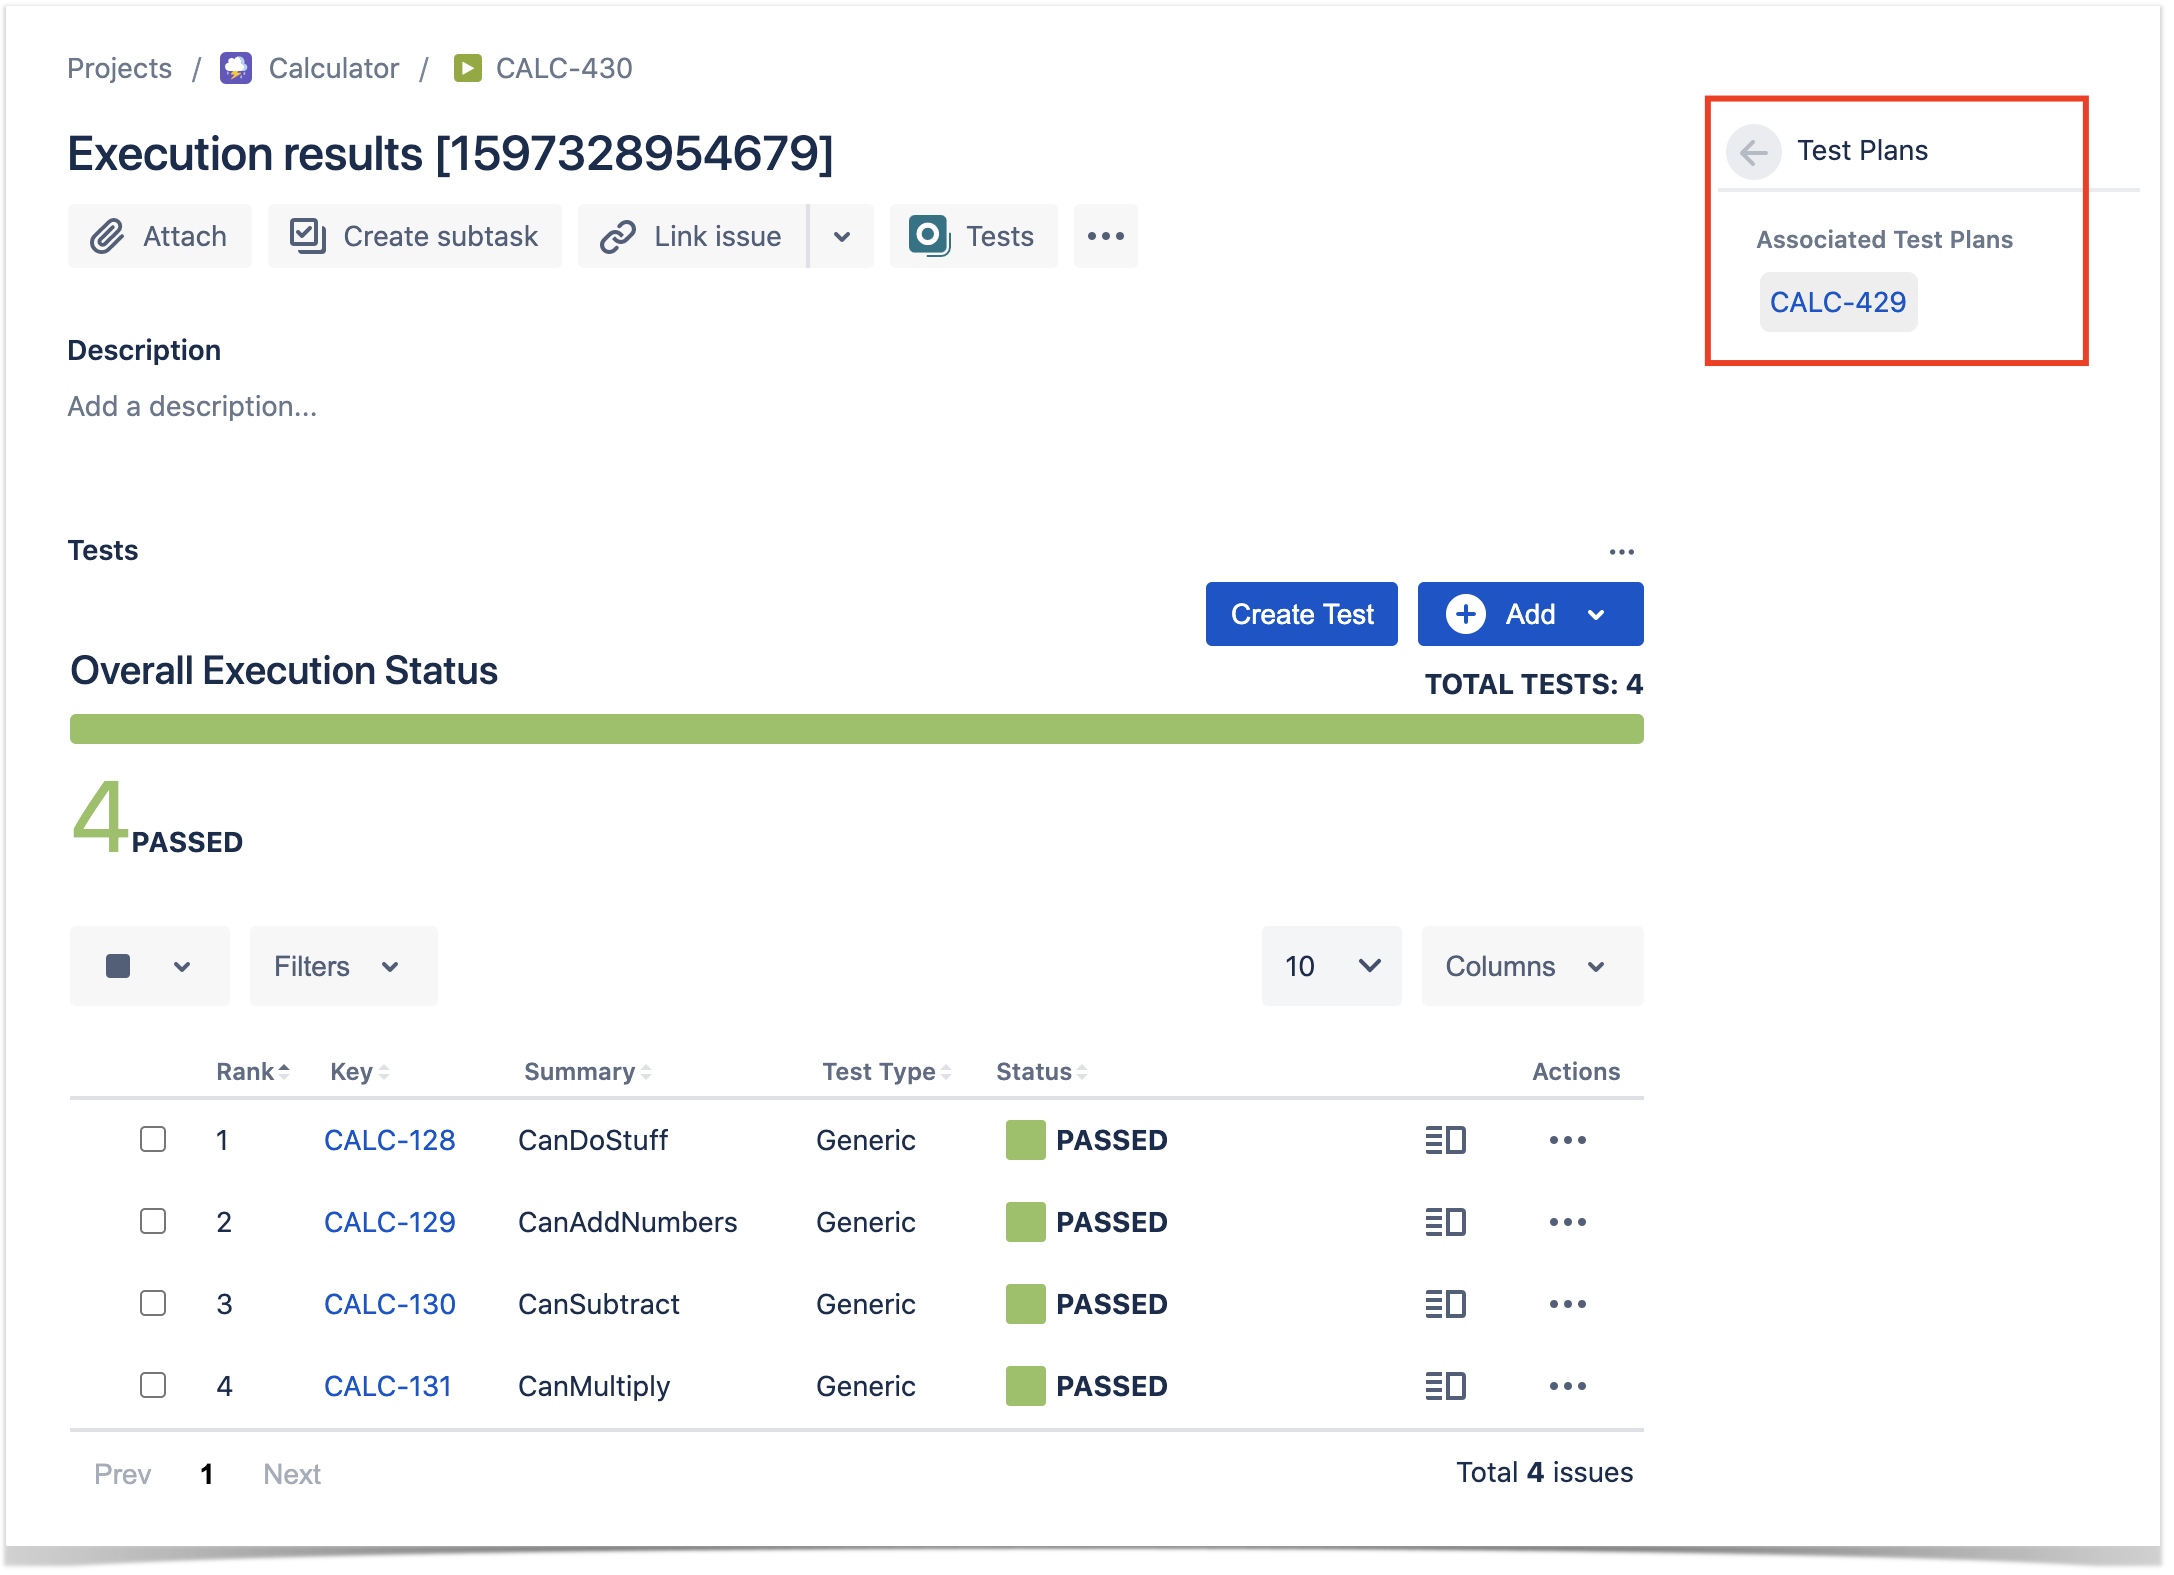
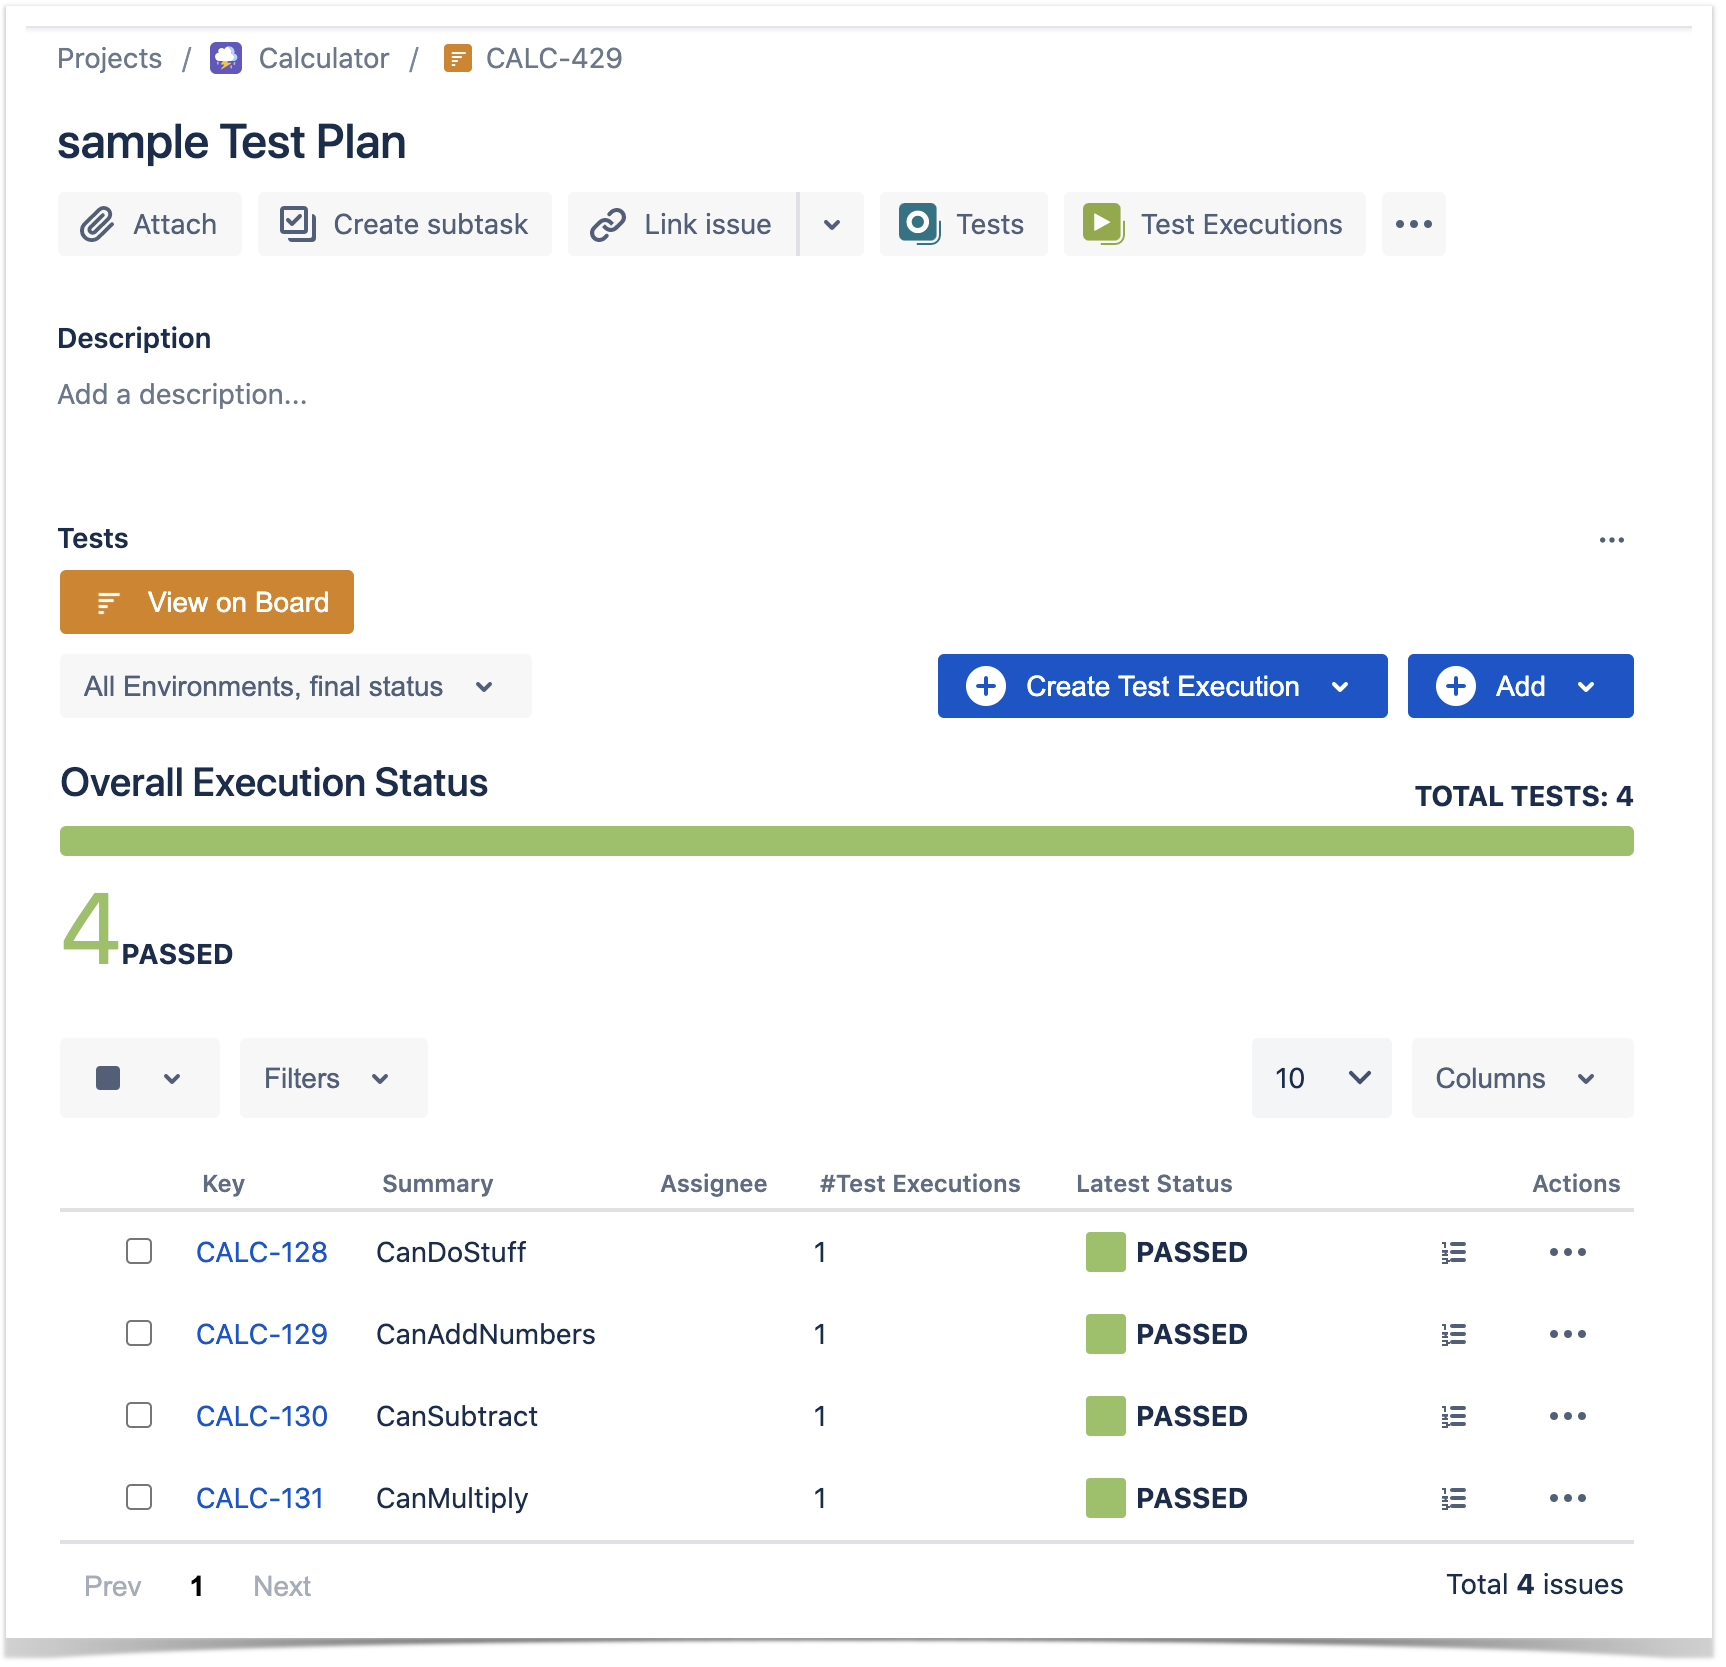
In this case, since Jenkins was configured to report results back to Xray, a new Test Execution would be created in Jira/Xray.
Trigger a Jenkins project build from a Test Plan and report the results back to it
In this simple scenario, we'll implement a rule, triggered manually, that will trigger a Jenkins project/job. The action will be available from the "Automation" panel, for all Test Plan issues of the selected project.
We're assuming that:
- you just want to trigger a CI job, period; this job may be totally unrelated to the issue from where you triggered it
- the results will be submitted back to Xray, if the project is configured to do so in Jenkins
Jenkins configuration
In Jenkins, we need to generate an API token for some user, which can be done from the profile settings page.

At the project level, we need to enable remote build triggers, so we can obtain an "authentication token" to be used in the HTTP request afterwards.
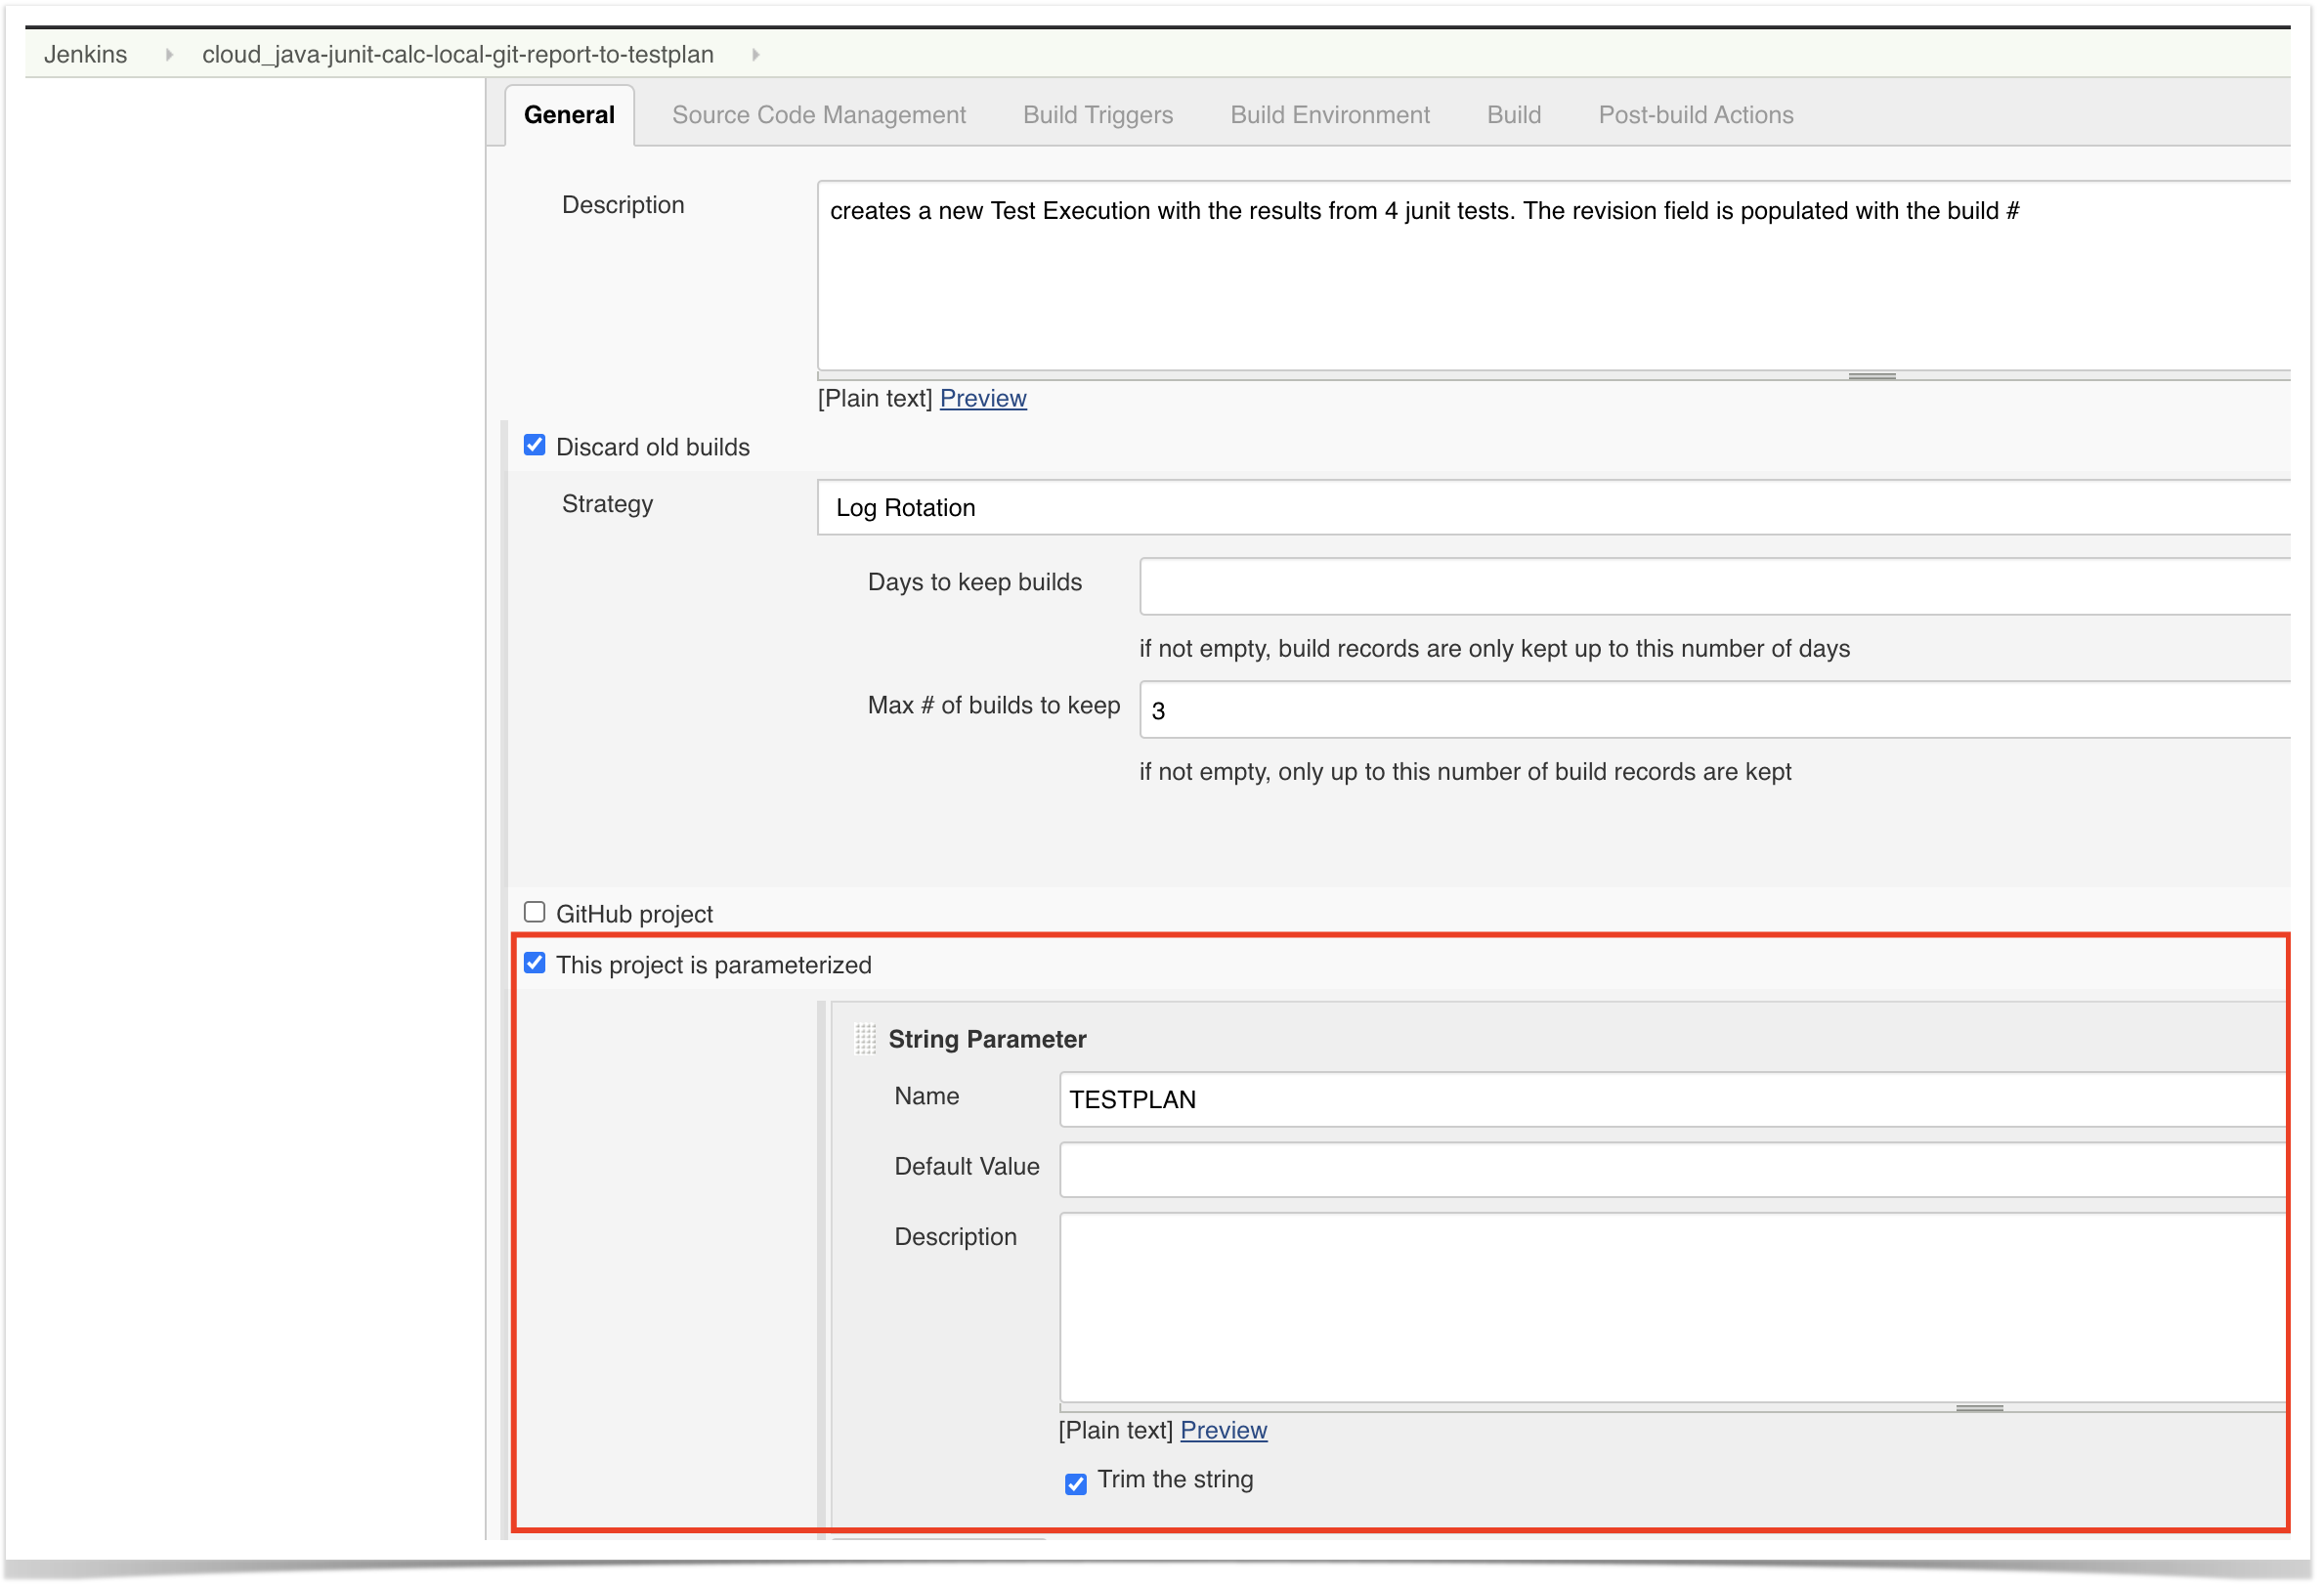
The project itself is a normal one; the only thing relevant to mention is that this project is a parameterized one, so it receives TESTPLAN, that in our case will be coming from Jira Cloud.
Automation configuration
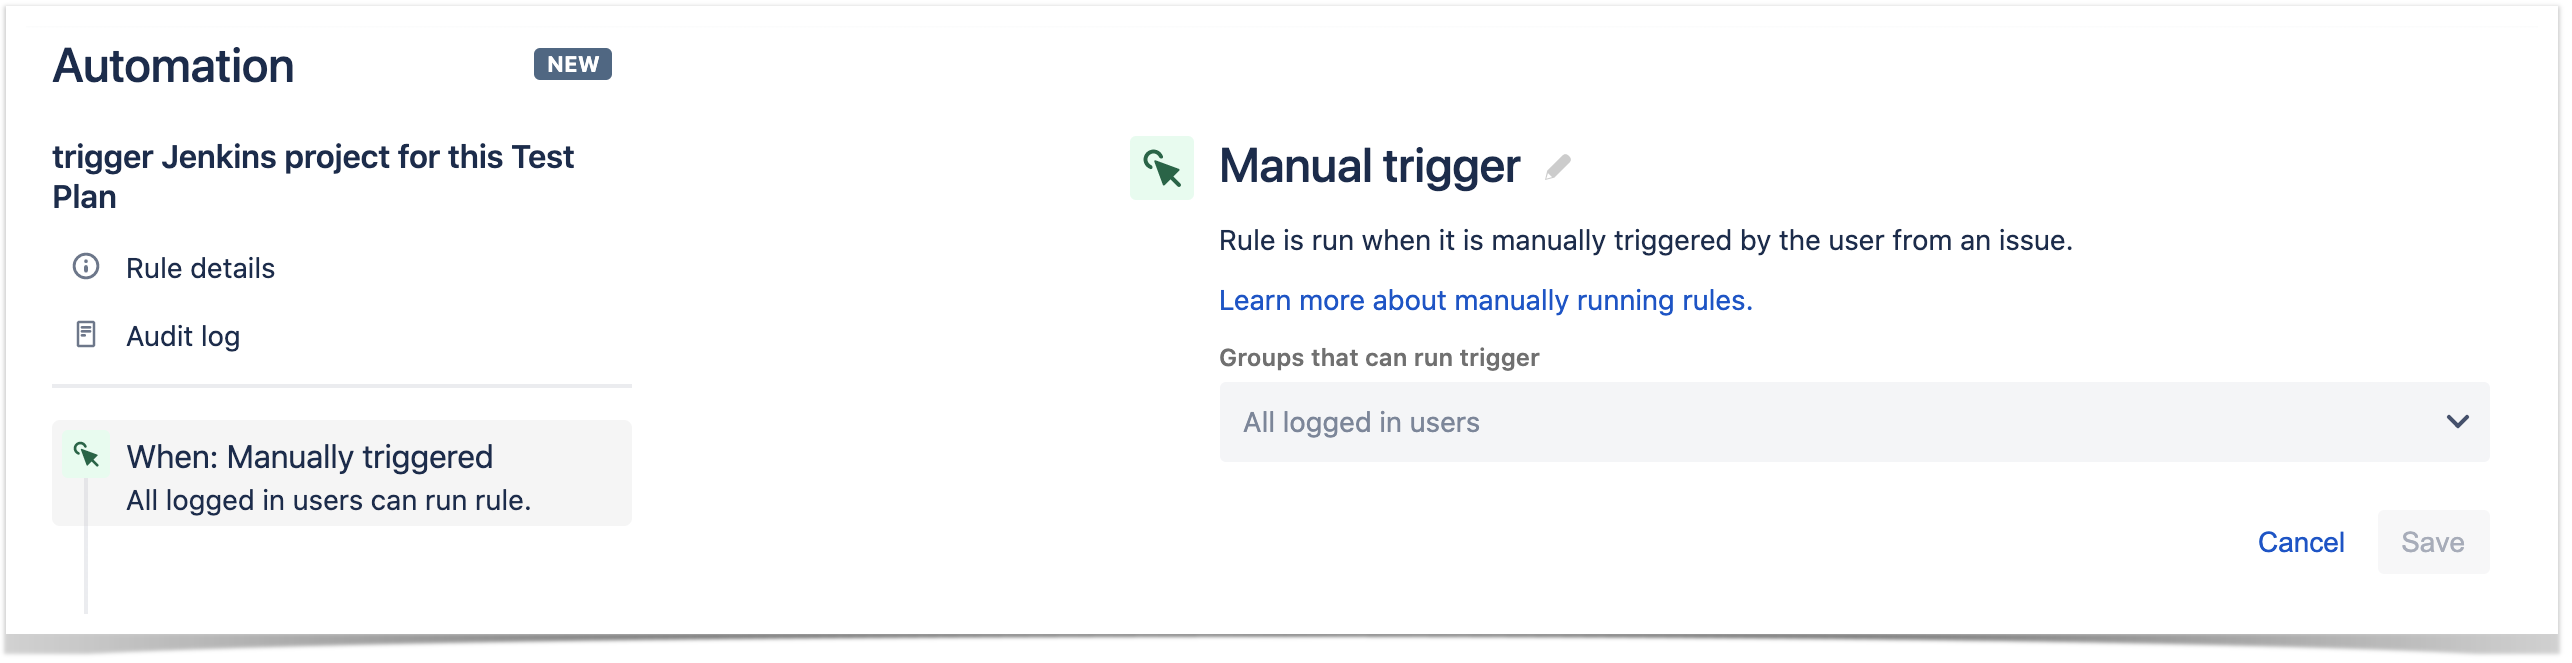
- create a new rule and define the "When" (i.e. when it to should be triggered ), to be "Manually triggered"
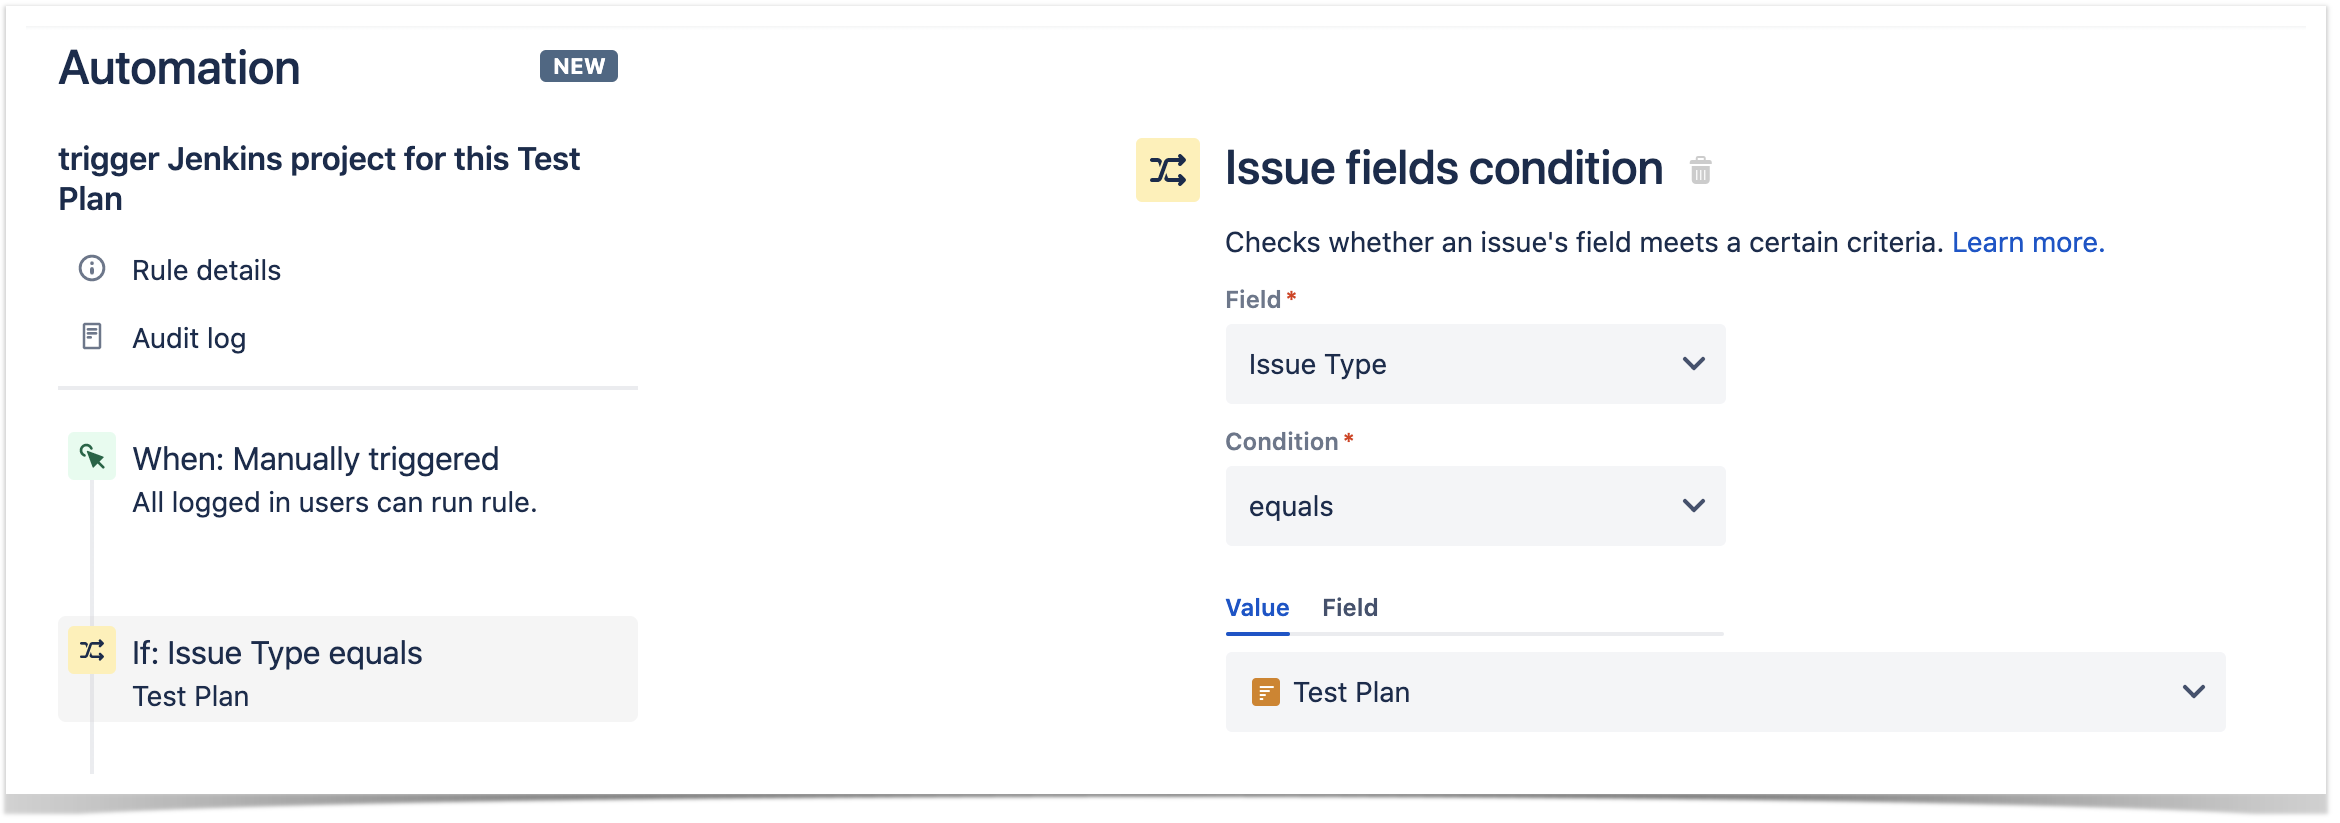
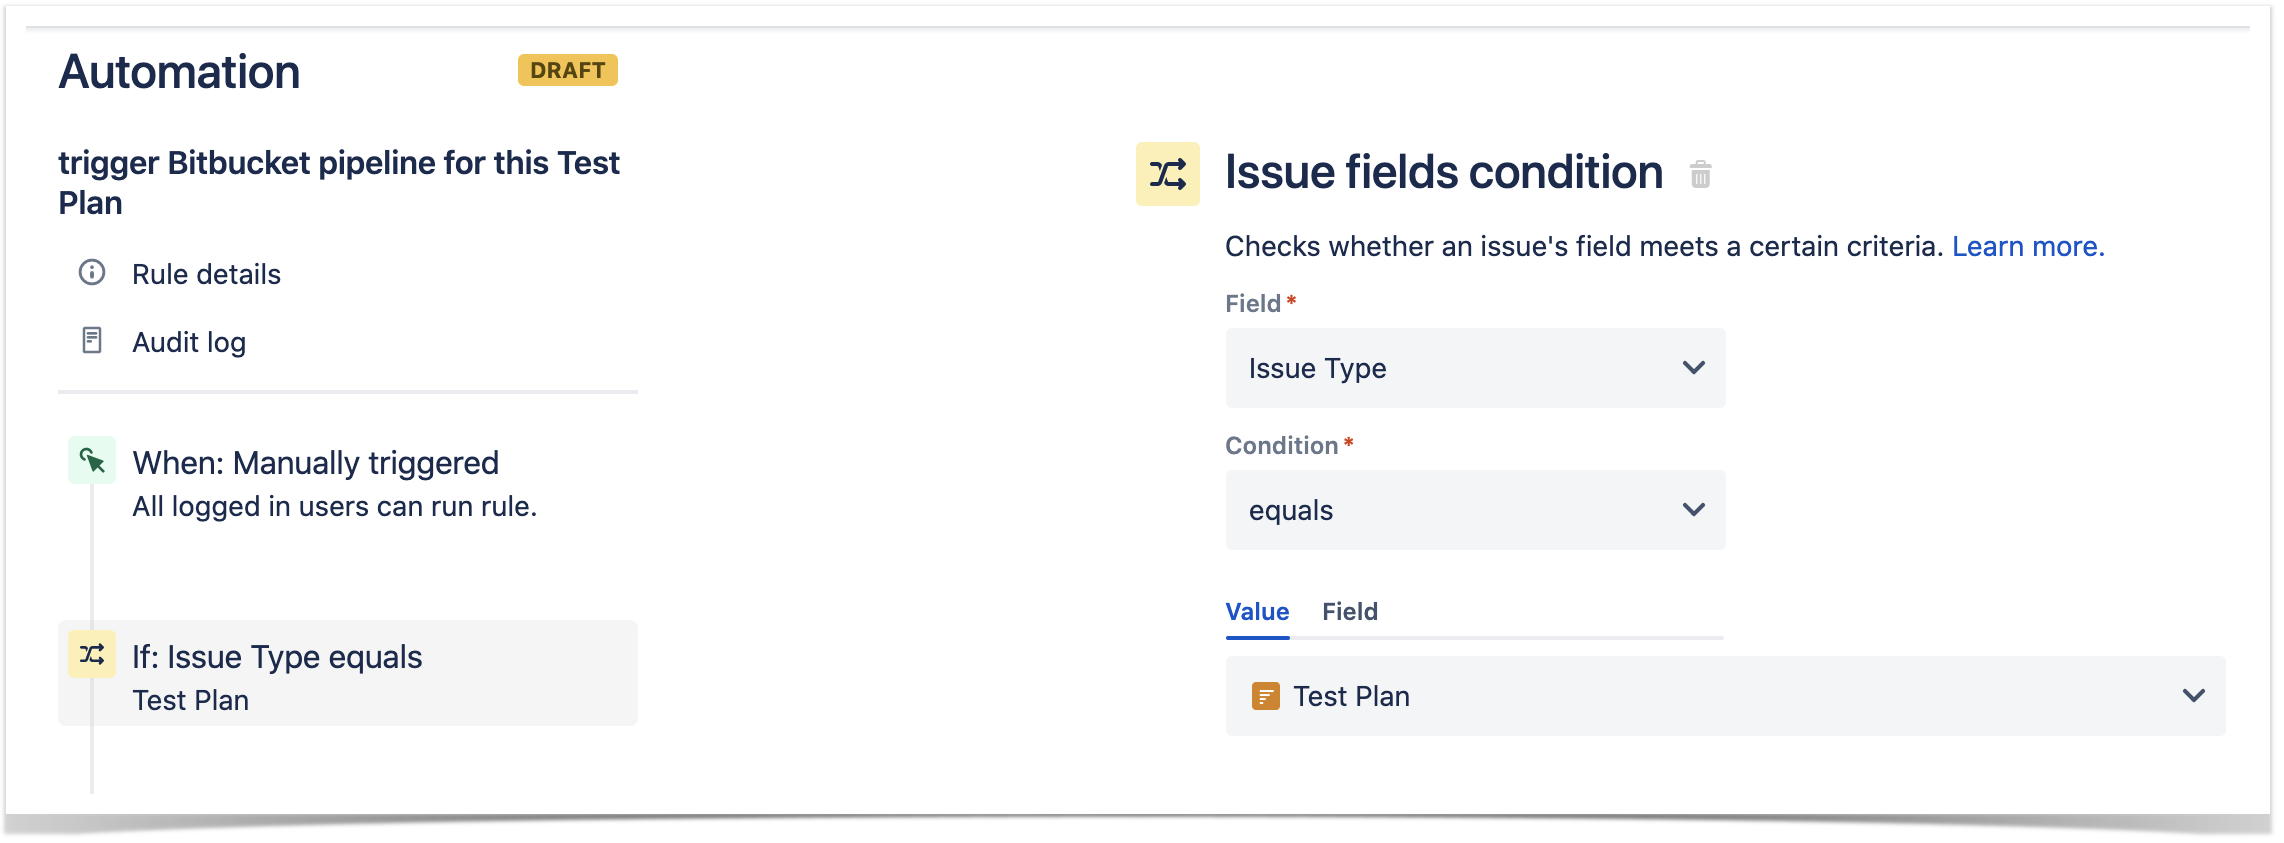
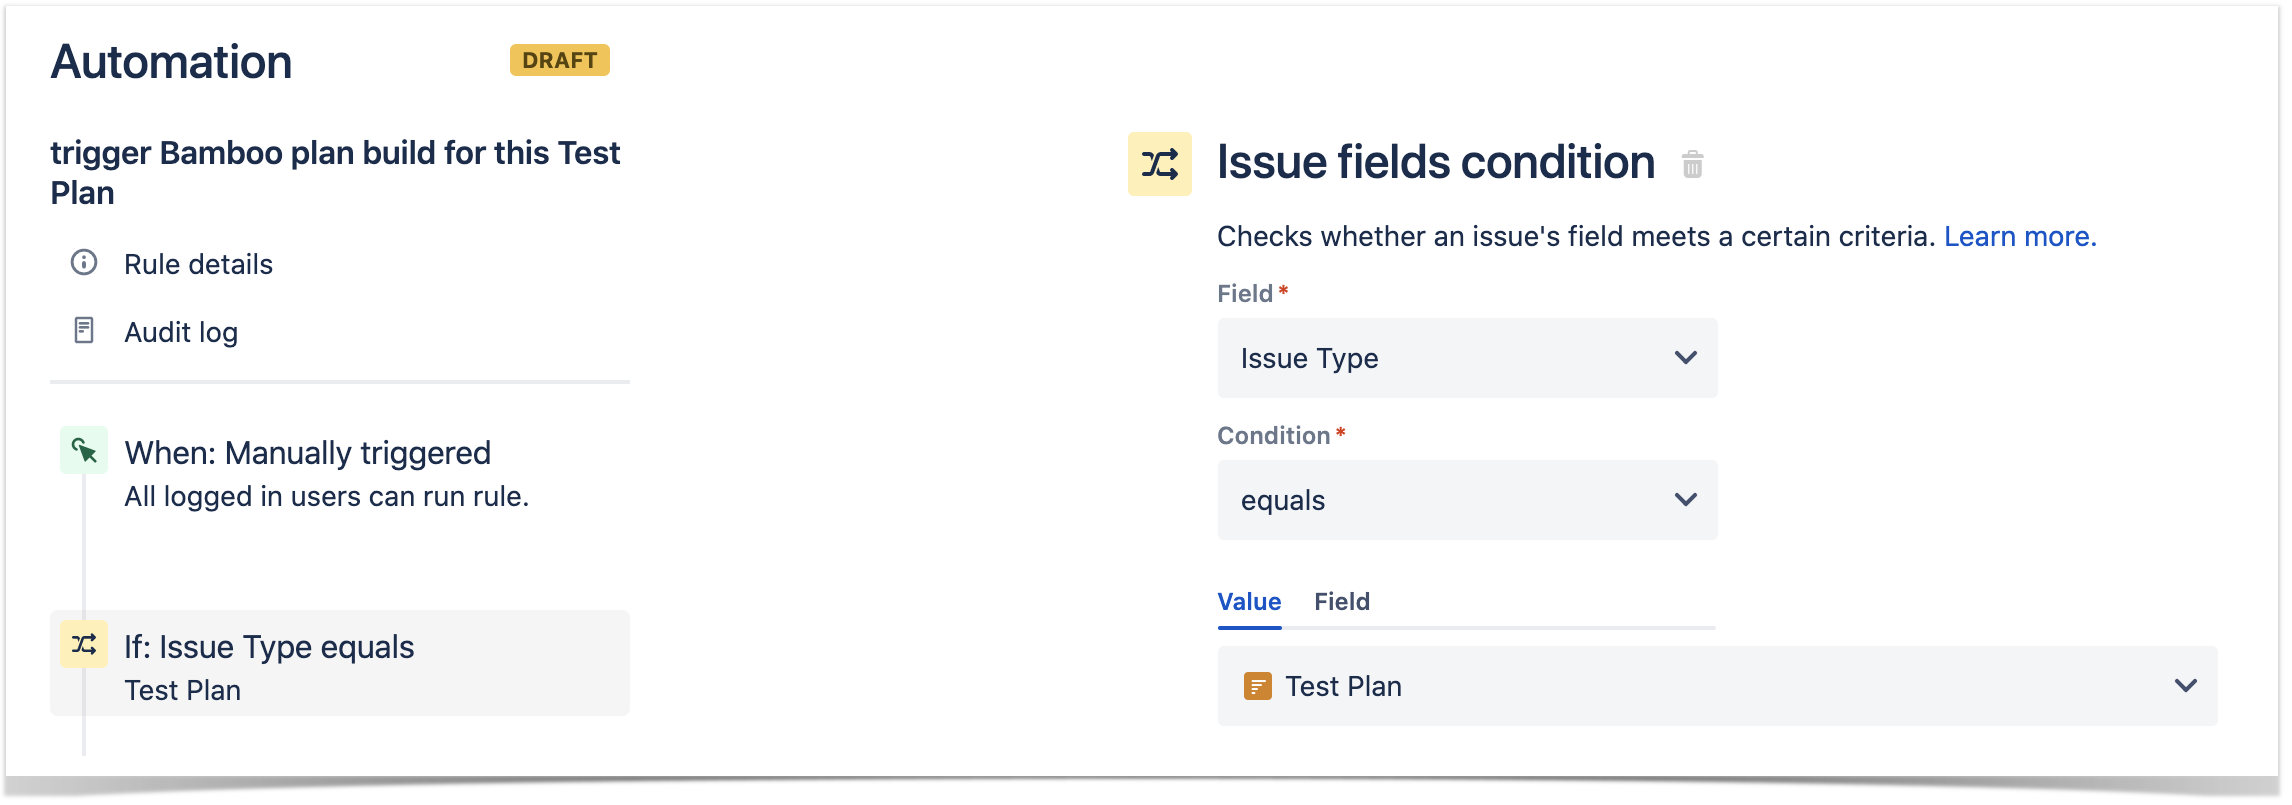
2. define the condition so that this rule can only be executed from Test Plan issue
3. define an action (i.e. the "Then") as "Send webhook" and configure it as follows
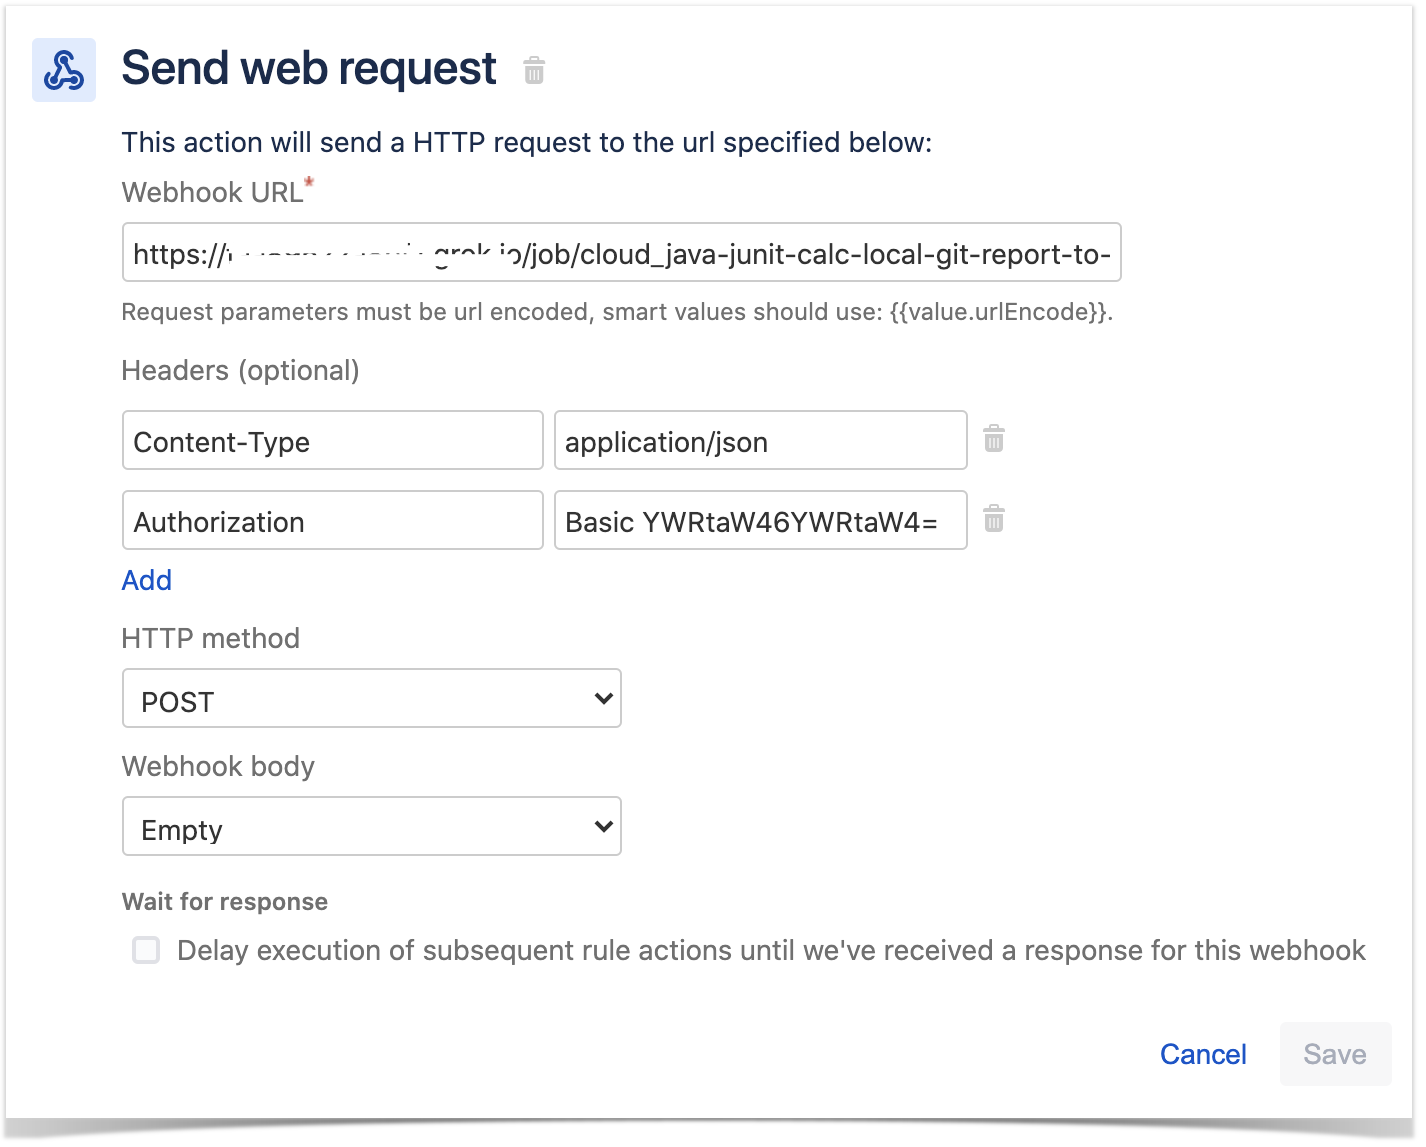
- the Webhook URL provided above follows this syntax:
- <jenkins_base_url>/job/<name_of_jenkins_project_job>/buildWithParameters?token=<token>&TESTPLAN={{issue.key}}
- besides the "Content-Type" header that should be "application/json", define also an "Authorization" header having the value "Basic <auth>", where the base64 encoded <auth> can be generated using your Jenkins API credentials
After publishing the rule, you can go to the screen of an issue and trigger the Jenkins project/job.
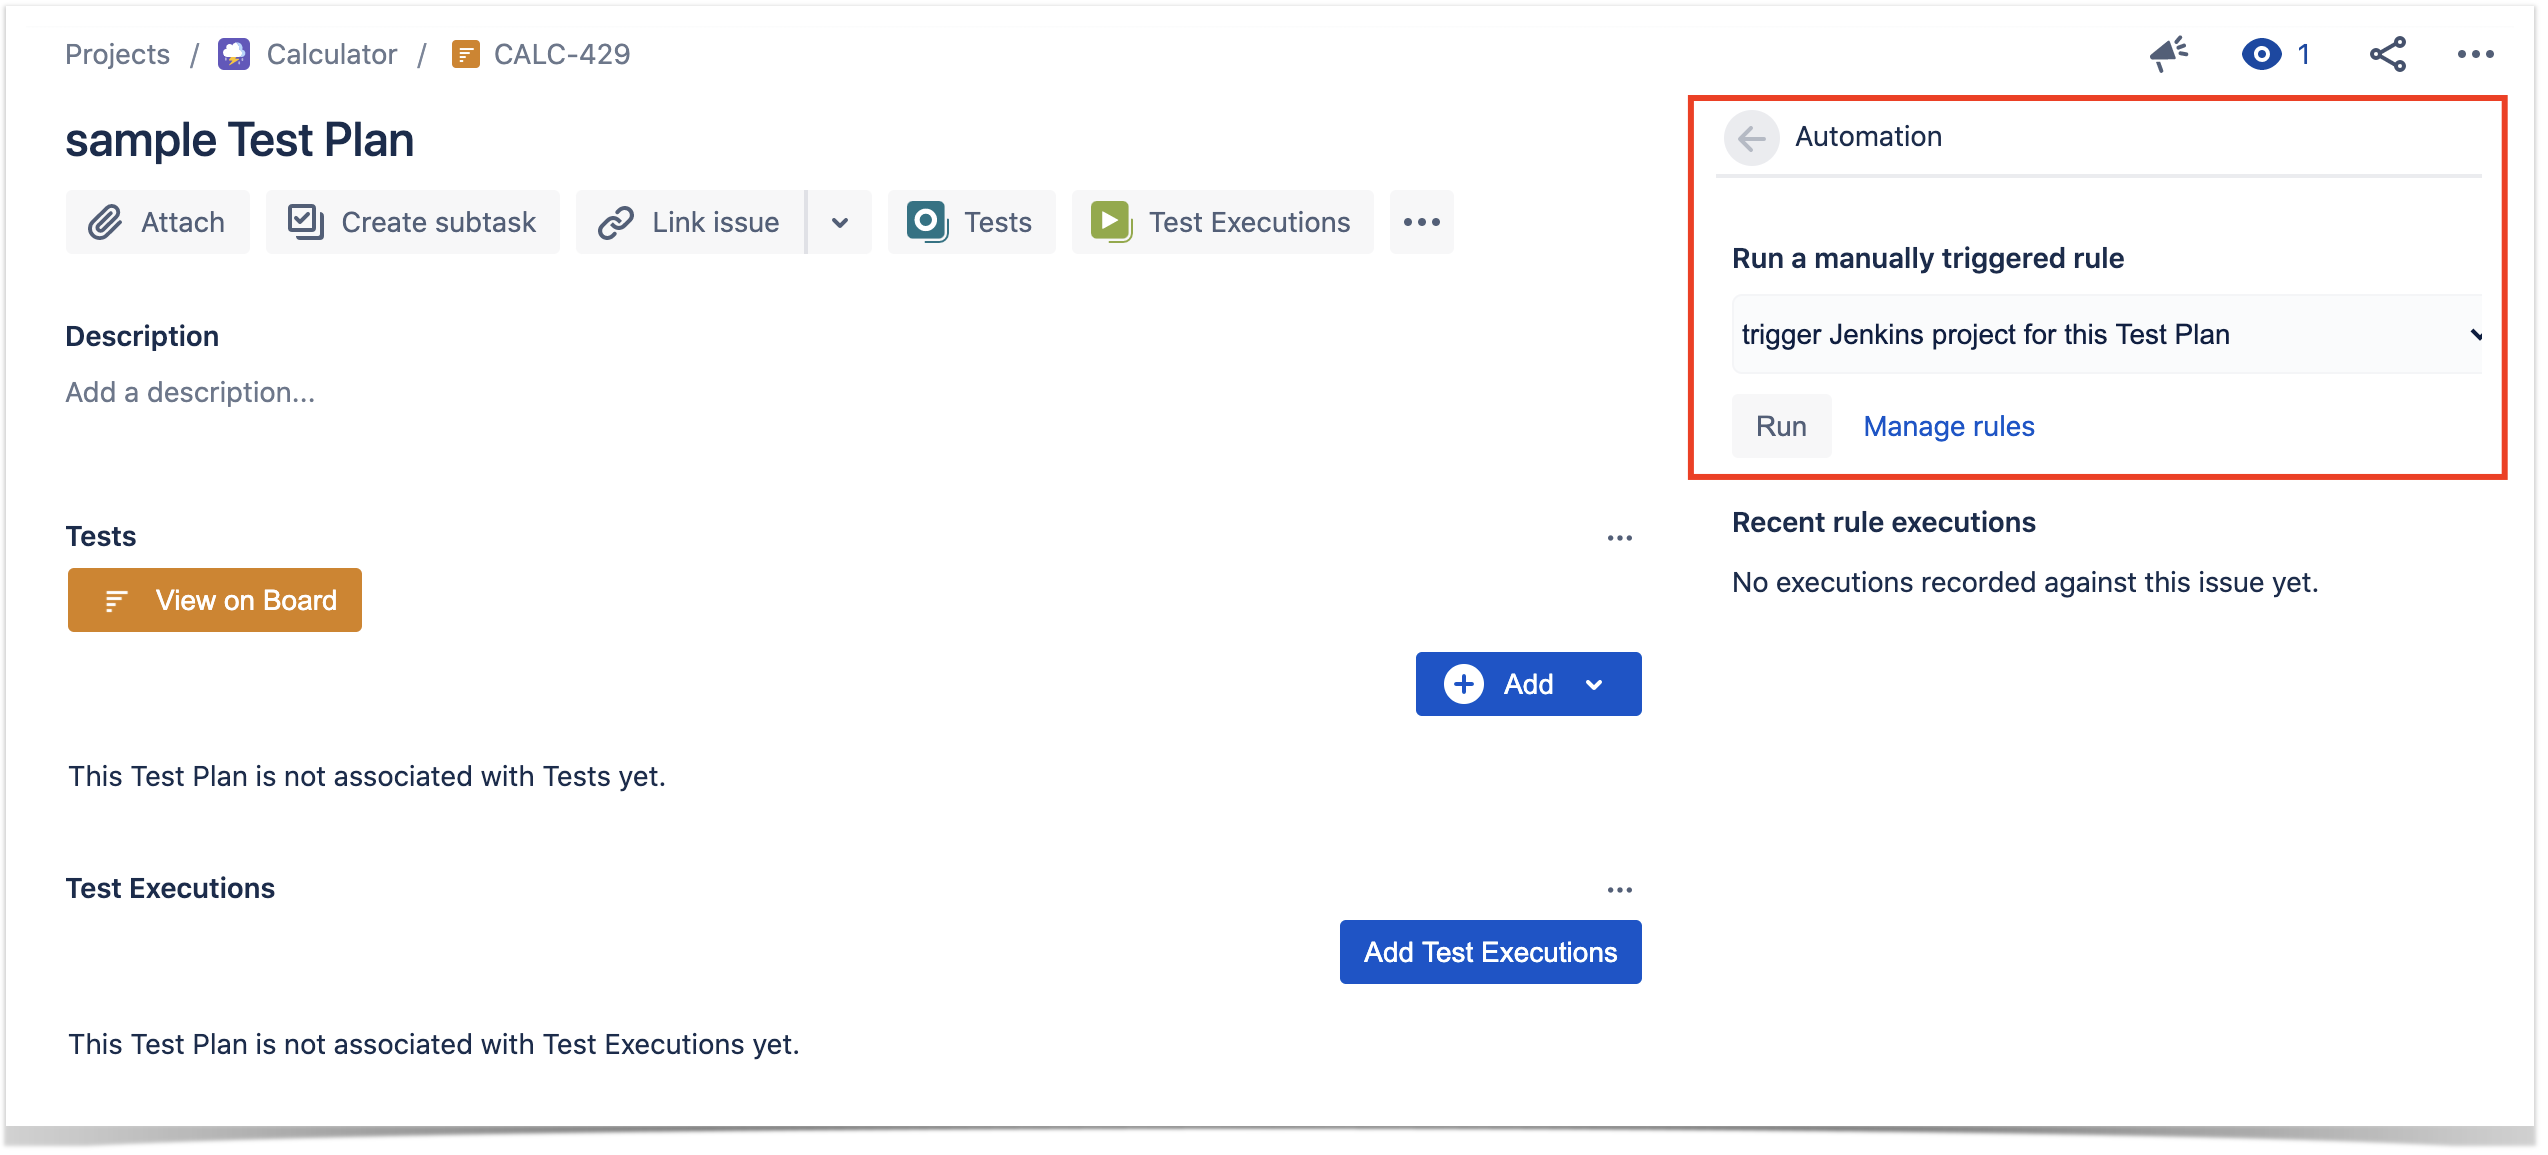
In this case, since Jenkins was configured to report results back to Xray, a new Test Execution would be created and linked back to the source Test Plan where the automation was triggered from.
Bitbucket Cloud/Pipelines
Trigger a Bitbucket pipeline build from an issue
In this very simple scenario, we'll implement a rule, triggered manually, that will trigger a Bitbucket pipeline build. The action will be available from the "Automation" panel, in all issues of the selected project.
We're assuming that:
- you just want to trigger a CI job, period; this job may be totally unrelated to the issue from where you triggered it
- what the CI job will do, including if it will report the results back to Xray or not, is not relevant
Bitbucket configuration
In Bitbucket we need to configure the pipeline as usual; no special configuration is needed. Some variables can be used and defined at multiple layers.
Automation configuration
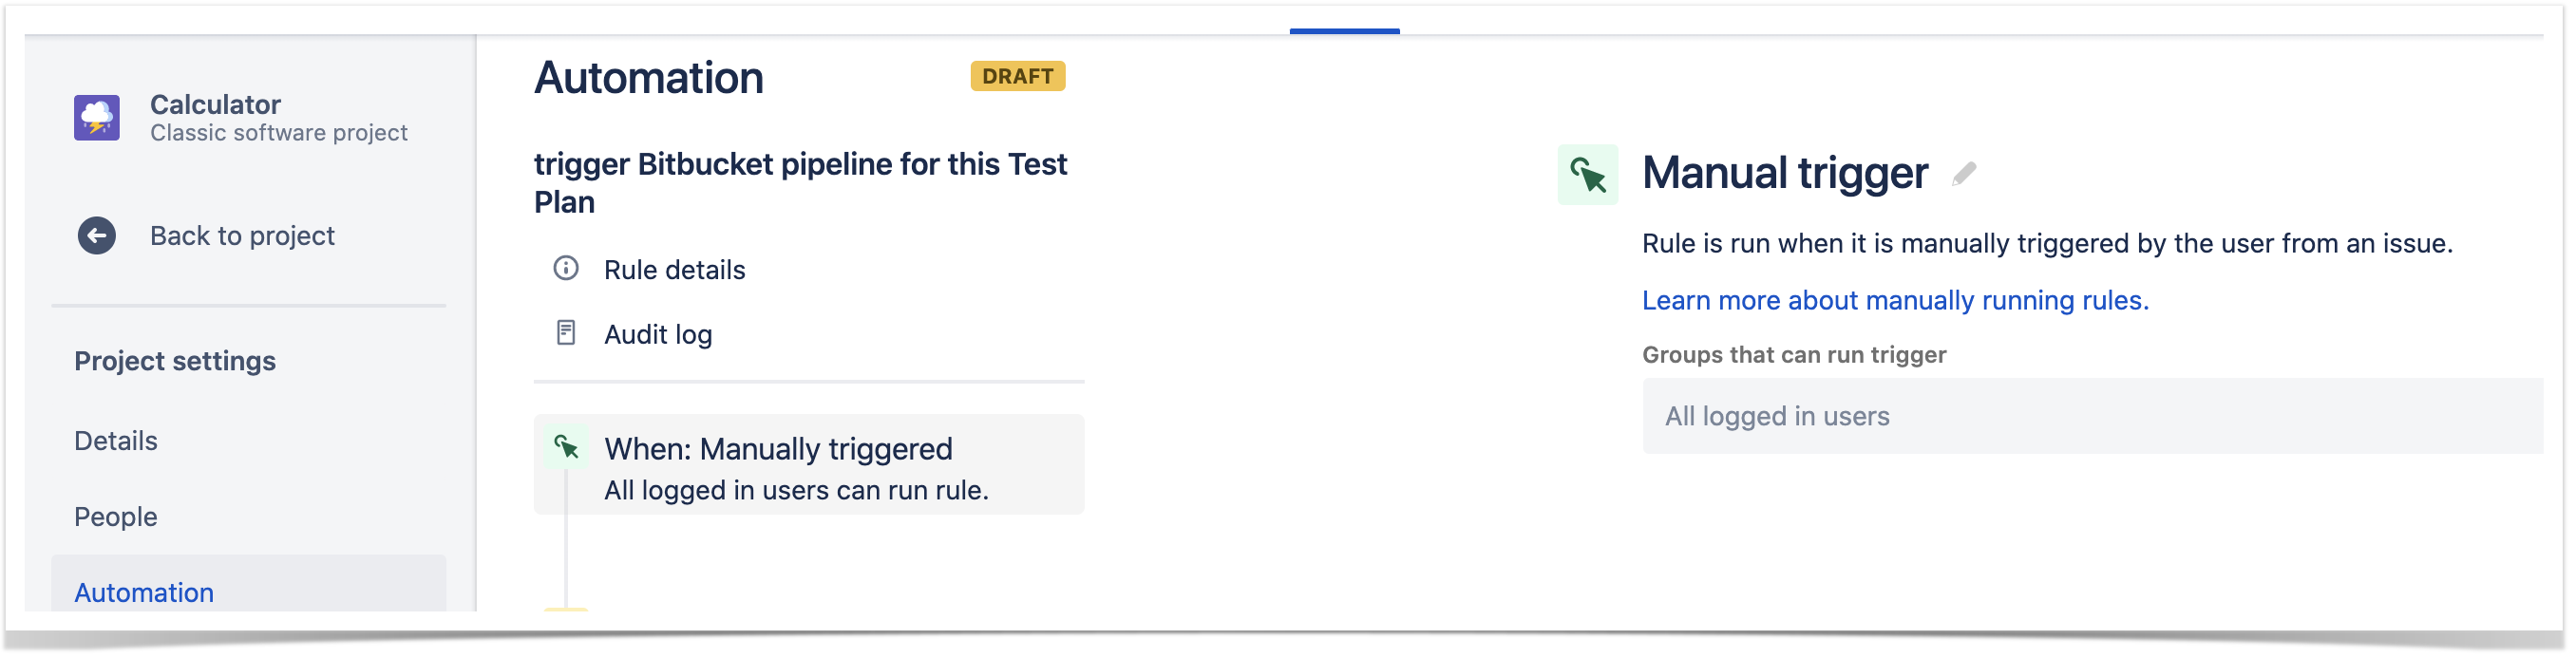
- create a new rule and define the "When" (i.e. when it to should be triggered), to be "Manually triggered"
2. define an action (i.e. the "Then") as "Send webhook" and configure it as follows
- the Webhook URL provided above follows the Bitbucket pipelines REST API syntax
- https://api.bitbucket.org/2.0/repositories/<workspace>/<repository>/pipelines/
the Webhook HTTP POST body content, defined in the "Custom data" field, will be used to identify the target branch and also a variable containing the Test Plan issue key that will be accessible to the pipeline build
- besides the "Content-Type" header that should be "application/json", define also an "Authorization" header having the value "Basic <auth>", where the base64 encoded <auth> can be generated using your Bitbucket credentials
After publishing the rule, you can go to the screen of an issue and trigger the Bitbucket pipeline build.
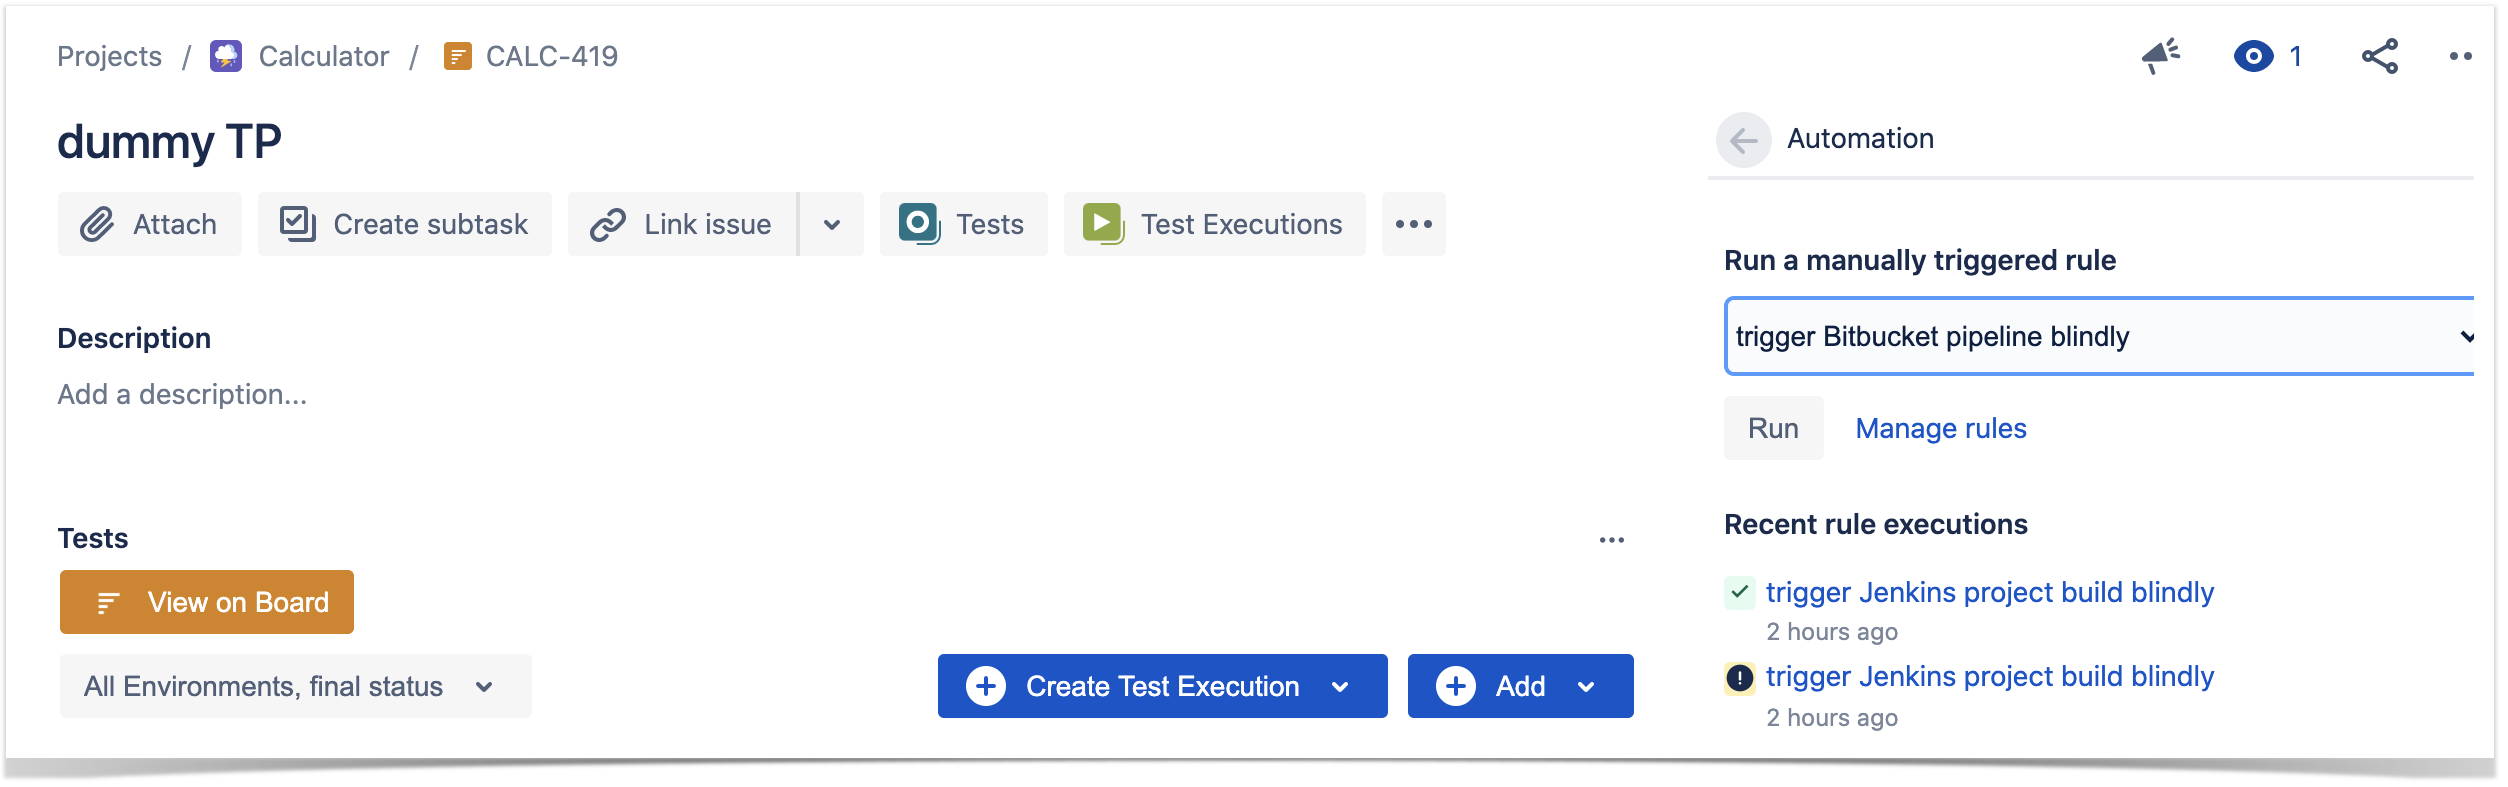
In this case, a new Test Execution would be created in Jira/Xray.
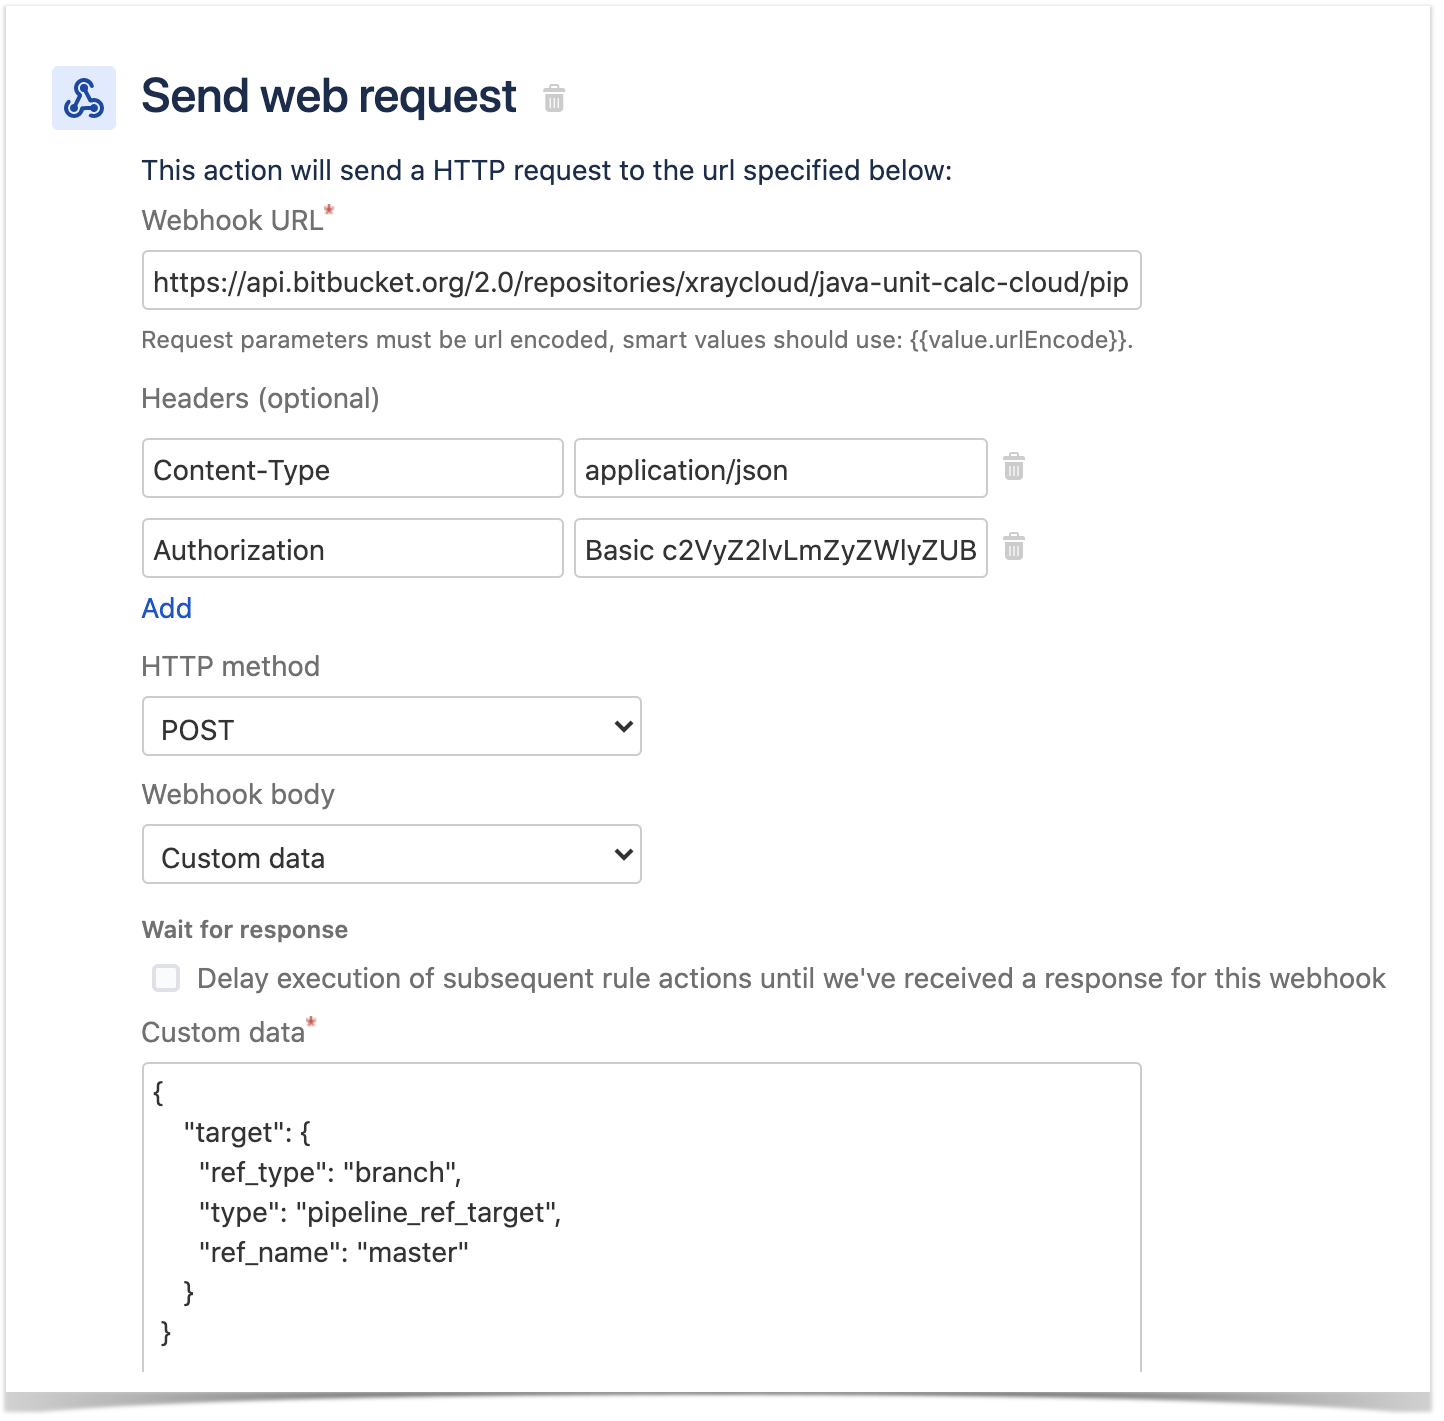
Trigger a Bitbucket pipeline build from a Test Plan and report the results back to it
In this simple scenario, we'll implement a rule, triggered manually, that will trigger a Bitbucket pipeline build. The action will be available from the "Automation" panel, for all Test Plan issues of the selected project.
We're assuming that:
- you just want to trigger a CI job, period; this job may be totally unrelated to the issue from where you triggered it
- the results will be submitted back to Xray, if the pipeline is configured to do so
Bitbucket configuration
In Bitbucket pipeline definition we will make use of a variable named "testplan" (referenced by $testplan). This variable does not need to be defined explicitly as such in Bitbucket; Bitbucket will pass to the pipeline all "variables" identified in the REST API request, if so, whenever triggering the pipeline.
Automation configuration
- create a new rule and define the "When" (i.e. when it to should be triggered ), to be "Manually triggered"
2. define the condition so that this rule can only be executed from Test Plan issue
3. define an action (i.e. the "Then") as "Send webhook" and configure it as follows
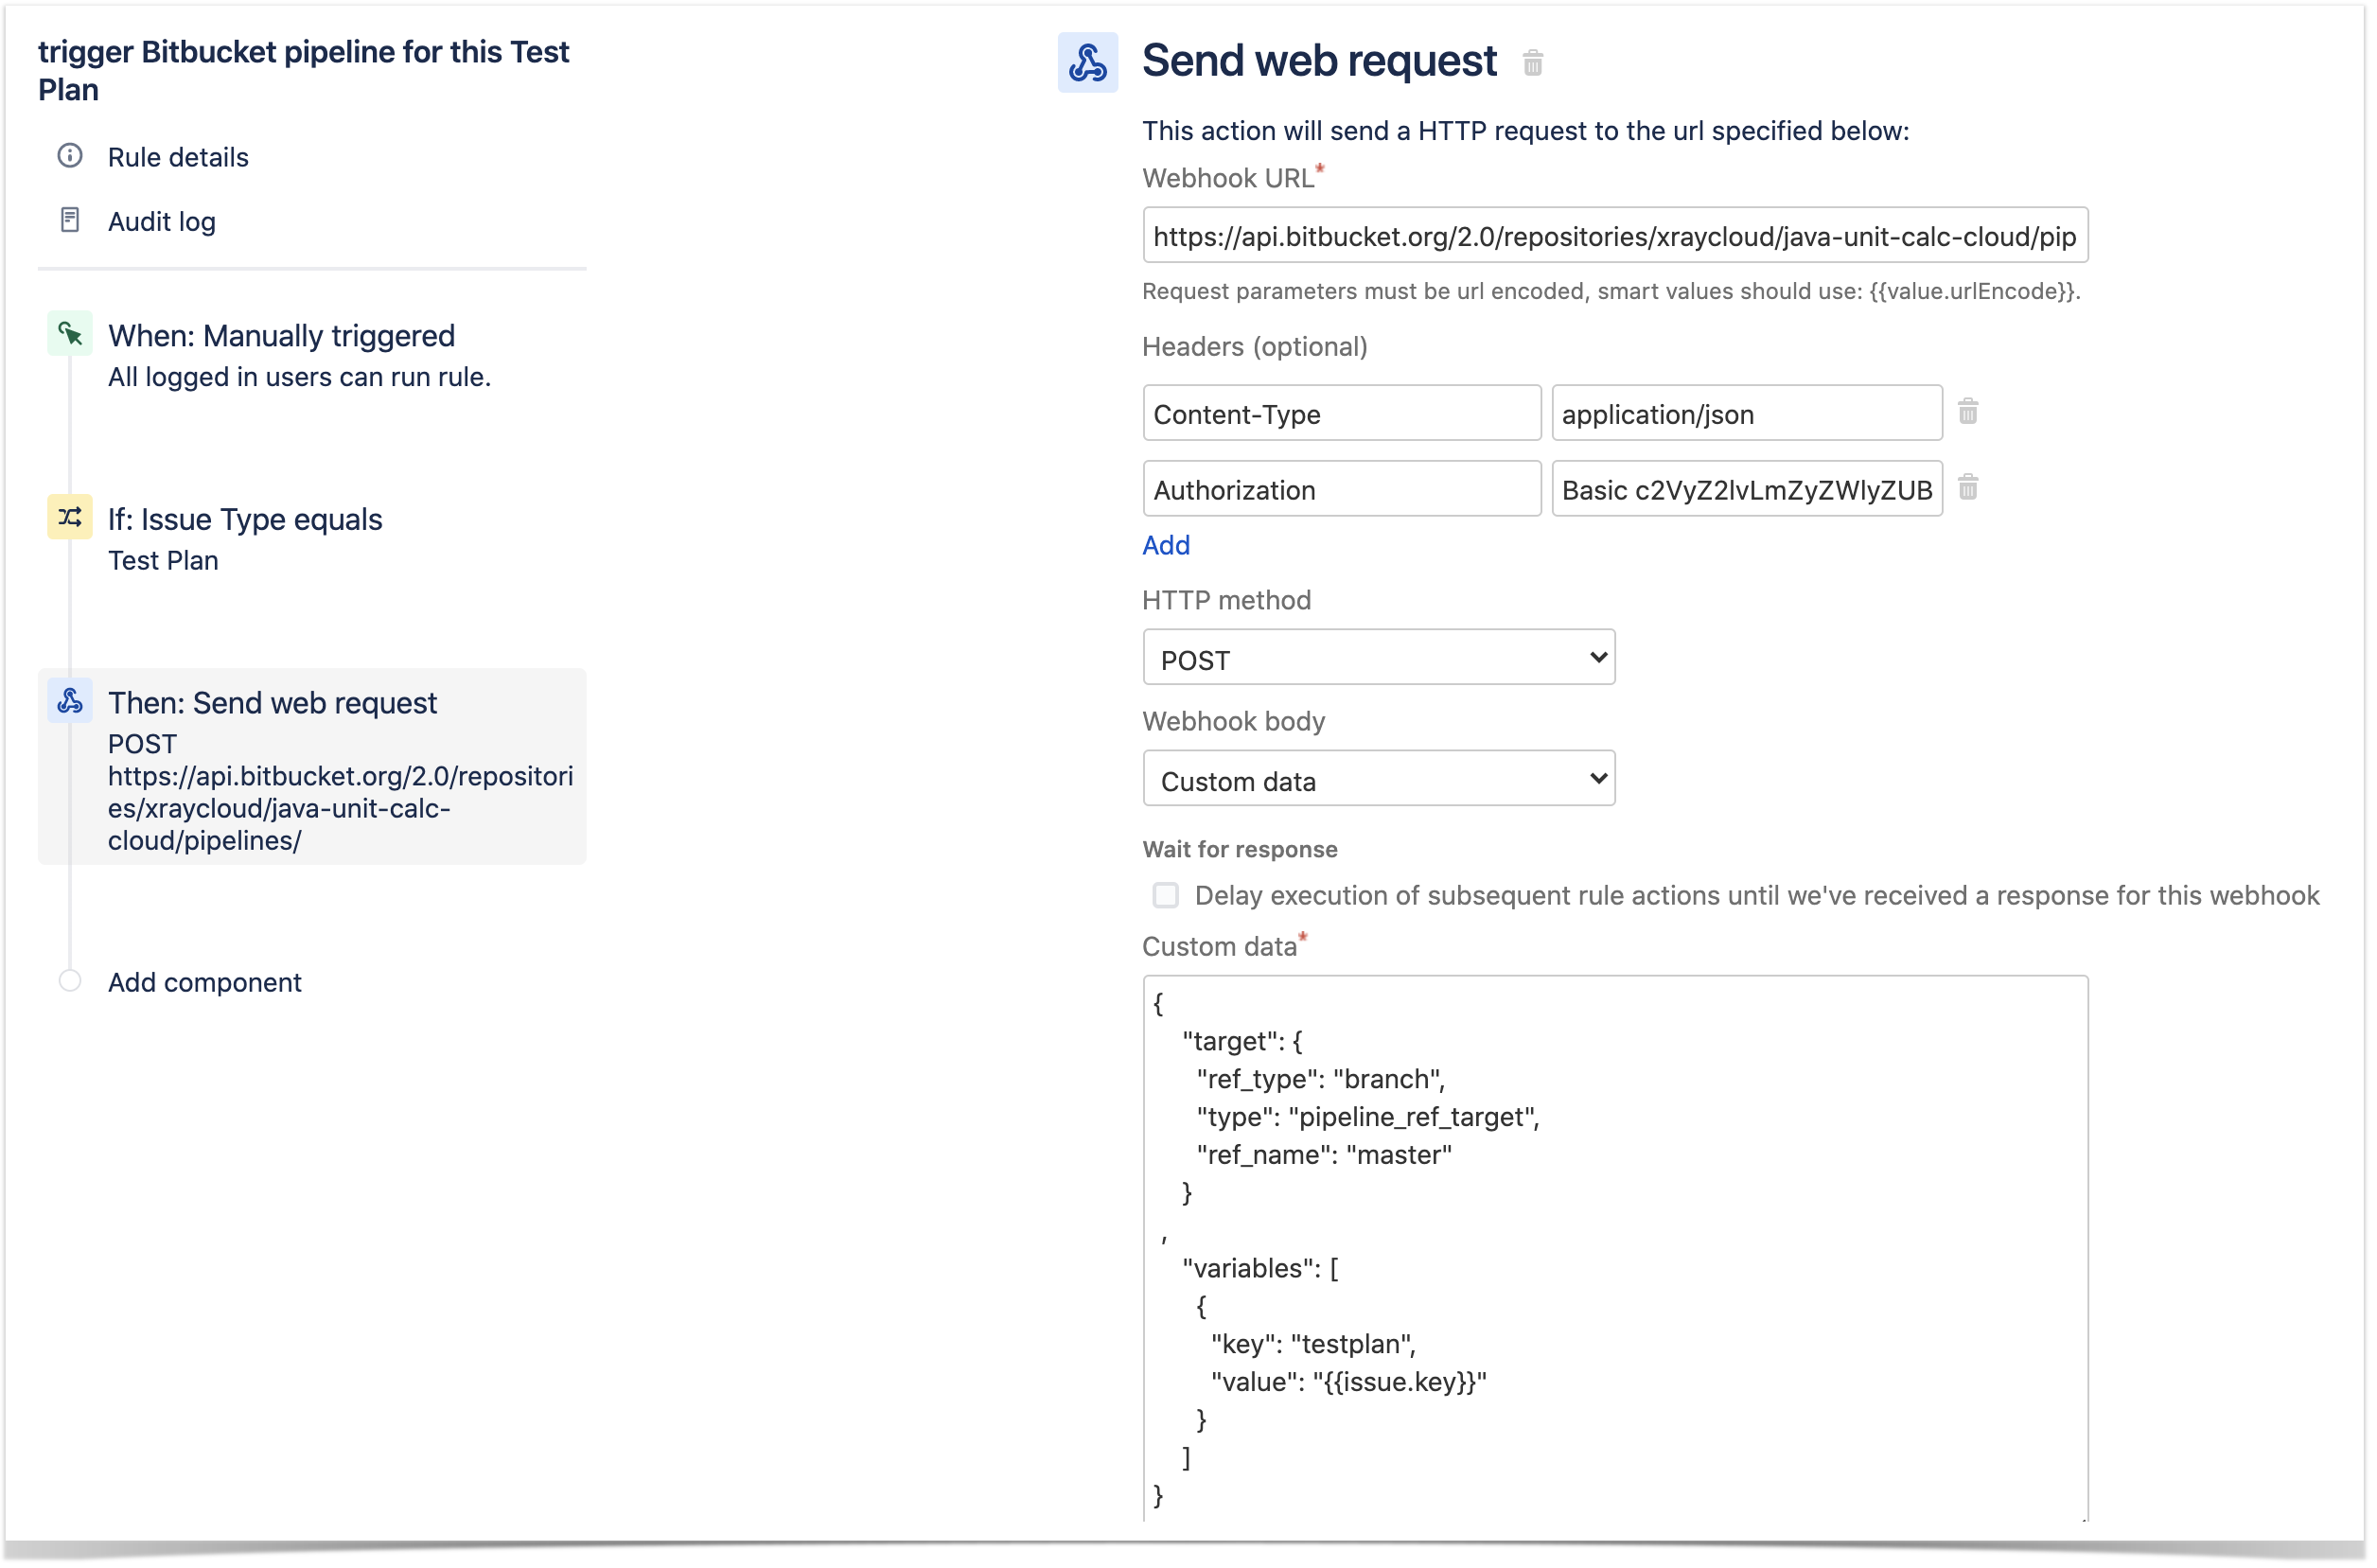
- the Webhook URL provided above follows the Bitbucket pipelines REST API syntax
- https://api.bitbucket.org/2.0/repositories/<workspace>/<repository>/pipelines/
the Webhook HTTP POST body content, defined in the "Custom data" field, will be used to identify the target branch and also a variable containing the Test Plan issue key that will be accessible to the pipeline build
- besides the "Content-Type" header that should be "application/json", define also an "Authorization" header having the value "Basic <auth>", where the base64 encoded <auth> can be generated using your Bitbucket credentials
After publishing the rule, you can go to the screen of an issue and trigger the Jenkins project/job.
In this case, a new Test Execution would be created and linked back to the source Test Plan where the automation was triggered from
Bamboo Server
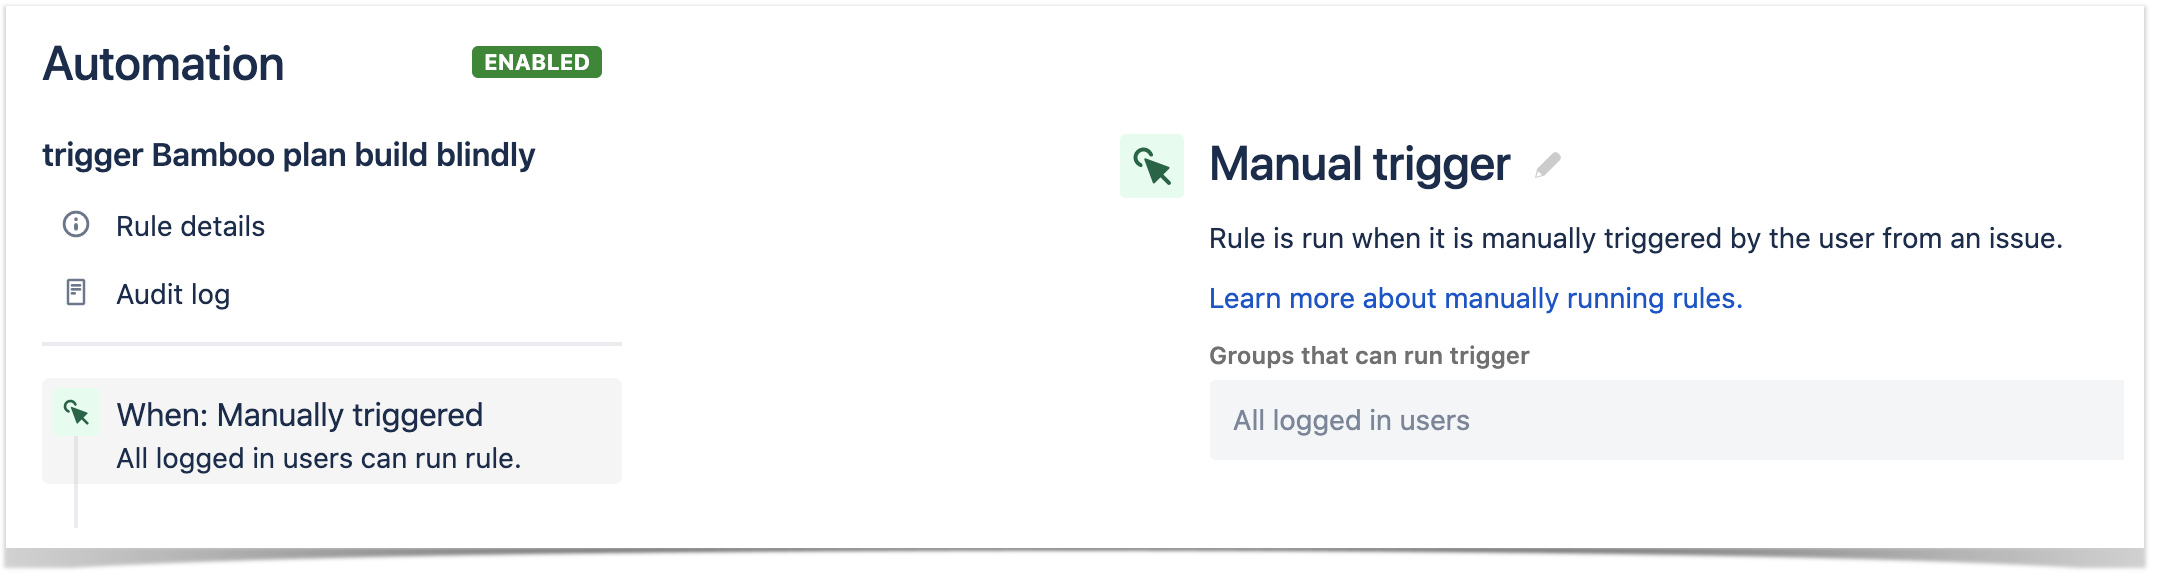
Trigger a Bamboo plan build from an issue
In this very simple scenario, we'll implement a rule, triggered manually, that will trigger a Bamboo plan build. The action will be available from the "Automation" panel, in all issues of the selected project.
We're assuming that:
- you just want to trigger a CI job, period; this job may be totally unrelated to the issue from where you triggered it
- what the CI job will do, including if it will report the results back to Xray or not, is not relevant
Bamboo configuration
No special configuration needs to be done in Bamboo.
Automation configuration
- create a new rule and define the "When" (i.e. when it to should be triggered), to be "Manually triggered"
2. define an action (i.e. the "Then") as "Send webhook" and configure it as follows
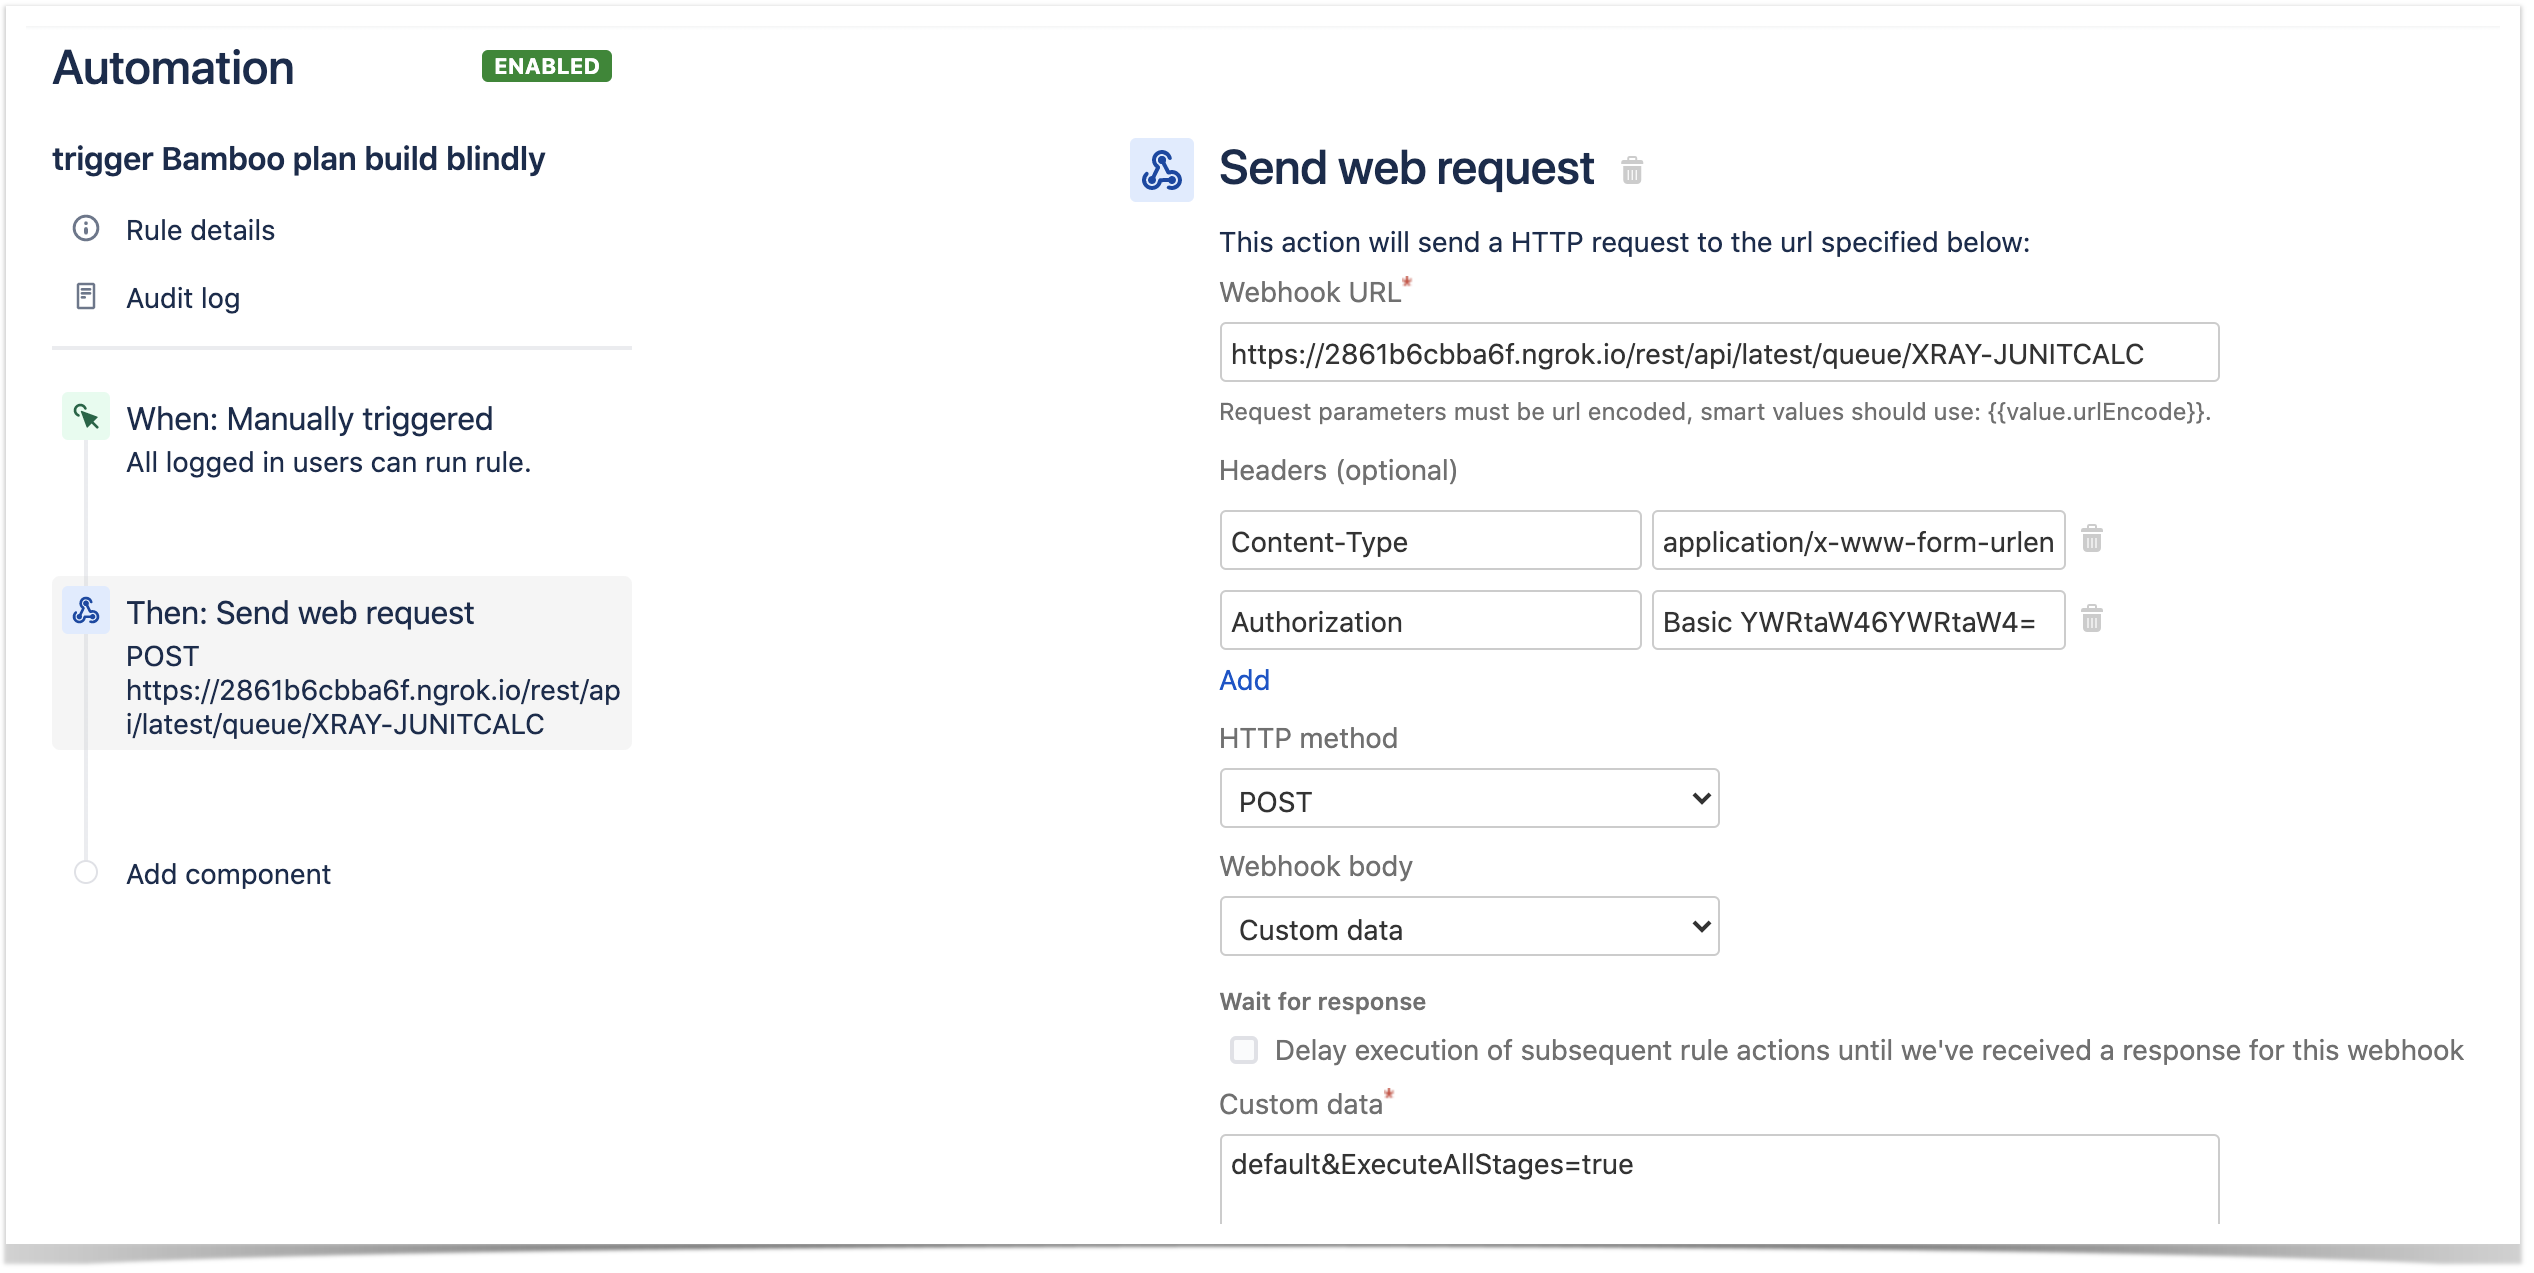
- the Webhook URL provided above follows this syntax:
- <bamboo_base_url>/rest/api/latest/queue/${projectKey}-${planKey}
the Webhook HTTP POST body content, defined in the "Custom data" field, will be used to identify the stages to run and other parameters
- besides the "Content-Type" header that should be "application/x-www-form-urlencoded", define also an "Authorization" header having the value "Basic <auth>", where the base64 encoded <auth> can be generated using your Bamboo credentials
After publishing the rule, you can go to the screen of an issue and trigger the Bamboo plan build.
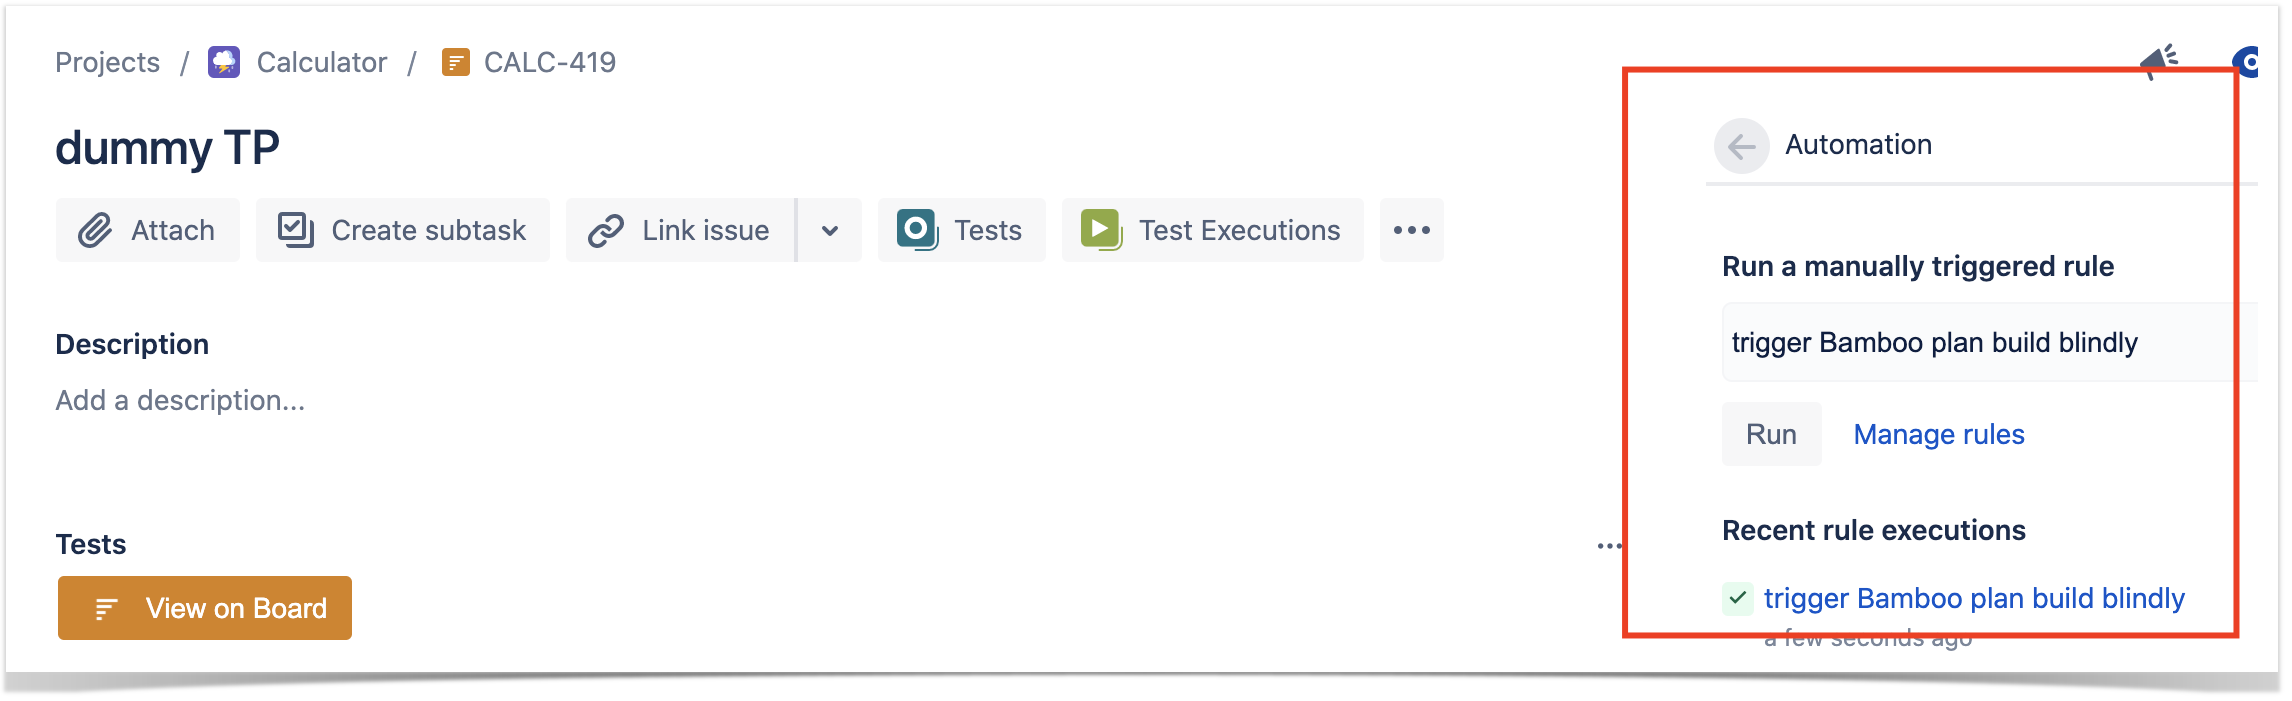
In this case, since Bamboo was configured to report results back to Xray, a new Test Execution would be created in Jira/Xray.
Trigger a Bamboo plan build from a Test Plan and report the results back to it
In this simple scenario, we'll implement a rule, triggered manually, that will trigger a Bamboo's plan build. The action will be available from the "Automation" panel, for all Test Plan issues of the selected project.
We're assuming that:
- you just want to trigger a CI job, period; this job may be totally unrelated to the issue from where you triggered it
- the results will be submitted back to Xray, if the project is configured to do so in Bamboo
Bamboo configuration
The project itself is a normal one; the only thing relevant to mention is that this project is a parameterized one, so it receives a TESTPLAN variable, that in our case will be coming from Jira.

Automation configuration
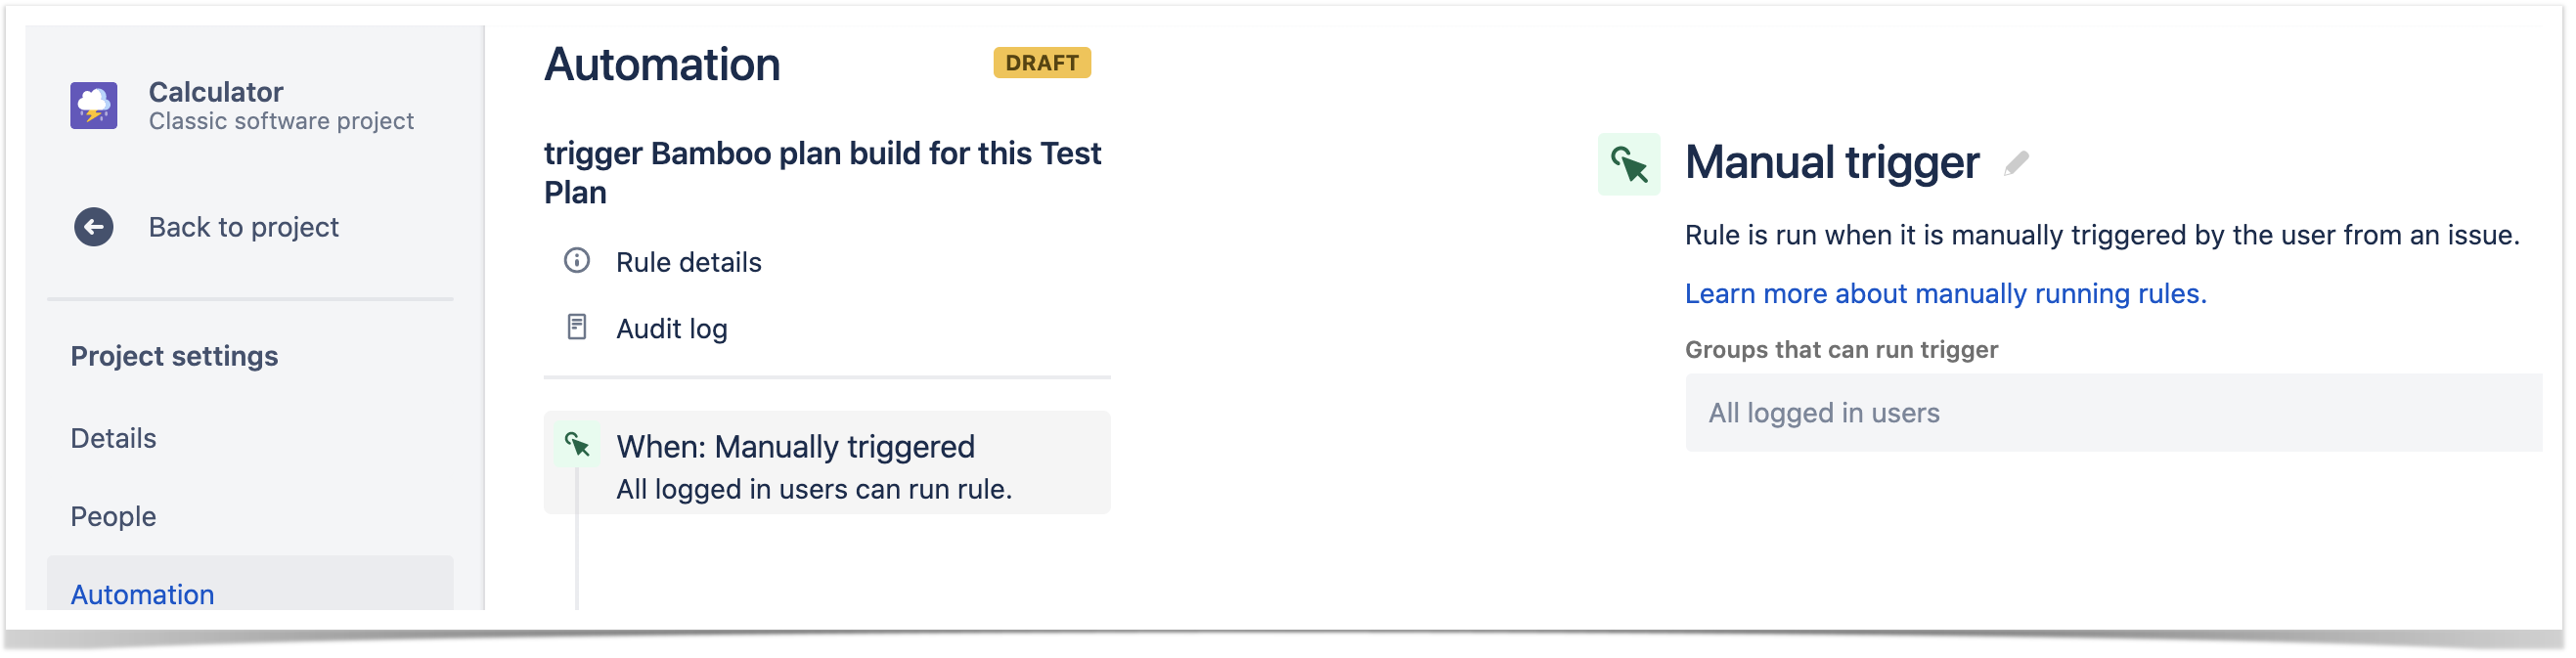
- create a new rule and define the "When" (i.e. when it to should be triggered ), to be "Manually triggered"
2. define the condition so that this rule can only be executed from Test Plan issue
3. define an action (i.e. the "Then") as "Send webhook" and configure it as follows
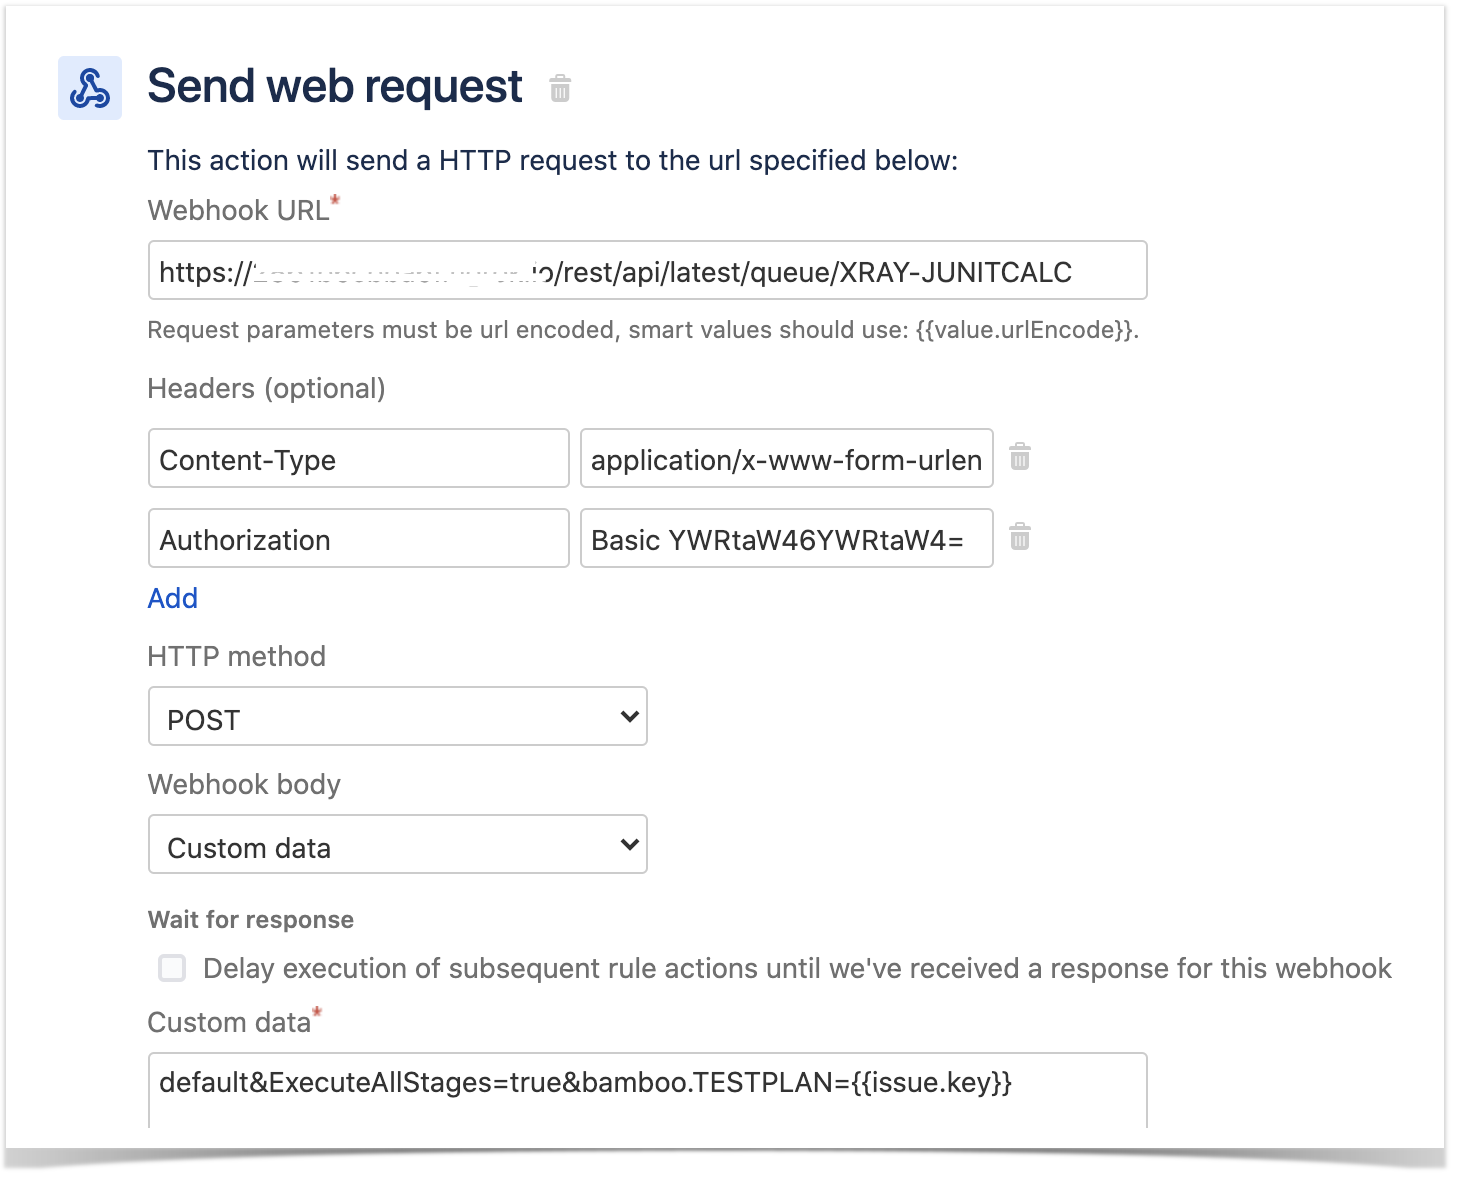
- the Webhook URL provided above follows this syntax:
- <bamboo_base_url>/rest/api/latest/queue/${projectKey}-${planKey}
the Webhook HTTP POST body content, defined in the "Custom data" field, will be used to identify the stages to run and other parameters
- besides the "Content-Type" header that should be "application/x-www-form-urlencoded", define also an "Authorization" header having the value "Basic <auth>", where the base64 encoded <auth> can be generated using your Jenkins API credentials
After publishing the rule, you can go to the screen of an issue and trigger the Bamboo plan.
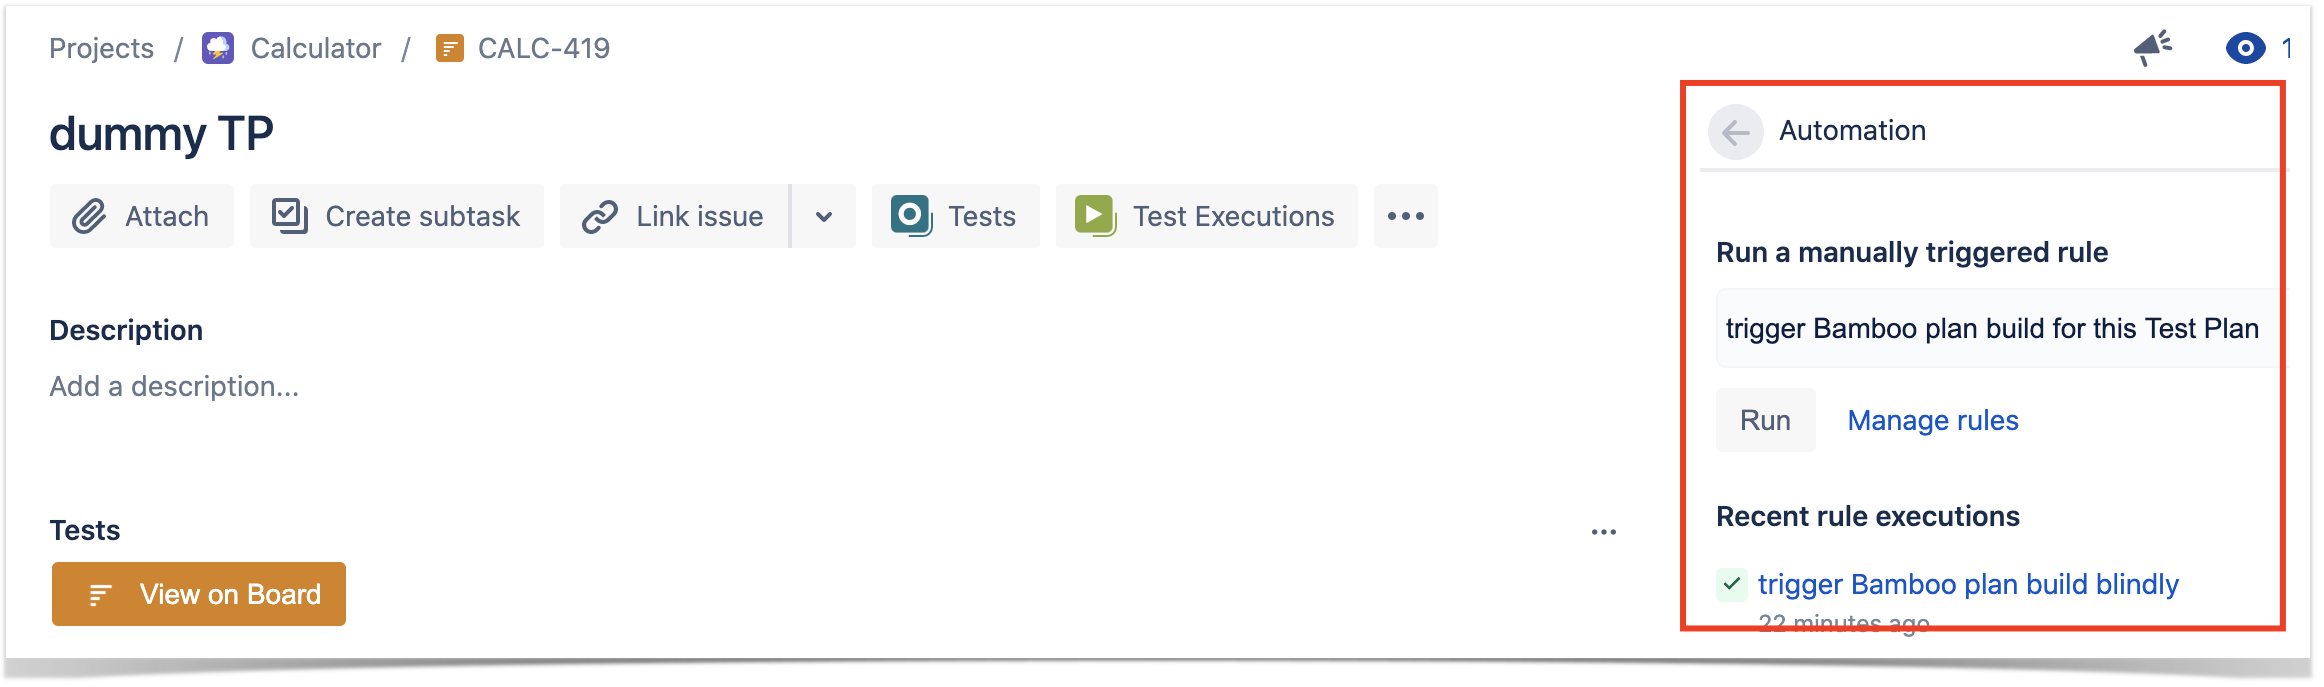
In this case, since Bamboo was configured to report results back to Xray, a new Test Execution would be created and linked back to the source Test Plan where the automation was triggered from
GitHub
Trigger a GitHub workflow from a Test Plan and report the results back to it
GitHub configuration
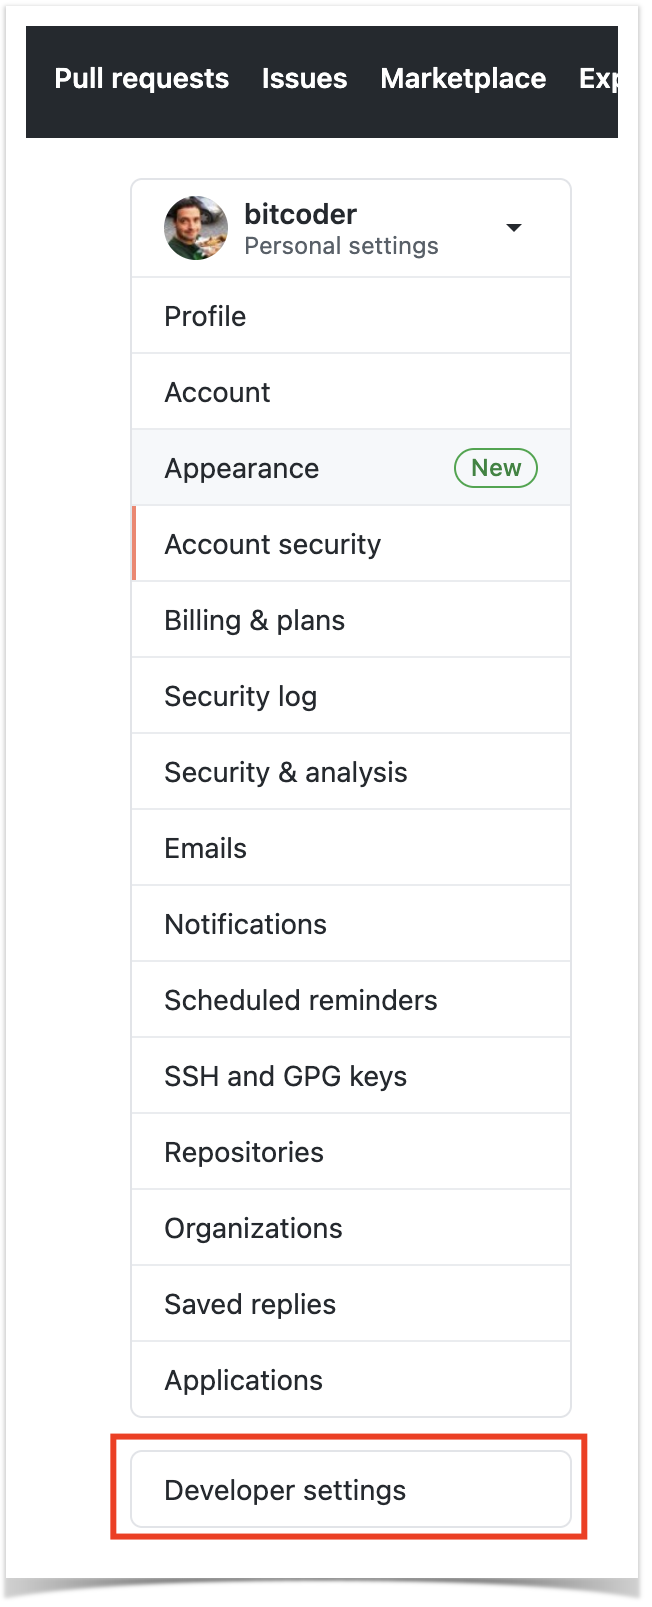
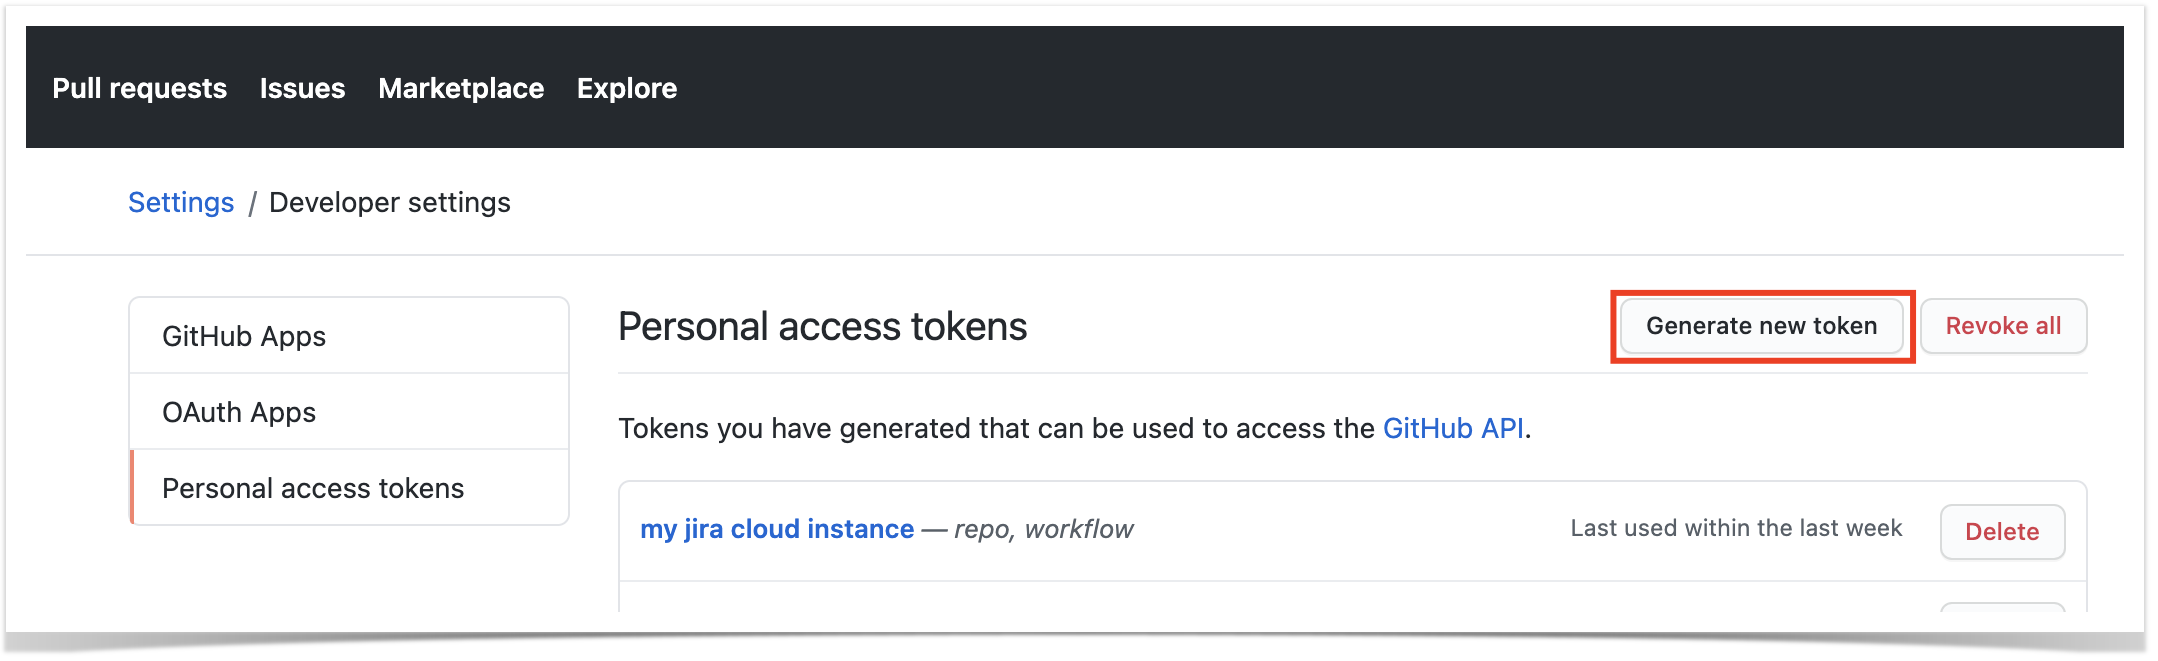
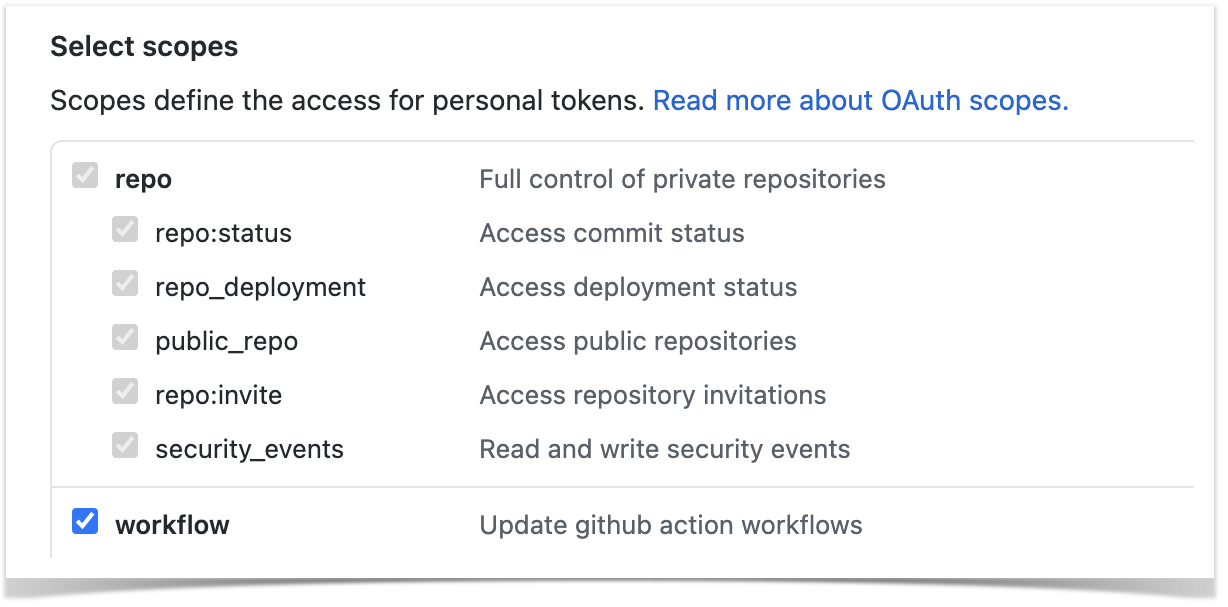
We need to create a personal access token so that we can use GitHub API later on. That can be done from within the user's profile.
The token must have "workflow" scope enabled.
Then, in your GitHub repository containing the project's code and tests, create a workflow under .github/workflows.
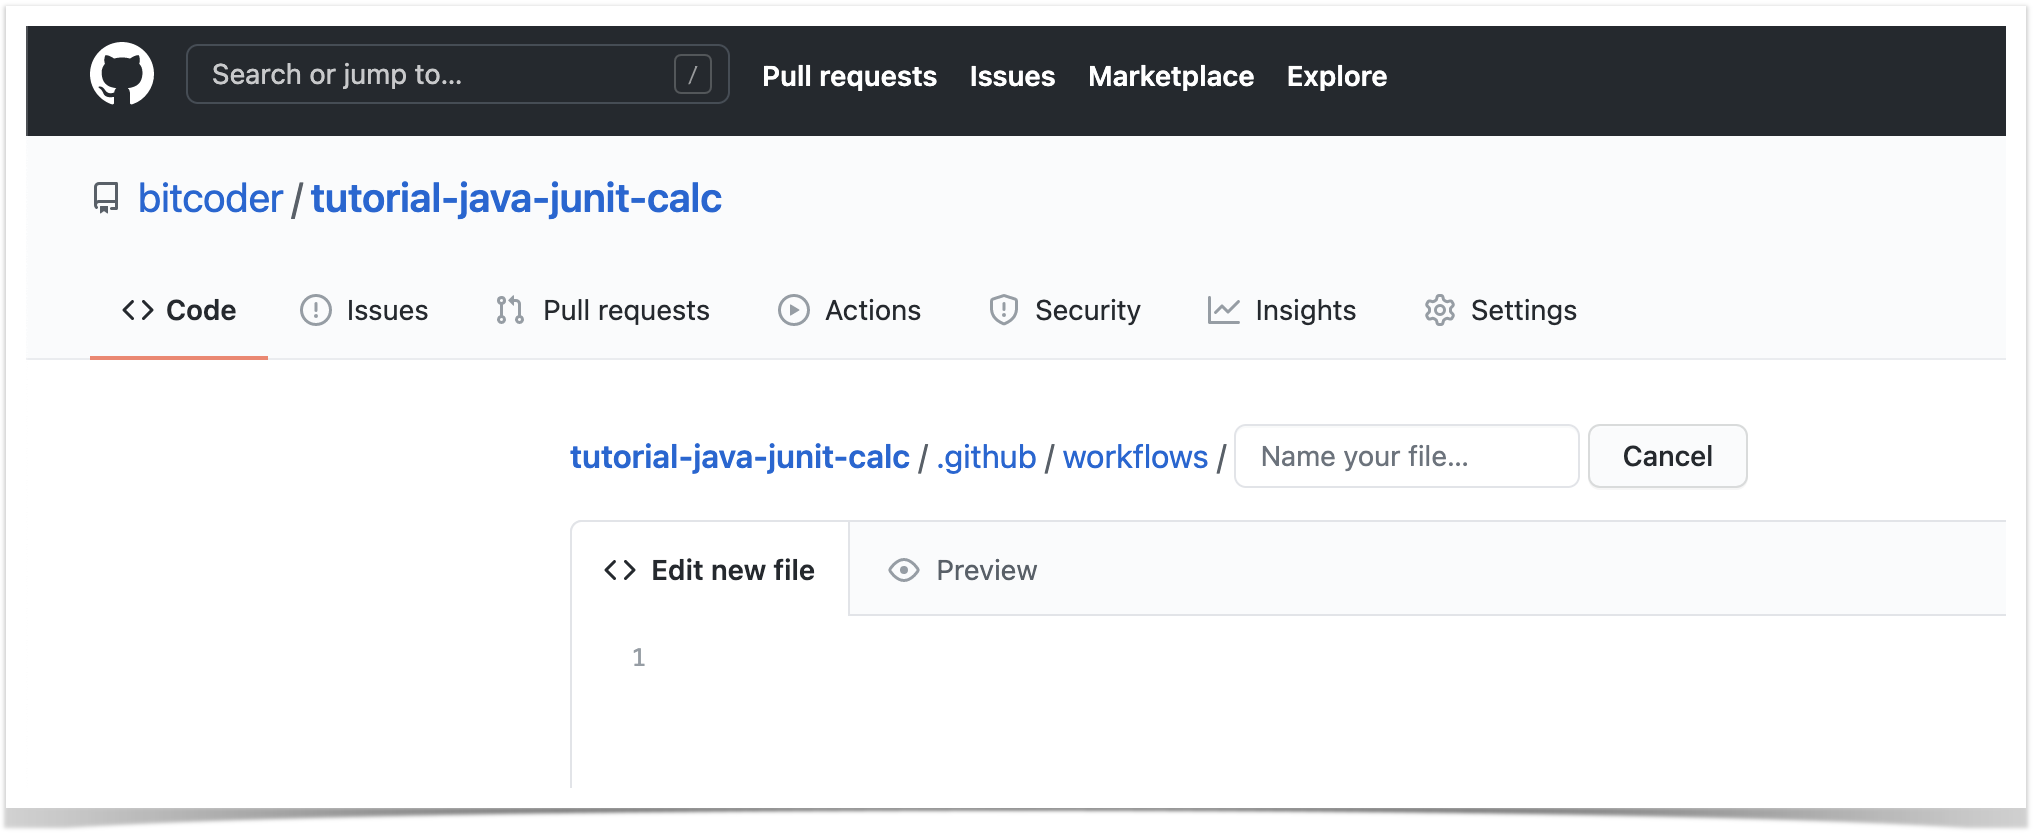
The workflow will be triggered upon a "workflow dispatch" event, which is usually manually triggered. However, this event can also be triggered using GitHub's API.
In the following example the workflow will receive the Test Plan issue key as an input parameter. It will then run the build, including the automated tests, and in the end it will report the results back to Xray using the open-source GitHub action xray-action.
name: CI (Jira cloud example with GH action, report results to Test Plan - demo)
on:
  workflow_dispatch:
    inputs:
      test_plan_key:
        description: 'Test Plan issue key'
        required: false
        default: ''

jobs:
  build:
    runs-on: ubuntu-latest

    steps:
    - uses: actions/checkout@v1
    - name: Set up Java
      uses: actions/setup-java@v1
      with:
        java-version: '1.8'
    - name: Cache Maven packages
      uses: actions/cache@v2
      with:
        path: ~/.m2
        key: ${{ runner.os }}-m2-${{ hashFiles('**/pom.xml') }}
        restore-keys: ${{ runner.os }}-m2
    - name: Build with Maven
      run: mvn clean compile test --file pom.xml
    - name: Submit results to Xray
      uses: mikepenz/xray-action@v0.9.4
      with:
        username: ${{ secrets.client_id }}
        password: ${{ secrets.client_secret }}
        testFormat: "junit"
        testPaths: "**/surefire-reports/*.xml"
        projectKey: "CALC"
        testPlanKey: ${{ github.event.inputs.test_plan_key }}
Automation configuration
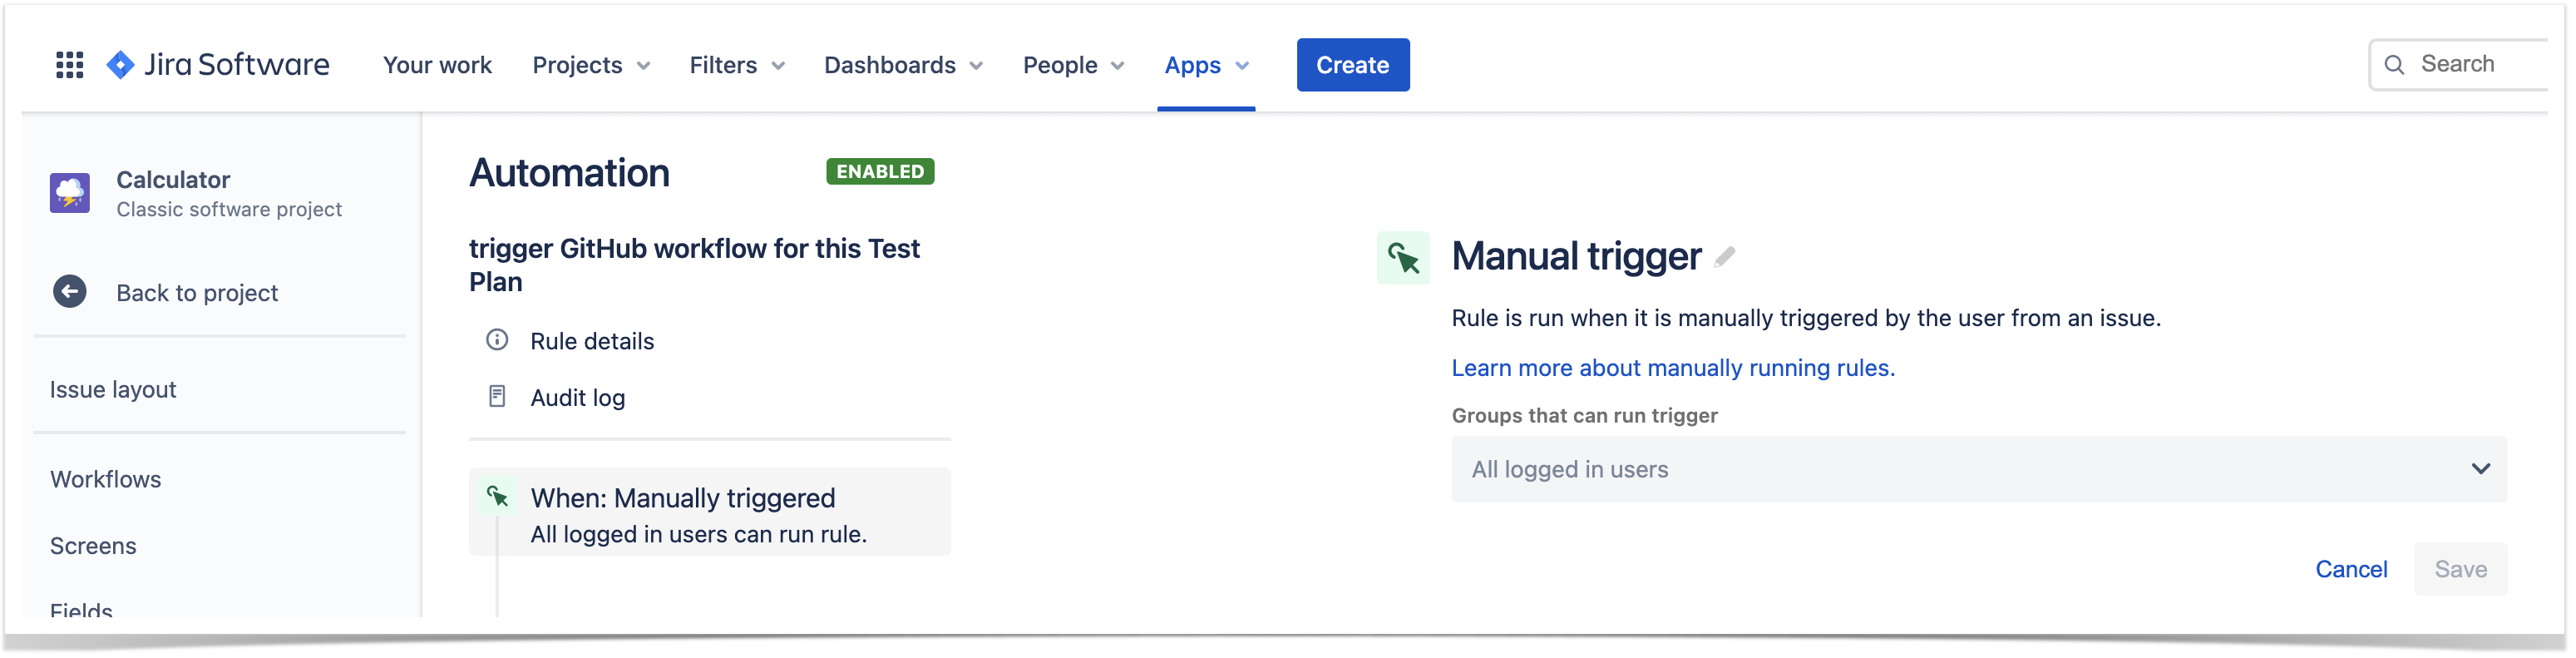
- create a new rule and define the "When" (i.e. when it to should be triggered ), to be "Manually triggered"
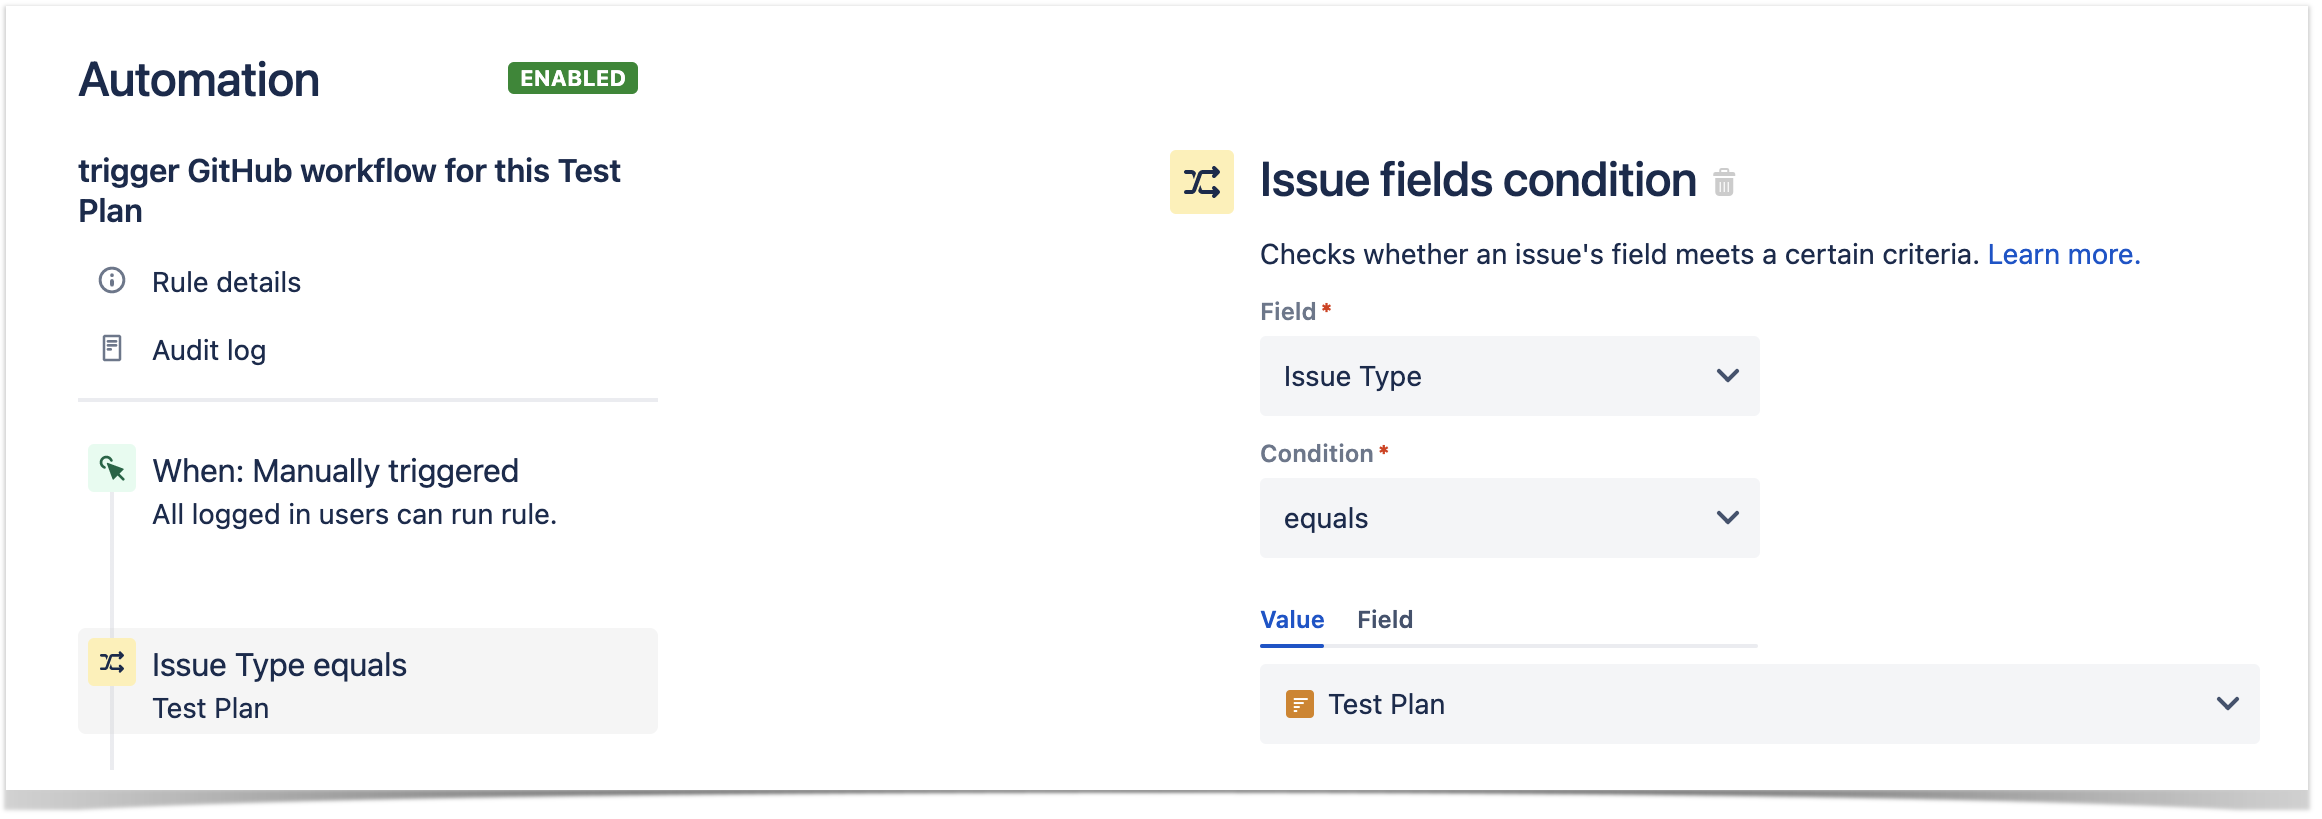
2. define the condition so that this rule can only be executed from Test Plan issue
3. define an action (i.e. the "Then") as "Send webhook" and configure it as follows
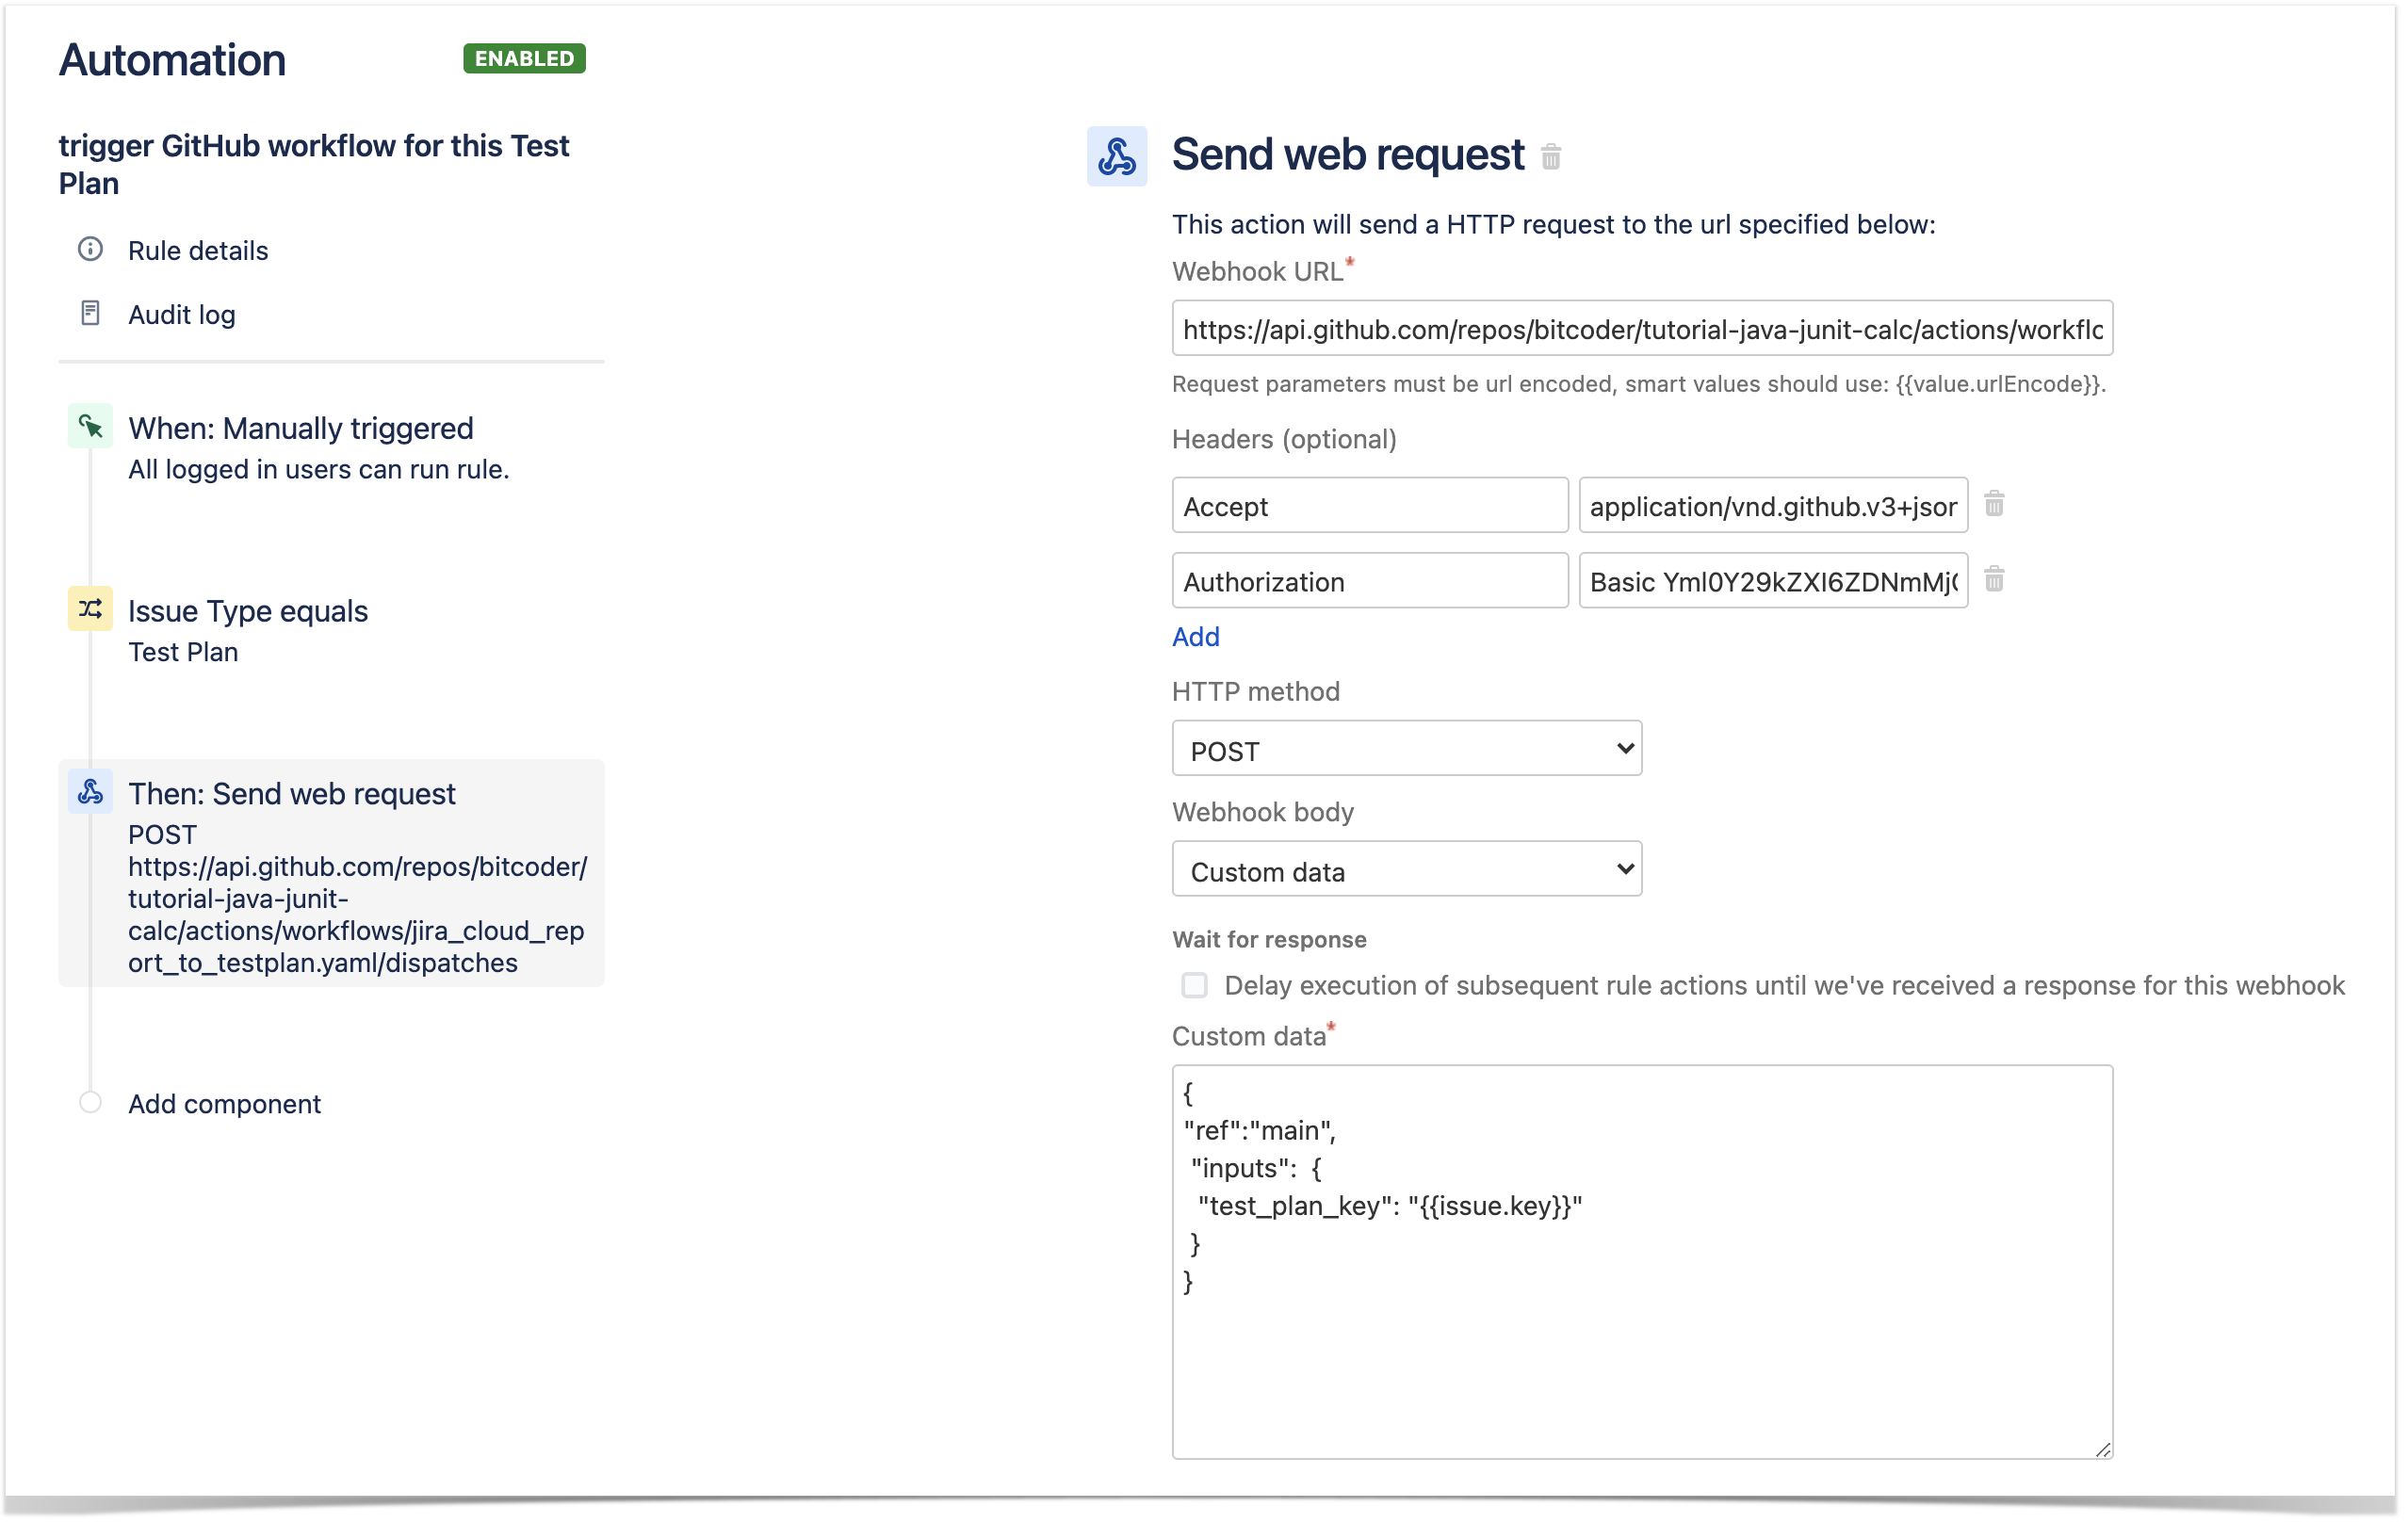
- the web request URL provided above follows this syntax:
- https://api.github.com/repos/<github_user>/<github_repository>/actions/workflows/<workflow_filename>/dispatches
the HTTP POST body content, defined in the "Custom data" field, will be used to identify the original Test Plan issue key and the branch of the code
- besides, the "Accept" header that should be "application/vnd.github.v3+json"; define also an "Authorization" header having the value "Basic <auth>", where the base64 encoded <auth> can be generated using your GitHub username plus the personal access token obtained earlier (as the password).
After publishing the rule, you can go to the screen of an issue and trigger a workflow run in GitHub.

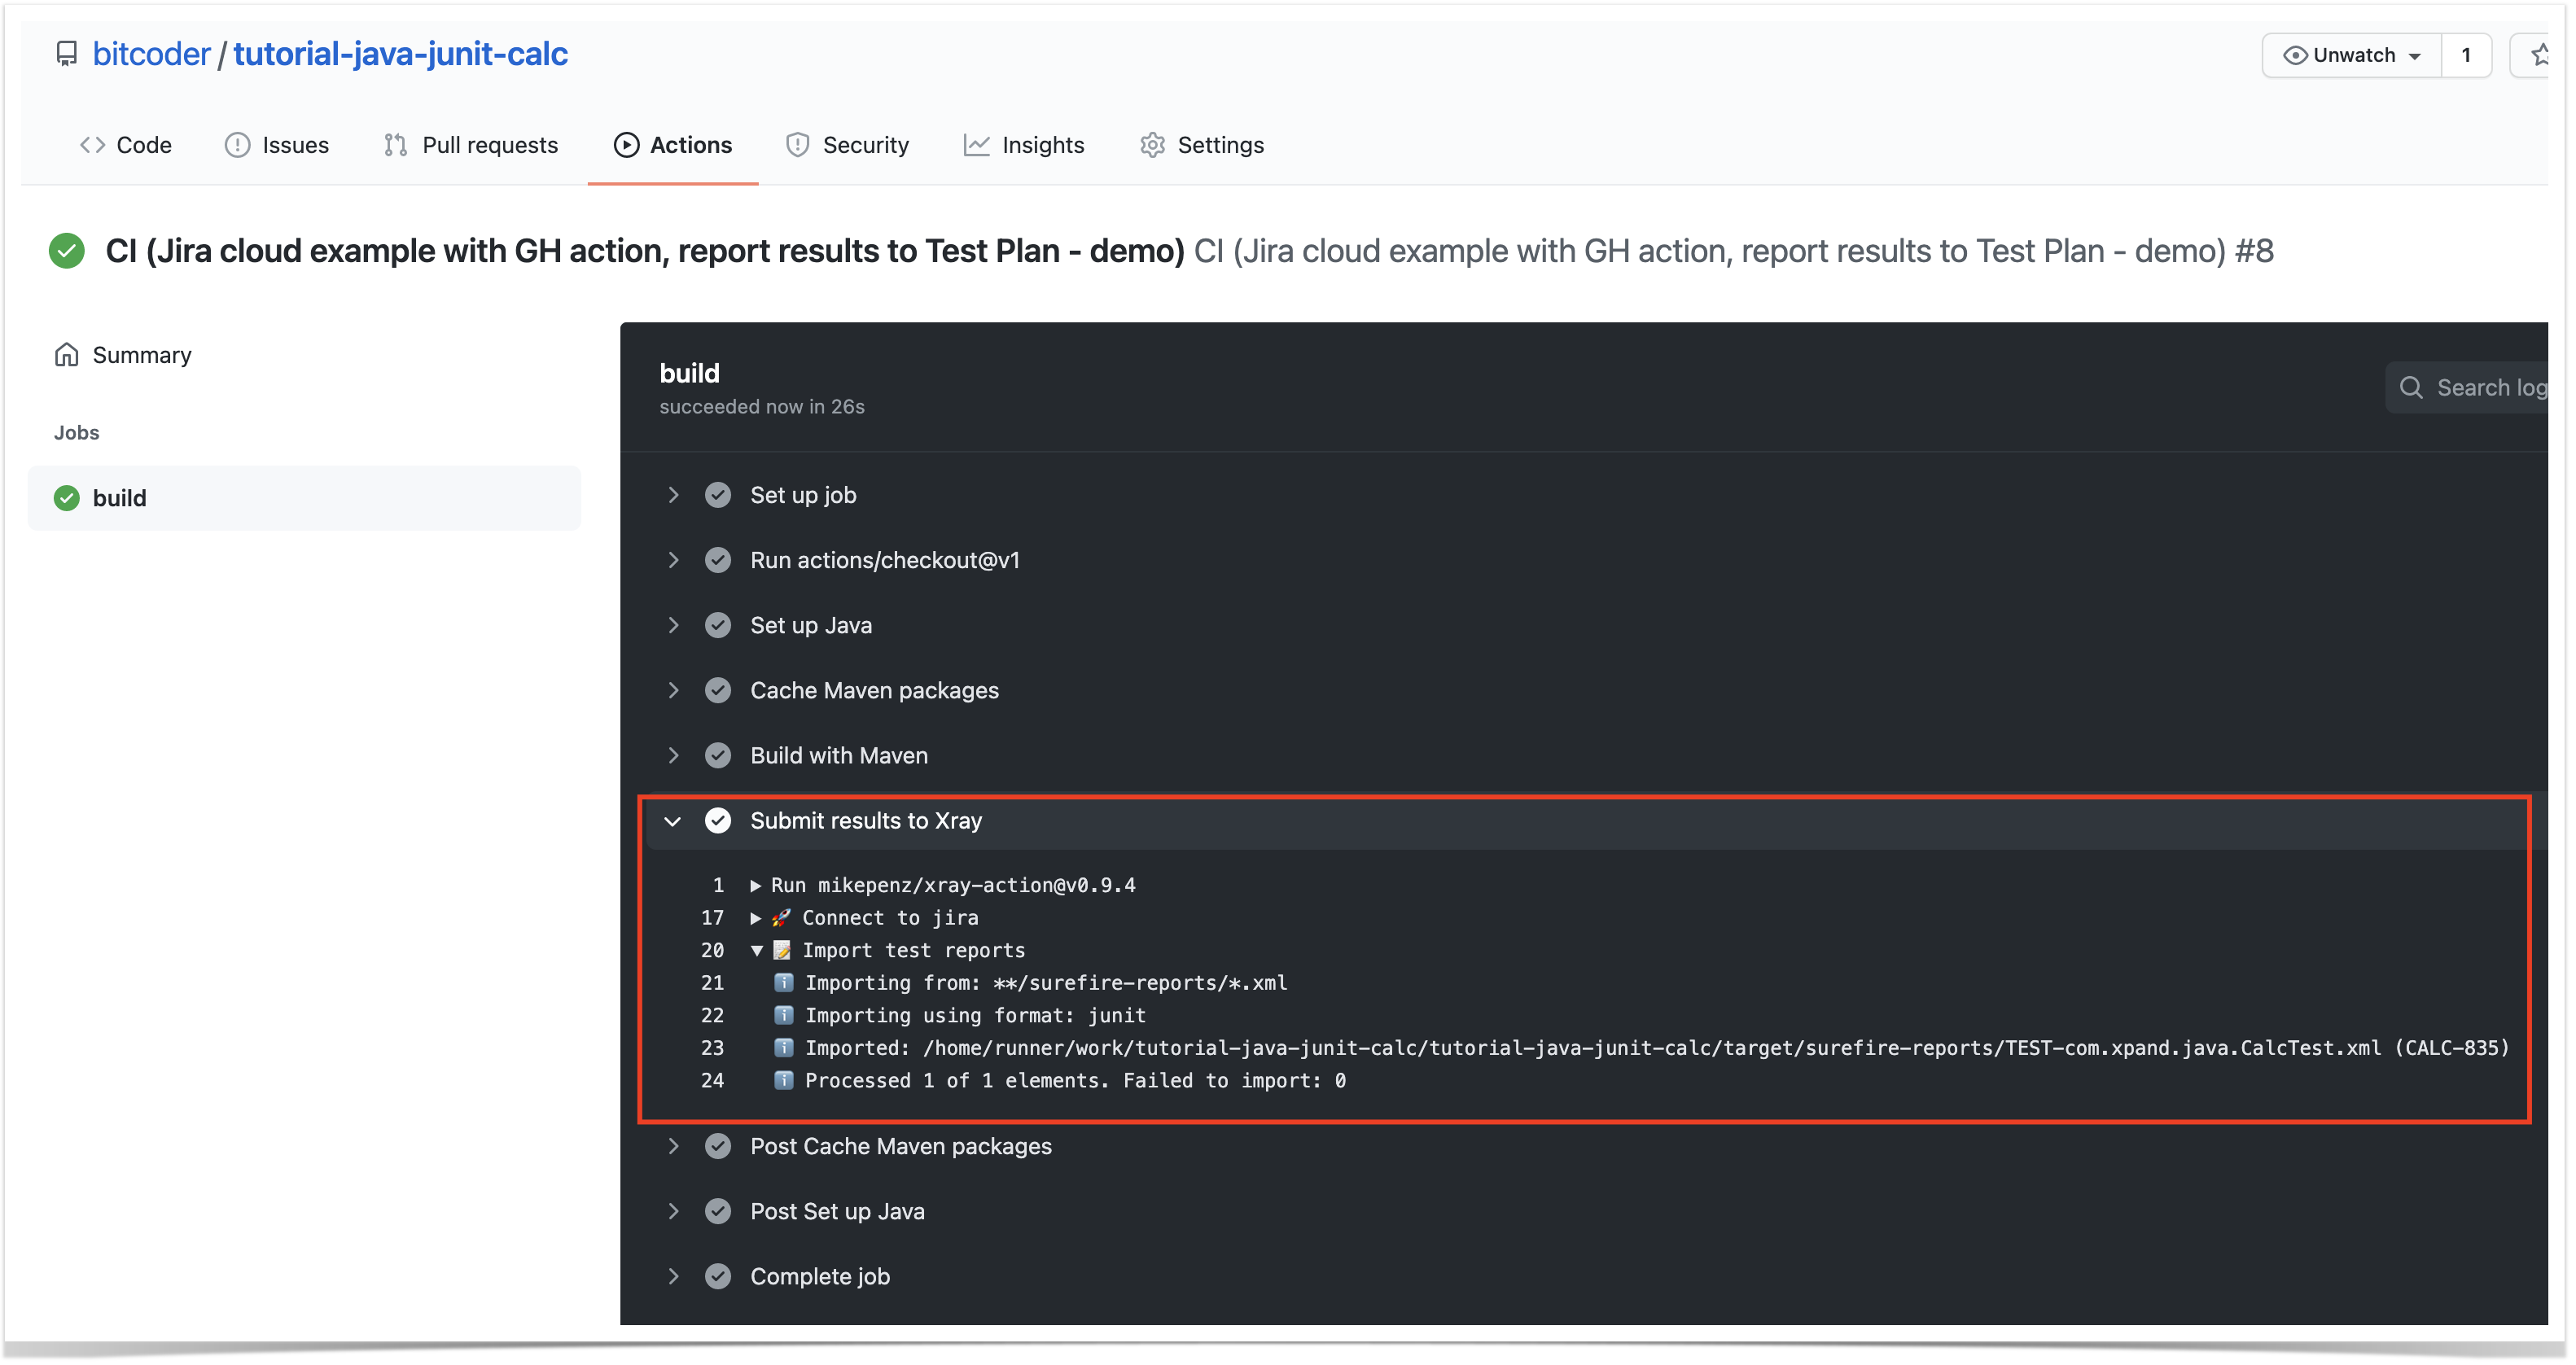
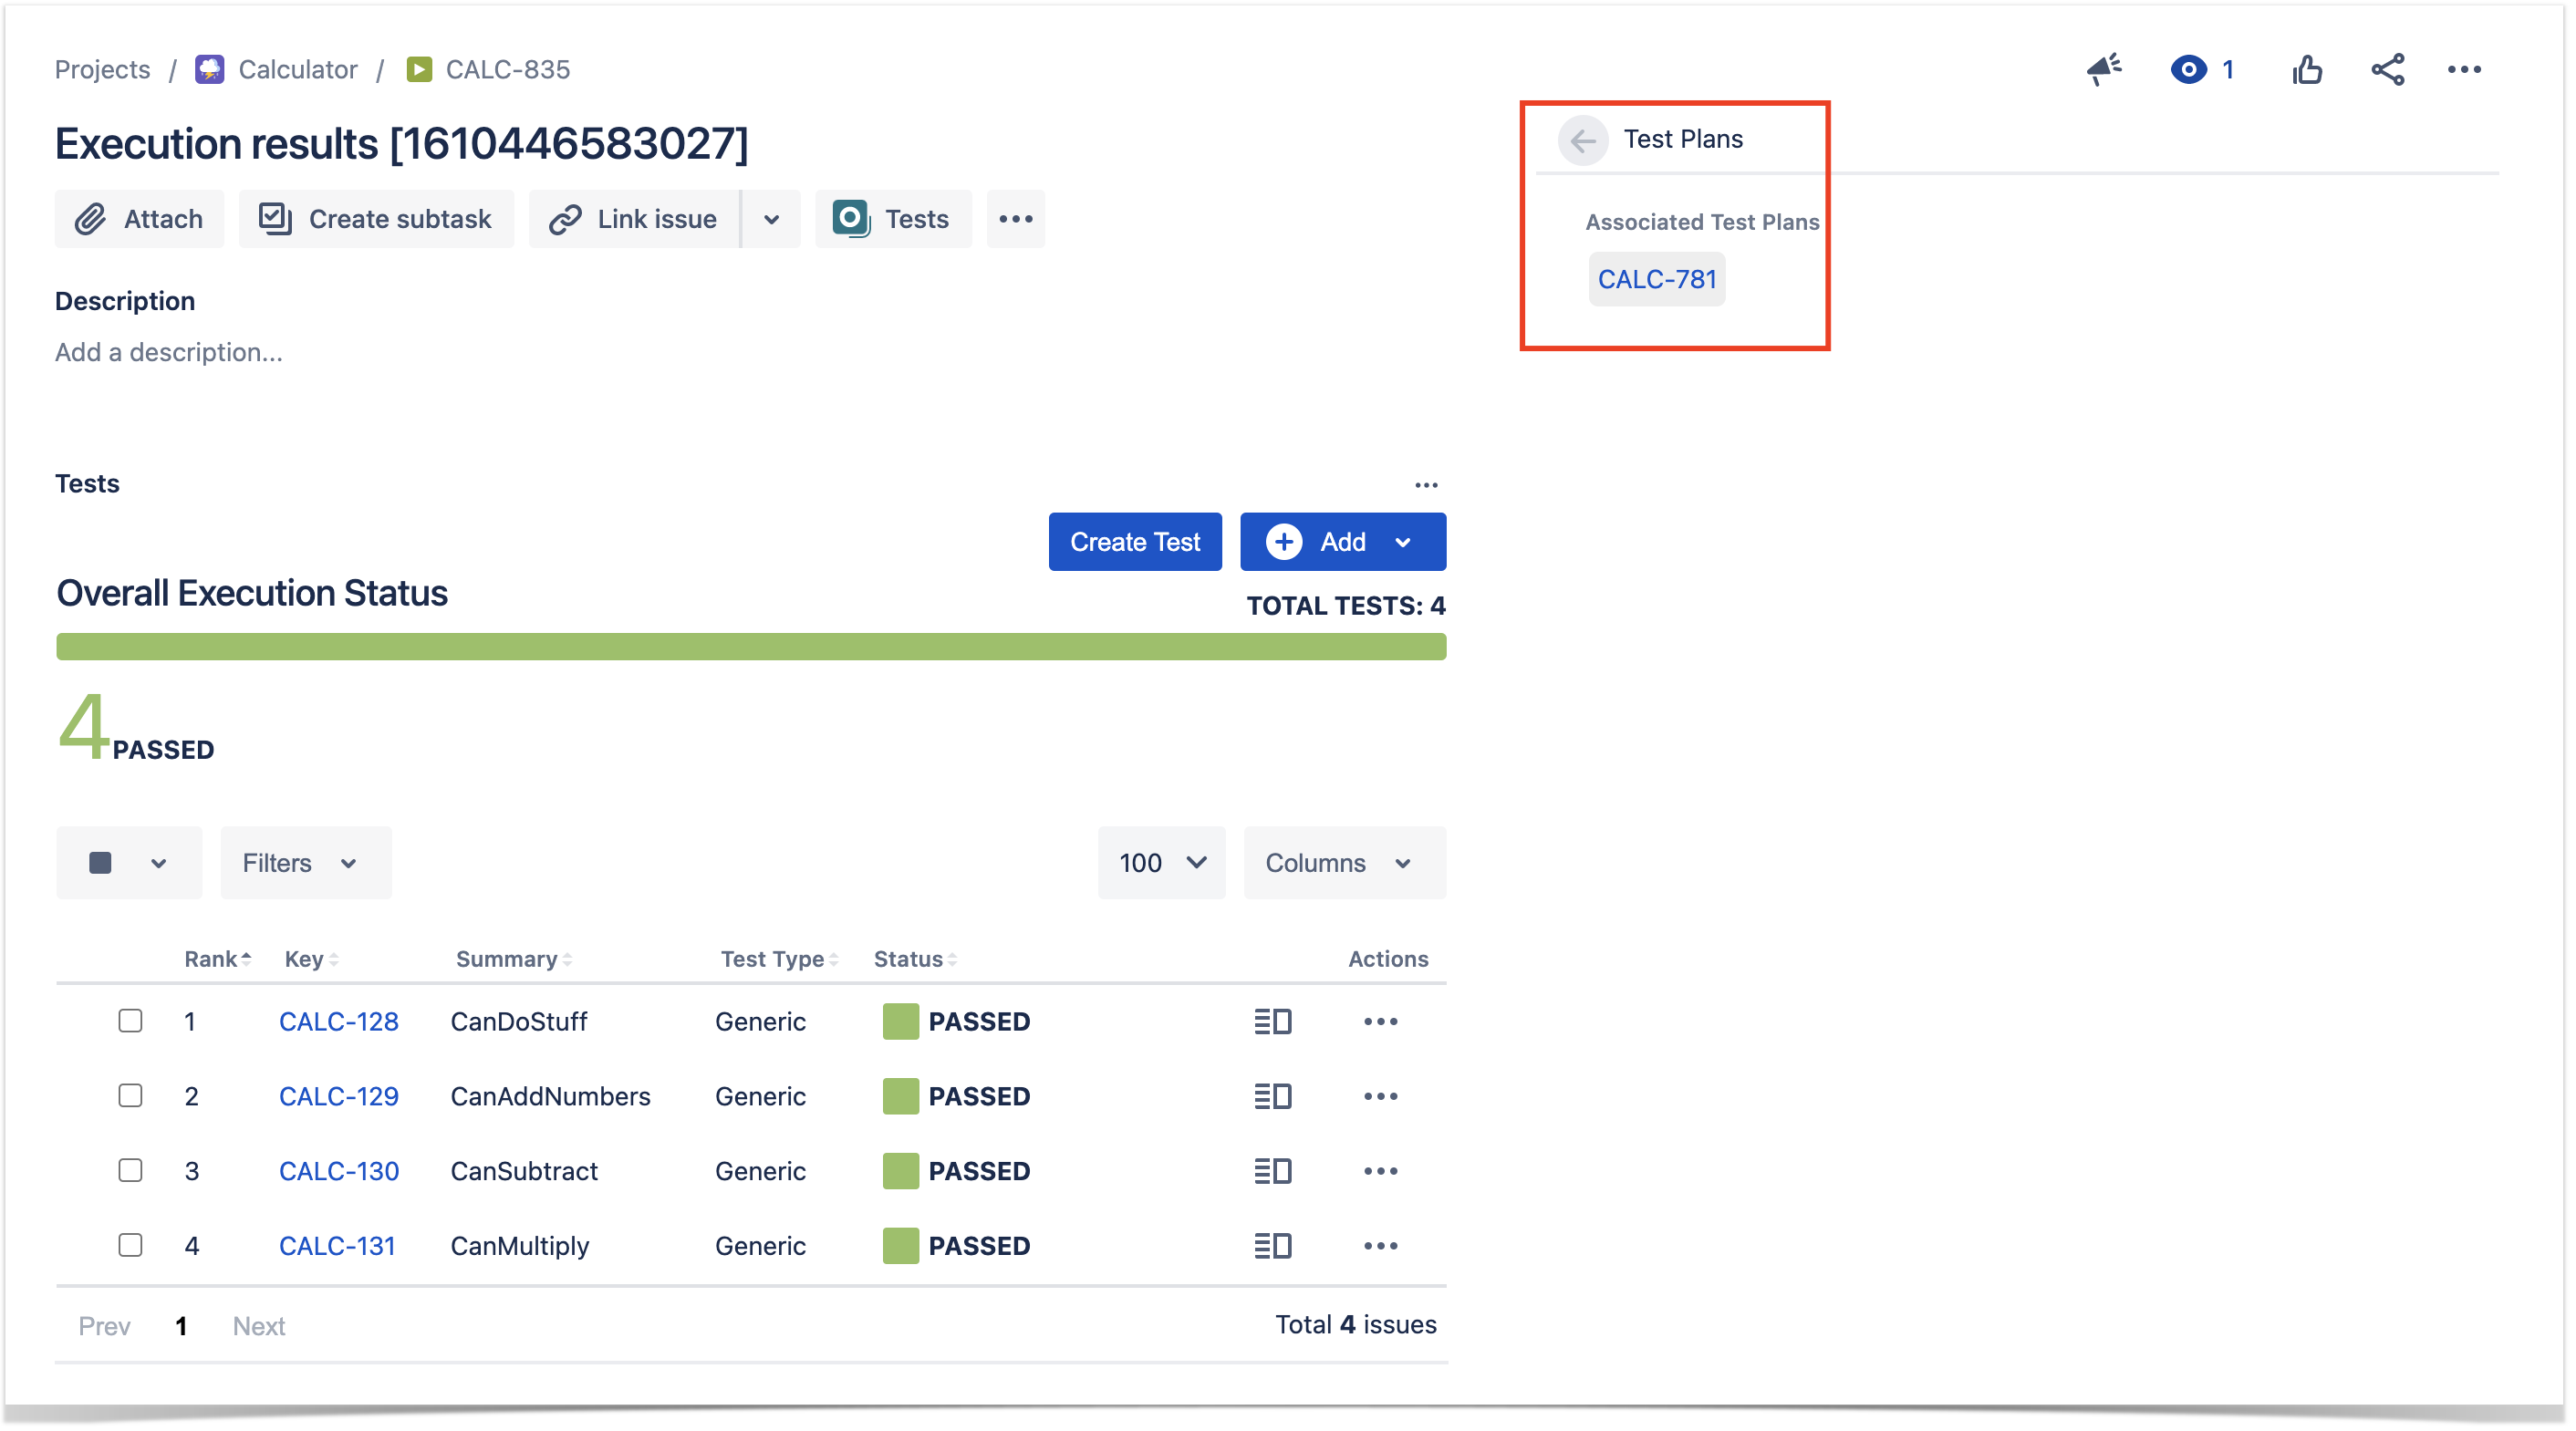
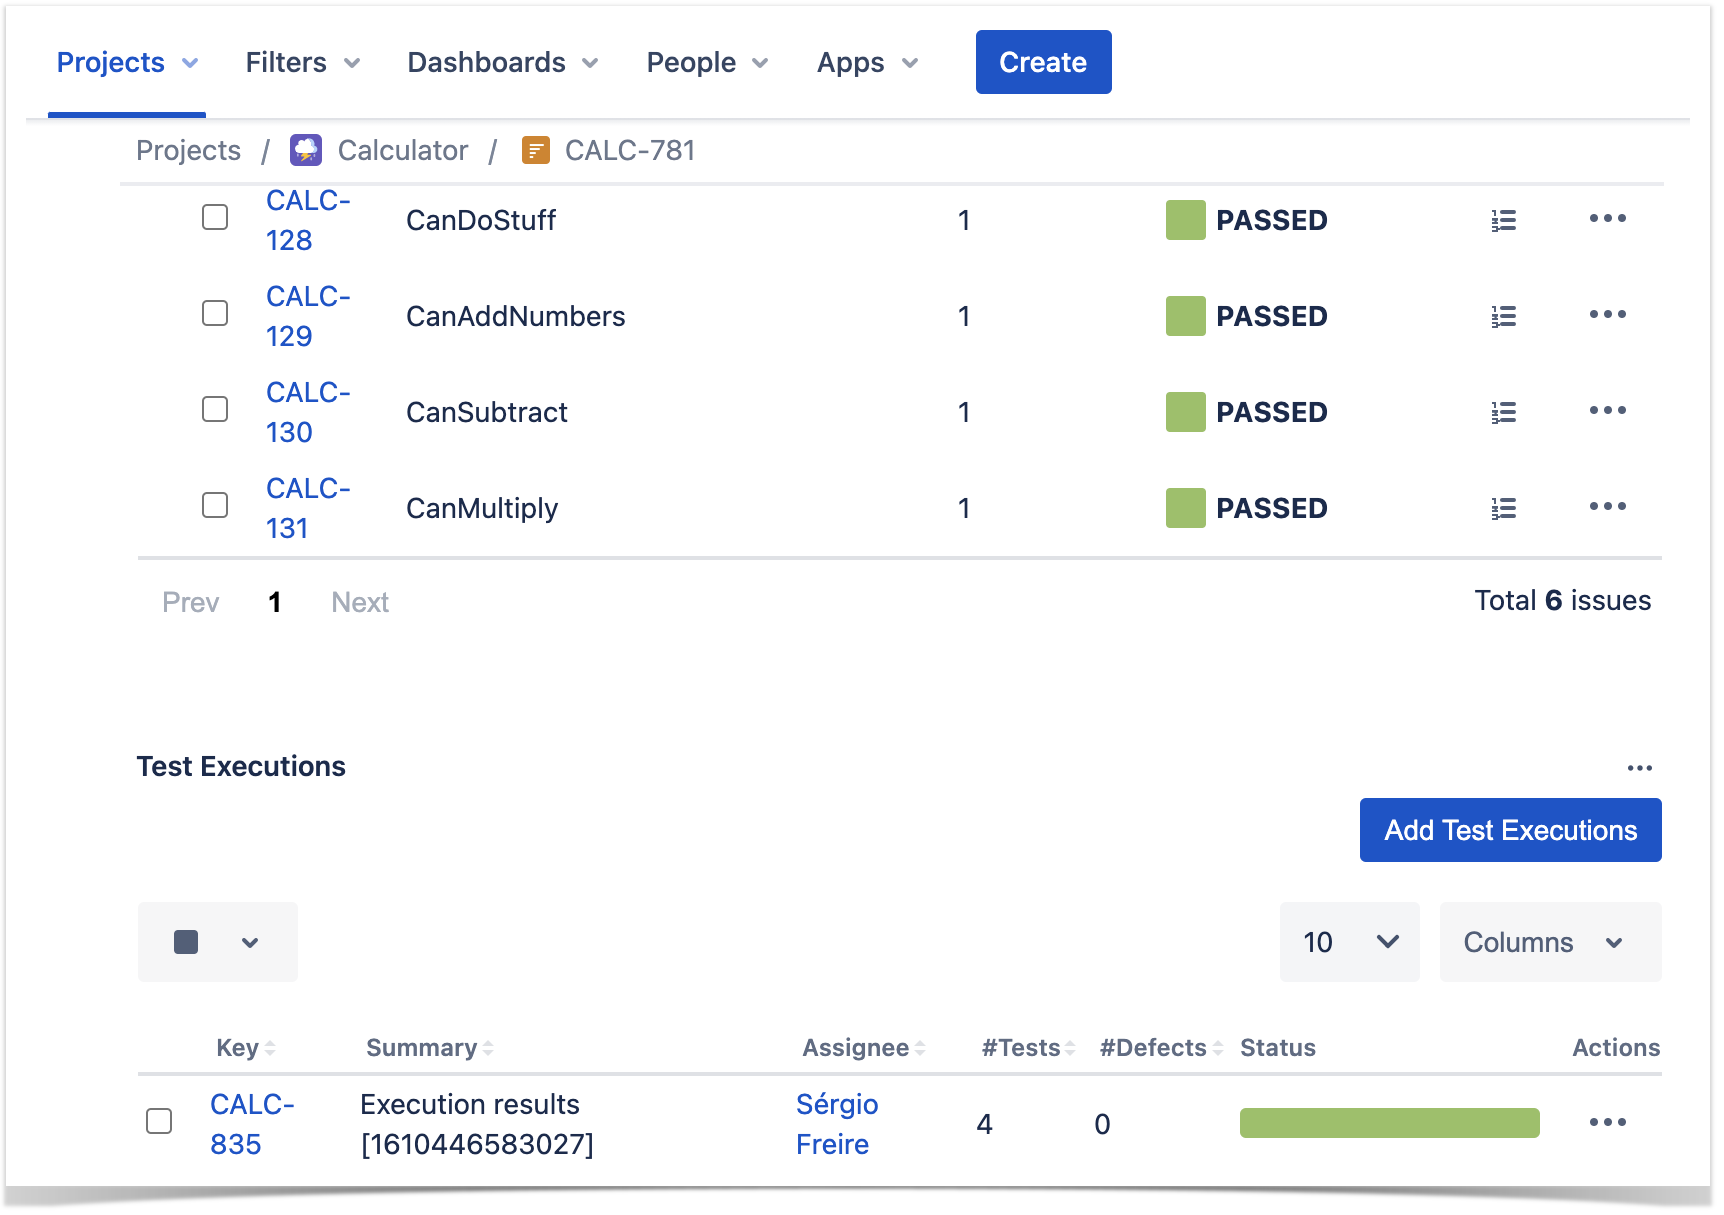
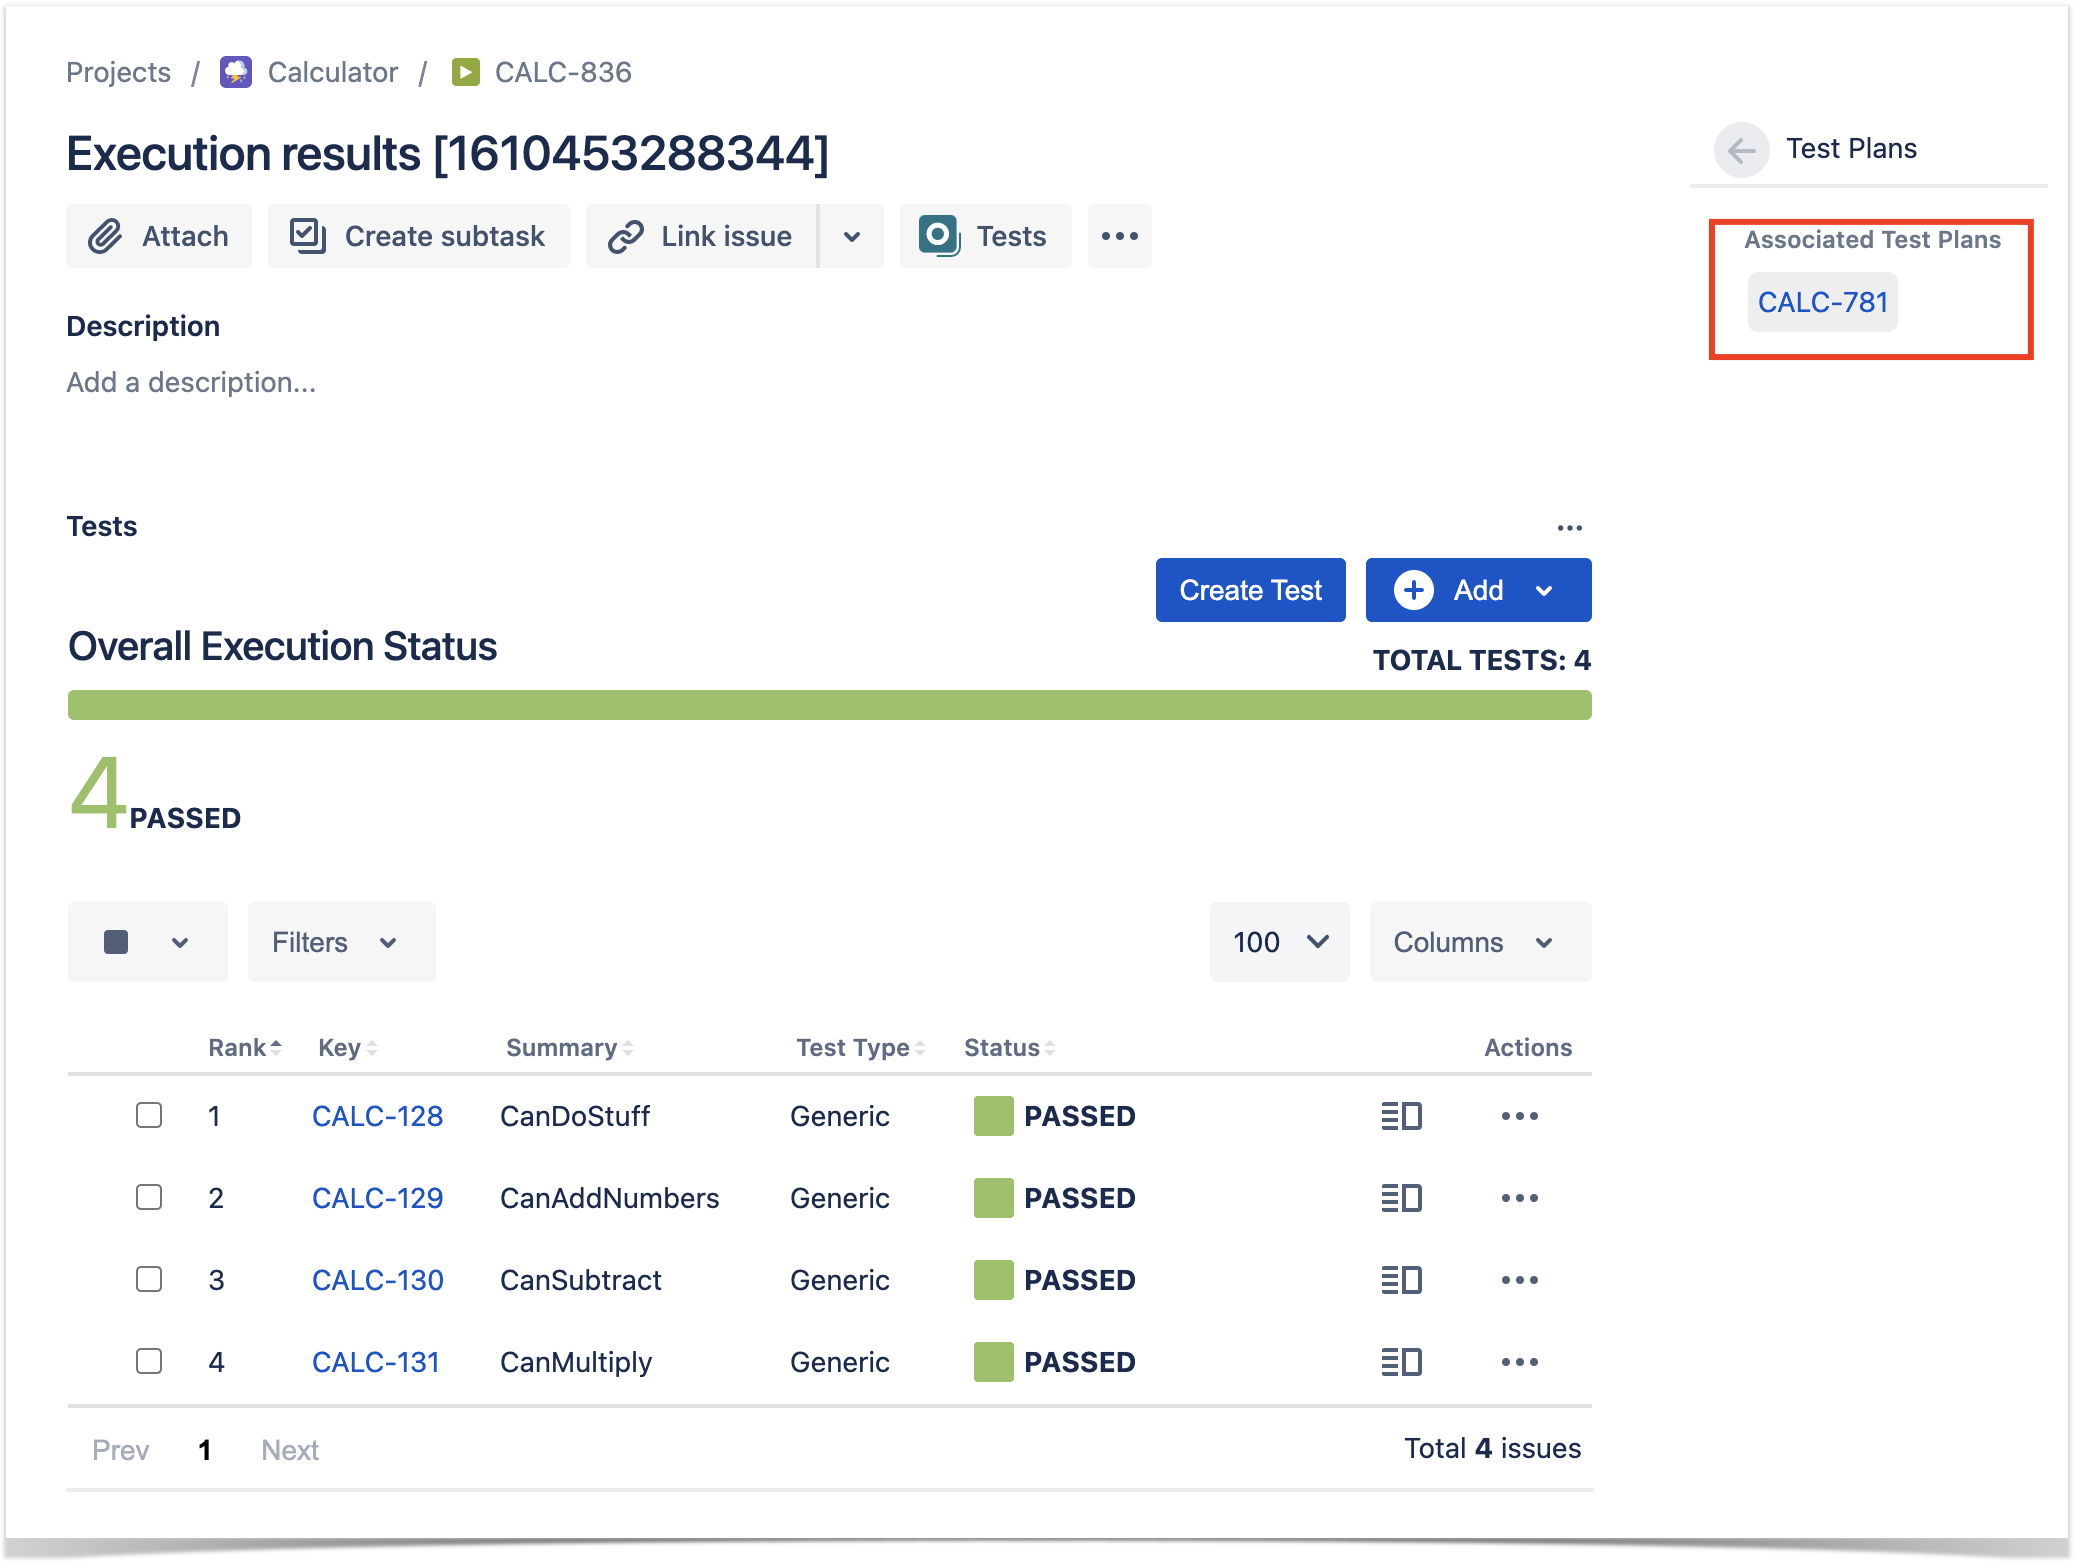
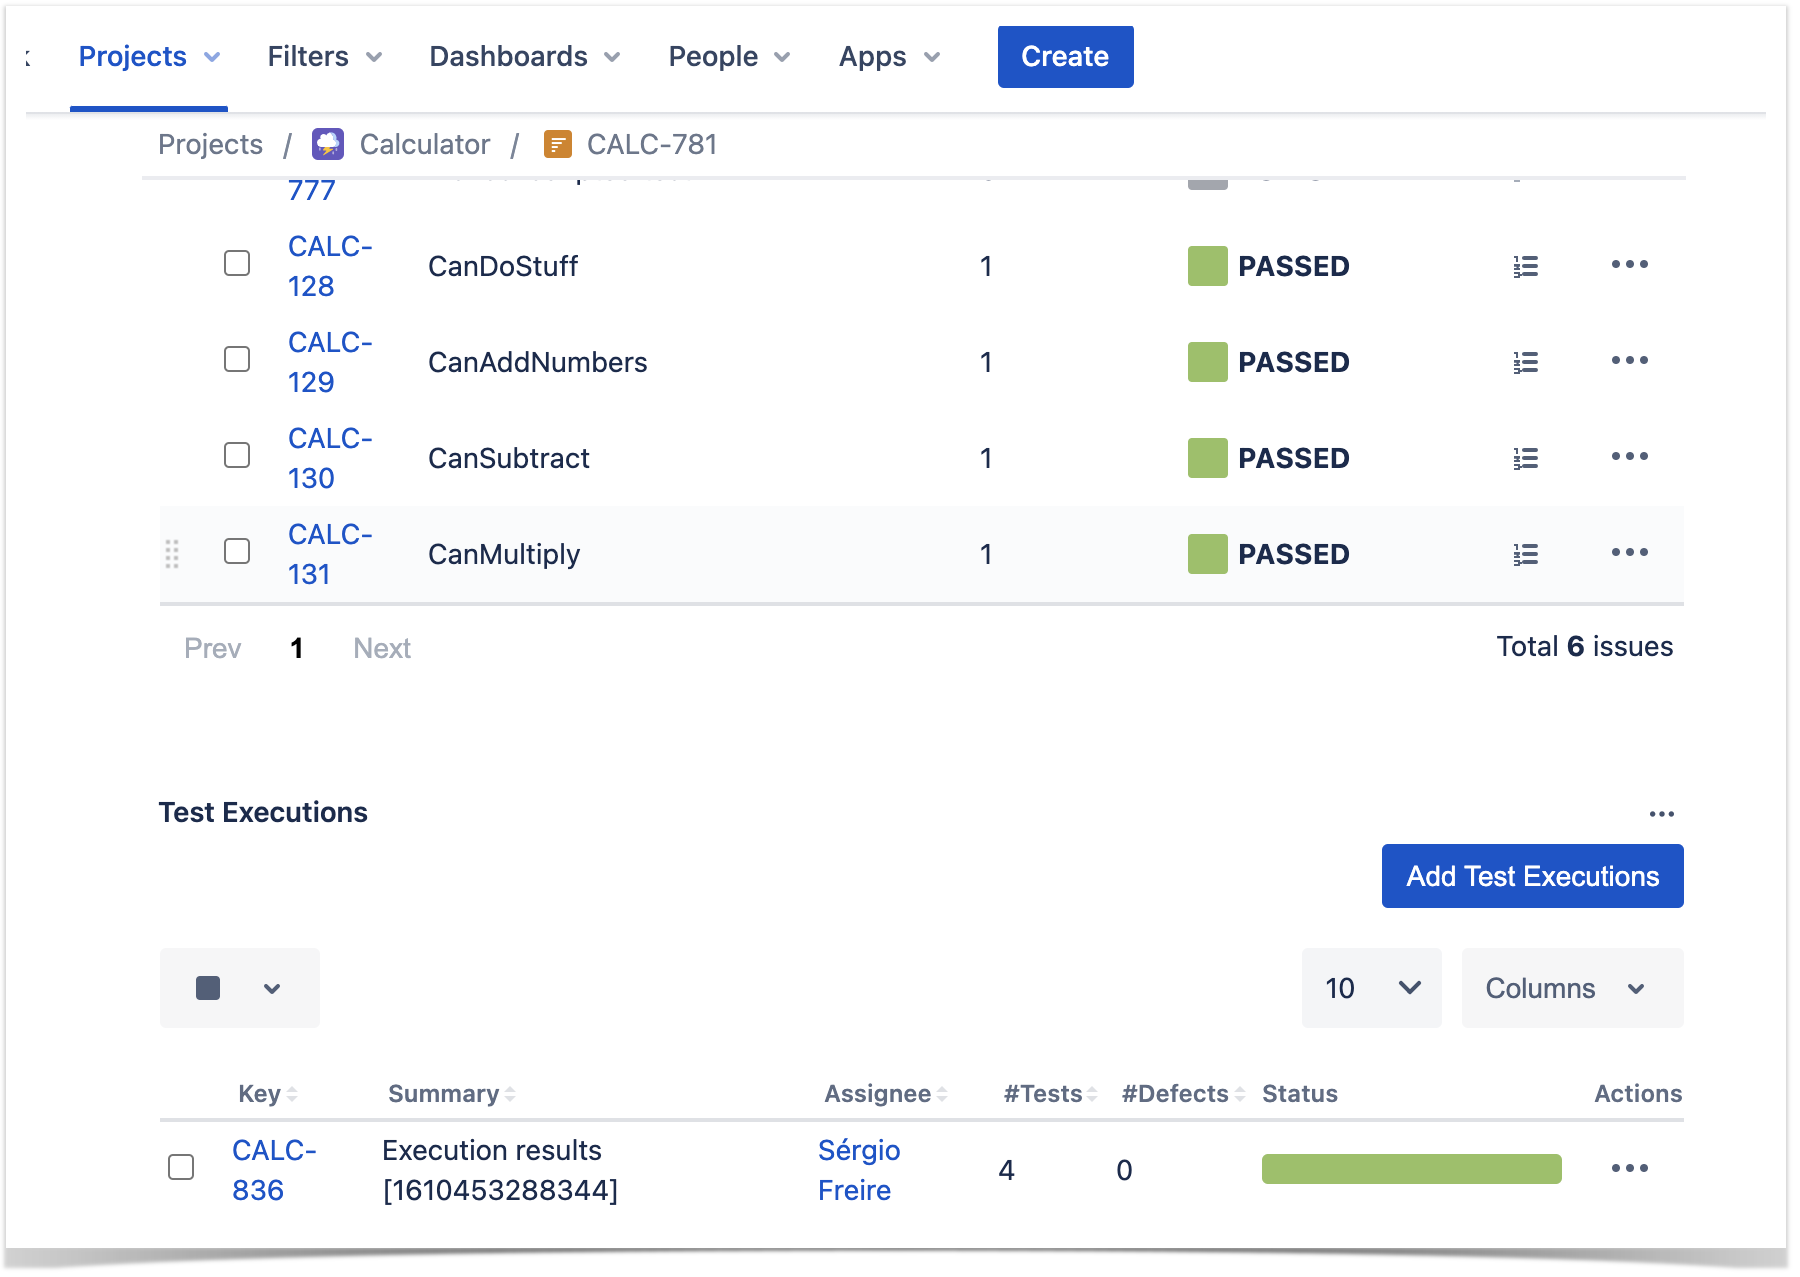
In this case, since the workflow was configured to report results back to Xray, a new Test Execution would be created and linked back to the source Test Plan where the automation was triggered from.
GitLab
Trigger a GitLab workflow from a Test Plan and report the results back to it
GitLab configuration
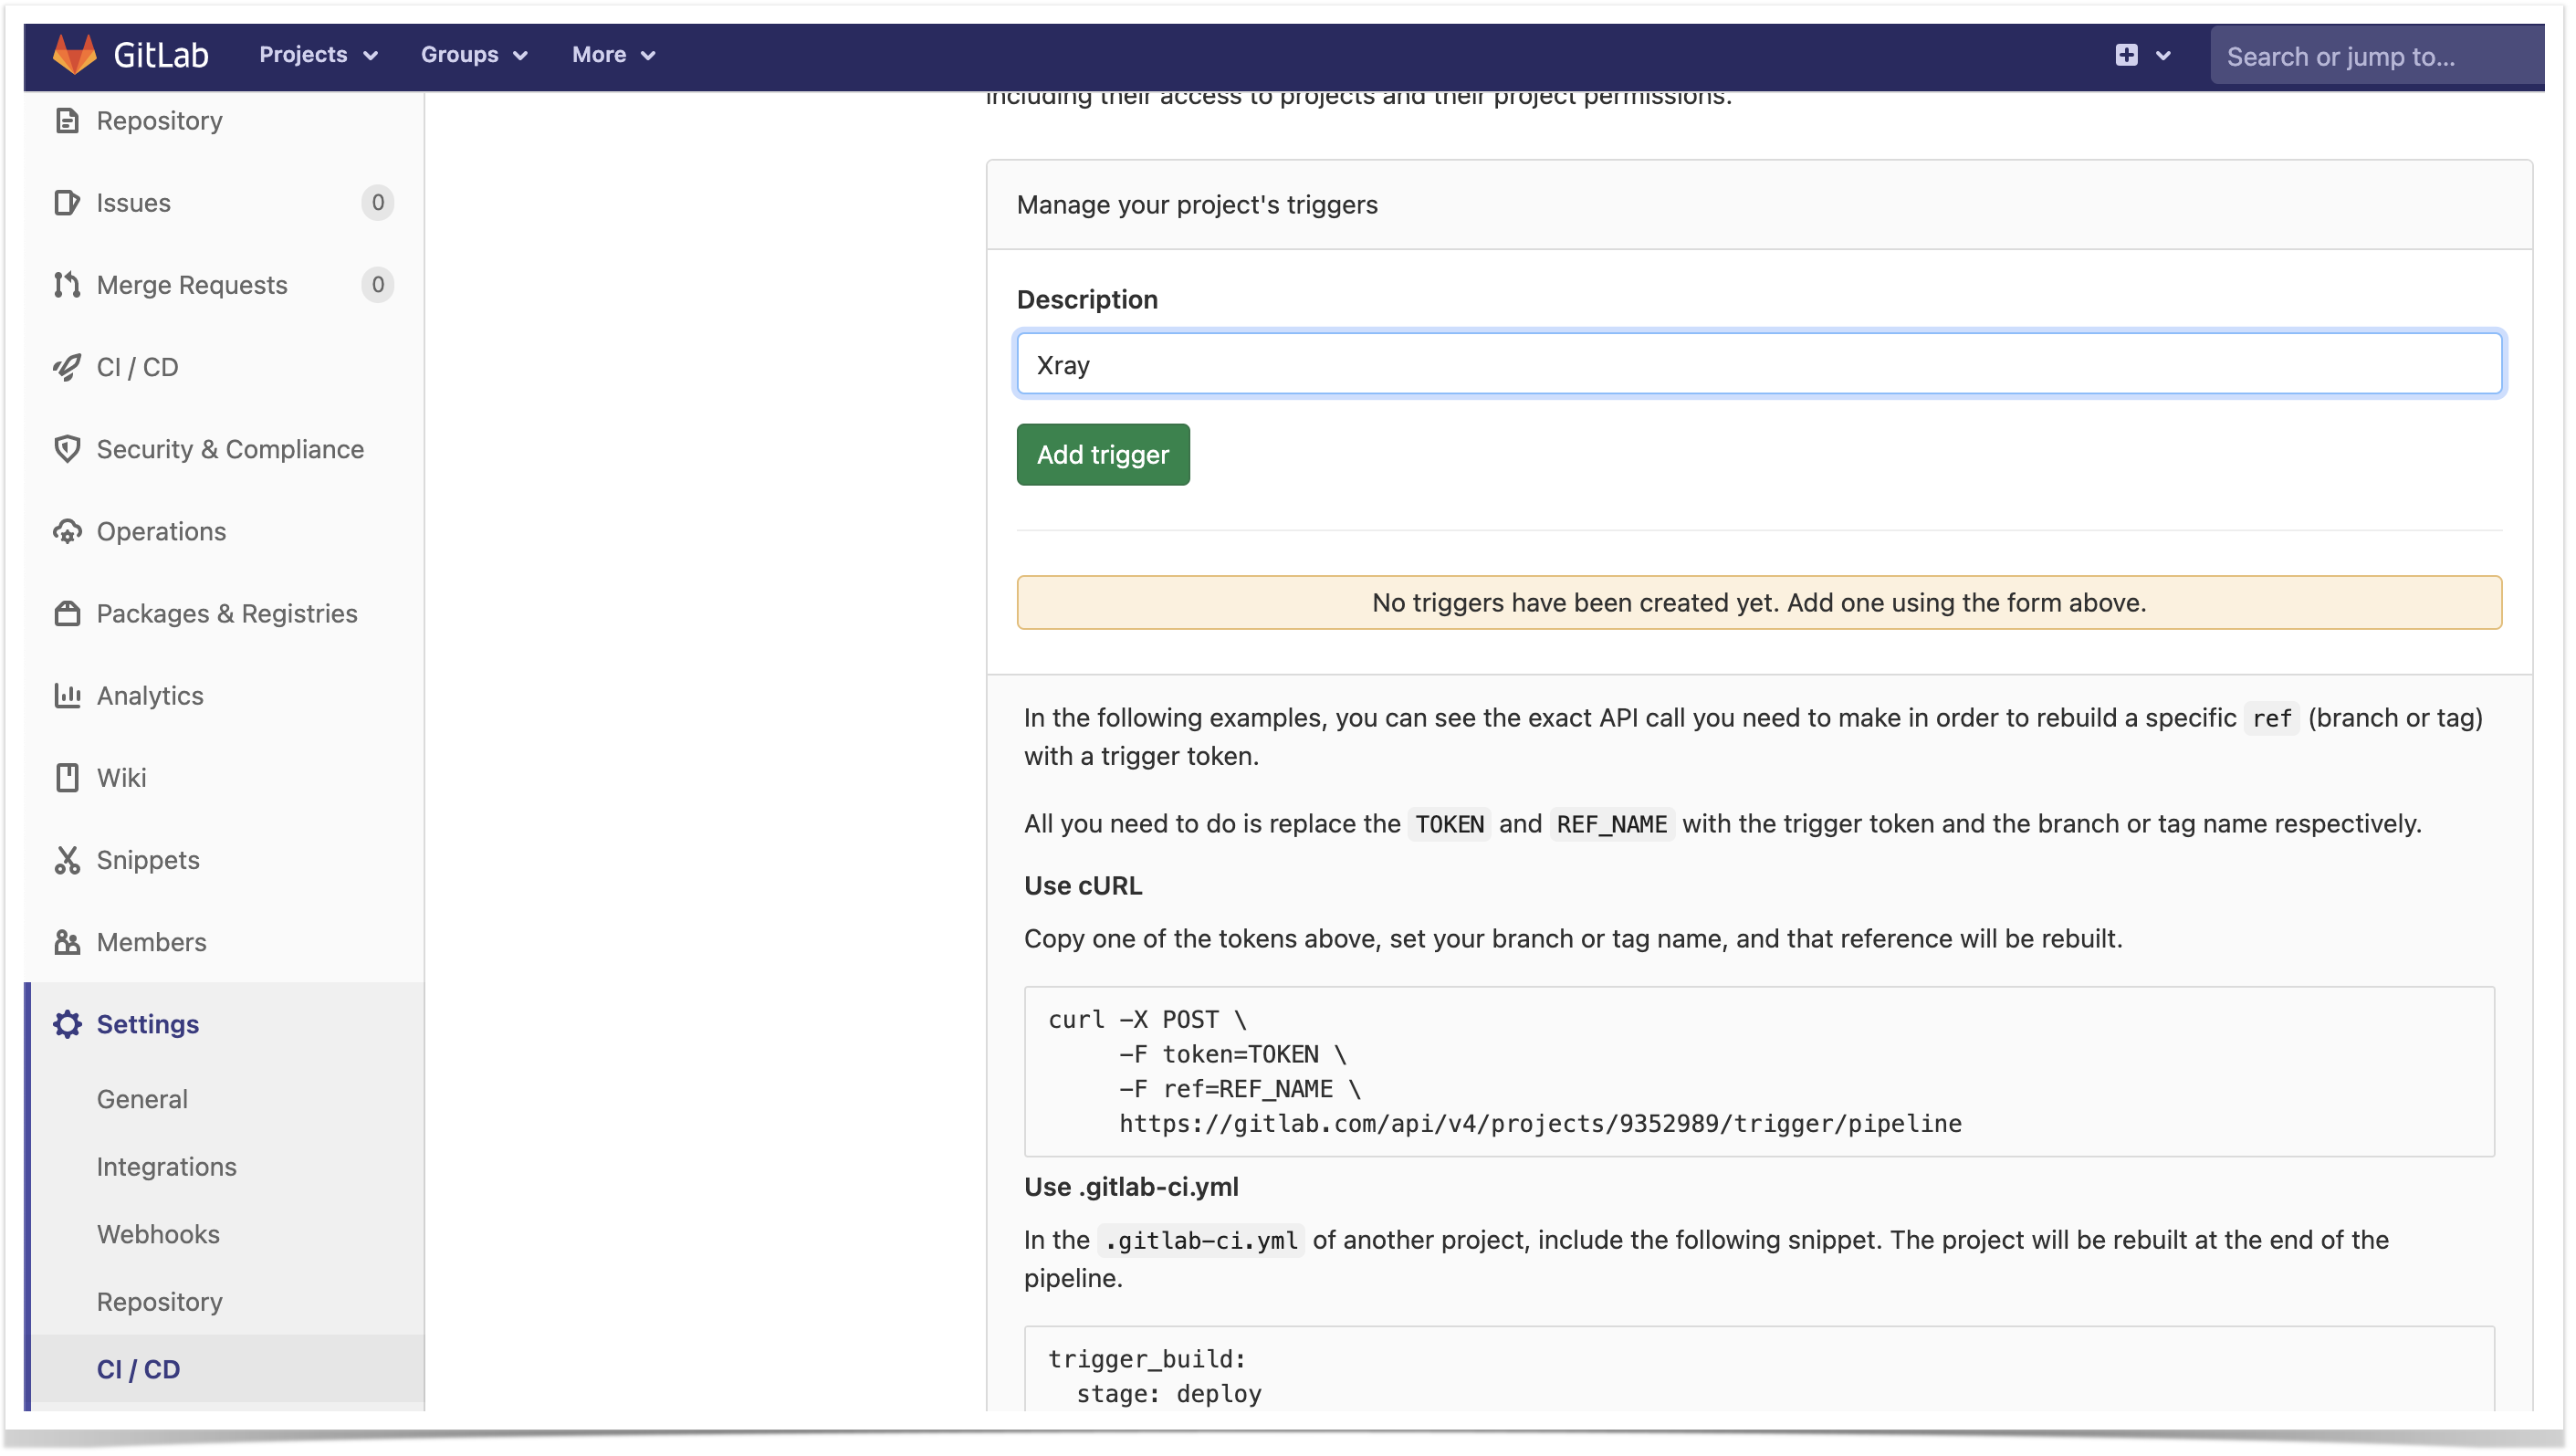
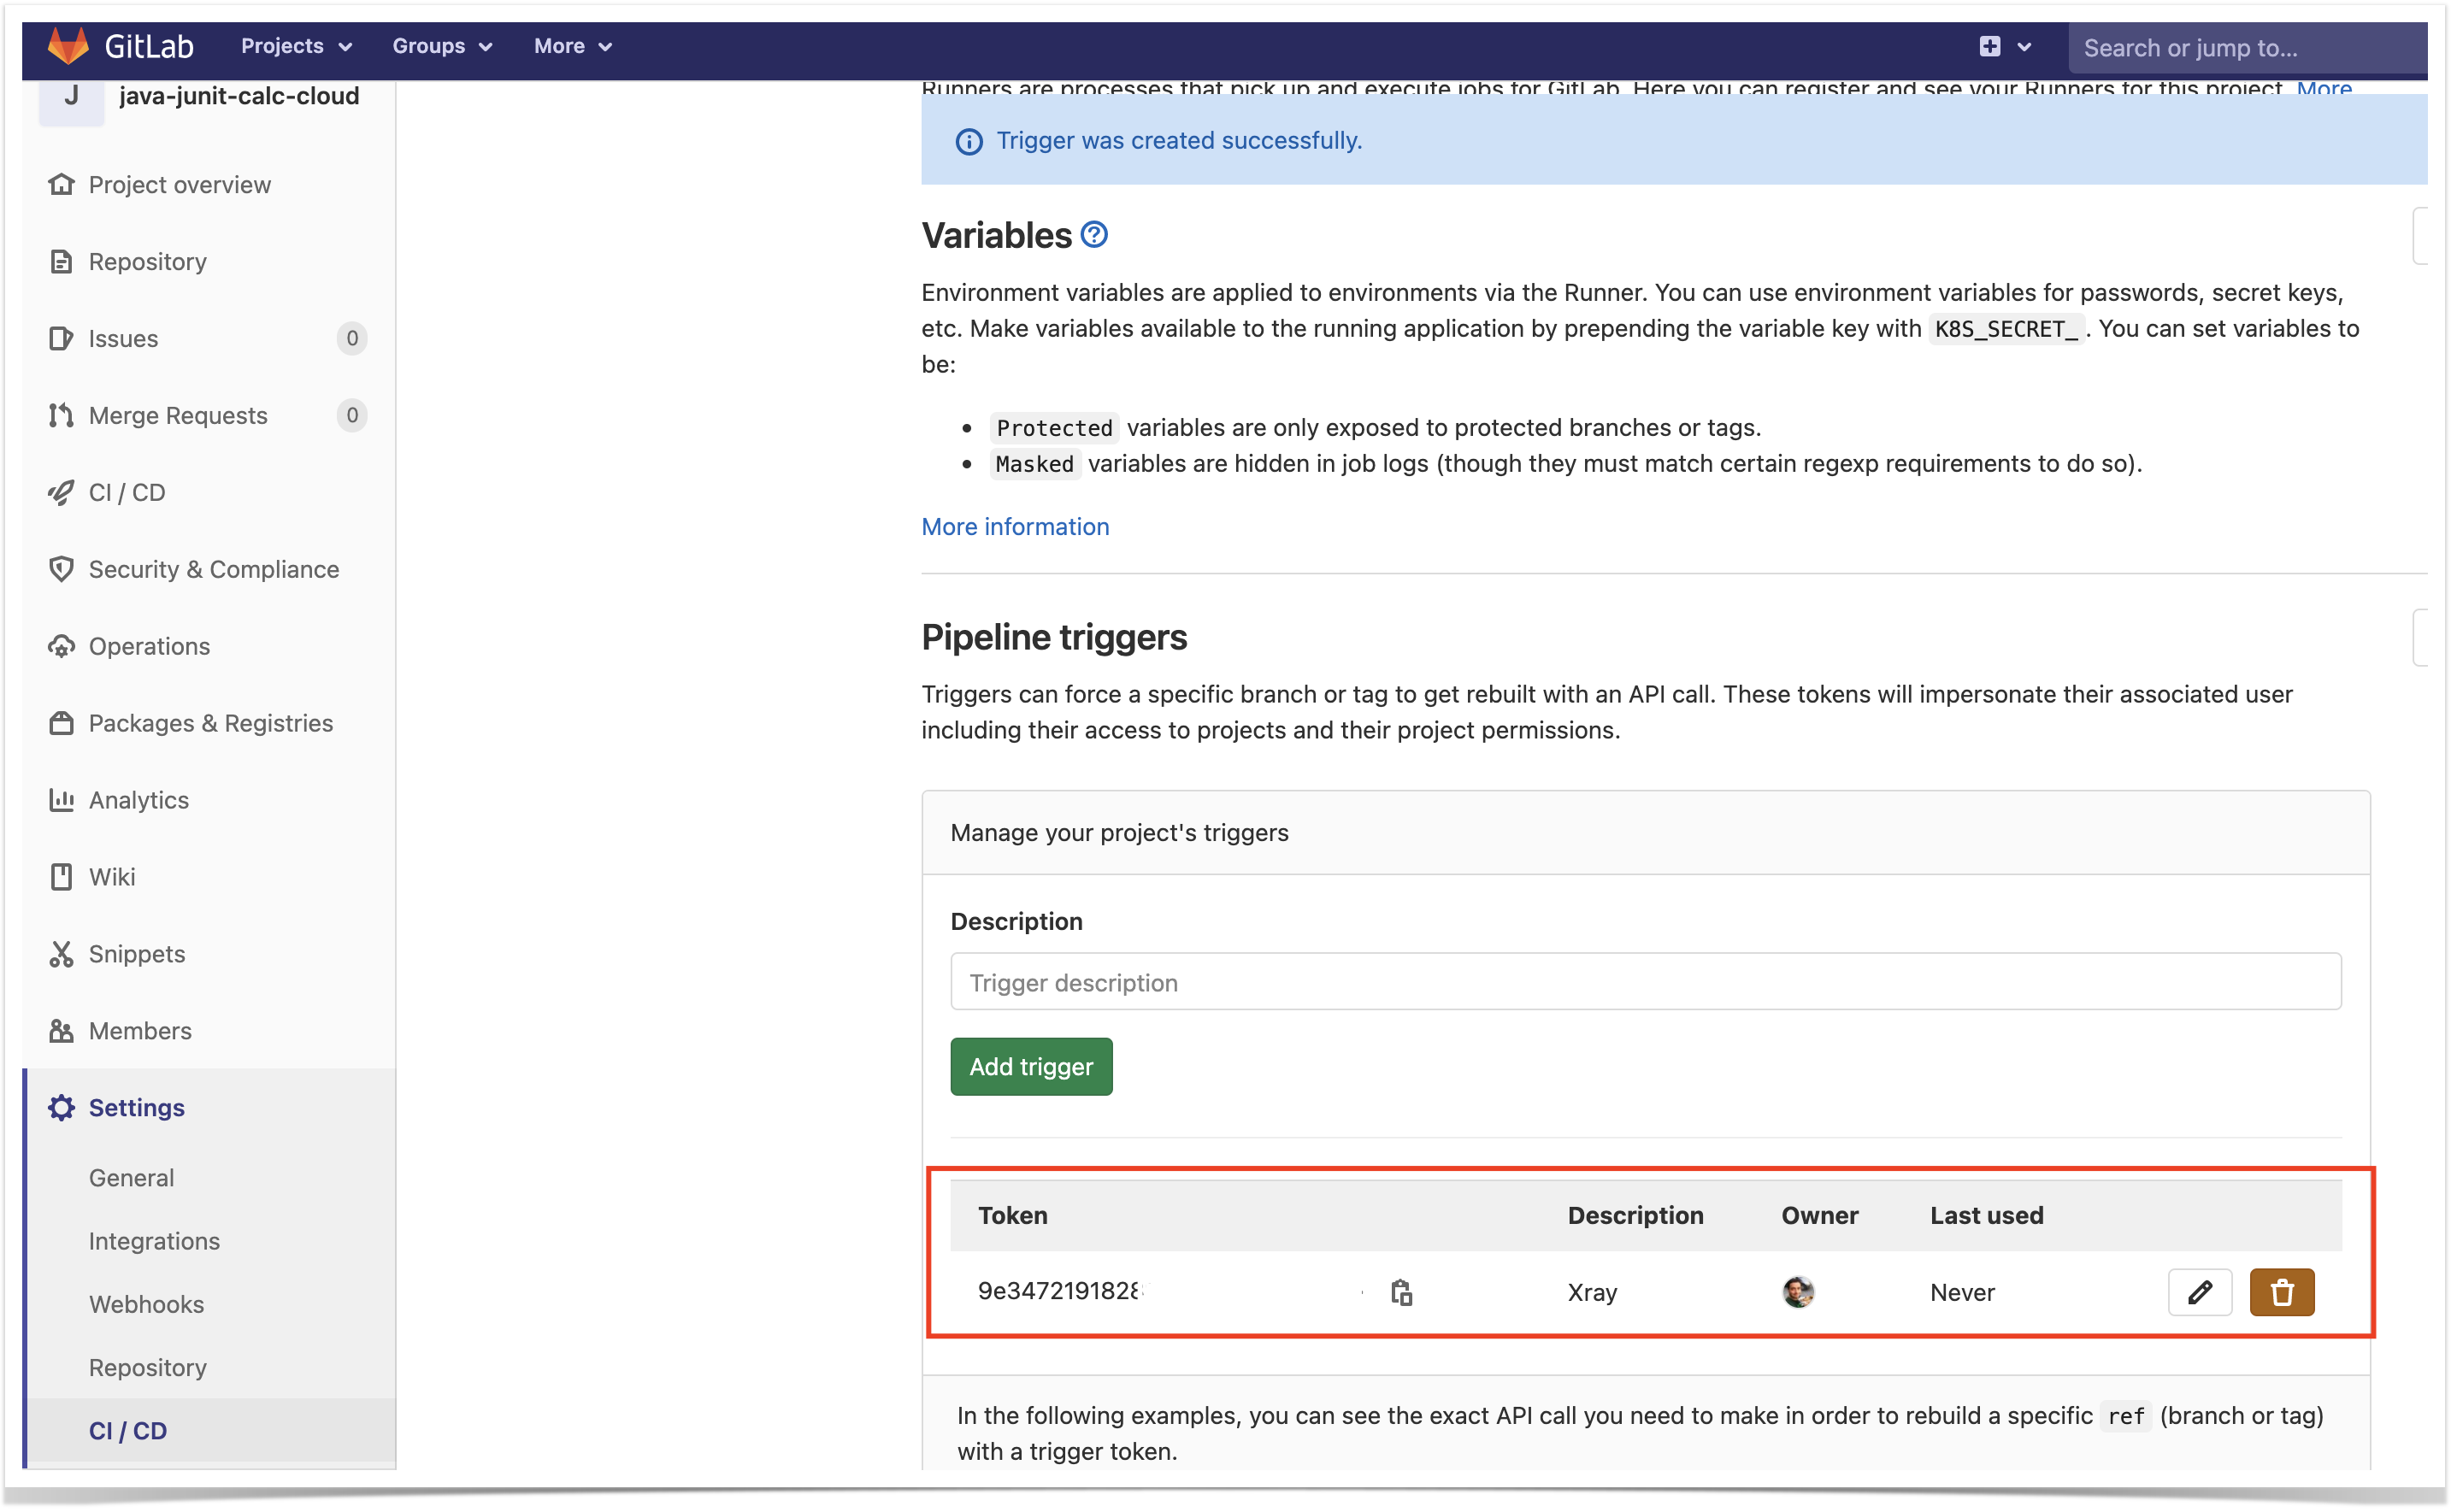
We need to create a trigger token so that we can use GitLab API later on. That can be done from within Settings > CI/CD.
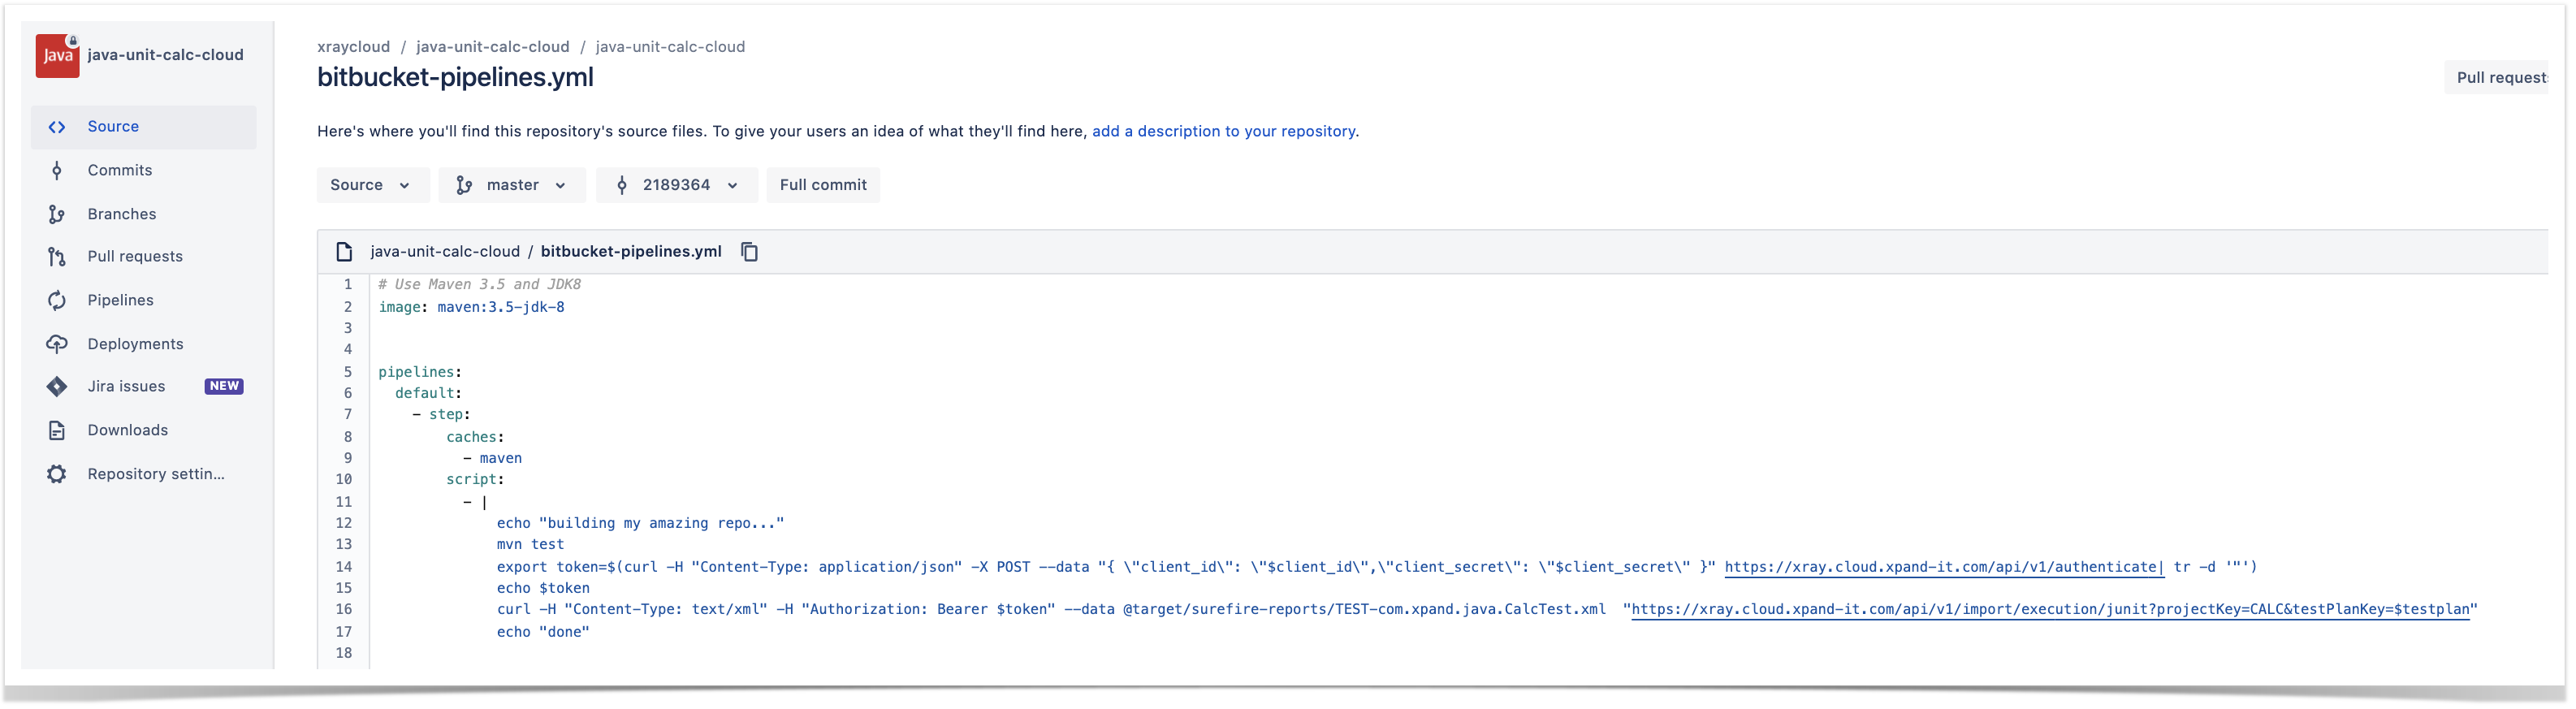
Then, in your GitLab repository containing the project's code and tests, create a pipeline /.gitlab-ci.yml; this pipeline will be triggered using GitLab's API.
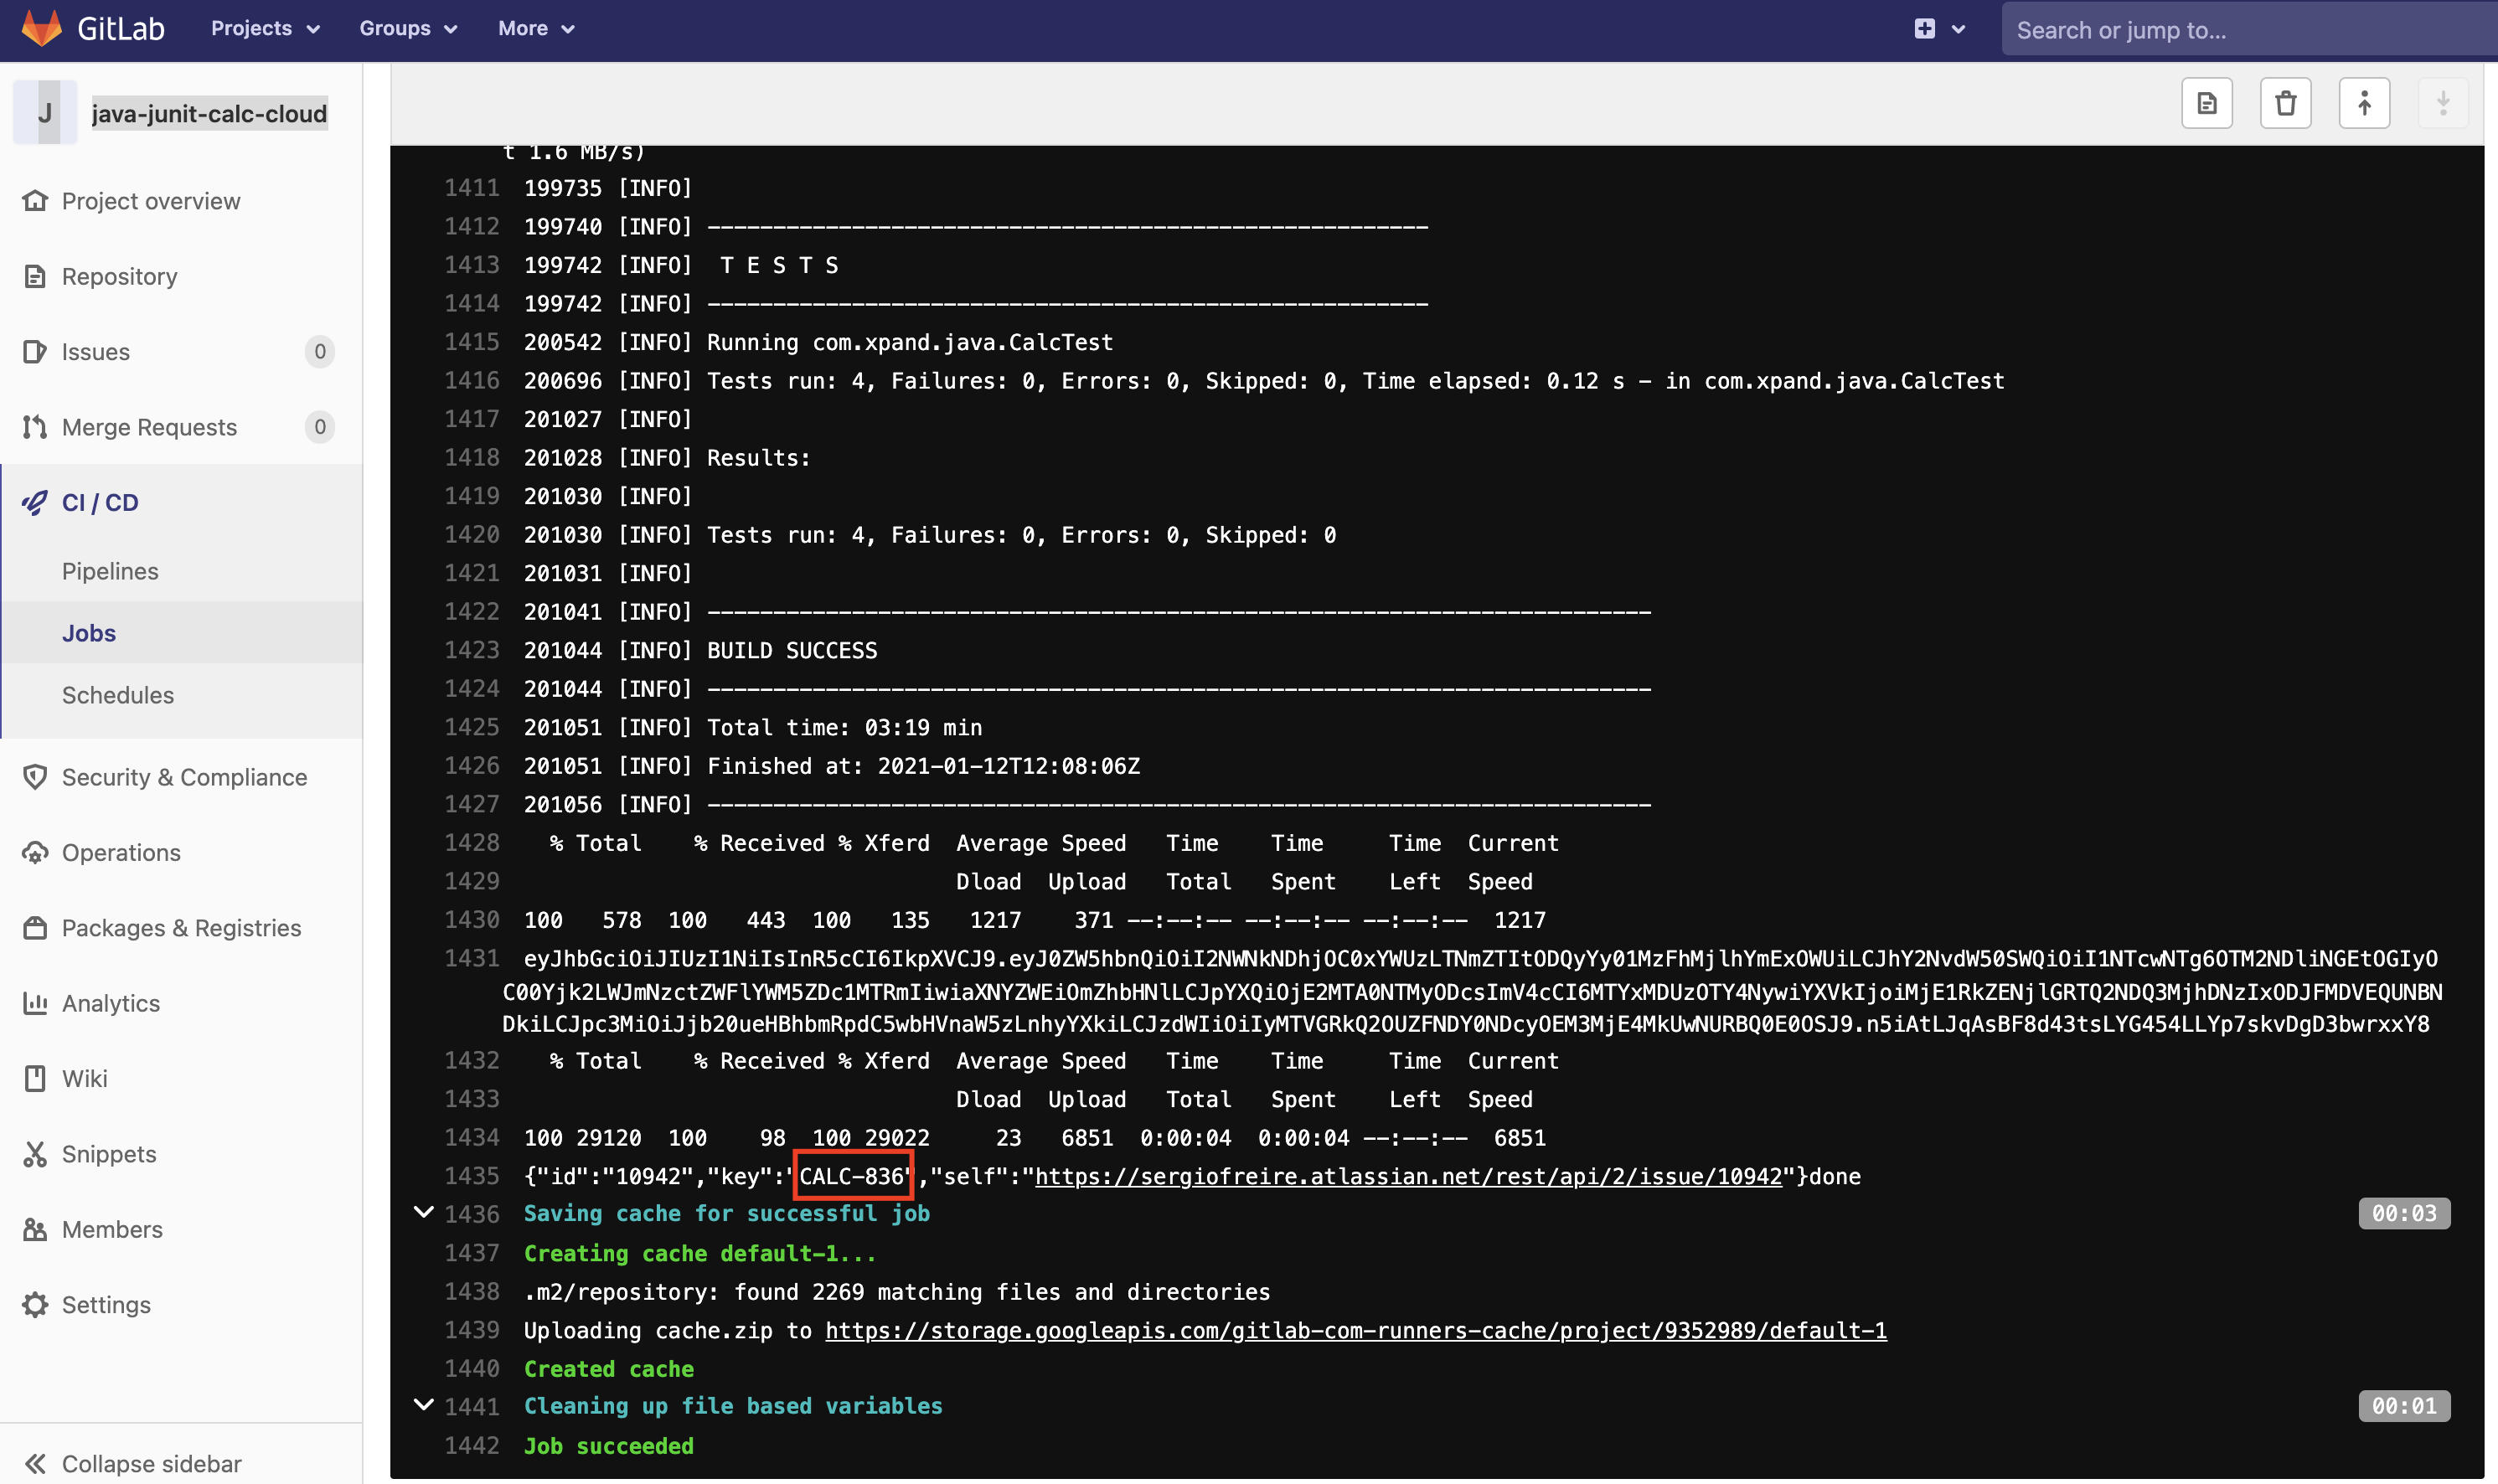
In the following example, the pipeline will receive the Test Plan issue key as an input parameter. It will then run the build, including the automated tests, and in the end it will report the results back to Xray using "curl" utility.
# Use Maven 3.5 and JDK8
image: maven:3.5-jdk-8

variables:
  # This will supress any download for dependencies and plugins or upload messages which would clutter the console log.
  # `showDateTime` will show the passed time in milliseconds. You need to specify `--batch-mode` to make this work.
  MAVEN_OPTS: "-Dmaven.repo.local=.m2/repository -Dorg.slf4j.simpleLogger.log.org.apache.maven.cli.transfer.Slf4jMavenTransferListener=WARN -Dorg.slf4j.simpleLogger.showDateTime=true -Djava.awt.headless=true"
  # As of Maven 3.3.0 instead of this you may define these options in `.mvn/maven.config` so the same config is used
  # when running from the command line.
  # `installAtEnd` and `deployAtEnd`are only effective with recent version of the corresponding plugins.
  MAVEN_CLI_OPTS: "--batch-mode --errors --fail-at-end --show-version -DinstallAtEnd=true -DdeployAtEnd=true"


# Cache downloaded dependencies and plugins between builds.
# To keep cache across branches add 'key: "$CI_JOB_REF_NAME"'
cache:
  paths:
    - .m2/repository


maven_build:
  script:
    - |
        echo "building my amazing repo..."
        mvn test
        export token=$(curl -H "Content-Type: application/json" -X POST --data "{ \"client_id\": \"$client_id\",\"client_secret\": \"$client_secret\" }" https://$xray_endpoint/api/v2/authenticate| tr -d '"')
        echo $token
        curl -H "Content-Type: text/xml" -H "Authorization: Bearer $token" --data @target/surefire-reports/TEST-com.xpand.java.CalcTest.xml  "https://$xray_endpoint/api/v2/import/execution/junit?projectKey=CALC&testPlanKey=${TESTPLAN}"
        echo "done"
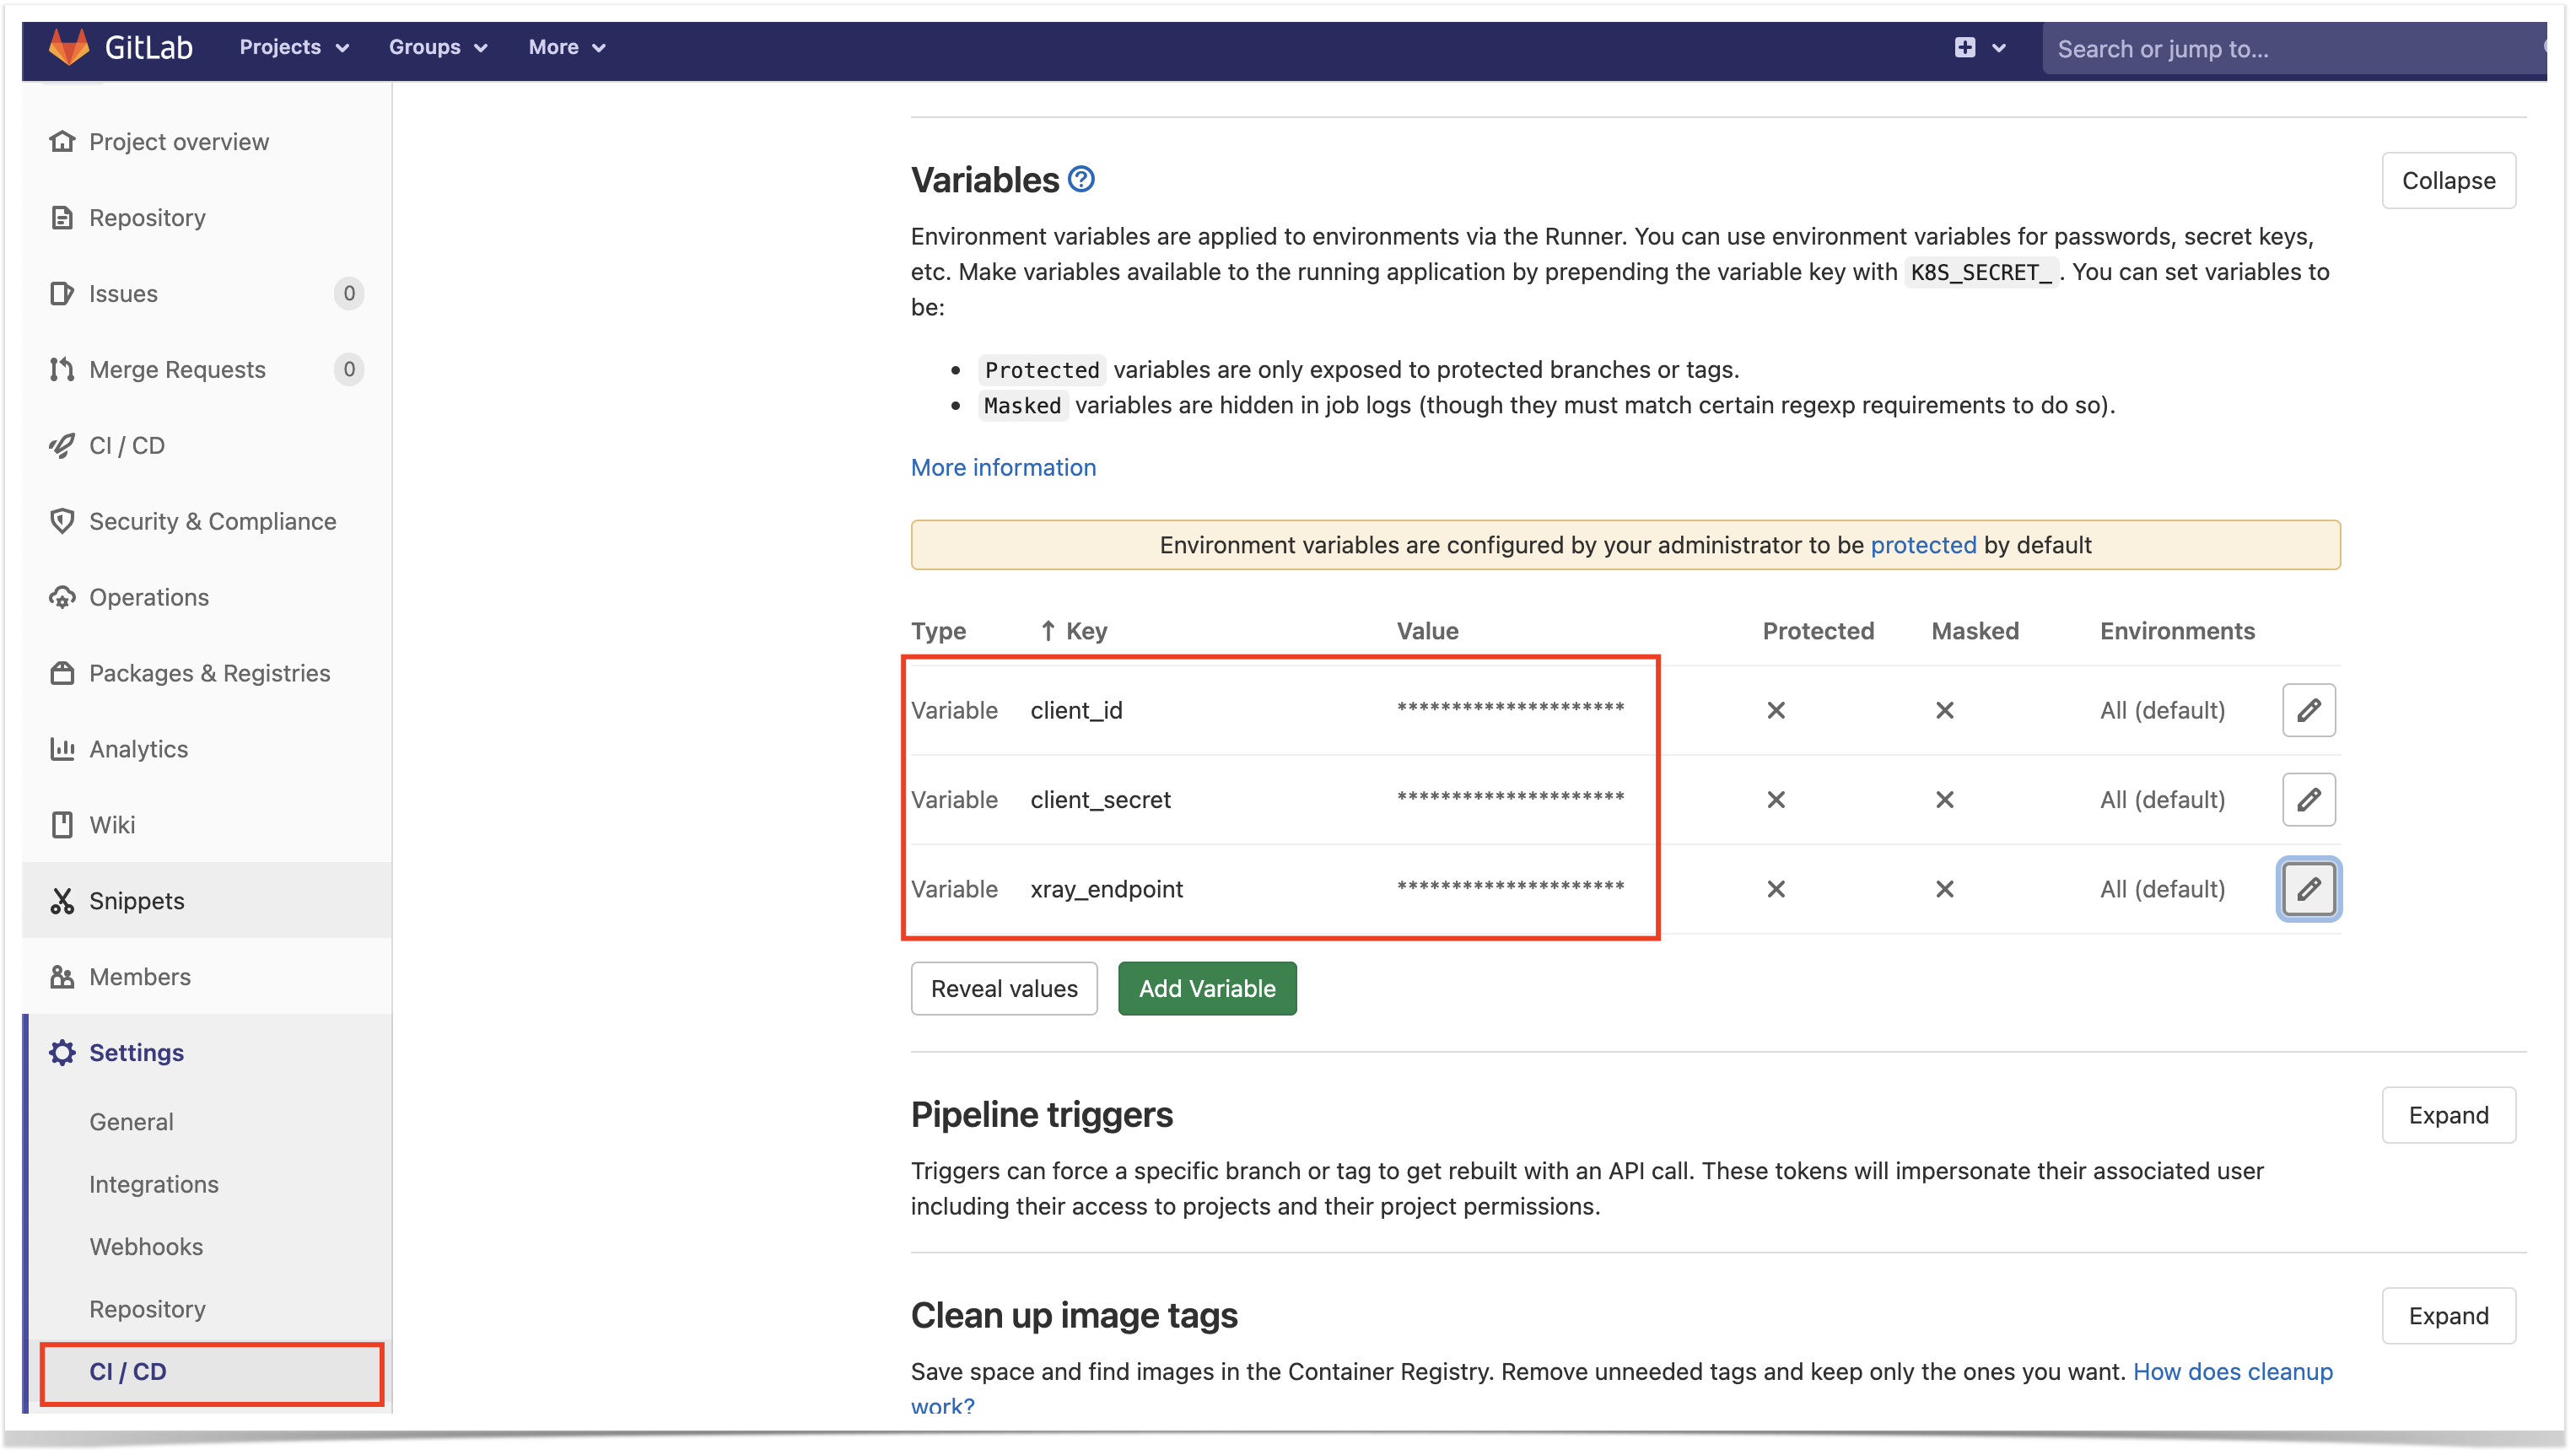
Xray endpoint's base URL and the API key credentials (i.e. client id + client secret) are defined in GitLab as variables.
Automation configuration
- create a new rule and define the "When" (i.e. when it to should be triggered ), to be "Manually triggered"
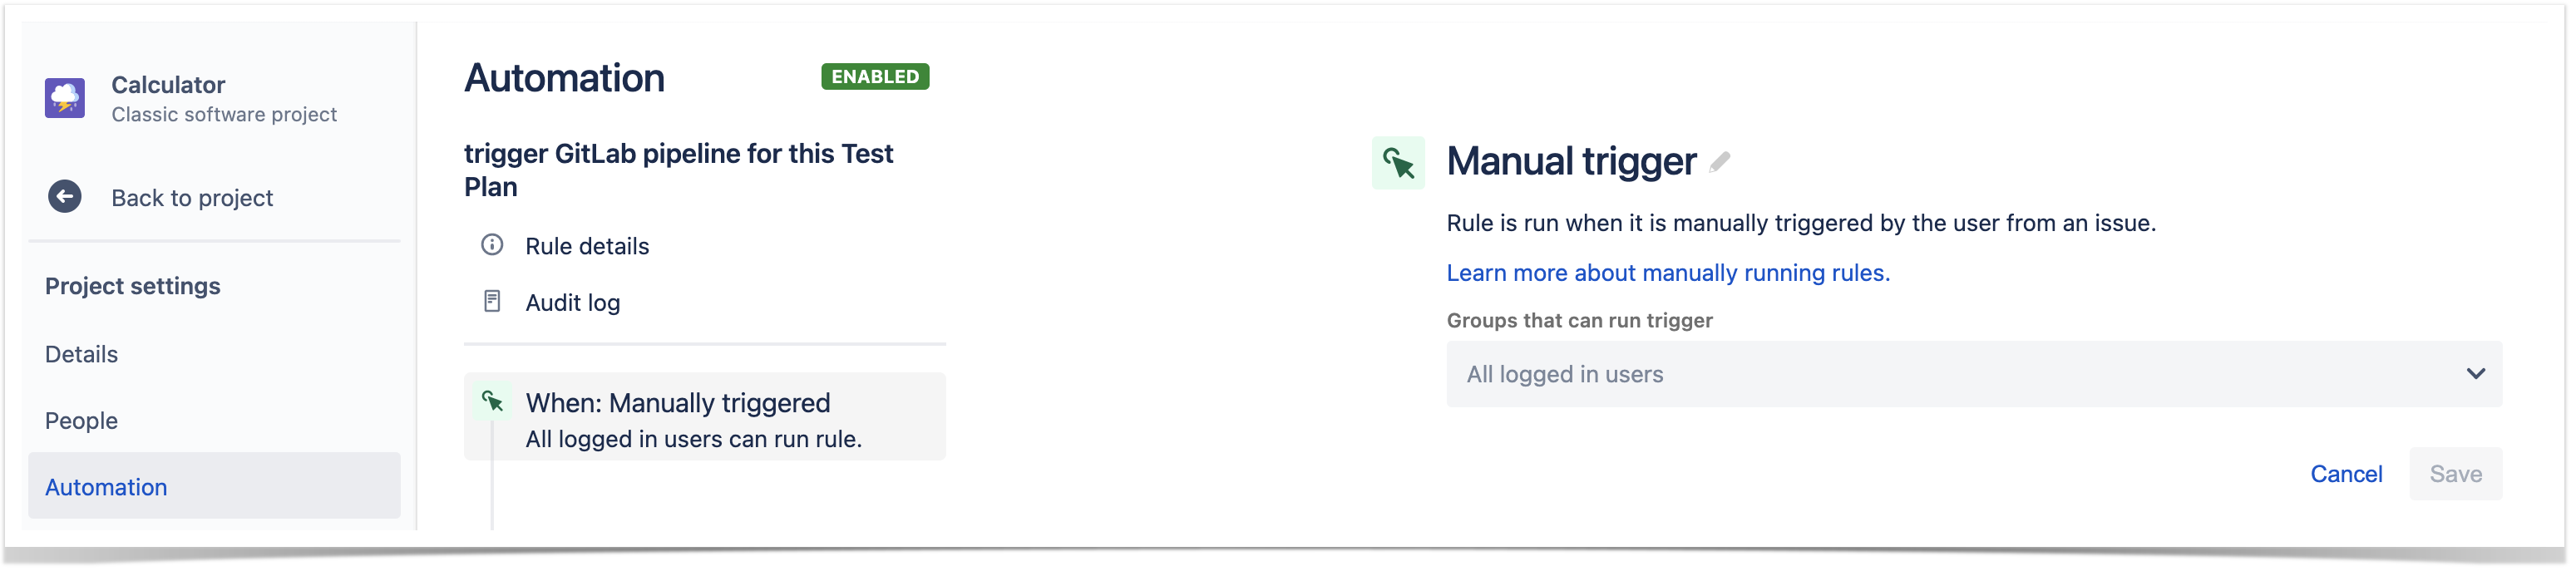
2. define the condition so that this rule can only be executed from Test Plan issue
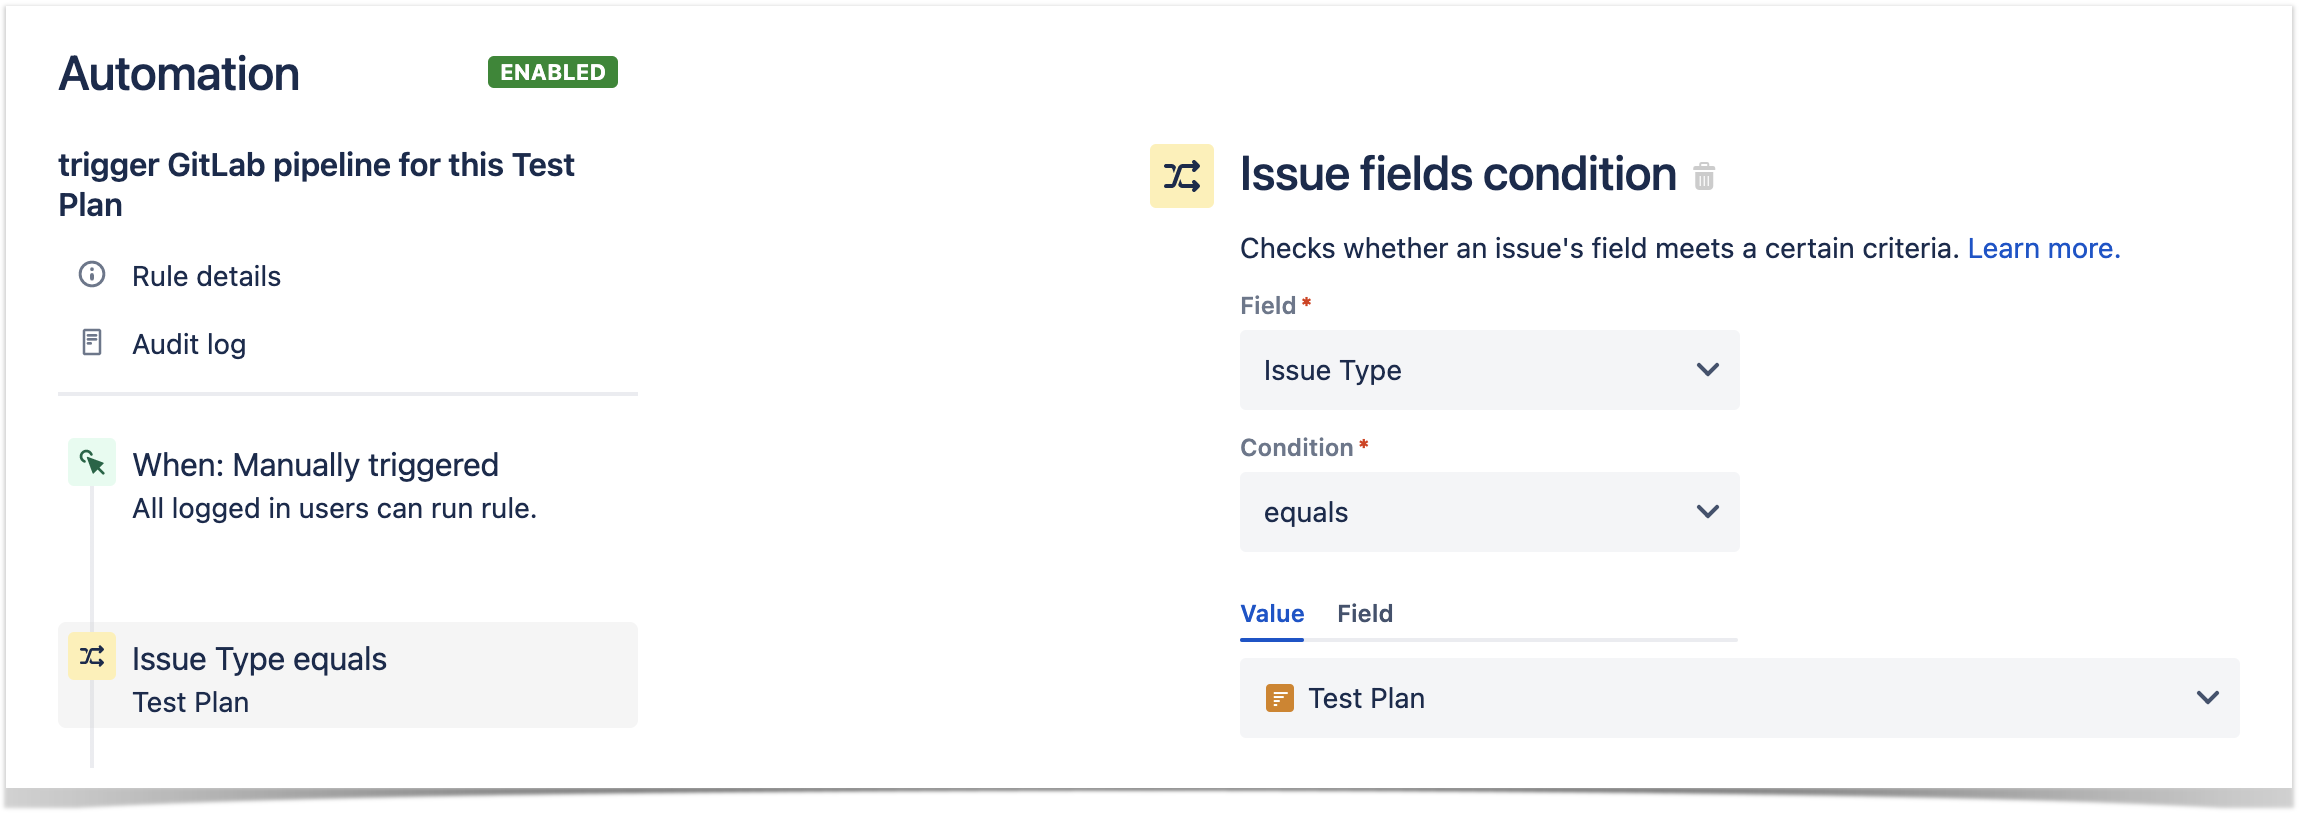
3. define an action (i.e. the "Then") as "Send web request" and configure it as follows
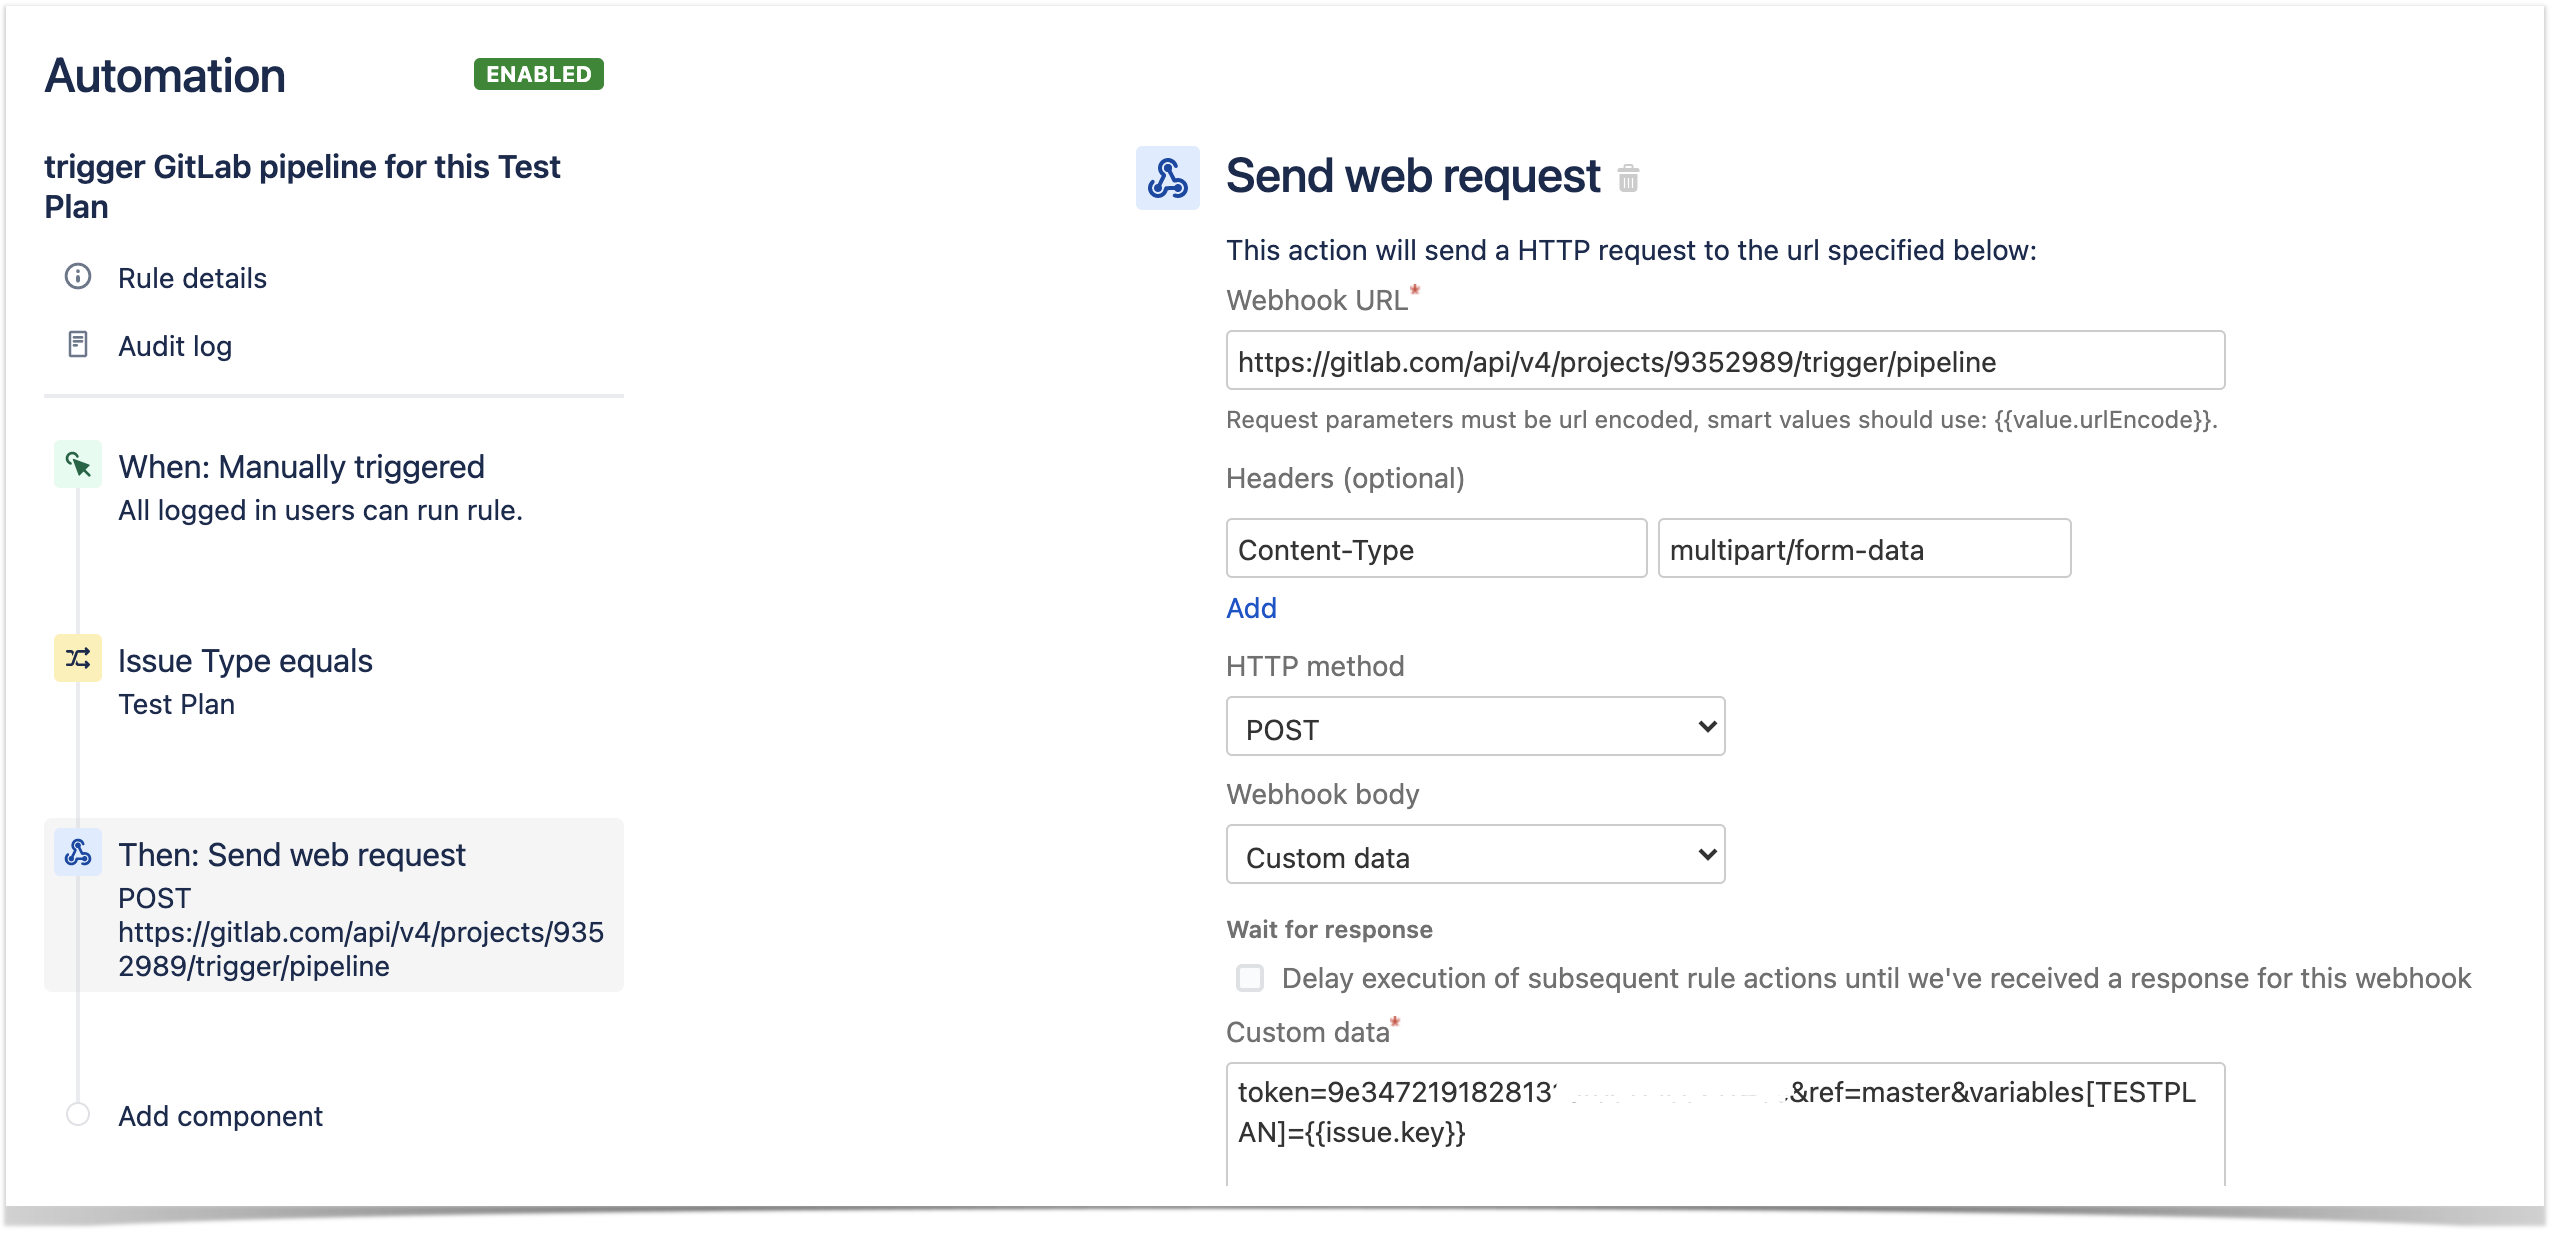
- the web request URL provided above follows this syntax:
- https://gitlab.com/api/v4/projects/<project_id_in_gitlab>/trigger/pipeline
the HTTP POST body content, defined in the "Custom data" field, will be used to identify the branch and also the original Test Plan issue key; authentication is done using the "token" variable, created earlier in GitLab
- besides, the "Content-Type" header should be "multipart/form-data"
After publishing the rule, you can go to the screen of an issue and trigger a pipeline run in GitLab.

In this case, since the pipeline was configured to report results back to Xray, a new Test Execution would be created and linked back to the source Test Plan where the automation was triggered from.
Tips
Accessing network-restricted CI/CD tools
If your target system is behind a firewall or it's a local IP address, you can use ngrok tool to create a temporary tunnel to it. Please check with your IT/security team(s).