
A Test Run is an instance of a Test scenario with different working conditions, such as a different environment or source code. Various test runs allow to easily detect defects in the code that could lead to system failures. A Test Run is therefore each association between a different Test and Test Execution issues.
A Test Run is not a JIRA issue itself; it's an Xray internal entity that you can search (see Enhanced querying with JQL).
Normally, you may see Test Runs within specific panels, namelly in a Test Execution (a test run per each test) or within the Test issue screen (history of previous runs for that test).
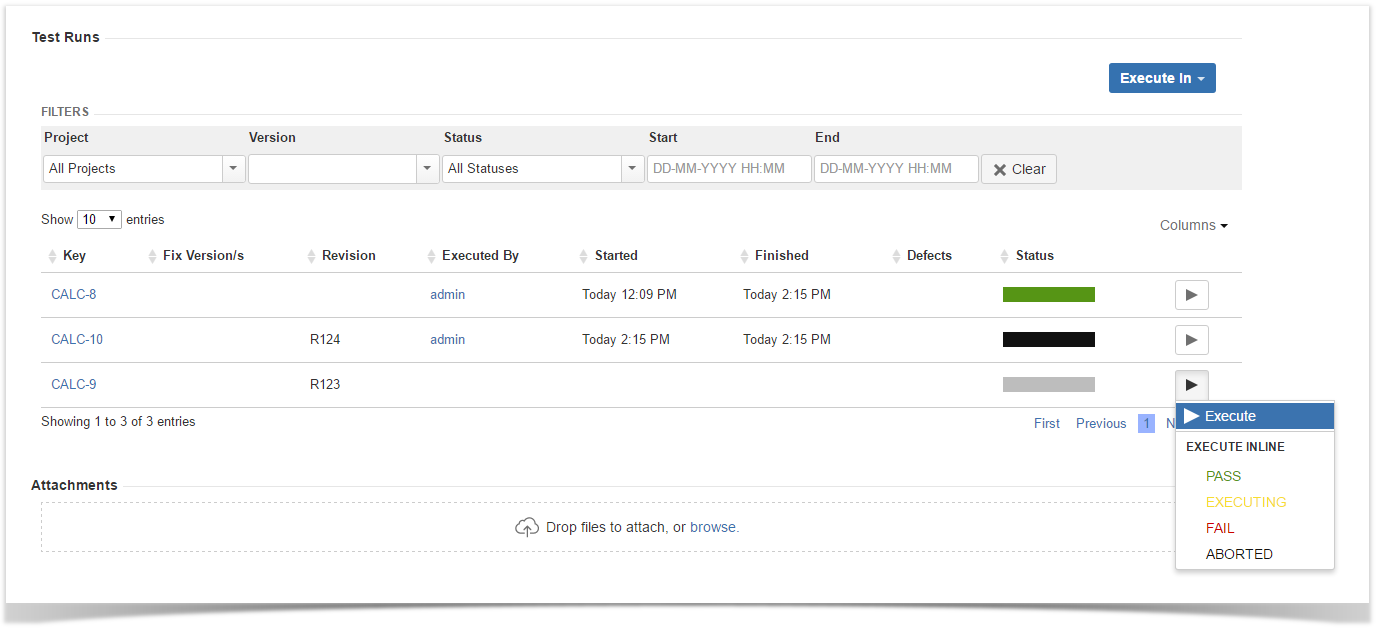
Execution History
The execution history of a given Test issue is available in the issue view page in the section named "Test Runs".
The Test Runs section is headlined by the Test Runs Filter, that allows the user to sort for:
- the Project which Test Execution the current Test is associated with;
- the target release Version tested by the Test Execution the current Test is associated with;
- the Status of the Test Execution the current Test is associated with;
- the Start and End dates of the Test Execution the current Test is associated with;
- the Clear button, that empties all the Test Runs Filter fields;
The search results are displayed on the table immediately under the Test Runs Filter, containing the following columns:
- the Execution Key of the listed Test Execution the current Test is associated with;
- the Fix Version tested by the listed Test Execution the current Test is associated with;
- the System Revision tested by the listed Test Execution the current Test is associated with;
- the Exec by who is the Assignee of the listed Test Execution the current Test is associated with;
- the Start and End dates of the listed Test Execution the current Test is associated with;
- the Defects related with the listed Test Execution the current Test is associated with;
- the Status of the listed Test Execution the current Test is associated with;
Actions
Execute Test
To execute a Test from a Test issue:
Step 1: Open the Test you wish to run.
Step 2: Click the Execute button that appears in the last column of the desired Test Run. The actions menu should popup with the available actions.
Step 3: Click Run action to open the Execution page.
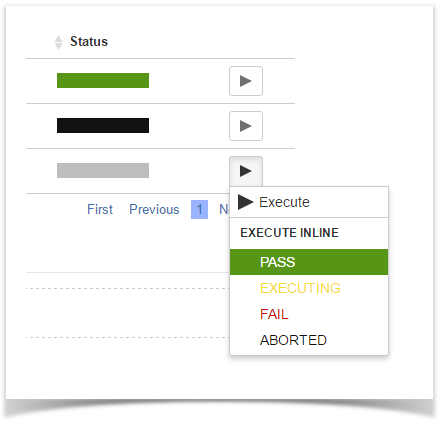
Execute Test Inline
To execute Test Runs inline from the Test view screen, this option must be enabled in the Xray administration page. The option for setting the Test Run status manually, without having to execute all Test Steps (or Examples in case of Cucumber Tests), must also be enabled in the Xray administration page.
Given that the above options are enabled, and the user has permission to execute the Test, the context menu for executing Test Runs, accessed be the Execute button on each Test Run must show the available transitions.
When executing inline Tests, the status of the manual steps (or Examples in case of Cucumber Tests), can be changed automatically. The following rules are applied:
- PASS: All steps statuses will be changed to PASS independently of their current status.
- FAIL: All steps statuses will remain unchanged, even if they are all PASS. This is because a Test might fail due to a Pre-Condition.
- TODO: All steps statuses will be changed to TODO.
- ABORTED: The Test execution status will be changed to ABORTED.
- EXECUTING: The Test execution status will be changed to EXECUTING.
- CUSTOM: The Test execution status will be changed to chosen custom status.
To execute a Test Run inline:
Step 1: Open the Test issue you wish to run.
Step 2: Click the Execute button located in the last column of the Test Runs table and select one of the available statuses.
View Test Execution Details
To view the execution details:
Step 1: Open the test issue you wish to view the test execution details.
Step 2: Click the Execute button that appears in the last column of the desired Test Run that is in a final state. The actions menu should popup with the available actions.
Step 3: Click Execution Details action to open the Execution page and view the details.

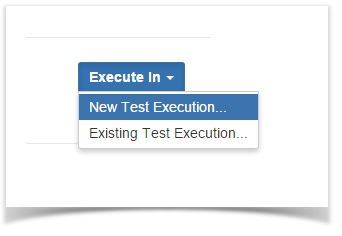
Ad hoc Test Execution
To execute a test in an Ad hoc manner:
Step 1: Open the test issue you wish to execute.
Step 2: Click the "Execute In" button in Test Runs section and select "New Test Execution..."
Step 3: The dialog comes with pre-populated fields so if you don't want to change anything just click Create.
Note: if there are custom required fields the normal issue create dialog will be displayed with the pre-populated fields. If the revision field is not configured in the create issue screen, of the Test Execution for the selected Project, the field will not appear in the dialog.
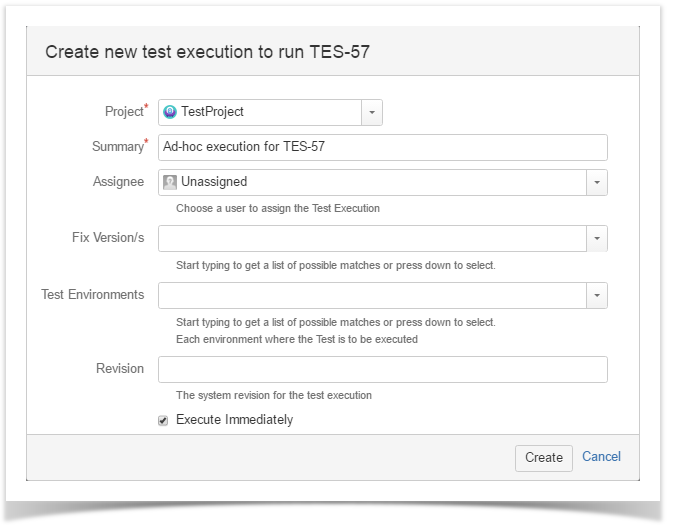
If the Redirect To Execute Test Page option is selected you will be redirected to the Execute Test page after the test execution is created.