Azure DevOps (previously known as VSTS) is an ALM solution that provides a set of cloud based tools for helping building and deploy software to the cloud.
Some teams may be using subsets of the Azure DevOps tool portfolio.
In this example we'll explore the scenario where you aim to use Azure DevOps to build and run the automated tests and finally report the results back to Xray.
Please note
Currently, Xray does not provide any plugin for Azure DevOps in order to submit automation related results. However, that can be easily achieved using the REST API, as shown in this tutorial.
Integration scenarios
There are several integration possibilities with Azure DevOps; this documentation depicts some them.
As Azure DevOps is a "full" ALM solution, you can use some parts of it and use other tools to "replace" some built-in features.
Lets explore some integration possibilities.
Using Azure DevOps for CI
This scenario explores usage of the Pipelines facility from Azure DevOps to, similarly to what happens with other well-known CI tools, build the software and run the automated tests.
JUnit example
In this scenario, we want to get visibility of the automated test results from some tests implemented in Java, using the JUnit framework.
This recipe could also be applied for other frameworks such as NUnit, TestNG or Robot.
Within the Repos section of Azure DevOps, we need to setup the code repository containing the code along with the configuration file for Azure Pipelines build process.
The tests are implemented in a JUnit class as follows.
The Azure Pipelines configuration file azure-pipelines.yml contains the definition of the build steps, including running the automated tests and submitting the results.
# Maven
# Build your Java project and run tests with Apache Maven.
# Add steps that analyze code, save build artifacts, deploy, and more:
# https://docs.microsoft.com/azure/devops/pipelines/languages/java


trigger:
- master

pool:
  vmImage: 'Ubuntu-16.04'

steps:
- task: Maven@3
  inputs:
    mavenPomFile: 'java-junit-calc/pom.xml'
    mavenOptions: '-Xmx3072m'
    javaHomeOption: 'JDKVersion'
    jdkVersionOption: '1.11'
    jdkArchitectureOption: 'x64'
    publishJUnitResults: false
    testResultsFiles: '**/surefire-reports/TEST-*.xml'
    goals: 'clean compile test'
- bash: |


    curl -H "Content-Type: multipart/form-data" -u ${jira_user}:${jira_password} -F "file=@target/surefire-reports/TEST-com.xpand.java.CalcTest.xml" "${jira_server_url}/rest/raven/1.0/import/execution/junit?projectKey=${project_key}"
In order to submit those results, we'll just need to invoke the REST API (as detailed in Import Execution Results - REST).
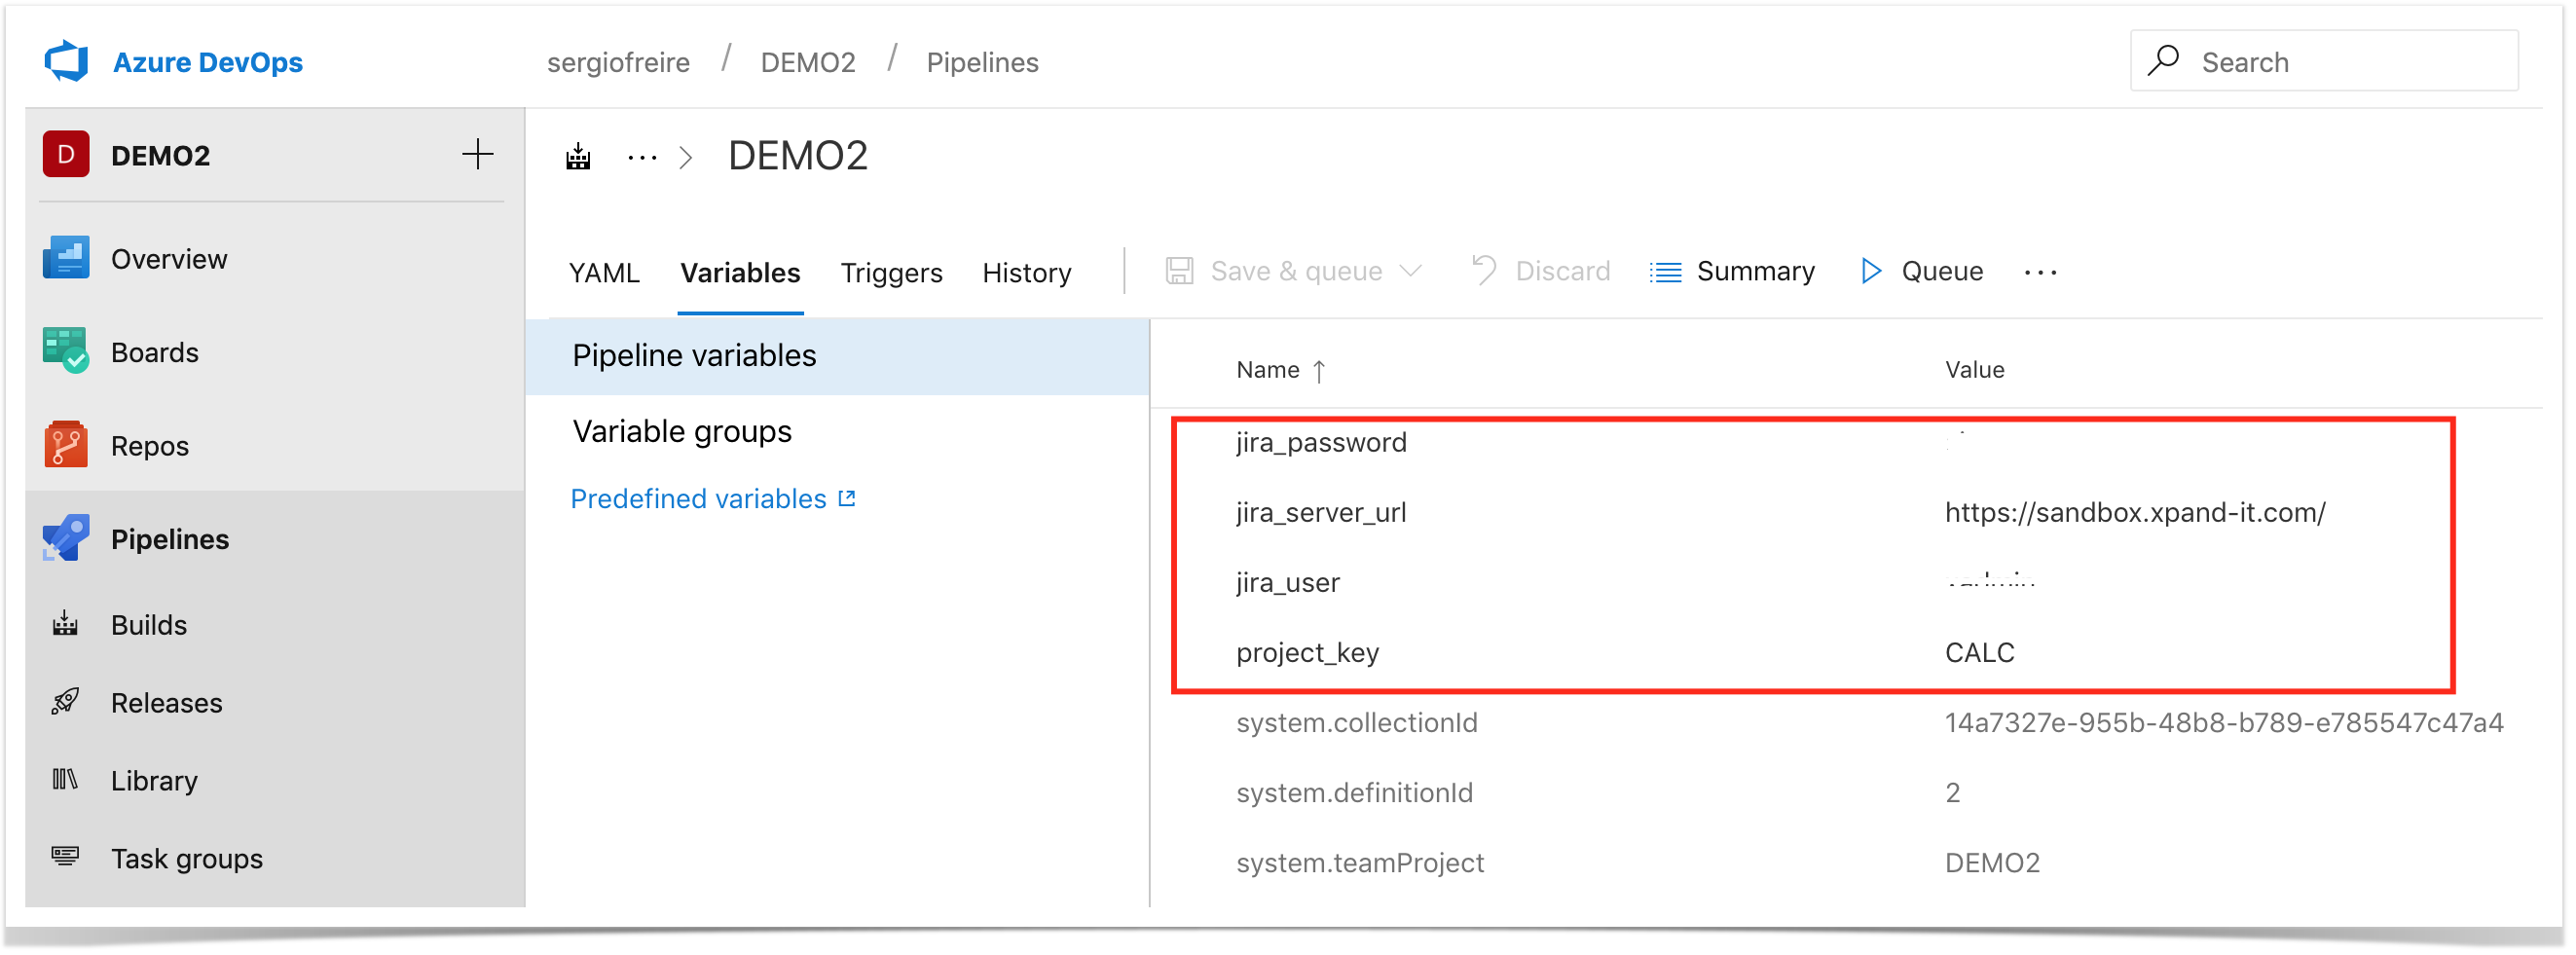
However, we do not want to have the Xray API credentials hardcoded in pipeline's configuration file. Therefore, we'll use some environment variables defined in Pipeline "variables" settings, including:
- jira_user: for the Jira username
- jira_password: for the Jira user's password
- jira_server_url: for the Jira's base URL (e.g. http://yourjiraserver)
- project_key: project key
Please note
The user present in the configuration below must exist in the Jira instance and have permission to Create Test and Test Execution Issues.
In azure-pipelines.yml a "bash" based step must be included that will use "curl" in order to submit the results to the REST API.
curl -H "Content-Type: multipart/form-data" -u $(jira_user):$(jira_password) -F "file=@target/surefire-reports/TEST-com.xpand.java.CalcTest.xml" "$(jira_server_url)/rest/raven/1.0/import/execution/junit?projectKey=$(project_key)"
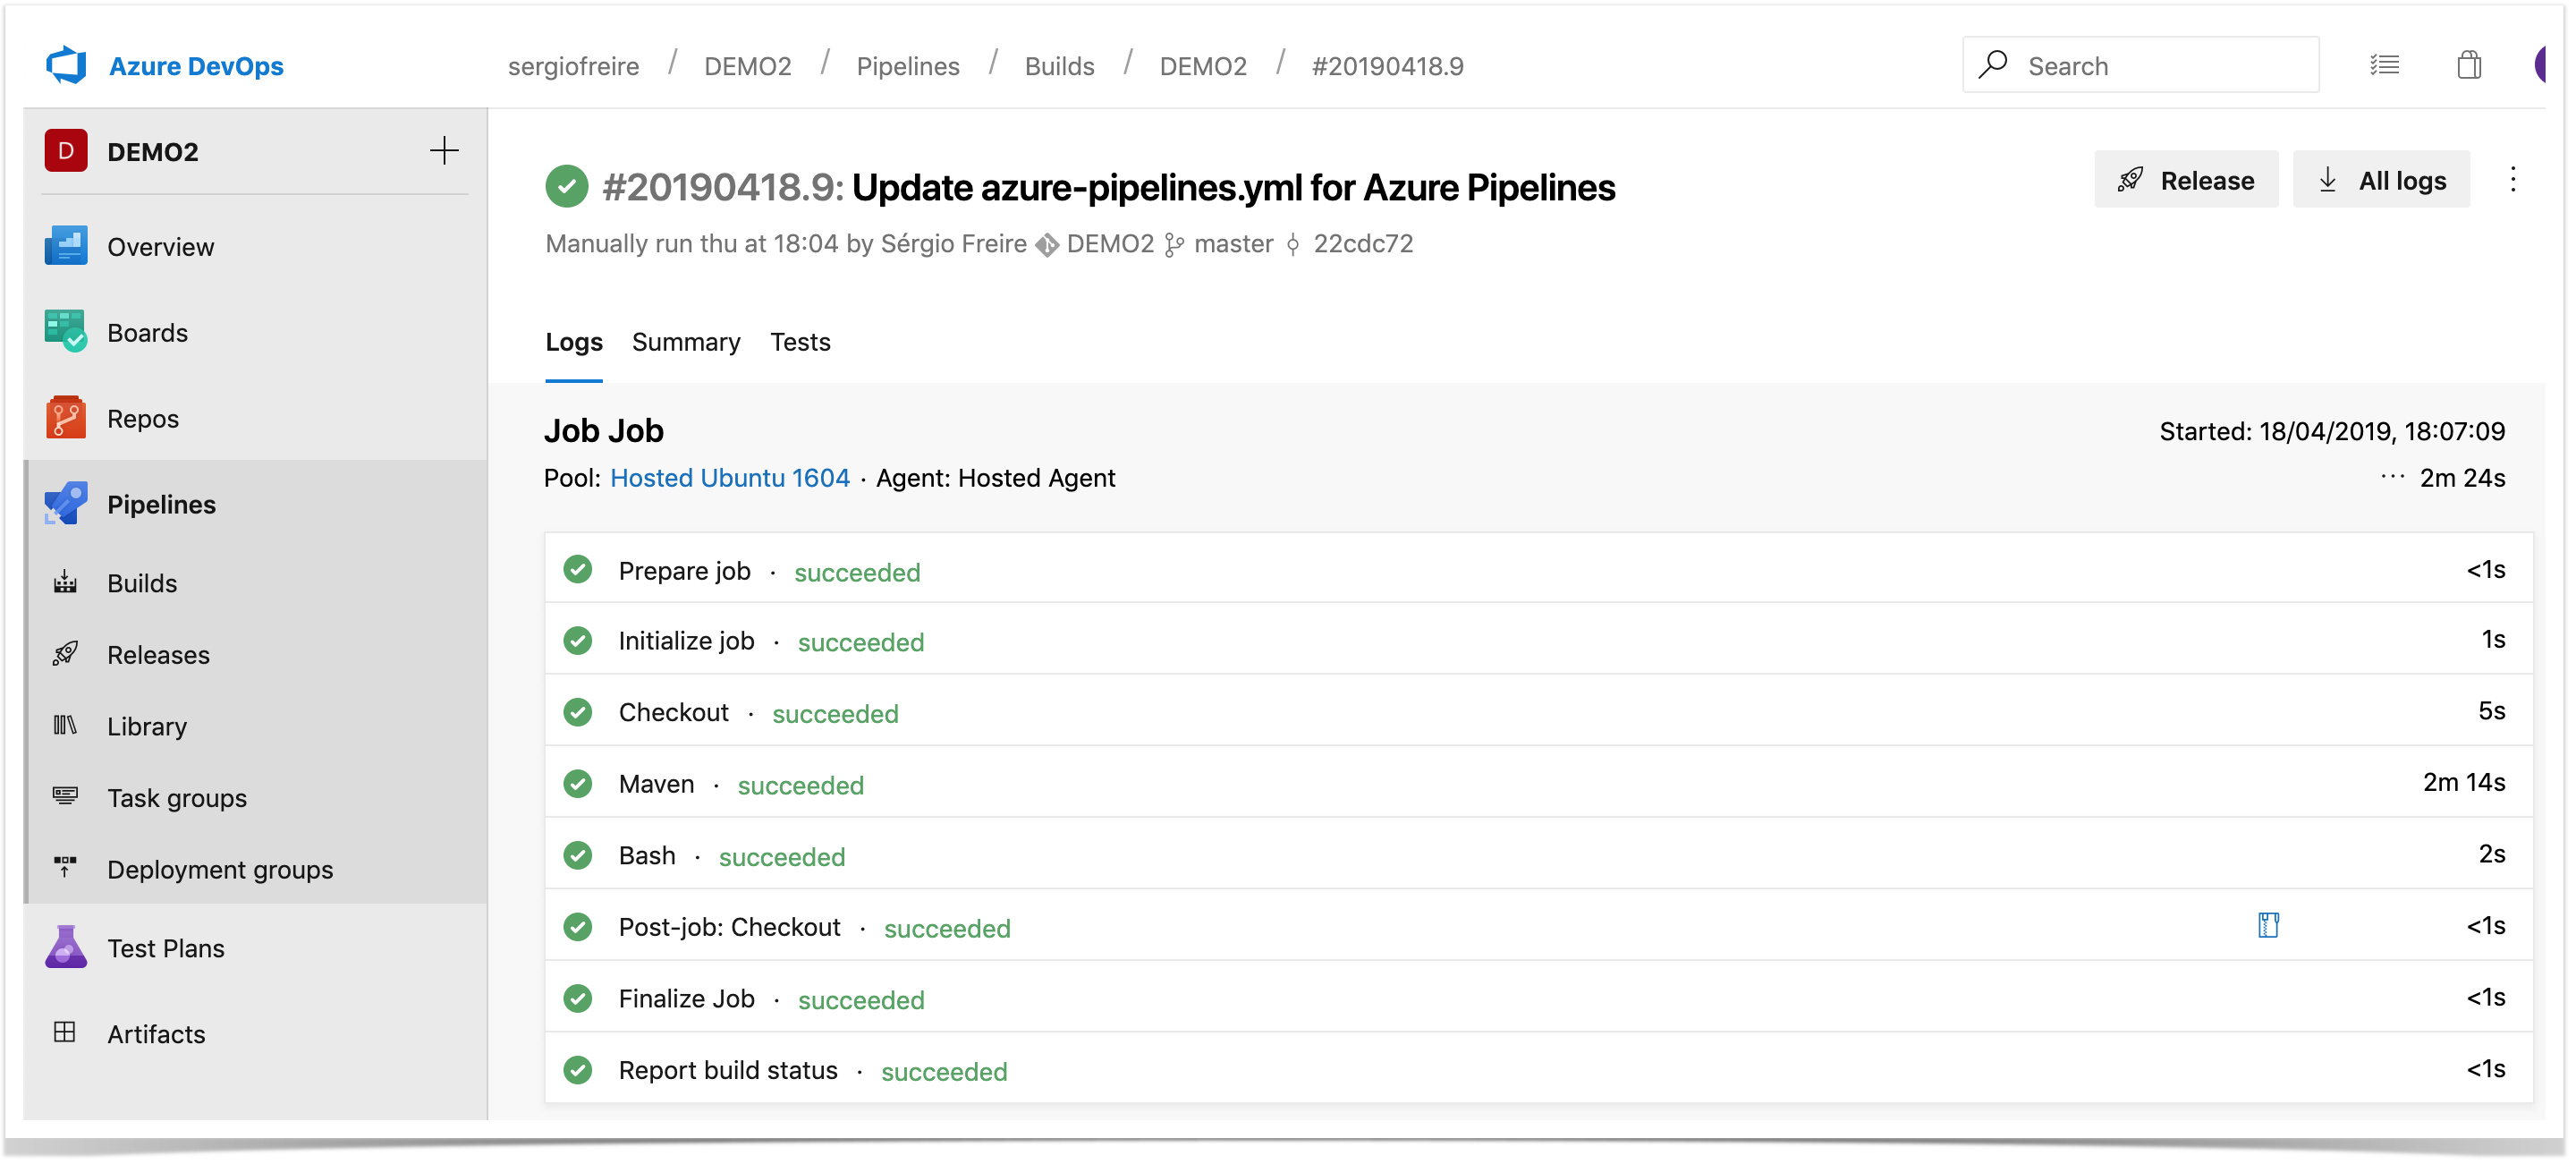
We may now run the Pipeline build...
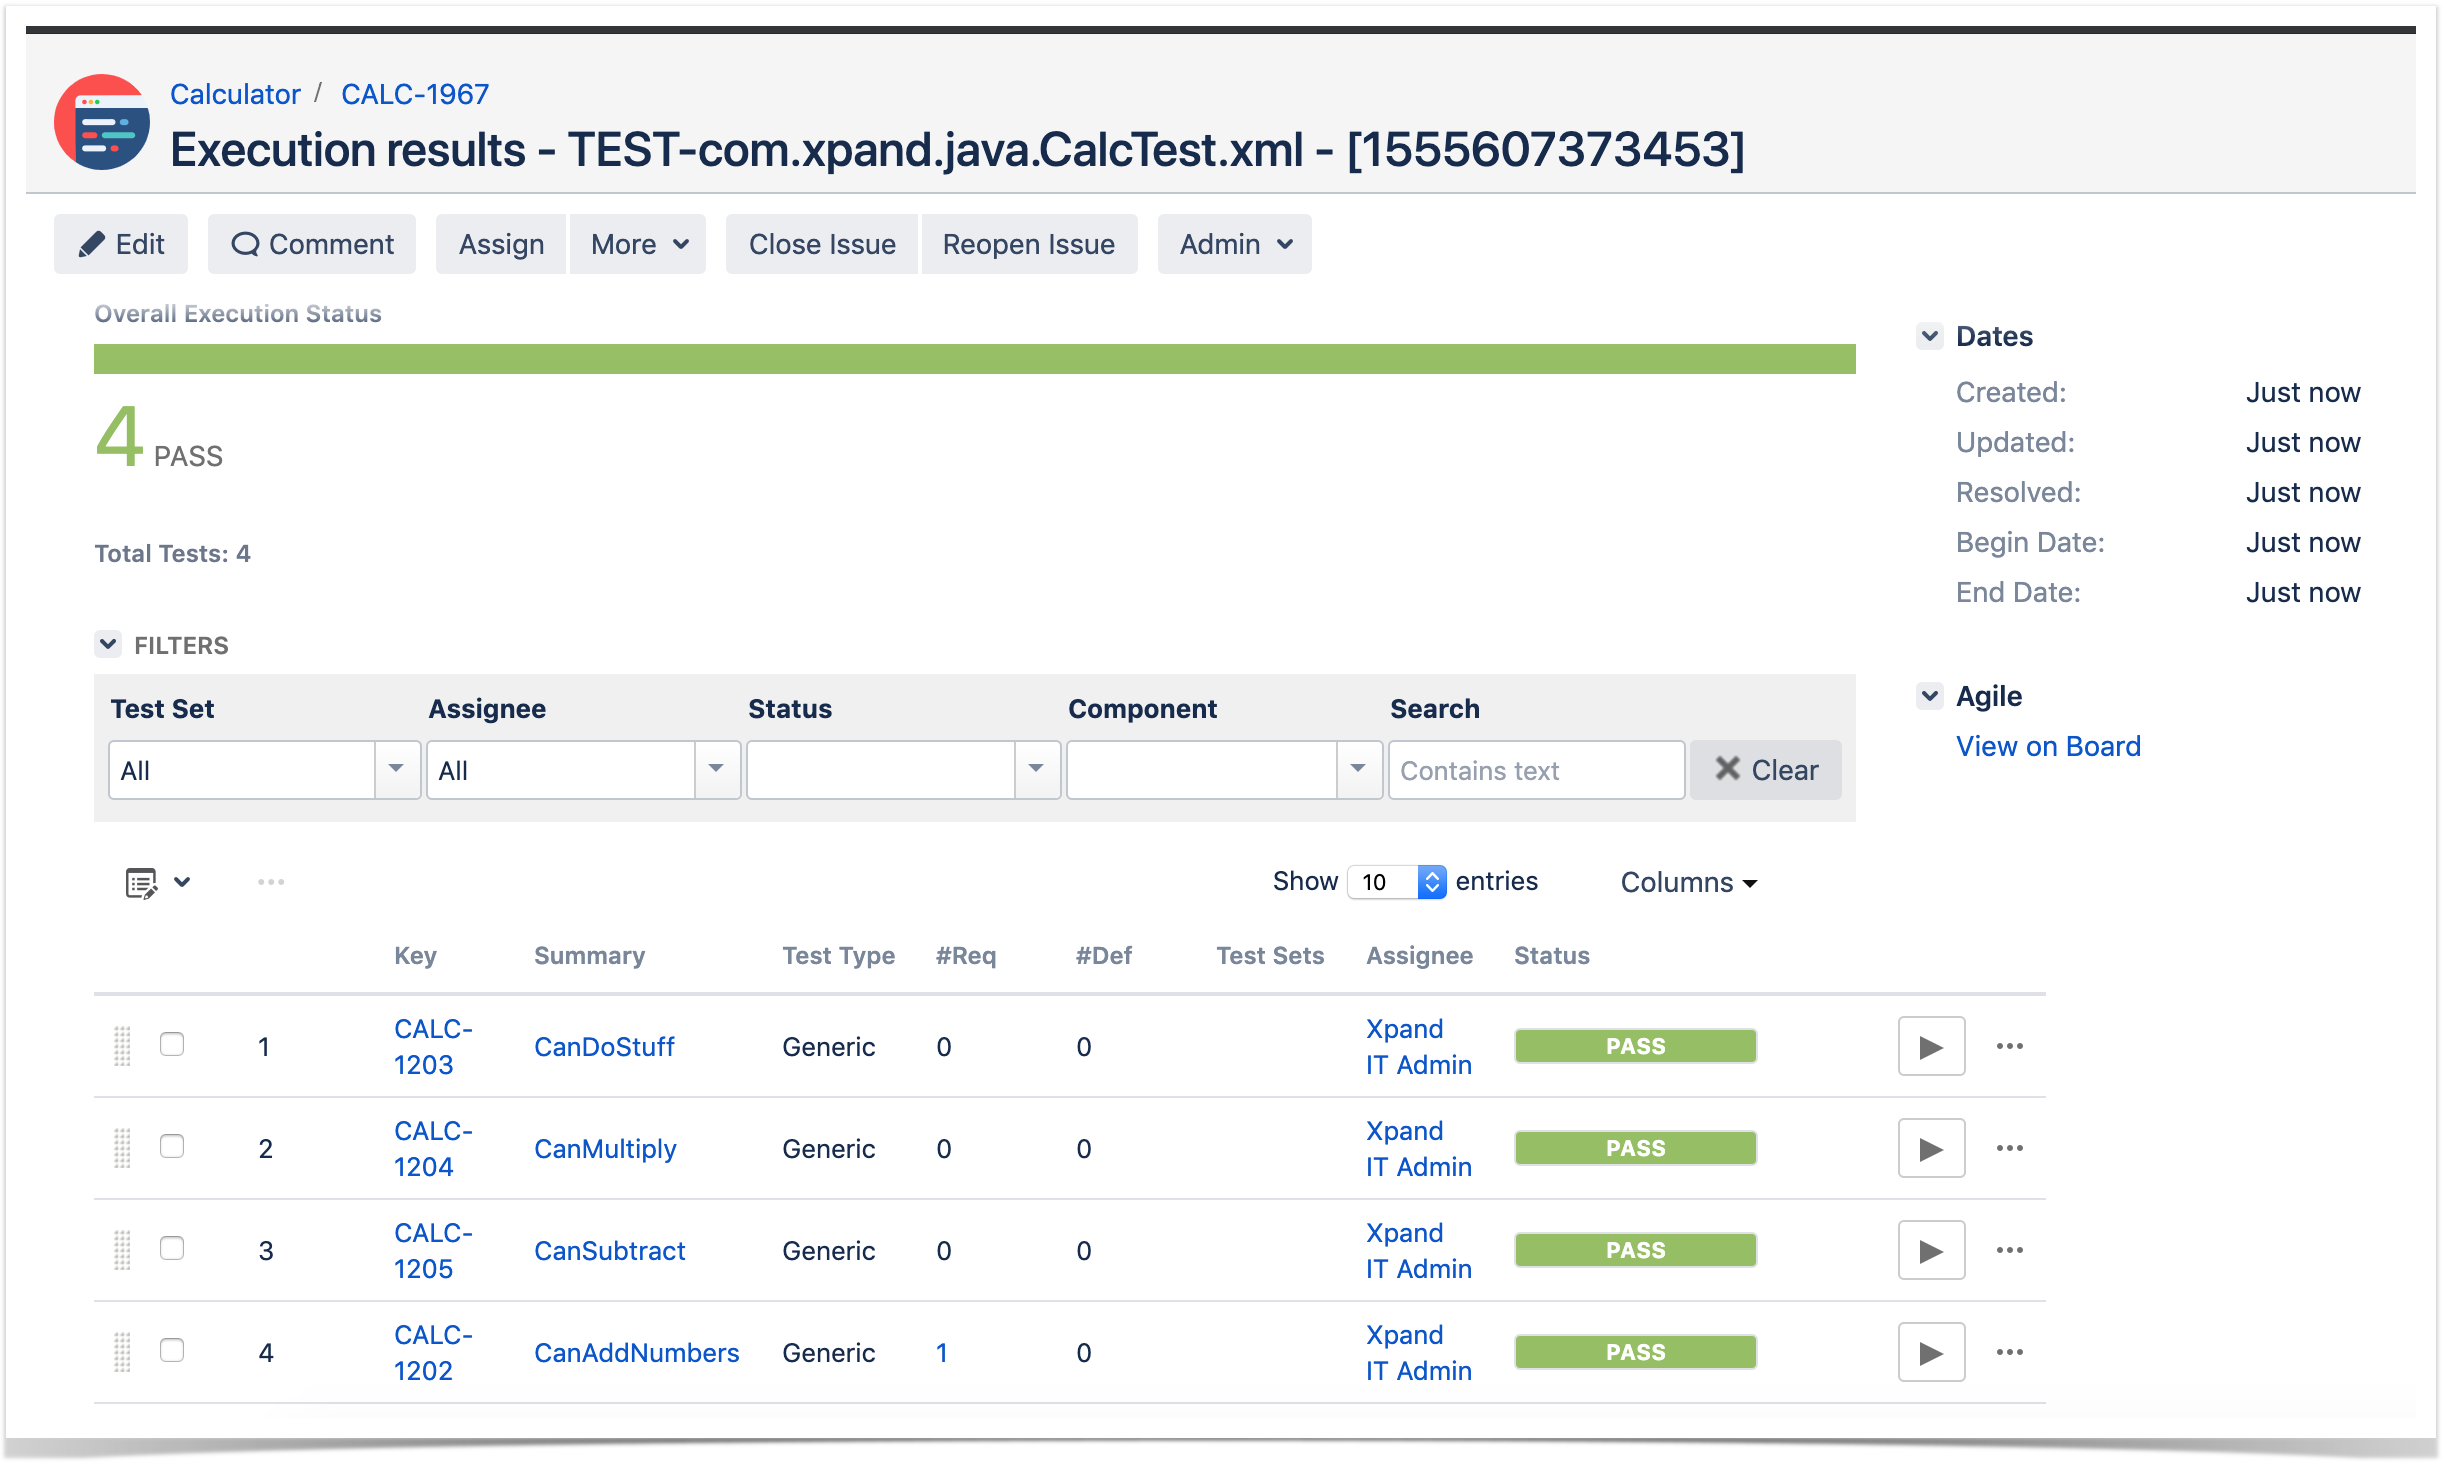
After results are imported, you can check them in Xray.
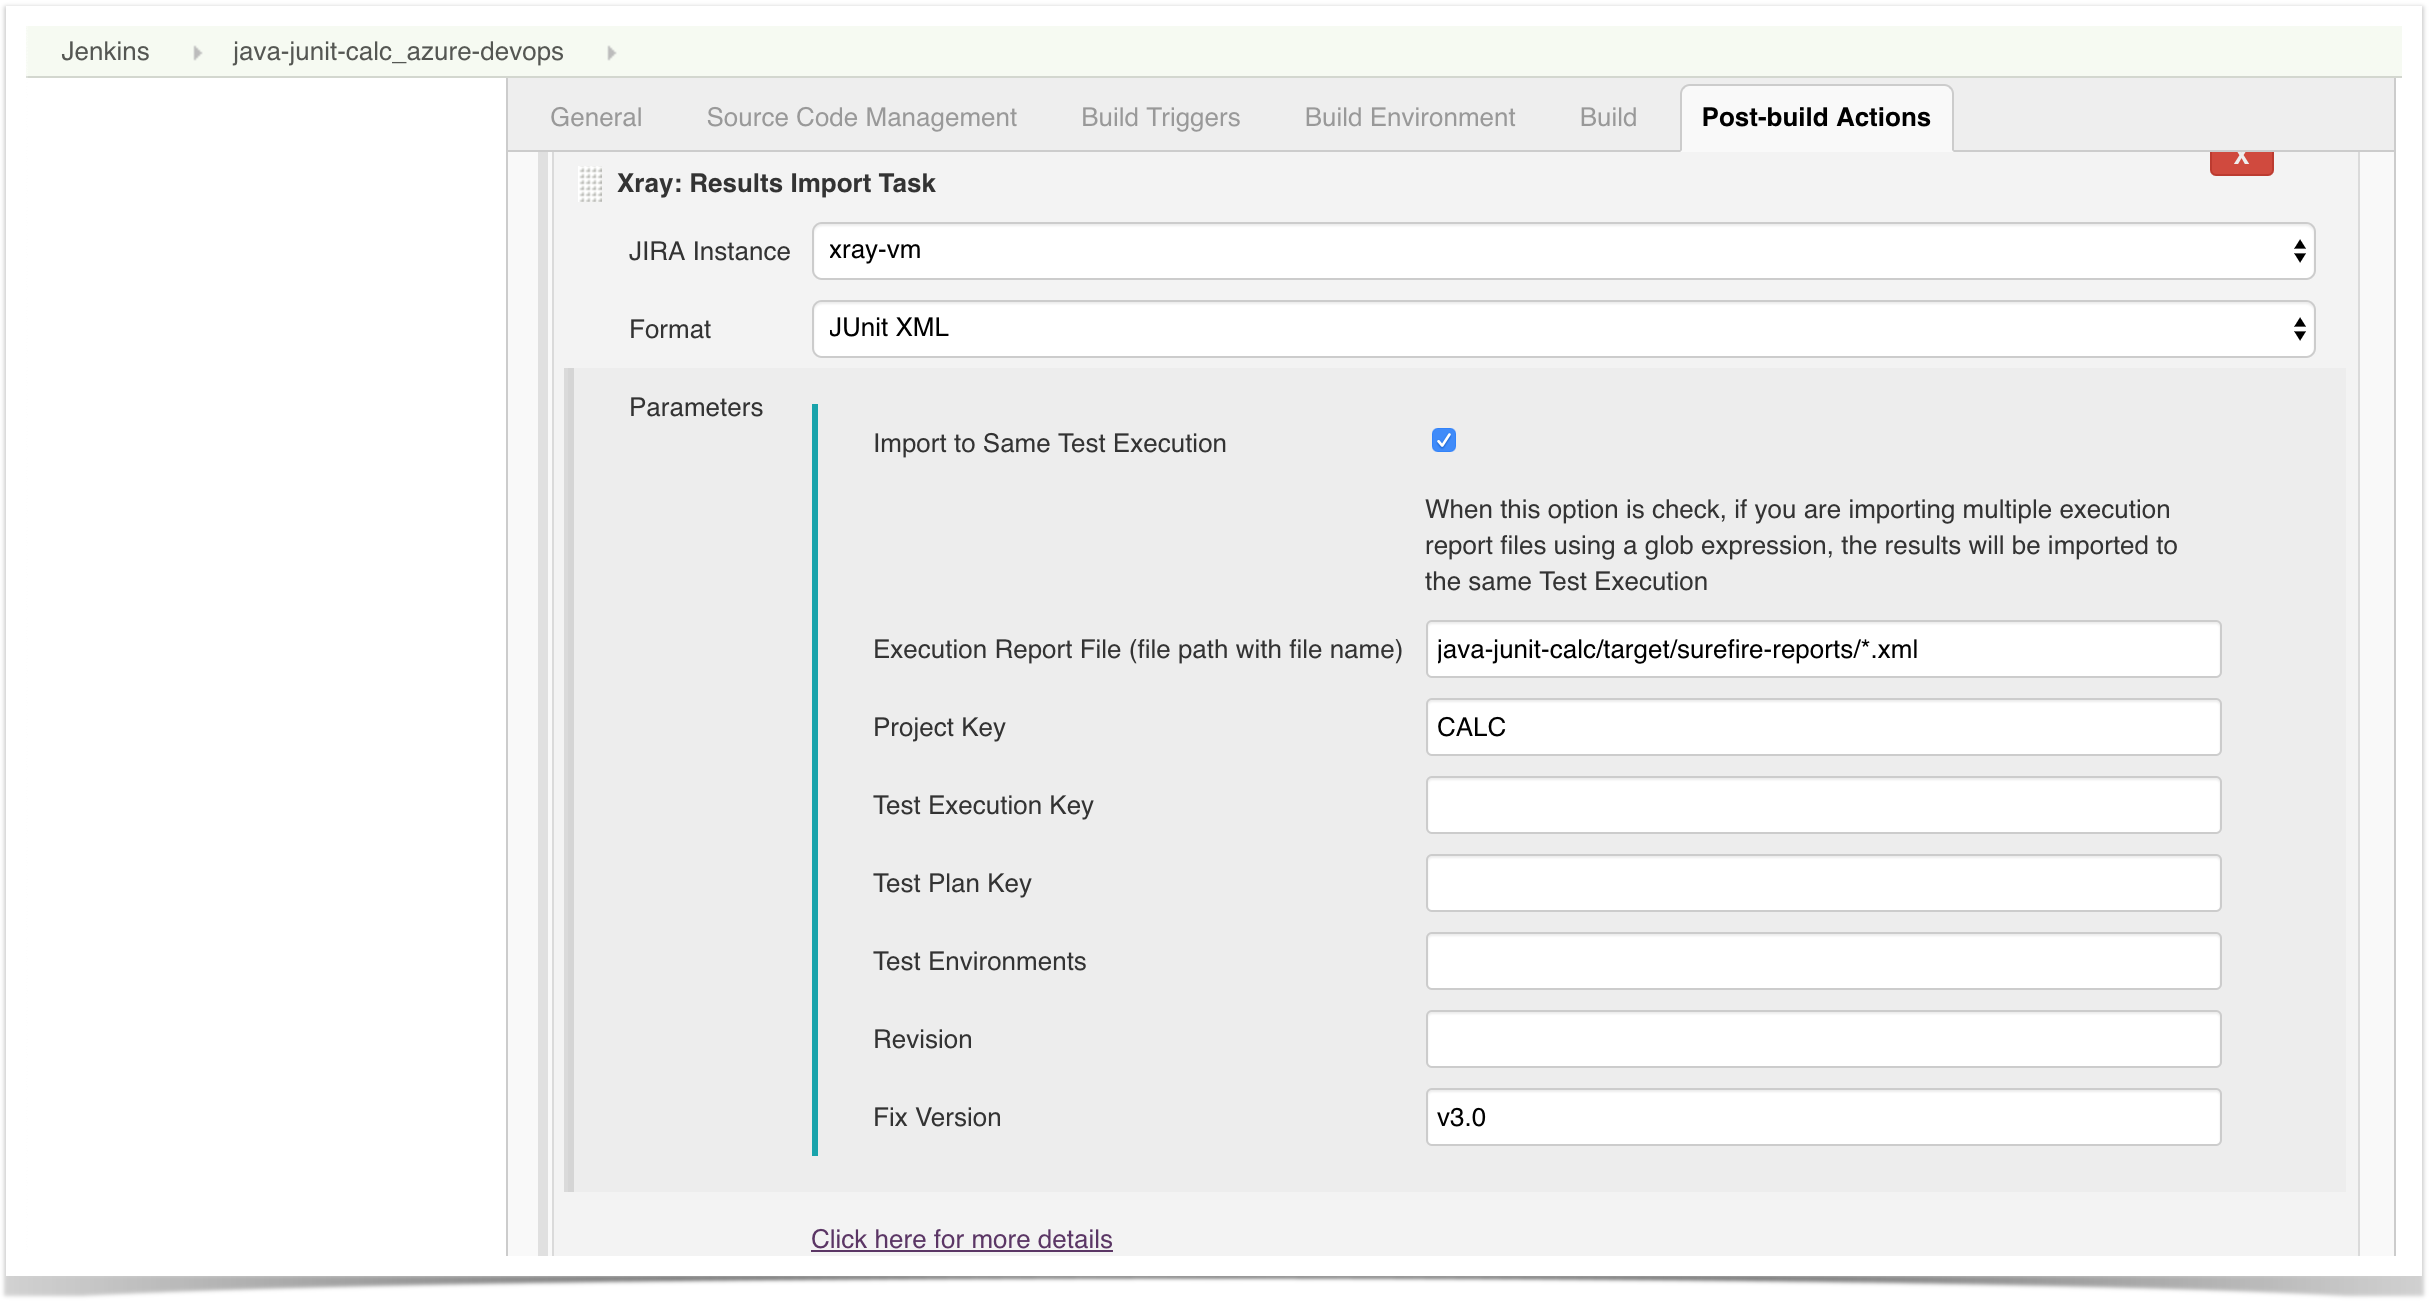
Using Azure DevOps to store code and Jenkins to manage the builds
This scenario explores usage of the Repos facility from Azure DevOps to store the code and uses Jenkins as the build tool.
JUnit example
This recipe could also be applied for other frameworks such as NUnit, TestNG or Robot.
The source code is stored and managed by Repos component of Azure DevOps.
Similarly to configuring any SCVS (e.g. Git, SVN, CVS), we need to configure Jenkins to checkout the code from Azure DevOps' Repos.
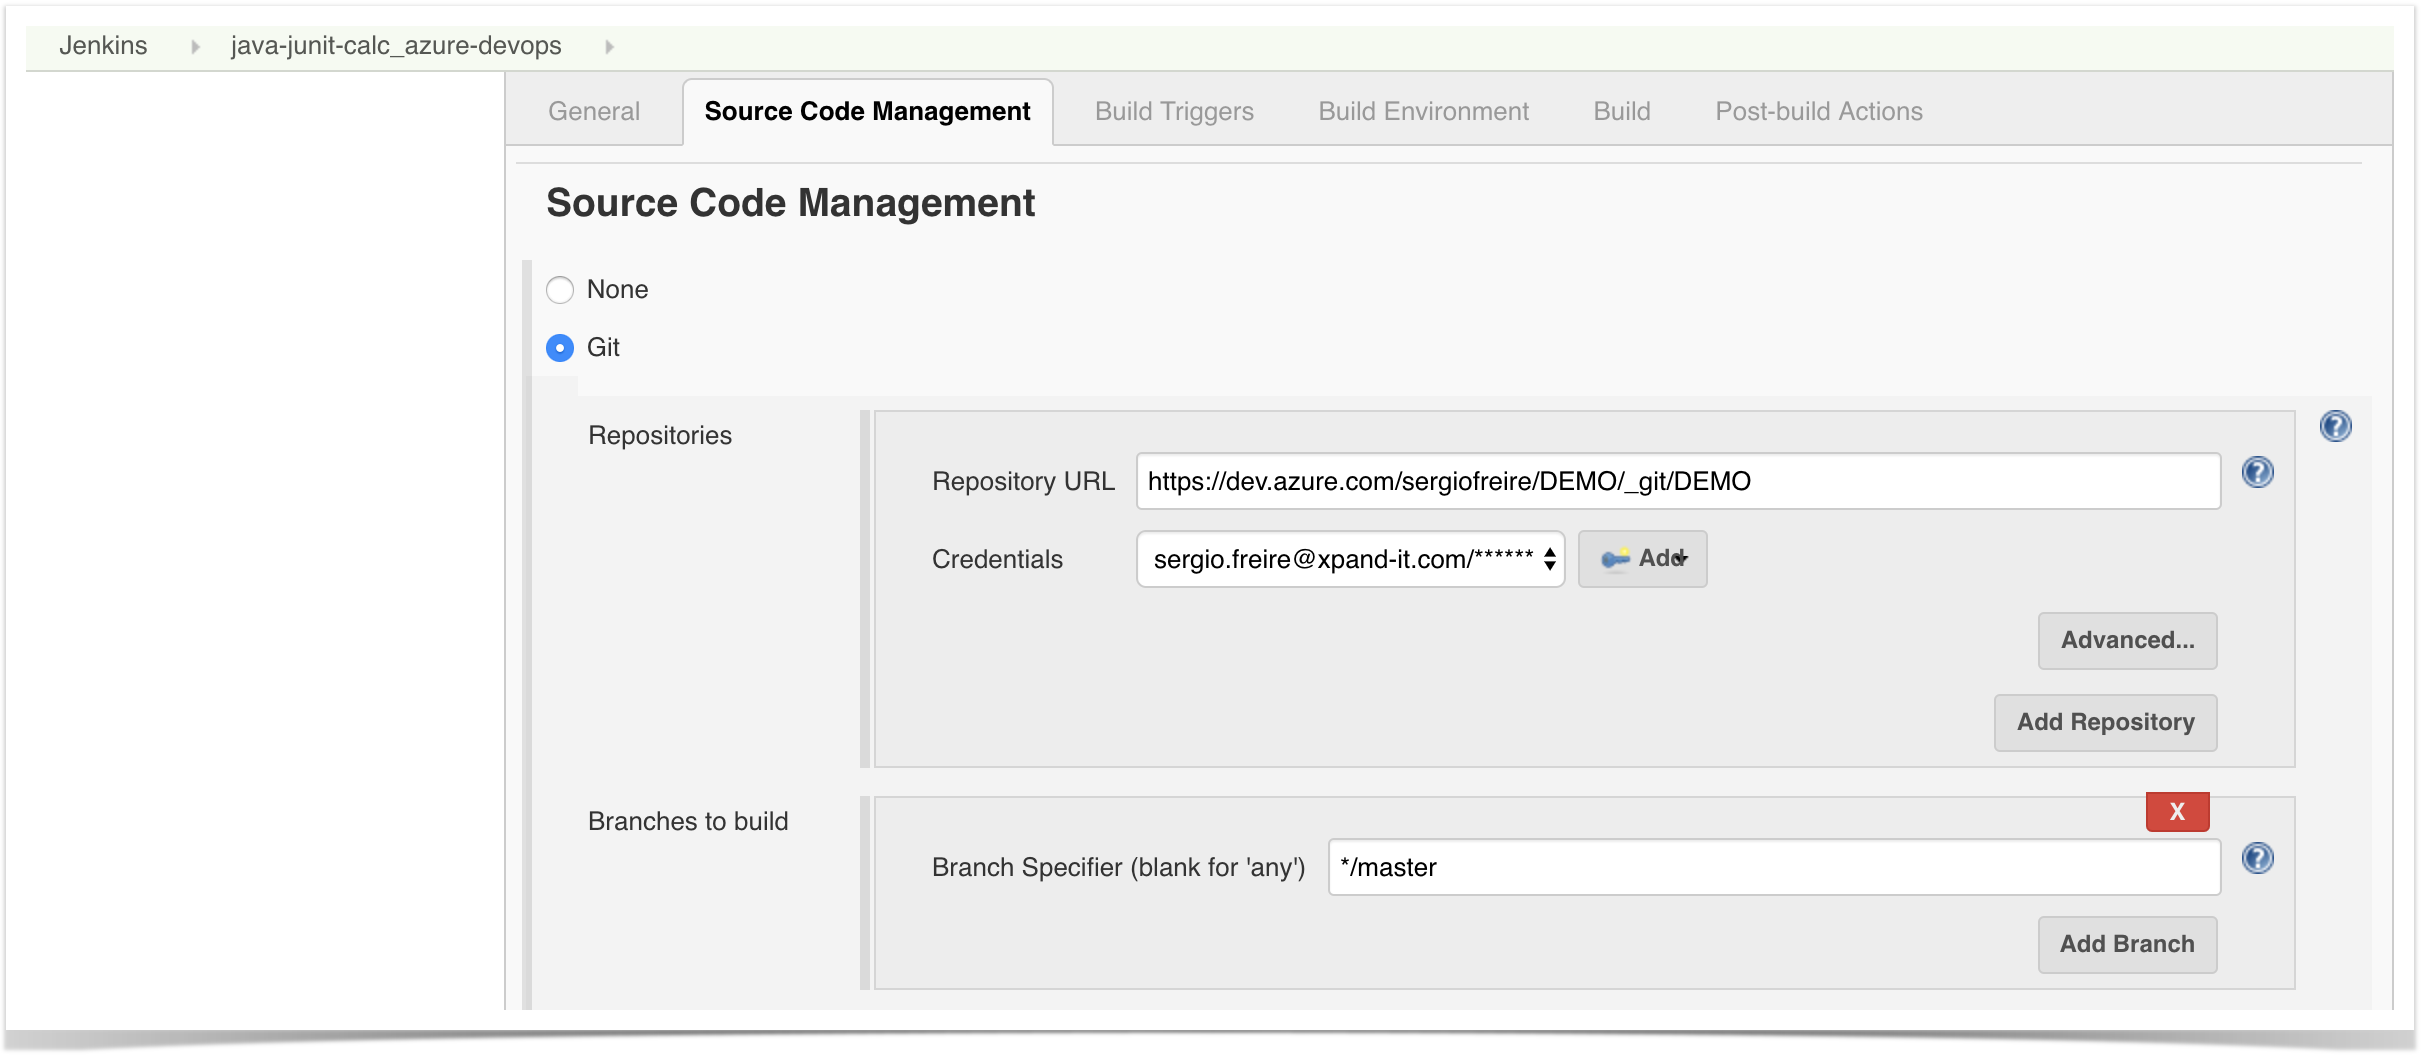
Please check the URL of your repository in Azure DevOps; it should be something similar to:
https://dev.azure.com/{orgName}/{projectName}/_git/{projectName}
Next, you can configure the remaining build process, including the build steps, in Jenkins as usual; thus, you can see the results back in Jira and Xray ![]()
References
- https://docs.microsoft.com/en-us/azure/devops/index?view=azure-devops&viewFallbackFrom=vsts
- https://docs.microsoft.com/en-us/azure/devops/pipelines/yaml-schema?view=azure-devops&tabs=schema
- https://docs.microsoft.com/en-us/azure/devops/pipelines/process/variables?view=azure-devops&tabs=yaml%2Cbatch
- https://docs.microsoft.com/en-us/azure/devops/pipelines/tasks/test/publish-test-results?view=azure-devops&tabs=yaml
- https://docs.microsoft.com/en-us/azure/devops/pipelines/release/integrate-jenkins-pipelines-cicd?view=azure-devops&tabs=yaml
- https://docs.microsoft.com/en-us/azure/devops/service-hooks/services/jenkins?view=azure-devops
- https://docs.microsoft.com/pt-pt/azure/devops/pipelines/languages/dotnet-core?view=azure-devops#run-your-tests
- https://docs.microsoft.com/en-us/azure/devops/pipelines/tasks/test/vstest?view=azure-devops