
What you'll learn
- Define tests using Playwright-test
- Add visual validations with Applitools Eyes
- Run the test and push the test report to Xray
- Validate in Jira that the test results are available
Overview
Playwright is a recent browser automation tool that provides an alternative to Selenium.
Applitools Eyes is a visual AI test automation tool that have an SDK available that you can add to your test project allowing visual validations.
Prerequisites
To start using the Playwright Test Runner please follow the Get Started documentation.
The tests consist in validating 3 features of the demo site: Home link, Find owners functionality and veterinarians link.
We want to add visual validations to these tests, so we have included the Applitools Eyes SDK to be able to use the comparison abilities of the tool.
Before coding the tests start by registering in the Applitools Eyes site and obtain an API-KEY (that is what we will use in the test execution to ship screenshots to the tool for comparison), more information on how to do it here.
We started by defining PageObjects that will represent the pages we will interact with, we have defined three, as we see below:
Plus a configuration file where we have the identifiers that will match the elements in the page, this will add an extra abstraction layer to the tests allowing us to redefine locators or text without changing the code.
We added an helper file that will parse returned information and add valuable information returned by Applitools Eyes to the Junit report.
The tests that validate if the features are behaving as expected are below, notice that we are using the Applitools Eyes SDK and adding checks on the tests in the moments we want to have visual validations.
For the tutorial purpose we will focus in the Owners validations (the others will be similar with more or less actions).
Looking to this class in more details we can see different areas:
- test.beforeEach()
- test()
- test.afterEach()
In the "test.beforeEach" we are configuring the runner that will be used by the Eyes instance, as you can see, we are using the classic one (Eyes have another available called "Visual Grid Runner" that interacts with the Eyes Ultrafast Grid server to render the checkpoint images in the cloud).
We defined a configuration object that will hold the configuration for the instance, we are defining the Batch named 'PetClinic Batch - Playwright - Classic', defining the match level (in our case we are using the recommended one Strict but there are more available).
In the test itself we have a normal Playwright test with additions from the Applitools Eyes SDK, let's look into those in more detail:
- await eyes.open(page, 'PetClinic', 'FindOwnersLink', { width: 800, height: 600 }); - to start a test, before calling any of the check methods and we are defining the AppName, TestName and ViewPortSize.
- await eyes.check(Target.window().fully()); - Run a checkpoint. Uses Fluent arguments to specify the various parameters.
- await eyes.close(); - Call this method at the end of the test. This terminates the sequence of checkpoints, and then waits synchronously for the test results and returns them.
Finally in the "test.afterEach" we make sure to close all eyes instances by calling the "abort" method and process the results that are returned by the runner.
Once the code is implemented, we will run it to define the baseline (A baseline stores a sequence of reference images), that will be used to compare to the next tests. We achieve that with the following command:
APPLITOOLS_API_KEY="API_KEY" PLAYWRIGHT_JUNIT_OUTPUT_NAME=results.xml npx playwright test ./tests/* --browser=chromium --reporter=junit,line
If the APPLITOOLS_API_KEY is not defined the tests will be executed but the screenshots will not be sent to Applitools Eyes.
The output generated shows how many tests have been executed, produces a Junit report and returns the link to check the visual assertions.
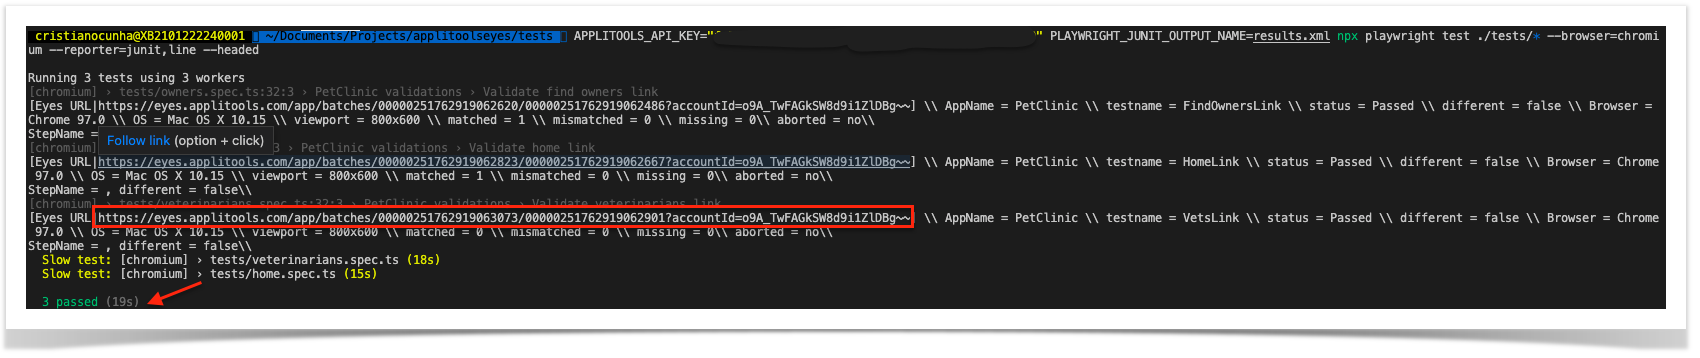
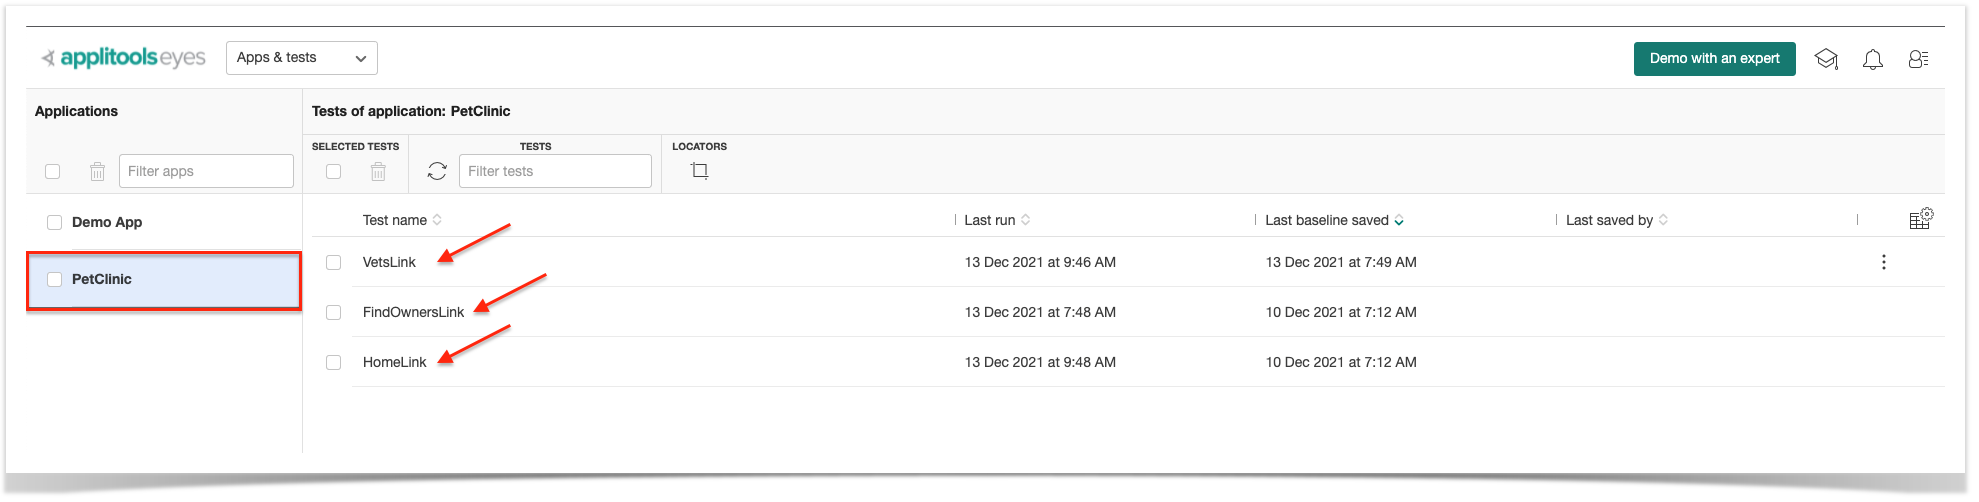
In Applitools Eyes interface we can see that a new application was created with 3 tests:
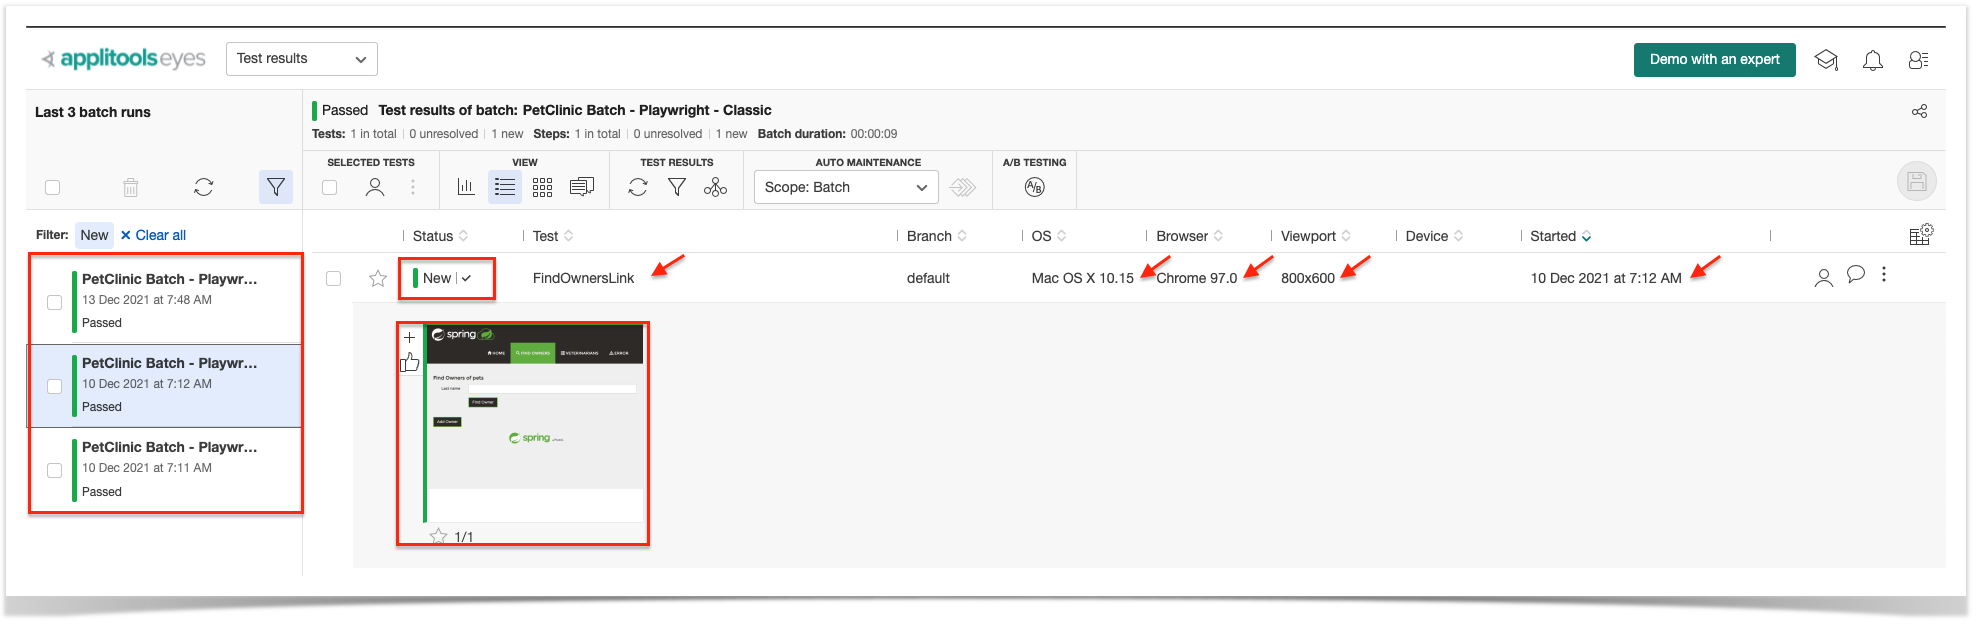
If we navigate to the test results we will see the three tests properly named, information about the OS, Browser and Viewport used, a screenshot taken and the notion if is new or not and a date.
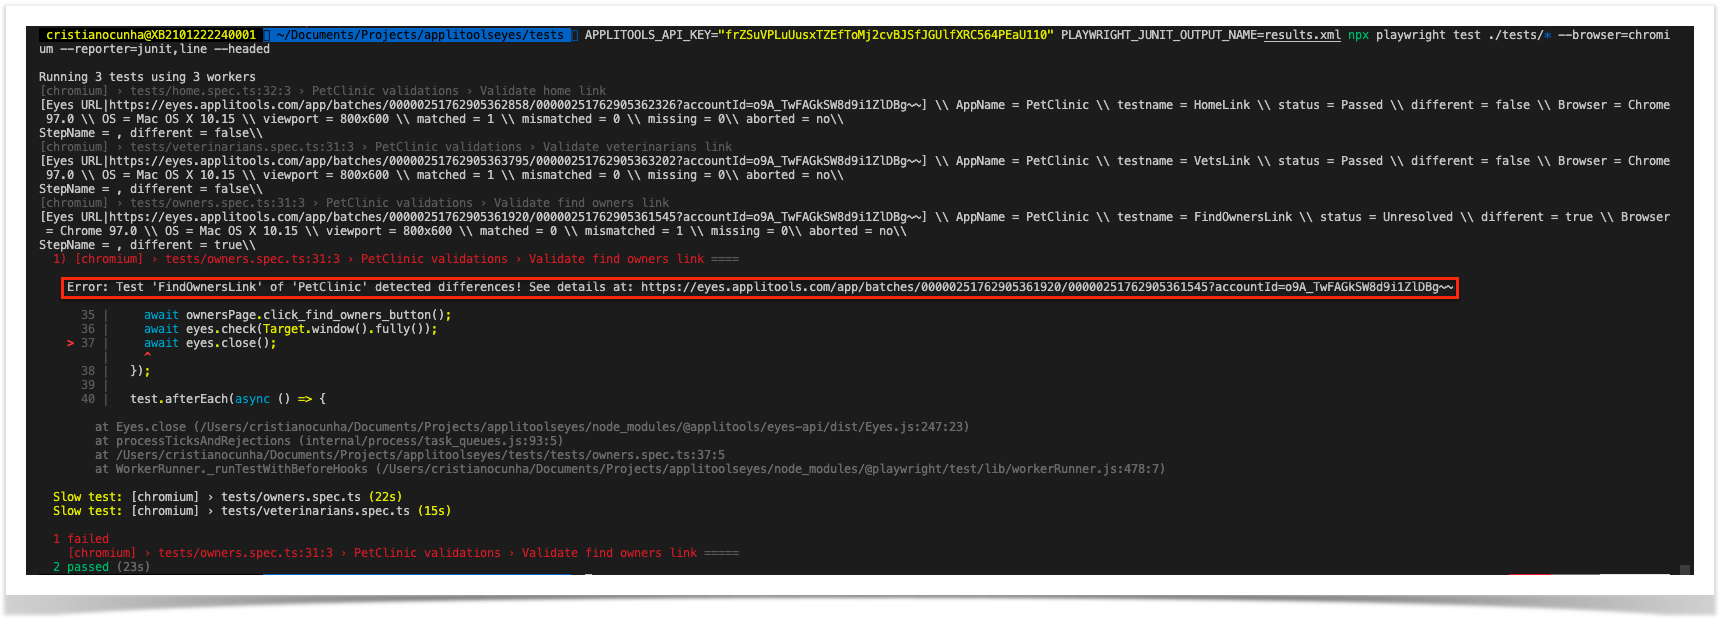
At this point we have generated our baseline and the tests are behaving as expected, we will now introduce a change in the application and remove strings from the Owners test that will make the test to succeed but the visual validation will fail as it will not match the baseline and thus failing the tests overall.
After the second execution the output terminal will have the following information:
The report generated will contain the following information:
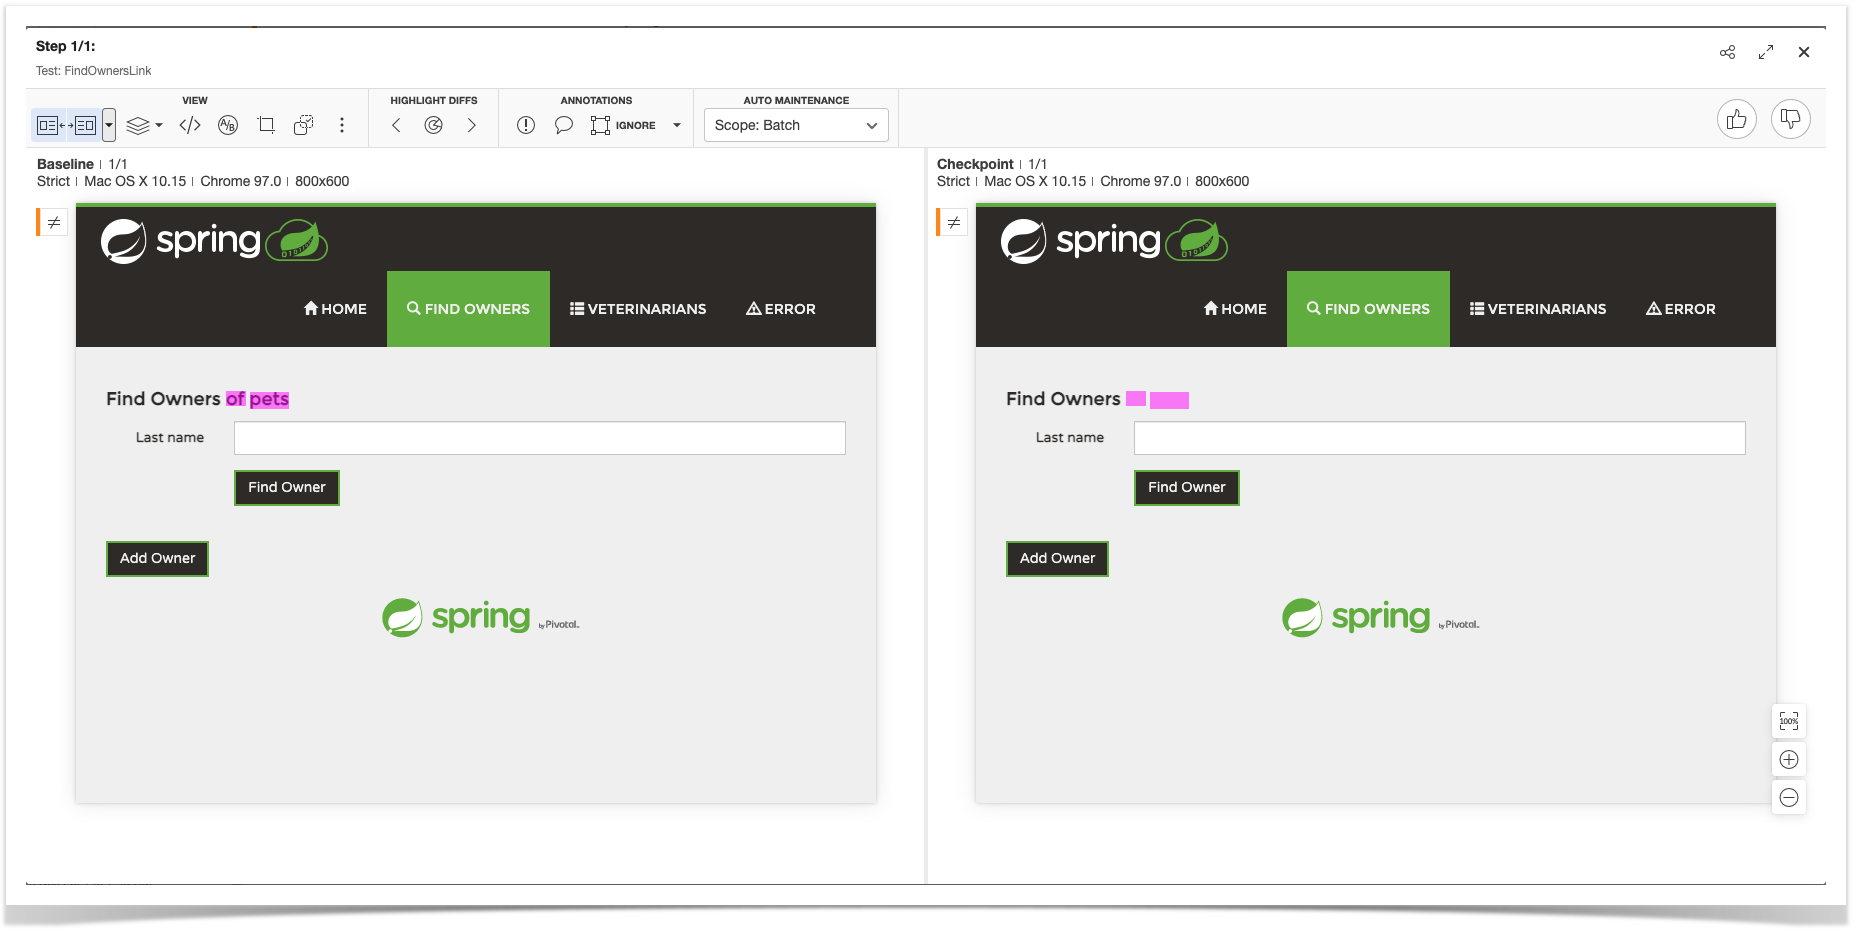
When we access the link provided by Applitools Eyes we can see the visual changes detected:

When accessing the details we can see the actual differences detected between the baseline and the latest test side by side:
Notes:
- Applitools will let you analyse further the problem by filtering the view in different layers.
- Applitools have available the possibility to define regions, regions to be ignore for example if the content is too dynamic.
- Applitools let you add annotations, such as remarks or setting a bug.
- By default Playwright will execute tests for the 3 browser types available (that is why we are forcing to execute only for one browser)
- By default all the tests will be executed in headless mode
- Folio command line will search and execute all tests in the format: "**/?(*.)+(spec|test).[jt]s"
- In order to get the Junit test report please follow this section
Integrating with Xray
As we saw in the above example, where we are producing Junit reports with the result of the tests, it is now a matter of importing those results to your Jira instance, this can be done by simply submitting automation results to Xray through the REST API, by using one of the available CI/CD plugins (e.g. for Jenkins) or using the Jira interface to do so.
API
Once you have the report file available you can upload it to Xray through a request to the REST API endpoint for JUnit, and for that the first step is to follow the instructions in v1 or v2 (depending on your usage) to obtain the token we will be using in the subsequent requests.
Authentication
The request made will look like:
curl -H "Content-Type: application/json" -X POST --data '{ "client_id": "CLIENTID","client_secret": "CLIENTSECRET" }' https://xray.cloud.getxray.app/api/v2/authenticate
The response of this request will return the token to be used in the subsequent requests for authentication purposes.
JUnit XML results
Once you have the token we will use it in the API request with the definition of some common fields on the Test Execution, such as the target project, project version, etc.
curl -H "Content-Type: text/xml" -X POST -H "Authorization: Bearer $token" --data @"results.xml" https://xray.cloud.getxray.app/api/v2/import/execution/junit?projectKey=XT&testPlanKey=XT-295
With this command we are creating a new Test Execution in the referred Test Plan with a generic summary and two tests with a summary based on the test name.
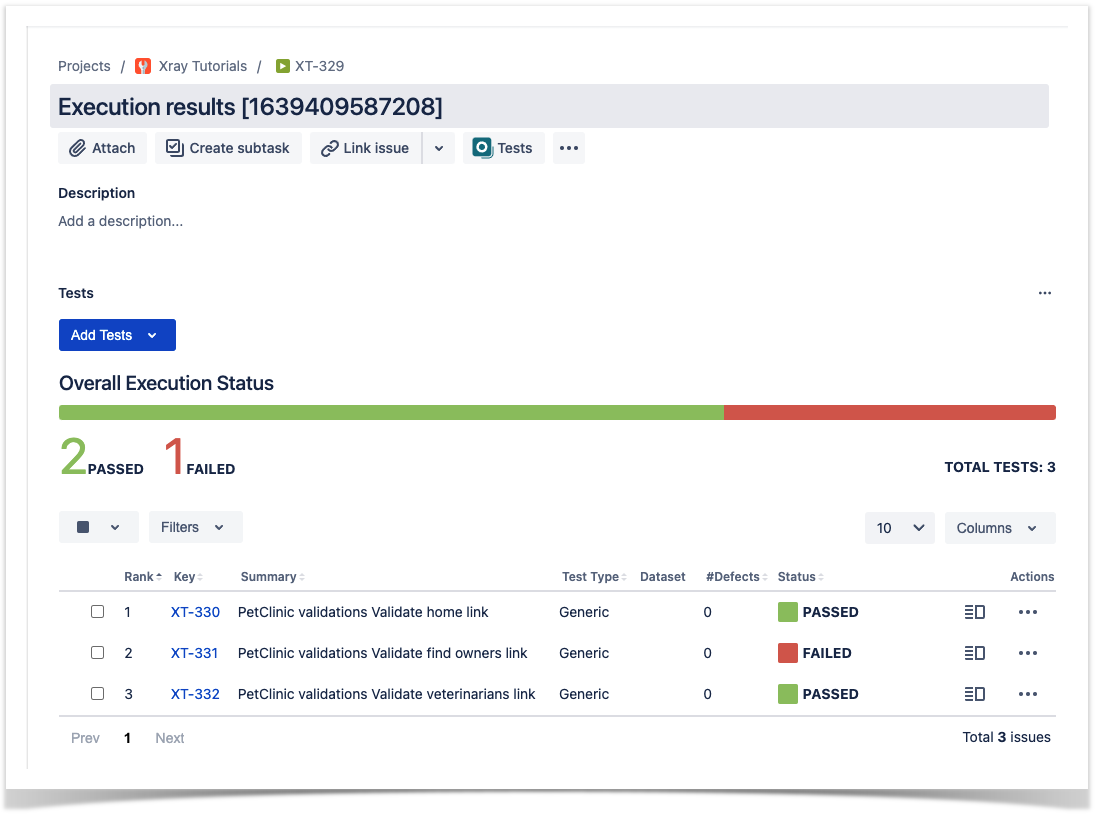
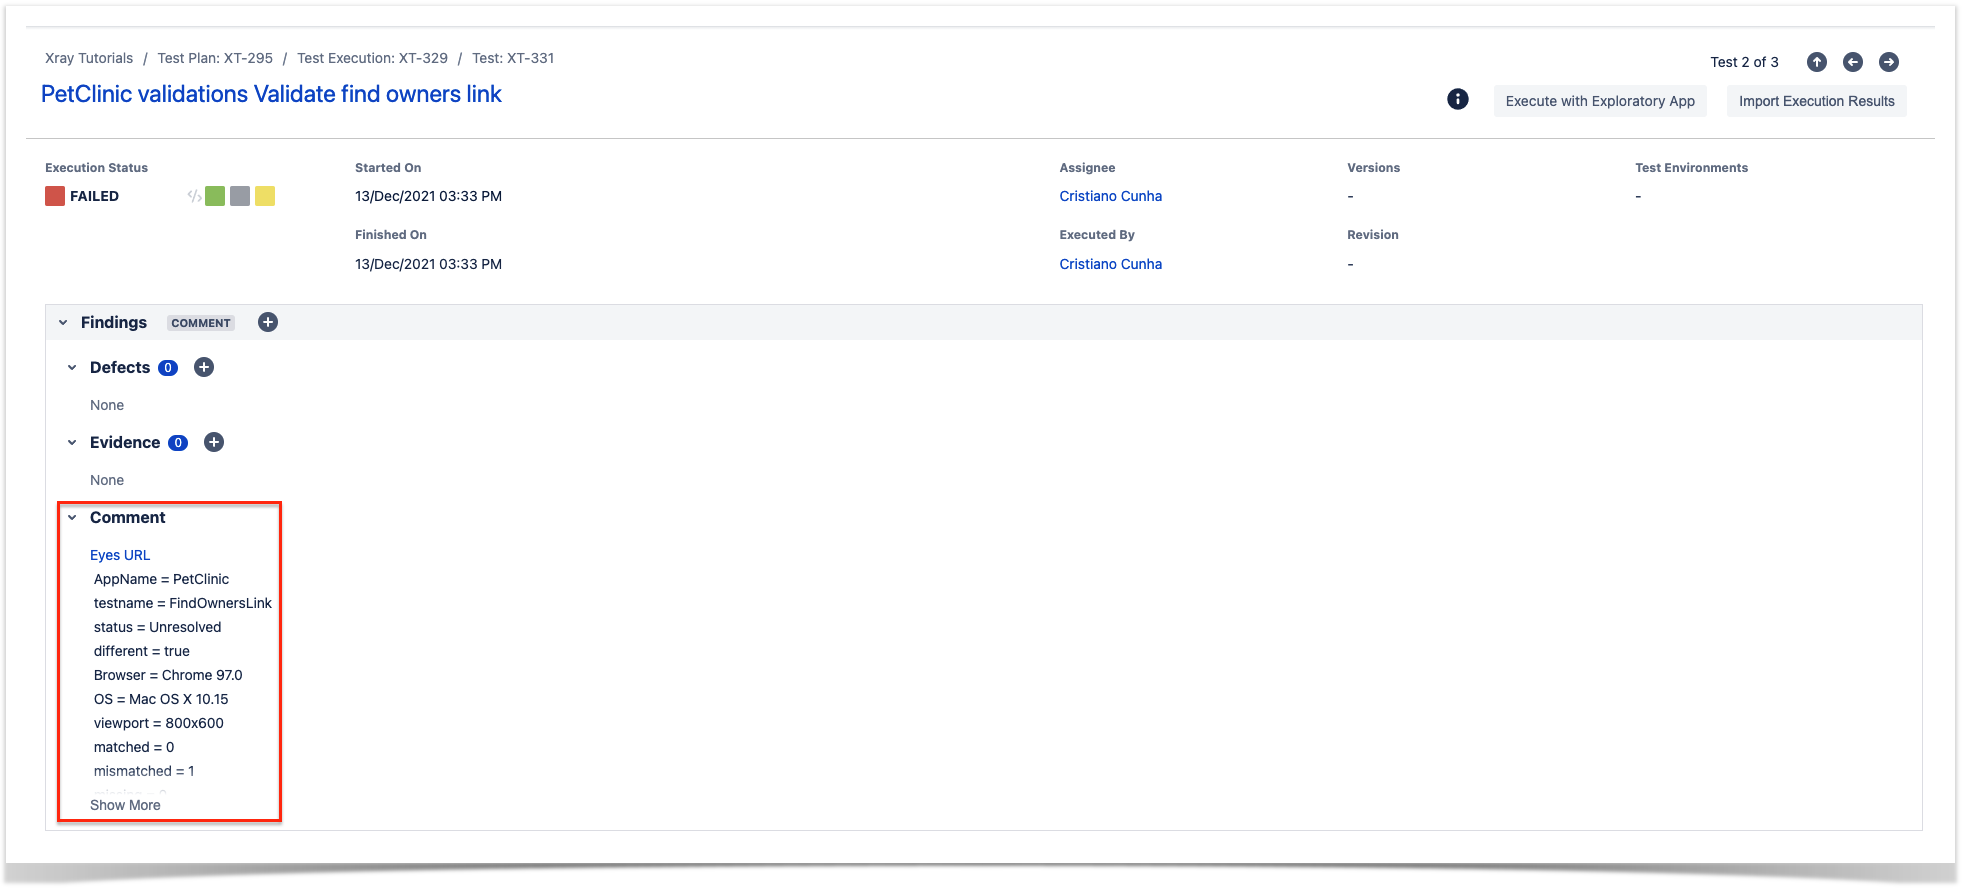
Looking closer to the failed test, if we click on it to check details we will see that in the comment section we have the details returned by the Applitools call, in there we find the link that will open the Applitools application with the details of the visual validations. The definition is automatically filled up with an auto-generated identifier that uniquely identifies the test and in the output section we have the stack trace returned when we executed the test.
Jira UI
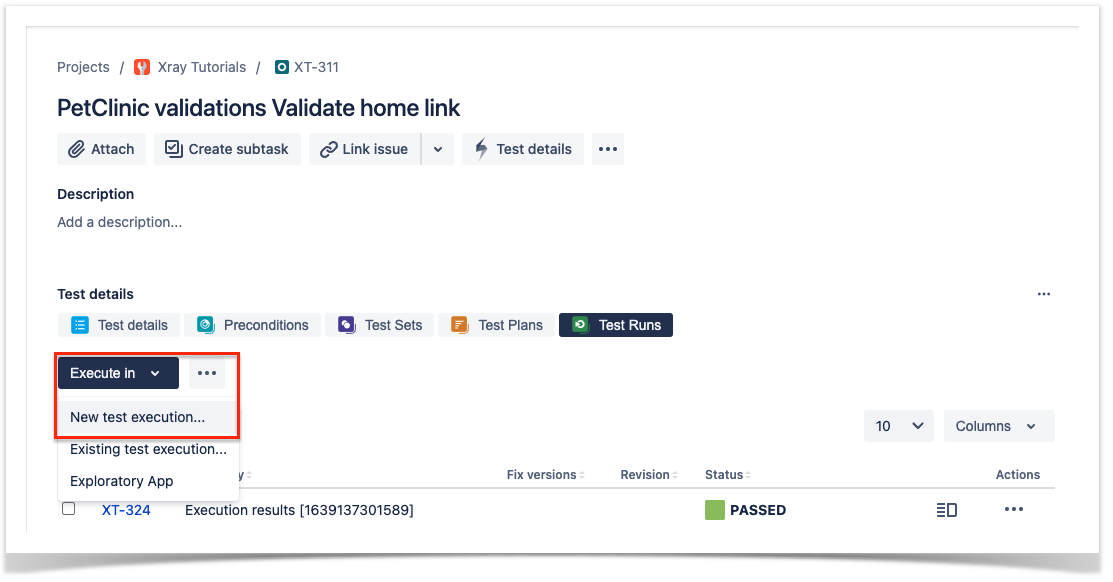
Create a Test Execution for the test that you have
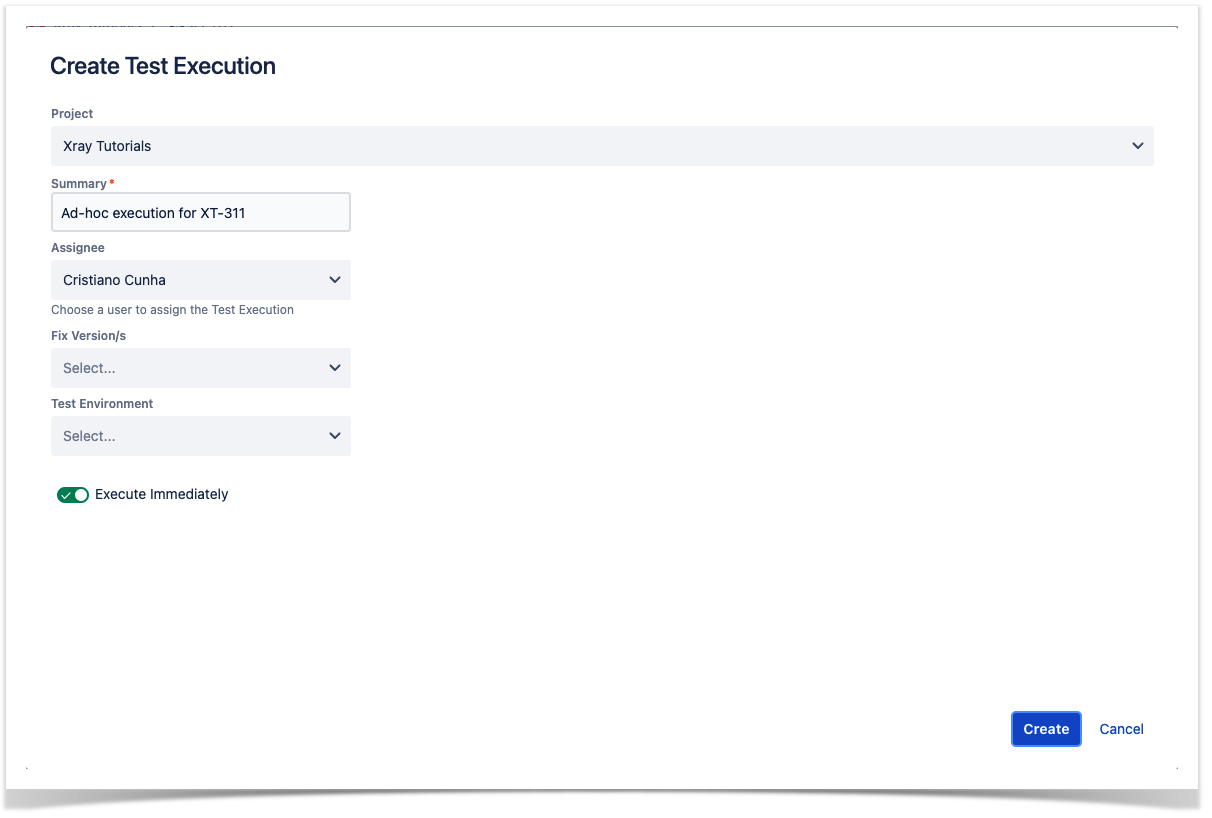
Fill in the necessary fields and press "Create"
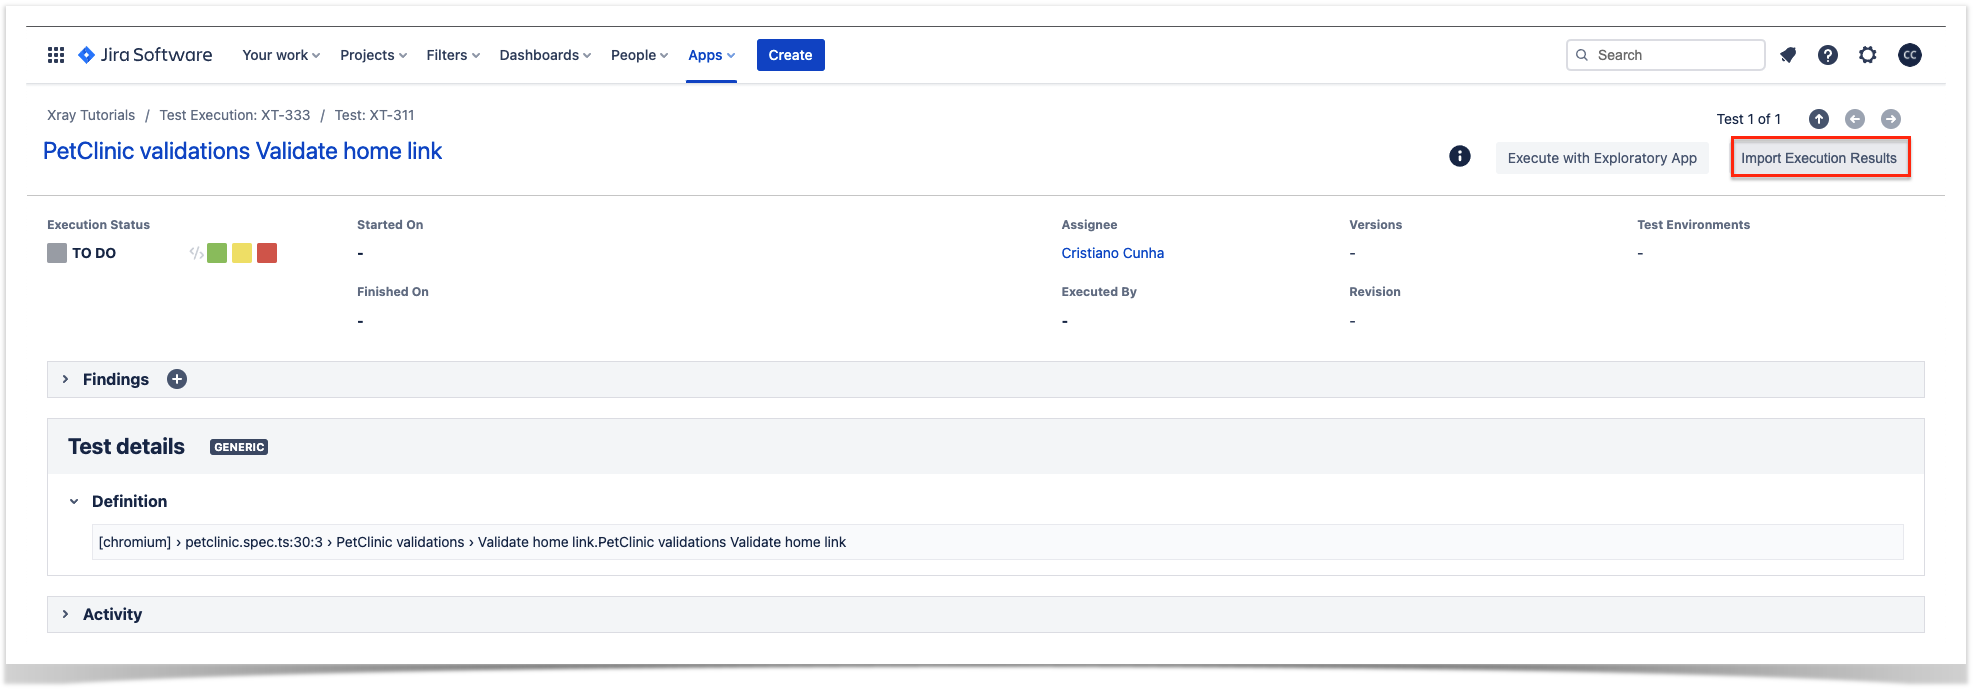
Open the Test Execution and import the JUnit report
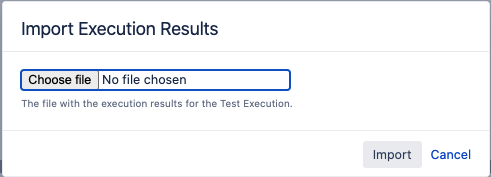
Choose the results file and press "Import"
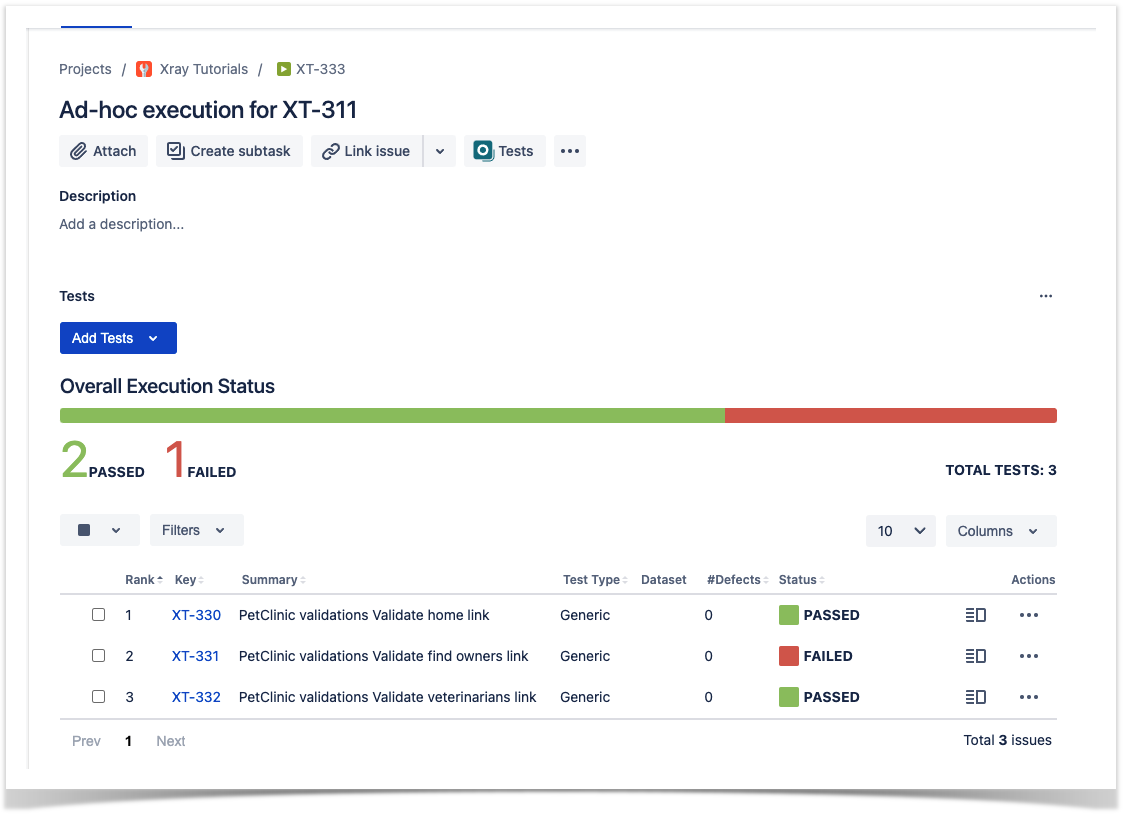
The Test Execution is now updated with the test results imported
Tests implemented using Playwright will have a corresponding Test entity in Xray. Once results are uploaded, Test issues corresponding to the Jest tests are auto-provisioned, unless they already exist.

Xray uses a concatenation of the suite name and the test name as the the unique identifier for the test.
In Xray, results are stored in a Test Execution, usually a new one. The Test Execution contains a Test Run per each test that was executed using playwright-test runner.
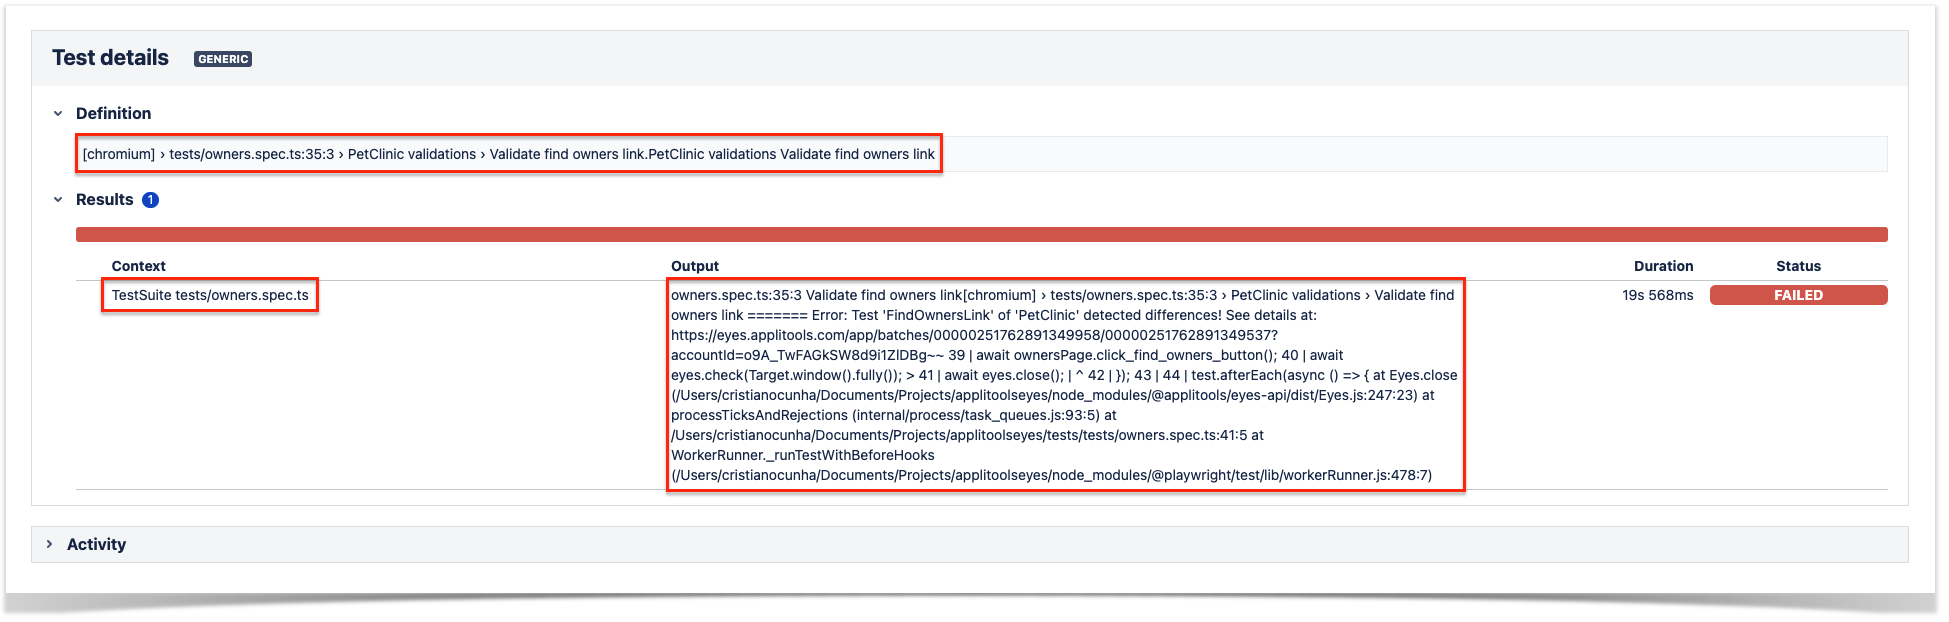
Detailed results, including logs and exceptions reported during execution of the test, can be seen on the execution screen details of each Test Run, accessible through the Execution details:
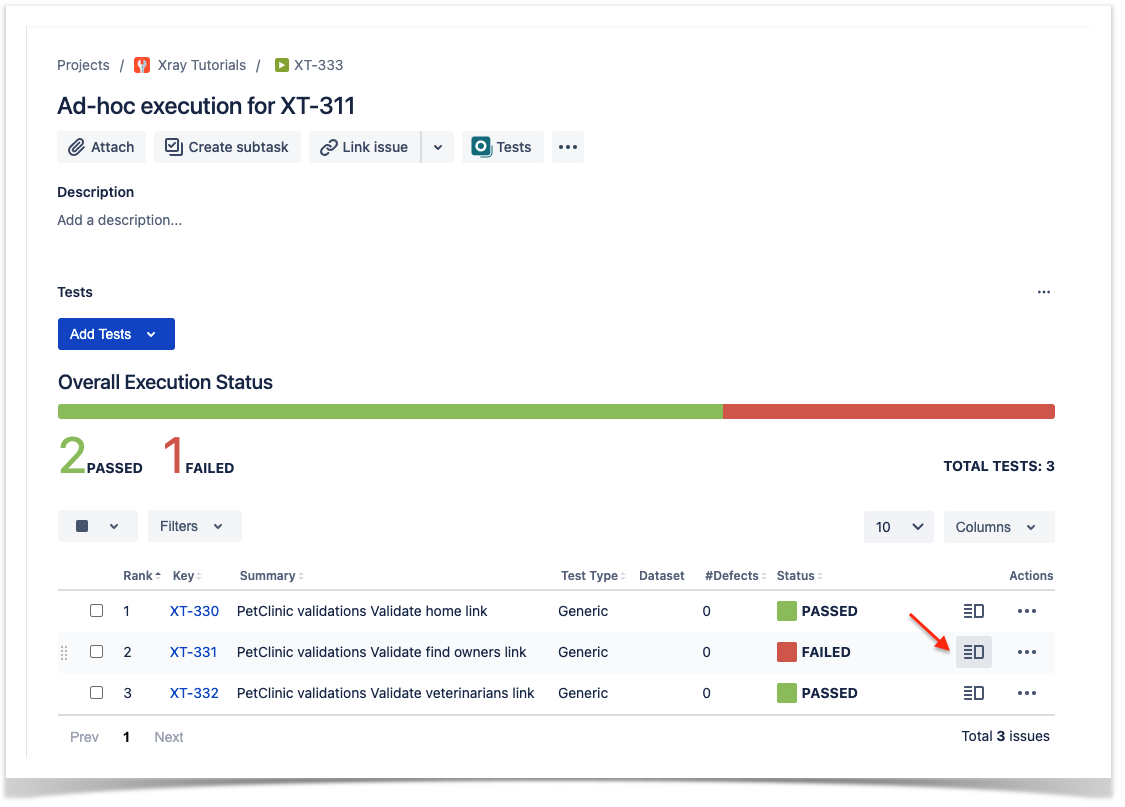
Looking to the details of the failed test, we see that in the comment section we have the details returned by the Applitools call. We can find the link that will open the Applitools application with the details of the visual validations. The definition is automatically filled up with an auto-generated identifier that uniquely identifies the test and in the output section we have the stack trace returned when we executed the test.
Tips
- after results are imported, in Jira Tests can be linked to existing requirements/user stories, so you can track the impacts on their coverage.
- results from multiple builds can be linked to an existing Test Plan, to facilitate the analysis of test result trends across builds.
- results can be associated with a Test Environment, in case you want to analyze coverage and test results by that environment later on. A Test Environment can be a testing stage (e.g. dev, staging, prepod, prod) or a identifier of the device/application used to interact with the system (e.g. browser, mobile OS).