Versions Compared

Key

  • This line was added.
  • This line was removed.
  • Formatting was changed.

Table of Contents
maxLevel4

Overview

Learn how to create detailed, consistent execution instructions with conditional expected results for your manual testing efforts. 

UI Expand
titleTable of Contents

Table of Contents

Introduction

Scripts define the Test steps and expected results for each Test scenario. They provide clear instructions for testers, ensuring consistency in how scenarios are executed.

By using the With Xray Test Case Designer Scripts feature, you can standardize Test execution and ensure repeatability, making your Tests more reliable and well-documented.

You can quickly transform optimized test data like this
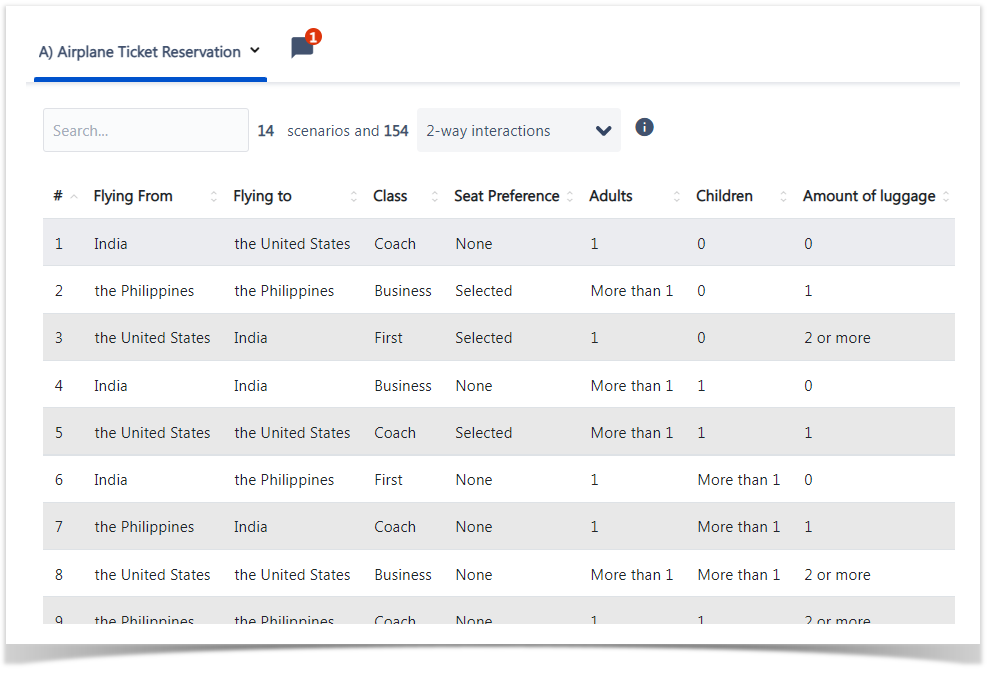
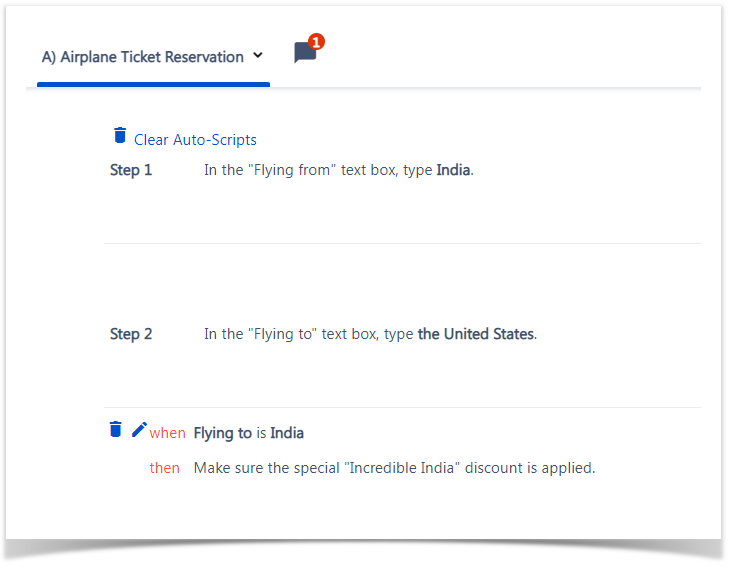
Image Removed

Test data as depicted in Figure 1 into customizable scripts . You can even (Figure 2).

Figure 1 - DataImage Added

Figure 1 - Data


Figure 2 - ScriptsImage Added

Figure 2 - Scripts


Info

You can add automatically generated

...

expected results to your steps

...

(Figure 3 - 2).

Figure 3 - ResultsImage Added

Figure 3 - Results


Operations

Accessing Scripts

UI Steps
UI Step

In the Xray Test Case Designer, click My Test Models (Figure 4 - 1) and then click a Test model (Figure 4 - 2).

Figure 4 - Test modelImage Added

Figure 4 - Test model

UI Step

A menu will open on the left. There, click Scripts (Figure 5 - 1) and select one of the two options: Automate / Manual (Figure 5 - 2).

Figure 5 - ScriptsImage Added

Figure 5 - Scripts

Creating/Editing Scripts

Automate

Automate (Figure 5 - 2) allows you to create Gherkin feature files as behaviors for your generated Test cases.

Editing a Script

UI Steps
UI Step

Go to Scripts (Figure 5 - 1) and then click Automate (Figure 5 - 2).

UI Step

Click the pencil icon to edit the script's name (Figure 5 - 3) and the trash icon to delete the script (Figure 5 - 3).

UI Step

Use the dropdown menu to select the strength of interactions (Figure 5 - 5).

UI Step

Click the grey background to edit the script's text and write anything you want (Figure 5 - 6).

UI Step

Once you're done editing, click the Save button (Figure 5 - 8). This button will become active as soon as you make a change in the text field (Figure 5 - 6).

Info

You can click the Usage button (Figure 5 - 7) to see some tips on creating a script.

Creating a Script

UI Steps
UI Step

Go to Scripts (Figure 5 - 1) and then click Automate (Figure 5 - 2).

UI Step

Click the + icon (Figure 5 - 4).

UI Step

A modal will open (Figure 6).

There, enter the name of the new script (Figure 6 - 1) and select a type (Figure 6 - 2).

Figure 6 - ModalImage Added

Figure 6 - Modal


Once you're finished, click Create (Figure 6 - 3).

UI Step

The newly generated script will now appear in a tab (Figure 7 - 1).

Figure 7 - New scriptImage Added

Figure 7 - New script

Manual

UI Steps
UI Step

Go to Scripts (Figure 8 - 1) and then click Manual (Figure 8 - 2).

Figure 8 - ScriptsImage Added

Figure 8 - Scripts

UI Step

The screen for the manual script will open (Figure 9).

Here, you can write the script instructions by hovering and clicking the script fields (Figure 9 - 1) and entering a description. Once you're finished writing the instructions, always click Save (Figure 9 - 2) before moving to the next step.

Figure 9 - ScriptImage Added

Figure 9 - Script

UI Step

You can edit/delete a step (Figure 10 - 1) and add the expected results to it by clicking the Add Expected Results button (Figure 10 - 2). A modal will open (Figure 11).

Figure 10 - ResultsImage Added

Figure 10 - Results

UI Step

Here, you’re setting up a simple “when / then” rule (Figure 11 - 1; 2; 3). 

Figure 11 - ResultsImage Added

Figure 11 - Results


You’re not restricted to rules with just one

...

Image Removed

Remember Mad Libs?

Image Removed

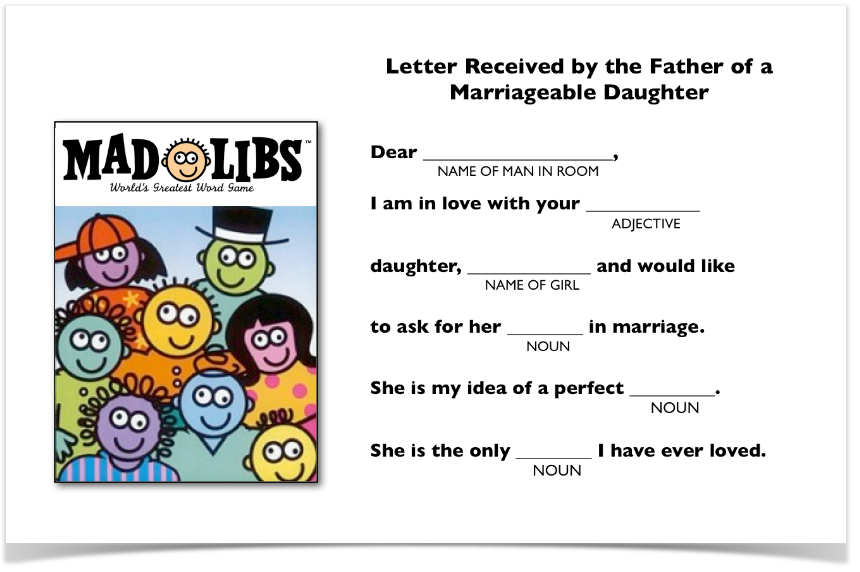
Creating Auto-scripts in Xray Test Case Designer is similar to that. Instead of adding adjectives and nouns into pre-formed sentences, however, you’ll be more like the author of the Mad Libs sentences themselves. You need to:

  1. Create sentences containing execution instructions that will be common to most of the test scripts and
  2. Identify “spaces” to indicate where Xray Test Case Designer should “fill in the blanks” you’ve left with test data appropriate for each scenario.

...

sizesmall
UI Step

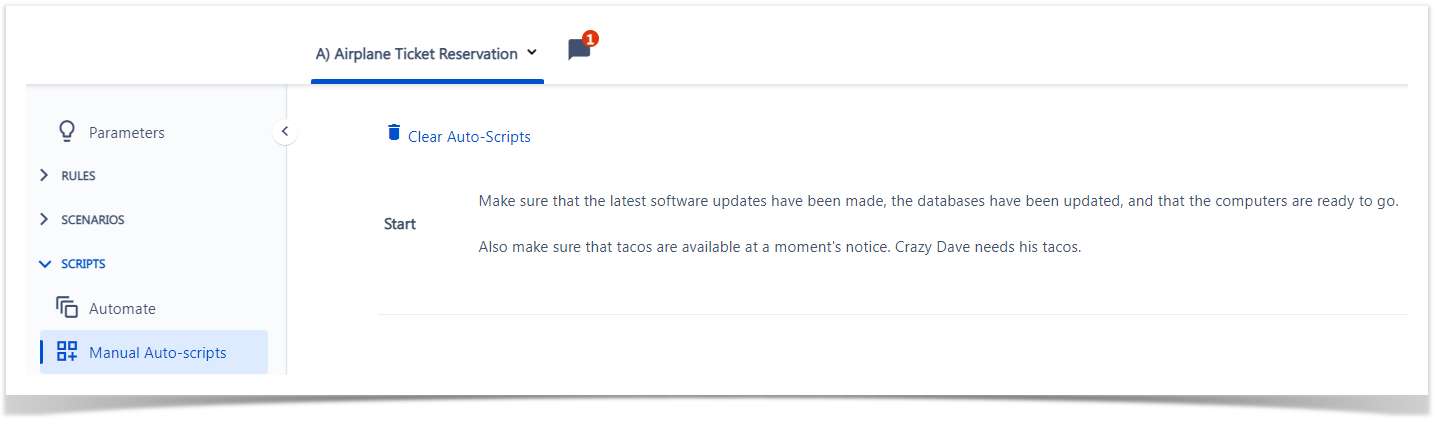
First, navigate to the Scripts -> Manual Auto-Scripts screen and (optionally) add instructions to be completed before execution for all these scenarios begins. (i.e. the details in the "Start" field have to be common across the board).

Image Removed

UI Step

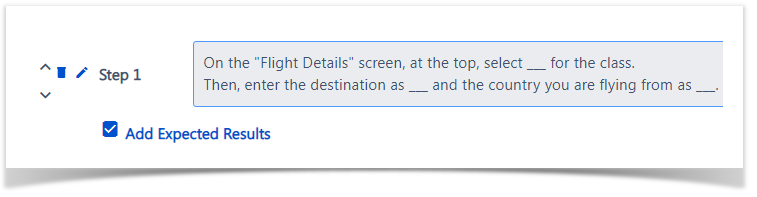
Next, click on the “pencil” icon to enter instructions for your first test step. Alternatively, you may click the text already present for the step. Enter detailed instructions for a tester for each step. For now, type Mad Libs-like sentences, as shown below with blank lines to indicate where Values are to be inserted.

Image Removed

As shown above, for example, you will want to type the words that will remain the same from test to test and leave 3 blanks (one for each place that Values will change from test to test):

  • One blank for the class,
  • One blank for the destination country, and
  • One blank for the origin country.

...

Next, replace those blank lines with the appropriate Parameter names.

...

Don’t forget to save each step before you add your next one! Thankfully, Xray Test Case Designer notifies you under the last edited step that there are unsaved edits. Click on different test cases at the bottom half of your screen (preview section that mirrors Scenarios screen) to see how your script steps will change. Finally, in the “Finish” section you may want to add some instructions that will appear only once at the end of all of the scenario scripts.

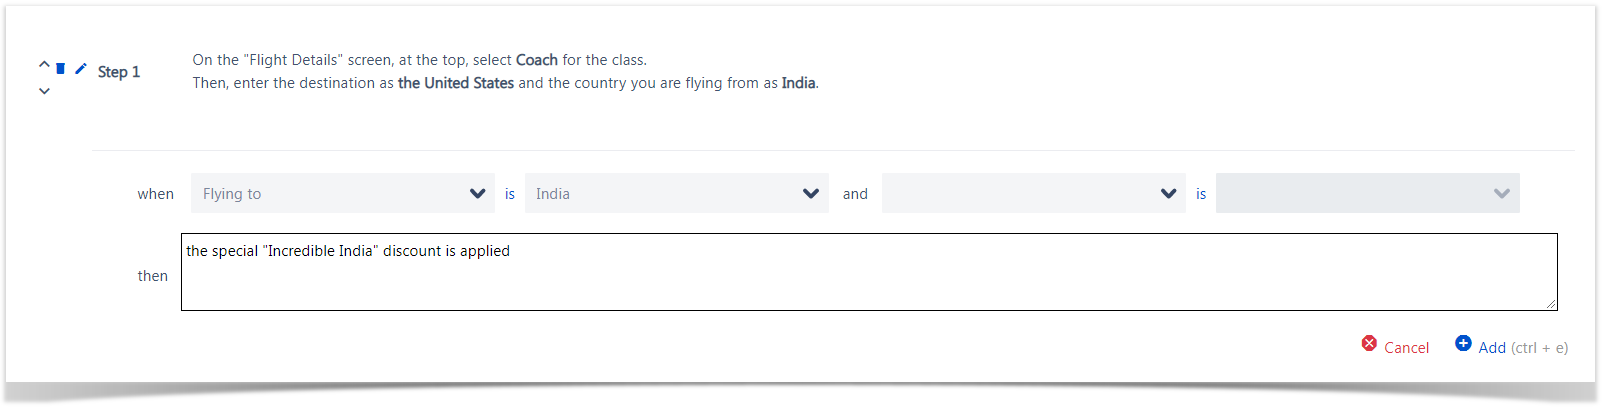
Incorporating “Parameterized expected results” into your plans

In the tests shown above for example, we might want to include this Expected Result every time the necessary values appear together in a test case:

When a customer flies to India, make sure the special "Incredible India" discount is applied.

UI Steps
sizesmall
UI Step

In the Scripts -> Manual screen, find the specific test step you want to add your Expected Result to and highlight it

UI Step

Hover over the Step that you want the Expected Result to appear with.

UI Step

Click on “Add Expected Results.”
Image Removed

You’re setting up a simple “when / then” rule here. Note that you’re not restricted to rules with just 1 positive condition - you could also create a rule that reads “IS NOT” (click on “is” between dropdowns to switch the rule type is not by clicking is (Figure 11 - 2).

If WHEN selection when (Figure 11 - 1) is blank, the expected result from THEN field the then field (Figure 11 - 3) will apply to that step in all test Test cases, regardless of the test Test data.

Lastly, you can put parameter names with { } syntax inside the THEN statement – this is typically valuable in the validation use cases where the step would say “Enter X as {X}” and the expected result would say “Validate the X is shown as {X}”. Parameter names do not have to match, in case you have already included actual expected results on the Parameters screen. In such cases WHEN conditions are often left blank.

Info

Once you're finished, click Add (Figure 11 - 4).

Info

Expected Results Feature

  • This feature provides

Important Usage Tips and things to know about the Expected Results feature

1. This feature is
  • a partial solution for straightforward Expected Results

. It primarily exists so that you won’t have to manually type many, simple expected results. It
  • , allowing you to avoid manually typing many simple results. However, it is not designed to handle

especially
  • particularly complex rules

that you might have
  • .

2. Be
  • Make sure you understand the similarities
&
  • and differences between
Xray Test Case Designer
  • Expected Results in the
automated
  • manual screen and Expected Outcomes in the
“Forced Interactions”
big
  • significant, yet subtle, difference:
    • Expected
Result
    • Results in Manual
Auto-Scripts takes
    • scripts treats the scenario data table as
“read only”
    • a read-only precondition and
generates
    • generate the
“Then” content ONLY IF 
    • Then content only if the conditions are satisfied
(i.e
    • .
“reactive approach”).
    • Expected
Outcome
    • Outcomes inForced Interactions
 
    • guarantees
 
    • that the
test
    • Test conditions to satisfy it will be included in the
Scenarios
    • scenarios table at least once (
i.e. “proactive approach”,
    • which may
cause the
    • increase
in
    • the number of
test
    • Test cases).

If you

want

need to define an Expected Result that requires

 3

three or more


specific

Values

values to appear in a single

test

Test script (and

you’re

you are creating pairwise sets of

tests

Tests), use the

“Forced Interactions”

Forced Interactions feature or a higher

algorithm

combination strength to

guarantee

ensure the scenario is included in your suite. Then, use the Manual

Auto-Scripts

scripts feature to document the Expected Result for export.

Xray Test Case Designer Automate scripts can leverage

that

the last column

on

in Forced Interactions directly as an internal variable.

If

you want to define an

your Expected Result

that

requires

 2

two or fewer


specific

Values

values to appear in a single

test

Test script (and

you’re

you're creating pairwise sets of

tests

Tests), use the Manual

Auto-Scripts

scripts feature without additional prep work.

UI Step

Select the interaction by using the dropdown menu (Figure 12 - 3).

Figure 12 - ScriptImage Added

Figure 12 - Script


UI Step

In the Finish field (Figure 12 - 4) you can add some instructions that will appear only once at the end of all of the scenario scripts.

Info
As long as you save the field descriptions as you go, your Manual script will also be saved and updated.


Expand
titleSupport/Troubleshooting

If you have questions or technical issues, please contact the Support team via the Customer Portal (Jira service management) or send us a message using the in-app chat.