
Page History
...
Each Test Type has one of three Test Kinds:
There are 3 default Test Types:
...
In Global or Project settings, you may add other values for the Test Type.
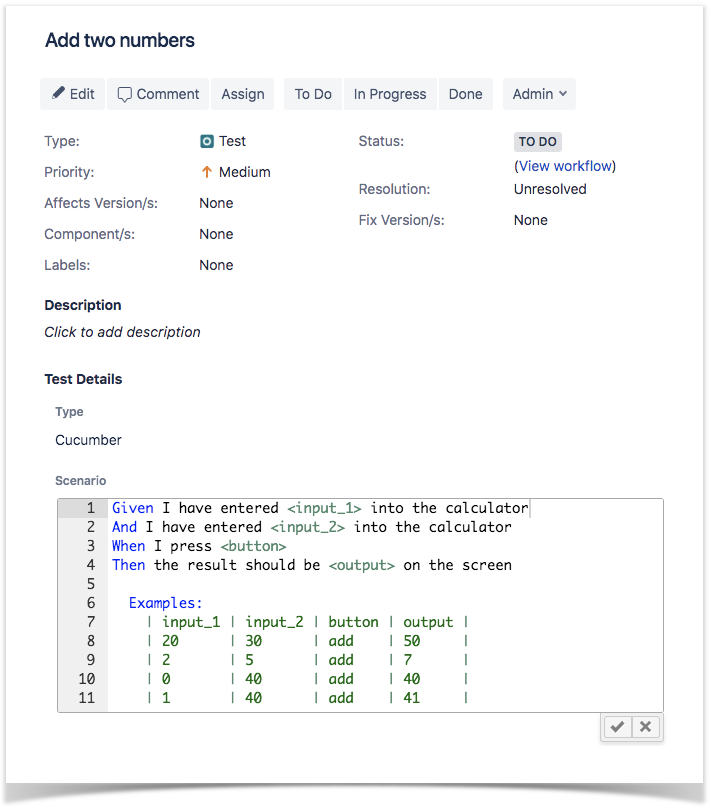
Cucumber
Cucumber is a tool that executes plain-text functional descriptions as automated tests. The language that Cucumber understands is called Gherkin, which is a business-readable, domain-specific language that describes the software’s behavior without detailing how that behavior is implemented. It is line-oriented language and uses indentation to define structure. Line endings terminate statements (e.g., steps). Either spaces or tabs may be used for indentation (but spaces are more portable). Most lines start with a keyword.
For more information on the Cucumber Basics, please consult the Wiki and Tutorials at: http://cucumber.io
Fields
Cucumber Tests are divided in two Scenario Types:
- Scenario: a set of instructions exclusively composed of constant values, which, when executed by a tool, will only give a static result (e.g., 2 + 3 = 5)
- Scenario Outline: a generic set of instructions containing variables, which, when executed by a tool, will prompt varied results according to the specified input.
The Scenario Types are inferred from the Scenario specification, i.e., the behavior to be reproduced by the Cucumber tool in entered in the Steps field.
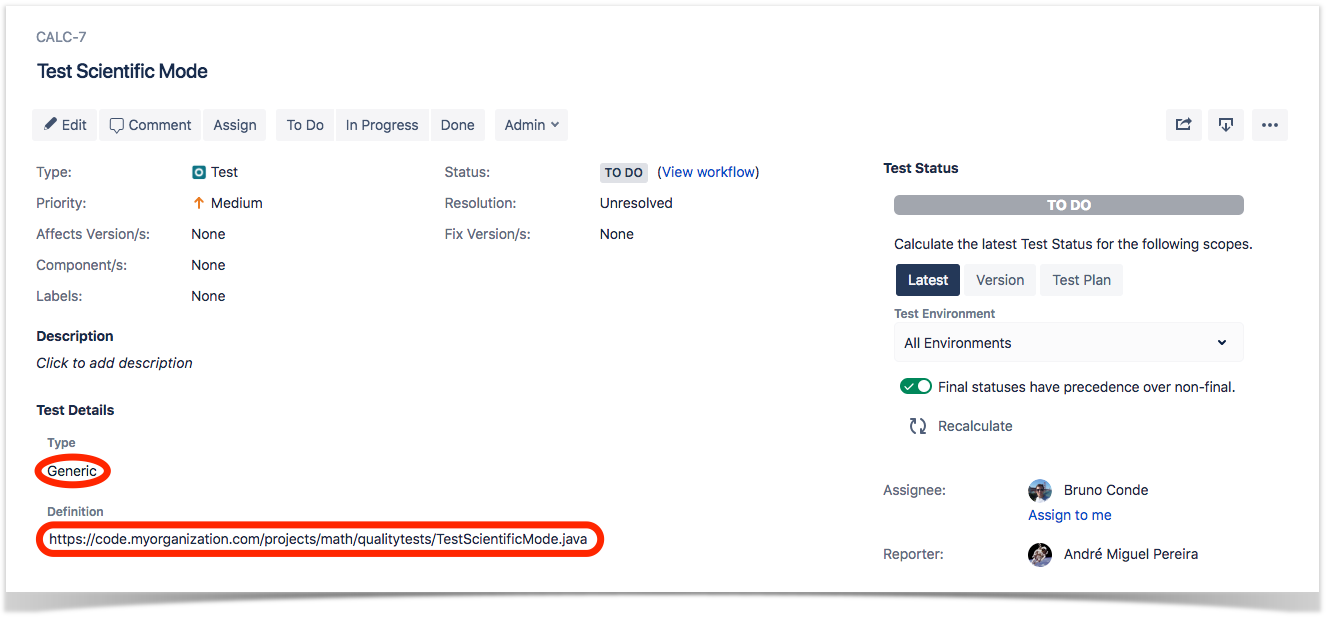
Generic
A Generic Test is an automated agnostic Test that is executed by an external tool. Execution results will then be imported back to Jira. An example might be a JUnit test that is used for quality assurance.
Fields
The only Field that is related to a Generic Test is its Definition. Here, the automated external test may be defined or referenced through an open text field.
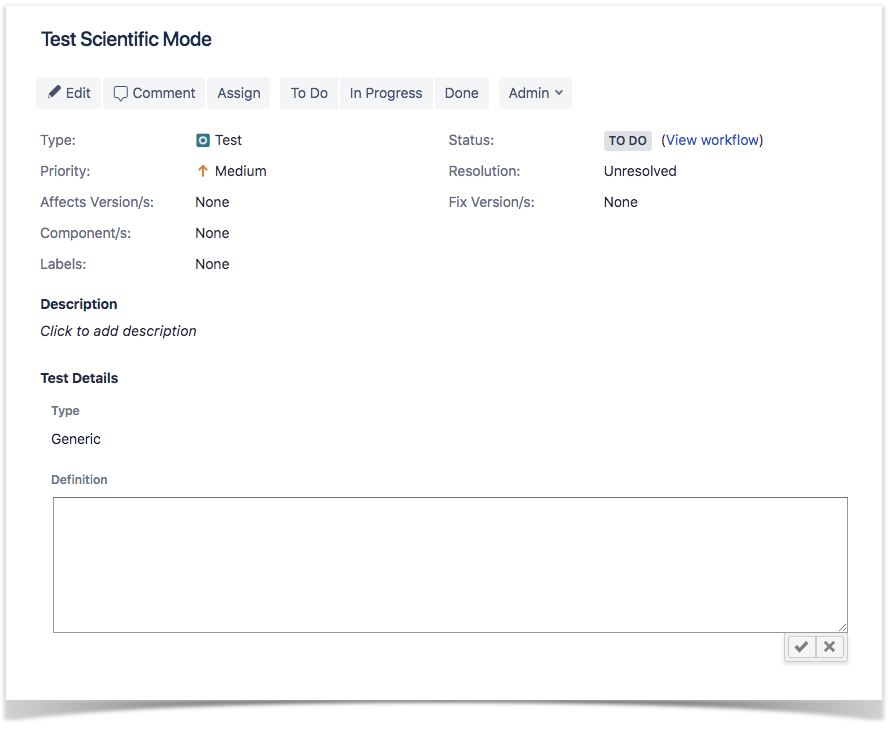
The Generic Test Definition field supports the Jira markup wiki language.
Manual
Manual Tests are user-assisted tests, listing an assortment of guidelines the user must follow, and the results such behavior is expected to accomplish. If the actual test result matches the expected test result, the test is considered as passed; otherwise, it is marked as failed.
Fields
Manual Tests are segmented in Manual Steps. Each Manual Step is composed of 4 fields (Action, Data, Expected Result and Attachments) with Action being the only mandatory one.
- Action - The action to be reproduced by the tester
- Data - Any data the related step requests (e.g., login credentials) to be used by the tester
- Expected Result - The behavior the step should accomplish
- Attachments - External files that provide additional information related with the corresponding Manual Step. Attachments can only be added or removed in the Test Issue view page.
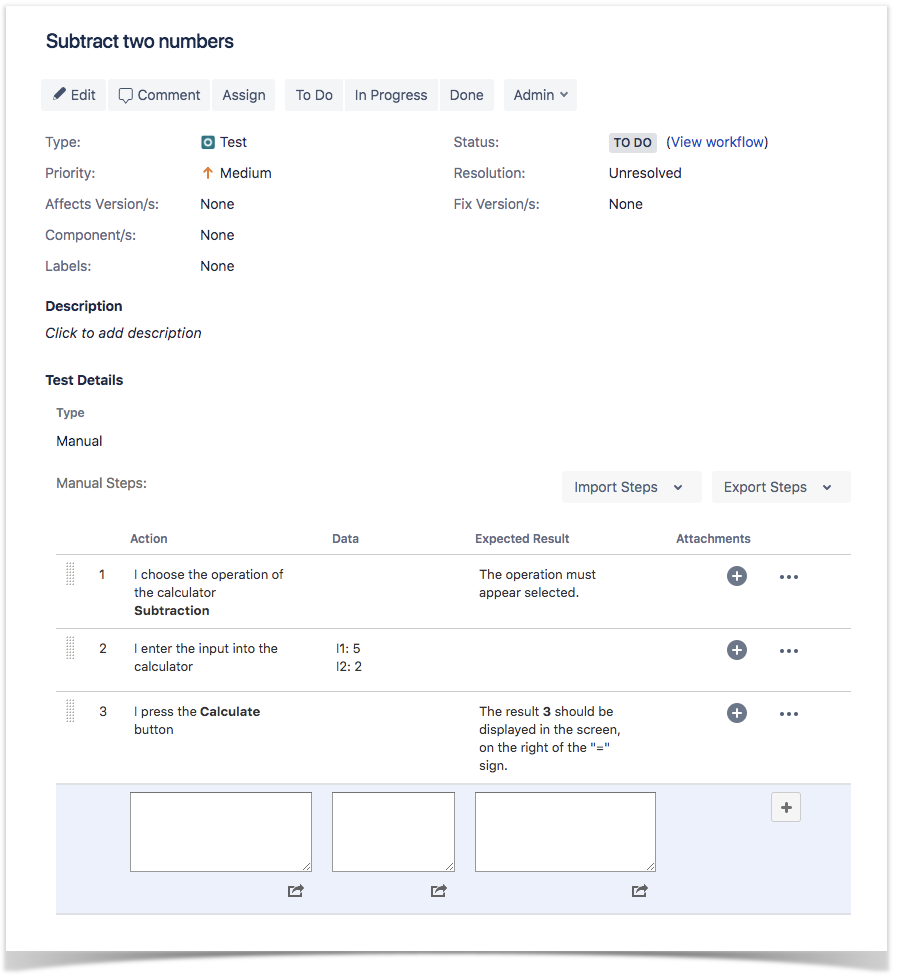
The Action, Data and Expected Result fields support the Jira markup wiki language.
Actions
| Table of Contents | ||||
|---|---|---|---|---|
|
...
Step 2: If you are inline editing a Generic Test:
- You can hover over the actual Test Type, click it, and change it to another type available on the select box.
- You can hover over the Definition field, click it, and edit its contents.
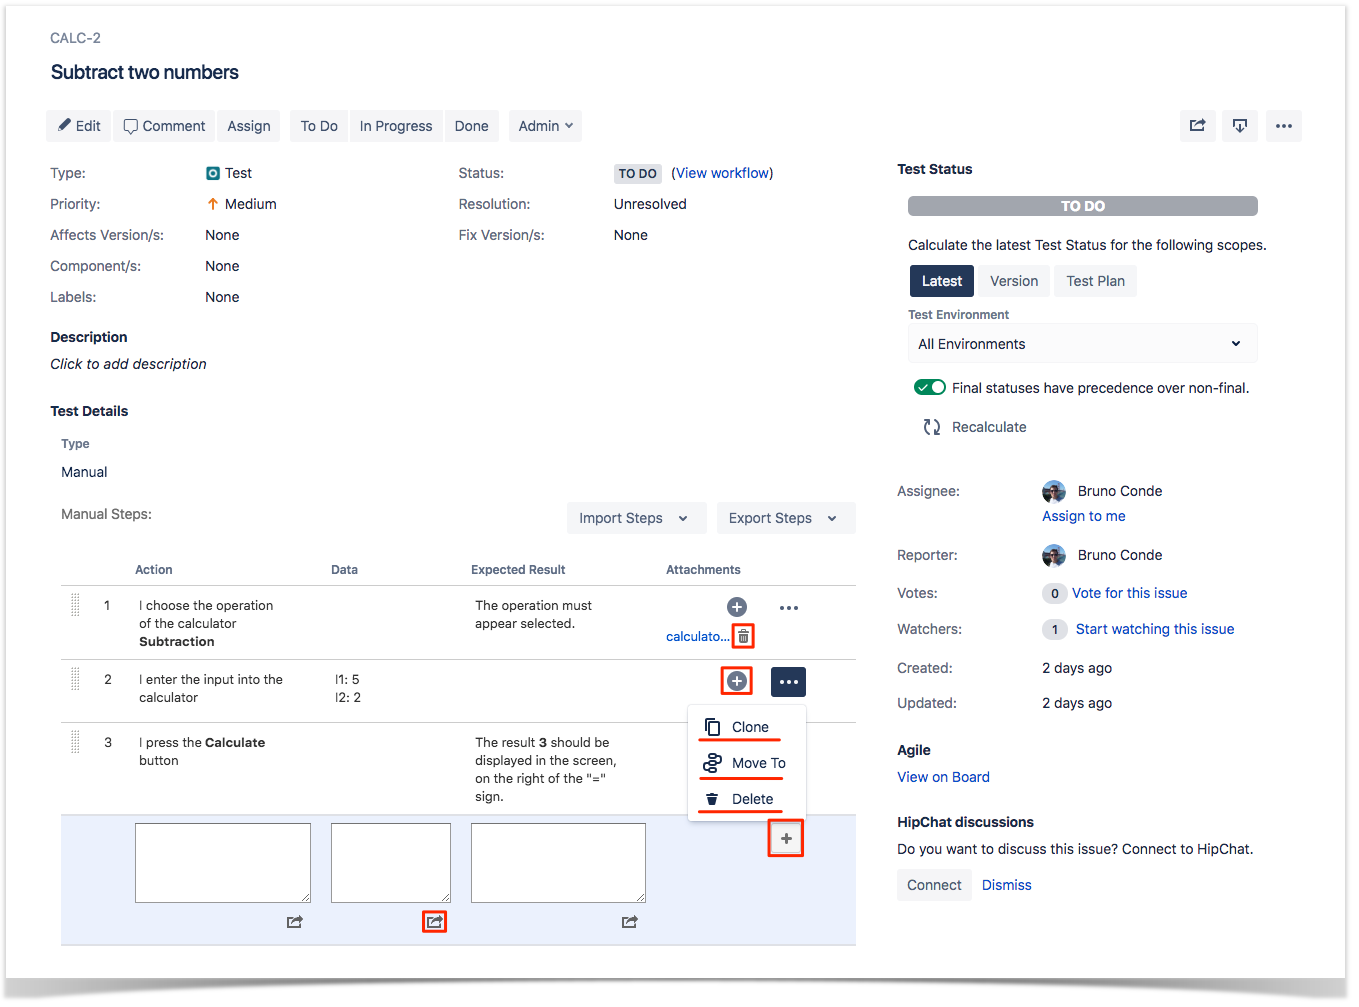
Manual Test Steps Table
In addition to inline editable fields, Xray provides a RESTful table for inline editing manual Test steps direcly from the Test view issue screen.
From this table, you can:
Add Steps: After entering the Test step details (Action, Data and Expected Result fields) using the bottom table row text boxes, click the Plus icon for creating a new step. The new step will be added in the last position in the Steps table.
Remove Steps: The last column for each step contains a Bin button for removing steps. After clicking the button, you will be prompted with a confirmation message to delete the step. This operation cannot be undone.
Edit Steps: When hovering over Action, Data and Expected Result fields, they get highlighted and if you click them, the step row visualization will change to Edit mode. From here, you can edit the fields and click Update that appears in the last column to save changes or you click Cancel to cancel the changes. Either way, the row will go back to View mode.
Move Steps: You can move a Test step Up or Down in the Test steps table in one of two ways:
- Click on the drag area in the first column of each step and drag the step to the desired position.
- Click on the actions menu and choosing the "Move To.." option. This method allows you to directly move a step to a specific position.
Add Attachments: While in View or Edit modes, you can add attachments to a step using the Plus sign appearing in the Attachments column. After clicking the button, you will be prompted with a dialog to choose the attachments to add.
Remove Attachments: While in View or Edit modes, you can remove attachments of Test steps using the Bin button that appears when hovering over existing attachments. After clicking the button, you will be prompted with a confirmation message to remove the attachment or not.
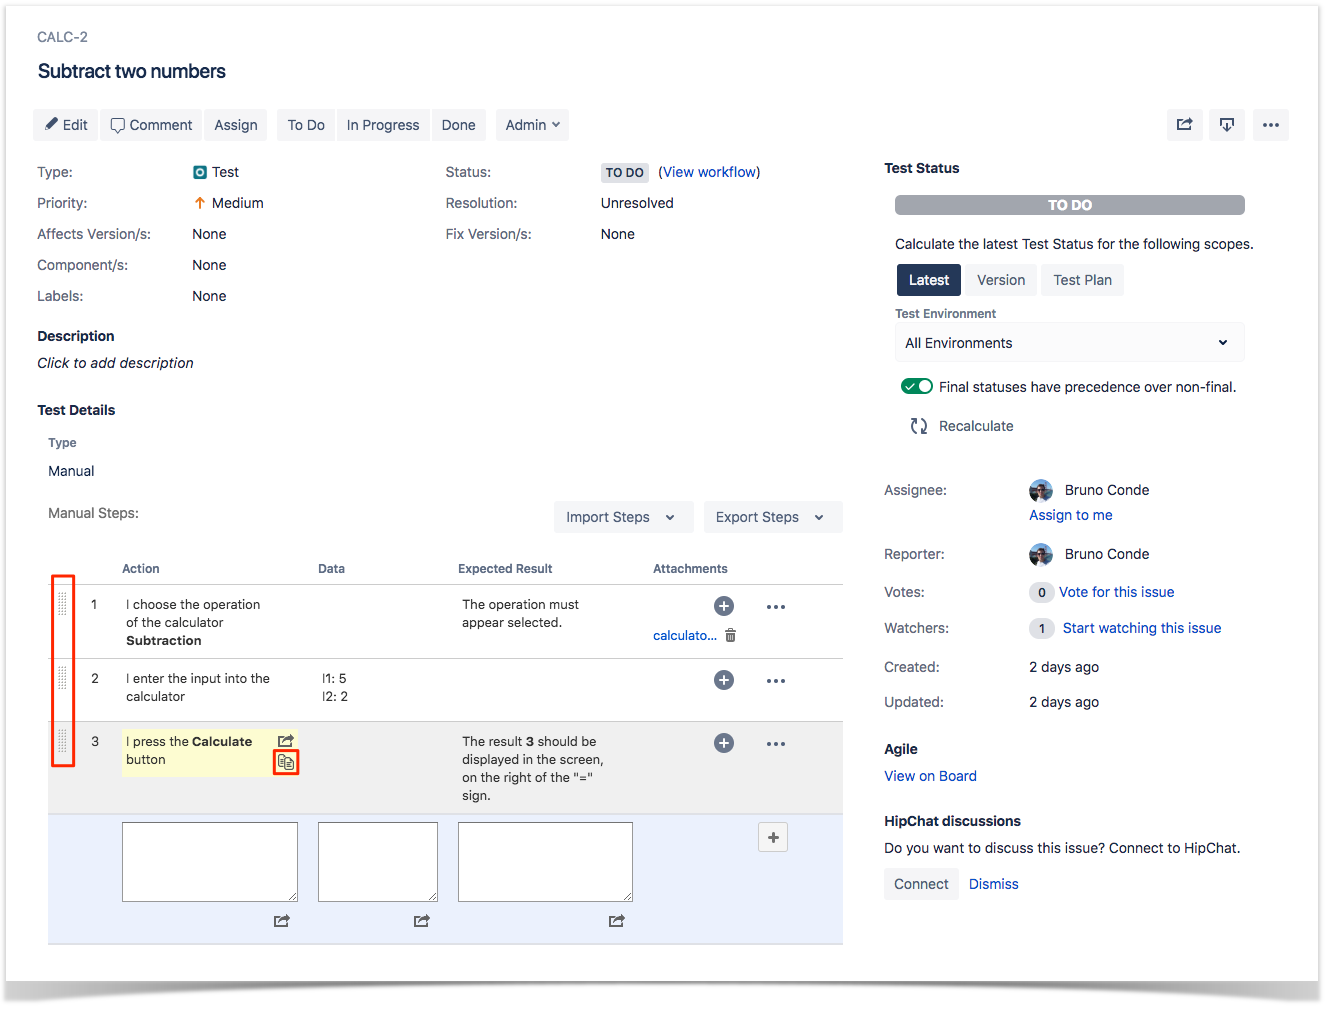
Copy Step Fields: You can copy the Action, Data and Expected Result fields to the clipboard by hovering over these fields and choosing the Copy icon next to each highlighted field. If the copy is successful, a green border will appear momentarily around the Copy icon.
Expand Fields: If the text boxes are too small to show all the information, you can expand the Action, Data and Expected Result fields by clicking the Expand icon next to each highlighted field. An inline dialog, with a bigger area, will be opened with the contents of the field. This operation is available in both View and Edit modes for manual Test steps.
Clone Steps: To clone an existing Test step, click on the actions menu and choose Clone. A confirmation message will appear. Once you confirm, a new step will be created in the last position, containing all information of the cloned step (Step, Data, Expected Result and Attachments).
To edit the steps of a Manual Test please check this page.
| Info | ||
|---|---|---|
| ||
You can only inline edit Xray fields if you have permission to edit the Test issue. |
...
By clicking "Refresh issue", the issue page will be reloaded and the cloned information will be visible.
Import Steps
Test Steps can be imported from external sources such as:
- Test
- CSV
- JSON
- Clipboard

You can configure which columns you want to import, including if you want to override the steps already present in the Test.
From Test
This dialog allows you to choose which steps you want to clone from a given test and a checkbox to choose if you want to override the steps already present in the Test.

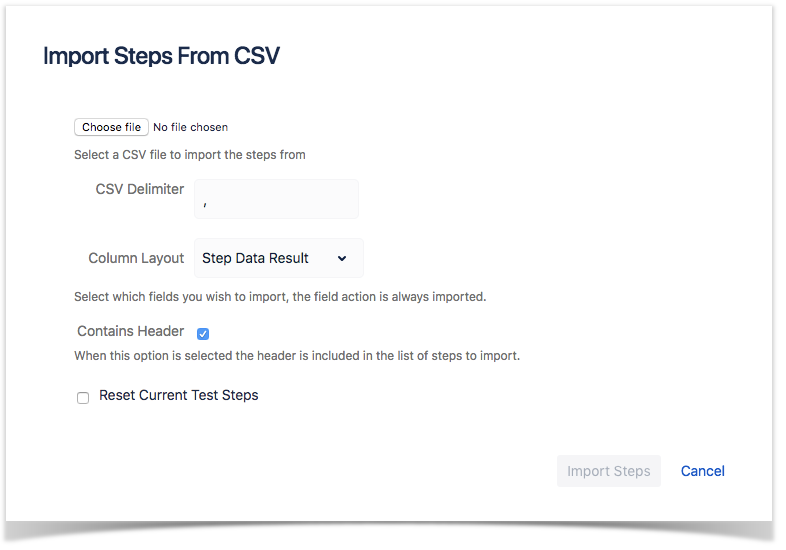
From CSV
This dialog allows you to choose the file that you want to import the steps from, the delimiter that is used in the CSV, a dropdown to specify which column layout the steps present in the file have, a checkbox to specify if the file has a header or not, and a checkbox to allow you to choose if you want to override the steps already present in the Test.
From JSON
This dialog allows you to specify which file you want to import the steps from and provides a checkbox if you want to override the steps already present in the Test.
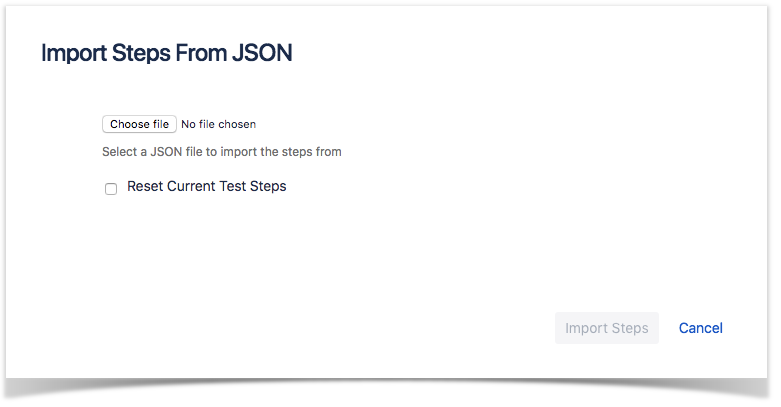
The JSON file should be an array of step objects. The objects should have the field step and can optionally have the fields data and result. Below is an example of a valid file:
| Code Block | ||||
|---|---|---|---|---|
| ||||
[
   {
      "action":"Step 1",
      "data":"Data for Step 1",
      "result":"Result for Steps 1"
   },
   {
      "action":"Step 2"
   },
   {
      "action":"Step 3",
      "data":"Data for Step 3"
   },
   {
      "action":"Step 4",
      "result":"Result for Step 4"
   }
] |
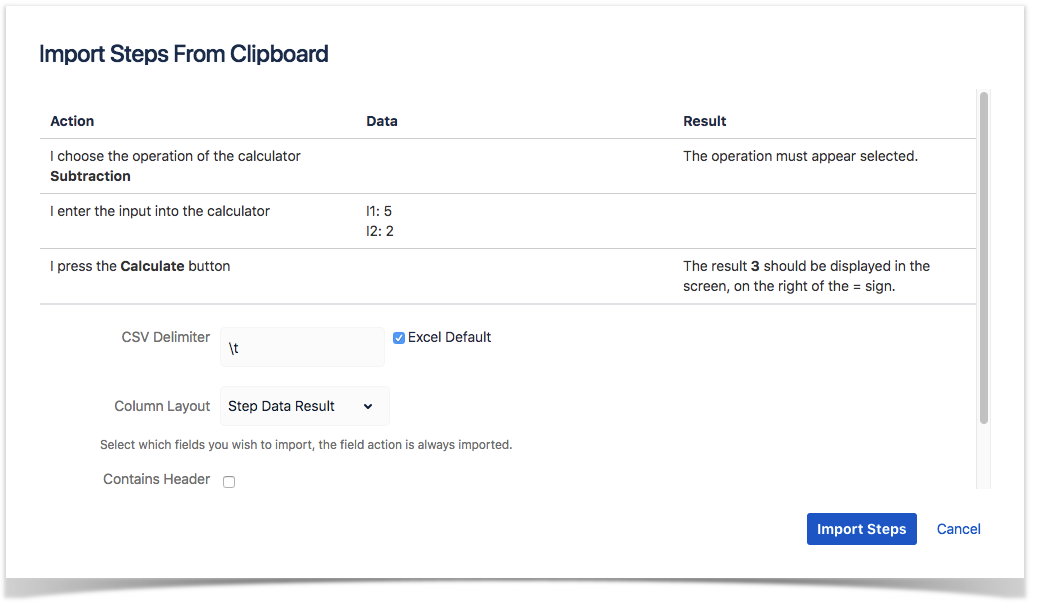
From Clipboard
This allows you to copy the steps from Excel or CSV and paste them in the dialog. You can choose if you want to use the default Excel delimiter or use a custom one, if you want to copy steps from CSV. You can choose which column layout the steps in the file have and provides a checkbox if you want to override the steps already present in the Test.
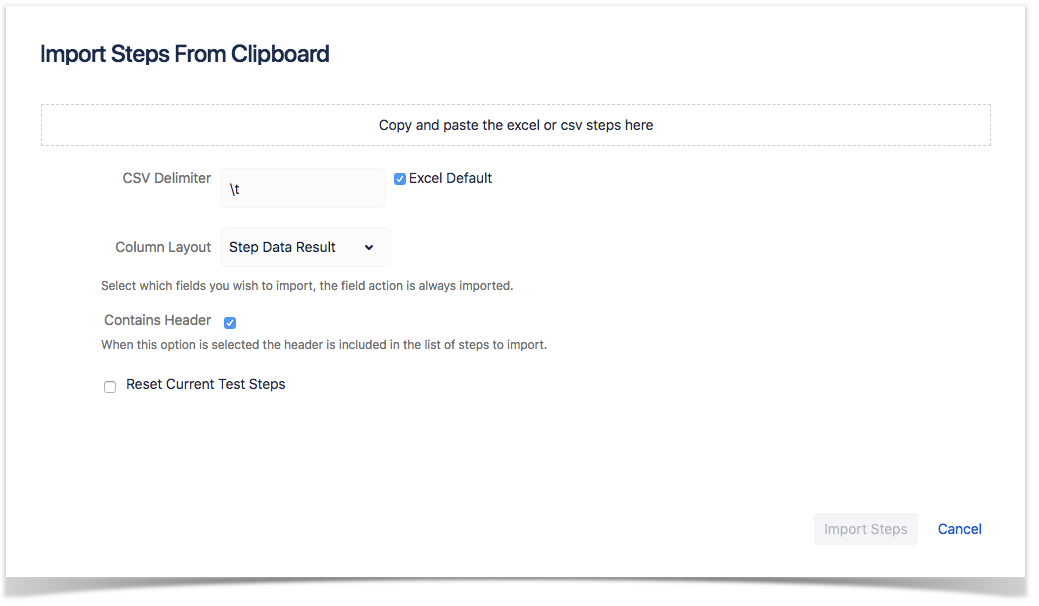
After the steps are pasted in the dialog, it will display the previous version of the steps in the same dialog.
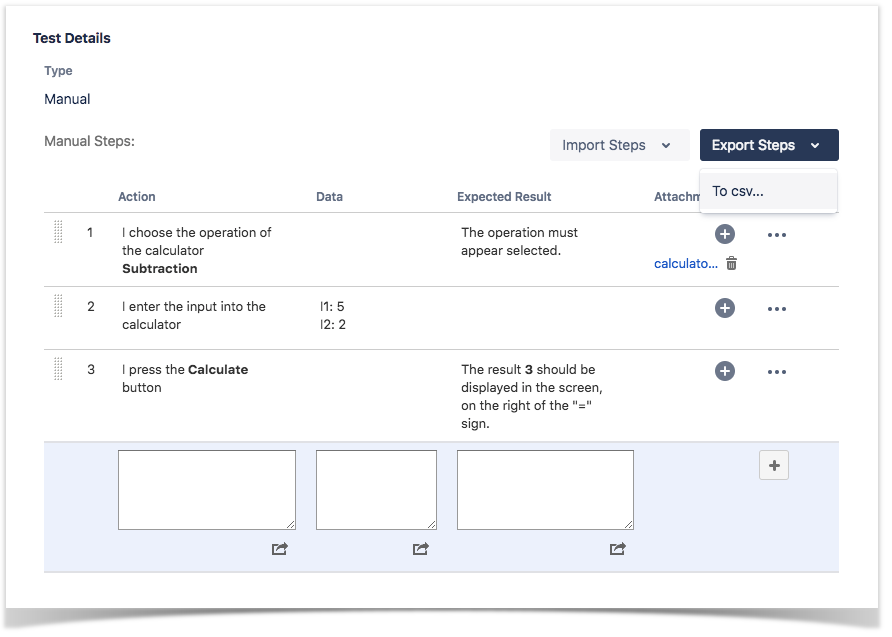
Export Steps
Manual Test Steps can be exported to CSV by clicking Export Steps in the Test Details section of the Test.
The following dialog will pop up.
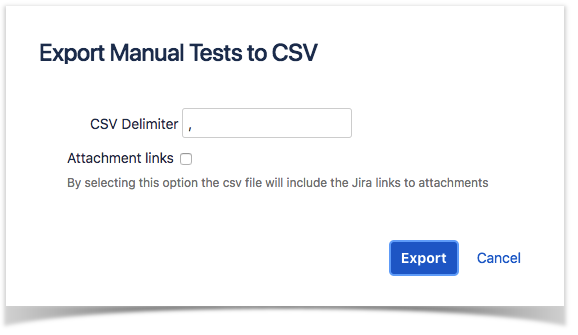
The CSV delimiter can be changed and optionally, the attachment links can also be included.
The result will be a CSV file containing the Action, Data, Expected Result columns and, if the option is selected, the Attachments column that contains the attachments links.
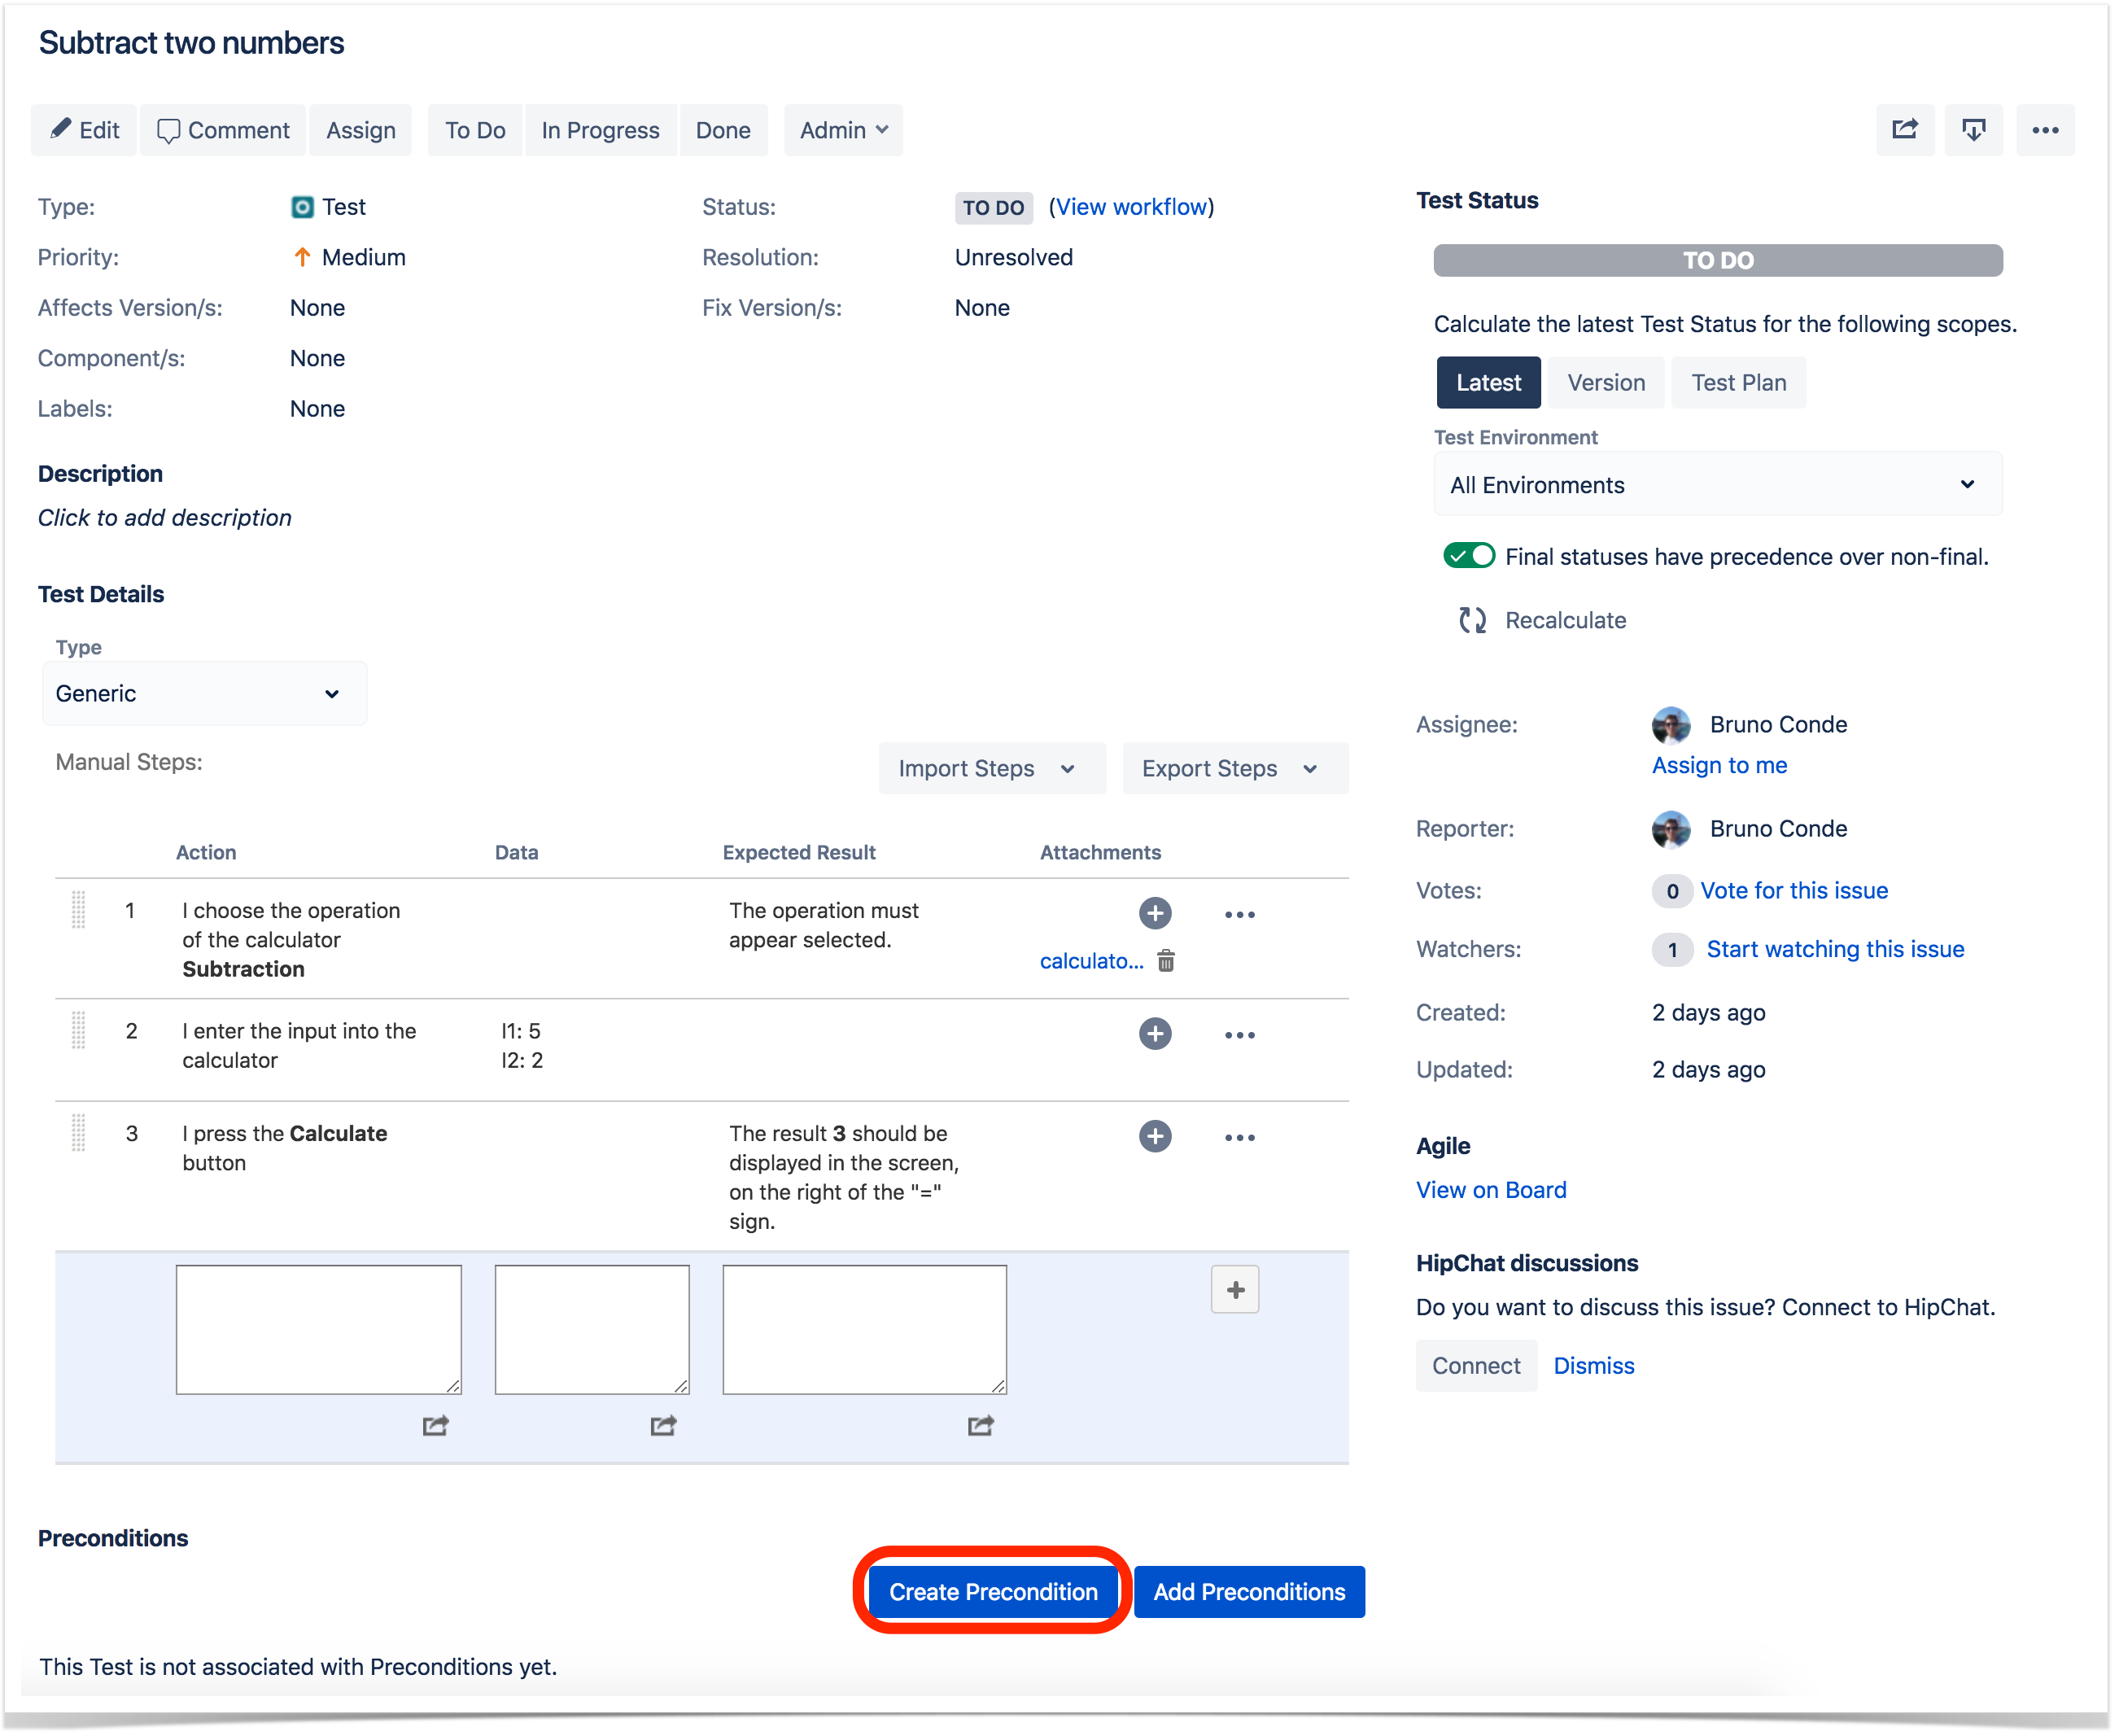
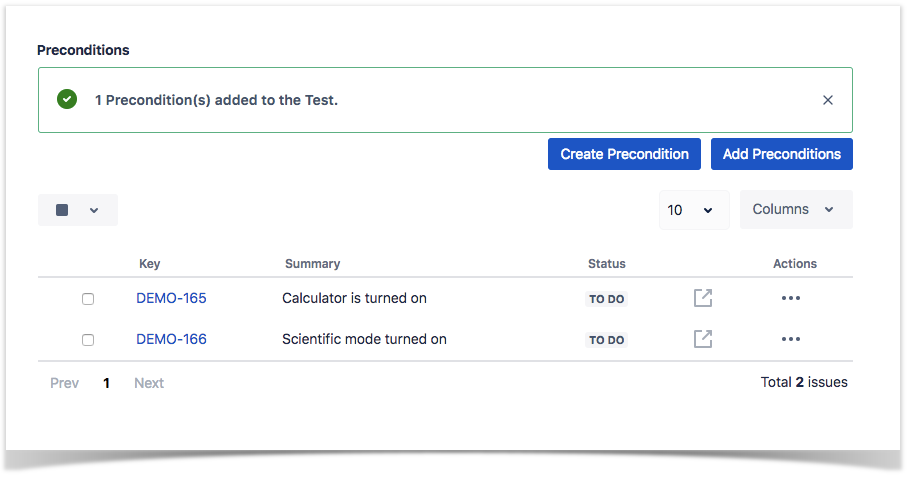
Create Precondition
To create a Precondition directly associated to the current Test from the Test issue view screen:
Step 1: Open the Test issue view screen you want to create a Precondition with.
Step 2: Click the Create Precondition button (under the Precondition section on the view page) to open the Create Issue dialog box.
Step 3: Type a Summary for the Precondition and complete all appropriate fields — at least, the required ones marked by an asterisk.This issue is automatically pre-populated with your previous Test issue Fix Version/s.
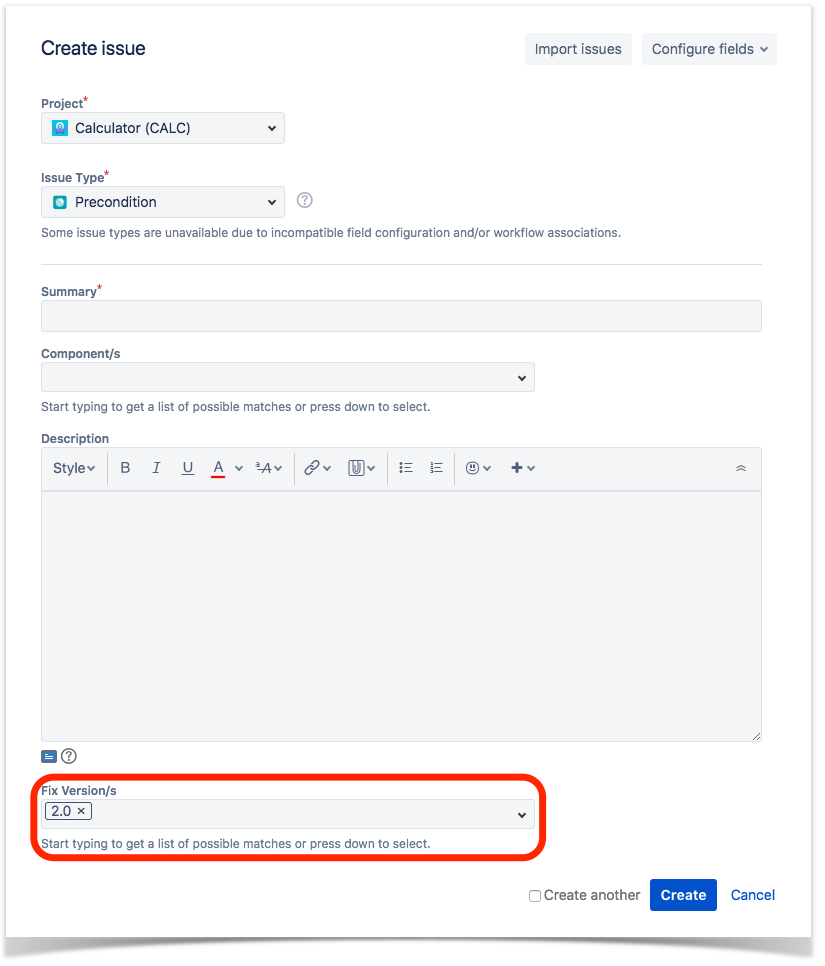
Step 4: Click Create.
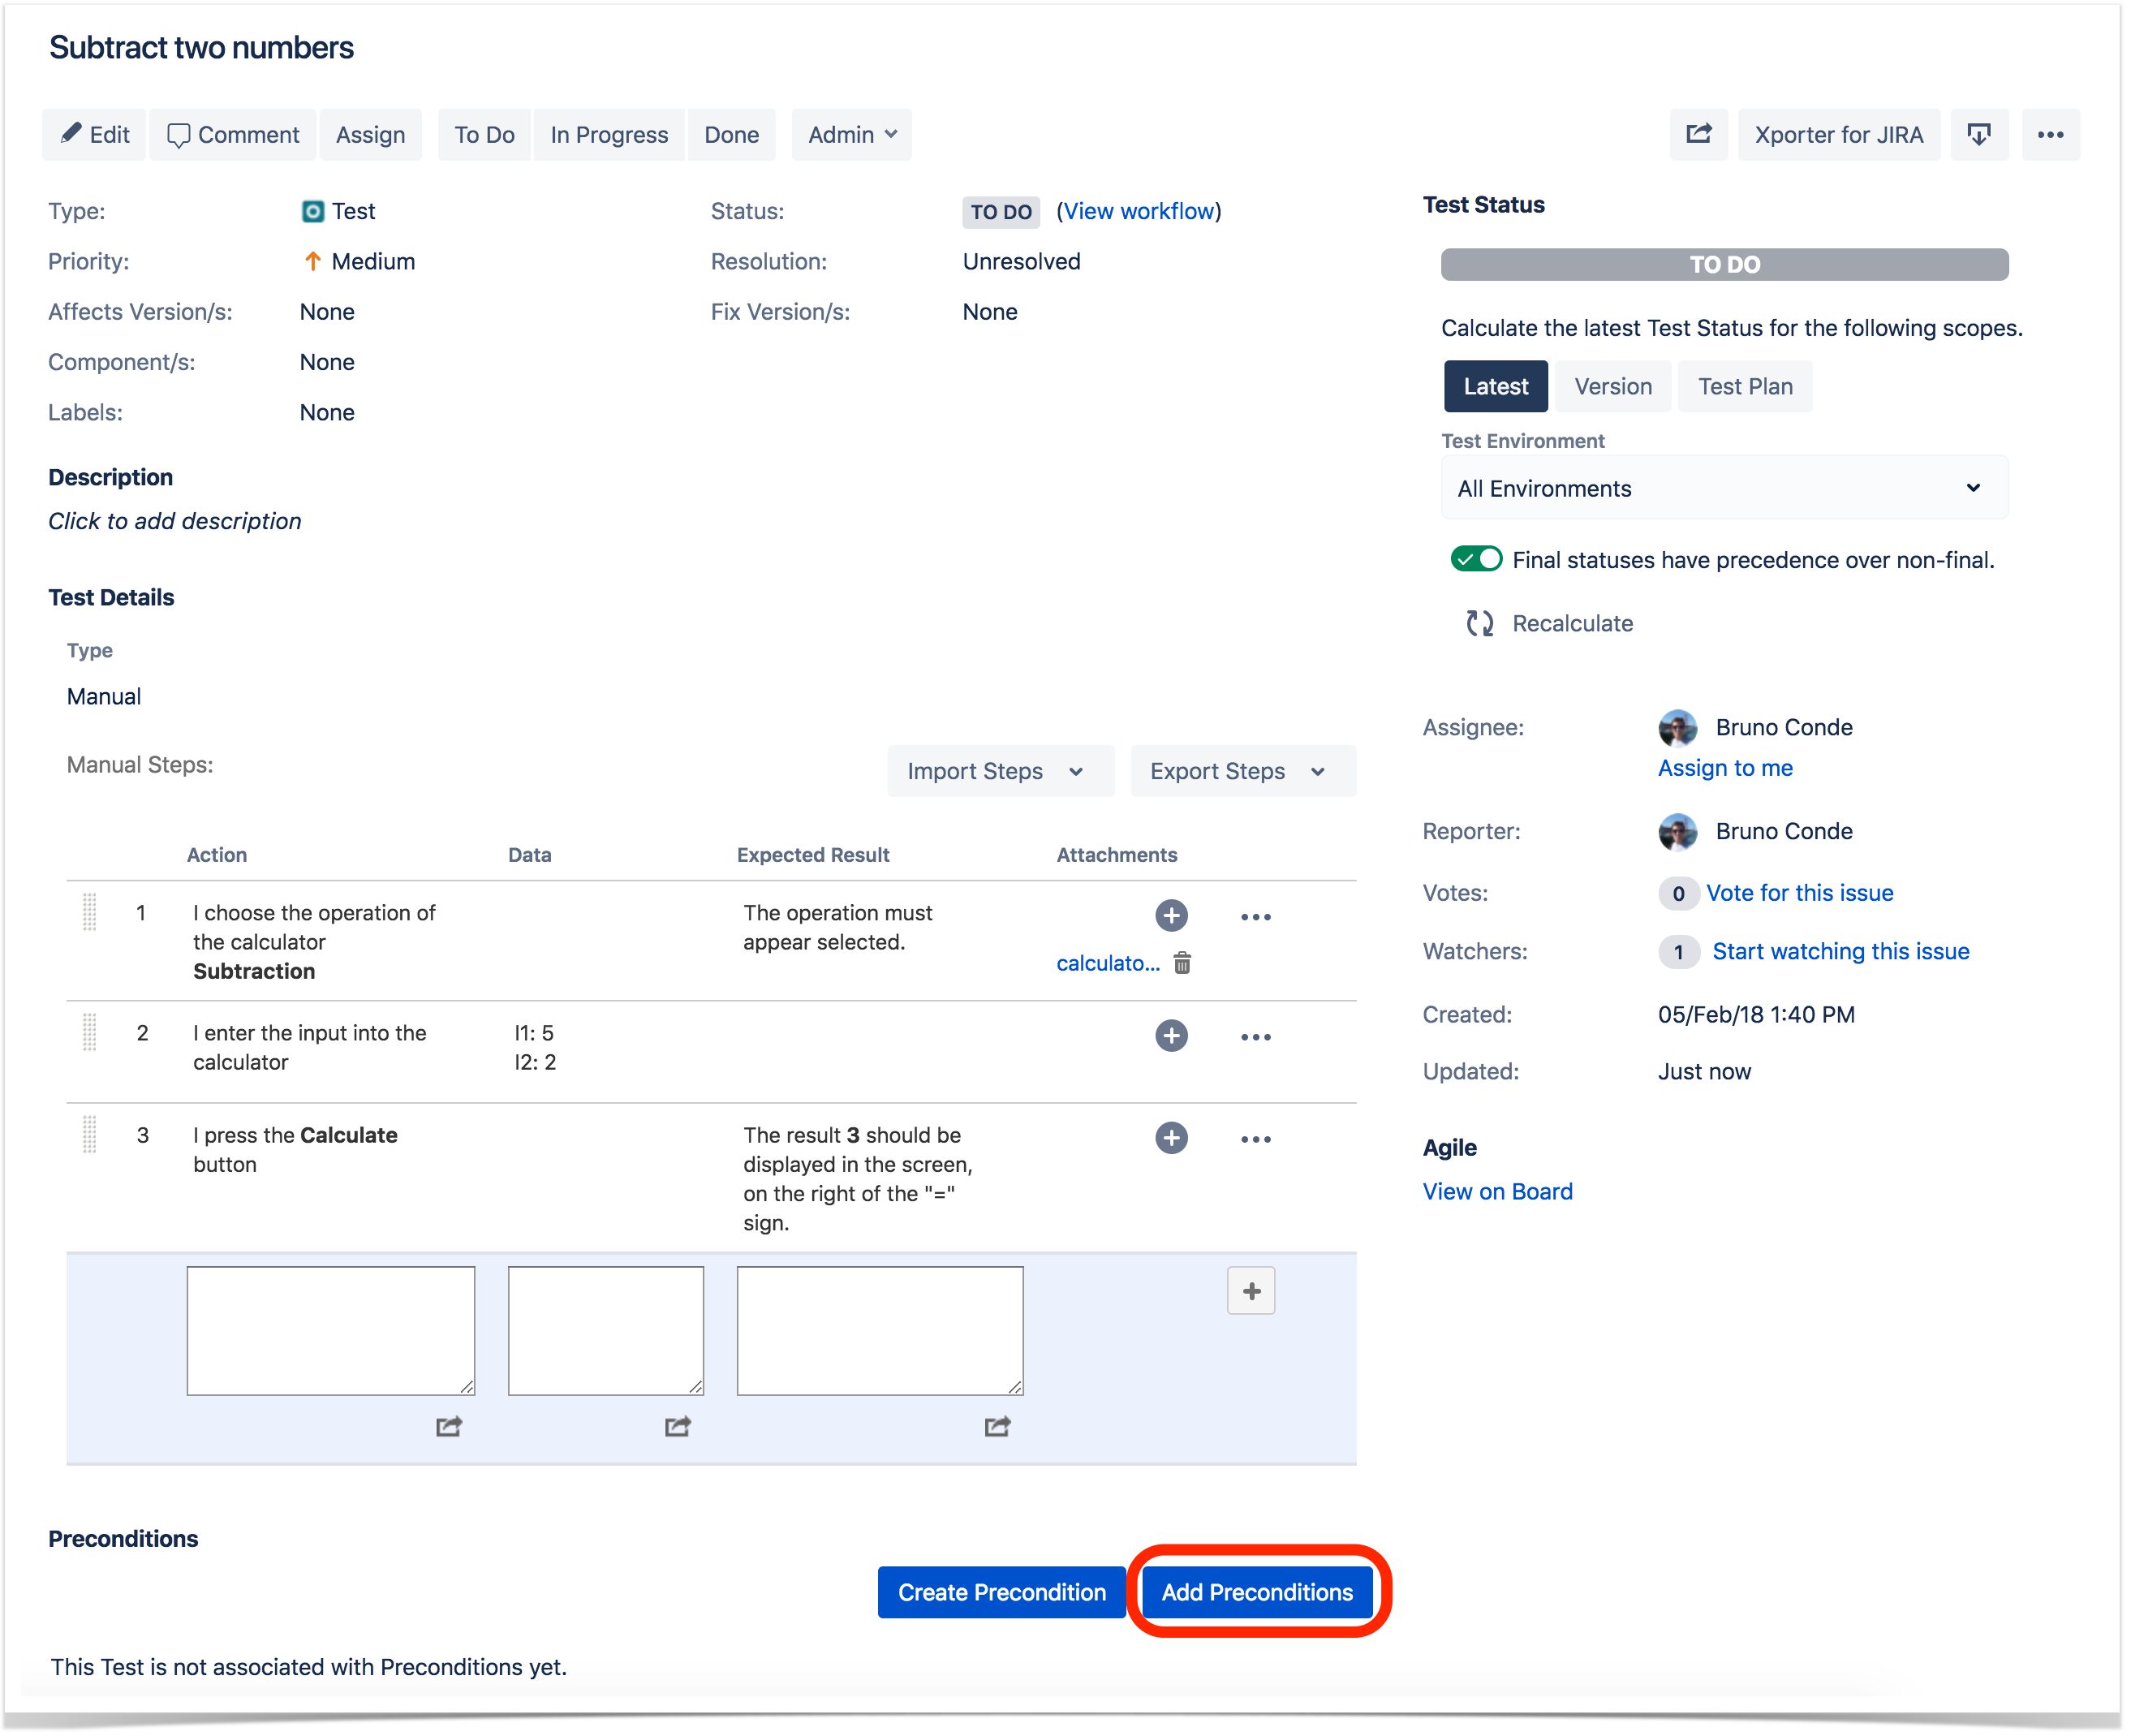
Associate Preconditions
To associate Tests with a Precondition from the Test issue view screen:
Step 1: Open the Test issue view screen you want to associate a Precondition with.
Step 2: Click the Associate Precondition button (under the Precondition section on the view page) to open the Associate Test with Precondition dialog box.
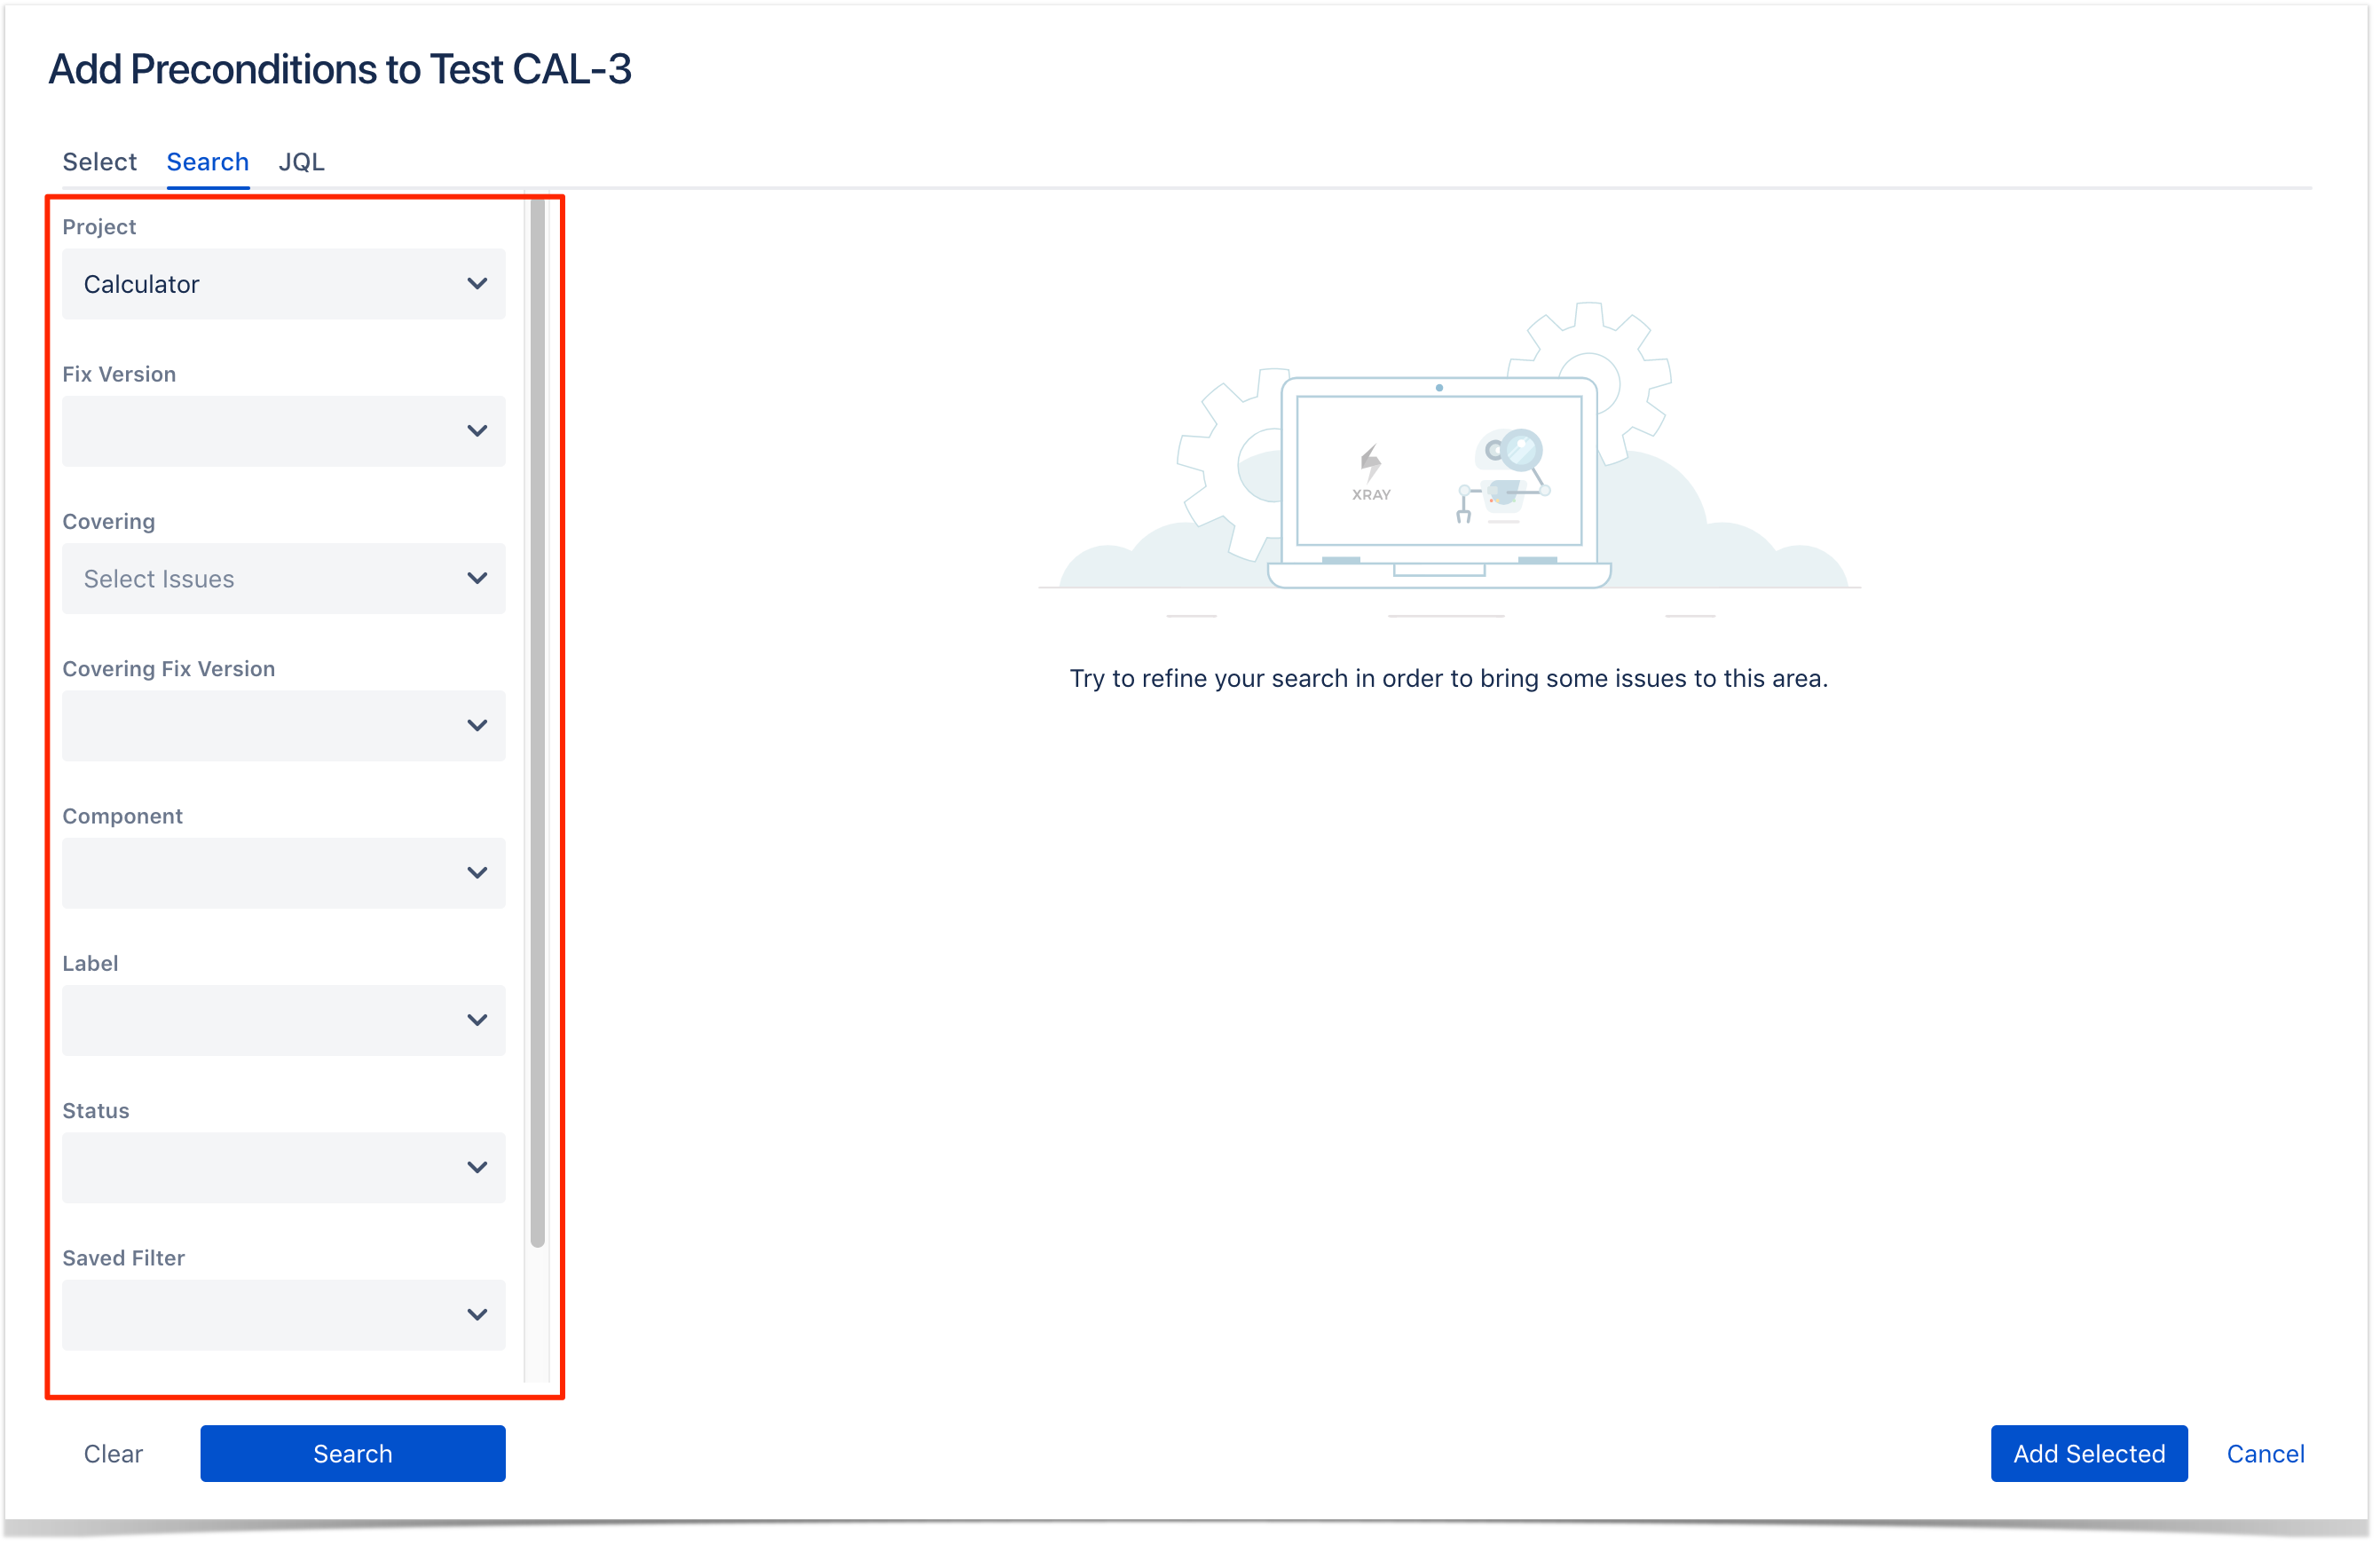
Step 3: Select or search the Precondition issues to be associated with the Test:
To select the Preconditions to be associated, you can:
- Input the desired Precondition Issue Key on the Preconditions field.
- Click on the Down Arrow on the Preconditions field and select the Test Set from its History Search list.

To search for Preconditions to be associated you can, under the Search tab:
- Select the desired Project and any other desired field such as Contains, Label, Fix Version, Component, Covering, Covering Fix Version, Saved Filters and Workflow Status
- Click on the Search button after filling the browse fields to get a list of matching entries
To search for Preconditions to be associated you can: under the JQL tab:
- Write the desired JQL search
- Click on the Search button perform the JQL search and to get a list of the matching entries (more details about JQL here)

Step 4: Click Add.
Remove Preconditions
To remove a Precondition association from the Test issue view screen:
Step 1: Open the Test you want to remove the Precondition association.
Step 2: On the Preconditions table, click on the ... in desired Precondition row and then click Delete in the drop down menu. You will be prompted with a confirmation dialog.
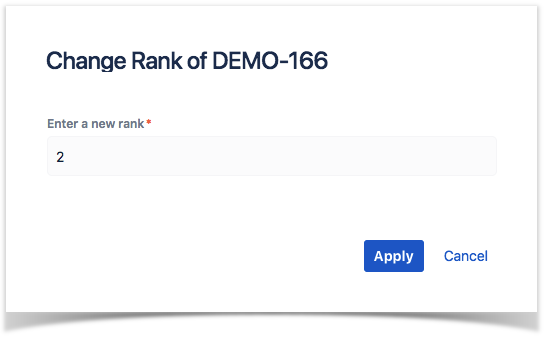
Reorder Preconditions
...
| Column |
|---|
Preconditions within a Test issue can be reordered. There are two ways to change the order of Preconditions: Drag-and-DropTo reorder Preconditions, Step 1: Open the Test issue. Step 2: Hover over the desired Precondition row (under the Precondition section on the view page) and the drag handle column. Step 3: Click the drag handle and move the Precondition up or down in the current page. Change Rank ActionThis action allows users to change the Rank of a Precondition between pages. To change the rank of a Precondition through the action: Step 1: Open the Test issue. Step 2: Hover over the desired Precondition (under the Precondition section on the view page). Step 3: Click the gear that appears in the last column. The actions menu should pop up with the available actions. Step 4: Click the Move To action. The change rank dialog appears. Step 5: Enter the desired index number (1-based) and click OK. |
...
...
| Section | ||||
|---|---|---|---|---|
|
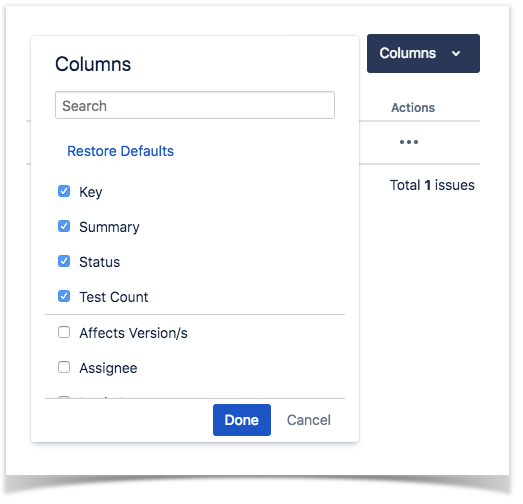
Configure Test Plan Columns
| Section | ||||
|---|---|---|---|---|
|
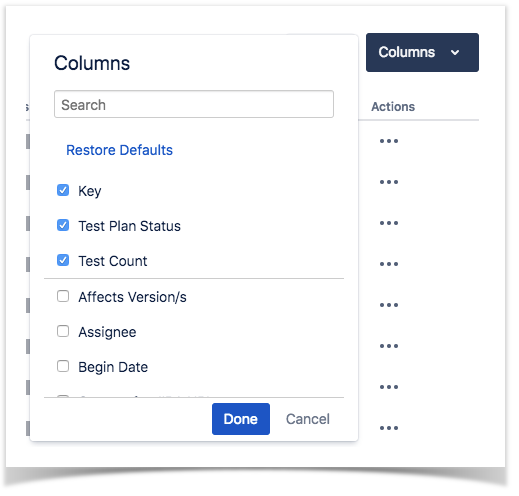
Configure Test Run Columns
More info in Test Runs.
Link Test to requirement(s)
Covering some requirement issue with an existing Test can either be done from the Test issue screen or from the requirement issue screen.
To link some existing Test case to some requirement directly from the Test issue screen, you just need to create a "tests" link between it and the requirement:
Step 1: Click on ... (actions) and then Link
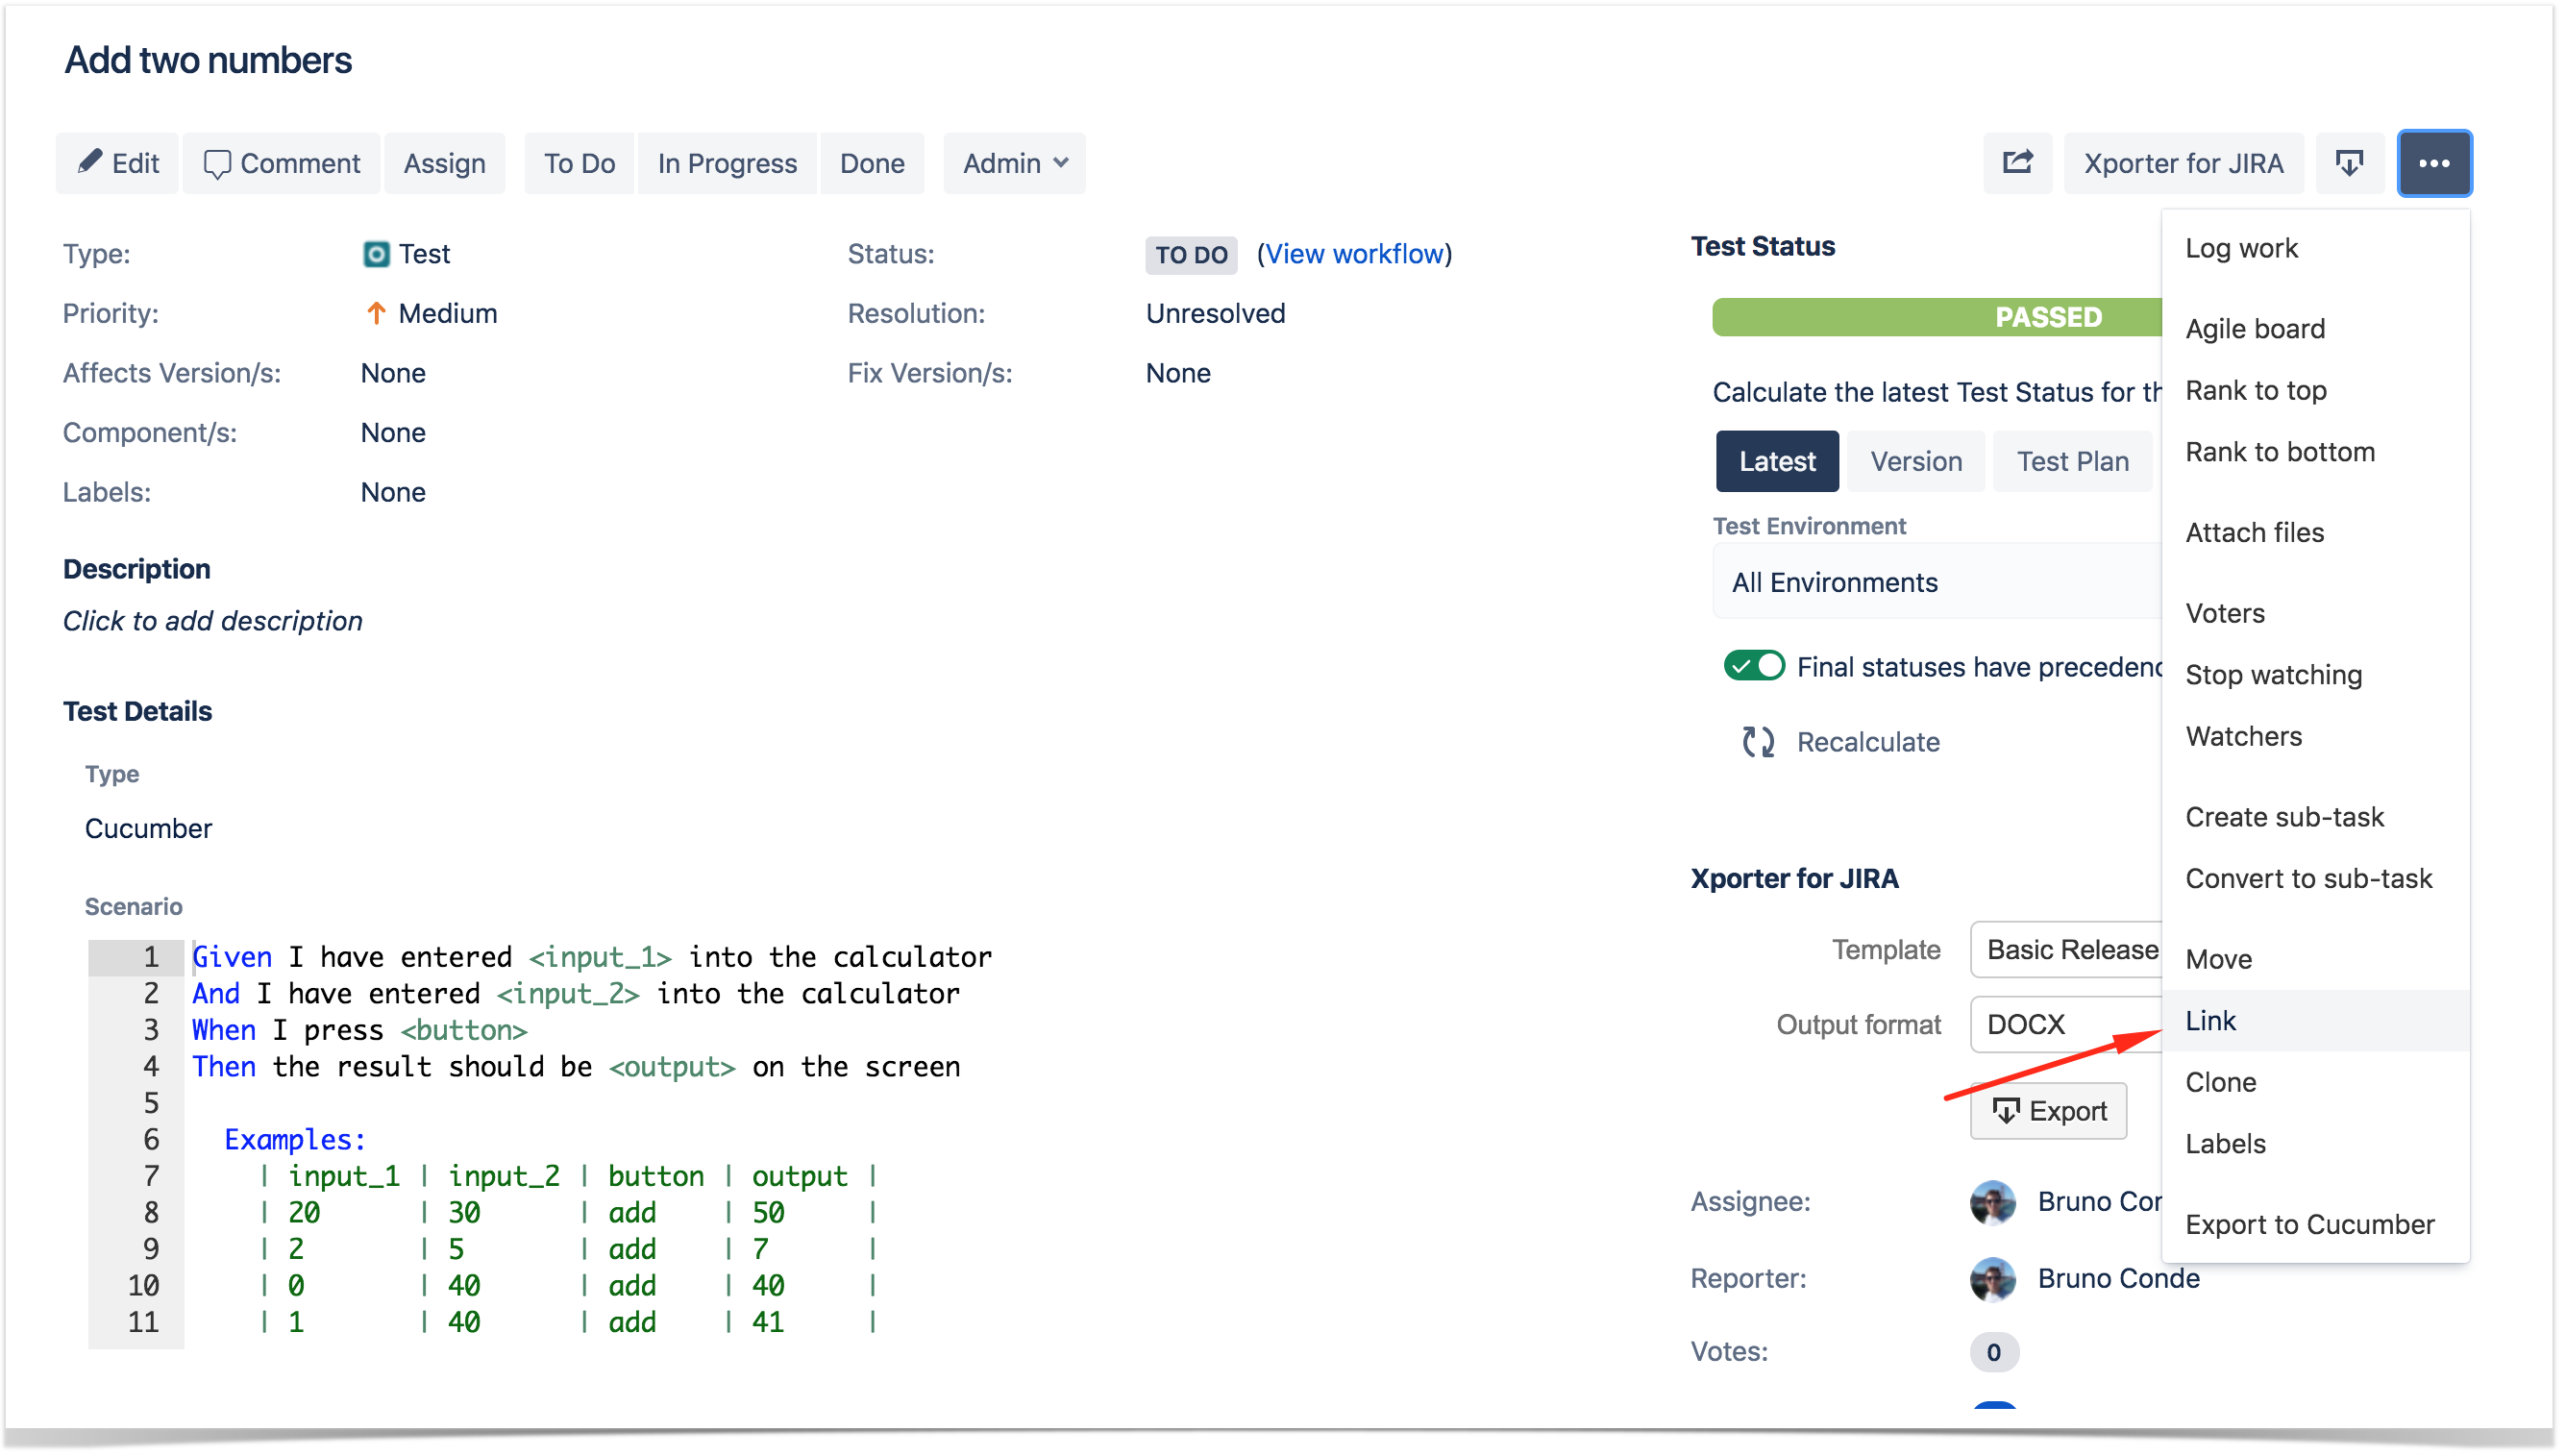
Step 2: Make sure that the created link is "tests" (i.e. the Test covers the given issues)
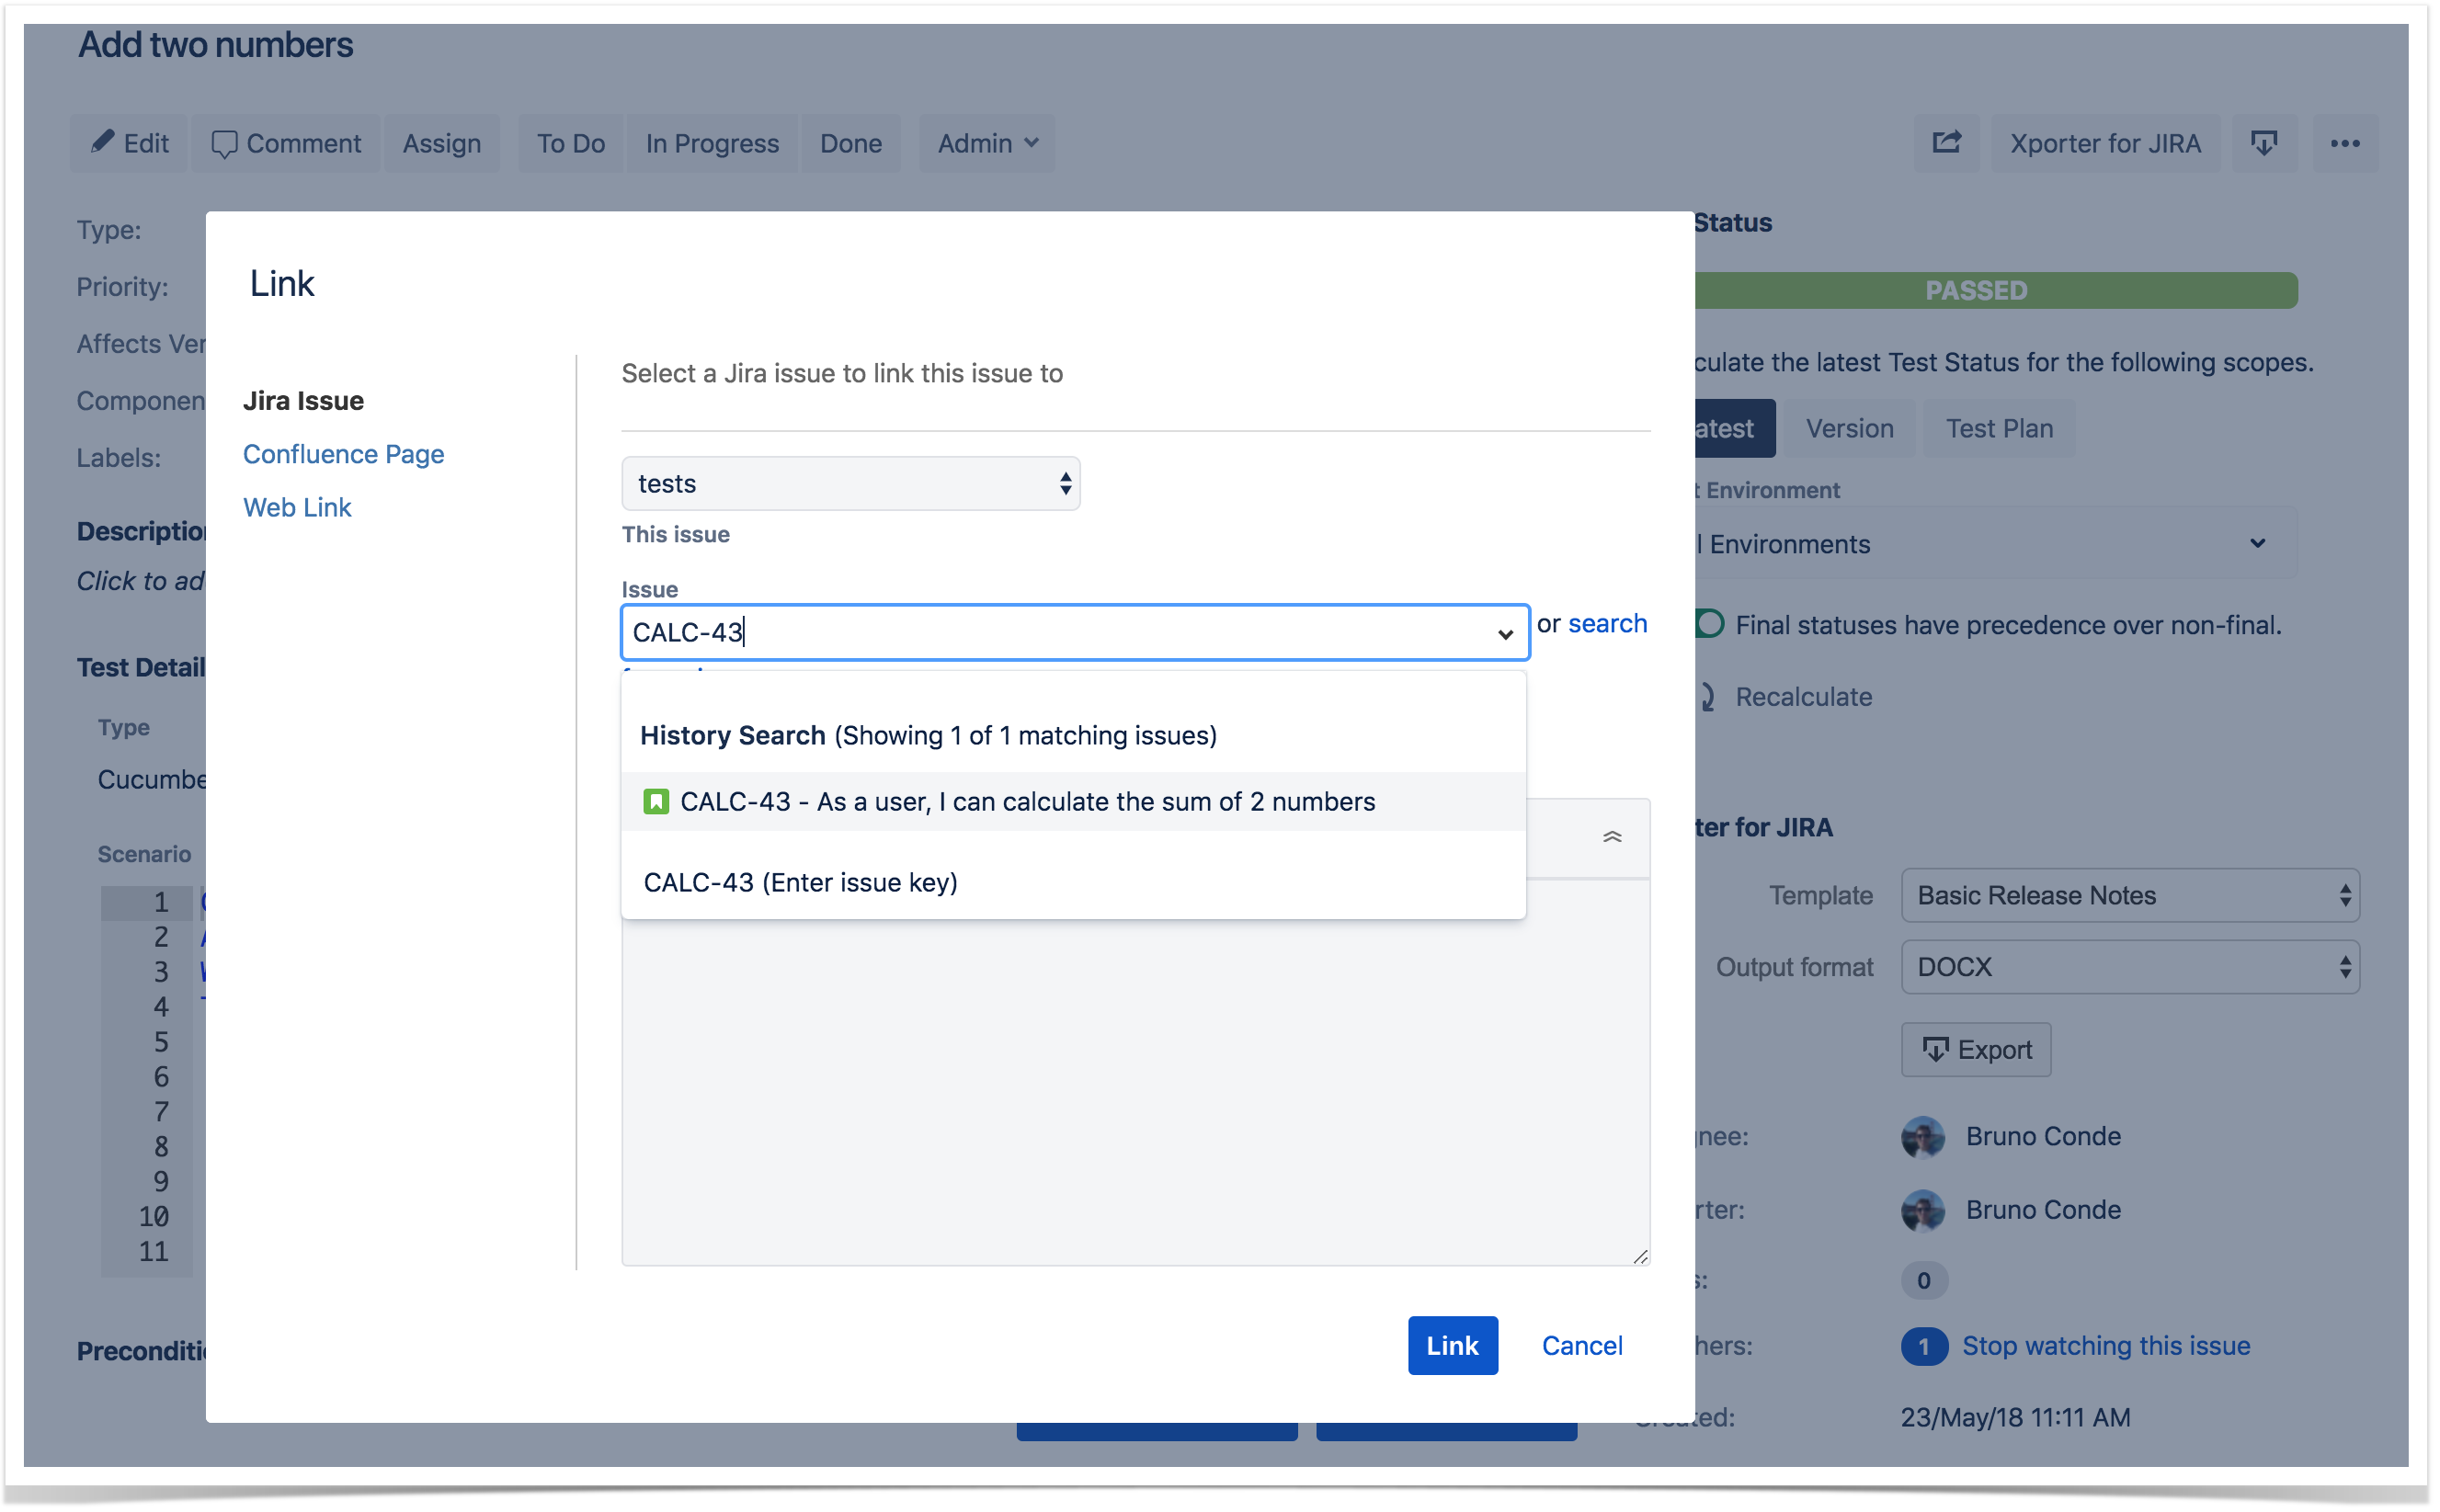
Step 3: Enter one, or more, issue key(s) of the requirement you wish to validate
Step 4: Click on "Link"
Export to Cucumber
Cucumber Tests in Jira can be exported to feature files ready to be executed in Cucumber. The generated feature files follow the rules defined in Export Cucumber Features and take into account the context of the Jira Test issue.
This action will prompt a FeatureBundle zip file containing a single Cucumber feature file for every Requirement associated with the target Test, to be generated and downloaded.
To export a Cucumber Test issue to feature files,
Step 1: Open the Cucumber Test issue view page.
Step 2: Select ... > Export to Cucumber. The file will be downloaded to the browser.
...