
Page History
| Table of Contents |
|---|
Do you want to export your tests in a template compatible with the one to do the CSV import in the other hosting?
Now you can! Just be sure to have Xporter and Xray in your instanceYou just need to Xray's Document Generator (DocGen).
| Info |
|---|
| The templates can be changed to add or remove fields. You just need to adapt it to the information you need to export/import. |
Template Scope Summary
All the templates linked in this article only take issues of type "Test" as input source. They rely on the capabilities described in this article (as well as the overall Document Generator ones).
Out of the box, the fields included are
| Key | Summary | Test Type | Priority | Component | Test Repository Folder |
Plus the test content details, depending on the type (Action/Data/Result, Gherkin Definition, Unstructured Definition).
In addition, you could leverage Jira mappings to add columns, keep in mind their relevance for reimporting though. Please note it is not possible to export the attachments themselves in this bulk scope.
Export and import tests
...
: Cloud/Cloud and Cloud/Server
Download this template (for Cloud or Server; exports only manual tests).
Download this template (only Cloud; exports all test types).
Download this template (only Cloud; export all Test Types, Preconditions and Test Sets).
- Upload the template to your instance;
- Go to the Search for Issues page and search for the tests you want to export and do it using bulk export with XporterDocGen;

- Open the exported file in Excel, make changes if needed, and then save the file as CSV.;
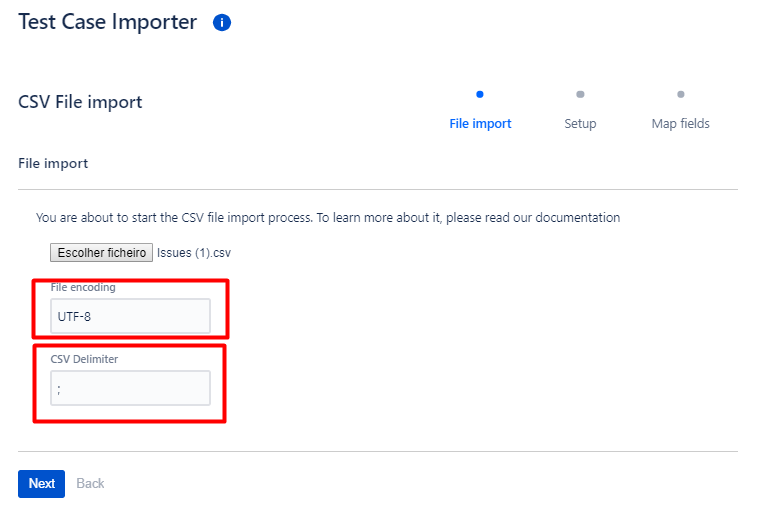
- Open the Xray Test Case Importer and choose the CSV file (Choose the semi-colon delimiter)

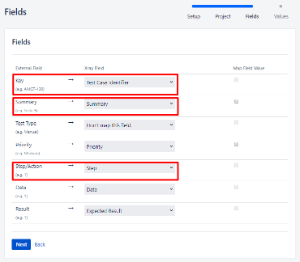
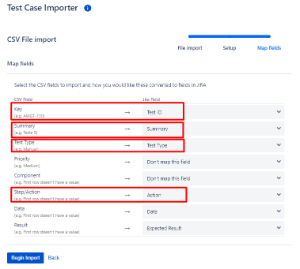
- Do the following mapping and then begin the import:
Tips for the Issue ID column to make it an identifier instead of Key:
- Select the Issue ID column
- Go to Home-> Find & Select -> Replace.
- Fill the "find what" and "replace with" with what you want, for this you will filter by the Key of the project and replace it with empty space

- Click "Find All".
- In the lower part of the Find and Replace window it will show the table with all occurrences for that Column
- Click one row of that table and do Ctrl + A, it should select the whole table. The whole table selected
- Click Replace All

Export and import tests: Server/Server
- Upload the template to your instance;
- Go to the Search for Issues page and search for the tests you want to export and do it using bulk export with DocGen;
- Open the exported file in Excel, make changes if needed, and then save the file as CSV;
- Open Go to Server instance, open the Xray Test Case Importer and choose the CSV file file. (Choose the semi-colon delimiter).
- Do the following mapping and then begin the import:
Export and import tests
...
: Server
...
/Cloud
- Upload the template to your instance;
- Go to the Search for Issues page and search for the tests you want to export and do it using bulk export with XporterDocGen;
- Open the exported file in Excel, make changes if needed, and then save the file as CSV.;
- Go to Cloud instance, open the Xray Test Case Importer and choose the CSV file. (Choose the semi-colon delimiter).
- Do the following mapping and then begin the import:
| Info |
|---|
| Please take into consideration the required fields from different hostings. For Server are , they are Test Case Identifier, Summary and Step. For Cloud are Test ID, Summary and , and Action; for Cloud - Issue Id, Summary, and Test Type. |
Related articles
Xray Cloud - Document Generator
Xray Cloud - Importing Tests using Test Case Importer CLOUD
Xray Server - Document Generator
Xray Server - Importing Manual Tests using Test Case Importer SERVER