
Page History

| Table of Contents |
|---|
...
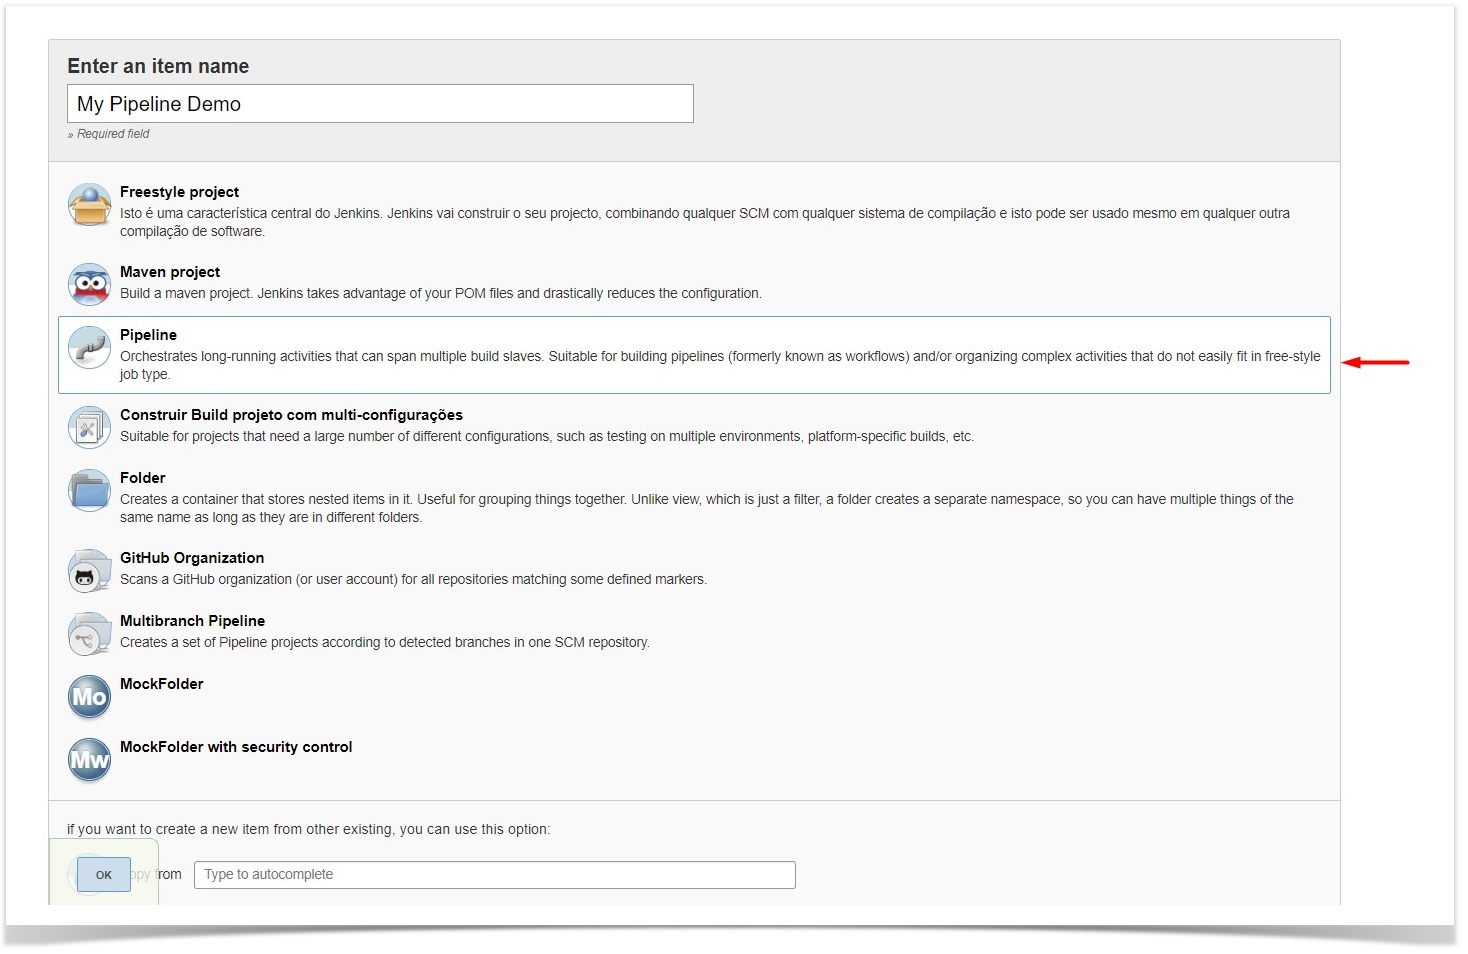
Xray for Jenkins provides support for pipelines projects, allowing you to use Xray specific tasks.
Here is a simple example of a pipeline script using the Xray: Cucumber Features Export Task
| Code Block | ||||
|---|---|---|---|---|
| ||||
pipeline {
    agent any
    stages {
        stage('Export Cucumber') {
            steps {
               step([$class: 'XrayExportBuilder', filePath: '\\features', issues: 'IF-1', serverInstance: '2ffc3a3e-9e2f-4279-abcd-e9301fe47bed'])
            }
        }
    }
} |
| Info | ||
|---|---|---|
| ||
For Pipeline specific documentation, you may want to give a look at: |
Examples
JUnit
This is a declarative example, for JUnit based tests.
There are 3 available steps to be used in a Pipeline project:
XrayImportBuilder-Import test results (Junit, NUnit, etc...) from your Jenkins job to JiraXrayExportBuilder-Export feature files from Jira to your Jenkins job workspaceXrayImportFeatureBuilder-Import feature files from Jenkins to Jira
| Info | ||
|---|---|---|
| ||
For each of the steps mentioned above, you can check the generated syntax reference in the official Jenkins documentation website. |
Step: XrayImportBuilder (import test execution results)
| Expand | ||||||||||||||||||||||||||||||||||||||||||||||||||||||||||||||||||||
|---|---|---|---|---|---|---|---|---|---|---|---|---|---|---|---|---|---|---|---|---|---|---|---|---|---|---|---|---|---|---|---|---|---|---|---|---|---|---|---|---|---|---|---|---|---|---|---|---|---|---|---|---|---|---|---|---|---|---|---|---|---|---|---|---|---|---|---|---|
| ||||||||||||||||||||||||||||||||||||||||||||||||||||||||||||||||||||
|
| Expand | |||||||||||||||
|---|---|---|---|---|---|---|---|---|---|---|---|---|---|---|---|
| |||||||||||||||
| Code Block | |||||||||||||||
| |||||||||||||||
pipeline {
agent any
stages {
|
| Expand | |||||||||||||
|---|---|---|---|---|---|---|---|---|---|---|---|---|---|
| |||||||||||||
|
| Expand | ||||||||||||||
|---|---|---|---|---|---|---|---|---|---|---|---|---|---|---|
| ||||||||||||||
|
| Expand | ||||
|---|---|---|---|---|
| ||||
node {
| ||||
| title | Jenkinsfile example (scripted) |
|
JUnit multipart
This is a declarative example, for JUnit based tests using the multipart variant/endpoint which allows customization over the Test Execution issue fields.
By changing the value of the endpointName variable, you can easily adapt it for other automation frameworks (e.g. Robot framework, TestNG, NUnit).
| Code Block | |||||||||||
|---|---|---|---|---|---|---|---|---|---|---|---|
| |||||||||||
pipeline {
|
Step: XrayExportBuilder (export cucumber features from Jira to Jenkins)
| Expand | ||||||||||||||||||||||||
|---|---|---|---|---|---|---|---|---|---|---|---|---|---|---|---|---|---|---|---|---|---|---|---|---|
| ||||||||||||||||||||||||
|
| Expand | ||||||||||||
|---|---|---|---|---|---|---|---|---|---|---|---|---|
| ||||||||||||
|
| Expand | ||||||||||
|---|---|---|---|---|---|---|---|---|---|---|
| ||||||||||
|
| Expand | ||||||||||
|---|---|---|---|---|---|---|---|---|---|---|
| ||||||||||
|
Step: XrayImportFeatureBuilder (import cucumber features from Jenkins to Jira)
| Expand | ||||||||||||||||||||||||||||||||
|---|---|---|---|---|---|---|---|---|---|---|---|---|---|---|---|---|---|---|---|---|---|---|---|---|---|---|---|---|---|---|---|---|
| ||||||||||||||||||||||||||||||||
|
| Expand | ||||||||
|---|---|---|---|---|---|---|---|---|
| ||||||||
|
| Expand | ||||||||
|---|---|---|---|---|---|---|---|---|
| ||||||||
|
| Info | ||
|---|---|---|
| ||
For Pipeline specific documentation, you may want to give a look at: |
Cucumber Workflow suggestions
Cucumber ("standard" workflow)
...
| Code Block | ||||
|---|---|---|---|---|
| ||||
pipeline {
agent any
stages {
stage('Synch (update) recent tests to Xray'){
steps {
checkout([$class: 'GitSCM', branches: [[name: '*/master']], doGenerateSubmoduleConfigurations: false, extensions: [], submoduleCfg: [], userRemoteConfigs: [[credentialsId: 'a3285253-a867-4ea7-a843-da349fd36490', url: 'ssh://git@localhost/home/git/repos/automation-samples.git']]])
step([$class: 'XrayImportFeatureBuilder', folderPath: 'cucumber_xray_tests/features', lastModified: '10', projectKey: 'CALC', serverInstance: '552d0cb6-6f8d-48ba-bbad-50e94f39b722'])
}
        }
stage('Export features from Xray'){
)
steps {
}
}
checkout([$class: 'GitSCM', branches: [[name: '*/master']], doGenerateSubmoduleConfigurations: false, extensions: [], submoduleCfg: [], userRemoteConfigs: [[credentialsId: 'a3285253-a867-4ea7-a843-da349fd36490', url: 'ssh://git@localhost/home/git/repos/automation-samples.git']]])
stage('Export features from Xray'){
sh "rm -rf cucumber_xray_tests/features"steps {
stepcheckout([$class: 'XrayExportBuilderGitSCM', filePath branches: [[name: 'cucumber_xray_tests/features', filter: '11400', serverInstance: '552d0cb6-6f8d-48ba-bbad-50e94f39b722'*/master']], doGenerateSubmoduleConfigurations: false, extensions: [], submoduleCfg: [], userRemoteConfigs: [[credentialsId: 'a3285253-a867-4ea7-a843-da349fd36490', url: 'ssh://git@localhost/home/git/repos/automation-samples.git']]])
}
sh "rm }-rf cucumber_xray_tests/features"
stagestep([$class: 'TestXrayExportBuilder'){
, steps{
sh "cd filePath: 'cucumber_xray_tests && cucumber -x -f json -o data.json"/features', filter: '11400', serverInstance: '552d0cb6-6f8d-48ba-bbad-50e94f39b722'])
}
}
stage('Import results to XrayTest') {
steps {
step([$class: 'XrayImportBuilder', endpointName: '/cucumber', importFilePath: 'sh "cd cucumber_xray_tests/data.json', serverInstance: '552d0cb6-6f8d-48ba-bbad-50e94f39b722']) && cucumber -x -f json -o data.json"
}
}
}
} |
Using parameters
You can ask for human input in your pipeline builds by passing parameters
| Code Block | ||||
|---|---|---|---|---|
| ||||
pipeline{ stage('Import results to Xray') { agent any parameterssteps { string(defaultValue: "NTP", description: '', name: 'projectKey') string(defaultValue: "Android", description: '', name: 'env'step([$class: 'XrayImportBuilder', endpointName: '/cucumber', importFilePath: 'cucumber_xray_tests/data.json', serverInstance: '552d0cb6-6f8d-48ba-bbad-50e94f39b722']) } stages { } stage ('Import Results') {} } } |
Using parameters
You can ask for human input in your pipeline builds by passing parameters
| Code Block | ||||
|---|---|---|---|---|
| ||||
pipeline{ agent any stepsparameters { string(defaultValue: "NTP", description: step([$class'', name: 'XrayImportBuilderprojectKey', ) string(defaultValue: endpointName"Android", description: '/junit', importFilePathname: 'java-junit-calc/target/surefire-reports/*.xml', env') } stages { importToSameExecution:stage ('trueImport Results',) { projectKey: params.projectKey,steps { revisionstep([$class: params.projectKey + env.BUILD_NUMBER,'XrayImportBuilder', serverInstanceendpointName: '552d0cb6-6f8d-48ba-bbad-50e94f39b722/junit', testEnvironmentsimportFilePath: params.env])'java-junit-calc/target/surefire-reports/*.xml', } importToSameExecution: 'true', } } } |
Recommendations
You can automatically generate your step scripts using the Jenkins Snippet Generator.
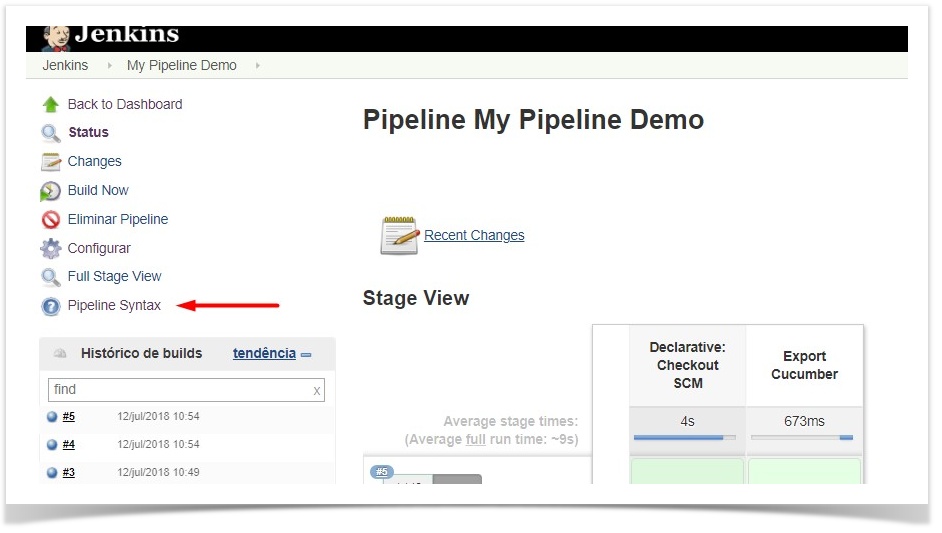
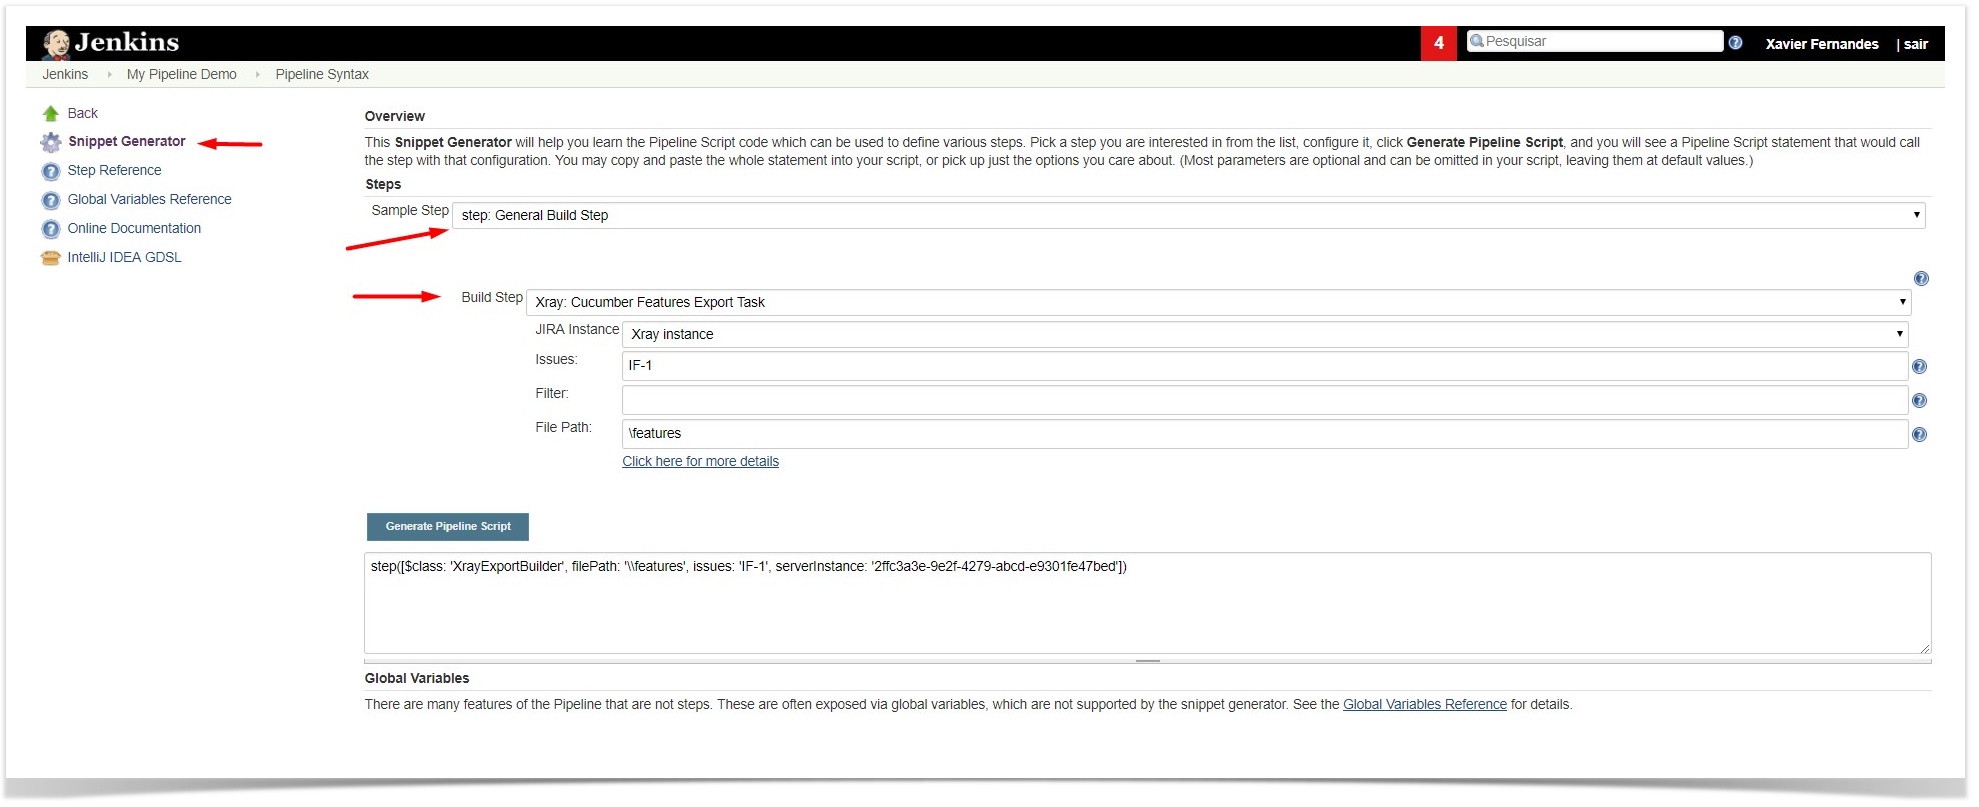
This is the simplest way to generate your step script, and we strongly recommend the use of this snippet due to the complexity of some task related parameters.
Jira instances configuration via Groovy script (Jenkins Script Console)
If you use a containerized version of Jenkins, or simply want to avoid creating the Jira configurations manually (using the Jenkins UI), you can use the following script in the Jenkins Script Console.
To use the script below, you just need to modify the contents of the instances and deleteOldInstances variables.
projectKey: params.projectKey,
                revision: params.projectKey + env.BUILD_NUMBER,
                serverInstance: '552d0cb6-6f8d-48ba-bbad-50e94f39b722',
                testEnvironments: params.env])
            }

        }
    }
} |
Recommendations
You can automatically generate your step scripts using the Jenkins Snippet Generator.
This is the simplest way to generate your step script, and we strongly recommend the use of this snippet due to the complexity of some task related parameters.
Jira instances configuration via Groovy script (Jenkins Script Console)
If you use a containerized version of Jenkins, or simply want to avoid creating the Jira configurations manually (using the Jenkins UI), you can use the following script in the Jenkins Script Console.
To use the script below, you just need to modify the contents of the instances and deleteOldInstances variables.
| Code Block | ||||||
|---|---|---|---|---|---|---|
| ||||||
import jenkins.model.Jenkins
import net.sf.json.JSONArray
import net.sf.json.JSONObject
import com.xpandit.plugins.xrayjenkins.model.HostingType
import com.xpandit.plugins.xrayjenkins.model.XrayInstance
import com.xpandit.plugins.xrayjenkins.model.ServerConfiguration

// true, if you want the old Jira instances removed, false otherwise.
boolean deleteOldInstances = false

/* Represents the Jira instances to be added to the Global Jenkins configuration.
 * - name: the name of the Jira instance to be displayed to the users.
 * - hostingType: must be one of two values. 'SERVER' for Server or Data Center instances OR 'CLOUD' for cloud instances.
 * - url: [ONLY FOR SERVER INSTANCES] the base URL/IP of the Jira server address.
* - credentialId: [OPTIONAL] the credential | ||||||
| Code Block | ||||||
| ||||||
import jenkins.model.Jenkins import net.sf.json.JSONArray import net.sf.json.JSONObject import com.xpandit.plugins.xrayjenkins.model.HostingType import com.xpandit.plugins.xrayjenkins.model.XrayInstance import com.xpandit.plugins.xrayjenkins.model.ServerConfiguration // true, if you want the old Jira instances removed, false otherwise. boolean deleteOldInstances = false /* Represents the Jira instances to be added to the Global Jenkins configuration. * - name: the name of the Jira instance to be displayed to the users. * - hostingType: must be one of two values. 'SERVER' for Server or Data Center instances OR 'CLOUD' for cloud instances. * - url: [ONLY FOR SERVER INSTANCES] the base URL/IP of the Jira server address. * - credentialId: [OPTIONAL] the credential ID from the 'Credentials' plugin that will be used to authenticate the jira REST API requests. */ JSONArray instances = [ [ name: 'my Jira server', hostingType: 'SERVER', url: 'http://example.com', credentialId: 'xxxxxxxx-xxxx-xxxx-xxxx-xxxxxxxxxxxx' // Credential ID from the 'Credentials' plugin. ], that will be used to authenticate the jira REST API requests. */ JSONArray instances = [ [ name: 'my Jira cloud server', hostingType: 'SERVER', hostingTypeurl: 'CLOUDhttp://example.com', credentialId: 'xxxxxxxx-xxxx-xxxx-xxxx-xxxxxxxxxxxx' // Credential ID from the 'Credentials' plugin. ] ] as JSONArray // ~~~ Saves the new Jira instances into the Jenkins global configuration ~~~ ServerConfiguration config = ServerConfiguration.get() List<XrayInstance> xrayInstances = new ArrayList<XrayInstance>() instances.each {instance -> String name = instance.optString('name', '') String hostingTypeString = instance.optString('hostingType', '') String url = instance.optString('url', '') String credentialId = instance.optString('credentialId', null) HostingType hostingType = hostingTypeString == 'CLOUD' ? HostingType.CLOUD : HostingType.SERVER xrayInstances.add(new XrayInstance(null, name, hostingType, url, credentialId)) } List<XrayInstance> oldXrayInstances = config.getServerInstances() if (!deleteOldInstances && oldXrayInstances != null) { xrayInstances.addAll(oldXrayInstances) } config.setServerInstances(xrayInstances) config.save() println('Xray Jira Instances created :)') |
Troubleshooting
The build process is failing with status code 403
When you check the log, it has the following:

By default, when you successively try to log into Jira with the wrong credentials, the Jira instance will prompt you to provide a CAPTCHA the next time you try to log in. It is not possible to provide this information via the build process, so it will fail with status code 403 Forbidden.
You will need to log into Jira via the browser and provide the CAPTCHA.

If you are a Jira administrator, you can go to Jira administration > User Management and reset the failed login.

Using Jira with a SSL connection
SSL connections are supported by the plug-in, however, the CA certificate must be available and obtainable publicly over the internet.
If you want to use a private CA certificate when connecting to your Jira instance, please make sure that the certificate is installed in the Jenkins Manager node and also in all your Worker nodes.
To install the certificate, you can follow CloudBees guidelines. You then can run the following commands in the command line in each of your Jenkins node to check if the CA certificate is correctly installed (using the SSLpoke.java script)
...
| language | bash |
|---|---|
| title | Check if CA certificate is installed |
...
,
        [
                name: 'my Jira cloud',
                hostingType: 'CLOUD',
                credentialId: 'xxxxxxxx-xxxx-xxxx-xxxx-xxxxxxxxxxxx' // Credential ID from the 'Credentials' plugin.
        ]
] as JSONArray

// ~~~ Saves the new Jira instances into the Jenkins global configuration ~~~
ServerConfiguration config = ServerConfiguration.get()
List<XrayInstance> xrayInstances = new ArrayList<XrayInstance>()

instances.each {instance ->
    String name = instance.optString('name', '')
    String hostingTypeString = instance.optString('hostingType', '')
    String url = instance.optString('url', '')
    String credentialId = instance.optString('credentialId', null)

    HostingType hostingType = hostingTypeString == 'CLOUD' ? HostingType.CLOUD : HostingType.SERVER

    xrayInstances.add(new XrayInstance(null, name, hostingType, url, credentialId))
}

List<XrayInstance> oldXrayInstances = config.getServerInstances()
if (!deleteOldInstances && oldXrayInstances != null) {
    xrayInstances.addAll(oldXrayInstances)
}

config.setServerInstances(xrayInstances)
config.save()

println('Xray Jira Instances created :)') |
Troubleshooting
The build process is failing with status code 403
When you check the log, it has the following:
By default, when you successively try to log into Jira with the wrong credentials, the Jira instance will prompt you to provide a CAPTCHA the next time you try to log in. It is not possible to provide this information via the build process, so it will fail with status code 403 Forbidden.
You will need to log into Jira via the browser and provide the CAPTCHA.
If you are a Jira administrator, you can go to Jira administration > User Management and reset the failed login.
...
The Jira xxx configuration of this task was not found
...