
Page History

| Table of Contents |
|---|
Overview
Xray enables easy integration with Jenkins through the "Xray for JIRA Jenkins Plugin", providing the means for successful Continuous Integration by allowing users to report automated testing results.
...
The installation is made manually. For more information on how to install add-ons, please refer to to how to install add-ons.
| Info | ||
|---|---|---|
| ||
The Jenkins baseline for this app is v2.138.4 and it may not work properly with previous versions. |
...
- Go to the Update Center of Jenkins in Manage Jenkins > Manage Plugins.
- Select the advanced Advanced tab
- In the Upload Plugin section, click upload and select the file
xray-connector.hpifile.
...
Since version 2.1.0, you can install the plugin by using the Jenkins native Web UI. You can read more about how to to do it here.
Configuration
Xray for Jenkins is configured in the global settings configuration page Manage Jenkins > > Configure System > Xray > Xray for Jira configuration.
Jira servers
The Jira servers configuration defines connections with Jira instances.
To add a new Jira instance connection, you need to specify some properties:
Credential permissions
If you want to ket your Jenkins' users to use their own Jira credentials in each build, you need to make sure that the users that need to configure the jobs have both USE ITEM and USE OWN permissions.
These permissions are not configurable in the Credentials plugin by default, you need to run your Jenkins instance with the following flags enabled:
-Dcom.cloudbees.plugins.credentials.UseOwnPermission=true -Dcom.cloudbees.plugins.credentials.UseItemPermission=true
After enabling these flags, go to the Credentials plugin configuration page, and give the required users the USE ITEM and USE OWN permissions.
You can read more about these permissions in the official CloudBees documentation.
Jira Instance
The Jira configuration defines connections with Jira instances.
To add a new Jira instance connection, you need to specify some properties:
- Configuration alias
- Hosting: Hosting (instance type) in this case Server/Data Center.
- Server Address: The address of the Jira Server where Xray is running
- Credentials:
- Use the Jenkins Credentials Plugin to set the API key/secret (please check Global Settings: API Keys for more info on creating API keys)
- Make sure that was used to create the API key has the following permissions in the projects where you want to import the results and import/
- Configuration alias
- Hosting: Hosting (instance type) in this case Server/Data Center.
- Server Address: The address of the Jira Server where Xray is running
- Credentials:
- Use the Jenkins Credentials Plugin to set the username/password (if you are using a Server/Data Center instance).
- Make sure that the user you are using have the following permissions in the projects where you want to import the results and import/export feature files: View, Edit, Create.
- This field is optional - if you don't want to use a System scoped credential to authenticate in your instance, you can leave this field empty and force the users to use an a User scoped credential in the build task.
...
Note: the Configuration ID is not editable. This value can be used in the pipelines pipeline scripts.
| Info | ||
|---|---|---|
| ||
The user present in this configuration must exist in the Jira instance and have permission to Create Test and Test Execution Issues |
...
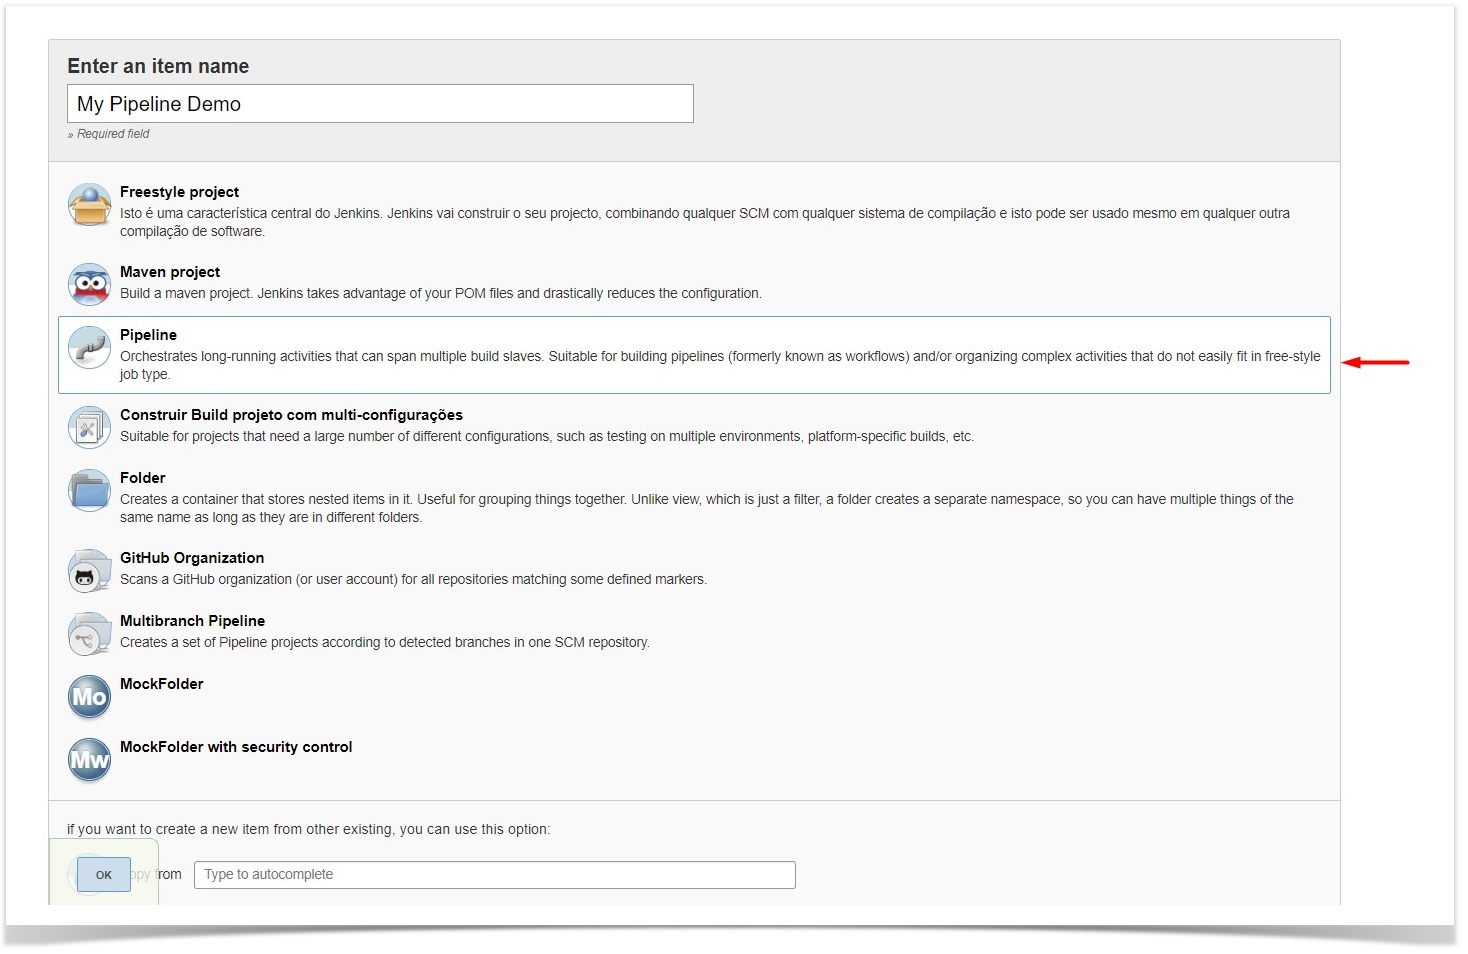
- Freestyle projects
- Maven Projects
- Multi-configuration Projects
- Pipeline Projects
In On the home page, clicking click for example New Item > Freestyle project, provide a name, and then click OK.
...
This build step will export the Cucumber Tests (i.e., Scenario/Scenario Outlines) in .feature or bundled in a .zip file. The rules for exporting are defined defined here.
It invokes Xray's Export Cucumber Tests REST API endpoint (see more information here).
...
Some fields need to be configured in order to export the Cucumber Tests. As input, you can either specify issue keys (see the endpoint documention documentation here) or the ID of the saved filter in Jira.
| field | description |
|---|---|
| Jira instance | The Jira instance where Xray is running |
| Credentials | If the above Jira Instance does not have any credential configured, you must define an a User scoped credential here |
| Issue keys | Set of issue keys separated by ";" |
Filter ID | A number that indicates the filter ID |
| File path | The relative path of the directory where the features should be exported to; normally, this corresponds to the "features" folder of the Cucumber project that has the implementation steps. Note: The directory will be created if it does not exist. |
...
It invokes Xray's Import Cumcumber Tests REST API endpoint (see more information here)
| field | decriptiondescription |
|---|---|
| JIRA instance | The Jira instance where Xray is running. |
| Credentials | If the above Jira Instance does not have any credential configured, you must define an a User scoped credential here |
| Project Key | This is the project where the Tests and Pre-Conditions will be created/updated. |
| Cucumber feature files directory | This is the directory containing your feature files. All the files in this directory and sub directories will be imported. Supports both relative and absolute paths. |
| Modified in the last hours | By entering an integer integer n here here, only files that where were modified in the last last n hours hours will be imported. Leave empty if you do not want to use this parameter. |
...
The app provides easy access to Xray's Import Execution Results REST API endpoints (see more information here). Therefore, it mimics the endpoints' input parameters.
It supports importing results in Xray's own JSON format, Cucumber, Behave, JUnit, and NUnit, among others.
...
For those formats, the file path needs to be relative to the workspace.
Configuration Configuration
| field | description |
|---|---|
| Jira instance | The Jira instance where Xray is running |
| Credentials | If the above Jira Instance does not have any credential configured, you must define an a User scoped credential here |
| Format | A list of test result formats and its their specific endpoint |
| Execution Report File | The results' relative or absolute file path Note: glob expressions are supported for
|
Additional fields
Depending on the chose chosen test result format and endpoint, some additional fields may need to be configured.
| Format and specific endpoint | Field | Description | ||||
|---|---|---|---|---|---|---|
Behave JSON multipart Cucumber JSON multipart NUnit XML multipart JUnit XML multipart Robot XML multipart TestNG XML multipart | Import to Same Test Execution | When this option is checkchecked, if you are importing multiple execution report files using a glob expression, the results will be imported to the same Test Execution | ||||
Test execution fields | An object (JSON) specifying the fields for the issue. You may specify the object either directly in the field or in the file path.
| |||||
| Import in parallel | If there are several result files, when this checkbox is selected, we will import all the files in parallel (using all available CPU cores) | |||||
NUnit XML JUnit XML Robot XML TestNG XML | Import to Same Test Execution | When this option is checkchecked, if you are importing multiple execution report files using a glob expression, the results will be imported to the same Test Execution | ||||
| Project key | Key of the project where the Test Execution (if the T est the Test Execution Key field field wasn't provided) and the Tests (if they aren't created yet) are going to be created | |||||
| Test execution key | Key of the Test Execution | |||||
| Test plan key | Key of the Test Plan | |||||
| Test environments | List of Test Environments separated by ";" | |||||
| Revision | Source code's revision being target targeted by the Test Execution | |||||
| Fix version | The Fix Version associated to associate with the test execution (it supports only one value) | |||||
| Import in parallel | If there are several result files, when this checkbox is selected, we will import all the files in parallel (using all available CPU cores) |
...
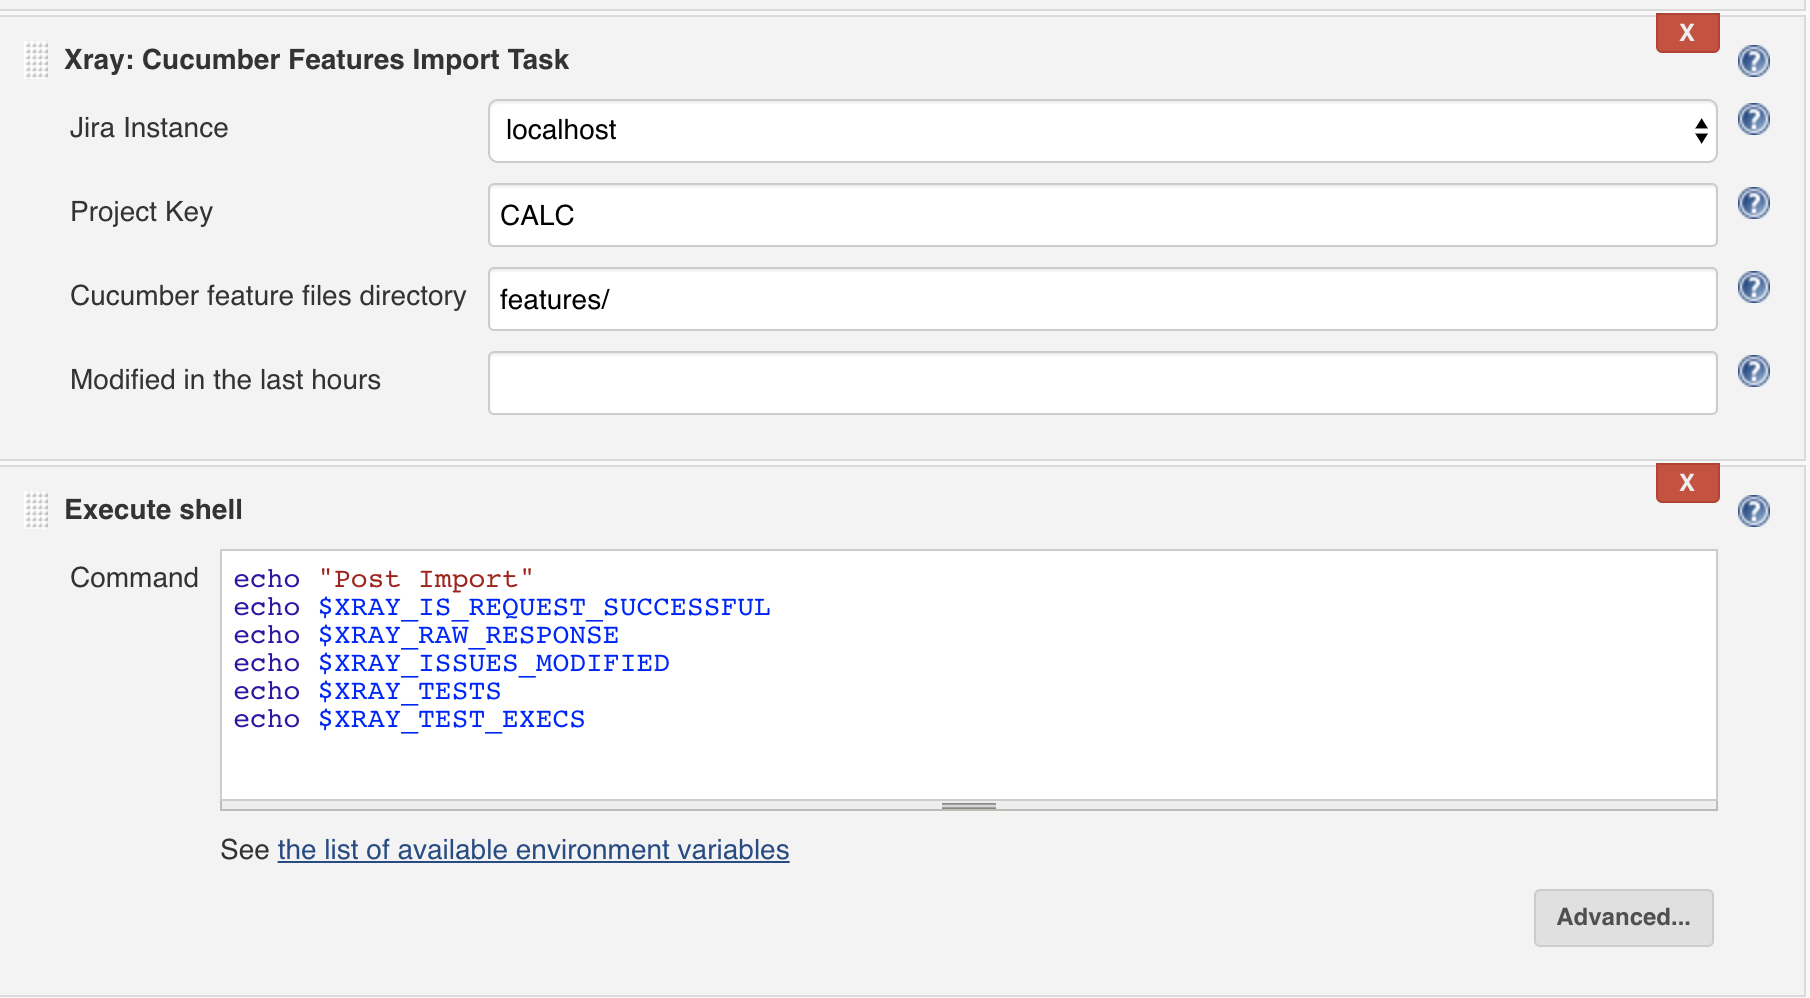
| Build Environment Variable Name | Meaning and Value |
|---|---|
XRAY_IS_REQUEST_SUCCESSFUL | Contains the string 'true' if all requests made by the step were successful, or 'false' otherwise. |
XRAY_ISSUES_MODIFIED | All Issue keys that were modified and/or created by the step, separated by ';' with no duplicated entries (E.g. 'CALC-100;CALC-101;CALC-102'). |
XRAY_RAW_RESPONSE | The unprocessed JSON response of all requests made by the step, separated by ';'. |
XRAY_TEST_EXECS | All Test Execution Issue keys that were modified and/or created by the step, separated by ';' with no duplicated entries (E.g. 'CALC-200;CALC-201;CALC-202'). Please note that in same some cases, it will be not possible to determine the issue type of the Issue key returned in the request response and in that case, the key it will only be added to the XRAY_ISSUES_MODIFIED variable. |
XRAY_TEST | All Test Issue keys that were modified and/or created by the step, separated by ';' with no duplicated entries (E.g. 'CALC-300;CALC-301;CALC-302'). Please note that in same some cases, it will be not possible to determine the issue type of the Issue key returned in the request response and in that case, the key it will only be added to the XRAY_ISSUES_MODIFIED variable. |
| Info | ||
|---|---|---|
| ||
Due to Jenkins limitations, these variables will not be set on Pipeline projects. |
Examples
Cucumber
In a typical typical Cucumber Workflow, after having created a Cucumber project and the Cucumber tests specified in Jira, you may want to have a project that exports the features from Jira, executes the automated tests on a CI environment and environment and then imports back its results.
...
In this example, we configured the task to extract the the features from a set of issues (PROJ-78 and PROJ-79) to the folder that holds the Cucumber project.
...
To start the configuration, add the build step Xray Xray: Cucumber Features Import Task.
...
In this example, we configured the task to import to the Project IF of the Xray instance all the .features and .zip files that are contained in \Cucumber directory and sub directoriessubdirectories, which were modified in the last 3 hours.
...
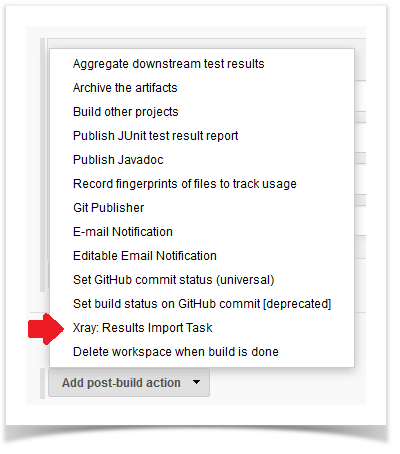
To start the configuration, add the post-build action Xray Xray: Results Import Task.
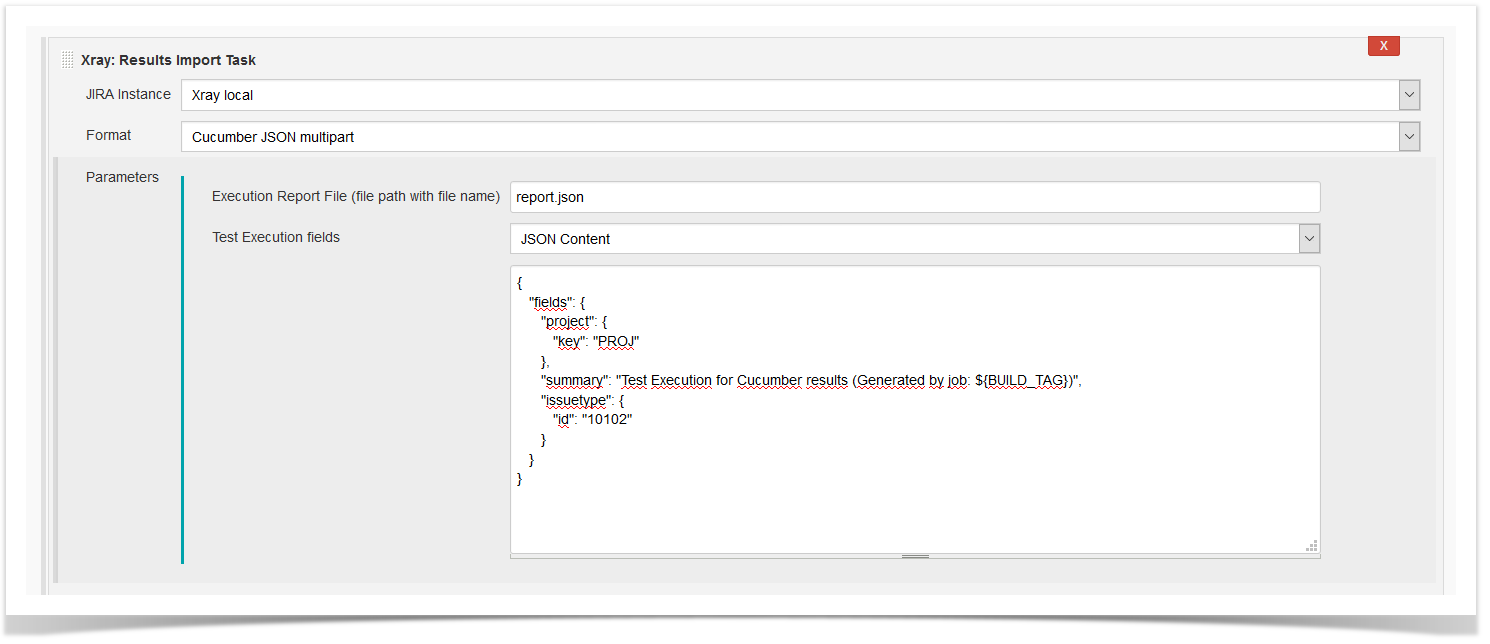
After that, configure it.
In this example, we we configured the task to import the Cucumber JSON results back to Jira.
...
Once all configurations are done, click Save at the bottom of the page.
After running the jobthe job, the expected result is a new Test Execution issue created in the Jira instance.
...
For Cucumber, Behave, JUnit, Nunit and Robot, Xray for Jenkins allows you to create new Test Executions and have control over newly-created Test Execution fields. You can send two files, the normal execution result file and a JSON file similar to the one Jira one Jira uses to create new issues. More details regarding how Jira creates new issues here.
For this scenario and example, the import task needs to be configured with the Cucumber JSON Multipart format. When selecting this option, you can additionally configure the Test Execution fields in in one of two ways:
- Insert the relative path to the JSON file containing the information, or
- Insert the JSON content directly in the field.
...
And configured the task to import the the Cucumber JSON Multipart results results back to Jira.
Once all configurations are done, click Save at the bottom of the page.
...
Apart from supporting Cucumber natively, Xray enables you enables you to take advantage of many other testing frameworks like JUnit. In this sense, Xray for Jenkins lets you import results in other formats besides Cucumber JSON.
...
To start the configuration, add the post-build action Xray Xray: Results Import Task.
After that, configure it.
...
Xray for Jenkins provides support for pipelines pipeline projects, allowing you to use Xray-specific tasks.
Here is a simple example of a pipeline script using the Xray: Cucumber Features Export Task
| Code Block | ||||
|---|---|---|---|---|
| ||||
pipeline {
    agent any
    stages {
        stage('Export Cucumber') {
            steps {
               step([$class: 'XrayExportBuilder', filePath: '\\features', issues: 'IF-1', serverInstance: '2ffc3a3e-9e2f-4279-abcd-e9301fe47bed'])
            }
        }
    }
} |
| Info | ||
|---|---|---|
| ||
For Pipeline specific documentation, you may want to give a look at: |
Examples
JUnit
This is a declarative example, for JUnit based tests.
There are 3 available steps to be used in a Pipeline project:
XrayImportBuilder-Import test results (Junit, NUnit, etc...) from your Jenkins job to JiraXrayExportBuilder-Export feature files from Jira to your Jenkins job workspaceXrayImportFeatureBuilder-Import feature files from Jenkins to Jira
| Info | ||
|---|---|---|
| ||
For each of the steps mentioned above, you can check the generated syntax reference in the official Jenkins documentation website. |
| Note | ||||||
|---|---|---|---|---|---|---|
| ||||||
Please see a tutorial with working Examples using Jenkins pipeline, showcasing different scenarios, which you can download and try by yourself. |
Step: XrayImportBuilder (import test execution results)
| Expand | ||||||||||||||||||||||||||||||||||||||||||||||||||||||||||||||||||||
|---|---|---|---|---|---|---|---|---|---|---|---|---|---|---|---|---|---|---|---|---|---|---|---|---|---|---|---|---|---|---|---|---|---|---|---|---|---|---|---|---|---|---|---|---|---|---|---|---|---|---|---|---|---|---|---|---|---|---|---|---|---|---|---|---|---|---|---|---|
| ||||||||||||||||||||||||||||||||||||||||||||||||||||||||||||||||||||
|
| Expand | ||||||
|---|---|---|---|---|---|---|
| ||||||
| ||||||
| Code Block | ||||||
| ||||||
pipeline {
agent any
stages {
stage('Compile'){
steps {
checkout([$class: 'GitSCM', branches: [[name: '*/master']], doGenerateSubmoduleConfigurations: false, extensions: [[$class: 'SparseCheckoutPaths', sparseCheckoutPaths: [[path: 'java-junit-calc/']]]], submoduleCfg: [], userRemoteConfigs: [[credentialsId: 'a3285253-a867-4ea7-a843-da349fd36490', url: 'ssh://git@localhost/home/git/repos/automation-samples.git']]])
sh "mvn clean compile -f java-junit-calc/pom.xml"
}
}
stage('Test')
|
| Expand | |||||||||||||||||||
|---|---|---|---|---|---|---|---|---|---|---|---|---|---|---|---|---|---|---|---|
| |||||||||||||||||||
|
| Expand | |||||||||||||||||||||||
|---|---|---|---|---|---|---|---|---|---|---|---|---|---|---|---|---|---|---|---|---|---|---|---|
| |||||||||||||||||||||||
| title | Jenkinsfile example (scripted)
|
| Expand | |||||||||||||||||||||||
|---|---|---|---|---|---|---|---|---|---|---|---|---|---|---|---|---|---|---|---|---|---|---|---|
| |||||||||||||||||||||||
|
JUnit multipart
This is a declarative example, for JUnit based tests using the multipart variant/endpoint which allows customization over the Test Execution issue fields.
By changing the value of the endpointName variable, you can easily adapt it for other automation frameworks (e.g. Robot framework, TestNG, NUnit).
| Code Block | ||||||||||||
|---|---|---|---|---|---|---|---|---|---|---|---|---|
| ||||||||||||
pipeline {
|
Step: XrayExportBuilder (export cucumber features from Jira to Jenkins)
| Expand | ||||||||||||||||||||||||
|---|---|---|---|---|---|---|---|---|---|---|---|---|---|---|---|---|---|---|---|---|---|---|---|---|
| ||||||||||||||||||||||||
|
| Expand | |||||||||
|---|---|---|---|---|---|---|---|---|---|
| |||||||||
|
| Expand | ||||||||||||
|---|---|---|---|---|---|---|---|---|---|---|---|---|
| ||||||||||||
|
| Expand | |||||||||
|---|---|---|---|---|---|---|---|---|---|
| |||||||||
|
Step: XrayImportFeatureBuilder (import cucumber features from Jenkins to Jira)
| Expand | ||||||||||||||||||||||||||||||||
|---|---|---|---|---|---|---|---|---|---|---|---|---|---|---|---|---|---|---|---|---|---|---|---|---|---|---|---|---|---|---|---|---|
| ||||||||||||||||||||||||||||||||
|
| Expand | ||||||||
|---|---|---|---|---|---|---|---|---|
| ||||||||
steps {
step([$class: 'XrayImportBuilder', endpointName: '/junit/multipart', importFilePath: 'java-junit-calc/target/surefire-reports/TEST-com.xpand.java.CalcTest.xml', importInfo: '''{
"fields": {
"project": {
"key": "CALC"
},
"summary": "Test Execution for java junit ${BUILD_NUMBER}",
"issuetype": {
"id": "9"
|
| Expand | ||||||||
|---|---|---|---|---|---|---|---|---|
| ||||||||
|
| Info | ||
|---|---|---|
| ||
For Pipeline specific documentation, you may want to give a look at: |
Cucumber Workflow suggestions
Cucumber ("standard" workflow)
...
This is a declarative example, for Cucumber tests using the "VCS/Git based" workflow (see see Testing in BDD with Gherkin based frameworks (e.g. Cucumber)).
| Code Block | ||||
|---|---|---|---|---|
| ||||
pipeline {
    agent any
    stages {
         stage('Synch (update) recent tests to Xray'){
            steps {
                checkout([$class: 'GitSCM', branches: [[name: '*/master']], doGenerateSubmoduleConfigurations: false, extensions: [], submoduleCfg: [], userRemoteConfigs: [[credentialsId: 'a3285253-a867-4ea7-a843-da349fd36490', url: 'ssh://git@localhost/home/git/repos/automation-samples.git']]])
                step([$class: 'XrayImportFeatureBuilder', folderPath: 'cucumber_xray_tests/features', lastModified: '10', projectKey: 'CALC', serverInstance: '552d0cb6-6f8d-48ba-bbad-50e94f39b722'])
            }
        }

        stage('Export features from Xray'){
            steps {
       }
        }
 checkout([$class: 'GitSCM', branches: [[name: '*/master']], doGenerateSubmoduleConfigurations: false, extensions:
 [], submoduleCfg: [], userRemoteConfigs: [[credentialsId: 'a3285253-a867-4ea7-a843-da349fd36490', url: 'ssh://git@localhost/home/git/repos/automation-samples.git']]])
    stage('Export features from Xray'){
            sh "rm -rf cucumber_xray_tests/features"steps {
                stepcheckout([$class: 'XrayExportBuilderGitSCM', filePath branches: [[name: 'cucumber_xray_tests/features', filter: '11400', serverInstance: '552d0cb6-6f8d-48ba-bbad-50e94f39b722'*/master']], doGenerateSubmoduleConfigurations: false, extensions: [], submoduleCfg: [], userRemoteConfigs: [[credentialsId: 'a3285253-a867-4ea7-a843-da349fd36490', url: 'ssh://git@localhost/home/git/repos/automation-samples.git']]])
            }
    sh "rm   }-rf cucumber_xray_tests/features"

        stagestep([$class: 'TestXrayExportBuilder'){
,            steps{
                sh "cd filePath: 'cucumber_xray_tests && cucumber -x -f json -o data.json"/features', filter: '11400', serverInstance: '552d0cb6-6f8d-48ba-bbad-50e94f39b722'])
            }
        }

        stage('Import results to Xray') {
            steps {
    Test'){
            step([$class: 'XrayImportBuilder', endpointName: '/cucumber', importFilePath: 'cucumber_xray_tests/data.json', serverInstance: '552d0cb6-6f8d-48ba-bbad-50e94f39b722'])
   steps{
             }
   sh "cd cucumber_xray_tests && cucumber }
-x -f json  }
} |
Using parameters
You can ask for human input in your pipeline builds by passing parameters
| Code Block | ||||
|---|---|---|---|---|
| ||||
pipeline{ -o data.json" agent any parameters {} string(defaultValue: "NTP", description: '', name: 'projectKey') } string(defaultValue: "Android", description: '', name: 'env') stage('Import results to Xray') { } stagessteps { stage ('Import Results') { step([$class: 'XrayImportBuilder', endpointName: '/cucumber', importFilePath: 'cucumber_xray_tests/data.json', steps {serverInstance: '552d0cb6-6f8d-48ba-bbad-50e94f39b722']) step([$class: 'XrayImportBuilder', } } } } |
Using parameters
You can ask for human input in your pipeline builds by passing parameters
| Code Block | ||||
|---|---|---|---|---|
| ||||
pipeline{ endpointName: '/junit', agent any parameters { importFilePath: 'java-junit-calc/target/surefire-reports/*.xml', string(defaultValue: "NTP", description: '', name: 'projectKey') string(defaultValue: "Android", importToSameExecutiondescription: 'true', name: 'env') } stages { projectKey: params.projectKey, stage ('Import Results') { revision: params.projectKey + env.BUILD_NUMBER,steps { serverInstancestep([$class: '552d0cb6-6f8d-48ba-bbad-50e94f39b722XrayImportBuilder', testEnvironments: params.env])endpointName: '/junit', } importFilePath: 'java-junit-calc/target/surefire-reports/*.xml', } } } |
Recommendations
You can automatically generate your step scripts using the Jenkins Snippet Generator.
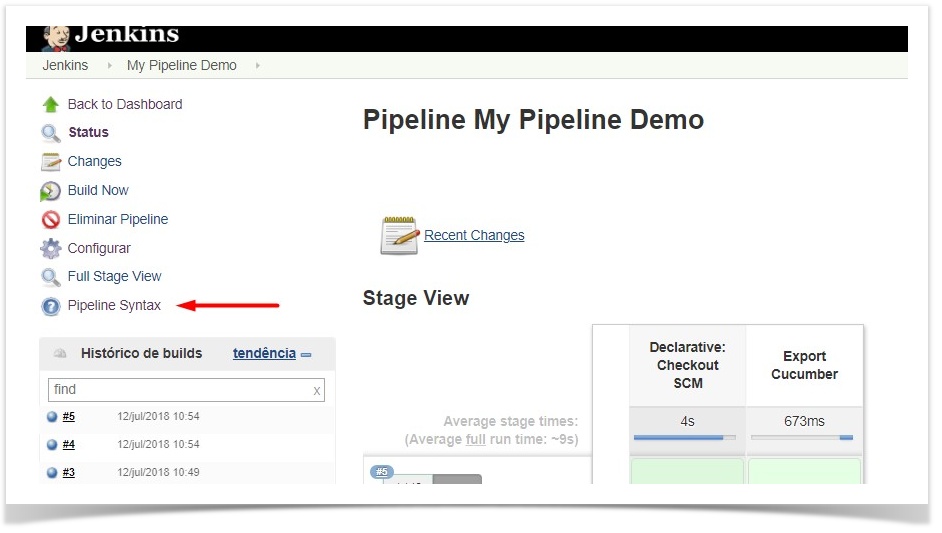
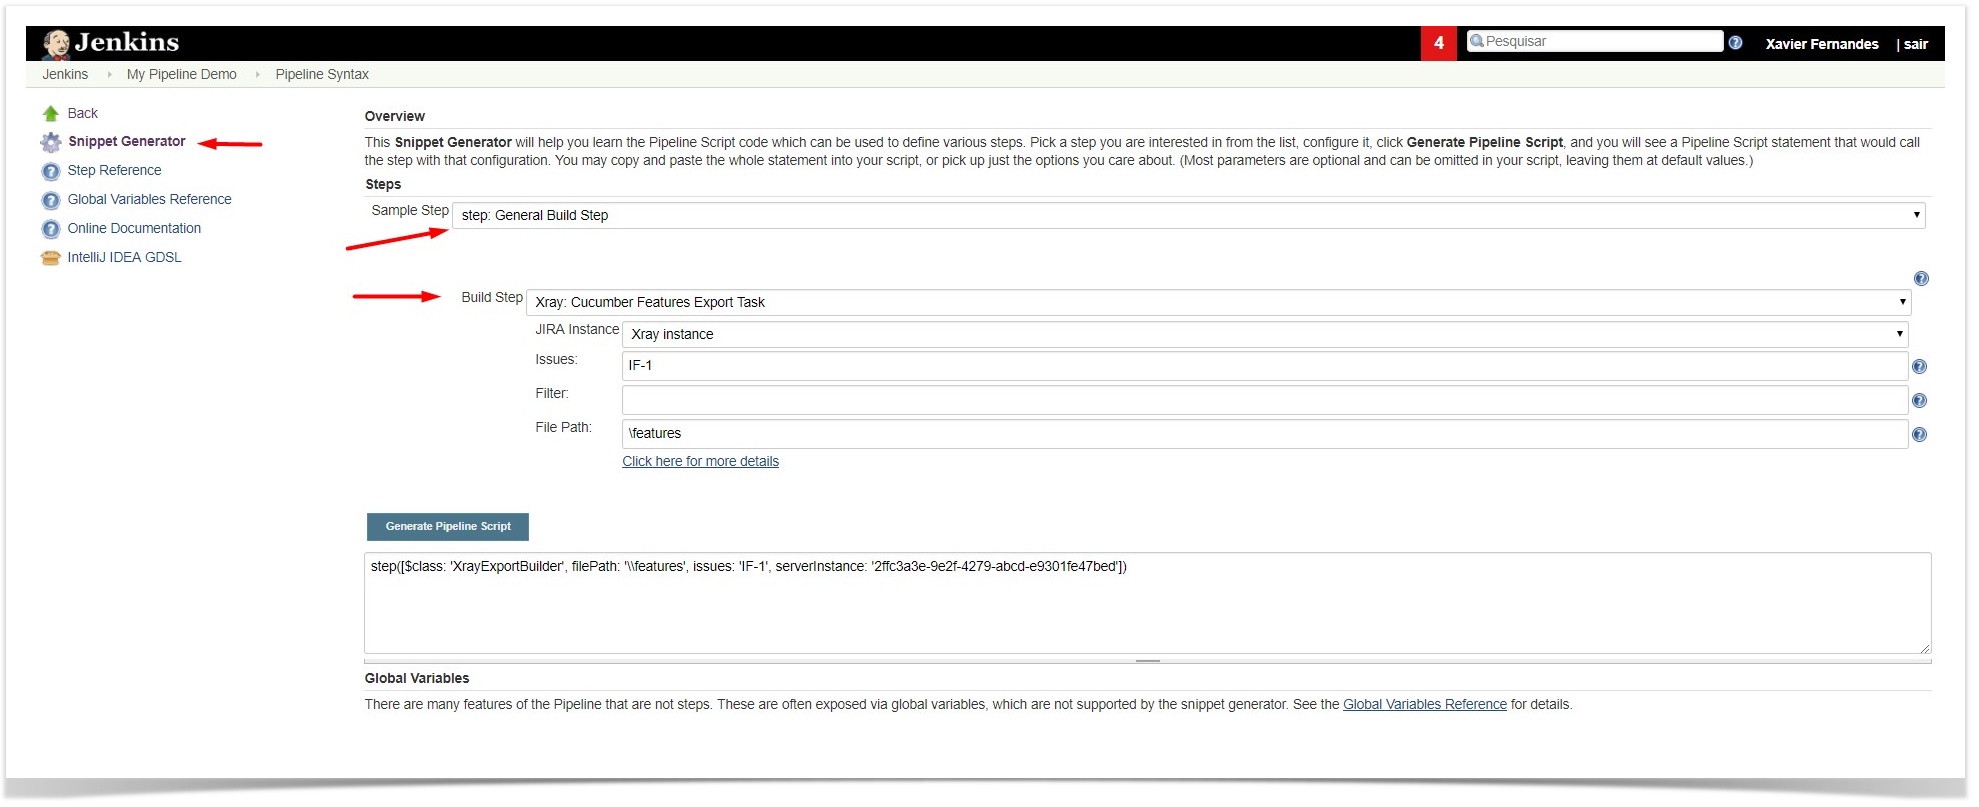
This is the simplest way to generate your step script, and we strongly recommend the use of this snippet due to the complexity of some task related parameters.
Jira instances configuration via Groovy script (Jenkins Script Console)
If you use a containerized version of Jenkins, or simply want to avoid creating the Jira configurations manually (using the Jenkins UI), you can use the following script in the Jenkins Script Console.
To use the script below, you just need to modify the contents of the instances and deleteOldInstances variables.
importToSameExecution: 'true',
                projectKey: params.projectKey,
                revision: params.projectKey + env.BUILD_NUMBER,
                serverInstance: '552d0cb6-6f8d-48ba-bbad-50e94f39b722',
                testEnvironments: params.env])
            }

        }
    }
} |
Recommendations
You can automatically generate your step scripts using the Jenkins Snippet Generator.
This is the simplest way to generate your step script, and we strongly recommend the use of this snippet due to the complexity of some task related parameters.
Jira instances configuration via Groovy script (Jenkins Script Console)
If you use a containerized version of Jenkins, or simply want to avoid creating the Jira configurations manually (using the Jenkins UI), you can use the following script in the Jenkins Script Console.
To use the script below, you just need to modify the contents of the instances and deleteOldInstances variables.
| Code Block | ||||||
|---|---|---|---|---|---|---|
| ||||||
import jenkins.model.Jenkins
import net.sf.json.JSONArray
import net.sf.json.JSONObject
import com.xpandit.plugins.xrayjenkins.model.HostingType
import com.xpandit.plugins.xrayjenkins.model.XrayInstance
import com.xpandit.plugins.xrayjenkins.model.ServerConfiguration

// true, if you want the old Jira instances removed, false otherwise.
boolean deleteOldInstances = false

/* Represents the Jira instances to be added to the Global Jenkins configuration.
 * - name: the name of the Jira instance to be displayed to the users.
 * - hostingType: must be one of two values. 'SERVER' for Server or Data Center instances OR 'CLOUD' for cloud instances.
 * - url: [ONLY FOR SERVER INSTANCES] the base URL/IP of the Jira server address.
 * - credentialId: [OPTIONAL] the credential ID from the 'Credentials' plugin that will be used to authenticate the jira REST API requests.
 */
JSONArray instances = [
[ | ||||||
| Code Block | ||||||
| ||||||
import jenkins.model.Jenkins import net.sf.json.JSONArray import net.sf.json.JSONObject import com.xpandit.plugins.xrayjenkins.model.HostingType import com.xpandit.plugins.xrayjenkins.model.XrayInstance import com.xpandit.plugins.xrayjenkins.model.ServerConfiguration // true, if you want the old Jira instances removed, false otherwise. boolean deleteOldInstances = false /* Represents the Jira instances to be added to the Global Jenkins configuration. * - name: the name of the Jira instance to be displayed to the users. * - hostingType: must be one of two values. 'SERVER' for Server or Data Center instances OR 'CLOUD' for cloud instances. * - url: [ONLY FOR SERVER INSTANCES] the base URL/IP of the Jira server address. * - credentialId: [OPTIONAL] the credential ID from the 'Credentials' plugin that will be used to authenticate the jira REST API requests. */ JSONArray instances = [ [ name: 'my Jira server', hostingType: 'SERVER', url: 'http://example.com', credentialId: 'xxxxxxxx-xxxx-xxxx-xxxx-xxxxxxxxxxxx' // Credential ID from the 'Credentials' plugin. ], name: 'my Jira [server', namehostingType: 'my Jira cloudSERVER', hostingTypeurl: 'CLOUDhttp://example.com', credentialId: 'xxxxxxxx-xxxx-xxxx-xxxx-xxxxxxxxxxxx' // Credential ID from the 'Credentials' plugin. ] ] as JSONArray // ~~~ Saves the new Jira instances into the Jenkins global configuration ~~~ ServerConfiguration config = ServerConfiguration.get() List<XrayInstance> xrayInstances = new ArrayList<XrayInstance>() instances.each {instance -> String name = instance.optString('name', '') String hostingTypeString = instance.optString('hostingType', '') String url = instance.optString('url', '') String credentialId = instance.optString('credentialId', null) HostingType hostingType = hostingTypeString == 'CLOUD' ? HostingType.CLOUD : HostingType.SERVER xrayInstances.add(new XrayInstance(null, name, hostingType, url, credentialId)) } List<XrayInstance> oldXrayInstances = config.getServerInstances() if (!deleteOldInstances && oldXrayInstances != null) { xrayInstances.addAll(oldXrayInstances) } config.setServerInstances(xrayInstances) config.save() println('Xray Jira Instances created :)') |
Troubleshooting
The build process is failing with status code 403
When you check the log, it has the following:

By default, when you successively try to log into Jira with the wrong credentials, the Jira instance will prompt you to provide a CAPTCHA the next time you try to log in. It is not possible to provide this information via the build process, so it will fail with status code 403 Forbidden.
You will need to log into Jira via the browser and provide the CAPTCHA.

If you are a Jira administrator, you can go to Jira administration > User Management and reset the failed login.

Using Jira with a SSL connection
SSL connections are supported by the plug-in, however, the CA certificate must be available and obtainable publicly over the internet.
If you want to use a private CA certificate when connecting to your Jira instance, please make sure that the certificate is installed in the Jenkins Manager node and also in all your Worker nodes.
To install the certificate, you can follow CloudBees guidelines. You then can run the following commands in the command line in each of your Jenkins nodes to check if the CA certificate is correctly installed (using the SSLpoke.java script)
...
| language | bash |
|---|---|
| title | Check if CA certificate is installed |
...
,
        [
                name: 'my Jira cloud',
                hostingType: 'CLOUD',
                credentialId: 'xxxxxxxx-xxxx-xxxx-xxxx-xxxxxxxxxxxx' // Credential ID from the 'Credentials' plugin.
        ]
] as JSONArray

// ~~~ Saves the new Jira instances into the Jenkins global configuration ~~~
ServerConfiguration config = ServerConfiguration.get()
List<XrayInstance> xrayInstances = new ArrayList<XrayInstance>()

instances.each {instance ->
    String name = instance.optString('name', '')
    String hostingTypeString = instance.optString('hostingType', '')
    String url = instance.optString('url', '')
    String credentialId = instance.optString('credentialId', null)

    HostingType hostingType = hostingTypeString == 'CLOUD' ? HostingType.CLOUD : HostingType.SERVER

    xrayInstances.add(new XrayInstance(null, name, hostingType, url, credentialId))
}

List<XrayInstance> oldXrayInstances = config.getServerInstances()
if (!deleteOldInstances && oldXrayInstances != null) {
    xrayInstances.addAll(oldXrayInstances)
}

config.setServerInstances(xrayInstances)
config.save()

println('Xray Jira Instances created :)') |
Troubleshooting
The build process is failing with status code 403
When you check the log, it has the following:
By default, when you successively try to log into Jira with the wrong credentials, the Jira instance will prompt you to provide a CAPTCHA the next time you try to log in. It is not possible to provide this information via the build process, so it will fail with status code 403 Forbidden.
You will need to log into Jira via the browser and provide the CAPTCHA.
If you are a Jira administrator, you can go to Jira administration > User Management and reset the failed login.
...
The Jira xxx configuration of this task was not found
...