
The Test Repository is a project level Test organisation feature that allows users to organise Tests in an hierarchical way, in folders. Have always in mind that each project has its own Test Repository.
Please note
For editing the Test Repository of a given project, the user must be able to access the project and have one of the roles configured in Xray settings.

Overview of the Test Repository UI
The Test Repository can be accessed from the project left side bar by choosing the Test Repository icon.

- A: Folders section
- A1: "All" and "Orphand" metafolders
- A2: the Test Repository itself, composed of folders and sub-folders with Tests organized within them
- A3: CRUD actions for the current selected folder (e.g. create, rename, delte)
- A4: information about the the amount of Tests within in the current folder and the total Tests, including sub-folders
- B: Tests section
- B1: path of the folder
- B2: filter for Tests
- B3: additional information about the shown Tests vs the actual total amount of Tests within the current folder
- B4: ranked list of Tests within the current folder (only direct childs)
Folder Actions
A folder can be selected by clicking on it.
After being selected, the user can do some context actions or use the icons available at the bottom of the folders' section.
Create
To create a new folder:
Step 1: Click on the parent folder
Step 2: Click on the proper add icon at the bottom of folders section

Step 3: Type the name for the folder

Step 4: Press Enter or click outside of the selected folder
Rename
To rename an existing folder:
Step 1: Double-click on the folder or click the proper edit icon at the bottom of the folders' section after selecting the folder

Step 2: Type the new name for the folder
Step 3: Press Enter or click outside of the selected folder
Remove
Users can easily remove an existing folder, and its descendant folders.
Tests that were in one of the removed folders will not be erased; Tests will be removed from the Test Repository and will appear in the Orphans meta-folder, so they can be organized in the Test Repository again, if needed.
In order to remove a folder:
Step 1: Click on the parent folder
Step 2: Click on the proper remove icon at the bottom of folders section

Step 3: Confirm removal of folder

Expand/Collapse
Folders can be expanded or collapsed easily just by clicking in the folder's icon.


Expand/Collapse All
Expand all and collapse all actions are available as contextual actions. These actions alow
In order to expand all or collapse all the subfolders of a folder:
Step 1: Click on the parent folder
Step 2: Use the context action Expand All or Collapse All


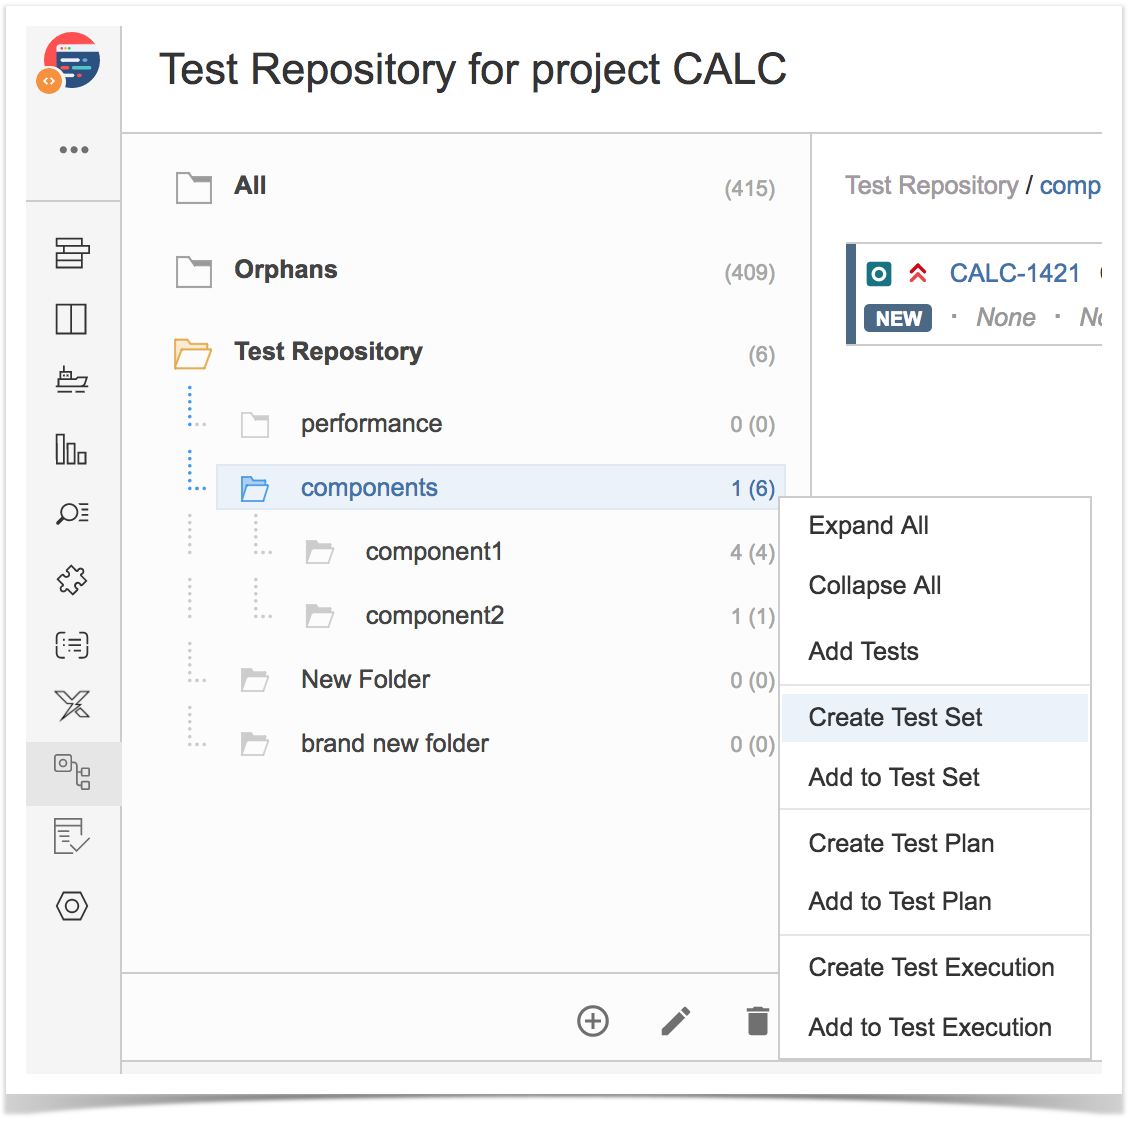
Create Test Set
Users can easily create a Test Set with all the Tests in a given folder and its descendant folders.
The ranking of the Tests within the Test Set will respect the ranking they have in the Test Repository folder.
In order to create a Test Set with all the Tests of a given folder, including its descendants:
Step 1: Click on the folder
Step 2: Use the context action "Create Test Set"
Step 3: Fill out the Test Set fields and click "Create". Your brand new Test Set is created with all the Tests, in the proper order.


Add to Test Set(s)
Users can add Tests to an existing Test Set with all the Tests in a given folder and its descendant folders.
The ranking of the Tests within the Test Set will respect the ranking they have in the Test Repository folder. If Tests already exist in the destination Test Set, their ranking in the Test Set is not changed.
In order to add Tests from a folder, including its descendants, to some existing Test Set(s):
Step 1: Click on the folder
Step 2: Use the context action "Add to Test Set"

Step 3: Choose the Test Set(s) key(s) and select "add selected". Test Set(s) will now be updated.


Create Test Execution
Users can easily create a Test Execution with all the Tests in a given folder and its descendant folders.
The ranking of the Tests within the Test Execution will respect the ranking they have in the Test Repository folder.
In order to create a Test Execution with all the Tests of a given folder, including its descendants:
Step 1: Click on the folder
Step 2: Use the context action "Create Test Execution"

Step 3: Fill out the Test Execution fields and click "Create". Your brand new Test Execution is created with all the Tests, in the proper order.


Add to Test Executon(s)
Users can add Tests to an existing Test Execution with all the Tests in a given folder and its descendant folders.
The ranking of the Tests within the Test Execution will respect the ranking they have in the Test Repository folder. If Tests already exist in the destination Test Execution, their ranking in the Test Execution is not changed.
In order to add Tests from a folder, including its descendants, to some existing Test Execution(s):
Step 1: Click on the folder
Step 2: Use the context action "Add to Test Execution"

Step 3: Choose the Test Execution(s) key(s) and select "add selected". Test Execution(s) will now be updated.


Create Test Plan
TO BE COMPLETED.
Add to Test Plan
TO BE COMPLETED.
Tests Actions
Tests can be selected by clicking on them. Multiple selection is possible by using the "Ctrl" key (on Windows) or the "Cmd" key (on OS X). The "shift" keys can be used to select a bunch of Tests, starting in the current selected one until the clicked one.
After selecting one or more Tests, context actions can then be done on them, such as creating a Test Set, Test Execution, etc.

Moving to another folder
Tests can be moved to another folder just by using drag-and-drop to the destination folder.
Users can also use this operation for "moving" Tests (i.e. adding Tests) from the meta-folders (i.e. All, Orphans) to folders within the Test Repository.

Ordering / Ranking
Tests can be ranked within a folder just by using drag-and-drop.

Create Test Set
Add to Test Set(s)
Create Test Execution
Add to Test Execution(s)
Create Test Plan
TO BE COMPLETED.
Add to Test Plan(s)
TO BE COMPLETED.
Move to Orphans
Users can move Tests to the Orphans folder; this actualy corresponds to remove them from the Test Repository.
In order to move Tests fo the Orphans meta-folder:
Step 1: Select the Tests you want
Step 2: Use the context action "Move to Orphans"

Step 3: Confirm by clicking on "Move to Orphans"

Please note
; the algorithm starts by adding the Tests of the folder and then iterating to next child folder; if no child folder exists, then it iterates to the next sibling folder.