You can use the Xray's Test Case Importer to import Tests from a CSV or JSON source file.
The Test Case Importer follows a wizard like interface, guiding you through the process which envolves:
- preparing data (CSV/JSON) beforehand
- submit the data
- choose the destination project along with some global settings
- for CSV, define the mapping of CSV columns <=> fields in Jira
Please note
The Test Case Importer is only able to create Test issues. If you wish to create other types of issues, you should use Jira's CSV importer instead. Note that Jira's CSV importer is not able to handle any Xray related semantics though.
CSV Importing
Preparing the source file
The CSV source file must follow some simple rules.
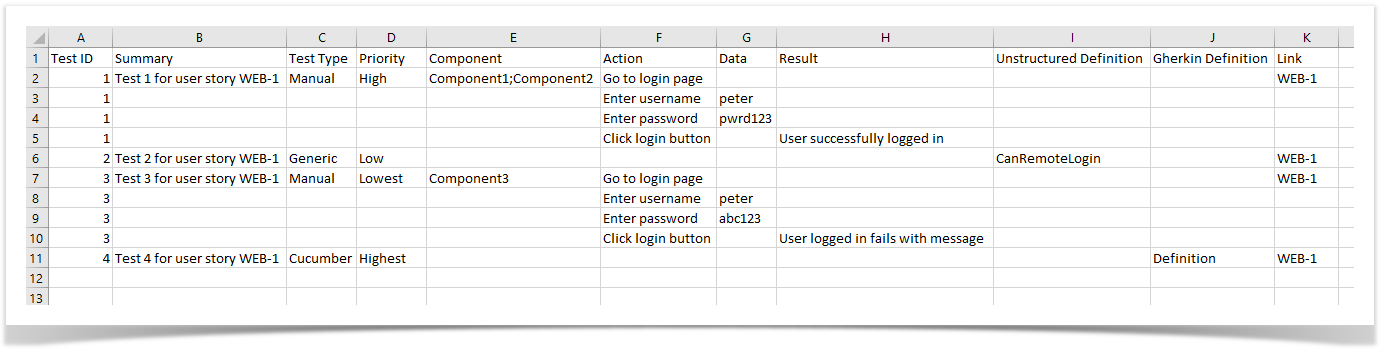
You can name the fields as you wish since they are going to be mapped during the importation process, but there are three mandatory fields:
- Test ID – this is the field used to identify which lines belongs to which test case.
- Summary – this field is mandatory since Jira doesn’t allow you to create an issue without a summary.
- Test Type – this field defines the Test type of the each test to import. The
Test Typemust match one of the types of the project to which the test is being imported.
Here is an example of a source file as seen in a spreadsheet application:
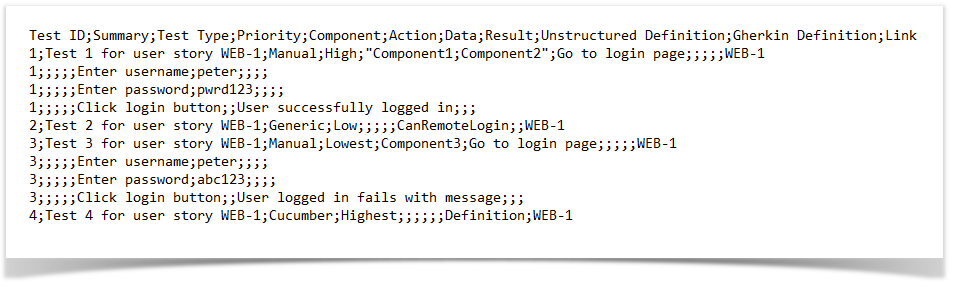
Here is the same example as seen in a text editor:
Importing into multiple projects
The tests can all be imported to the same project or into multiple projects, one column in the source file can be used to define the destination project (either by having its key or id).
CSV column delimiter
If you choose the "," (comma) as the CSV column delimiter, then you must use quotation marks around any field that contains commas. The same is true if you use ";" (semicolon) as a delimiter and you want to use them in a field, for example as a list value delimiter (see the example above).
Fields with line breaks
If you need to use new lines within a field, for example, in the issue description, then you need to quote the field.
Importing
Go to the "Xray" menu and then Select "Test Case Importer" and the select the CSV file format:

The Test Case Importer is also accessible through the Test Plan Board of a project with Xray:

And in the old Jira UI:


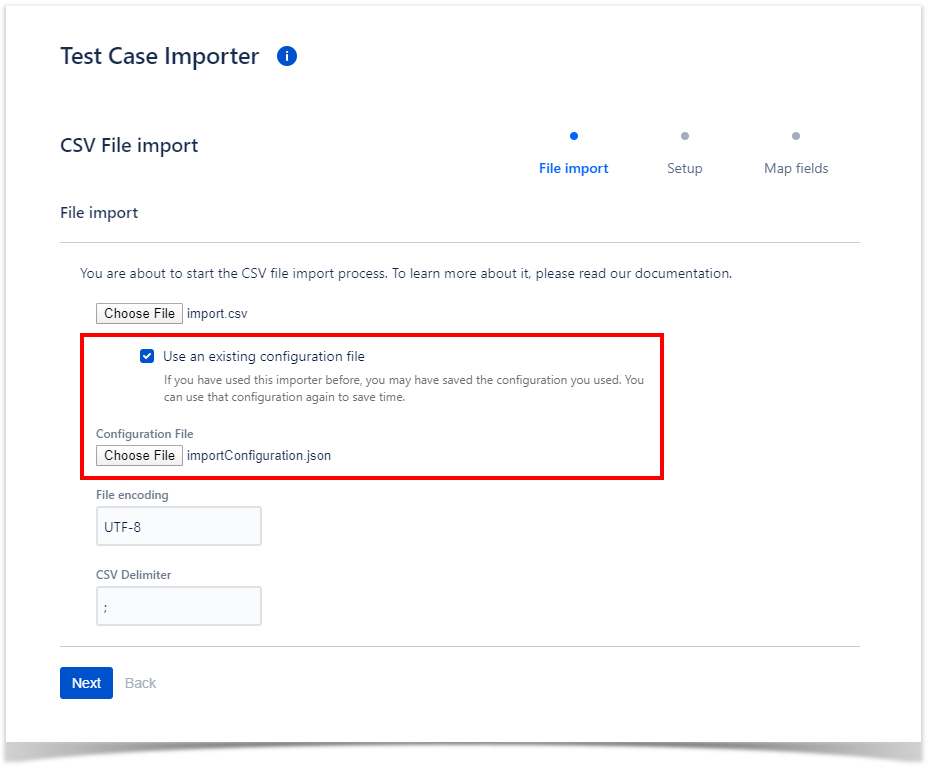
File Import step
Provide the source file and settings regarding the file to import.

- An existing configuration file saved from the last import made with this file or a similar one.
- The file encoding used in the CSV source file, this is especially important when the file contains non-ASCII characters. The supported encodings can be seen here.
- The CSV delimiter is the column delimiter used
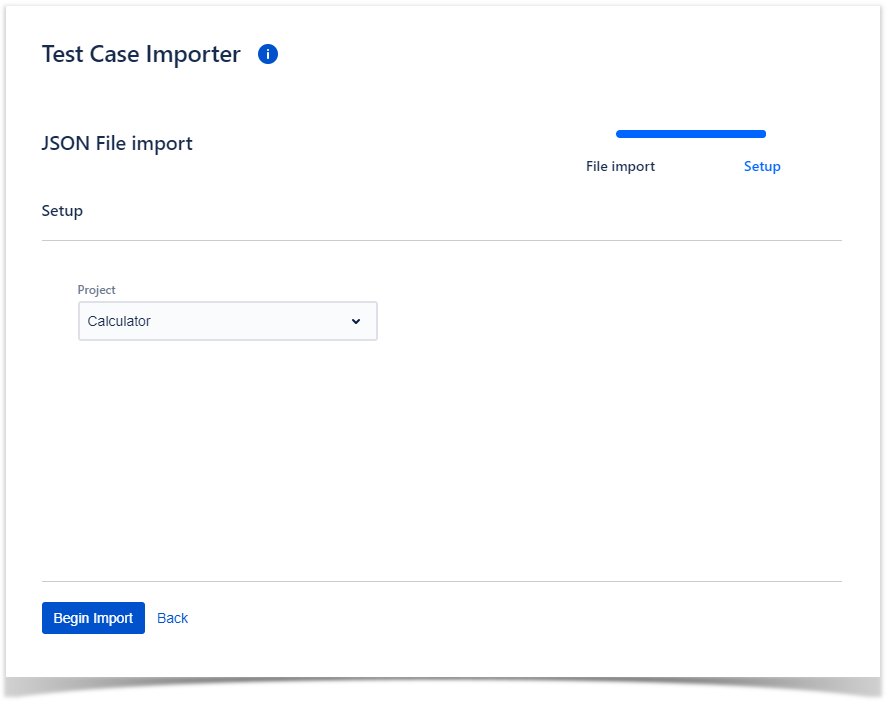
Setup step
Aditional setup information, for choosing the destination project along some settings related with the source data.
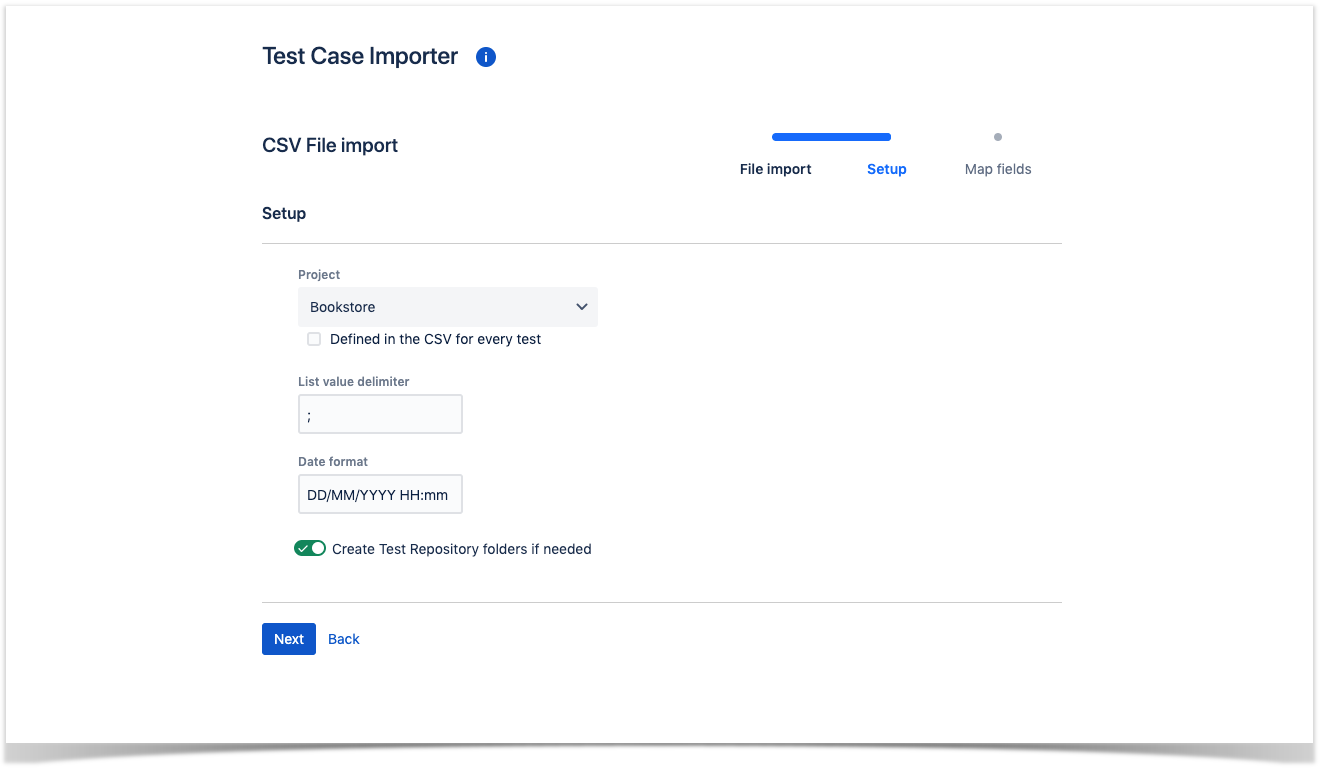
- The default project to which the tests will be imported into. Tests without project information associated will be imported into the project defined by this field.
- The list value delimiter is the delimiter used for fields that are lists of values.
- Date format used to parse the fields that are representing dates, refer to this page for help on how to define a valid format.
- Flag indicating if Test Repository folders should be created automatically if they do not exist.
Map fields step
During this step, you'll define the mapping of columns to Jira/Xray fields.
There are two mandatory fields that must be mapped: Summary and Test Type.
Besides these ones, if you have defined additional fields as mandatory for Test issues, then you will also need to specify their mapping.
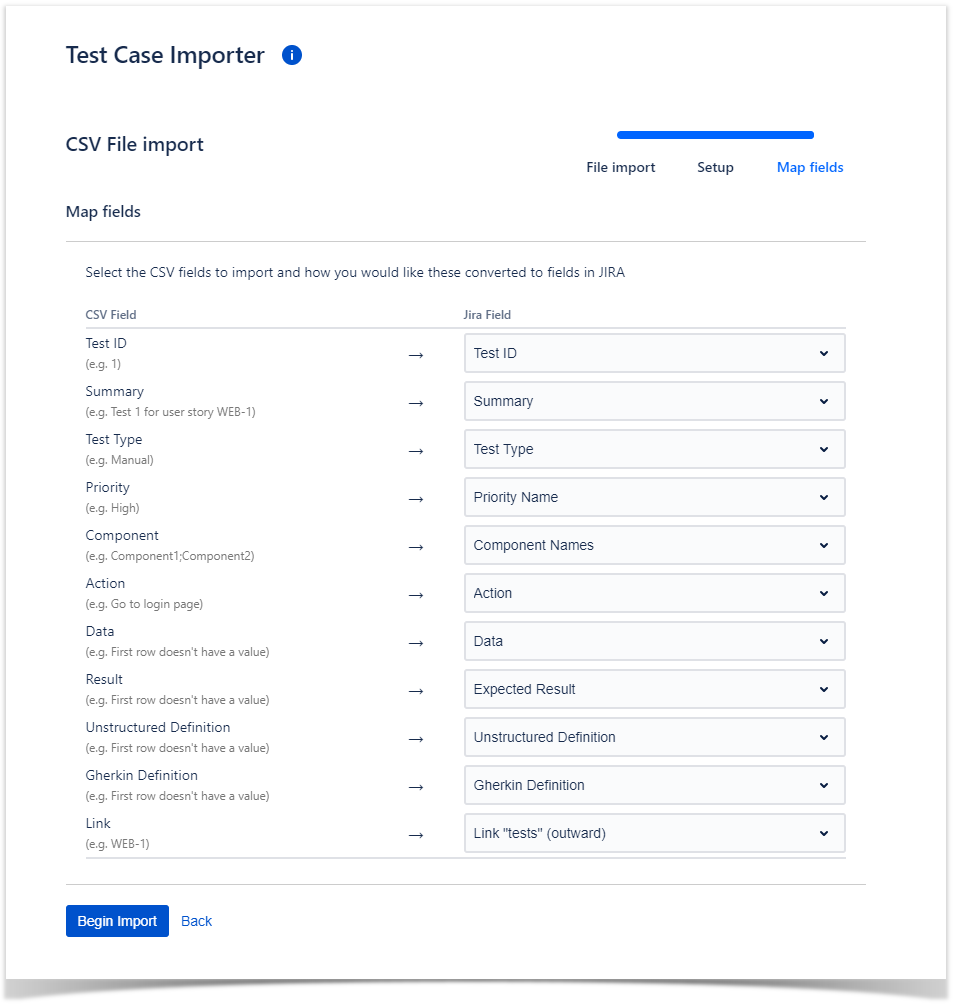
Project field
The project to which the test will be imported can be defined for each test in a field. The fields "Project Key" or "Project Id" can be used for this.
If no project field is mapped or when the value in this field is empty, the project selected in the Setup step will be the one where these tests will be imported into.

Test Repository Folder field
The Test Repository folder path to the folder in which the Tests will be associated.
The folder path consists of folder names separated by the "/" character, for example: Main Tests/Sub Tests 1/Inner Tests 2

List fields
List fields can hold multiple values separated by the list delimiter defined in the Setup step.

Link fields
Links can be created between imported tests and other existent issues using the "Link ..." Jira fields.
The field is a list field and the value of the respective field should hold a list the issue keys of the issues to link to the test.
The direction (inward/outward) can also be specified.

Issue links limit
Due to technical restrictions there is a limit to the total amount of links the import file can have. The limit is 2000 issue links apart from the first one in every test.
In other words, every test in the import file can have an issue link defined, every additional issue link after that one, added up can be no more than 2000.
An error will be shown if this limit is exceeded.
Datetime fields
Datetime fields must have values that can be parsed using the Datetime format in the Setup step.
This page explains possible date formats and respective values.

Test step fields
You can also map columns to test step fields for manual tests.
The fields are in the group "Xray Test Step Fields".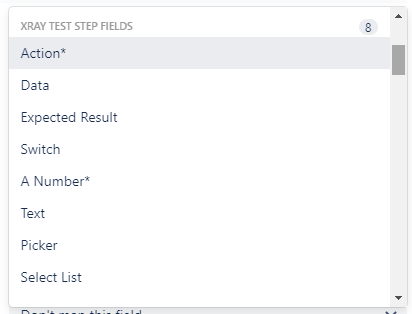
The configured test step fields for every project in the instance is shown here and the ones that are required are shown with a "*".
After this step the import process will start.
JSON importing
Preparing the source file
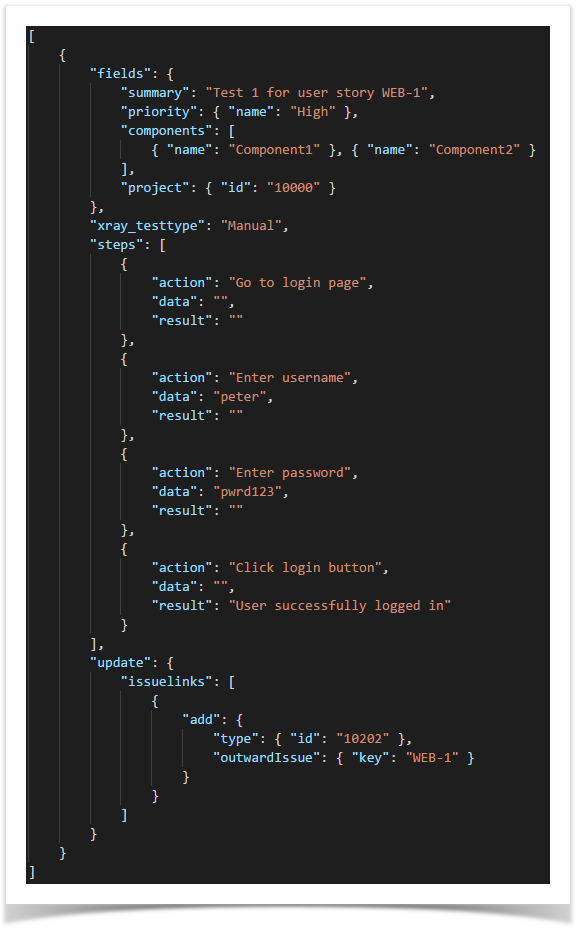
The JSON source file must have the same structure as the one used in the import through the REST API.
Example of one test in the JSON import format:
Importing
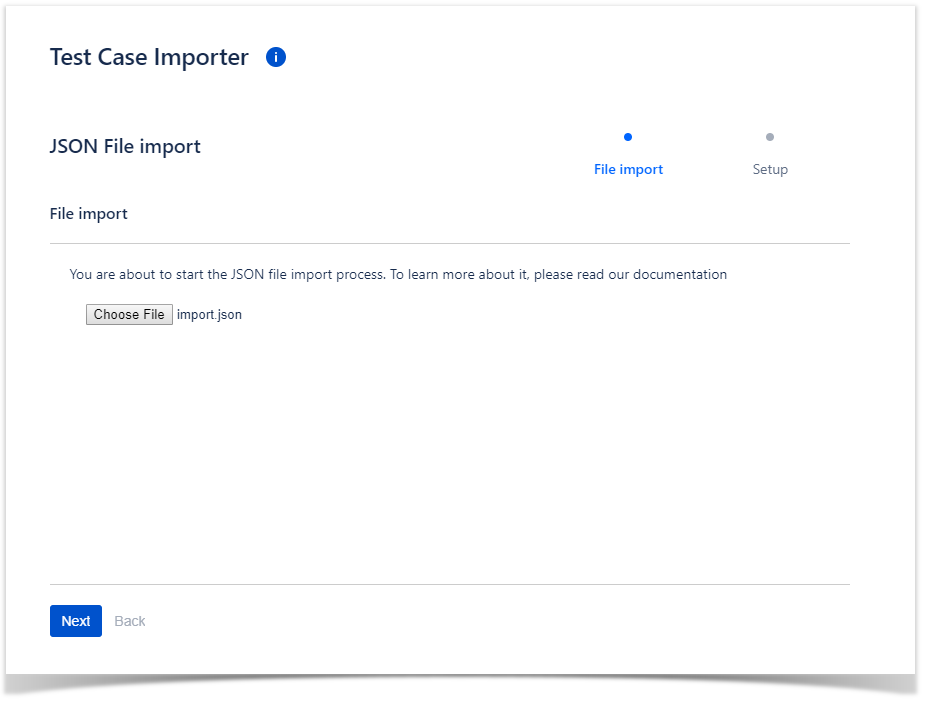
To import tests using a JSON source file, you must choose the JSON file format in the Test Case Importer.

File Import step
Choosing the file to import.
Setup step
Choosing the default project to import into. If each test to import already refers to a project, this field is not necessary to be filled, otherwise you should choose a project.
Results of the import process
After the import process has began its status will be periodically updated in the Test Case Importer page. No new import process can be started until the current one finishes.

After the process finishes the result will be visible for about a day and then it will be removed from the page.
Example of 5 tests imported successfully:

You may also download the detailed import results, this is useful to get the issue keys of the imported test issues and also to see which tests were not imported and why.
Example of 4 tests imported out of 5:

Detailed import result for the example above:
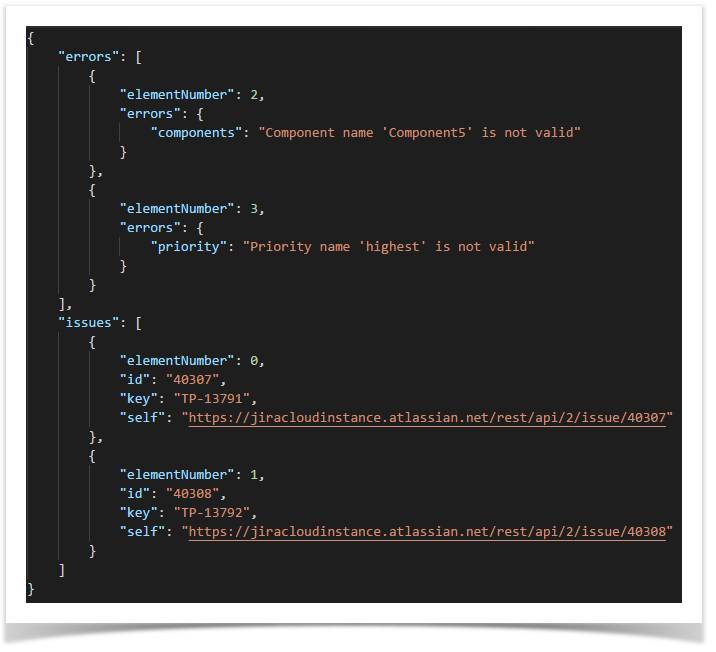
In the detailed import result, the elementNumber field represents to which test the information corresponds (elementNumber 0 being the first test).
When importing into Test Repository folders, if for any reason the process is unable to create a folder or move a test to the respective folder, the respective tests will be still be migrated and a warning detailing the situation will be written to the import result.
Configuration file
When importing a file, when the import status is being shown, you can download the configuration file that will have all the settings you've set:

And then you can use it when you import the next file (if the configurations are supposed to be the same or similar):