Overview

With the acquisition of "Automation for Jira" app by Atlassian, Jira Cloud now provides built-in automation capabilities allowing easy implementation of automated Jira processes and workflows.

This way, users can implement rules that are triggered upon some event, executed if certain condition(s) are met and, that perform certain action(s). 

Rules can also be triggered manually or may be scheduled.

Since Xray uses issue types for most of its entities, you can take advantage of it to implement some rules related to Xray.


Automation rules are available and, can be created, from the project settings, namely from the "Automation" tab.


This document highlights some examples around triggering test automation but you may implement other automation rules related to your processes.


Please note

The following examples are provided as-is, no warranties attached; use them carefully.

Please feel free to adapt them to your needs. 

Note: We don't provide support for Jira Cloud's Automation capabilities; if you have doubts concerning its usage, please contact Atlassian. If you have specific needs related to Xray, feel free to reach out Xray support and share them with us.


Concepts

Jira Automation allows project administrators to implement rules that can make certain processes automated, guaranteeing efficiency and consistency.

The main concepts of Jira Automation follow a very simple approach for defining an automation rule: if a certain "thing" happens (trigger) and certain conditions are met, then execute one or more actions.

  • Trigger: Triggers start the execution of a rule. Triggers can listen for events or be scheduled to run.
    • manual
    • upon field or workflow status changes 
    • upon releasing
    • periodic
    • ...
  • Condition: Actions will only execute if all conditions preceding them pass.
    • "If" statement
    • Issue fields condition
    • ...
  • Action: Actions perform changes to a system. 
    • change fields on issues
    • transition issues
    • web request
    • log
    • ...


It's also possible to run actions on issues that are related to the issue that triggered the rule, using "branches".


Please note

Automation rules run asynchronously.  Some actions can run in parallel but usually they're sequential. There is no interaction with the user (except if the trigger was set off manually from Jira's UI).

Usage Examples

Jenkins

Trigger a Jenkins project build from an issue

In this very simple scenario, we'll implement a rule, triggered manually, that will trigger a Jenkins project/job. The action will be available from the "Automation" panel, in all issues of the selected project.

We're assuming that:

  • you just want to trigger a CI job, period; this job may be totally unrelated to the issue from where you triggered it
  • what the CI job will do, including if it will report the results back to Xray or not, is not relevant


Jenkins configuration

In Jenkins, we need to generate an API token for some user, which can be done from the profile settings page.


At the project level, we need to enable remote build triggers, so we can obtain an "authentication token" to be used in the HTTP request afterwards.

The project itself is a normal one, without parameters.


Automation configuration

  1. create a new rule and define the "When" (i.e. when it to should be triggered), to be "Manually triggered"

2. define an action (i.e. the "Then") as "Send webhook" and configure it as follows

  • the Webhook URL provided above follows this syntax:
    • <jenkins_base_url>/job/<name_of_jenkins_project_job>/build?token=<token>
  • besides the "Content-Type" header that should be "application/json", define also an "Authorization" header having the value "Basic <auth>", where  the base64 encoded <auth> can be generated using your Jenkins API credentials

After publishing the rule, you can go to the screen of an issue and trigger the Jenkins project/job.


In this case, since Jenkins was configured to report results back to Xray, a new Test Execution would be created in Jira/Xray.

Trigger a Jenkins project build from a Test Plan and report the results back to it

In this simple scenario, we'll implement a rule, triggered manually, that will trigger a Jenkins project/job. The action will be available from the "Automation" panel, for all Test Plan issues of the selected project.

We're assuming that:

  • you just want to trigger a CI job, period; this job may be totally unrelated to the issue from where you triggered it
  • the results will be submitted back to Xray, if the project is configured to do so in Jenkins


Jenkins configuration

In Jenkins, we need to generate an API token for some user, which can be done from the profile settings page.


At the project level, we need to enable remote build triggers, so we can obtain an "authentication token" to be used in the HTTP request afterwards.

The project itself is a normal one; the only thing relevant to mention is that this project is a parameterized one, so it receives TESTPLAN, that in our case will be coming from Jira Cloud.


Automation configuration

  1. create a new rule and define the "When" (i.e. when it to should be triggered ), to be "Manually triggered"

2. define the condition so that this rule can only be executed from Test Plan issue

3. define an action (i.e. the "Then") as "Send webhook" and configure it as follows

  • the Webhook URL provided above follows this syntax:
    • <jenkins_base_url>/job/<name_of_jenkins_project_job>/buildWithParameters?token=<token>&TESTPLAN={{issue.key}}
  • besides the "Content-Type" header that should be "application/json", define also an "Authorization" header having the value "Basic <auth>", where  the base64 encoded <auth> can be generated using your Jenkins API credentials


After publishing the rule, you can go to the screen of an issue and trigger the Jenkins project/job.


In this case, since Jenkins was configured to report results back to Xray, a new Test Execution would be created and linked back to the source Test Plan where the automation was triggered from.

Bitbucket Cloud/Pipelines

Trigger a Bitbucket pipeline build from an issue

In this very simple scenario, we'll implement a rule, triggered manually, that will trigger a Bitbucket pipeline build. The action will be available from the "Automation" panel, in all issues of the selected project.

We're assuming that:

  • you just want to trigger a CI job, period; this job may be totally unrelated to the issue from where you triggered it
  • what the CI job will do, including if it will report the results back to Xray or not, is not relevant


Bitbucket configuration

In Bitbucket we need to configure the pipeline as usual; no special configuration is needed.  Some variables can be used and defined at multiple layers.

bitbucket-pipelines.yml
# Use Maven 3.5 and JDK8
image: maven:3.5-jdk-8


pipelines:
  default:
    - step:
        caches:
          - maven
        script:
          - |
              echo "building my amazing repo..."
              mvn test
              export token=$(curl -H "Content-Type: application/json" -X POST --data "{ \"client_id\": \"$client_id\",\"client_secret\": \"$client_secret\" }" https://xray.cloud.xpand-it.com/api/v1/authenticate| tr -d '"')  
              echo $token
              curl -H "Content-Type: text/xml" -H "Authorization: Bearer $token" --data @target/surefire-reports/TEST-com.xpand.java.CalcTest.xml  "https://xray.cloud.xpand-it.com/api/v1/import/execution/junit?projectKey=CALC&testPlanKey=$testplan"
              echo "done


Automation configuration

  1. create a new rule and define the "When" (i.e. when it to should be triggered), to be "Manually triggered"

2. define an action (i.e. the "Then") as "Send webhook" and configure it as follows

custom data (i.e. HTTP body content)
{
    "target": {
      "ref_type": "branch",
      "type": "pipeline_ref_target",
      "ref_name": "master"
    }
}
  • the Webhook URL provided above follows the Bitbucket pipelines REST API syntax 
    • https://api.bitbucket.org/2.0/repositories/<workspace>/<repository>/pipelines/
  • the Webhook HTTP POST body content, defined in the "Custom data" field, will be used to identify the target branch and also a variable containing the Test Plan issue key that will be accessible to the pipeline build

    custom data (i.e. HTTP body content)
    {
        "target": {
          "ref_type": "branch",
          "type": "pipeline_ref_target",
          "ref_name": "master"
        }
     ,
        "variables": [
          {
            "key": "testplan",
            "value": "{{issue.key}}"
          }
        ]
    }
  • besides the "Content-Type" header that should be "application/json", define also an "Authorization" header having the value "Basic <auth>", where  the base64 encoded <auth> can be generated using your Bitbucket credentials


After publishing the rule, you can go to the screen of an issue and trigger the Bitbucket pipeline build.


In this case, a new Test Execution would be created in Jira/Xray.

Trigger a Bitbucket pipeline build from a Test Plan and report the results back to it

In this simple scenario, we'll implement a rule, triggered manually, that will trigger a Bitbucket pipeline build. The action will be available from the "Automation" panel, for all Test Plan issues of the selected project.

We're assuming that:

  • you just want to trigger a CI job, period; this job may be totally unrelated to the issue from where you triggered it
  • the results will be submitted back to Xray, if the pipeline is configured to do so


Bitbucket configuration

In Bitbucket pipeline definition we will make use of a variable named "testplan" (referenced by $testplan). This variable does not need to be defined explicitly as such in Bitbucket; Bitbucket will pass to the pipeline all "variables" identified in the REST API request, if so, whenever triggering the pipeline. 

bitbucket-pipelines.yml
# Use Maven 3.5 and JDK8
image: maven:3.5-jdk-8


pipelines:
  default:
    - step:
        caches:
          - maven
        script:
          - |
              echo "building my amazing repo..."
              mvn test
              export token=$(curl -H "Content-Type: application/json" -X POST --data "{ \"client_id\": \"$client_id\",\"client_secret\": \"$client_secret\" }" https://xray.cloud.xpand-it.com/api/v1/authenticate| tr -d '"')  
              echo $token
              curl -H "Content-Type: text/xml" -H "Authorization: Bearer $token" --data @target/surefire-reports/TEST-com.xpand.java.CalcTest.xml  "https://xray.cloud.xpand-it.com/api/v1/import/execution/junit?projectKey=CALC&testPlanKey=$testplan"
              echo "done


Automation configuration

  1. create a new rule and define the "When" (i.e. when it to should be triggered ), to be "Manually triggered"

2. define the condition so that this rule can only be executed from Test Plan issue

3. define an action (i.e. the "Then") as "Send webhook" and configure it as follows


  • the Webhook URL provided above follows the Bitbucket pipelines REST API syntax
    • https://api.bitbucket.org/2.0/repositories/<workspace>/<repository>/pipelines/
  • the Webhook HTTP POST body content, defined in the "Custom data" field, will be used to identify the target branch and also a variable containing the Test Plan issue key that will be accessible to the pipeline build

    custom data (i.e. HTTP body content)
    {
        "target": {
          "ref_type": "branch",
          "type": "pipeline_ref_target",
          "ref_name": "master"
        }
     ,
        "variables": [
          {
            "key": "testplan",
            "value": "{{issue.key}}"
          }
        ]
    }
  • besides the "Content-Type" header that should be "application/json", define also an "Authorization" header having the value "Basic <auth>", where  the base64 encoded <auth> can be generated using your Bitbucket credentials

After publishing the rule, you can go to the screen of an issue and trigger the Jenkins project/job.


In this case, a new Test Execution would be created and linked back to the source Test Plan where the automation was triggered from

Bamboo Server

Trigger a Bamboo plan build from an issue

In this very simple scenario, we'll implement a rule, triggered manually, that will trigger a Bamboo plan build. The action will be available from the "Automation" panel, in all issues of the selected project.

We're assuming that:

  • you just want to trigger a CI job, period; this job may be totally unrelated to the issue from where you triggered it
  • what the CI job will do, including if it will report the results back to Xray or not, is not relevant


 Bamboo configuration

In a Bamboo Plan Configuration we will use the Script task to import the results back to Xray. We have defined internal Bamboo variables for the CLIENT_ID, CLIENT_SECRET, that are required for authentication and the TESTPLAN to associate on the Xray side.

token=$(curl -H "Content-Type: application/json" -X POST --data '{ "client_id": "${bamboo.CLIENT_ID}","client_secret": "${bamboo.CLIENT_SECRET}" }' https://xray.cloud.getxray.app/api/v1/authenticate| tr -d '"');
curl -H "Content-Type: text/xml" -X POST -H "Authorization: Bearer $token"  --data @"/home/jira/bamboo-home/xml-data/build-dir/XRAY-JAV-JOB1/java-junit-Bookstore/target/surefire-reports/TEST-com.xpand.java.BookstoreTest.xml" https://xray.cloud.getxray.app/api/v1/import/execution/junit?projectKey=XT&testPlanKey=${bamboo.TESTPLAN}


Automation configuration

  1. create a new rule and define the "When" (i.e. when it to should be triggered), to be "Manually triggered"

2. define an action (i.e. the "Then") as "Send webhook" and configure it as follows

  • the Webhook URL provided above follows this syntax:
    • <bamboo_base_url>/rest/api/latest/queue/${projectKey}-${planKey}
  • the Webhook HTTP POST body content, defined in the "Custom data" field, will be used to identify the stages to run and other parameters

    custom data (i.e. HTTP body content)
    default&ExecuteAllStages=true
  • besides the "Content-Type" header that should be "application/x-www-form-urlencoded", define also an "Authorization" header having the value "Basic <auth>", where  the base64 encoded <auth> can be generated using your Bamboo credentials


After publishing the rule, you can go to the screen of an issue and trigger the Bamboo plan build.


In this case, since Bamboo was configured to report results back to Xray, a new Test Execution would be created in Jira/Xray.

Trigger a Bamboo plan build from a Test Plan and report the results back to it

In this simple scenario, we'll implement a rule, triggered manually, that will trigger a Bamboo's plan build. The action will be available from the "Automation" panel, for all Test Plan issues of the selected project.

We're assuming that:

  • you just want to trigger a CI job, period; this job may be totally unrelated to the issue from where you triggered it
  • the results will be submitted back to Xray, if the project is configured to do so in Bamboo


Bamboo configuration

The project itself is a normal one; the only two things relevant to mention are:

  • that this project is a parameterized one, so it receives a TESTPLAN variable, that in our case will be coming from Jira and that we have added a step to import the results back to Xray.

  • For authentication we use internal Bamboo variables to define the CLIENT_ID, CLIENT_SECRET and the TESTPLAN to associate on the Xray side.

token=$(curl -H "Content-Type: application/json" -X POST --data '{ "client_id": "${bamboo.CLIENT_ID}","client_secret": "${bamboo.CLIENT_SECRET}" }' https://xray.cloud.getxray.app/api/v1/authenticate| tr -d '"');
curl -H "Content-Type: text/xml" -X POST -H "Authorization: Bearer $token"  --data @"/home/jira/bamboo-home/xml-data/build-dir/XRAY-JAV-JOB1/java-junit-Bookstore/target/surefire-reports/TEST-com.xpand.java.BookstoreTest.xml" https://xray.cloud.getxray.app/api/v1/import/execution/junit?projectKey=XT&testPlanKey=${bamboo.TESTPLAN}


Automation configuration

  1. create a new rule and define the "When" (i.e. when it to should be triggered ), to be "Manually triggered"

2. define the condition so that this rule can only be executed from Test Plan issue

3. define an action (i.e. the "Then") as "Send webhook" and configure it as follows

  • the Webhook URL provided above follows this syntax:
    • <bamboo_base_url>/rest/api/latest/queue/${projectKey}-${planKey}
  • the Webhook HTTP POST body content, defined in the "Custom data" field, will be used to identify the stages to run and other parameters

    custom data (i.e. HTTP body content)
    default&ExecuteAllStages=true&bamboo.TESTPLAN={{issue.key}}
  • besides the "Content-Type" header that should be "application/x-www-form-urlencoded", define also an "Authorization" header having the value "Basic <auth>", where  the base64 encoded <auth> can be generated using your Bamboo credentials


After publishing the rule, you can go to the screen of an issue and trigger the Bamboo plan.


In this case, since Bamboo was configured to report results back to Xray, a new Test Execution would be created and linked back to the source Test Plan where the automation was triggered from

GitHub

Trigger a GitHub workflow from a Test Plan and report the results back to it

GitHub configuration

We need to create a personal access token so that we can use GitHub API later on. That can be done from within the user's profile.


The token must have "workflow" scope enabled.


Then, in your GitHub repository containing the project's code and tests, create a workflow under .github/workflows.


The workflow will be triggered upon a "workflow dispatch" event, which is usually manually triggered. However, this event can also be triggered using GitHub's API.

In the following example the workflow will receive the Test Plan issue key as an input parameter. It will then run the build, including the automated tests, and in the end it will report the results back to Xray using the open-source GitHub action xray-action.

/.github/workflows/jira_cloud_report_to_testplan.yaml
name: CI (Jira cloud example with GH action, report results to Test Plan - demo)
on:
  workflow_dispatch:
    inputs:
      test_plan_key:
        description: 'Test Plan issue key'
        required: false
        default: ''

jobs:
  build:
    runs-on: ubuntu-latest
        
    steps:
    - uses: actions/checkout@v1
    - name: Set up Java
      uses: actions/setup-java@v1
      with:
        java-version: '1.8'  
    - name: Cache Maven packages
      uses: actions/cache@v2
      with:
        path: ~/.m2
        key: ${{ runner.os }}-m2-${{ hashFiles('**/pom.xml') }}
        restore-keys: ${{ runner.os }}-m2
    - name: Build with Maven
      run: mvn clean compile test --file pom.xml
    - name: Submit results to Xray
      uses: mikepenz/xray-action@v2.4.5
      with:
        username: ${{ secrets.client_id }}
        password: ${{ secrets.client_secret }}
        xrayCloud: true
        testFormat: "junit"
        testPaths: "**/surefire-reports/*.xml"
        projectKey: "CALC"
        testPlanKey: ${{ github.event.inputs.test_plan_key }}


Automation configuration

  1. create a new rule and define the "When" (i.e. when it to should be triggered ), to be "Manually triggered"

2. define the condition so that this rule can only be executed from Test Plan issue

3. define an action (i.e. the "Then") as "Send webhook" and configure it as follows

  • the web request URL provided above follows this syntax:
    • https://api.github.com/repos/<github_user>/<github_repository>/actions/workflows/<workflow_filename>/dispatches
  • the HTTP POST body content, defined in the "Custom data" field, will be used to identify the original Test Plan issue key and the branch of the code 

    custom data (i.e. HTTP body content)
    {
    "ref":"main",
     "inputs":  {
      "test_plan_key": "{{issue.key}}"
     }
    }
  • besides, the "Accept" header that should be "application/vnd.github.v3+json"; define also an "Authorization" header having the value "Basic <auth>", where  the base64 encoded <auth> can be generated using your GitHub username plus the personal access token obtained earlier (as the password).


After publishing the rule, you can go to the screen of an issue and trigger a workflow run in GitHub.


In this case, since the workflow was configured to report results back to Xray, a new Test Execution would be created and linked back to the source Test Plan where the automation was triggered from.

GitLab

Trigger a GitLab workflow from a Test Plan and report the results back to it

GitLab configuration

We need to create a trigger token so that we can use GitLab API later on. That can be done from within Settings > CI/CD.


Then, in your GitLab repository containing the project's code and tests, create a pipeline /.gitlab-ci.yml; this pipeline will be triggered using GitLab's API.


In the following example, the pipeline will receive the Test Plan issue key as an input parameter. It will then run the build, including the automated tests, and in the end it will report the results back to Xray using "curl" utility.

/.gilab-ci.yml
# Use Maven 3.5 and JDK8
image: maven:3.5-jdk-8

variables:
  # This will supress any download for dependencies and plugins or upload messages which would clutter the console log.
  # `showDateTime` will show the passed time in milliseconds. You need to specify `--batch-mode` to make this work.
  MAVEN_OPTS: "-Dmaven.repo.local=.m2/repository -Dorg.slf4j.simpleLogger.log.org.apache.maven.cli.transfer.Slf4jMavenTransferListener=WARN -Dorg.slf4j.simpleLogger.showDateTime=true -Djava.awt.headless=true"
  # As of Maven 3.3.0 instead of this you may define these options in `.mvn/maven.config` so the same config is used
  # when running from the command line.
  # `installAtEnd` and `deployAtEnd`are only effective with recent version of the corresponding plugins.
  MAVEN_CLI_OPTS: "--batch-mode --errors --fail-at-end --show-version -DinstallAtEnd=true -DdeployAtEnd=true"


# Cache downloaded dependencies and plugins between builds.
# To keep cache across branches add 'key: "$CI_JOB_REF_NAME"'
cache:
  paths:
    - .m2/repository


maven_build:
  script:
    - |
        echo "building my amazing repo..."
        mvn test
        export token=$(curl -H "Content-Type: application/json" -X POST --data "{ \"client_id\": \"$client_id\",\"client_secret\": \"$client_secret\" }" https://$xray_endpoint/api/v2/authenticate| tr -d '"')  
        echo $token
        curl -H "Content-Type: text/xml" -H "Authorization: Bearer $token" --data @target/surefire-reports/TEST-com.xpand.java.CalcTest.xml  "https://$xray_endpoint/api/v2/import/execution/junit?projectKey=CALC&testPlanKey=${TESTPLAN}"
        echo "done"


Xray endpoint's base URL and the API key credentials (i.e. client id + client secret) are defined in GitLab as variables.


Automation configuration

  1. create a new rule and define the "When" (i.e. when it to should be triggered ), to be "Manually triggered"

2. define the condition so that this rule can only be executed from Test Plan issue

3. define an action (i.e. the "Then") as "Send web request" and configure it as follows


  • the web request URL provided above follows this syntax:
    • https://gitlab.com/api/v4/projects/<project_id_in_gitlab>/trigger/pipeline
  • the "Content-Type" header should be "multipart/form-data"
  • the HTTP POST body content, defined in the "Custom data" field, will be used to identify the branch and also the original Test Plan issue key; authentication is done using the "token" variable, created earlier in GitLab

    custom data (i.e. HTTP body content)
    token=9e347219182813....&ref=master&variables[TESTPLAN]={{issue.key}}


After publishing the rule, you can go to the screen of an issue and trigger a pipeline run in GitLab.


In this case, since the pipeline was configured to report results back to Xray, a new Test Execution would be created and linked back to the source Test Plan where the automation was triggered from.

Azure DevOps

Trigger a Azure DevOps pipeline from a Test Plan and report the results back to it

Azure DevOps configuration

We need to create a service connection, using the "incoming webhook" template, so that we can use Azure DevOps API later on.


Create a Personal Access Token (PAT), so you can use it as the password in API requests, along with the "organization name" as username.


Then, in your Azure DevOps repository containing the project's code and tests, create a pipeline /azure-pipelines.yml; this pipeline will be triggered using Azure DevOps API.


In the following example, the pipeline will receive the Test Plan issue key as an input parameter. It will then run the build, including the automated tests, and in the end it will report the results back to Xray using "curl" utility.

We need to define a resources section, that contains a reference to the webhook configured earlier.


/azure-pipelines.yml
parameters:
- name: "testplan"
  type: string
  default: ""

trigger:
- main

resources:
  webhooks:
    - webhook: "MyWebhookTrigger"             ### Webhook alias
      connection: "MyWebhookConnection"       ### Incoming webhook service connection

pool:
  vmImage: ubuntu-latest

steps:

- script: dotnet restore
  displayName: 'install build dependencies'

- script: |
    dotnet test -s nunit.runsettings
  displayName: 'Run tests'
- bash: |
    set -x
    export token=$(curl -H "Content-Type: application/json" -X POST --data "{ \"client_id\": \"$CLIENT_ID\",\"client_secret\": \"$CLIENT_SECRET\" }" "$(xray_endpoint)/api/v2/authenticate"| tr -d '"')  
    curl -o - -H "Content-Type: text/xml" -H "Authorization: Bearer $token" --data @./bin/Debug/net5.0/TestResults/nunit_webdriver_tests.xml  "$(xray_endpoint)/api/v2/import/execution/nunit?projectKey=CALC&testPlanKey=${TESTPLAN}"
  displayName: 'Import results to Xray cloud'


Xray endpoint's base URL and the API key credentials (i.e. client id + client secret) are defined in Azure DevOps as variables. These may be marked as secret.


Automation configuration

  1. create a new rule and define the "When" (i.e. when it to should be triggered ), to be "Manually triggered"

2. define the condition so that this rule can only be executed from Test Plan issue

3. define an action (i.e. the "Then") as "Send web request" and configure it as follows


  • the web request URL provided above is from Azure DevOps API, for queueing builds, and follows this syntax:
    • https://dev.azure.com/<organization_name>/<project>/_apis/build/builds?ignoreWarnings=true&api-version=6.0
  • authentication is done using the organization name plus the personal access token, created earlier in Azure DevOps, as the login:password pair used to calculate the Base64 content of the Authorization header
  • the "Content-Type" header should be "application/json"
  • the HTTP POST body content, defined in the "Custom data" field, will be used to identify the build definition and also the original Test Plan issue key; 

    custom data (i.e. HTTP body content)
    {
        "parameters": "{ \"testplan\": \"{{issue.key}}\" }", 
        "definition":  {
                           "id": 3
                       }
    }

    Note: to find the definition id, you can click on the pipeline in Azure DevOps and its id is shown as part of the URL


After publishing the rule, you can go to the screen of an issue and trigger a pipeline run in Azure DevOps.


In this case, since the pipeline was configured to report results back to Xray, a new Test Execution would be created and linked back to the source Test Plan where the automation was triggered from.

TravisCI

Trigger a TravisCI project build from an issue

In this very simple scenario, we'll implement a rule, triggered manually, that will trigger a TravisCI project/job. The action will be available from the "Automation" panel, in all issues of the selected project.

We're assuming that:

  • you just want to trigger a CI job, period; this job may be totally unrelated to the issue from where you triggered it
  • what the CI job will do, including if it will report the results back to Xray or not, is not relevant


TravisCI configuration

In TravisCI, we need to generate an API authentication token for some user, which can be done from the My Account settings page.

We have defined the following configuration in our source code that will be used in TravisCI configuration of the pipeline:

.travis.yml
sudo: false
language: java
jdk:
  - openjdk8
cache:
  directories:
  - "$HOME/.cache"
  
jobs:
  include:
    - stage: test and report to Xray
      script:
        - |
            echo "building repo..."
            mvn clean compile test --file pom.xml
            export token=$(curl -H "Content-Type: application/json" -X POST --data "{ \"client_id\": \"$CLIENT_ID\",\"client_secret\": \"$CLIENT_SECRET\" }" https://xray.cloud.xpand-it.com/api/v2/authenticate| tr -d '"')
            echo $token
            curl -H "Content-Type: text/xml" -H "Authorization: Bearer $token" --data @target/surefire-reports/TEST-com.xpand.java.CalcTest.xml  "https://xray.cloud.xpand-it.com/api/v2/import/execution/junit?projectKey=$PROJECTKEY"
            echo "done"

For the configuration of the YAML file we used the TravisCI tutorial documentation.

As you can see we are pushing results back to Xray with the last curl command:

curl command
curl -H "Content-Type: text/xml" -H "Authorization: Bearer $token" --data @target/surefire-reports/TEST-com.xpand.java.CalcTest.xml  "https://xray.cloud.xpand-it.com/api/v2/import/execution/junit?projectKey=$PROJECTKEY"

On this command we are passing the project key in order to report back to a specific Project in the Xray side, we will further ahead show how it is populated.

  • PROJECTKEY - The key that identifies the project on the Jira side.

Once we have the authentication token we followed the TravisCI API documentation to configure the following steps on the Jira side. 

Automation configuration

On the Jira side we will use the Automation capabilities that it provides out of the box, so within the project you want to use automation go to project settings and: 

  1. create a new rule and define the "When" (i.e. when it to should be triggered), to be "Manually triggered"

2. define an action (i.e. the "Then") as "Send webhook" and configure it as follows


  • the Webhook URL provided above follows this syntax:
    • <TravisCI_API_URL>/repo/{slug|id}/requests (The %2F in the request URL is required so that the owner and repository name in the repository slug are interpreted as a single URL segment.)
  • besides the "Content-Type" header that should be "application/json", define also an "Authorization" header having the value "token <token>", where  you will place the authentication token obtained previously in the TravisCI page and the "Travis-API-Version" header is also mandatory and it will contain the version used.
  • Custom data
    • We included the simplest possible just to trigger the pipeline from the master branch.

After publishing the rule, you can go to the screen of an issue and trigger the TravisCI project/job.


In this case, since TravisCI was configured to report results back to Xray, a new Test Execution would be created in Jira/Xray.


Trigger a TravisCI project build from a Test Plan and report the results back to it

In this simple scenario, we'll implement a rule, triggered manually, that will trigger a TravisCI project/job. The action will be available from the "Automation" panel, for all Test Plan issues of the selected project.

We're assuming that:

  • you just want to trigger a CI job, period; this job may be totally unrelated to the issue from where you triggered it
  • the results will be submitted back to Xray, if the project is configured to do so in TravisCI


TravisCI configuration

In TravisCI, we need to generate an API authentication token for some user, which can be done from the My Account settings page.

Once we have the authentication token we followed the TravisCI API documentation to configure the following steps on the Jira side. 

For the TravisCI the important change we must do is in the YAML file that will configure TravisCI pipeline, we use the following configuration to achieve that:

.travis.yml
sudo: false
language: java
jdk:
  - openjdk8
cache:
  directories:
  - "$HOME/.cache"
  
jobs:
  include:
    - stage: test and report to Xray
      script:
        - |
            echo "building repo..."
            mvn clean compile test --file pom.xml
            export token=$(curl -H "Content-Type: application/json" -X POST --data "{ \"client_id\": \"$CLIENT_ID\",\"client_secret\": \"$CLIENT_SECRET\" }" https://xray.cloud.xpand-it.com/api/v2/authenticate| tr -d '"')
            echo $token
            curl -H "Content-Type: text/xml" -H "Authorization: Bearer $token" --data @target/surefire-reports/TEST-com.xpand.java.CalcTest.xml  "https://xray.cloud.xpand-it.com/api/v2/import/execution/junit?projectKey=$PROJECTKEY&testPlanKey=$TESTPLAN"
            echo "done"

For more details about this configuration please check the TravisCI tutorial documentation.

As you can see we are pushing results back to Xray with the last curl command:

curl command
curl -H "Content-Type: text/xml" -H "Authorization: Bearer $token" --data @target/surefire-reports/TEST-com.xpand.java.CalcTest.xml  "https://xray.cloud.xpand-it.com/api/v2/import/execution/junit?projectKey=$PROJECTKEY&testPlanKey=$TESTPLAN"

On this command we are passing the project key in order to report back to a specific Project in the Xray side, we will further ahead show how it is populated.

  • PROJECTKEY - The key that identifies the project on the Jira side.
  • TESTPLAN - The Test Plan key used to identify the Test Plan to associate the execution with.

Once we have the authentication token we followed the TravisCI API documentation to configure the following steps on the Jira side. 

Automation configuration

On the Jira side we will use the Automation capabilities that it provides out of the box, so within the project you want to use automation go to the automation entry in the project settings and: 

  1. create a new rule and define the "When" (i.e. when it to should be triggered), to be "Manually triggered"

2.Define a condition, in our case we  will define that only Test Plan issue types will be allowed to trigger this pipeline, this is achieved with the following condition:


3. define an action (i.e. the "Then") as "Send webhook" and configure it as follows


  • the Webhook URL provided above follows this syntax:
    • <TravisCI_API_URL>/repo/{slug|id}/requests (The %2F in the request URL is required so that the owner and repository name in the repository slug are interpreted as a single URL segment.)
  • besides the "Content-Type" header that should be "application/json", define also an "Authorization" header having the value "token <token>", where  you will place the authentication token obtained previously in the TravisCI page and the "Travis-API-Version" header is also mandatory and it will contain the version used.
  • Custom data
    • We included the simplest possible just to trigger the pipeline from the master branch.
    • Added environment configuration variables to be used later in the TravisCI pipeline
      • TESTPLAN - that will be automatically filled with the test plan key from where the pipeline is triggered.
      • PROJECTKEY - that will be automatically filled in with the project key.

After publishing the rule, you can go to the screen of an issue and trigger the Jenkins project/job.


In this case, since TravisCI was configured to report results back to Xray, a new Test Execution would be created in Jira/Xray.

Associated with the Test Plan that we have passed along:

Generic automation of processes

Add custom steps to a manual test

In this simple scenario we are adding manual steps to a Test previously created. We'll use Xray's GraphQL API to achieve this goal. Even though this use case is mostly for demonstration purposes only, it's a good example of how to take advantage of Xray API to query/modify information in Xray side.

Automation Configuration

  1. create a new rule and define the "When" (i.e. when it should be triggered ), to be "Manually triggered".
  2. for this example, we have added a condition so that this automation can only be triggered by Jira issues of the type: Test.
  3. The next component to be added is a of type: "Send web request" where we will perform the authentication with the Xray API. 
    1. Make sure to fill the fields with correct information:
      1. Web request URL: Authentication URL of Xray API.
      2. Headers: Add the "Content-Type" header with the value: "application/json".
      3. Define the HTTP method as POST.
      4. Choose the "Custom data" as the Web request body.
      5. Add the Json request as seen in the picture with a valid client_id and client_secret (obtained in your Jira instance).
      6.  Tick the "delay execution..." option at the bottom as we want to use the token generated in this request in the next ones.
  4. Next add another "Send web request" component to make the GraphQL request.
    1. Make sure to fill the fields with correct information:
      1. Web request URL with the endpoint of the Xray graphQL.
      2. Add two headers:
        1. "Content-Type" with "application/json".
        2. "Authorization" with "Bearer <token>". Notice that we are using a special way to get the token {{webResponse.body}} provided by Jira automation, this will get the value from the last web request made and fetch the body of the answer.
      3. Define the HTTP method as POST.
      4. Choose the Web request body to be Custom data.
      5. Fill the Custom data with a proper formatted graphQL request as seen in the picture (make sure the format is correct or the request will fail).
Usage

Once the automation is defined we can access it in the test detail view of a Test in Jira. On the right side you have an entry called "Automation".

After clicking on it another screen will load with all the automation rules defined and the possibility to run each of them. Once you choose the correct rule and press "Run" the rule will be executed.


The status of the execution is showed in the section "Recent rule executions".


When the automation rule is executed with success a new test step will be added to the Test as we can see below.

Copy fields from requirement/Story to Test whenever creating a Test or linking it to a story

Sometimes it may be useful to copy some fields from the requirement/Story to the Tests that cover it.


Automation configuration

On the Jira side we will use the Automation capabilities that it provides out of the box, so within the administration area go to the automation entry in the system settings and: 

  1. create a new rule and define the "When" (i.e. when it should be triggered) to be "Issue linked". Since Xray, by default, uses the issue link type "Test" to establish the coverage relation between a Test and the requirement, we can take advantage of that to trigger the rule whenever such issue link is created.
  2. create a condition to ensure that the rule only runs for Test issues
  3. use an "Edit issue" action to set the fields on the Test based on the fields of the linked requirement/Story (i.e., the destination issue of the linking event). In this example, we'll copy the values of Labels and Priority custom fields.  


This rule will run:

  • whenever a Test is created from the requirement/Story issue screen
  • whenever a Test has been initially created and later on linked to the requirement

Reopen/transitionTests linked to a requirement whenever the requirement is transitioned or changed

Whenever you change the specification of a requirement/story, you most probably will need to review the Tests that you have already specified.

The following rule tries to perform a transition of all Tests linked to a requirement.

Automation configuration

On the Jira side we will use the Automation capabilities that it provides out of the box, so within the administration area go to the automation entry in the system settings and: 

  1. create a new rule and define the "When" (i.e. when it should be triggered) to be "Field value changed"
    1. Note: we could also define the trigger to be based on the transition of the requirement issue to a certain workflow status; in that case we would define it, for example, as shown below.
  2. create a condition to ensure that the rule only runs for Story and Epic issues; adjust these to include all the "requirement" issue types (i.e., the ones that you can cover with Tests)
  3. create a "branch rule / related issues" to obtain related Tests using JQL and the requirementTests() JQL function and run one, or more, action(s) on them
  4. under the "For JQL" block, create a action "Transition the issue to" in order to reopen the related Test issues

Create a new Test Execution for the Tests that failed on a previous Test Execution

Whether you're using Test Plans or not, you may want to rerun the failed Tests from a given Test Execution by scheduling a new Test Execution containing just those Tests (e.g., like rerunning the failed tests, but on a new Test Execution).

In this example, we'll associate the new Test Execution to the same Test Environments and the same Test Plan of the Test Execution where we triggered the rule from (i.e., the one that contains some tests that failed).

Automation configuration

On the Jira side we will use the Automation capabilities that it provides out of the box.

This use case requires a slightly more complex flow to set up due to some limitations of Jira Automation.

We need to create 2 rules:

  1. an automation rule to associate the new Test Execution (created on the next rule) to the same Test Plan, if required
  2. an automation rule to create the Test Execution with only the Tests that failed on the original Test Execution
Automation rule 1
  1. we start by creating the rule to associate the Test Execution with a Test Plan; we need to make sure this rule can be triggered by another rule
  2. in this rule, the "When" trigger should be "Incoming webhook"
  3. use an "IF" block to only proceed if there are Test Plan AND Test Execution issue ids
  4. make a GraphQL API call to associate the Test Execution that will be created with the Test Plan
    1. sample GraphQL query
      { "query": "mutation { addTestExecutionsToTestPlan(  issueId: \"{{webhookData.testPlanId}}\", testExecIssueIds: [\"{{webhookData.testExecutionId}}\"] ) { warning }}" }
Automation rule 2
  1. create a new rule (i.e., the one that will actually create a new Test Execution and trigger the previous rule) and define the "When" (i.e. when it should be triggered) to be "Manual Trigger"
  2. create an action using the "Send web request" template to make the authentication request and obtain a token to be used on the GraphQL operations; we need a client_id and a client_secret (please see how to create API keys).
  3. save the response in a variable (e.g., "token")
  4. make a GraphQL query to obtain the details of the Test Execution and its results
    1. Use the GraphQL API, namely the getTestExecution function. We'll need the issue id of the Test Execution that was already completed; we can use the smart values feature from Jira automation to obtain it. We need to also obtain the custom field id of the "Revision" custom field, if we want to set it later on, under the "Issue Fields" section of your Jira administration. 

    2. Escape the GraphQL query (e.g., using the online GraphQL to JSON Body Converter tool)


      sample GraphQL query
      {
        "query": "{ getTestExecution(issueId: \"{{issue.id}}\") { issueId jira(fields: [\"key\",\"customfield_10033\"]) testRuns(limit: 100){ results{ status{ name } test { issueId jira(fields: [\"key\"]) } } } testEnvironments testPlans(limit: 1) { results{ issueId jira(fields: [\"key\"]) } } }}"
      }
  5. get the linked Test Plan issue id and store it in a variable
    1. {{webResponse.body.data.getTestExecution.testPlans.results.get(0).issueId}}
  6. get the associated Test Environments and store it in a variable
    1. {{webResponse.body.data.getTestExecution.testEnvironments.asJsonStringArray}}
  7. post-process it and store it in another variable, as we need to escape some characters to embed the Test Environments on the GraphQL request later on
    1. {{testEnvironments.replaceAll("\"","\\\\\"")}}
  8. get all the failed tests and store them in a variable (note that this is an approximate value as GraphQL results can be limited and paginated)
    1. {{webResponse.body.data.getTestExecution.testRuns.results.status.name.match(".*(FAILED).*").size|0}} 
  9. store the issue ids of the failed tests in a variable (note that this is an approximate value as GraphQL results can be limited and paginated) 
    1. {{#webResponse.body.data.getTestExecution.testRuns.results}}{{#if(equals(status.name,"FAILED")) }}"{{test.issueId}}" {{/}}{{/}}
  10. post-process it and store it in another variable, as we need to escape some characters to embed the Test issue ids on the GraphQL request later on
    1. {{testIds.split(" ").join(",")}}
    2. {{testIds.replaceAll("\"","\\\\\"")}}
  11. use an "IF" block to only proceed if there are failed tests
  12. make a GraphQL API request to create a new Test Execution containing just the Tests that failed
    1. {
        "query": "mutation { createTestExecution( testEnvironments: {{escapedTestEnvironments}}, testIssueIds: [{{escapedTestIds}}], jira: { fields: { summary: \"dummy Test Execution\", project: {key: \"{{project.key}}\"} } } ) { testExecution { issueId jira(fields: [\"key\"]) } warnings }}"
      }
  13. store the issue id of the new Test Execution in a variable
    1. {{webResponse.body.data.createTestExecution.testExecution.issueId}}
  14. use the "Send web request" action to trigger the incoming webhook we defined in the "Automation rule 1" mentioned at start  
    1. {
        "issues": [
          "{{newTestExecutionId}}",
          "{{testPlanId}}"
        ],
        "testExecutionId": "{{newTestExecutionId}}",
        "testPlanId": "{{testPlanId}}",
        "token": "{{token}}"
      }

Tips

Accessing network-restricted CI/CD tools

If your target system is behind a firewall or it's a local IP address, you can use ngrok tool to create a temporary tunnel to it. Please check with your IT/security team(s).


Accessing audit log of Jira automation

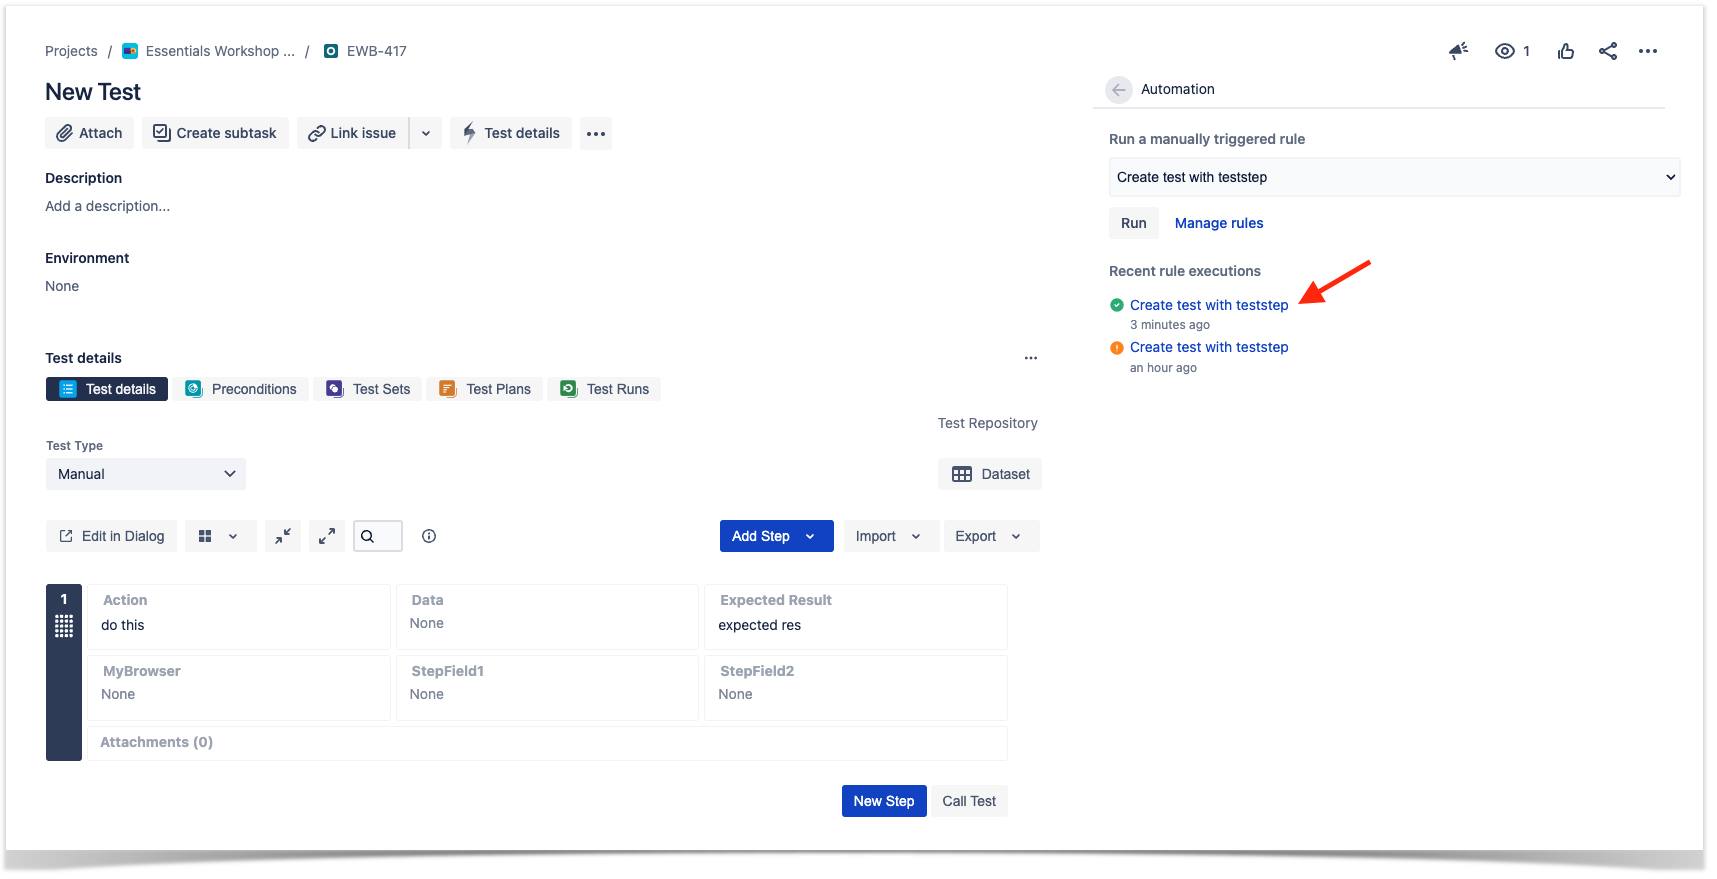
If you wan to have more information about the rule execution you can click over the link presented in the "Recent rules executions".


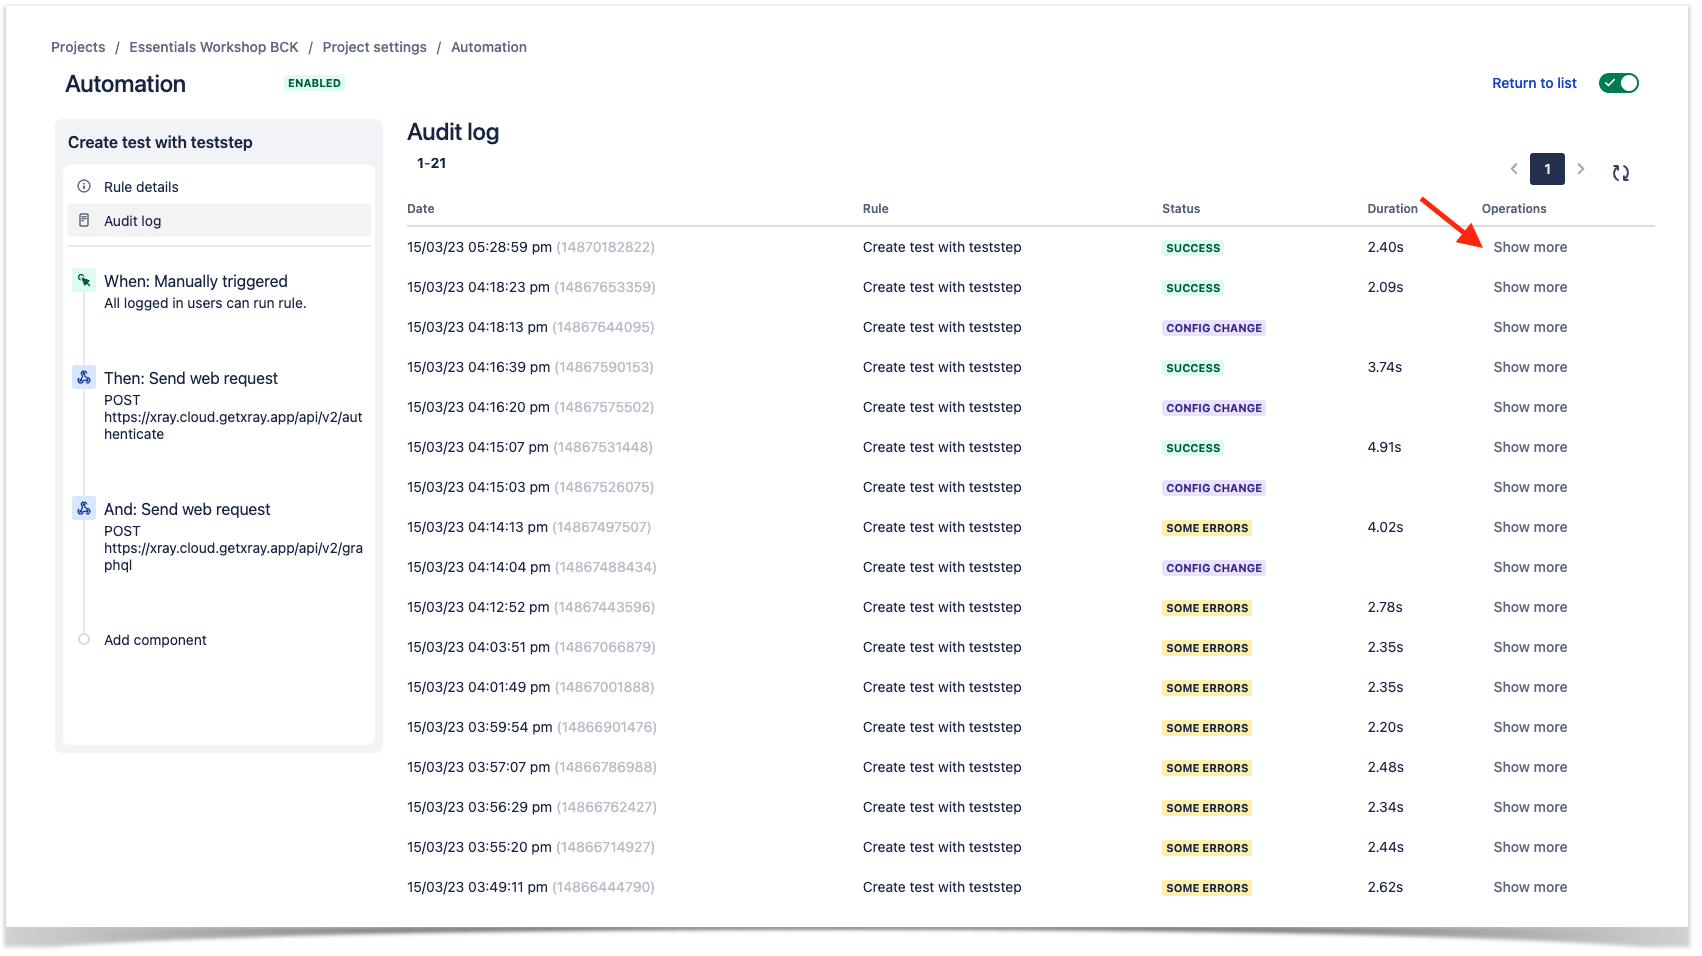
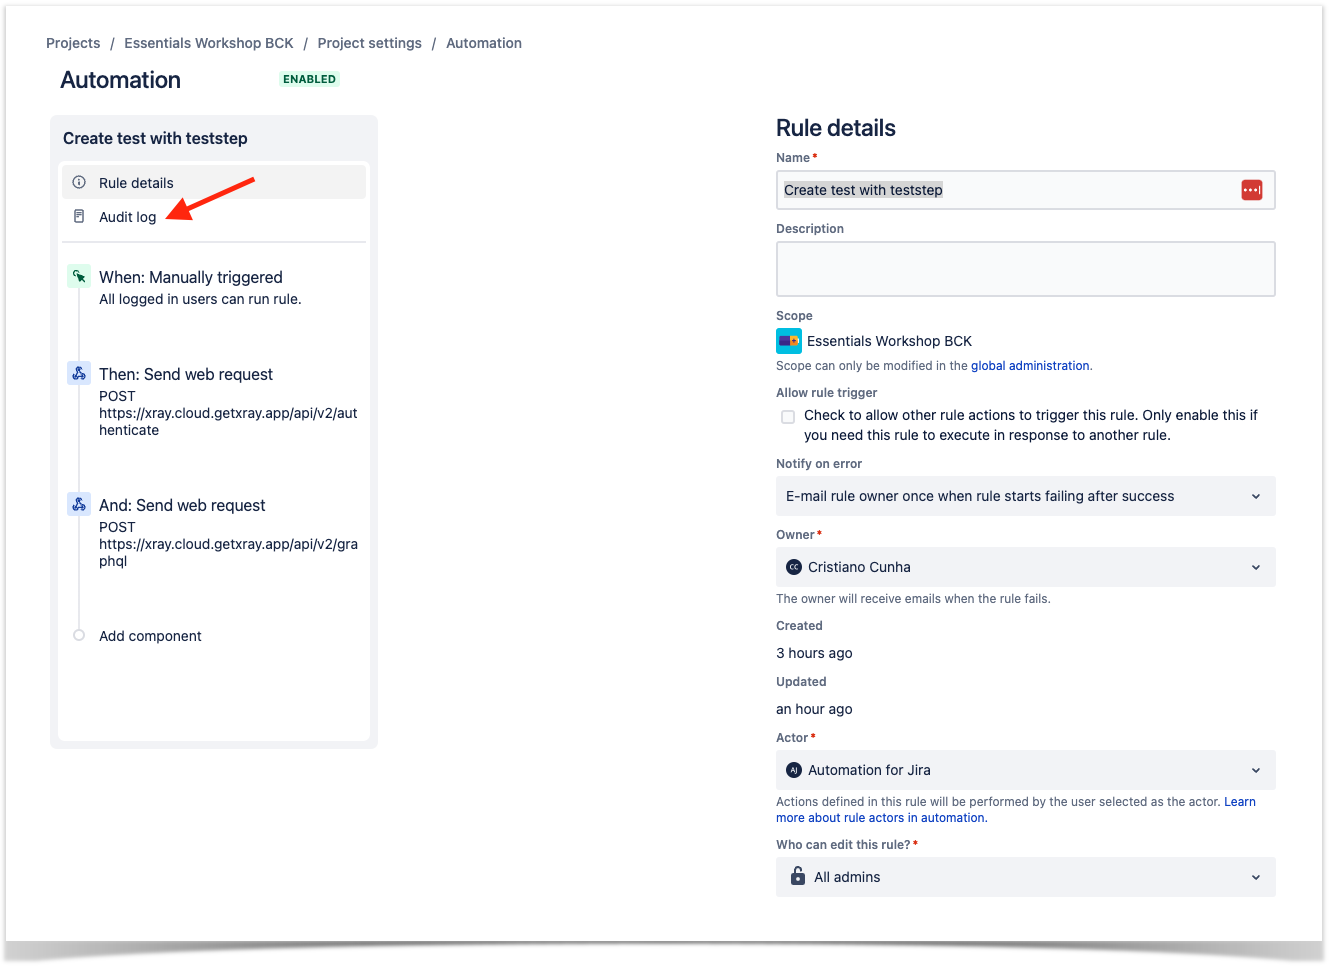
This will take us to the Automation rule details page where we can access the Audit log of that rule.


This option will load all the actions performed over the rule and we can have some more details if we press the "Show more" option.

References