Actions
Create
Using the top "Create" button"
In order to create a new Test Issue,
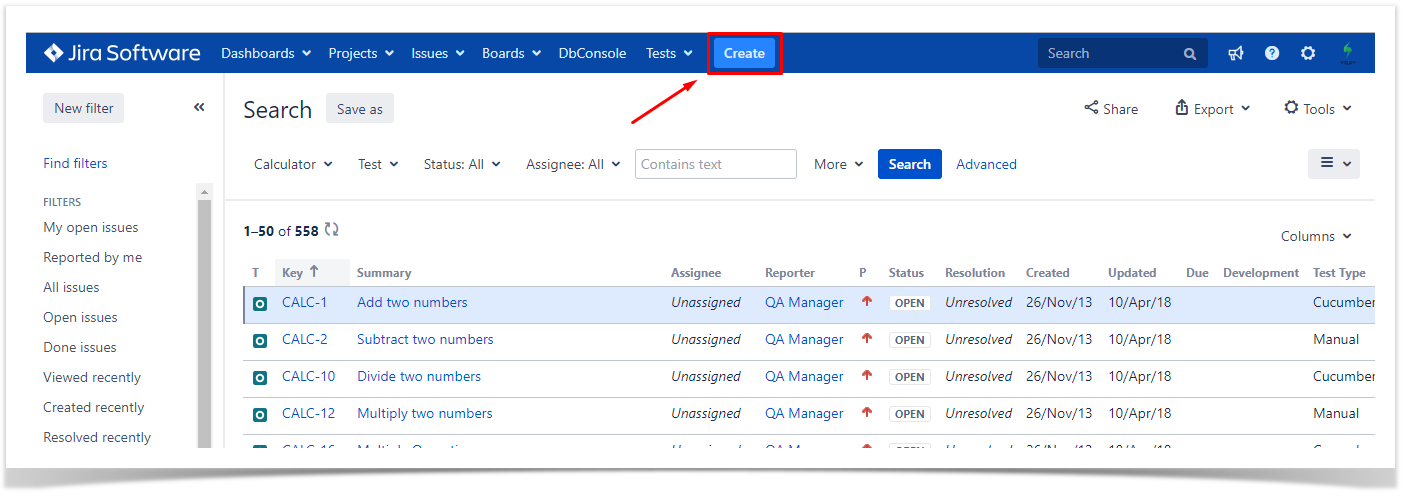
Step 1: Click the Create Issue at the top of the screen to open the Create Issue dialog box / page.
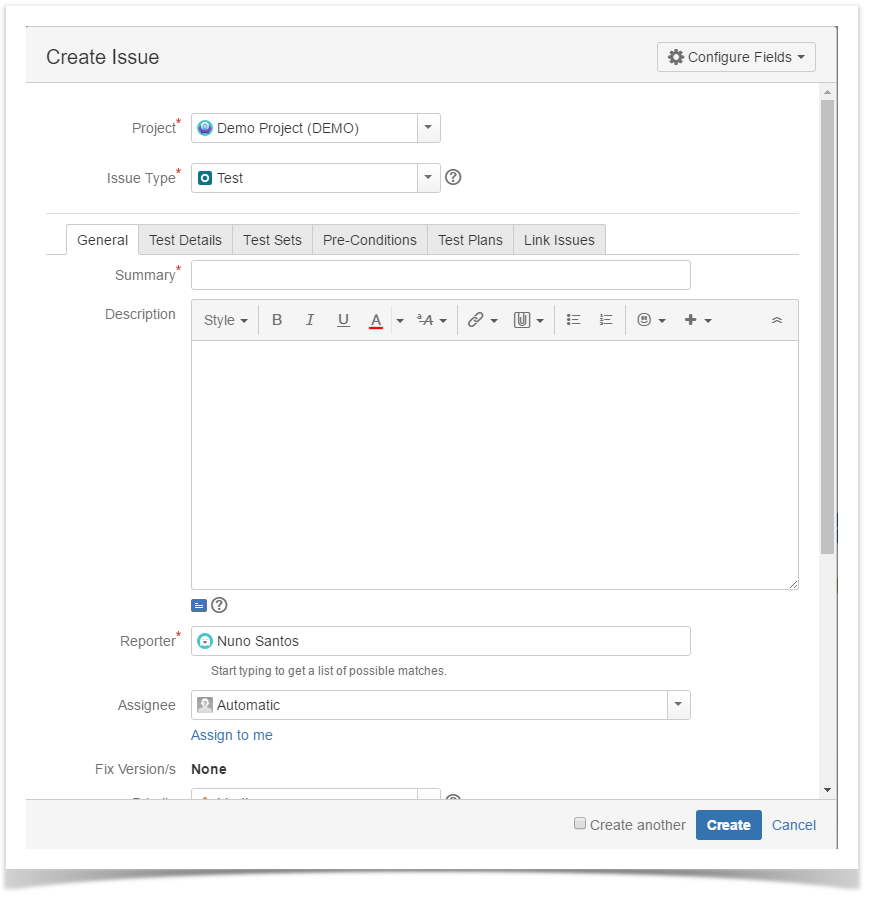
Step 2: Select the Project and on Issue Type, select Test.
Step 3: Under the General tab, type a Summary for the test and fill all appropriate fields — at least, the mandatory ones marked with an asterisk.
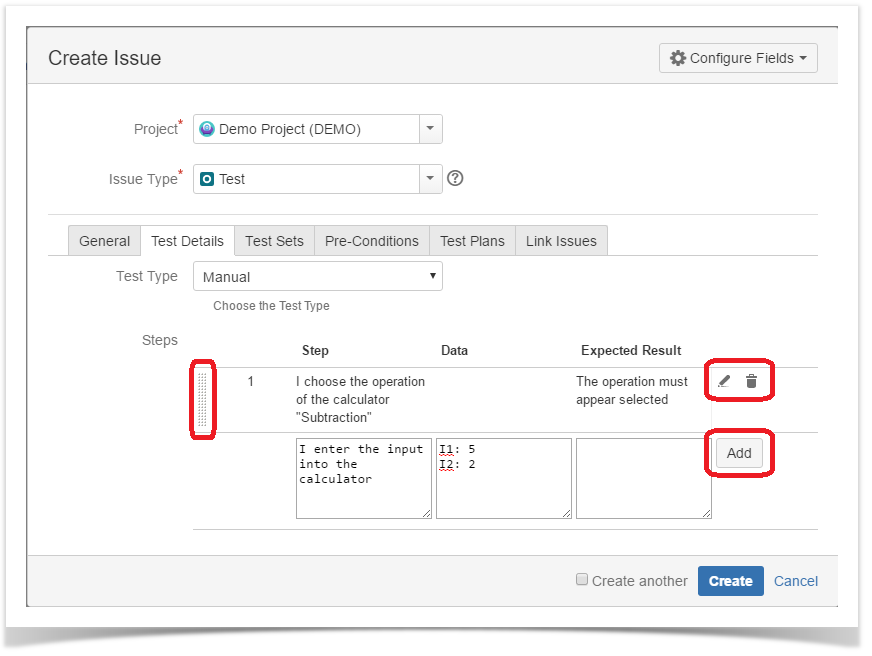
Step 4: On the Test Details tab, select the Test Type and complete all appropriate fields;
Step 4a: If you are writing a Manual Test:
- Select the Test Type as Manual.
- After filling out the Manual Steps fields, press the Add button to jump to the next Manual Step.
- Use the Pencil button to edit a previously entered Manual Step, and press the Update button when done.
- Use the Bin button to delete a previous entered Manual Step.
- To change a Manual Step position in the Test, drag the left area of the row and drop it to the desired place.
Step 4b: If you are writing a Cucumber Test:
- Select the Test Type as Cucumber.
- On Cucumber Type, select either Scenario or Scenario Outline as test type.
- On Cucumber Scenario, enter the Cucumber Scenario clauses in Gherkin.

Step 4c: If you are writing a Generic Test:
- Select the Test Type as Generic.
- On Generic Test Definition, enter the definition for the automated generic Test.

Optional:
- Click on the Test Sets tab to associate the current issue with Test Sets.
- Click on the Pre-Conditions tab to associate the current issue with Pre-Conditions.
- Click on the Test Plans tab to associate the current issue with Test Plans.
- Click on the Link Issues tab to link with other issues and specify the nature of the association.
- To create a series of similar tests – within the same Project – check the Create another box at the bottom of the dialog.
Step 5: When you are satisfied with the content of your test, click the Create button.
Step 5a: If you checked the Create another box, a new Create Issue dialog appears. This issue is automatically pre-populated with your previous test details, while leaving the Summary field blank.
From the requirement issue screen
In order to create a new Test Issue directly from the requirement issue screen, and link it automatically to the requirement,
Step 1: Click the Create Issue at the top of the screen to open the Create Issue dialog box / page.

Step 2: Select the Project and on Issue Type make sure you have Test selected.
Step 3: Under the General tab, type a Summary for the test and fill all appropriate fields — at least, the mandatory ones marked with an asterisk.
Step 4: On the Test Details tab, select the Test Type and complete all appropriate fields;
Step 4a: If you are writing a Manual Test:
- Select the Test Type as Manual.
- After filling out the Manual Steps fields, press the Add button to jump to the next Manual Step.
- Use the Pencil button to edit a previously entered Manual Step, and press the Update button when done.
- Use the Bin button to delete a previous entered Manual Step.
- To change a Manual Step position in the Test, drag the left area of the row and drop it to the desired place.
Step 4b: If you are writing a Cucumber Test:
- Select the Test Type as Cucumber.
- On Cucumber Type, select either Scenario or Scenario Outline as test type.
- On Cucumber Scenario, enter the Cucumber Scenario clauses in Gherkin.
Step 4c: If you are writing a Generic Test:
- Select the Test Type as Generic.
- On Generic Test Definition, enter the definition for the automated generic Test.
Optional:
- Click on the Test Sets tab to associate the current issue with Test Sets.
- Click on the Pre-Conditions tab to associate the current issue with Pre-Conditions.
- Click on the Test Plans tab to associate the current issue with Test Plans.
- Click on the Link Issues tab to link with other issues and specify the nature of the association.
- To create a series of similar tests – within the same Project – check the Create another box at the bottom of the dialog.
Step 5: When you are satisfied with the content of your test, click the Create button.
Step 5a: If you checked the Create another box, a new Create Issue dialog appears. This issue is automatically pre-populated with your previous test details, while leaving the Summary field blank.