
In very simple terms, a Test is a sequence of steps coupled with conditions or variables, test inputs, and an expected result. It is intended to establish the quality, performance, or reliability of a piece of the system, i.e., test target. Usually, every requirement or objective the test target is expected to achieve needs at least one Test. The success of the Test is determined by comparing expected and actual results. In Xray, a Test case is an issue. You can create Tests just like creating any other issue in Jira.
Manual Tests
Manual Tests are manually executed by testers without using any automation tools. It requires a tester to play the role of an end-user whereby they use most of the application's features to ensure correct behavior. Usually, manual Tests are defined with a Test script that users must follow in order to assert the expected functionality. The Test script can be organized in steps where each step has the action and expected result. Other types of manual Tests (e.g. Exploratory Tests) do not have any structure or even a Test script.
Automated Tests
Automated Tests are executed through an external tool which controls the execution of tests and the comparison of actual outcomes to predicted outcomes. They can automate some repetitive tasks in a formalized testing process already in place, or add additional testing that would be difficult to perform manually.
Test Types
Xray supports the following kinds of Tests:
- Steps - defined with an ordered list of steps. Each step contains the action and the excepted result along with other fields.
- Gherkin - defined using the Gherkin language for BDD.
- Unstructured - defined with a single text field without any enforced structure.
When Xray is first installed, one Test Type is installed for each Test kind that Xray supports:
- Manual (Steps kind)
- Cucumber (Gherkin kind)
- Generic (Unstructured kind)
The Test Type is specified using a custom field from Xray within the Test issues.
Configuring Test Types
It is possible to define additional Test Types in the Xray custom field. In Jira's administration, you may add other values for the "Test Type" custom field (see list below). For example, you may want to differentiate automated tests that may exist simultaneously in a project.
| Test Type custom field possible values | Internally will be handled as ... |
|---|---|
| "Manual" | Steps kind |
| "Cucumber", "Automated[Cucumber]", "Gherkin", "Behave", "SpecFlow", "Behat" | Gherkin kind |
| "Generic", "Automated[Generic]" | Unstructured kind |
All other Test Types that you define will be mapped automatically to Unstructured Tests.
Test Type mapping
We have a feature planned in our roadmap to allow users to create their own Test Types and map them to any kind in Xray.
Manual and Automated Tests relation to Xray Test Types
All Xray Test Types can be executed manually by testers directly in Jira or automatically by a machine (perhaps within a Continuous Integration environment).
Manual Tests in Xray were designed to be executed manually within Jira. However, it is also possible to import execution results for Manual tests as well using the Xray REST API.
In the same way, although Cucumber Tests were designed to be automated Tests, these can also be executed manually within Xray. In fact, this is a usual pattern for defining Tests using a domain-specific language that can later be automated.
Unstructured or Generic Test Types in Xray can also be used for manual or automated Tests. When importing execution results from frameworks other than Cucumber/Gherkin, Xray will do the auto-provisioning of Tests by creating generic Tests. Another example of Unstructured Tests is Exploratory Tests. You can create a custom Test Type named "Exploratory" that Xray will map by default to the Unstructured Test Type. An Exploratory Test is also a manual Test because the execution will be driven by the testers and not by a machine.
Issue Actions
The sections below describe all the available actions for Test issues.
Create
Creating a Test case is just creating a new issue with type Test. Test issues can be created in different contexts.
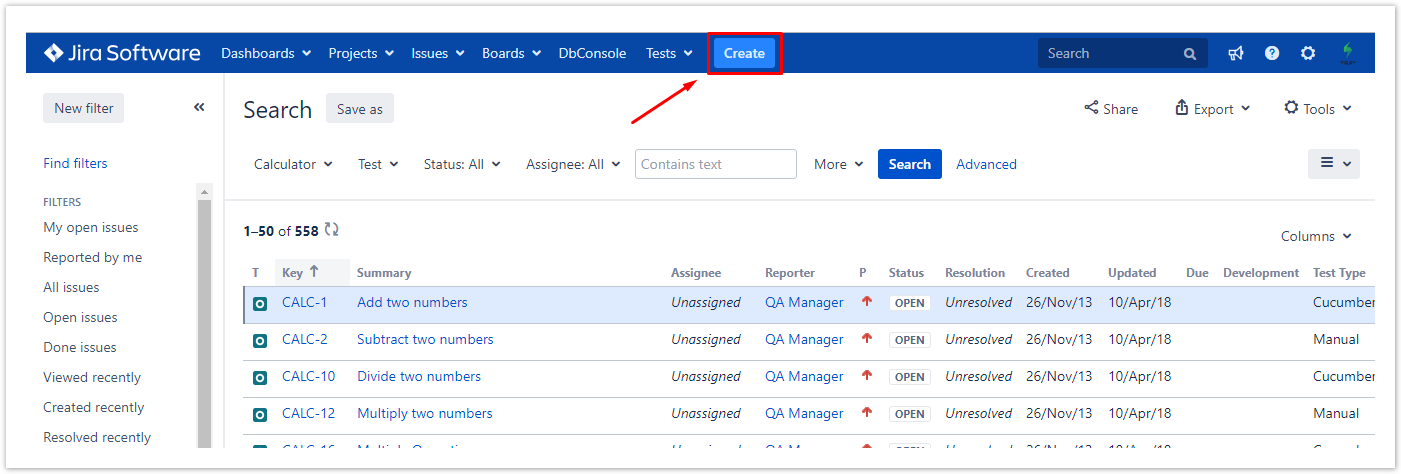
Using the global "Create" button or shortcut
From the Requirement issue screen
In order to create a new Test Issue directly from the requirement issue screen, and link it automatically to the requirement,

In order to create a new Test Issue,
Step 1: Click the Create Issue button (from the context above) to open the Create Issue dialog box/page.
Step 2: Select the Project and on Issue Type, select the Test issue type.
Step 3: Under the General tab, type a Summary for the test and fill all appropriate fields — at least, the mandatory ones marked with an asterisk.
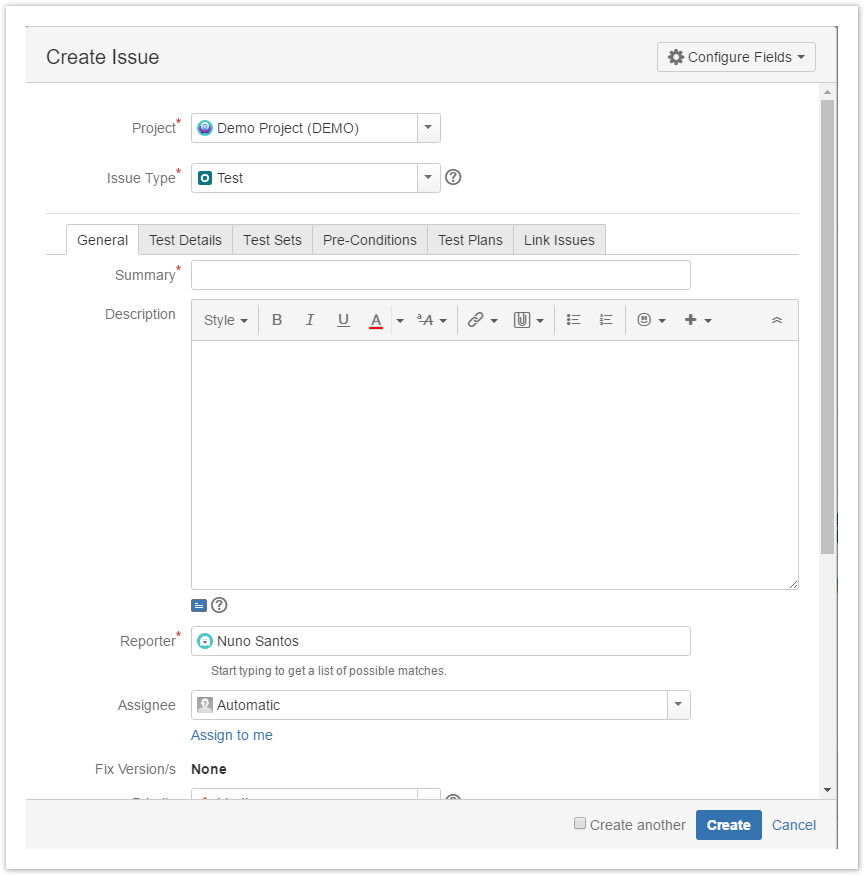
Step 4: On the Test Details tab, select the Test Type and complete all appropriate fields;
Optional:
- Click on the Test Sets tab to associate the current issue with Test Sets.
- Click on the Pre-Conditions tab to associate the current issue with Pre-Conditions.
- Click on the Test Plans tab to associate the current issue with Test Plans.
- Click on the Link Issues tab to link with other issues and specify the nature of the association.
- To create a series of similar tests – within the same Project – check the Create another box at the bottom of the dialog.
Step 5: When you are satisfied with the content of your test, click the Create button.
Step 5a: If you checked the Create another box, a new Create Issue dialog appears. This issue is automatically pre-populated with your previous test details while leaving the Summary field blank.
Edit
Test issues can be edited using:
- Jira "Edit Issue" dialog
- Inline edit in Xray fields
Using the Jira Edit Issue dialog
The Edit Issue dialog box is similar to the Create Issue dialog box, and can be accessed through the following steps:
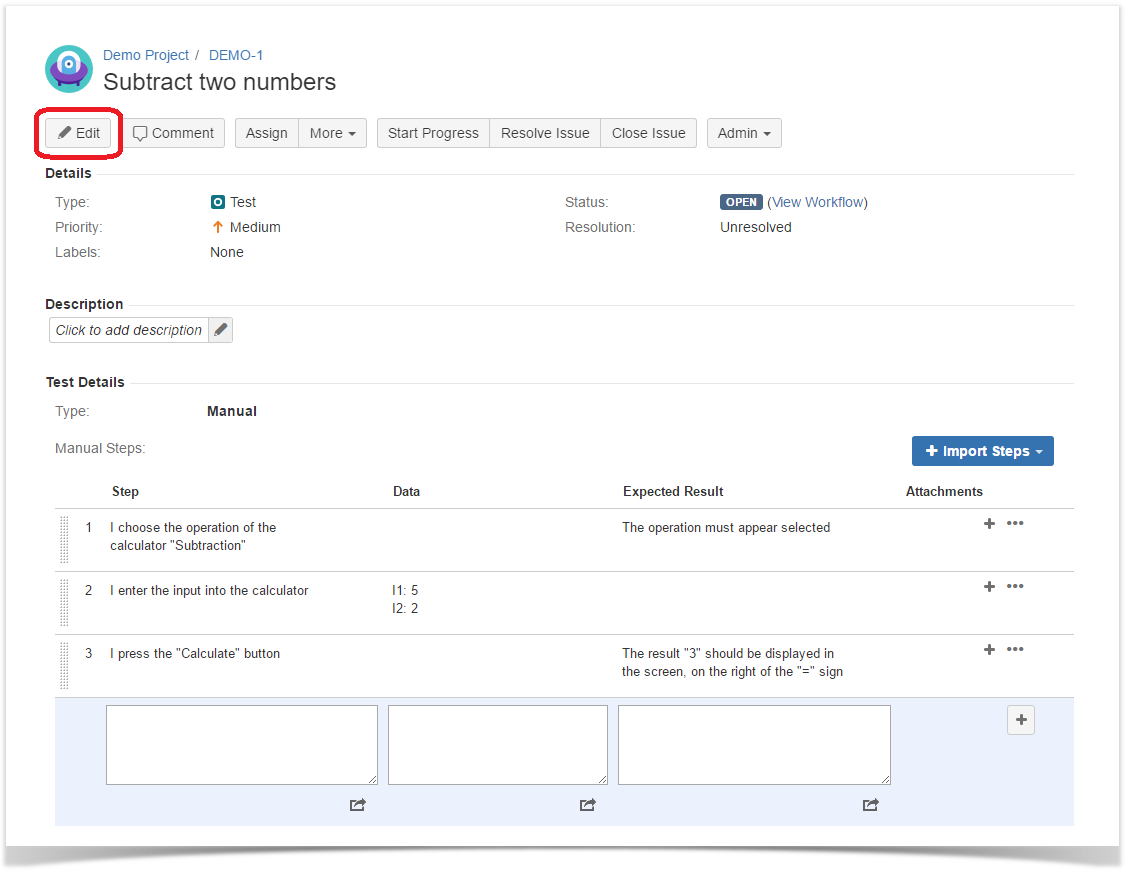
Step 1: Click the Edit button (at the top-left of the 'view issue' page) to open the Edit Issue dialog box.
Step 2: Modify your Test's details in the appropriate fields of the Edit Issue dialog box General tab.
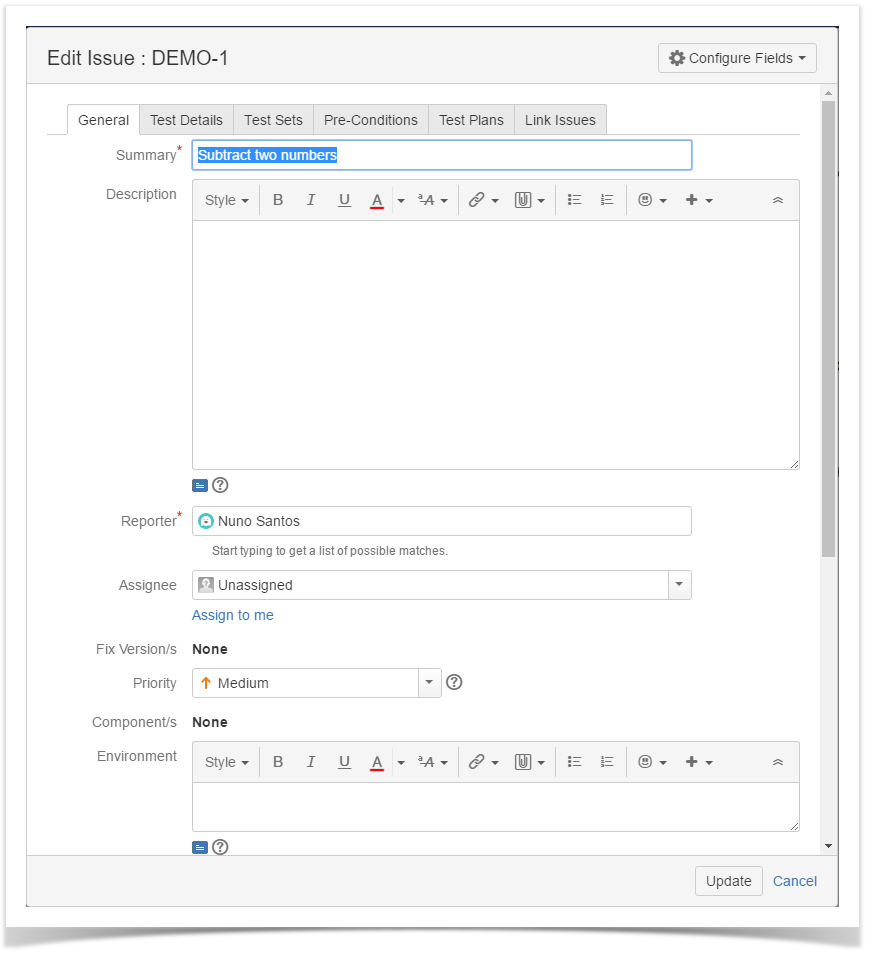
Step 3: Click on the Test Details tab to edit the Test Type and any complementary fields.
Optional:
- Click on the Test Sets tab to edit Test Set associations.
- Click on the Pre-Conditions tab to edit Pre-Condition associations.
- Click on the Link Issues tab to edit Links with other issues.
Step 4: Click the Update button to save your changes.
Inline Editing Xray Tests
Xray Test issue sections support inline editing similar to Jira native and custom fields inline edit. This prevents full page reloads when modifying fields.
Within the Test Details web panel, users will be presented with a different UI and fields based on the Test Type. The Test Type field can also be changed inline. Please refer to following pages for more details for each Test Type:
Edit Permissions
You can only inline edit Xray fields if you have permission to edit the Test issue.
Link Test to requirement(s)
Covering some requirement issues with an existing Test can either be done from the Test issue screen or from the requirement issue screen.
From the Test issue screen
To link some existing Test case to some requirement directly from the Test issue screen, you just need to create a "tests" link between it and the requirement
Step 1: Click on More and then Link
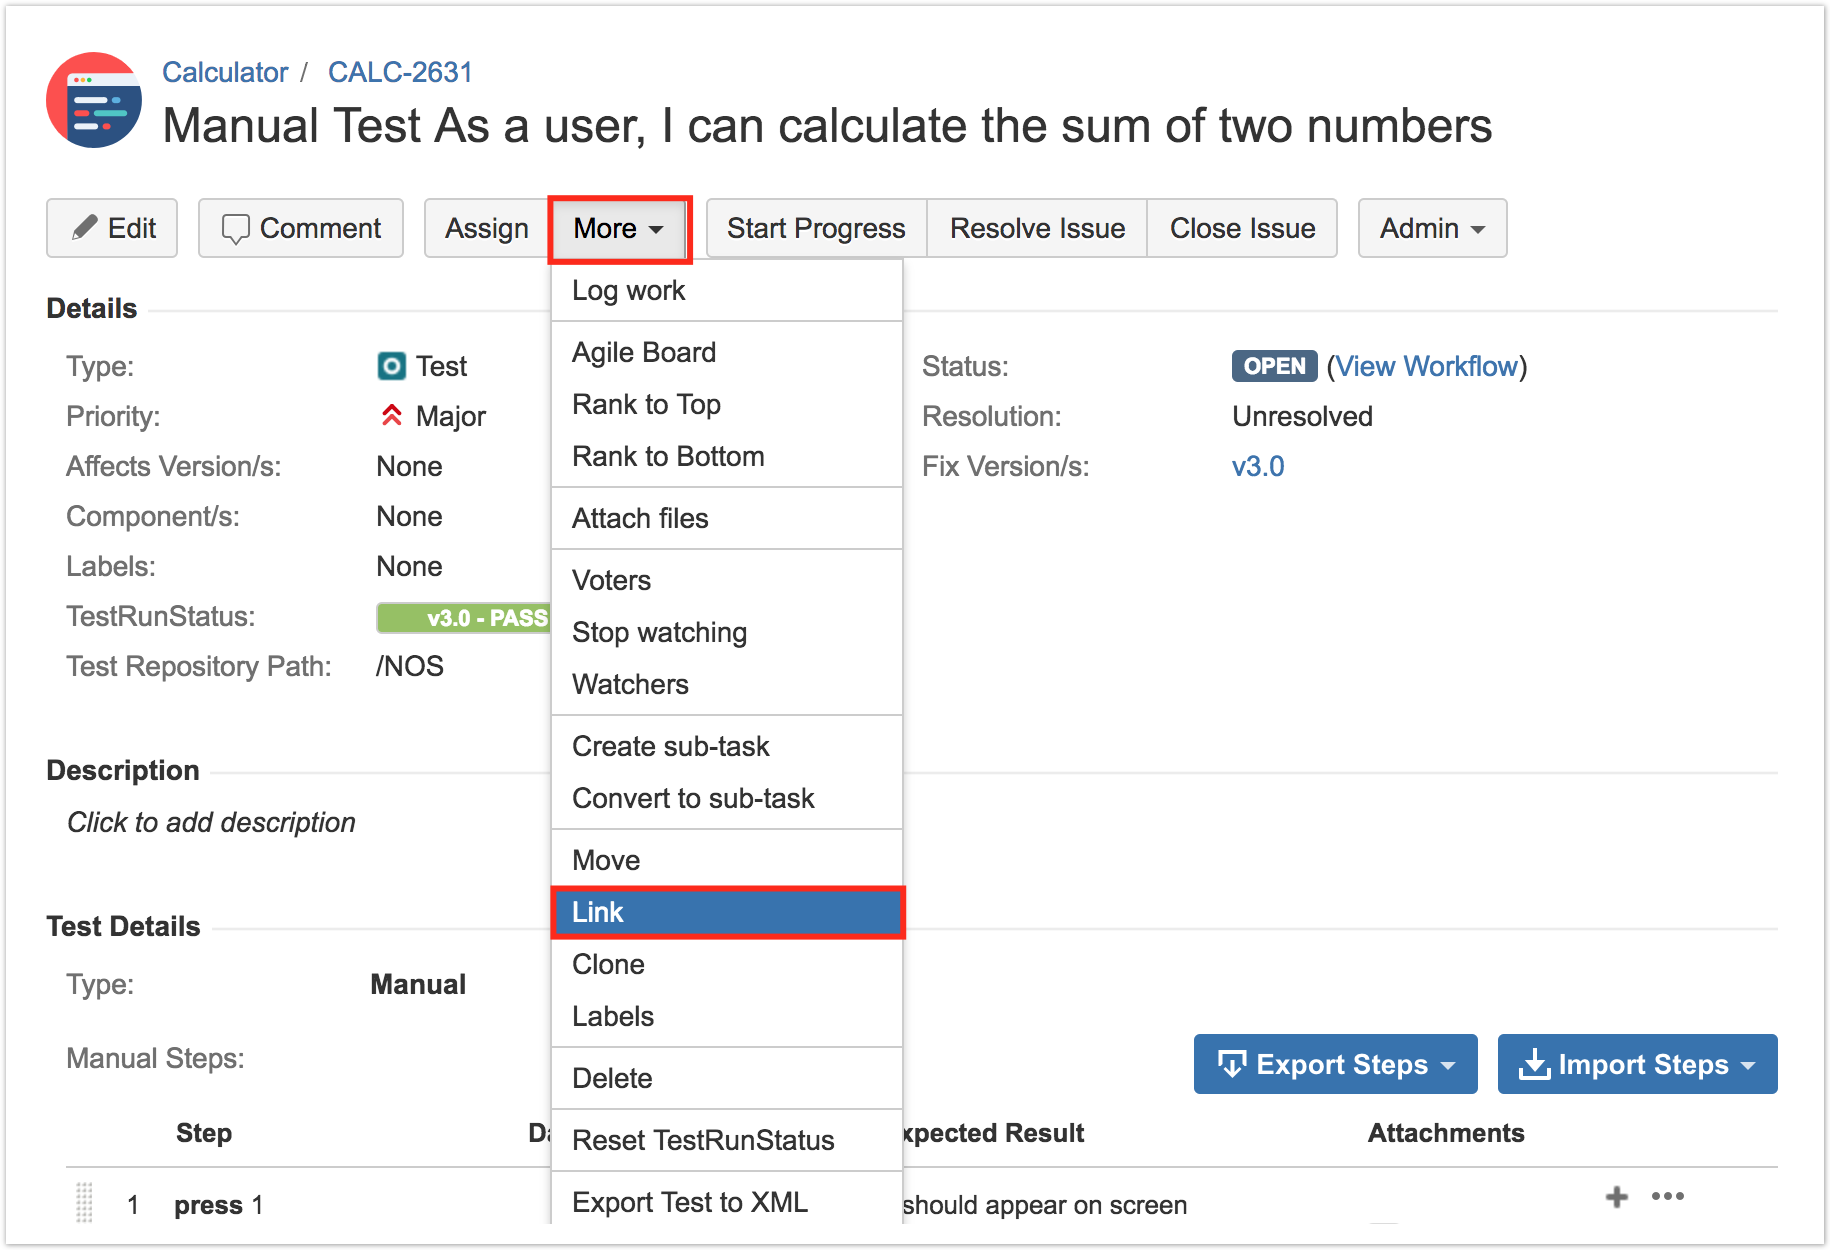
Step 2: Make sure that the created link is "tests" (i.e. the Test covers the given issues)
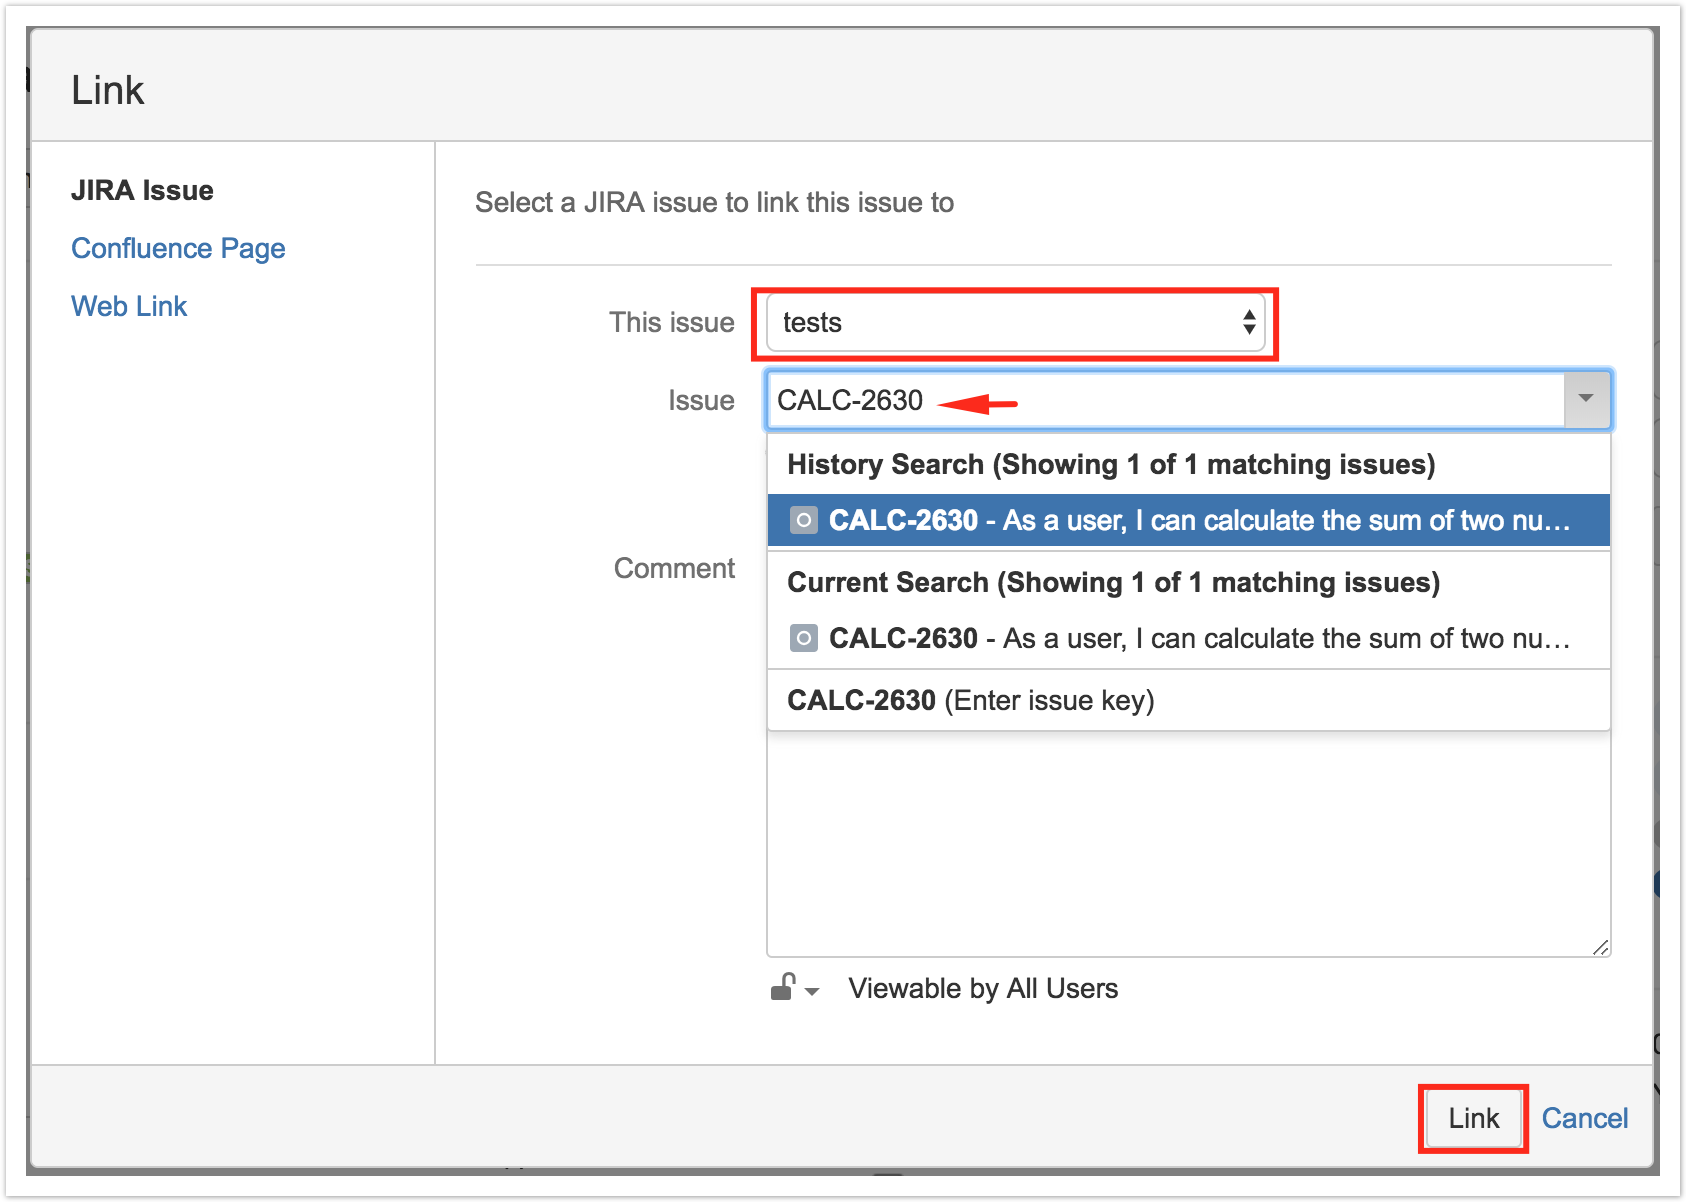
Step 3: Enter one, or more, issue key(s) of the requirement you wish to validate
Step 4: Click on "Link"
From the requirement issue screen
To link existing Test cases to a requirement directly from the requirement issue screen, we can do it using two different shortcuts as detailed in the first step below.
Step 1a: Using the "+" icon on the Test Coverage panel - Click the Edit button (at the top-left of the 'view issue' page) to open the Edit Issue dialog box.

Step 1b: Using the Jira native issue link creation dialog - Click on More and then Link
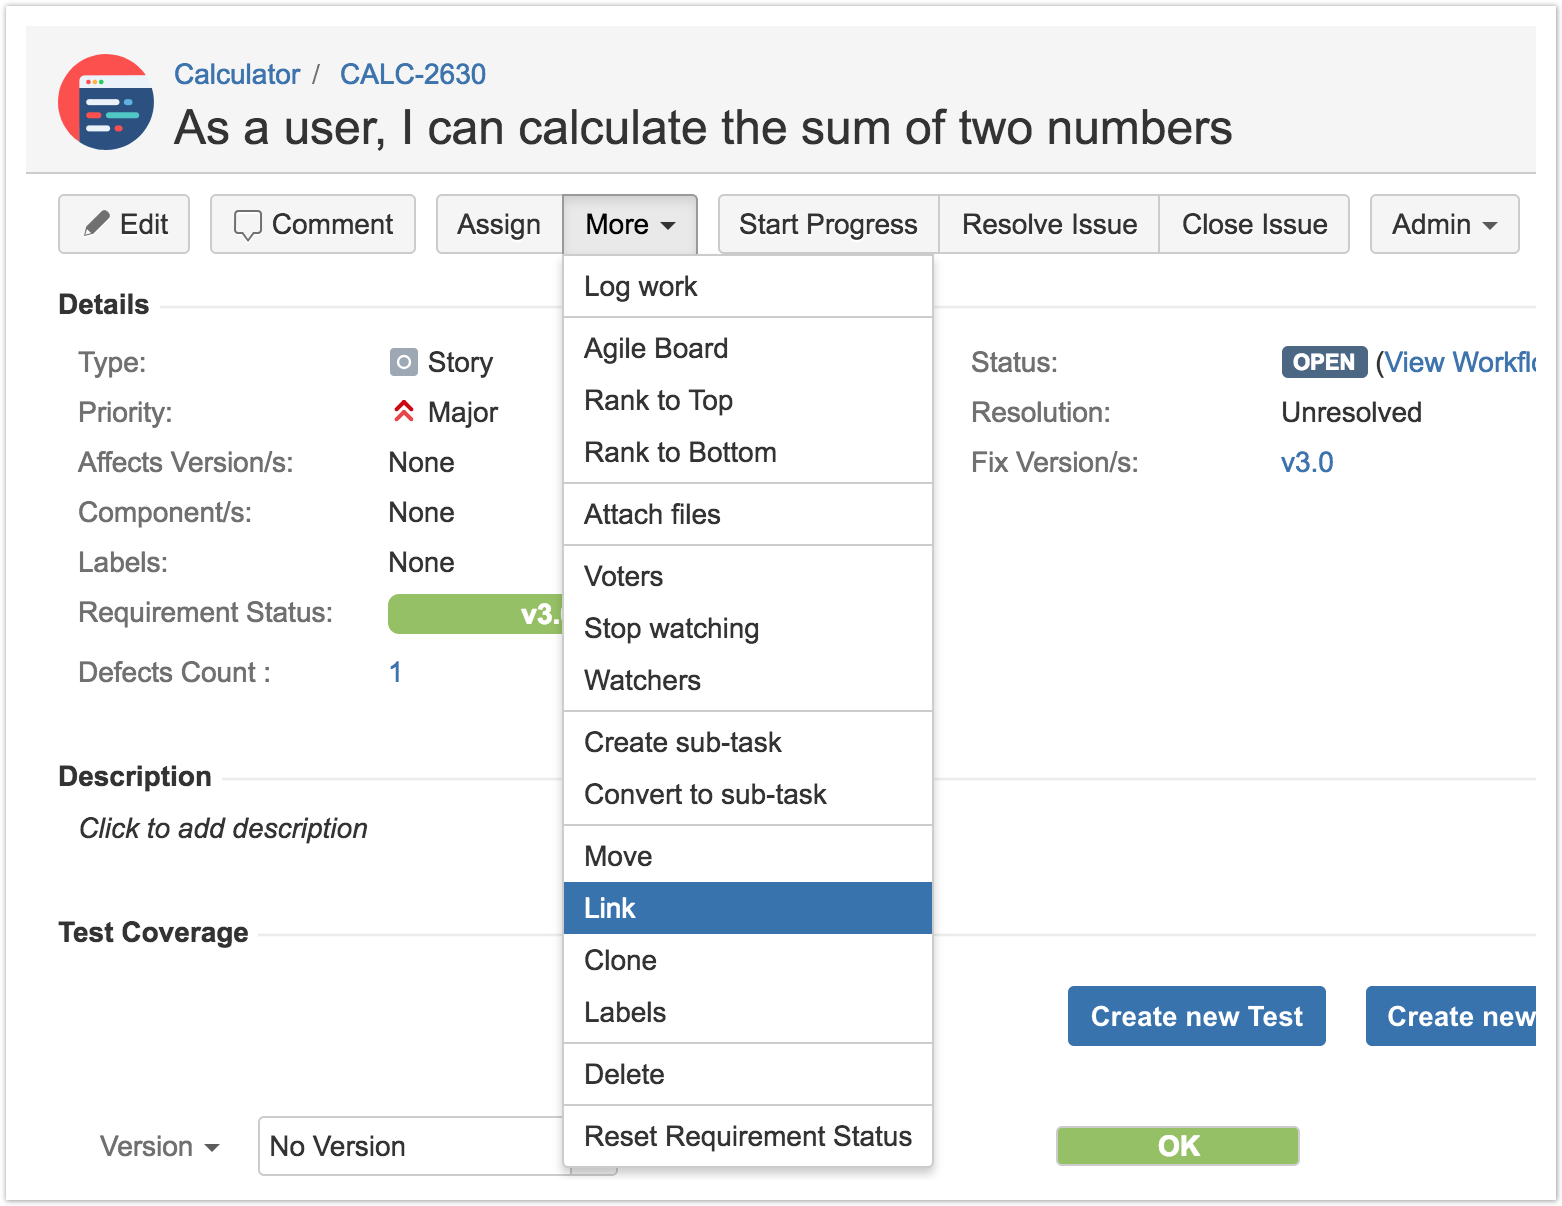
Step 2: Make sure that the created link is "tested by" (i.e. the requirement will be tested by the given issues)
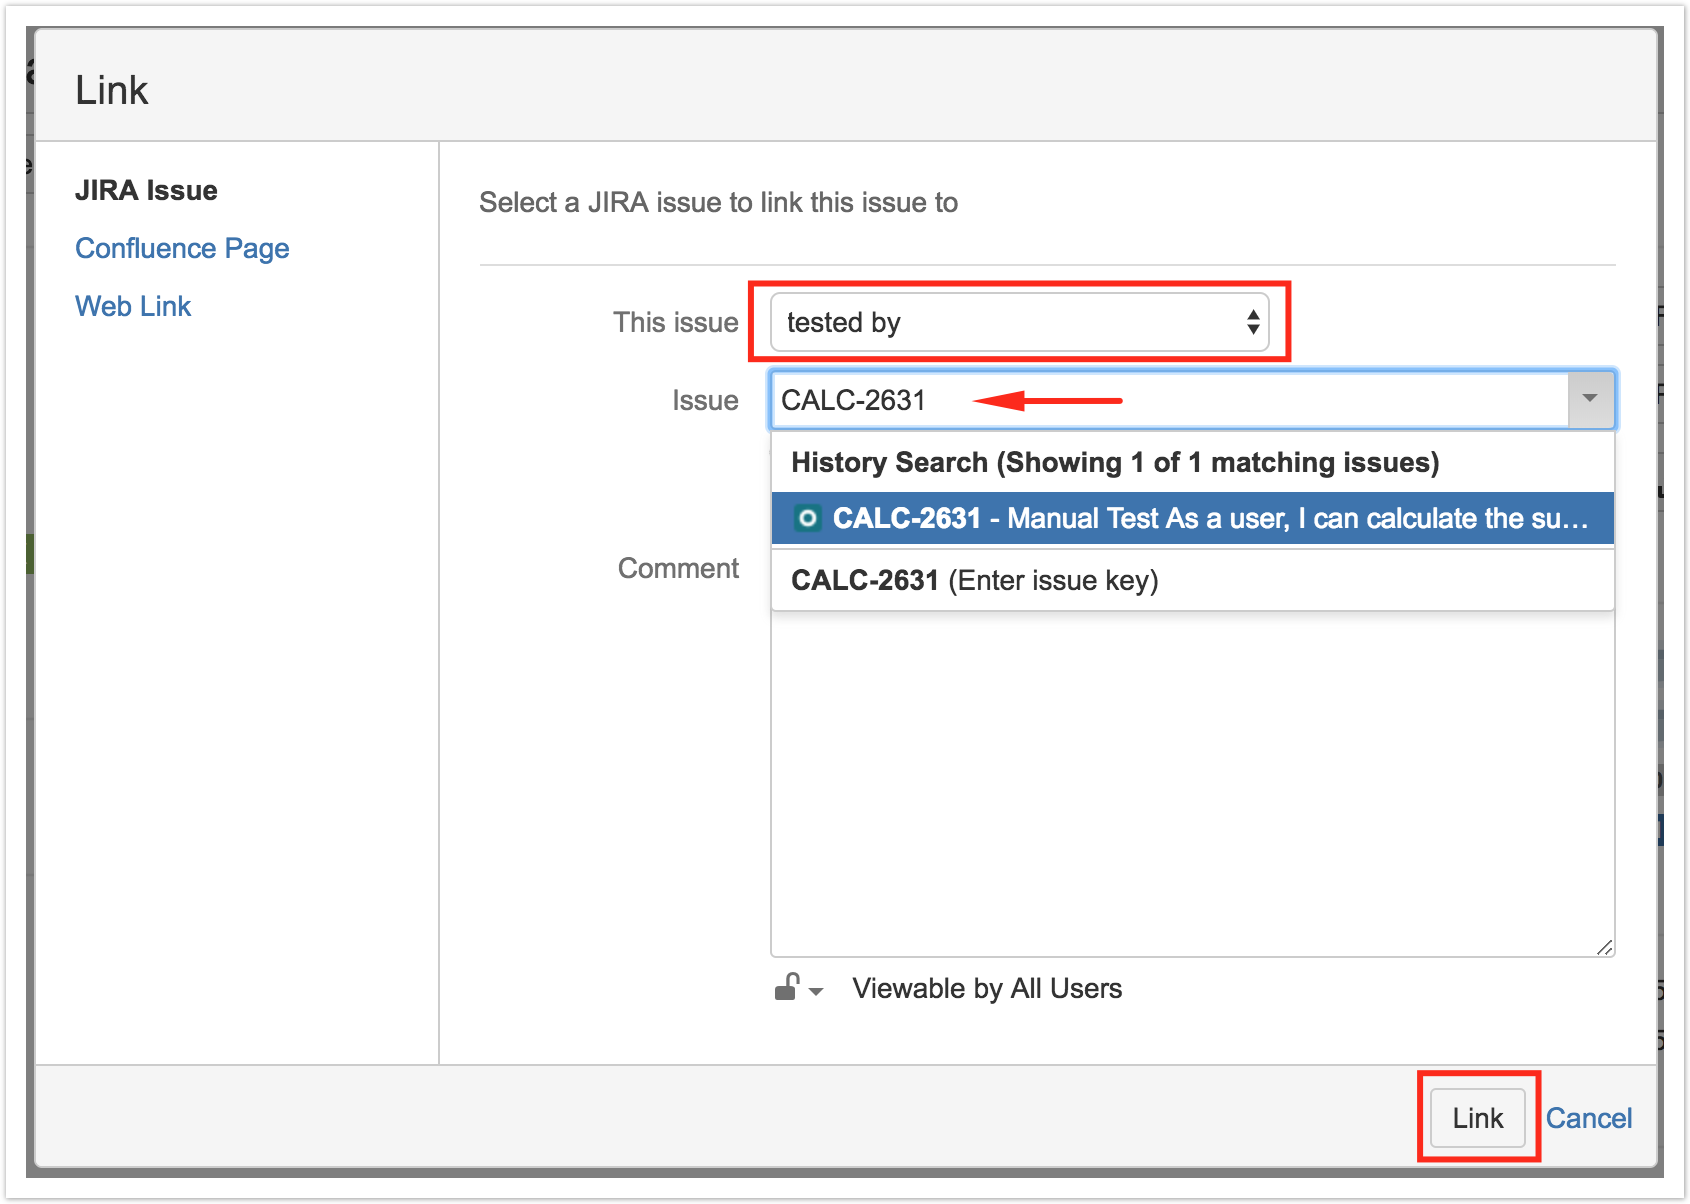
Step 3: Enter one, or more, issue key(s) of the Test cases that validate your requirement.
Please note
You may also specify Test Set issue keys; in this case, the link will be created between the requirement and the Test Set.
When you do this, you'll have a dynamic coverage of the requirement based on the Tests belonging to the Test Set. That mean that you can then add or remove Tests to/from the Test Set and they will be covering the requirement or not depending on being or not on the Test Set.
Step 4: Click on "Link"
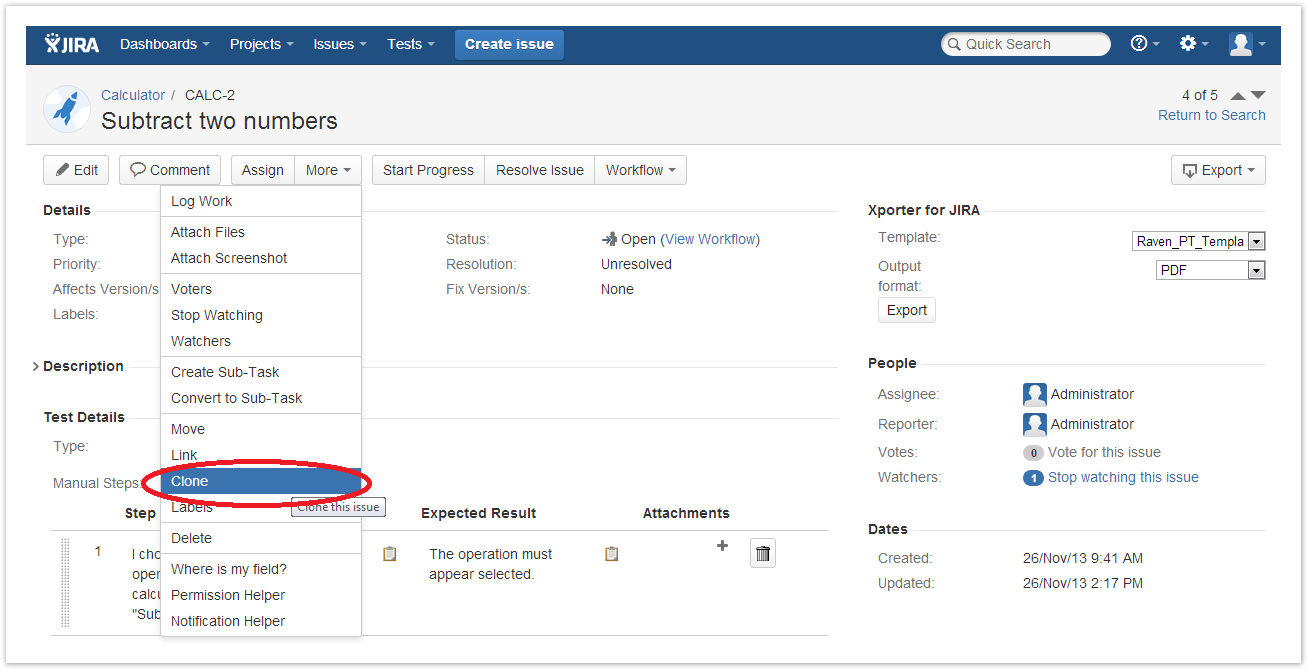
Clone
Cloning a Test issue creates a new Test with all the information of the cloned Test, except its executions. Therefore, the cloned issue will not be associated with any Test Execution issue.
Step 1: Select More > Clone. The Clone Issue screen will appear.
Step 2: You can edit the clone Test's Summary if you wish.
- If the test contains links to other issues, you can select whether or not to include the links in the new clone test.
- If the test contains sub-tasks, you can select whether or not to create the sub-tasks in the new clone test.
- If the test contains attachments, you can select whether or not to include the attachments in the new clone test.
Step 3: Click Create.
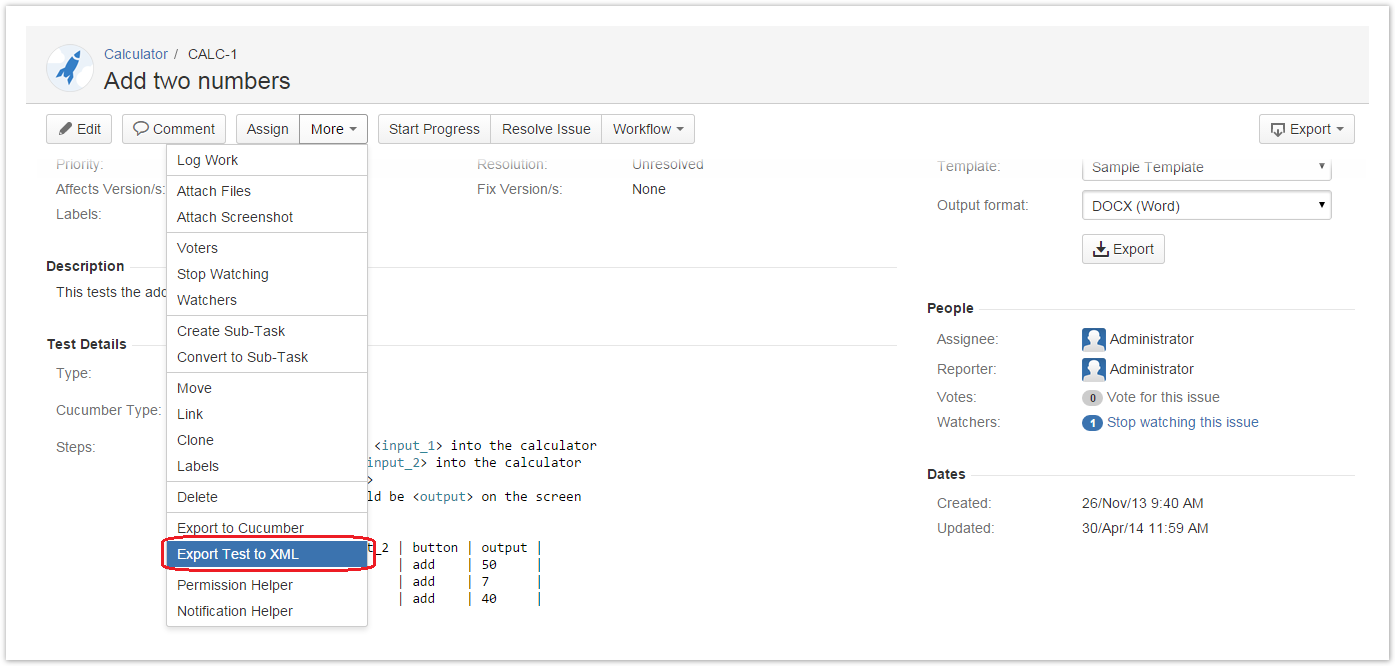
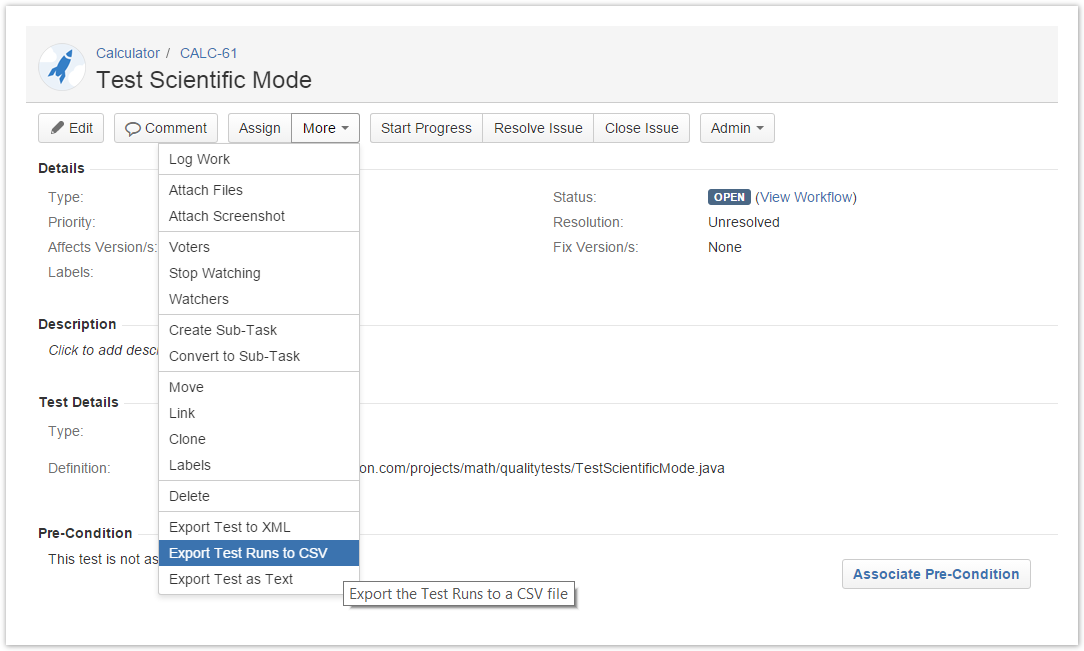
Xray Test issues can be exported to XML. This export differs from the Jira default action for exporting to XML. Rather than exporting all fields, the Xray export action will only export to XML the most relevant fields for Tests, such as the Test definition fields, Pre-Conditions and some issue-tracking information. To export a Test issue to XML, Step 1: Open the Test issue view page. Step 2: Select More > Export Test to XML. The resulting XML file will be downloaded to the browser. Xray Test Runs can be exported to CSV. Xray export action will export to CSV the most relevant fields for Test Runs such as: To export a Test Run to CSV, Step 1: Open the Test issue view page. Step 2: Select More > Export Test Runs to CSV. The resulting CSV file will be downloaded to the browser.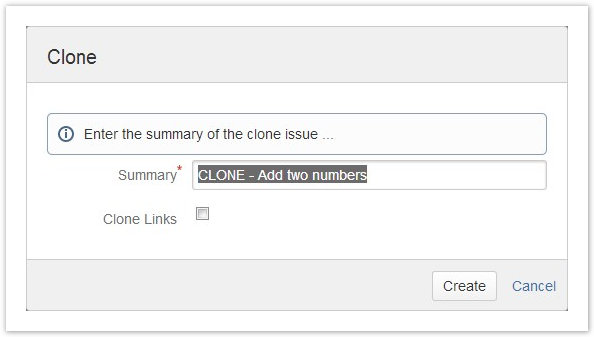
Export Test to XML
Export Test Runs to CSV
Test Issue Layout
Xray provides additional web panels into the Test issue page:
- Test Details
- Pre-Conditions
- Test Sets
- Test Plans
- Test Runs
Test Details
Within the Test Details web panel, you can define the Test Type and Test Specification.
Changing the Type of a Test
In the Global Preferences, Xray allows you to configure if a test definition is deleted or not.
If enabled, the previous Info details will be deleted.
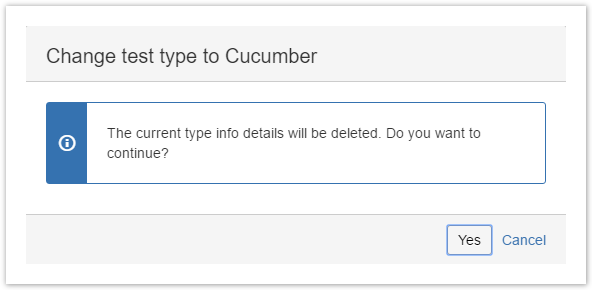
Otherwise, the Info details will not be deleted, and it'll be possible to undo the Test Type change operation and keep the previous information.
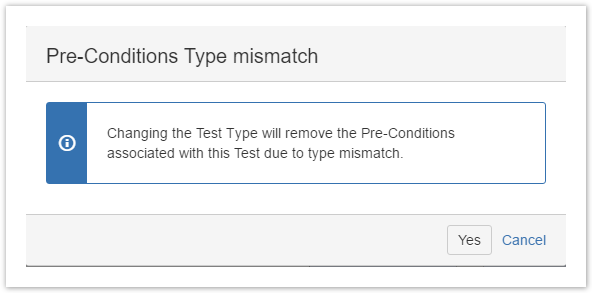
Additionally, in both cases, because each pre-condition must be of the same Type of the Test, any associated Pre-Conditions will be lost.
Please check how to define each Test Type in the child pages below:
Pre-Conditions
This web panel displays a data-table with all the Pre-Condition issues associated with the current Test. You can also create new Pre-Conditions, associate existing Pre-Condition issues, and remove the association between the Test and Pre-Conditions. It is possible to preview each Pre-Condition definition by clicking on the preview button for each data-table row.
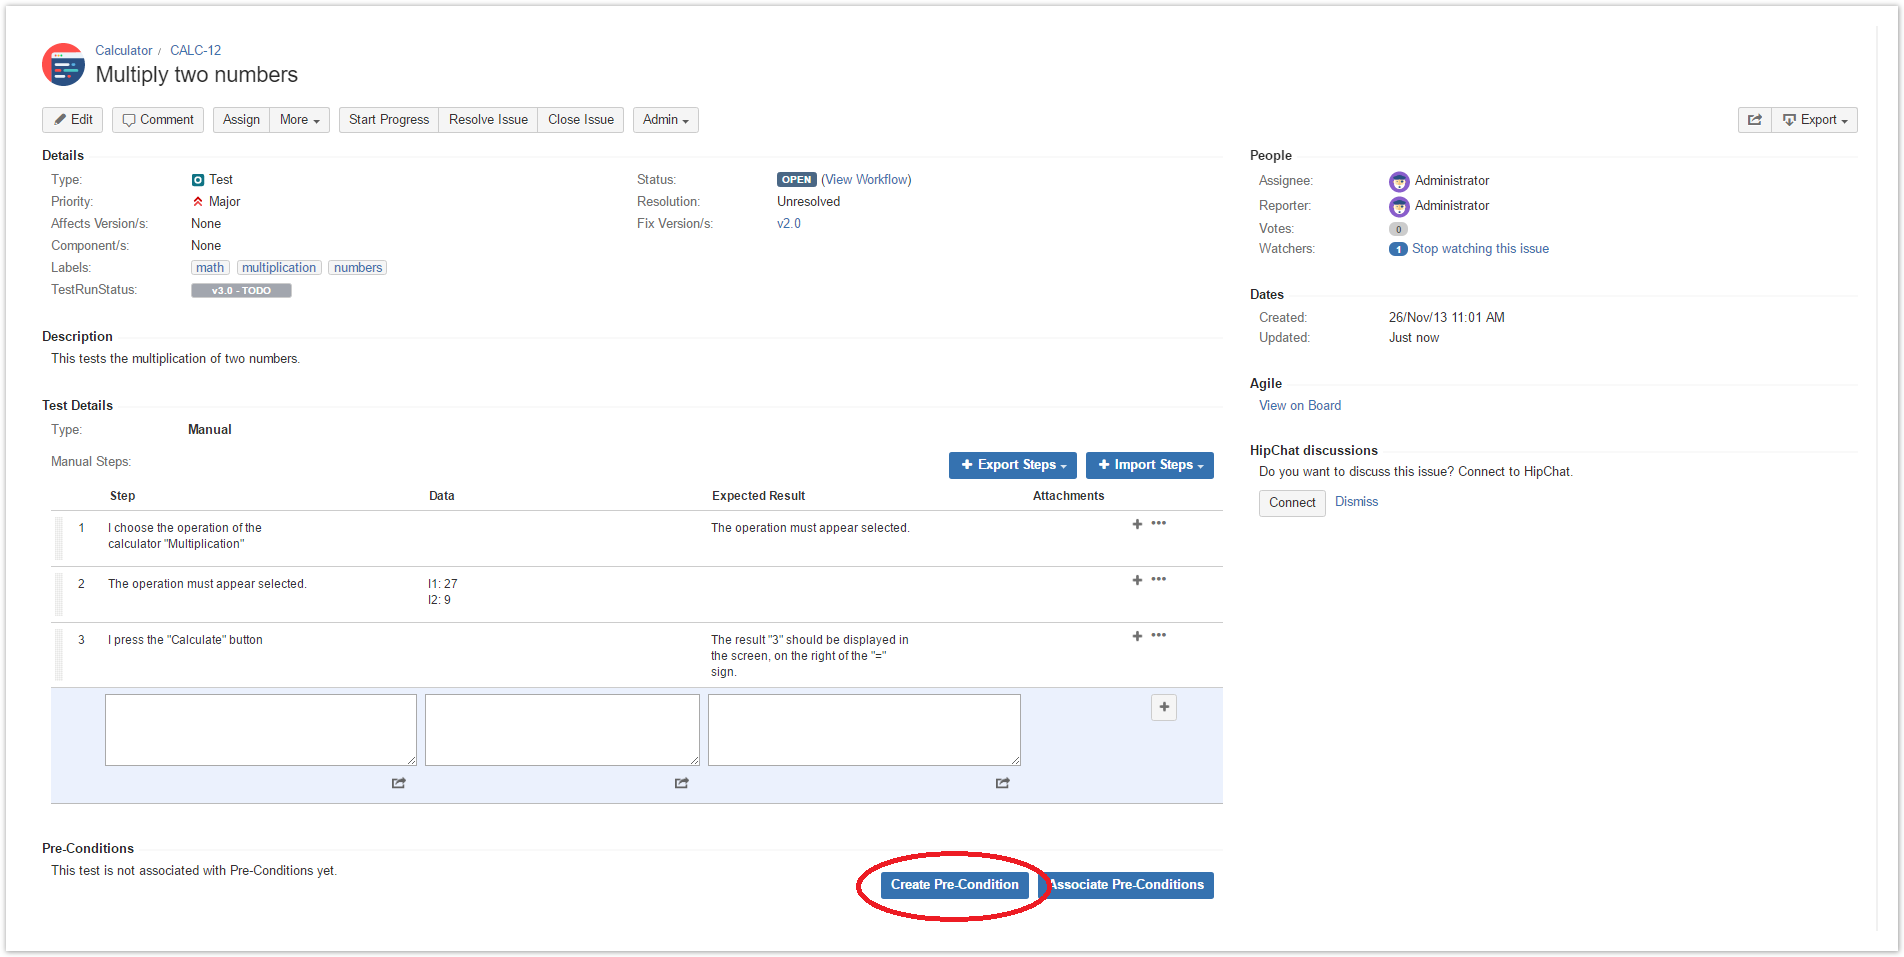
Create Pre-Condition
To create a Pre-Condition directly associated to the current Test from the Test issue view screen:
Step 1: Open the Test issue view screen you wish to create a Pre-Condition with.
Step 2: Click the Create Pre-Condition button (under the Pre-Condition section on the view page) to open the Create Issue dialog box.
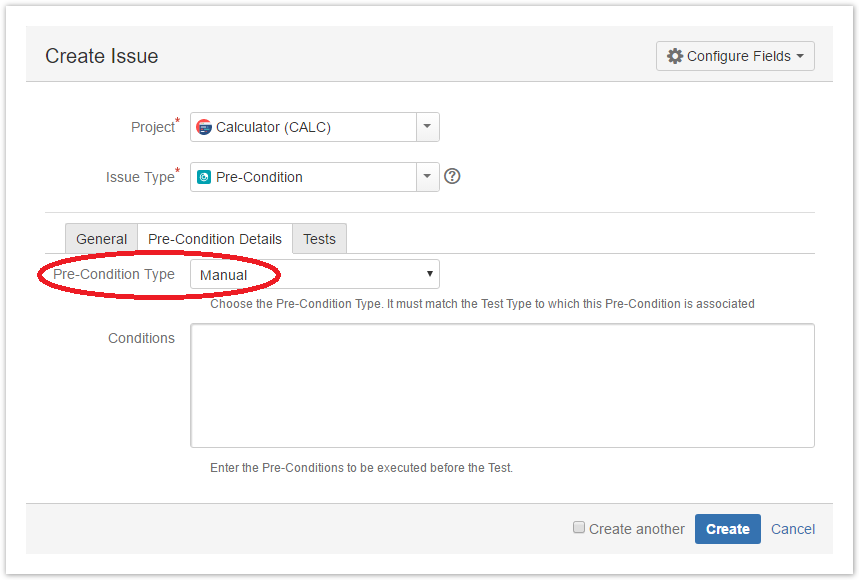
Step 3: Type a Summary for the Pre-Condition and complete all appropriate fields — at least, the required ones marked by an asterisk.This issue is automatically pre-populated with your previous Test issue Fix Version/s.

Step 4: On the Pre-Condition Details tab, complete all appropriate fields. This issue is automatically pre-populated with your previous Test type.
Step 5: Optional. Click on the Tests tab to edit Test associations to associate more Tests. This issue is automatically pre-populated with your previous Test key.
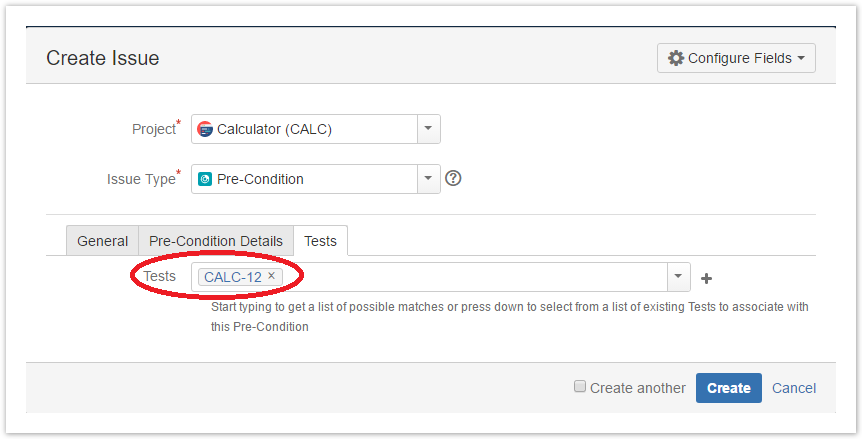
Step 6: Click Create.
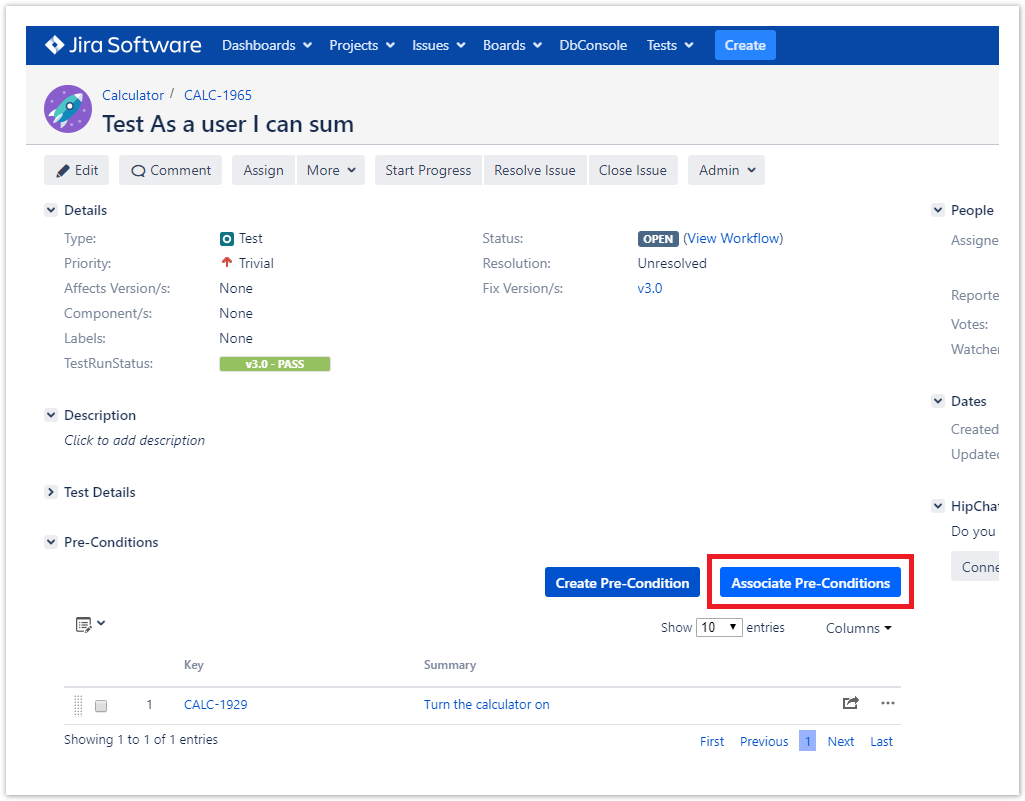
Associate Pre-Conditions
To associate Tests with a Pre-Condition from the Test issue view screen:
Step 1: Open the Test issue view screen you wish to associate a Pre-Condition with.
Step 2: Click the Associate Pre-Condition button (under the Pre-Condition section on the view page) to open the Issue Picker D ialog.
Step 3: Open the Search tab.
How to use de Issue Picker Dialog
This is an example of how to add tests, using some of the features available in the Search tab.
For more information, please visit the Issue Picker Dialog detailed overview.
Step 4: Configure the search.
- Use the Filters dropdown button to include extra fields in the search criteria.
- Fill in the field values.
- Press the search button.

Step 5: Select and Add Pre-conditions.
- Once the results are obtained you can order, add/remove columns to the results list (the columns selection is saved as a preference).
- Check the pre-conditions you wish to add from the listed results.
Step 6: Add tests by pressing " Add selected ".
Remove Pre-Conditions
To remove a Pre-Condition association from the Test issue view screen:
Step 1: Open the Test you wish to remove the Pre-Condition association.
Step 2: On the Pre-Conditions table, hover over the desired Pre-Condition row and click on the Trash button that appears in the end of the row. You will be prompted with a confirmation dialog.
Reorder Pre-Conditions
Pre-Conditions within a Test issue can be reordered. There are two ways to change the order of Pre-Conditions:
Drag-and-Drop
To reorder Pre-Conditions,
Step 1: Open the Test issue.
Step 2: Hover over the desired Pre-Condition row (under the Pre-Condition section on the view page) and the drag handle column.
Step 3: Click the drag handle and move the Pre-Condition up or down on the current page.
Change Rank Action
This action allows users to change the Rank of a Pre-Condition between pages.
To change the rank of a Pre-Condition through the action:
Step 1: Open the Test issue.
Step 2: Hover over the desired Pre-Condition (under the Pre-Condition section on the view page).
Step 3: Click the gear that appears in the last column. The actions menu should pop up with the available actions.
Step 4: Click the Move To action. The change rank dialog appears.
Step 5: Enter the desired index number (1-based) and click OK.
![]()
Test Sets
This web panel displays a data-table with all the Test Set issues associated with the current Test. You can also add the current Test issue to other Test Set issues, and remove the association between existing Test Sets.
Associate Test Sets
Prompts the user with the Xray issue picker dialog to search and select Test Set issues to associate with the current Test.
Remove Test Sets
Removes the current Test from the selected Test Set issues.
Configure Test Set Columns
Xray provides the ability to configure columns for the Test Sets table. This configuration is specific to each user and can be restored to the default configuration defined in the Default columns layout page in Xray app administration.
To configure columns for the Test Sets table,
Step 1: Open the Test issue.
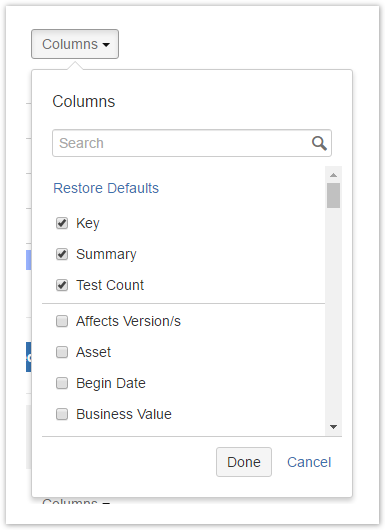
Step 2: Click on Columns, select the dropdown that appears in the Test Sets section, above the table in the top right corner. A list of the current configure columns and all available columns appear.
Step 3: Add or remove columns by clicking the checkboxes next to each field.
Step 4: Click the Done button when finished or Cancel to abort this operation. The table refreshes with the configured columns.
Restoring Columns to Default Configuration
To restore columns in the Test Sets table to the default configuration,
Step 1: Open the Test issue.
Step 2: Click on the Columns select dropdown that appears in the Test Sets section, above the table in the top right corner. A list of the current configure columns and all available columns appear.
Step 3: Click the Restore Columns link above the columns list. The table refreshes with the default configured columns.
Change Columns Order
To reorder columns in the Test Sets table,
Step 1: Open the Test issue.
Step 2: Hover over the desired column header.
Step 3: Click on the column header and drag it to the desired position.
Test Plans
The Test Plans web panel displays a data-table with all Test Plan issues that include the current Test. It is also possible to see the progress status of each Test Plan. POssible actions are:
Associate Test Plans
Prompts the user with the Xray issue picker dialog to search and select Test Plan issues to associate with the current Test.
Remove Test Plans
Removes the current Test from the selected Test Plans.
Configure Test Plan Columns
Xray provides the ability to configure columns for the Test Plans table. This configuration is specific to each user and can be restored to the default configuration defined in the Default columns layout page in Xray app administration.
To configure columns for the Test Plans table,
Step 1: Open the Test issue.
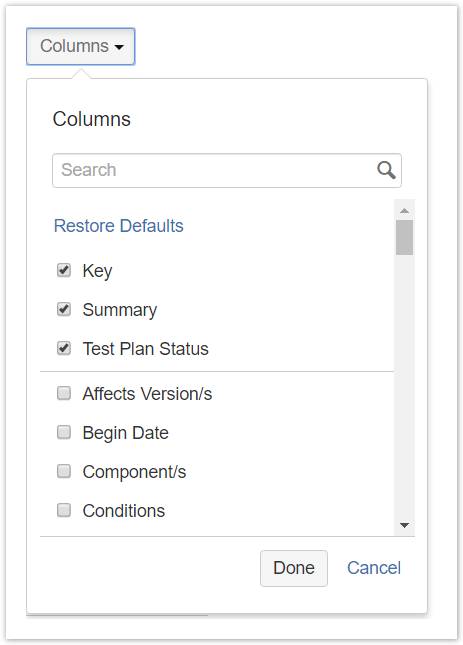
Step 2: Click on Columns, select the dropdown that appears in the Test Plans section, above the table in the top right corner. A list of the current configure columns and all available columns appears.
Step 3: Add or remove columns by clicking the checkboxes next to each field.
Step 4: Click the Done button when finished or Cancel to abort this operation. The table refreshes with the configured columns.
Restoring Columns to Default Configuration
To restore columns in the Test Plans table to the default configuration,
Step 1: Open the Test issue.
Step 2: Click on Columns, select the dropdown that appears in the Test Plans section, above the table in the top right corner. A list of the current configure columns and all available columns appears.
Step 3: Click the Restore Columns link above the columns list. The table refreshes with the default configured columns.
Change the Order of Columns
To reorder columns in the Test Plans table,
Step 1: Open the Test issue.
Step 2: Hover over the desired column header.
Step 3: Click on the column header and drag it to the desired position.
Test Runs
The Test Runs web panel displays a data-table with all executions for the current Test. From this panel, you can filter the Test Runs, create new ad-hoc executions, and create new executions for existing Test Execution issues.
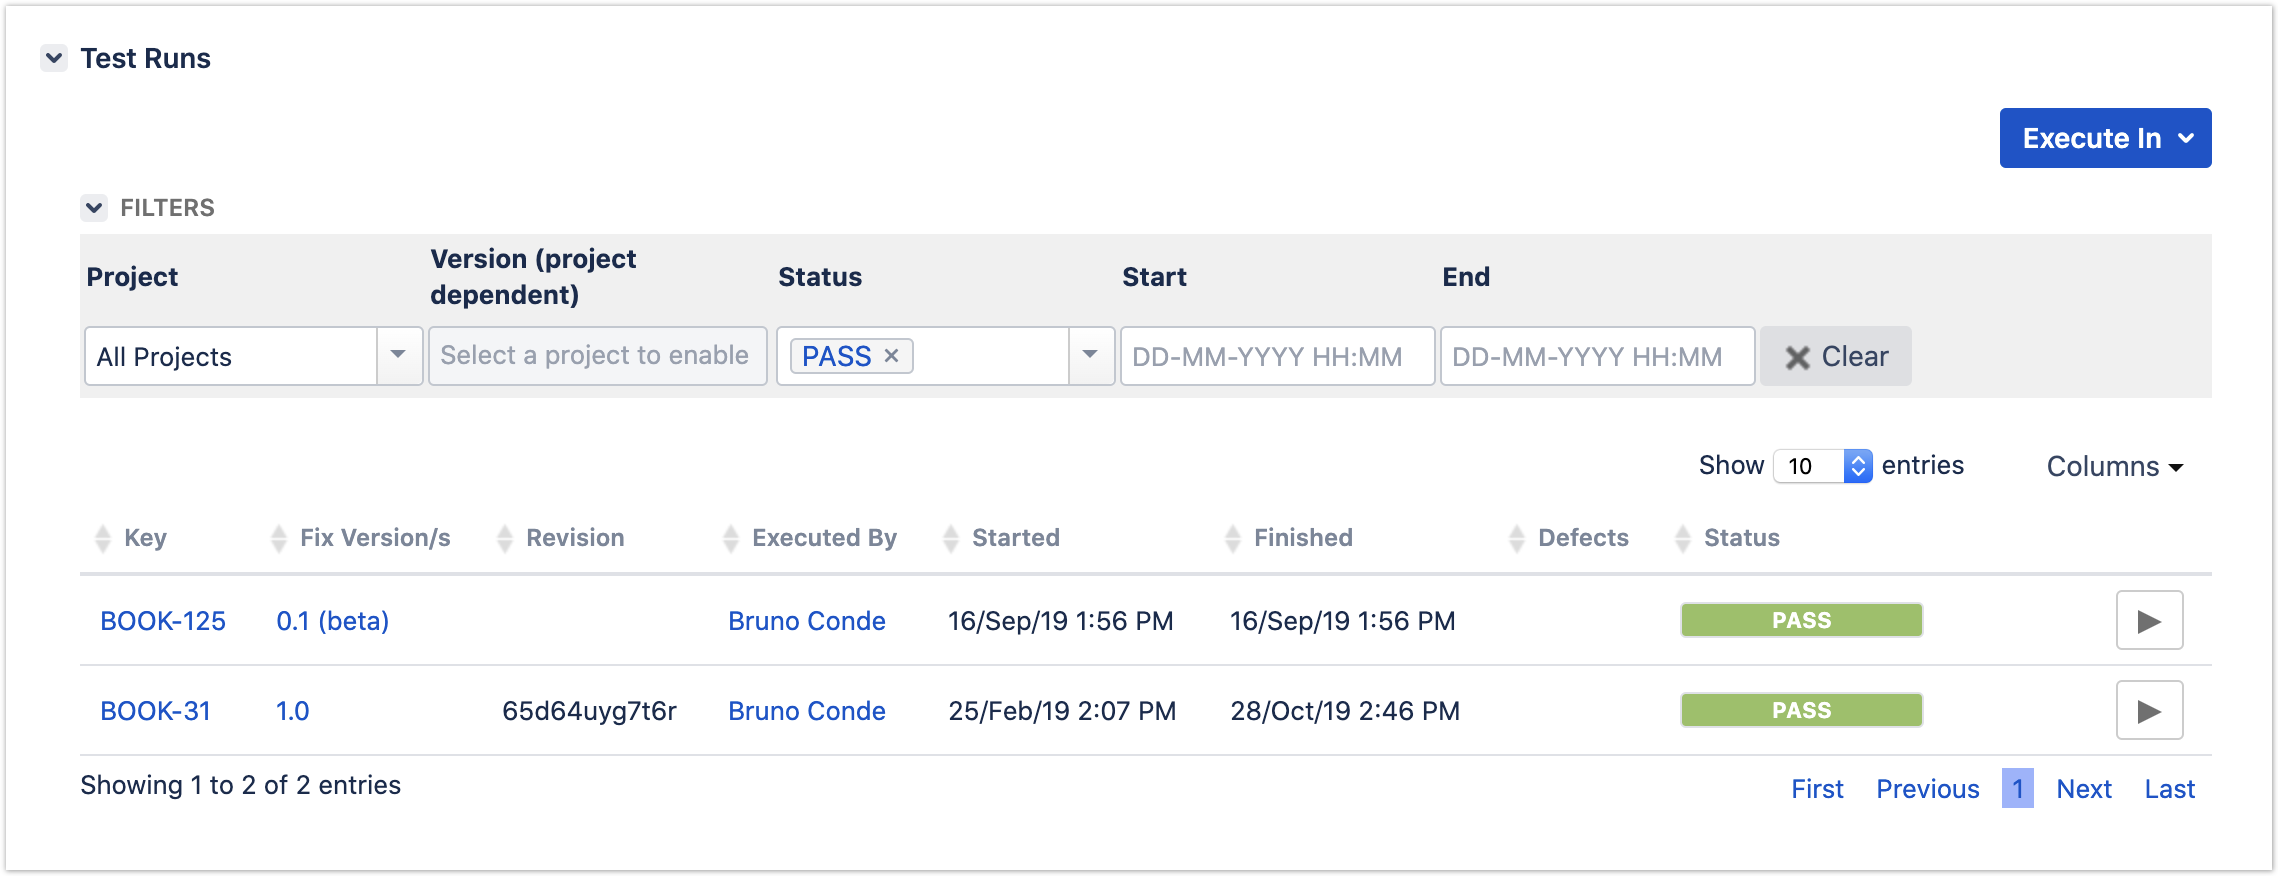
Filtering
Users can filter the Test Runs using the following fields:
- Project
- Fix Version (project dependent)
- Status
- Start date
- Finish date
Configuring Columns
More info in Test Runs.
Executing
A button named "Execute In" is provided on the top actions of the web panel. This button is a dropdown with two options:
- Execute In > New Test Execution - Prompts the user with a dialog to create an ad-hoc execution by creating a new Test execution issue for the current Test. The user has the option to navigate directly to the execution page of the newly created Test Run.
- Execute In > Existing Test Execution - Prompts the user for an existing Test Execution issue. This creates a new Test Run on the existing Test Execution. The user has the option to navigate directly to the execution page of the newly created Test Run.
For each row in the data-table users can also inline execute Test Runs (provided that they have permission to do so), or jump into the execution page.